CDC-FM08 - AUS- - Car stereo BLAUPUNKT - Free user manual and instructions
Find the device manual for free CDC-FM08 - AUS- BLAUPUNKT in PDF.
User questions about CDC-FM08 - AUS- BLAUPUNKT
0 question about this device. Answer the ones you know or ask your own.
Ask a new question about this device
Download the instructions for your Car stereo in PDF format for free! Find your manual CDC-FM08 - AUS- - BLAUPUNKT and take your electronic device back in hand. On this page are published all the documents necessary for the use of your device. CDC-FM08 - AUS- by BLAUPUNKT.
USER MANUAL CDC-FM08 - AUS- BLAUPUNKT
Mounting and connection instructions
Safety notes
Before starting to mount your CDC-FM 08 remote control, please read through the following information carefully.

Disconnect the vehicle battery's negative terminal before making connections.
Be sure to observe the safe
ty notes of the automobile manufacturer (airbags, alarm systems, on-board computers, vehicle immobilisers)!
Before drilling any holes for attachment or laying cables, look to see what is on the other side - be sure not to damage important parts such as the battery, wiring looms, fuse boxes or fuel lines!
Follow the mounting instructions attached to the CD changer to install the equipment.
Power connection
In order to ensure that the unit operates properly the positive power supply line must be connected via the ignition and the constant +12V lead.
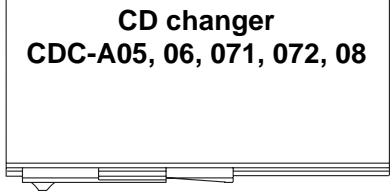
Make all connections as illustrated in figure 2. To install the CD changer, follow the mounting instructions attached to the equipment. Be sure to disconnect the vehicle battery's negative terminal before making connections. This will serve for your personal protection and protect the changer from overvoltage damages.
Note: Mount the CD changer first following the instructions attached to the unit and then connect it to the on-board system.
Modulator installation
The modulator is used to generate an FM signal fed in via the antenna input of the car radio.
-
Find a suited mounting location, e.g. behind the dashboard close to the car radio. Note that the vehicle's antenna cable has to be connected to the modulator.
-
Use the supplied screws to attach the modulator unit.
-
Undo the antenna connection of the radio and plug the antenna connector into the corresponding modulator input.
- Connect the modulator's antenna output with the car radio.
Note: To hook up the antenna cables you may need specific adapters, which are not included in the delivery.
- Connect the power cables as illustrated in figure 2.
- Use a screwdriver to adjust the frequency to be employed for signal output (switch). You can choose between 88.7 and 89.1 MHz. Select a free frequency which is not used by a local broadcasting station. The switch used for frequency adjustment is found on one of the two long sides of the housing and is marked RF FREQ.
- Connect the 8-pole cable of the CD changer to the modulator. For the CDC-A 05 model you will also need the adapter cable 7 607 889 093.
Remote control installation
The remote control does not necessarily have to be firmly attached to the passenger compartment of the vehicle. For example, you may fix it using a self-adhesive hook-and-loop fabric fastener as illustrated in figure 1.
- Find a suited mounting location for the remote control unit. It should be conveniently accessible from the driver seat.
- Attach it so that it cannot slip.
- Route the remote control cable to the modulator.
- Connect the 6-pole cable connector with the modulator.
- Re-connect the battery terminal after having completed all installation and connection work.

Fig. 1 Possible installation of the remote control using self-adhesive hook-and-loop fabric fastener tape.
First operation
Re-establish all electrical connections after having completed all installation and connection work.
- Press to switch on the CDC-FM 08. Now use a pencil or ball pen to press the reset button on the back of the remote control.
Note: Press the reset button briefly whenever a malfunction occurs.
- Tune your car radio into the frequency selected before on the modulator. To adjust the frequency, follow the operating instructions of the radio equipment.
Note: If you would like to adjust the frequency by seek tuning, start CD playback first (see "Starting CD playback").
- We recommend to store the selected frequency on one of the preset buttons. For this, please read the information in your car radio user manual.
Electrical connection scheme

Connection to a dedicated ground connector marked or an unpainted part of the chassis (scratched down to the bare metal).
* Use adapter 7 691 290 202 (AUDI, SEAT, VW)
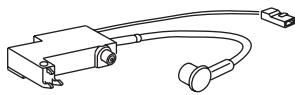
Fig. 2 Electrical connections
Connection to a 12 V voltage source which is activated when the ignition is switched on and deactivated when the ignition is switched off.
Caution: If the car radio is connected to the battery + terminal only, you will need to use the following type of connection:
Connection to the 12 volt switching voltage output of the car radio (e.g. switch plus for an amplifier).
Caution: In the case of Blaupunkt car radios with TIM function, the switch plus output for the aerial must not be used.
Note: In order to ensure fault-free operation, the "RDS" radio function AF (Alternative Frequency) must be switched off.
Troubleshooting guide
| Malfunction | Cause | Remedy |
| CD changer does not function properly. | Fuse blown. Bad ground connection of the changer. No magazine inserted, no CDs in the magazine, CDs inserted upside down. | Replace fuse. Provide good ground connection. Insert discs and magazine correctly. |
| CD is played back but no music audible. | Bad modulator connection. Bad ground connection of the modulator. Modulator fuse blown. Car radio not tuned into the right frequency (88.7 MHz or 89.1 MHz). Moisture on the changer's pick-up unit. | Take care that all components are properly connected. Provide good ground connection. Replace fuse. Adjust the correct frequency. Remove the magazine, leave changer door open for approx. 1 hour. |
| No display on the remote control. | Modulator fuse blown. | Replace fuse. |
| Playback permanently "jumping" while the vehicle is moving. | Transport protection screws of the CD changer not removed. Adjustable screws for vertical/horizon-tal installation in wrong position. CD changer mounted at a wrong angle. | Remove screws. Adjust correct position. Install changer at correct angle. |
Should the malfunction remain despite these troubleshooting recommendations, then please get in touch with an authorised Blaupunkt service centre.
Specifications
Output
frequency: 88.7 MHz, 89.1 MHz switchable
Frequency
response: 20 - 15000 Hz ± 3 dB
THD: < 0.25 %
Dimensions
(wxhxd):
Remote control: 99 × 23 × 54 ~mm
Modulator: 87 × 26 × 54 ~mm