
BDALLI18 - Uncategorized BLACK & DECKER - Free user manual and instructions
Find the device manual for free BDALLI18 BLACK & DECKER in PDF.


| Product type | Cordless drill driver |
| Brand | Black & Decker |
| Model | BDALLI18 |
| Voltage | 18 V |
| Battery capacity | 1.5 Ah |
| Battery type | Lithium-ion |
| No-load speed | 0-600 rpm |
| Max torque | 30 Nm |
| Chuck | 10 mm keyless |
| Weight | 1.2 kg |
| Dimensions (L x W x H) | 220 x 190 x 60 mm |
| Power source | Rechargeable battery |
| Main functions | Drilling, screwdriving |
| Maintenance and cleaning | Clean with a dry cloth, do not use solvents |
| Safety | Use protective glasses, disconnect before maintenance |
| Spare parts and repairability | Available on the manufacturer's website |
| General information | 2-year warranty |
Frequently Asked Questions - BDALLI18 BLACK & DECKER
User questions about BDALLI18 BLACK & DECKER
0 question about this device. Answer the ones you know or ask your own.
Ask a new question about this device
Download the instructions for your Uncategorized in PDF format for free! Find your manual BDALLI18 - BLACK & DECKER and take your electronic device back in hand. On this page are published all the documents necessary for the use of your device. BDALLI18 by BLACK & DECKER.
USER MANUAL BDALLI18 BLACK & DECKER
natural_image
Line drawing of a hand using a tool to adjust or install a mechanical component, labeled with number 15 (no text or symbols on the diagram itself)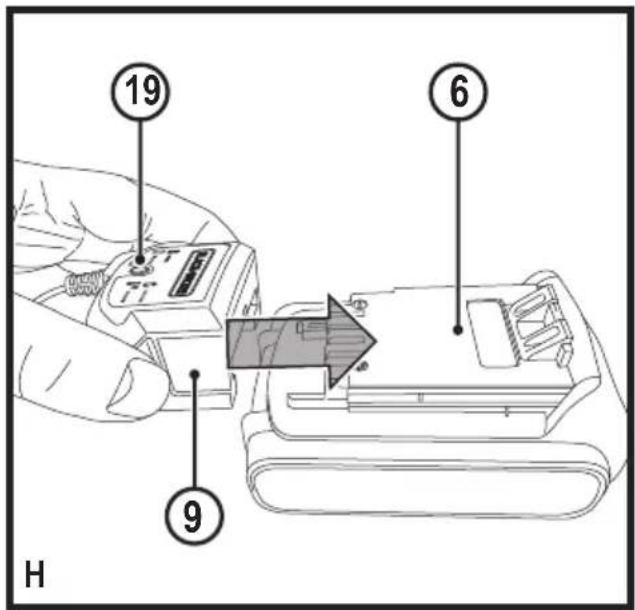
(Original instructions)
ENGLISH
Intended use
Your BLACK+DECKER™, BDALLI18 Alligator™ Lopper has been designed for trimming the branches of trees, cutting fallen branches and cutting small logs 25 mm to 100 mm in diameter while the operator is standing on the ground. This tool is intended for consumer use only.
Safety instructions
General power tool safety warnings

Warning! Read all safety warnings and all instructions. Failure to follow the warnings and instructions listed below may result in electric shock, fire and/or serious injury.
Save all warnings and instructions for future reference.
The term "power tool" in all of the warnings listed below refers to your mains operated (corded) power tool or battery operated (cordless) power tool.
- Work area safety
a. Keep work area clean and well lit. Cluttered or dark areas invite accidents.
b. Do not operate power tools in explosive atmospheres, such as in the presence of flammable liquids, gases or dust. Power tools create sparks which may ignite the dust or fumes.
c. Keep children and bystanders away while operating a power tool. Distractions can cause you to lose control.
- Electrical safety
a. Power tool plugs must match the outlet. Never modify the plug in any way. Do not use any adapter plugs with earthed (grounded) power tools. Unmodified plugs and matching outlets will reduce risk of electric shock.
b. Avoid body contact with earthed or grounded surfaces such as pipes, radiators, ranges and refrigerators. There is an increased risk of electric shock if your body is earthed or grounded.
c. Do not expose power tools to rain or wet conditions. Water entering a power tool will increase the risk of electric shock.
d. Do not abuse the cord. Never use the cord for carrying, pulling or unplugging the power tool. Keep cord away from heat, oil, sharp edges or moving parts. Damaged or entangled cords increase the risk of electric shock.
e. When operating a power tool outdoors, use an extension cord suitable for outdoor use. Use of a cord suitable for outdoor use reduces the risk of electric shock.
f. If operating a power tool in a damp location is unavoidable, use a residual current device (RCD) protected supply. Use of an RCD reduces the risk of electric shock.
- Personal safety
a. Stay alert, watch what you are doing and use common sense when operating a power tool. Do not use a power tool while you are tired or under the influence of drugs, alcohol or medication. A moment of inattention while operating power tools may result in serious personal injury.
b. Use personal protective equipment. Always wear eye protection. Protective equipment such as dust mask, non-skid safety shoes, hard hat, or hearing protection used for appropriate conditions will reduce personal injuries.
c. Prevent unintentional starting. Ensure the switch is in the off-position before connecting to power source and/or battery pack, picking up or carrying the tool. Carrying power tools with your finger on the switch or energising power tools that have the switch on invites accidents.
d. Remove any adjusting key or wrench before turning the power tool on. A wrench or a key left attached to a rotating part of the power tool may result in personal injury.
e. Do not overreach. Keep proper footing and balance at all times. This enables better control of the power tool in unexpected situations.
f. Dress properly. Do not wear loose clothing or jewellery. Keep your hair, clothing and gloves away from moving parts. Loose clothes, jewellery or long hair can be caught in moving parts.
g. If devices are provided for the connection of dust extraction and collection facilities, ensure these are connected and properly used. Use of dust collection can reduce dust-related hazards.
h. Do not let familiarity gained from frequent use of tools allow you to become complacent and ignore tool safety principles. A careless action can cause severe injury within a fraction of a second.
- Power tool use and care
a. Do not force the power tool. Use the correct power tool for your application. The correct power tool will do the job better and safer at the rate for which it was designed.
b. Do not use the power tool if the switch does not turn it on and off. Any power tool that cannot be controlled with the switch is dangerous and must be repaired.
c. Disconnect the plug from the power source and/or the battery pack from the power tool before making any adjustments, changing accessories, or storing power tools. Such preventive safety measures reduce the risk of starting the power tool accidentally.
d. Store idle power tools out of the reach of children and do not allow persons unfamiliar with the power tool or these instructions to operate the power tool. Power tools are dangerous in the hands of untrained users.
e. Maintain power tools. Check for misalignment or binding of moving parts, breakage of parts and any other condition that may affect the power tools operation. If damaged, have the power tool repaired before use. Many accidents are caused by poorly maintained power tools.
f. Keep cutting tools sharp and clean. Properly maintained cutting tools with sharp cutting edges are less likely to bind and are easier to control.
g. Use the power tool, accessories and tool bits etc. in accordance with these instructions, taking into account the working conditions and the work to be performed. Use of the power tool for operations different from those intended could result in a hazardous situation.
h. Keep handles and grasping surfaces dry, clean and free from oil and grease. Slippery handles and grasping surfaces do not allow for safe handling and control of the tool in unexpected situations.
- Battery tool use and care
a. Recharge only with the charger specified by the manufacturer. A charger that is suitable for one type of battery pack may create a risk of fire when used with another battery pack.
b. Use power tools only with specifically designated battery packs. Use of any other battery packs may create a risk of injury and fire.
c. When battery pack is not in use, keep it away from other metal objects, like paper clips, coins, keys, nails, screws, or other small metal objects, that can make a connection from one terminal to another. Shorting the battery terminals together may cause burns or a fire.
d. Under abusive conditions, liquid may be ejected from the battery; avoid contact. If contact accidentally occurs, flush with water. If liquid contacts eyes, additionally seek medical help. Liquid ejected from the battery may cause irritation or burns.
e. Do not use a battery pack or tool that is damaged or modified. Damaged or modified batteries may exhibit unpredictable behaviour resulting in fire, explosion or risk of injury.
f. Do not expose a battery pack or tool to fire or excessive temperature. Exposure to fire or temperature above 130^ C may cause explosion.
g. Follow all charging instructions and do not charge the battery pack or tool outside the temperature range specified in the instructions. Charging improperly or at temperatures outside the specified range may damage the battery and increase the risk of fire.
6. Service
a. Follow all charging instructions and do not charge the battery pack or tool outside the temperature range specified in the instructions. Charging improperly or at temperatures outside the specified range may damage the battery and increase the risk of fire.
b. Never service damaged battery packs. Service of battery packs should only be performed by the manufacturer or authorised service providers.
Additional power tool safety warnings

Warning! Additional safety warnings for Alligator™ Lopper.
Warning! Never use the tool above shoulder height. Always position yourself out of the path of falling branches and debris. Warning! Do not use this tool to fell trees.
- Hold power tool by insulated gripping surfaces when performing an operation where the cutting tool may contact hidden wiring or its own cord. Contact with a "live" wire will also make exposed metal parts of the power tool "live" and give the operator an electric shock.
- Keep all parts of the body and clothing away from the saw chain at all times. Before you start the tool, make sure the saw chain is not contacting anything. A moment of inattention while operating the tool may cause entanglement of your clothing or body with the saw chain.
Hold the tool in front of you and be aware of the saw chain position especially when cutting branches near the ground.
- Pre-plan a safe exit from falling branches and debris. Ensure the exit route is clear of obstacles that would prevent or hinder movement. Remember wet grass and freshly cut bark is slippery.
- Be aware of the direction that a branch may fall. Consider all conditions that may affect the direction of fall, including:
◆ The intended direction of fall.
◆ The natural lean of the branch.
◆ Any unusual heavy limb structure or decay.
◆ Surrounding trees and obstacles including overhead lines.
◆ The wind speed and direction.
- The safe distance between a branch to be felled and bystanders, buildings and other objects is at least 2 1/2 times the length of the branch. Any bystander, building or object within this distance is at risk from being struck by the falling branch.
- When cutting a limb that is under tension be alert for spring back. When the tension in the wood fibres is released the spring loaded limb may strike the operator and/or throw the tool out of control.
◆ Always wear suitable safety equipment such as non-skid safety shoes, hard hat, goggles, ear protection and gloves when operating the tool. - Ensure someone is nearby (but at a safe distance) in case of an accident.
Do not attempt to operate the tool when in a tree, on a ladder or standing on any other unstable support.
◆ Keep proper footing and balance at all times. - Hold the tool firmly with both hands when the motor is running.
- Keep handles dry, clean, and free from oil and grease. Greasy, oily handles are slippery causing loss of control.
- Do not let the moving chain contact any object at the tip of the guide bar.
- Keep your saw chain properly tensioned. Check tension at regular intervals with the motor stopped and cord disconnected.
- Begin and continue cutting only with the chain moving at full speed.
◆ Watch for shifting branches or other forces that could close a cut and pinch or fall into the chain. - Use extreme caution when re-entering a previous cut. Engage spikes on lower jaw into wood and allow the chain to reach full speed before proceeding with cut.
◆ Use of this tool for operation different to those intended could result in hazardous situations. Cut wood only.
ENGLISH
(Original instructions)
Don't use this tool for purposes not intended - for example - Don't use tool for cutting plastic, masonry or non wood building materials.
- If any debris gets caught with the guard or tool discontinue use, remove the battery and clear debris.
◆ Worn chains and chain guide bars should be replaced. - Only use replacement bars and chains specified by the manufacturer.
Residual risks
Additional residual risks may arise when using the tool which may not be included in the enclosed safety warnings. These risks can arise from misuse, prolonged use etc.
Even with the application of the relevant safety regulations and the implementation of safety devices, certain residual risks can not be avoided. These include:
◆ Injuries caused by touching any rotating/moving parts.
◆ Injuries caused when changing any parts, blades or accessories.
- Injuries caused by prolonged use of a tool. When using any tool for prolonged periods ensure you take regular breaks.
◆ Impairment of hearing.
- Health hazards caused by breathing dust developed when using your tool (example:- working with wood, especially oak, beech and MDF.)
Vibration
The declared vibration emission values stated in the technical data and the declaration of conformity have been measured in accordance with a standard test method provided by EN 60745 and may be used for comparing one tool with another. The declared vibration emission value may also be used in a preliminary assessment of exposure.
Warning! The vibration emission value during actual use of the power tool can differ from the declared value depending on the ways in which the tool is used. The vibration level may increase above the level stated.
When assessing vibration exposure to determine safety measures required by 2002/44/EC to protect persons regularly using power tools in employment, an estimation of vibration exposure should consider, the actual conditions of use and the way the tool is used, including taking account of all parts of the operating cycle such as the times when the tool is switched off and when it is running idle in addition to the trigger time.
Labels on tool
The following pictograms are shown on the tool along with the date code:

Warning! To reduce the risk of injury, the user must read the instruction manual.

Do not use your saw in wet conditions or expose it to rain.

Always wear eye protection.

Always wear ear protection.

Beware of falling objects
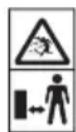
Keep bystanders away

Do not use ladders
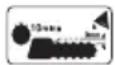
To ensure continued safe operation, check the chain tension as described in this manual after every 10 minutes of use, and adjust back to a clearance of 3 mm as required. Oil the chain after every 10 minutes of use.

Warning! Do not touch saw chain at the chipping ejection point

Direction of rotation of the chain.

Directive 2000/14/EC guaranteed sound power.
Additional safety instructions for batteries and chargers
Batteries
◆ Never attempt to open for any reason.
◆ Do not expose the battery to water.
◆ Do not expose the battery to heat.
- Do not store in locations where the temperature may exceed 40°C.
◆ Charge only at ambient temperatures between 10°C and 40°C.
◆ Charge only using the charger provided with the appliance/tool. Using the wrong charger could result in an electric shock or overheating of the battery.
- When disposing of batteries, follow the instructions given in the section “Protecting the environment”.
- Do not damage/deform the battery pack either by puncture or impact, as this may create a risk of injury and fire.
◆ Do not charge damaged batteries.
Under extreme conditions, battery leakage may occur.
When you notice liquid on the batteries, carefully wipe the liquid off using a cloth. Avoid skin contact.
In case of skin or eye contact, follow the instructions below.
Warning! The battery fluid may cause personal injury or damage to property. In case of skin contact, immediately rinse with water. If redness, pain or irritation occurs seek medical attention. In case of eye contact, rinse immediately with clean water and seek medical attention.
Chargers
Warning! Your charger has been designed for a specific voltage. Always check that the mains voltage corresponds to the voltage on the rating plate.
Warning! Never attempt to replace the charger unit with a regular mains plug.
- Use your BLACK+DECKER charger only to charge the battery in the appliance/tool with which it was supplied. Other batteries could burst, causing personal injury and damage.
- Never attempt to charge non-rechargeable batteries.
If the supply cord is damaged, it must be replaced by the manufacturer or an authorised BLACK+DECKERService Centre in order to avoid a hazard.
◆ Do not expose the charger to water.
◆ Do not open the charger.
◆ Do not probe the charger. - The charger must be placed in a well ventilated area when charging.
Labels on the charger (not included with GKC1000LB)
The following symbols are found on your charger:

The charger is intended for indoor use only.
Read the instruction manual before use.
Electrical safety

Your charger is double insulated; therefore no earth wire is required. Always check that the mains voltage corresponds to the voltage on the rating plate. Never attempt to replace the charger unit with a regular mains plug.
If the supply cord is damaged, it must be replaced by the manufacturer or an authorised BLACK+DECKER Service Centre in order to avoid a hazard.
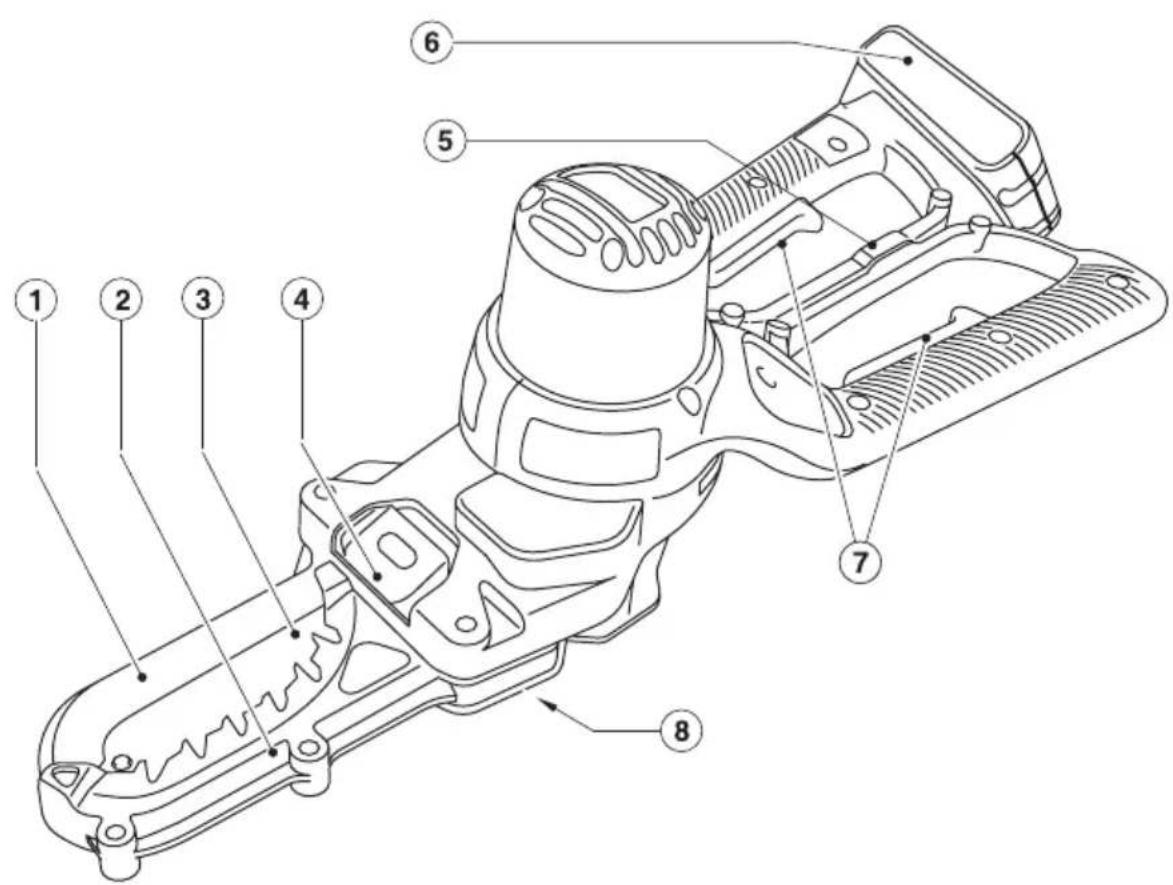
Features
-
Top jaw
-
Lower jaw
- Chain guide bar
- Oiling cover
- Latch
- Battery
- On/off switch actuators
- Chipping ejection point
- Charger
Assembly
Warning! Before assembly, remove the battery (6) from the tool.
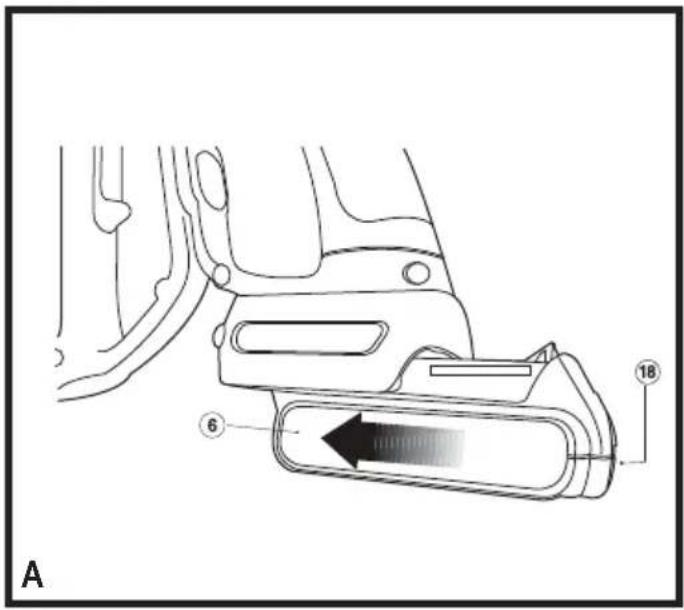
Fitting and removing the battery (fig. A)
- To fit the battery (6), line it up with the receptacle on the tool. Slide the battery (6) into the receptacle and push until the battery (6) snaps into place.
- To remove the battery (6), push the release button (18) while at the same time pulling the battery (6) out of the receptacle.
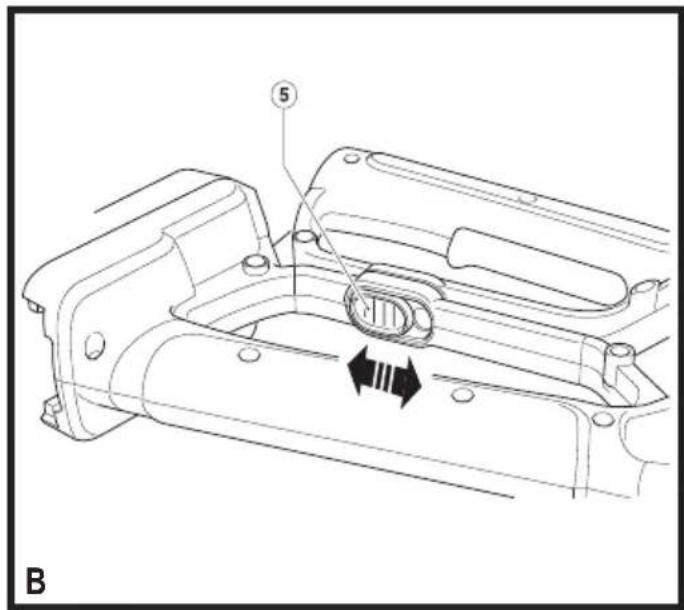
Opening the handles (fig. B)
◆ To open the handles, slide the latch (5) backwards and pull the handles apart.
- After use, close the handles and slide the latch (5) forward to the lock position. The handles should be locked during transportation and storage.
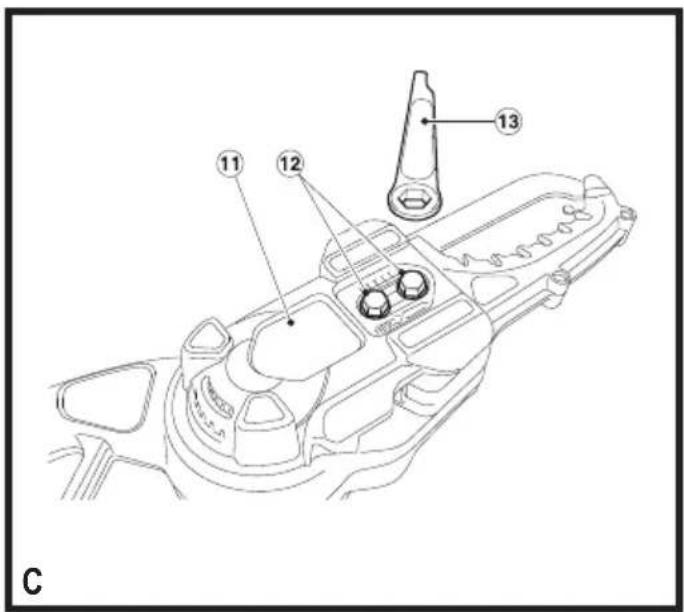
Chain tension adjustment (fig. C)
Warning! Before adjusting the chain tension or any other adjustments, make sure that the tool is switched off and the battery removed.
Warning! The chain guide bar and the saw chain may be hot after use. Allow to cool before adjustment.
The product comes ready assembled. However we recommend that you check the tension of the saw chain (14), and chain access cover retention bolts before use and adjust if required.
Checking and adjusting the saw chain tension (fig. C)
To tension the saw chain (14) slacken the two chain cover retention bolts (12) with the spanner (13) and the chain tensioning device will push the chain guide bar (3) out, setting the correct tension. Retighten the two retention bolts (12) securely.
Check the correct tension has been set by lightly pulling on the saw chain (14). The tension is correct when the saw chain snaps back after being pulled 3 mm away from the guide bar. There should be no "sag" between the chain guide bar (3) and the saw chain (14) on the underside.
Note: Do not over tension the saw chain as this will lead to excessive wear and reduce the life of the bar and saw chain.
It will also lead to reduced product performance.
Note: With first use and when the saw chain is new, check tension frequently as a new saw chain stretches slightly.
Replacing the saw chain and chain guide bar
After prolonged use the saw chain (14) and /or chain guide bar (3) may need replacing. Ensure only Black & Decker recommended replacements are used.
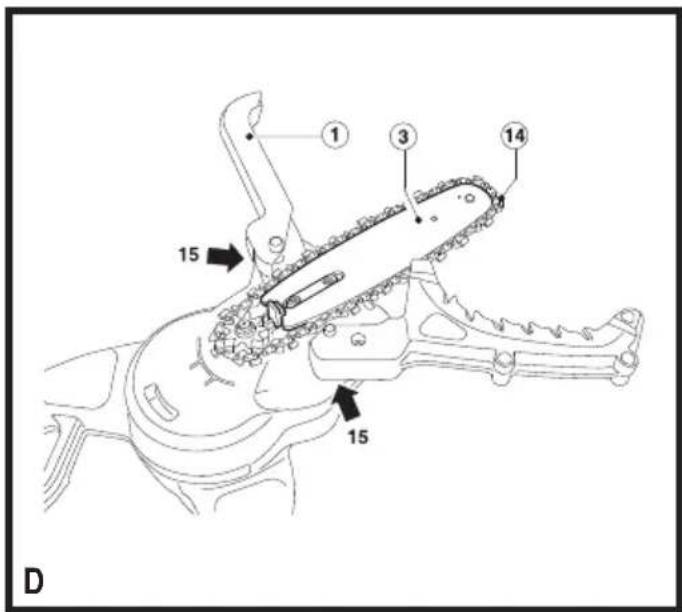
Removing the saw chain and chain guide bar (fig. C & D)

Always wear protective gloves when installing or removing the saw chain (8). The saw chain is sharp and can cut you when it is not running.
Warning! The chain guide bar and the saw chain may be hot after use. Allow to cool before replacing.
◆ Place the tool on a firm surface.
◆ Rotate the two retention bolts (12) counter clockwise with the spanner (13) provided and remove completely.
◆ Remove the chain access cover (11).
◆ Slide the latch (5) to the unlock position, open the handles and pull back the top jaw (1).
◆ Pull back chain guide bar (3) and then lift the saw chain (14) out of the groove in the guide bar. The saw chain can then be removed from the unit.
- The chain guide bar (3) can then be angled up and removed.
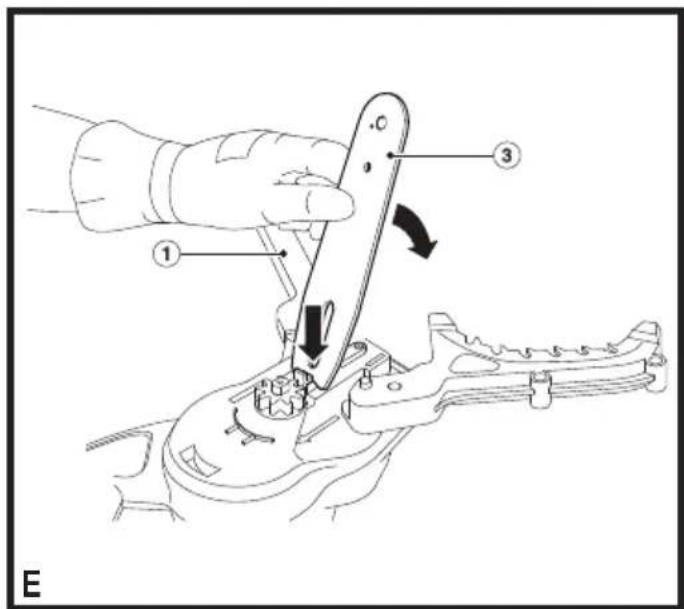
Assembling the chain guide bar and saw chain (fig. E & F)
Warning! Always wear protective gloves when installing or removing the saw chain. The saw chain is sharp and can cut you when it is not running.
◆ Ensure the operation is carried out on a firm surface.
◆ Slide the latch (5) to the unlock position, open the handles and pull back the top jaw (1).
- Insert the chain guide bar (3) into the space between the chain tensioner and align with the chain guide bar locator, angle the chain guide bar (3) down ensuring it is correctly located.
◆ Place the saw chain (14) around the front of the chain guide bar (3).
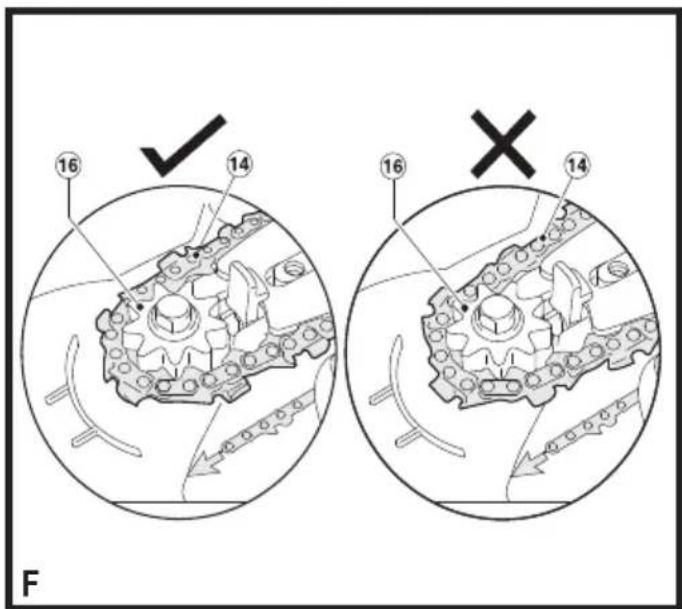
◆ Pull the chain guide bar (3) and the saw chain (14) back, engaging it in the groove in the chain guide bar (3) and then over the sprocket (16) positioning teeth in the correct position on the sprocket.
◆ Replace the chain access cover (11) and the two retention bolts (12) tightening securely.
- Ensure the saw chain (14) is fitted correctly with reference to the markings on the tool.
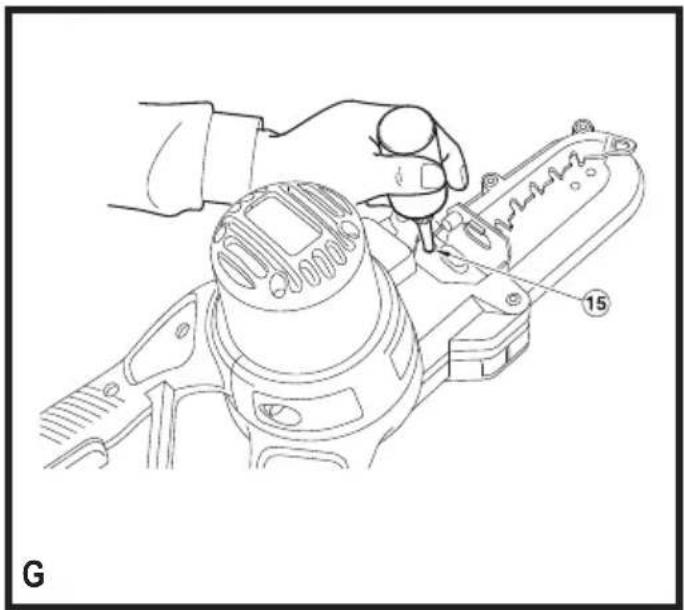
Oiling (fig. G)
Before first use and every ten minutes of use you must oil the product with the correct chain oil. (Cat No A6027) Open the oiling cover (4) and insert the bottle into the oil filling hole (15), apply pressure to the bottle once to dispense oil.
- This should be adequate for about 10 minutes of cutting depending upon cutting speed and type of wood.
The hole feeds the oil through to the saw chain on to the chain guide bar (3) and an excessive amount of oil applied to the unit could mean the oil drips from the unit around the jaw area. This is normal and is nothing to be concerned about.
Use
Charging the battery (fig. H)
Warning! Do not charge the battery at ambient temperatures below 10^ C or above 40^ C. Recommended charging temperature is approximately 24^ C.
Note: The charger will not charge a battery pack if the cell temperature is below approximately 0^ C or above 40^ C. The battery should be left in the charger and the charger will begin to charge automatically when the cell temperature warms up or cools down.
- To charge the battery (6), insert it into the charger (9). The battery will only fit into the charger one way. Do not force.
- Make sure that the battery pack is fully seated in the charger (9).
◆ Plug in the charger (9) and switch on at the mains.
◆ The charging indicator (19) will flash continuously (slowly). - The charge is complete when the charging indicator (19) lights green continuously.
- The LED will change to flashing green (charging) state as the charger occasionally tops up the battery charge.
- The charging indicator (19) will be lit as long as the battery pack is connected to the plugged in charger (9).
Charge discharged batteries within 1 week. Battery life will be greatly diminished if stored in a discharged state.
Leaving the battery in the charger
The charger and battery pack can be left connected with the LED glowing indefinitely. The charger will keep the battery pack fresh and fully charged.
Charger diagnostics
If the charger detects a weak or damaged battery, the charging indicator will flash red at a fast rate. Proceed as follows:
◆ Re-insert the battery (6).
- If the charging indicator (19) continues flashing red at a fast rate, use a different battery to determine if the charging process works properly.
- If the replaced battery charges correctly, the original battery is defective and should be returned to a service centre for recycling.
- If the new battery gives the same indication as the original battery, take the charger to be tested at an authorised services centre.
Note: It may take as long as 60 minutes to determine that the battery is defective.
If the battery is too hot or too cold, the LED will alternately blink red, fast and slow, one flash at each speed and repeat.
Preparation
- Carry out regular cleaning of the unit as described in the maintenance section and in particular cleaning inside the chain access cover (11).
- The lower jaw (2) and top jaw (1) are designed to close when one of the handles is released or when the piece of branch being cut has been cut. If this does not occur, discontinue use of the tool and remove the battery from the tool.
- Check if any debris is blocking movement. To help in this process it may be necessary to remove the chain access cover (11). If on assembly the problem is still present, return the unit to an authorised service centre.
Switching on and off
Warning! Never attempt to lock or fix a switch actuator in the on position.
For your safety, this tool is equipped with a double switching system. This system prevents starting the tool inadvertently.
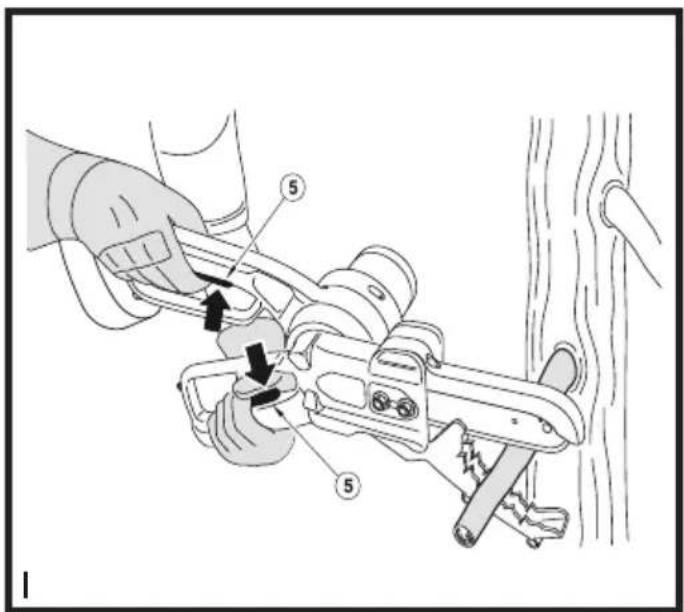
Switching on (fig. I)
Ensure a firm grip on the handles and then squeeze both switch actuators (7) to switch the unit on.
Switching off (fig. I)
Release either of the switches.
Notes: Both switches must be activated for the product to be used.
Do not force the tool - allow it to do the work. It will do a better and safer job at the speed for which it is designed. Excessive force will stretch the saw chain.
If the saw chain (14) or guide bar (3) becomes jammed:
◆ Switch the tool off.
◆ Disconnect the battery from the tool.
Open the cut with wedges to relieve the strain on the guide bar. Do not try to wrench the saw free. Start a fresh cut.
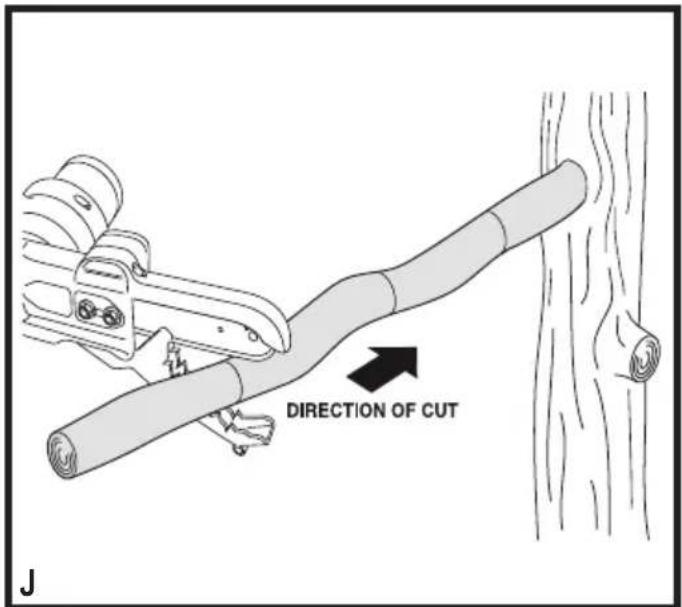
Trimming branches (fig. J)
Ensure that there are no local by-laws or regulations that would prohibit or control the trimming of the tree limbs.
◆ Make sure the tool is running at full speed before making a cut.
- Hold the tool firmly in place to avoid possible bouncing or sideways movement of the tool.
◆ Guide the tool using light pressure.
◆ Always cut down from the top. This way you will avoid pinching the saw chain (14).
- Remove branches as shown in figure I. Starting from the branch tip, reduce the branch in logical steps cutting off small sections.
- Remove the tool from the cut while it is running at full speed.
Maintenance
Your BLACK+DECKER corded/cordless appliance/tool has been designed to operate over a long period of time with a minimum of maintenance. Continuous satisfactory operation depends upon proper tool care and regular cleaning.
Warning! Before performing any maintenance on corded/cordless power tools:
◆ Switch off and unplug the appliance/tool.
- Or switch off and remove the battery from the appliance/tool if the appliance/tool has a separate battery pack.
- Or run the battery down completely if it is integral and then switch off.
◆ Unplug the charger before cleaning it. Your charger does not require any maintenance apart from regular cleaning.
Regularly clean the ventilation slots in your appliance/tool/charger using a soft brush or dry cloth.
Regularly clean the motor housing using a damp cloth. Do not use any abrasive or solvent-based cleaner.
Regularly open the chuck and tap it to remove any dust from the interior (when fitted).
Cleaning
- Regularly remove the chain access cover (11) and remove any debris that has become trapped.
- Regularly clean the ventilation slots with a clean, dry paint brush.
- To clean the tool, use only mild soap and a damp cloth. Never let any liquid get inside the tool and never immerse any part of the tool into liquid.
Oiling
◆ Regularly oil the oiling points (15) as indicated in figure D.
Transport
◆ Always transport the tool with the jaws closed and the latch (5) in the locked position.
Saw Chain sharpening
If you are to get the best possible performance from the tool it is important to keep the teeth of the saw chain sharp.
Guidance for this procedure is found on the sharpener package. For this purpose we recommend the purchase of BLACK+DECKER saw chain sharpening kit A6039 (available from BLACK+DECKER service agents and selected dealers).
Replacing worn out saw chains
Replacement saw chains are available through retailers or BLACK+DECKER service agents. Always use genuine spare parts.
Saw chain sharpness
The saw chain cutters will blunt immediately if they touch the ground or a nail while cutting.
Saw chain tension
Regularly check the saw chain tension.
What to do if your chainsaw needs repair
Your tool is in accordance with the relevant safety requirements. Repairs should only be carried out by a qualified person using original spare parts otherwise this may result in considerable danger to the user. We recommend you keep this user manual in a safe place.
Storage
When the tool will not be used for several months, wipe any metal components with oil. Ideally, leave the battery (6) connected to the charger.
Proceed as follows:
◆ Fully charge the battery (6).
◆ Remove the battery (6) from the tool.
- Store the tool and battery (6) in a secure and dry location. The storage temperature must always remain in the range of +5°C to +40°C. Place the battery (6) on a level surface.
- Before using the tool after prolonged storage, fully charge the battery (6) again.
Protecting the environment

Separate collection. Products and batteries marked with this symbol must not be disposed of with normal household waste.
Products and batteries contain materials that can be recovered or recycled, reducing demand for raw materials. Please recycle electrical products and batteries according to local provisions. Further information is available at www.2helpU.com.
Technical data
| BDALLI18 | ||
| Voltage V | DC | 18 |
| Chain speed (No-load) min | -1 | 1.9 |
| Maximum diameter of cut mm | 100 | |
| Weight kg 3.1 | ||
| Battery BL2018 | ||
| Voltage V | DC | 18 |
| Capacity Ah 2.0 | ||
| Type | Li-Ion | |
| Charger | 906349** TYPE 1 | |
| Input Voltage V | AC | 200–240 |
| Output Voltage V | dc | 8–20 |
| Output Current mA 1000 | ||
| Approx. charge time h | 2 | |
| Guaranteed sound pressure level measured according to EN60745: |
| LpA (sound pressure) 85 dB(A), uncertainty (K) 3 dB(A)LwA (sound power) 95 dB(A), uncertainty (K) 2.3 dB(A)LwA (guaranteed sound power) 97 dB(A) |
| Vibration total values (triax vector sum) according to EN 60745: |
| Cutting freshly felled softwood ( a_H ) = 4.9 m/s ^2 , uncertainty (K) = 1.5 m/s ^2 |
EC declaration of conformity MACHINERY DIRECTIVE OUTDOOR NOISE DIRECTIVE

BDALLI18 – Alligator™ Lopper
Black & Decker declares that these products described under "technical data" are in compliance with:
EN 60745-1:2009 +A11:2010
These products also comply with Directive
2006/42/EC, 2014/30/EU and 2011/65/EU.
For more information, please contact Black & Decker at the following address or refer to the back of the manual.
The undersigned is responsible for compilation of the technical file and makes this declaration on behalf of
Black & Decker.
R. Laverick
Engineering Director
Black & Decker Europe, 210 Bath Road, Slough,
Berkshire, SL1 3YD
United Kingdom
04/09/2018
ENGLISH
(Original instructions)
The Alligator ^™ Lopper is the subject of patent and design applications in Europe, the United States and other countries around the world. ALLIGATOR is a trade mark of the Black & Decker Corporation.
Guarantee
Black & Decker is confident of the quality of its products and offers consumers a 24 month guarantee from the date of purchase. This guarantee is in addition to and in no way prejudices your statutory rights. The guarantee is valid within the territories of the Member States of the European Union and the European Free Trade Area.
To claim on the guarantee, the claim must be in accordance with Black & Decker Terms and Conditions and you will need to submit proof of purchase to the seller or an authorised repair agent. Terms and conditions of the Black&Decker 2 year guarantee and the location of your nearest authorised repair agent can be obtained on the Internet at www.2helpU.com, or by contacting your local Black & Decker office at the address indicated in this manual.
Please visit our website www.blackanddecker.co.uk to register your new Black & Decker product and receive updates on new products and special offers.
DEUTSCH
R. Laverick Engineering Director Black & Decker Europe, 210 Bath Road, Slough, Berkshire, SL1 3YD Vereinigtes Königreich 04/09/2018
Black & Decker Europe, 210 Bath Road, Slough,
Berkshire, SL1 3YD
Royaume-Uni
04/09/2018
Black & Decker Europe, 210 Bath Road, Slough,
Berkshire, SL1 3YD
Regno Unito
04/09/2018
Engineering Director
Black & Decker Europe, 210 Bath Road, Slough,
Berkshire, SL1 3YD
Verenigd Koninkrijk
04/09/2018
Black & Decker Europa, 210 Bath Road, Slough,
Berkshire, SL1 3YD
Reino Unido
04/09/2018
Abrir as pegas (Fig. B)
Director de Engenharia
Black & Decker Europe, 210 Bath Road, Slough,
Berkshire, SL1 3YD
Reino Unido
04/09/2018
Engineering Director
Black & Decker Europe, 210 Bath Road, Slough,
Berkshire, SL1 3YD
Storbritannien
04/09/2018
Engineering Director
Black & Decker Europe, 210 Bath Road, Slough,
Berkshire, SL1 3YD
Storbritannia
04/09/2018
Black & Decker Europe, 210 Bath Road, Slough,
Berkshire, SL1 3YD
Storbritannien
04/09/2018
Black & Decker Europe, 210 Bath Road, Slough,
Berkshire, SL1 3YD
Iso-Britannia
04/09/2018
Black & Decker Europe, 210 Bath Road, Slough,
Berkshire, SL1 3YD
United Kingdom
4.9.2018
Black & Decker Europe, 210 Bath Road, Slough,
Berkshire, SL1 3YD
Egyesült Királyság
2018/09/04
DYREKTYWA W SPRAWIE EMISJI HAŁASU
C€
Black & Decker Europe, 210 Bath Road, Slough,
Berkshire, SL1 3YD
Wielka Brytania
04/09/2018
Black & Decker Europe, 210 Bath Road, Slough,
Berkshire, SL1 3YD
Vel'ká Británia
4.9.2018
Black & Decker Europe, 210 Bath Road, Slough,
Berkshire, SL1 3YD
Velika Britanija
4.09.2018
- ENGLISH
- Intended use
- Safety instructions
- General power tool safety warnings
- Service
- Additional power tool safety warnings
- (Original instructions)
- Residual risks
- Vibration
- Labels on tool
- Additional safety instructions for batteries and chargers
- Batteries
- Chargers
- Labels on the charger (not included with GKC1000LB)
- Electrical safety
- Features
- Assembly
- Fitting and removing the battery (fig. A)
- Opening the handles (fig. B)
- Chain tension adjustment (fig. C)
- Checking and adjusting the saw chain tension (fig. C)
- Replacing the saw chain and chain guide bar
- Removing the saw chain and chain guide bar (fig. C & D)
- Assembling the chain guide bar and saw chain (fig. E & F)
- Oiling (fig. G)
- Use
- Charging the battery (fig. H)
- Leaving the battery in the charger
- Charger diagnostics
- Preparation
- Switching on and off
- Switching on (fig. I)
- Switching off (fig. I)
- Trimming branches (fig. J)
- Maintenance
- Cleaning
- Oiling
- Transport
- Saw Chain sharpening
- Replacing worn out saw chains
- Saw chain sharpness
- Saw chain tension
- What to do if your chainsaw needs repair
- Storage
- Proceed as follows:
- Protecting the environment
- EC declaration of conformity MACHINERY DIRECTIVE OUTDOOR NOISE DIRECTIVE
- Guarantee
- DEUTSCH
- Abrir as pegas (Fig. B)
Brand : BLACK & DECKER
Model : BDALLI18
Category : Uncategorized