
BDCGG12 - Glue gun BLACK & DECKER - Free user manual and instructions
Find the device manual for free BDCGG12 BLACK & DECKER in PDF.


| Product Type | Cordless Glue Gun |
| Brand | Black & Decker |
| Model | BDCGG12 |
| Input Voltage | 12 V |
| Operating Temperature | 150 °C |
| Glue Stick Diameter | 7 mm |
| Weight | 0.3 kg |
| Compatible Battery | BDCB12 (12 V, 1.5 Ah, Li-Ion, not included) |
| Power Supply | USB Adapter (included) |
| Intended Use | Creative hobbies and small DIY projects |
| Heat-up Time | Approximately 60 seconds |
| Bonding Time | 5 to 10 seconds |
| Trigger | Yes, for glue dispensing |
| Nozzle | Yes, for precise application |
| Glue Storage | Yes |
| On/Off Switch | Yes |
| Indicator Light | Indicates heating and operation |
| Maintenance | Clean with a damp cloth; do not use abrasive detergents |
| Safety | Do not immerse; do not open; use only BLACK+DECKER low-temperature glue sticks |
| Warranty | 24 months |
Frequently Asked Questions - BDCGG12 BLACK & DECKER
User questions about BDCGG12 BLACK & DECKER
0 question about this device. Answer the ones you know or ask your own.
Ask a new question about this device
Download the instructions for your Glue gun in PDF format for free! Find your manual BDCGG12 - BLACK & DECKER and take your electronic device back in hand. On this page are published all the documents necessary for the use of your device. BDCGG12 by BLACK & DECKER.
USER MANUAL BDCGG12 BLACK & DECKER



Intended use
Your BLACK+DECKER™ BDCGG12 glue gun has been designed for leisure and DIY activities in the home to join materials together including paper, card and material. This appliance is intended for consumer use only.
General appliance safety warnings
Warning! When using mains powered/cordless appliances, basic safety precautions, including the following, should always be followed to reduce the risk of fire, electric shock, personal injury and material damage.
- Read all of this manual carefully before using the appliance, be familiar with the controls and the proper use of the appliance.
- The intended use is described in this manual. The use of any accessory or attachment or the performance of any operation with this appliance other than those recommended in this instruction manual may present a risk of personal injury.
The term "appliance" in all of the warnings listed below refers to your mains operated (corded) appliance or battery operated (cordless) appliance.
- Save all warnings and instructions for future reference.
Using your appliance
• Always take care when using the appliance.
- Keep work area clean and well lit. Cluttered or dark areas invite accidents.
- Do not expose the appliance to rain or wet conditions. Water entering the appliance will increase the risk of electric shock.
• Do not immerse the appliance in water. - Only use the appliance in daylight or good artificial light.
- Do not operate your appliance in explosive atmospheres, such as in the presence of flammable liquids, gases or dust.
• The appliance is not to be used as a toy. - Do not open body casing. There are no user serviceable parts inside.
- Disconnect the battery from the appliance when not in use, before fitting or removing parts and before cleaning.
Appliance use and care
Before use, check the appliance for damaged or defective parts. Check for breakage of parts, damage to switches and any other conditions that may affect its operation.
- Do not use the appliance if the switch does not turn it on and off. Any appliance that cannot be controlled with the switch is dangerous and must be repaired.
- Disconnect the plug from the power source and/or the battery pack from the appliance before making any adjustments, changing accessories, or storing appliances. Such preventive safety measures reduce the risk of starting the appliance accidentally.
ENGLISH
(Original instructions)
- Do not use the appliance if any part is damaged or defective.
- Have any damaged or defective parts repaired or replaced by an authorised repair agent.
- Never attempt to remove or replace any parts other than those specified in this manual.
After Use
- Switch off and remove the battery before leaving the appliance unattended and before changing, cleaning or inspecting any parts of the appliance.
- When not in use, the appliance should be stored in a dry, well ventilated place out of the reach of children.
- Children should not have access to stored appliances.
Service
- Have your appliance serviced by a qualified repair person using only identical replacement parts. This will ensure that the safety of the appliance is maintained.
Additional Safety instructions for heat guns
The intended use is described in this manual. The use of any accessory or attachment or performance of any operation with this appliance other than those recommended in this instruction manual can present a risk of personal injury and/or damage to property.
- A fire may result if the appliance is not used with care, therefore:
- be careful when using the appliance in places where there are combustible materials:
- do not apply to the same place for a long time;
- do not use in presence of an explosive atmosphere;
- be aware that heat may be conducted to combustible materials that are out of sight;
- allow the appliance to cool down before storage;
• do not leave the appliance unattended when it is switched on.
- Do not touch the heated nozzle of the Glue Gun. The operating temperature of this appliance is approximately 199 °C.
- Keep hands away from the heated attachment and work area. Heat may be conducted through the work piece. Use clamps or pliers to hold the work piece.
- The heating element will begin to heat up as soon as the appliance is switched on. To avoid injury or damage to property always assume that the appliance is hot.
- Protect the work surface and materials from heat damage. Heat may be conducted through the work piece. Use a heat resistant material to protect the work surface.
- Glue sticks are not intended for ingestion and should not come in contact with food, etc.
If swallowed, seek medical attention. Keep out of the reach of children.
(Original instructions)
ENGLISH
Before cleaning. Remove the battery from the appliance and allow it to cool.
- Never attempt to force cool the appliance after use by immersing any part of it in water or any other liquid. Allow the appliance to air cool only.
- Keep the appliance away from all flammable material. Be aware that this product may ignite material. Where this is a concern, test a piece of scrap material.
- Never leave the appliance unattended.
After use, remove the battery from the appliance, allow it to cool and store in a safe place out of the reach of children.
- Fumes resulting from heating materials for craft activities may be hazardous. Always work in a well ventilated area. Seek advice on the materials being used.
- Never attempt to insert any material other than recommended glue sticks, sealer, or caulk sticks in the glue gun. For example: Do not attempt to melt crayons or candles.
• DO NOT use hot melt glue to take the place of structural fasteners.
- The glue sticks used with this glue gun will begin to soften at about 60 °C. Don't use the glue on objects or materials that are subjected to heat.
- Avoid accidental glue discharge. Forcing glue sticks into an unheated appliance may damage the appliance or cause hot glue to be unexpectedly
expelled from nozzle when the operating temperature is achieved. Glue may discharge from a heated appliance without pressure applied to the trigger (1). Use a heat resistant material to protect the work surface.
- This appliance is not a toy. Keep out of the reach of children.
- The appliance is only to be used with the USB power supply unit. The appliance must only be supplied at safety extra low voltage corresponding to the marking on the appliance.
Safety of others
- This appliance can be used by children aged from 8 years and above and persons with reduced physical, sensory or mental capabilities or lack of experience and knowledge if they have been given supervision or instruction concerning use of the appliance in a safe way and understand the hazards involved. Children shall not play with the appliance. Cleaning and user maintenance shall not be made by children without supervision.
- Children should be supervised to ensure that they do not play with the appliance.
Labels on Appliance
The following symbols, along with the date code, are shown on the appliance:

Warning! To reduce the risk of injury, the user must read the instruction manual.
ENGLISH
(Original instructions)

Warning! Hot surface do not touch.
Additional safety instructions for batteries and chargers (not supplied)
Batteries
- Never attempt to open for any reason.
- Do not expose the battery to water.
- Do not store in locations where the temperature may exceed 40 °C.
- Charge only at ambient temperatures between 10 °C and 40 °C.
- Charge only using the charger provided with the tool.
- When disposing of batteries, follow the instructions given in the section "Protecting the environment".

Do not attempt to charge damaged batteries.
Chargers
- Use your recommended BLACK+DECKER charger only to charge the battery in the appliance with which it was supplied. Other batteries could burst, causing personal injury and damage.
- Never attempt to charge non-rechargeable batteries.
- Have defective cords replaced immediately.
- Do not expose the charger to water.
- Do not open the charger.
- Do not probe the charger.

The charger is intended for indoor use only.

Read the instruction manual before use.
Electrical safety
☐ Your charger is double insulated; therefore no earth wire is required. Always check that the mains voltage corresponds to the voltage on the rating plate. Never attempt to replace the charger unit with a regular mains plug.
If the supply cord is damaged, it must be replaced by the manufacturer or an authorised BLACK+DECKER Service Centre in order to avoid a hazard.
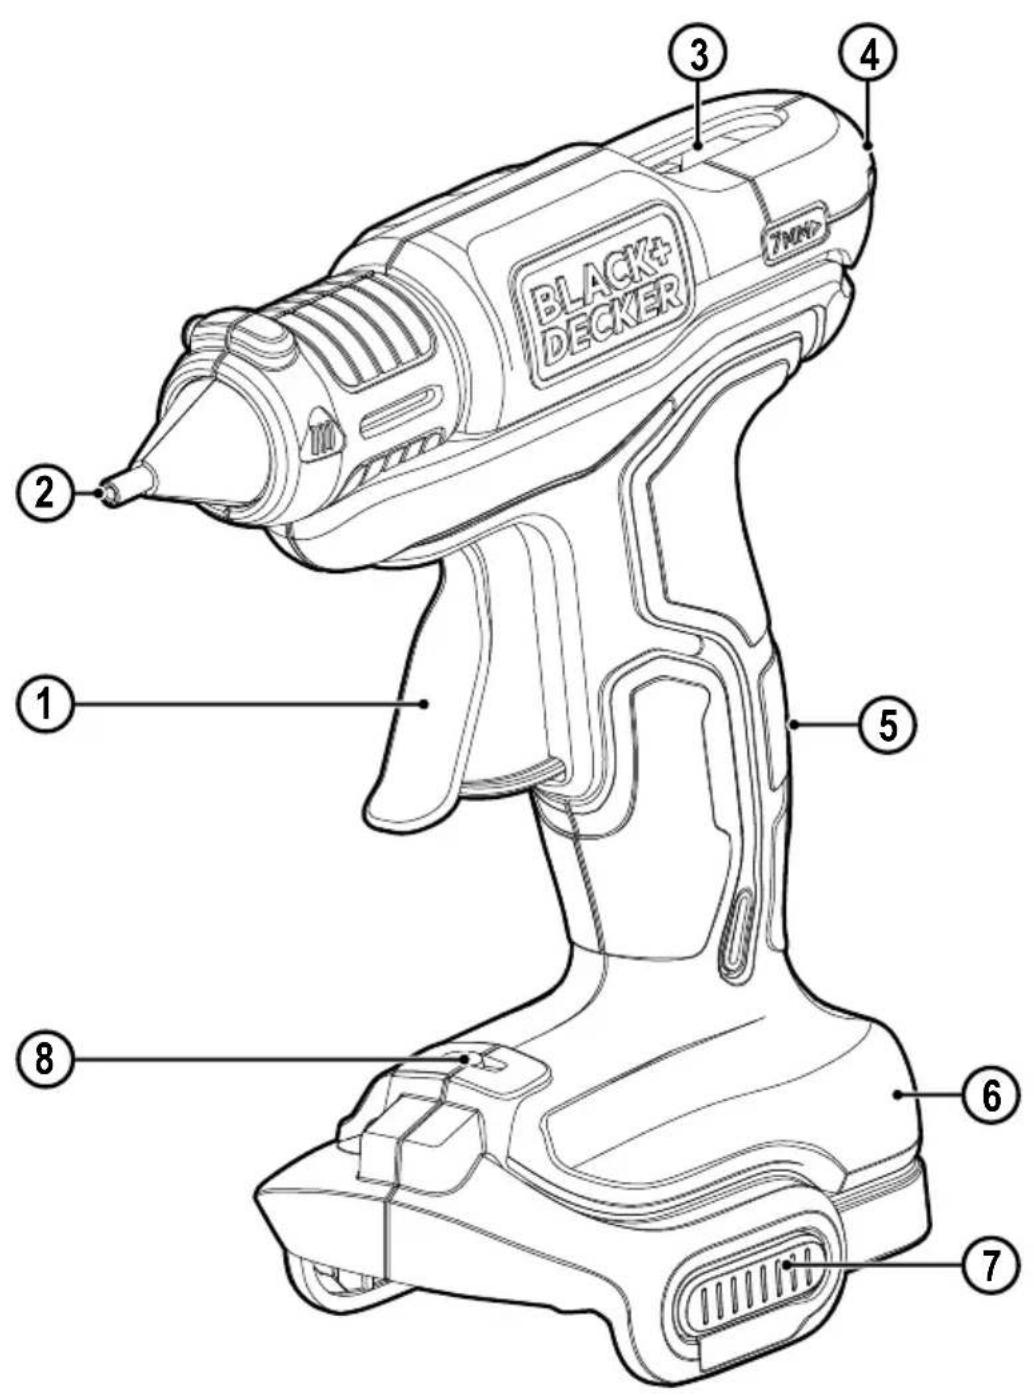
Features
This appliance includes some or all of the following features:
-
Trigger
-
Nozzle
-
Glue chamber
-
Cluo stick inlet tube
-
On/off switch
-
On/Off switch
-
Battery housing
-
Battery release button
Assembly
Warning! Before cleaning. Remove the battery from the appliance and allow to cool.
Charging the battery (fig. A) (not supplied) The battery needs to be charged before first use and whenever it falls to produce sufficient power on jobs that were easily done before. The battery may become warm while charging; this is normal and does not indicate a problem. Warning! Do not charge the battery at ambient temperatures below 10 °C or above 40 °C. Recommended charging temperature: approx. 24 °C. Note: The charger will not charge a battery if the cell temperature is below approximately 10 °C or above 40 °C. The battery should be left in the charger and the charger will begin to charge automatically when the cell temperature warms up or cools down.
◆ To charge the battery (10) (not supplied), insert the USB charger (9) (not supplied).
◆ Connect the USB charger (9) to a power source.
- The USB charger and the battery can be left connected indefinitely.
◆ Charge discharged batteries within 1 week. Battery life will be greatly diminished if stored in a discharged state.
State of charge indicator
The BLACK+DECKER battery is equipped with a state of charge button with a four LED display. The state of charge is an indication of approximate levels of charge remaining in the battery according to the following indicators:


96 - 100% charged


76 - 95%


51 - 75%


26 - 50%


Pack needs to be charged
Note: The state of charge LED will only display once the state of charge button is pressed.

Fitting and removing the battery (fig. B) (not supplied)
Warning! Before fitting and removing the battery ensure the On/Off switch (5) is in the off position by pressing the On/Off switch (5) to the down position.
◆ To fit the battery (10) (Not supplied), line it up with the receptacle (6) on the appliance. Slide the battery into the receptacle and push up until the battery snaps into place.
◆ To remove the battery, push the release button (7) while at the same time pulling the battery out of the receptacle.
(Original instructions)
ENGLISH
Fitting the glue sticks (fig. C)
Warning! Only use BLACK+DECKER low temperature glue sticks. Replacement glue sticks are available from your BLACK+DECKER dealer. Other brands may cause dangerous malfunctions.
Warning! Do not attempt to remove an unused portion of a glue stick from the appliance.
- Insert a glue stick into the inlet tube located at the rear of the appliance (4).
◆ Gently squeeze the trigger (1) to locate the glue stick firmly in position. - On first use, the glue stick may be completely inserted into the appliance. A second glue stick may be required.
Use
Warning! Be aware that this product may ignite material. Where this is a concern, test a piece of scrap material. This appliance will become warm during use. This is normal and does not indicate a problem. Avoid contact with the nozzle.
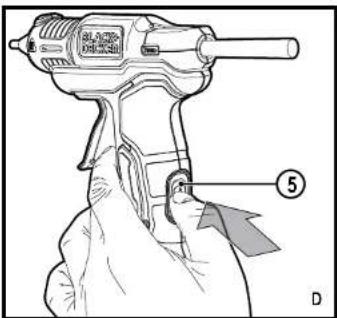
Turning the appliance on and off (fig. D)
- To turn on the appliance push the On/Off switch (5) to the up position.
- To turn off the appliance push the On/Off switch (5) to the down position.
- The LED indicator light (8) will illuminate and flash to indicate the heating element is warming up.
- After approximately 60 seconds the LED indicator light (8) will stop flashing and remain lit to show the appliance is hot enough for use.
◆ The LED indicator light (8) will no longer be illuminated, this indicates that the heating element is off.
Warning! Mollen glue and nozzle (2) area will remain hot even after the appliance is turned off or the battery is removed. Squeezing the trigger (1) after the appliance is turned off may dispense melted glue. Allow the appliance to cool for 30 minutes before storing.
Applying glue (fig. E)
- After the glue gun has been turned on for at least 60 seconds, apply the glue by squeezing the trigger (1).
- To glue objects together apply glue to one object and press second object into the melted glue.
- Hold glued objects together for 5-10 seconds. Heavy applications may require up to a minute for the glue to reach full strength.
Warning! Molten glue reaches 150 °C. Do not touch applied glue. Keep away from children.
Warning! Glue dispersion may be delayed longer than time claimed due to the presence of solidified glue in the unit.
ENGLISH
(Original instructions)
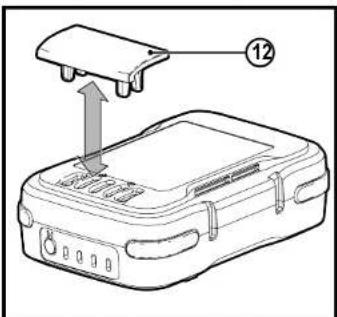
Battery Terminal Safety Cap (fig. F)
A power source storage and carrying cap (12) is provided for use whenever the power source is out of the tool. Remove the cap as shown before placing power source onto tool.
Troubleshooting
| Problem Possible | to cause Possible solution | |
| Appliance will not start or heats slowly | Battery not installed Cl | Back battery is properly installed |
| Battery will not charge | USB charger not connected | Insert the USB charger, connect to power source |
| USB charger not connected to power source | Connect USB charger to power source | Refer to "Charging the battery ifg. A" for more details |
| Surrounding air temperature too hot or too cold | Surrounding temperature too hot or too cold | Move USB charger and battery to a surrounding air temperature of above 4.5°C or below =40.5°C |
| Appliance shuts off abruptly | Battery has reached its maximum thermal limit | Allow battery to cool down |
| Out of charge Cl | Connect USB charger to battery and power source | Allow to charge I to maximise the life of the battery it is designed to shut off abruptly when the charge is depleted. |
Hints for Optimum Use
The basic instructions given below are provided as a guide to craft and DIY applications. The operator should practise the various applications on scrap materials to obtain the required effect and prevent damage to the work piece.
Tips on using your glue gun
- Choose the right glue stick for the appliance. Low temperature glue sticks suitable for this appliance.
- Make sure that the surfaces are clean and free from dirt or oily films before gluing.
◆ Assemble the parts to confirm that they can be joined together in the required position before applying clue.
◆ Make arrangements to hold the parts in position while the glue hardens.
The heat from the glue may be conducted to the material. Clamps or pliers should be used to protect the operator from the heat.
- Working in a cold environment will reduce the time required for the glue to harden. Warm environments will increase the time for the glue to set.
The amount of glue applied will affect the hardening time. Large heavy pools of glue will take up to fifty percent longer to dry than small drops. Very thin beads will dry in as few as 10 seconds. Some experimentation with your glue gun on scrap material will help to determine the best method to use for your particular project.
- Some paints and stains containing petroleum distillates can weaken the adhesive. Test before using.
You may need to paint or stain before gluing.
Excess glue is not easily removed from materials when it has hardened. Removal of excess glue may be attempted by scraping, peeling, or softening the glue by applying heat e.g. with the hot tip of the appliance. Adhesive may be removed from fabric by dry cleaning.
Maintenance
Your BLACK+DECKER appliance has been designed to operate over a long period of time with a minimum of maintenance. Continuous satisfactory operation depends upon proper care and regular cleaning.
◆ Regularly clean the appliance using a damp cloth. Do not use any abrasive or solvent-based cleaner. Never let any liquid get inside the appliance and never immerse any part of the appliance into liquid.
Protecting the environment

Separate collection. Products and batteries marked with this symbol must not be disposed of with normal household waste.
Products and batteries contain materials that can be recovered or recycled reducing the demand for raw materials. Please recycle electrical products and batteries according to local provisions.
Further information is available at www.2helpU.com
Technical data
| BDCGG12 (H1) | ||
| Input voltage V | _0 | 12 |
| Operating temperature °C | 150 | |
| Glue stick diameter mm 7 | ||
| Weight kg 0.3 | ||
| Battery BDCB12 | ||
| Voltage V | ∞ | 12 |
| Capacity Ah | 1.5 | |
| Type | Lilon | |
Guarantee
Black & Decker is confident of the quality of its products and offers consumers a 24 month guarantee from the date of purchase. This guarantee is in addition to and in no way prejudices your statutory rights. The guarantee is valid within the territories of the Member States of the European Union and the European Free Trade Area.
To claim on the guarantee, the claim must be in accordance with Black&Decker Terms and Conditions and you will need to submit proof of purchase to the seller or an authorised repair agent.
ENGLISH
(Original instructions)
Terms and conditions of the Black&Decker 2 year guarantee and the location of your nearest authorised repair agent can be obtained on the Internet at www.2helpU.com, or by contacting your local Black & Decker office at the address indicated in this manual.
Please visit our website www.blackanddecker.co.uk to register your new BLACK+DECKER product and receive updates on new products and special offers.
DEUTSCH
- Intended use
- General appliance safety warnings
- Using your appliance
- Appliance use and care
- ENGLISH
- (Original instructions)
- After Use
- Service
- Additional Safety instructions for heat guns
- Safety of others
- Labels on Appliance
- Additional safety instructions for batteries and chargers (not supplied)
- Batteries
- Chargers
- Electrical safety
- Features
- Assembly
- State of charge indicator
- Fitting and removing the battery (fig. B) (not supplied)
- Fitting the glue sticks (fig. C)
- Warning! Do not attempt to remove an unused portion of a glue stick from the appliance.
- Use
- Turning the appliance on and off (fig. D)
- Applying glue (fig. E)
- Battery Terminal Safety Cap (fig. F)
- Hints for Optimum Use
- Tips on using your glue gun
- Maintenance
- Protecting the environment
- Guarantee
- DEUTSCH
Brand : BLACK & DECKER
Model : BDCGG12
Category : Glue gun