
GG500S - Glue gun BLACK & DECKER - Free user manual and instructions
Find the device manual for free GG500S BLACK & DECKER in PDF.
| Product Type | Glue Gun |
| Brand | Black & Decker |
| Model | GG500S |
| Power Supply | 120 V AC, 60 Hz |
| Operating Temperature | 199 °C (390 °F) |
| Glue Softening Temperature | 60 °C (140 °F) |
| Heating Indicator | Yes, changes from gray to red |
| Nozzles Included | 3 (standard wide, extended angle) |
| Minimum Glue Stick Length | 4 in (10.2 cm) |
| Usage | Indoor Only |
| Safety Precautions | Do not touch hot nozzle, unplug before maintenance, never immerse, keep children away |
| Cleaning | Mild soap and damp cloth |
| Warranty | 2 years for domestic use |
| Glue Type | High-temperature resistant round sticks |
| Stand Included | Yes, with groove for cord winding |
| Cord Rewind | Yes |
| Nozzle Wrench | Yes, included at base |
| First Aid in case of Ingestion | Consult a doctor |
Frequently Asked Questions - GG500S BLACK & DECKER
User questions about GG500S BLACK & DECKER
0 question about this device. Answer the ones you know or ask your own.
Ask a new question about this device
Download the instructions for your Glue gun in PDF format for free! Find your manual GG500S - BLACK & DECKER and take your electronic device back in hand. On this page are published all the documents necessary for the use of your device. GG500S by BLACK & DECKER.
USER MANUAL GG500S BLACK & DECKER
SAVE THIS MANUAL FOR FUTURE REFERENCE.
VEA EL ESPANOL EN LA CONTRAPORTADA.
POUR LE FRANÇAIS, VOIR LA COUVERTURE ARRIÈRE.
INSTRUCTIVO DE OPERACION, CENTROS DE SERVICIO Y POLIZA DE GARANTIA. ADVERTENCIA: LEASE ESTE INSTRUCTIVO ANTES DE USAR EL PRODUCTO.
Welcome to the Wonderful World of Black & Decker Craft Products.
Your new Cord Free Glue Gun is designed to apply hot melt glues to almost any surface in a smooth, easy manner. Its solid state heater melts the glue and trigger pressure forces it through the nozzle to be applied wherever necessary. You'll find dozens of uses in the workshop and around the house for this versatile tool.
Various formulations of glue are available to meet the requirements of different applications.
For personal safety and for proper operation of your Glue Gun, please take the time to carefully read and understand all of the safety rules and instructions in this booklet. Thank you for selecting Black & Decker!
IMPORTANT SAFETY RULES
WARNING: Read and understand all instructions. Failure to follow all instructions listed below may result in electric shock, fire and/or serious personal injury.
SAVE THESE INSTRUCTIONS
WARNING: When using Electric Tools, basic safety precautions should always be followed to reduce the risk of fire, electric shock, and personal injury, including the following:
- KEEP WORK AREA CLEAN. Cluttered areas and benches invite injuries.
- CONSIDER WORK AREA ENVIRONMENT. Don't expose power tools to rain. Don't use power tools in damp or wet locations. Keep work area well lit.
- KEEP CHILDREN AWAY. All visitors should be kept away from work area. Do not let visitors contact tool or extension cord. Supervise the use of this tool by children.
- STORE IDLE TOOLS. When not in use, tools should be stored in dry, high or locked-up place - out of reach of children.
- USE SAFETY GLASSES
- DON'T ABUSE CORD. Never carry tool by cord or yank it to disconnect from receptacle. Keep cord from heat, oil, and sharp edges.
- DON'T OVERREACH. Keep proper footing and balance at all times.
- DISCONNECT TOOLS. When not in use, before servicing and when changing accessories.
- This tool is recommended for indoor use only
- STAY ALERT. Watch what you are doing. Use common sense. Do not operate tool when you are tired.
-
DO NOT TOUCH THE HEATED NOZZLE OF THE GLUE GUN OR THE HOT MELT GLUE. The operating temperature of this tool is 390^ (199^) . Do not allow contact with skin or surfaces not intended to be glued.
-
NEVER attempt to use any material other than recommended glue sticks, sealer, or caulk sticks in the glue gun. For example: Do not attempt to melt crayons or candles. Permanent damage to the glue gun could result.
- DO NOT use hot melt glue to take the place of structural fasteners.
- The glue sticks used with this glue gun will begin to soften at about 140^ . Don't use the glue on objects that should not be subjected to temperatures of 140^ (60^) or above.
- DO NOT ATTEMPT TO REMOVE THE UNUSED PORTION OF A GLUE STICK FROM THE TOOL.
- NEVER attempt to force cool the gun after use by immersing any part of it in water or any other liquid. Allow the gun to air cool only.
- ALWAYS BE SURE THAT THE GLUE GUN IS COOL BEFORE STORING IT OR CHANGING NOZZLES.
- THE GLUE GUN IS ON as soon as it is seated in the cradle and the cord is plugged in.
- WHEN NOT IN USE,DO NOT LEAVE THE GLUE GUN PLUGGED IN FOR AN EXTENDED TIME.DO NOT LEAVE UNATTENDED.
- AVOID ACCIDENTAL GLUE DISCHARGE. Feeding or pushing glue sticks with too much force into a heated gun may damage glue gun cause hot glue to be unexpectedly expelled from nozzle.
- DO NOT store glue sticks in direct sunlight for extended periods.
- ALWAYS work in a well ventilated area. NOTE: This tool will become quite warm during use. This is normal and does not indicate a problem. Avoid contact with top housing surface.
WARNING: This product contains chemicals, including lead, known to the state of California to cause cancer, and birth defects or other reproductive harm. Wash hands after handling.
First Aid Measures for Glue Sticks
Glue sticks are not intended for ingestion and should not come in contact with food, etc. If swallowed, seek medical attention. Material Safety Data Sheet (MSDS) available from 1-800-544-6986.
Extension Cords
Only round jacketed extension cords should be used and we recommend that they be listed by Underwriters' Laboratories (U.L.). An extension cord must have adequate wire size (AWG or American Wire Gauge) for safety, and to prevent loss of performance. The smaller the gauge number of the wire, the greater the capacity of the cable; that is, 16 gauge has more capacity than 18 gauge. When using more than one extension cord to make up the total length, be sure each individual extension contains at least the minimum wire size.
To determine the minimum size required, refer to the chart below: Before using an extension cord, inspect it for loose or exposed wires, damaged insulation and defective fittings. Make any needed repairs or replace the cord if necessary. Black & Decker has extension cords available that are U.L. listed.
| Minimum Gage for Cord Sets Volts Total Length of Cord in Feet 120V 0-25 26-50 51-100 101-150 240V 0-50 51-100 101-200 201-300 | ||||||
| Ampere Rating More Not more American Wire Gage Than Than | ||||||
| 0 | - | 6 | 1 | 8 | 1 | 6 |
| 6 | - | 10 | 18 | 16 | 14 | 12 |
| 10 | - | 12 | 16 | 16 | 14 | 12 |
| 12 | - | 16 | 14 | 12 | Not Recommended | |
SAVE THESE SAFETY RULES FOR FUTURE USE
Operation
NOTE: Protect what is under the workpiece with a heat resistant material to avoid heat damage to a table, etc. Insert stick of hot melt adhesive into inlet tube of melt chamber
m = 311 ;
through back of gun. (For best results, use 4^th or longer sticks). Squeeze trigger to set adhesive stick firmly in chamber.
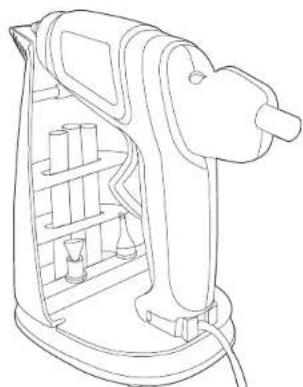
Set glue gun into cradle as shown in figure 1.
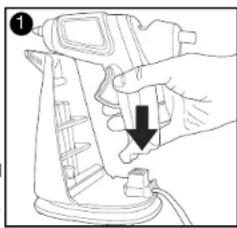
Note: The channel around the bottom of the base serves as a cord wrap for the cord. If needed, fully unwrap cord. Plug cord into a 120 Volt AC outlet and wait for "Ready for Use Indicator" to turn from GRAY to RED. See figure 2.
WARNING: If gun is seated in cradle it will turn "ON" as soon as the cord is plugged in.
Apply glue by squeezing trigger. The further the trigger is pulled, the more glue will flow out of nozzle. When gun stops feeding glue, release trigger and squeeze again for additional flow. When glue stick is depressed to the level of the inlet tube lip, insert another stick.
When glue gun cord is removed from the cradle, it will begin to cool off. When the ready for use indicator changes to gray, or when the glue is no longer flowing easily, replace the gun in the cradle.
For heavier duty use the glue gun can be used as a plugged in unit away from it's base.
To use as a plugged in unit: 1.) Make sure unit is cool. 2.) Unwind cord from cord wrap. 3.) Push down on the two tabs in front of the receptacle as shown in figure 3. Rotate the receptacle toward the
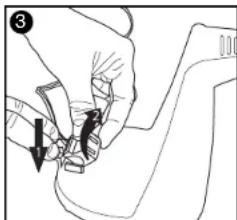
:
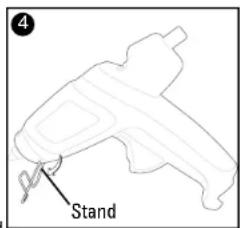
inside of the base and lift the receptacle and cord out of the holder. 4.) Rotate stand forward as shown in figure 4.
NOTE: Make sure unit is "OFF" and cool before adjusting kickstand. We recommend placing a piece of scrap material under nozzle to prevent damage to surface unit is resting on. 5.) Insert receptacle into the handle of the glue gun (cord facing back of unit). Plug cord into a 120 Volt AC outlet and wait for "Ready for Use Indicator" to turn from GRAY to RED or when glue
CAUTION: Feeding or pushing glue sticks with too much force into a heated gun may cause hot adhesive to be unexpectedly expelled from nozzle.
NOTE: Some materials can be damaged by the hot nozzle or even the hot glue. Where this is a concern, test a piece of scrap material or a portion of the object being repaired that will not be visible. When all gluing operations are completed, place the gun back in the cradle and unplug the cord to allow the gun to cool to room temperature. DO NOT ATTEMPT TO PULL THE UNUSED STICK FROM GUN AFTER USE. Any unused adhesive can be reheated and used at a future date without any loss of bonding strength.
CAUTION: Do not confine the glue gun in an area where the heat cannot dissipate.
CAUTION: Make sure the gun is cooled down before putting in storage.
Changing Nozzles
There are three different nozzles:
Standard
·Wide
Extended Angle
CAUTION: Make sure the nozzle is cool and the gun is unplugged before changing nozzles.
To change a nozzle, a wrench is included and stores in the base. Note that a nozzle tip can be aligned independent of the nozzle base and then tightened with the wrench.
Tips On Using Your Cord Free Glue Gun
- Choose the right glue stick for the right application. High or multi-temperature round glue sticks only.
- Make sure the surfaces are clean and free from dirt or oily films. Clean surfaces always bond best so take time to prepare the surfaces prior to gluing.
- There is no need to spread the hot glue. Just simply apply and position the surfaces together squeezing slightly to ensure even spreading.
- It's always best to work in a room with an ambient temperature of 68 to 72 degrees F(20^ et 22^) . Extreme cold will quicken adhesive set-up time (the time it takes the adhesive to harden). Heat will extend it.
- You can extend set-up time by slightly prewarming the surfaces to be glued with a hand held hair dryer. The heat will allow additional time to position difficult objects and also to ensure better bonding of more difficult substrates (surfaces to be bonded).
- Glue drying time can also be controlled somewhat by the method of application. Large heavy pools of adhesive will take up to fifty percent longer to dry than normal size drops. Very thin beads will dry in as few as 10 seconds. Some experimentation with your glue gun on scrap material will help to determine the best method to use for your particular project.
- Use hot melt glue to hold projects together while you install more permanent fasteners like nails, screws, bolts, etc. This makes the whole project stronger and eliminates the need for clamps.
-
Some paints and stains containing petroleum distillates can weaken the adhesive. Test before using. You may need to paint or stain before gluing.
-
Excess adhesive may be removed by scraping, peeling, or remelting with hot tip of gun. Adhesive may be removed from fabric by dry cleaning.
Cleaning
Use only mild soap and a damp cloth to clean the tool. Many household cleaners contain chemicals which could seriously damage the plastic. Also, do not use gasoline, turpentine, lacquer or paint thinner, dry cleaning fluids or similar products. Never let any liquid get inside the tool; never immerse any part of the tool into a liquid.
Important
To assure product SAFETY and RELIABILITY, repairs, maintenance and adjustments should be performed by Black & Decker Service Centers or other qualified personnel. This tool contains no customer serviceable components.
Service Information
Whether you need technical advice, repair, or genuine factory replacement parts, contact the Black & Decker location nearest you. To find your local service location, refer to the yellow page directory under "Tools-Electric" or call: 1-800-54-HOW TO (544-6986).
Full Two-Year Home Use Warranty
Black & Decker (U.S.) Inc. warrants this product for two years against any defects in material or workmanship. The defective product will be replaced or repaired at no charge in either of two ways: The first, which will result in exchanges only, is to return the product to the retailer from whom it was purchased (provided that the store is a participating retailer). Returns should be made within the time period of the retailer's policy for exchanges (usually 30 to 90 days after the sale). Proof of purchase may be required. Please check with the retailer for their specific return policy regarding returns that are beyond the time set for exchanges.
The second option is to take or send the product (prepaid) to a Black & Decker owned or authorized Service Center for repair or replacement at our option. Proof of purchase may be required. Black & Decker owned and authorized service centers are listed under "Tools-Electric" in the yellow pages of the phone directory.
This warranty does not apply to accessories. This warranty gives you specific legal rights and you may have other rights which vary from state to state. Should you have any questions, contact the manager of your nearest Black & Decker Service Center. This product is not intended for commercial use.
FREE WARNING LABEL REPLACEMENT: If your warning labels become illegible or are missing, call 1-800-544-6986 for a free replacement

www.blackanddecker.com
1-800-544-6986
Black & Dacker (U.S.) Inc., 701 E. Joppa Rd. Towson, MD 21286 U.S.A.
See 'Tools-Electric - Yellow Pages - for Service & Sales

BLACK&DECKER
GG500SC-PISTOLET-COLLEUR A CORDON RANGÉ
MODE D'EMPLOI
AVANT DE RETOURNER CE PRODUIT POUR
QUELQUE
RAISON QUI SOIT, VEUILLEZ APPELER AU
1-800-54-HOW-TO (544-6986)
Laittership, a part of the company's main business, is located in the city of Los Angeles. The company offers a variety of services including: repair and maintenance of the vehicle; installation and repair of the vehicle; and sales and technical support.
BOSQUES DE CIDROS ACCESO RADIATAS NO.42
COL. BOSQUES DE LAS LOMAS.
05120 MEXICO, D.F.
TEL.55-5326-7100
Cat.No. G5G00S Form No.632900-00 JUNE 2005 Copyright:2005 Black & Decker Printed in China
632900-00 GLUE GUN 6/15/05 8:19 AM Page 18
一


- Welcome to the Wonderful World of Black & Decker Craft Products.
- IMPORTANT SAFETY RULES
- SAVE THESE INSTRUCTIONS
- First Aid Measures for Glue Sticks
- Extension Cords
- SAVE THESE SAFETY RULES FOR FUTURE USE
- Operation
- Changing Nozzles
- Tips On Using Your Cord Free Glue Gun
- Cleaning
- Important
- Service Information
- Full Two-Year Home Use Warranty
- BLACK&DECKER
- MODE D'EMPLOI
Brand : BLACK & DECKER
Model : GG500S
Category : Glue gun