
TG2000CB - Griddle GORENJE - Free user manual and instructions
Find the device manual for free TG2000CB GORENJE in PDF.

| Product Type | Table Grill / Griddle (Plancha) |
| Brand | Gorenje |
| Model | TG2000CB |
| Cooking Surface | Non-stick plate (C), detachable |
| Lid | Tempered glass, detachable, with lock and stand-up function |
| Drip Tray | Detachable grease tray (E), fits into base (F) |
| Temperature Control | Adjustable dial on detachable controller (H), 5 settings (1-5) |
| Power Indicator | Indicator light on controller shows heating and temperature maintenance |
| Non-stick Coating | Yes, on cooking plate |
| Detachable Parts | Non-stick plate, drip tray, lid, temperature controller |
| Material | Plastic housing, glass lid, non-stick coated metal plate |
| Safety Features | Auto shut-off not specified; caution: hot surface; do not immerse; keep away from children under 8; use only with closed lid |
| Cleaning | Wipe lid, base, and plates with damp cloth; plate, drip tray, and lid dishwasher safe (top rack); do not immerse controller or cord |
| Storage | Store clean and dry; do not store while hot or plugged in; do not wrap cord tightly |
| Usage | Household use only; preheat before cooking; use wooden or silicone utensils |
| Power Supply | Not specified in manual (typical 2000W, 220-240V) |
Frequently Asked Questions - TG2000CB GORENJE
User questions about TG2000CB GORENJE
0 question about this device. Answer the ones you know or ask your own.
Ask a new question about this device
Download the instructions for your Griddle in PDF format for free! Find your manual TG2000CB - GORENJE and take your electronic device back in hand. On this page are published all the documents necessary for the use of your device. TG2000CB by GORENJE.
USER MANUAL TG2000CB GORENJE
natural_image
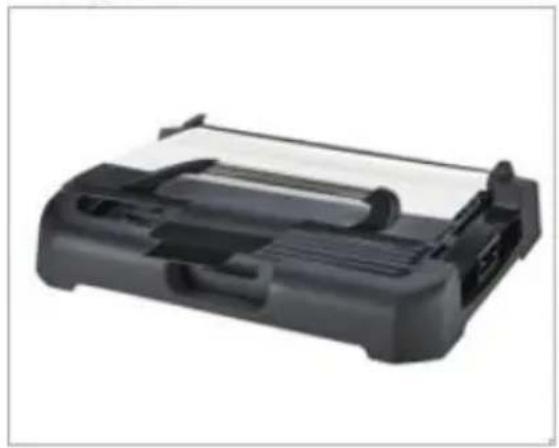
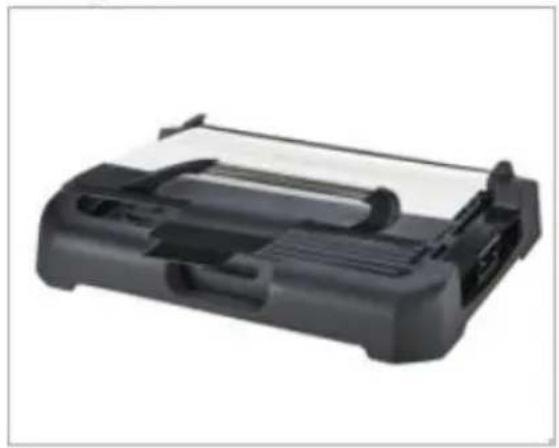
Black portable electronic device with ventilation slots and a brand logo (no visible text or symbols on body)TG2000CB
| Namizni žar | Navodila za uporabo | SI |
| Stolni žar | Upute za uporabu | BIH HR |
| Stolni roštilj | Uputstvo za upotrebu | BIH SRB MNE |
| Електрична скара | Упатства за употреба | MK |
| Table grill | Instruction manual | GB |
| Tischgrill | Gebrauchsanweisung | D |
| Настолен грил | Инструкции за употреба | BG |
| Stolní gril | Návod na použití | CS |
| Stolný gril | Návod na obsluhu | SK |
| Asztali grillsütő | Használati utasítás | H |
| Grill stołowy | Instrukcja obsługi | PL |
| Grătar de masă | Manual de utilizare | RO |
| Настільний гриль | Інцтрукція з експлуатації | UA |
| Настольный гриль | Инструкция по эксплуатации | RUS |
| Bordgrill | Brugsanvisning | DK |
| Bordgrill | Bruksanvisning | NO |
| Bordsgrill | Bruksanvisning | SV |
| P ägrilliöyt | Käyttöohje | FI |
Shranite ta navodila.
natural_image
Close-up of a black electrical plug with a circular knob and a labeled pin (H), no text or symbols present.Fig 1

natural_image
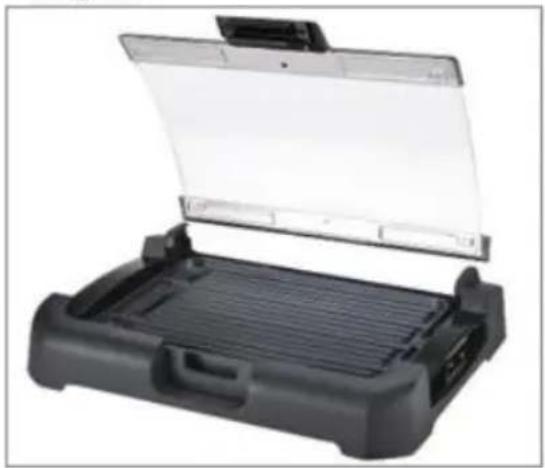
Black plastic device with lid open, showing internal structure (no text or symbols visible)Fig 2

natural_image
Exterior view of a black plastic kitchen appliance with cutouts and internal compartments (no text or symbols visible)Fig 3

natural_image
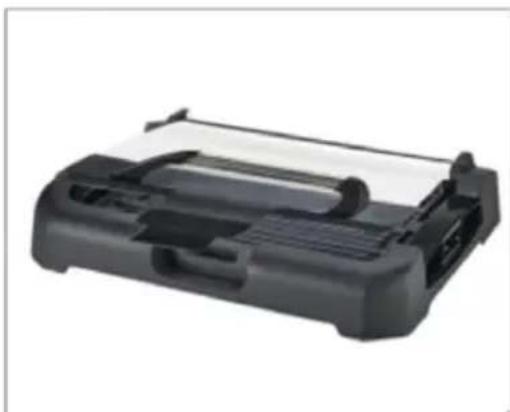
Exterior view of a black plastic device with open lid and ventilation grilles (no text or symbols visible)Fig 4

natural_image
Black rectangular electronic device with a paper roller and ventilation slots (no visible text or symbols)natural_image
Close-up of gloved hands holding a dark object, with an arrow pointing to a small white arrow on the left side (no text or symbols visible)Odpiranje steklenega pokrova:
natural_image
Interior view of a modern office or retail space with a black counter and glass window (no visible text or symbols)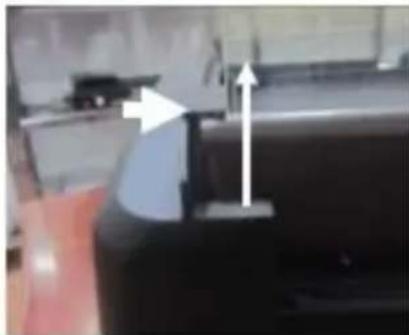
natural_image
Close-up of a black car's side panel with a white arrow pointing upward and a blue arrow pointing downward (no text or symbols visible)Nega in čiščenje
Pomembno: nikoli ne potopite termostata, vtikača ali priključne vrvice oz. kabla v vodo ali drugo tekočino. Te dele samo obrišite z vlažno krpo.
natural_image
Close-up of a black electrical plug with a circular knob and a labeled pin (H), no text or symbols present.Fig 1
natural_image
Black plastic device with lid open, showing internal structure (no text or symbols visible)Fig 2
natural_image
Exterior view of a black plastic kitchen appliance with cutaway view showing internal compartments (no text or symbols visible)Fig 3
natural_image
Exterior view of a black plastic device with open lid and ventilation grilles (no text or symbols visible)Fig 4

natural_image
Black rectangular electronic device with a paper roller and ventilation slots (no visible text or symbols)- Okretnim gumbom na priključku s regulatorom temperature (H) odaberite potrebnu snagu rada. Kao pomoć, u sljedećoj su tabeli navedene različite regulacije.
natural_image
Interior view of a modern office or cinema space with a black desk and window (no visible text or symbols)
natural_image
Close-up of a black mechanical component with two white arrows pointing upward, no visible text or symbolsNjega i čišćenje
Važno: termostat, utikač, ili priključni kabel nemojte nikad uranjati u vodu ili neku drugu tekućinu. Te dijelove samo obrišite vlažnom krpom.
natural_image
Close-up of a black electrical plug with a circular knob and a labeled pin (H), no text or symbols present.Fig 1
natural_image
Black plastic mechanical component with lid open, showing internal structure (no text or symbols)Fig 2

natural_image
Exterior view of a black and white flat-screen grater with lid and base (no text or symbols)Fig 3

natural_image
Exterior view of a black plastic device with open lid and ventilation slots (no text or symbols visible)Fig 4

natural_image
Black plastic printer holder with paper lid and scroll wheel (no visible text or symbols)- Odstranite ambalažni materijal i eventualne nalepnice.
- Pre upotrebe ploču (C) i pladanj za sakupljanje masnoće (E) operite vrućom vodom i blagim deterdžentom. Temeljito ih osušite.
- Pladanj za sakupljanje masnoće (E) namestite u postolje (F), tako da ga najpre umetnete pod zatvarač na poleđini postolja (Slika 1), a zatim ga spustite na svoje mesto.
SAVETI: Za lakše čišćenje, uljem premažite pladanj u kog se sakupljaju masnoća i sokovi.
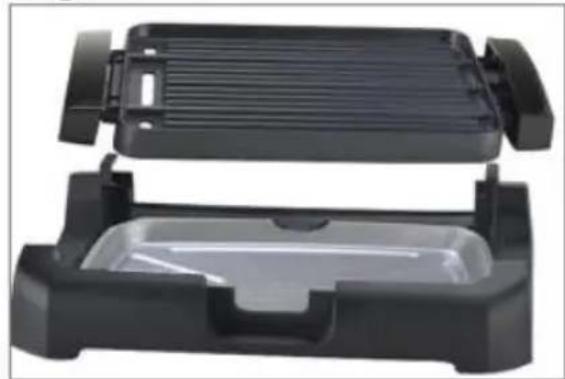
- Ploče protiv lepljenja hrane (C) stavite preko pladnja za sakupljanje masnoće (E) (Slika 2), i pri tome se uverite da drške (D) u potpunosti nalegnu na posebne otvore u postolju (F).
- Hranu koju želite ispeći stavite na ploču (C) a poklopac (A) uspravite da bude vertikalan, tako da bočni klinovi kliznu u posebne otvore na poleđini postolja (F) (Slika 3).
Spustite poklopac (A), tako da ga uhvatite za dršku i nežno ga obrnete nagore i napred (Slika 4).
- Priključak s regulatorom temperature (H) umetnite u utičnicu (I) na ploči (C), i utikač na priključnom kablu ugurajte u utičnicu. Slika 5
- Okretnim dugmetom na priključku s regulatorom temperature (H) izaberite potrebnu snagu rada. Kao pomoć, u narednoj tabeli navedene su različite regulacije. Pridržavajte se narednih vrednosti:
PODEŠAVANJE RADA
| Regulacije | Funkcija |
| 1/-2 | Niska temperatura – za održavanje toplote hrane. |
| 2/-3 | Srednja temperatura – za temeljito pečenje |
| 3/-4 | Visoka temperatura za brzo pečenje, pri čemu sokovi ostanu u hrani. |
| 5 | Naročito visoka temperatura – za brzo pečenje hrane |
- Kada se signalna lampica na priključku s regulatorom temperature (H) isključi, to znači da je temperatura za pečenje postignuta, i da je roštilj spreman za upotrebu.
- Signalna lampica na priključku s regulatorom temperature (H) prikazuje da se roštilj
ugrejava, i svetli sve dok roštilj ne postigne izabranu temperaturu. Nakon toga u intervalima će se uključivati i isključivati, te tako označavati rad grejača koji održavaju izabranu temperaturu.
natural_image
Close-up of gloved hands holding a black object, with an arrow pointing to a component (no visible text or symbols)Fig. 7:
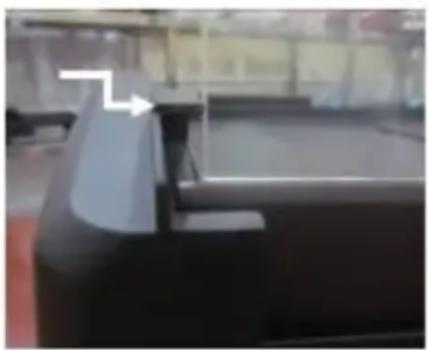
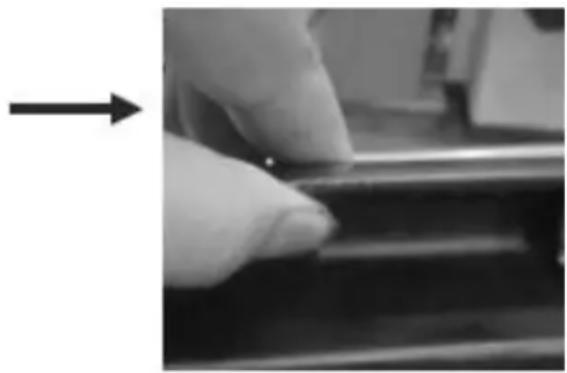
Otvaranje staklenog poklopca:
Molimo vas da podignete stakleni poklopac uzduž žleba do gornjeg položaja, a zatim pritisnite i zatvorite zasun staklenog poklopca na postolju (F). Ako stakleni poklopac nije podignut do gornjeg položaja, može da dođe do oštećenja aparata. Stakleni poklopac u uspravnom položaju (Slika 8). Stakleni poklopac dodiruje gornji deo kada je podignut (Slika 9). Molimo pogledajte donje priloge (slike):
Fig 8:
natural_image
Interior view of a modern office or cinema space with a black desk and window (no visible text or symbols)Fig 9:

natural_image
Close-up of a hand holding a small object with directional arrows indicating movement or force (no visible text or symbols)Nega i čišćenje
natural_image
Close-up of a black electrical plug with a circular connector and a circular symbol labeled 'K' (no readable text or symbols beyond the label)Приказ 1
natural_image
Black plastic electronic device with a transparent lid and mounting bracket (no text or symbols visible)Приказ 2
natural_image
Black and white photo of a flat-screen grater with lid open, showing internal structure (no text or symbols visible)Приказ 3
natural_image
Exterior view of a black plastic electronic device with open lid and internal tray (no text or symbols visible)Приказ 4

natural_image
Black rectangular electronic device with paper roll and ventilation slots (no visible text or symbols)natural_image
Close-up of a hand pressing down on a dark surface with an arrow pointing upward (no text or symbols visible)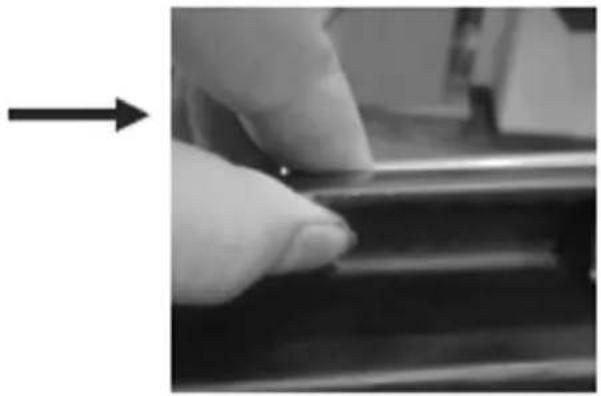
natural_image
Close-up of a gloved hand pressing down on a metal component, with an arrow indicating direction (no text or symbols visible)natural_image
Close-up of a black industrial machine component with a white arrow pointing to a section (no visible text or symbols)
natural_image
Close-up of a black mechanical component with two white arrows pointing to features, no visible text or symbols.Одржување и чистење
Save these instructions.
This product is intended for household use only.
Do not immerse this product into water.
Main Functions:
- Detachable non-stick grill/griddle plates ensure effortless food release and quick clean-up.
- Detachable tempered glass lid for viewing and as a wind shield
- Detachable grease tray
- Adjustable temperature control probe with power-on indicator for more precise cooking
Important safeguards
- This appliance can be used by children aged 8 years and above and persons with reduced physical, sensory or mental capabilities or lack of experience and knowledge if they have been given supervision or instruction concerning use of the appliance in a safe way and if they understand the hazards involved.
- Children shall not play with the appliance.
- Cleaning and user maintenance shall not be made by children without supervision.
- Cleaning and user maintenance shall not be made by children unless they are older than 8 years and supervised.
-
Keep the product and its cord out of the reach of children aged less than 8 years.
-
: Caution, hot surface
When using electrical appliances, basic safety precautions should always be followed, including the following:
Read all instructions.
Do not touch any hot surface. Use handles or knobs.
To protect against electrical shock, do not immerse the cord, plugs or the appliance in water or other liquid.
Close supervision is necessary when any appliance is used by or near children.
Unplug from outlet when not in use and before cleaning. Allow to cool before putting on or taking off parts, and before cleaning the appliance.
Do not operate any appliance with a damaged cord or plug, or after the appliance malfunctions or if it is damaged in any manner. Return the appliance to the nearest authorized service facility for examination, repair or adjustment.
Use of accessory attachments not recommended by the appliance manufacturer may cause injuries.
Do not use outdoors.
Do not let the cord hang over the edge of a table or counter, or touch a hot surface.
Extreme caution must be used when moving an appliance containing hot oil or other hot liquids.
To disconnect, remove the plug from the wall outlet.
Do not use this appliance for other than intended use.
If the supply cord is damaged, it must be replaced by the manufacturer or its service agent or a similarly qualified person in order to avoid a hazard.
Never connect this appliance to an external timer switch or a remote control system in order to avoid a hazardous situation.
The appliance is only to be operated in closed position.
Save these instructions.
This product is intended for household use only.
Do not immerse this product in water.
DO NOT THROW AWAY THESE INSTRUCTIONS.
INSTRUCTIONS FOR USE
IMPORTANT: ALWAYS UNPLUG THE POWER CORD FROM THE ELECTRICITY
MAINS BEFORE FITTING OR REMOVING SINGLE ATTACHMENTS OR
BEFORECLEANING THE APPLIANCE.
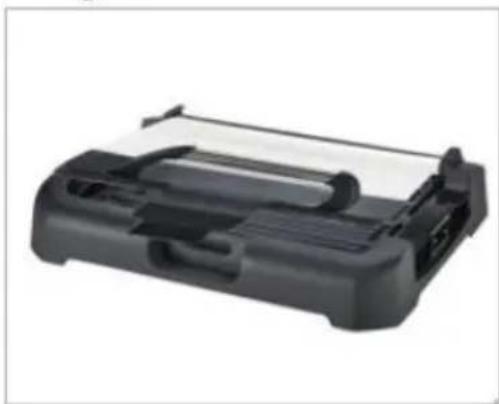
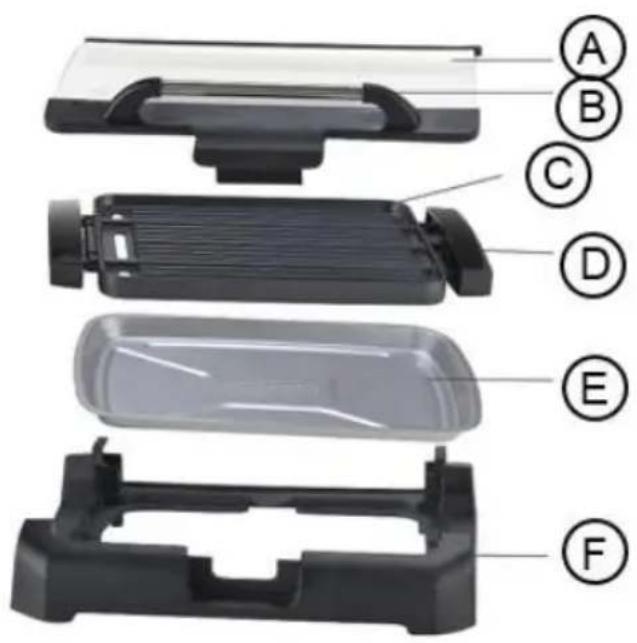
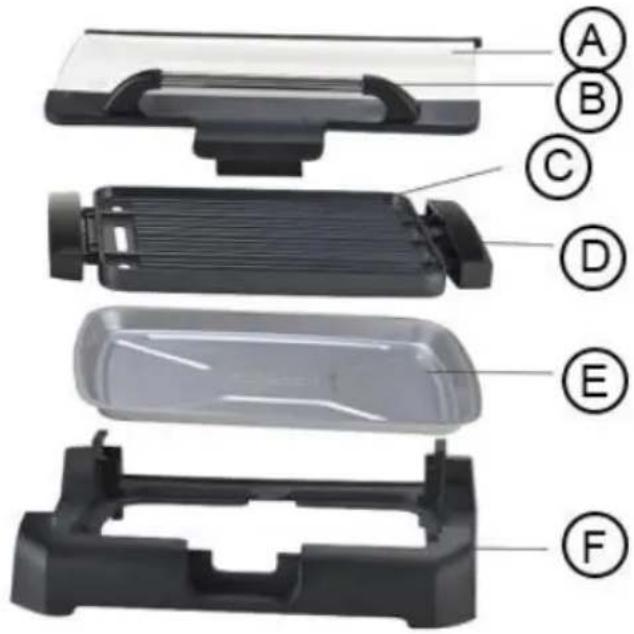
Components:


natural_image
Close-up of a black electrical plug with a circular knob and a labeled pin (H), no text or symbols present.Fig 1

natural_image
Black plastic mechanical component with lid open, showing internal structure (no text or symbols)Fig 2

natural_image
Exterior view of a black and white flat-screen grater with lid and base plate (no text or symbols)Fig 3

natural_image
Exterior view of a black plastic device with open lid and ventilation slots (no text or symbols visible)Fig 4

natural_image
Black plastic printer holder with paper lid and scroll wheel (no visible text or symbols)- Remove all packing material and any stickers.
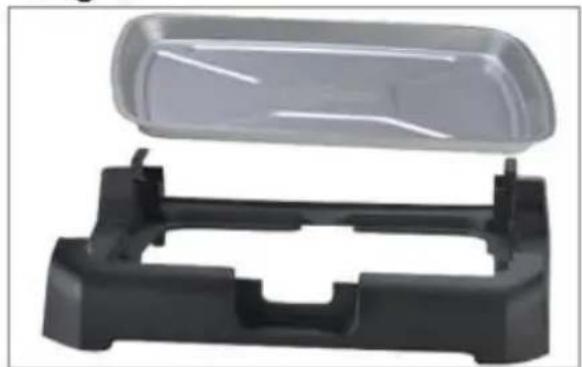
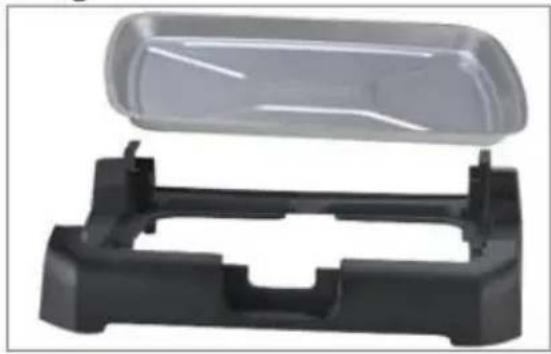
- Before use, wash the plate (C) and the drip tray (E) in hot water with some mild detergent. Dry them thoroughly.
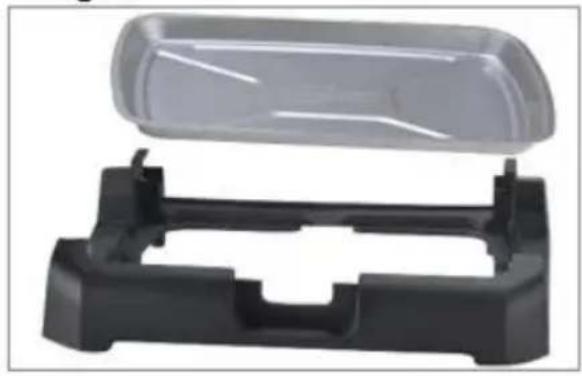
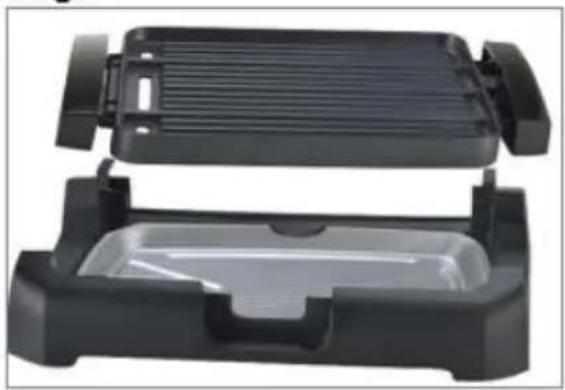
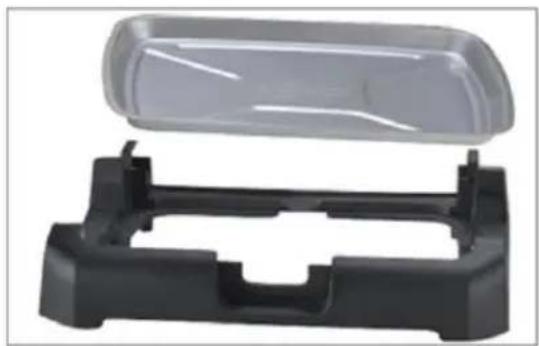
- Fit the drip tray (E) inside the base (F), inserting it first under the lock tab in the back of the base (Fig.1) before lowering it into place.
TIPS: To make clearing easier, coat the drip tray with oil to collect any fats and juices.
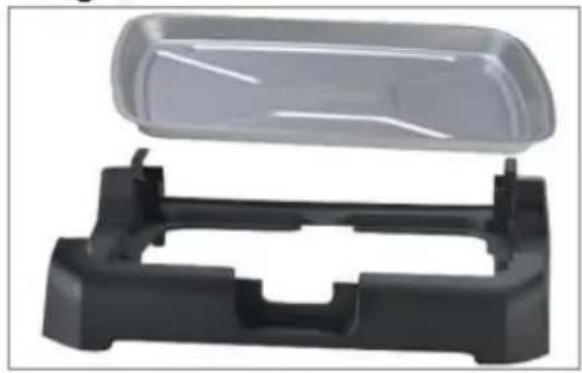
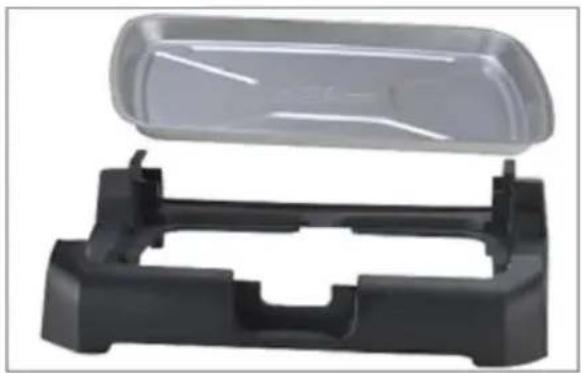
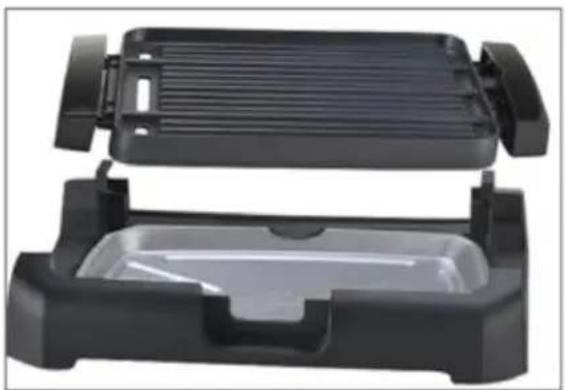
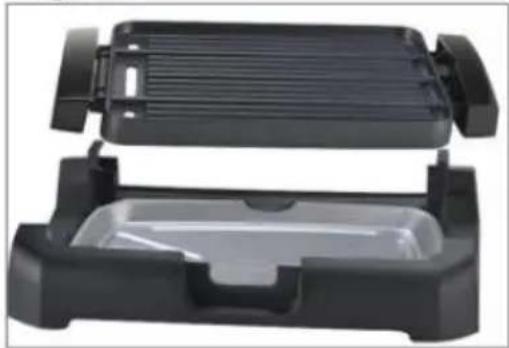
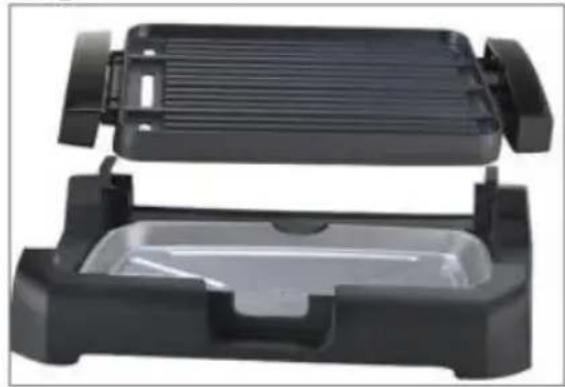
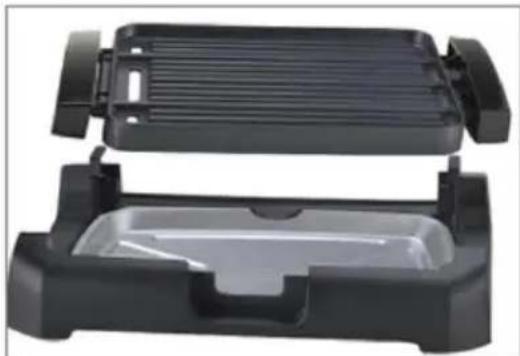
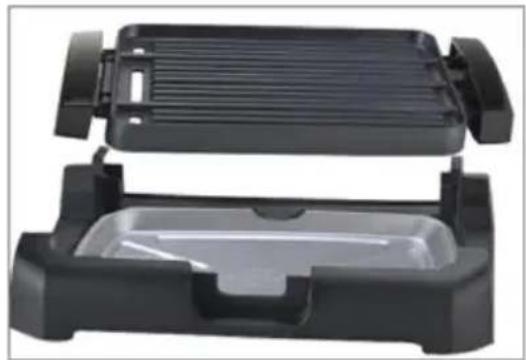
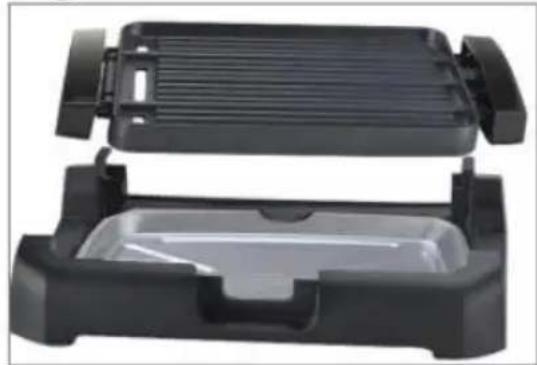
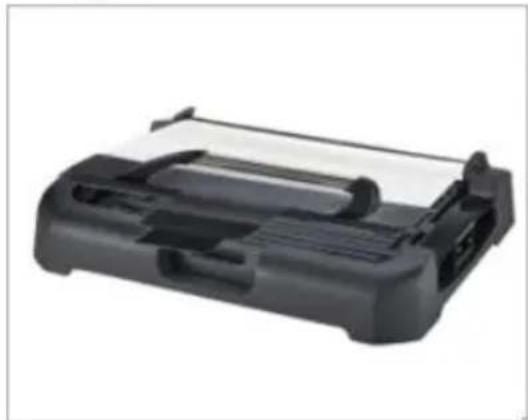
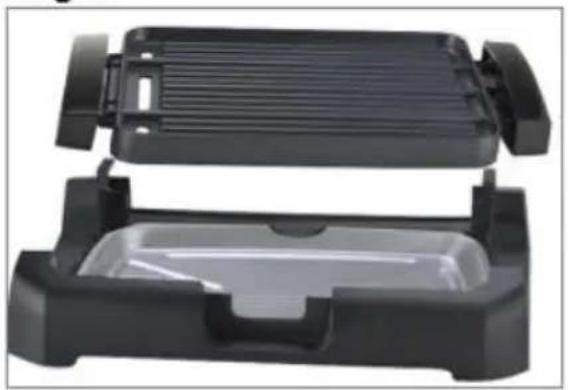
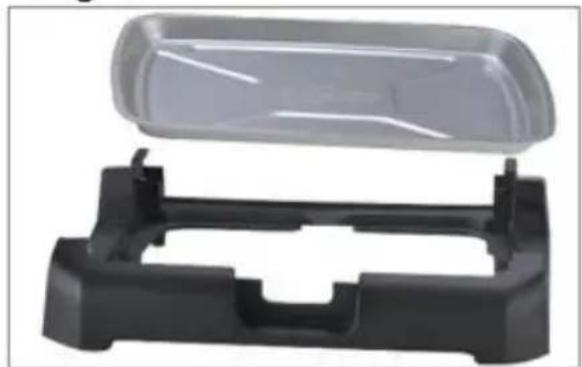
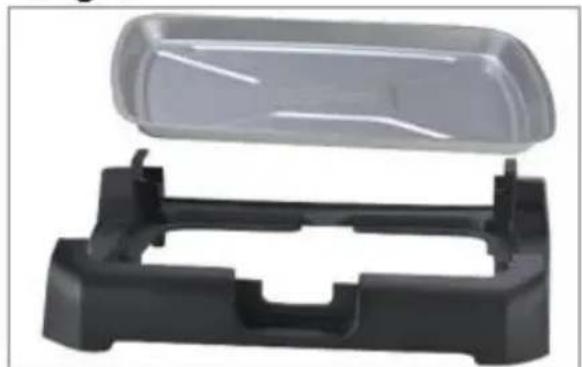
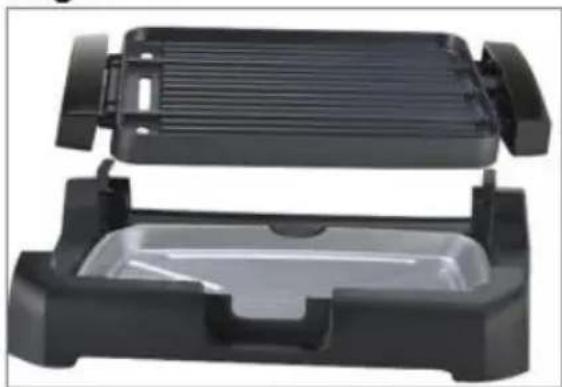
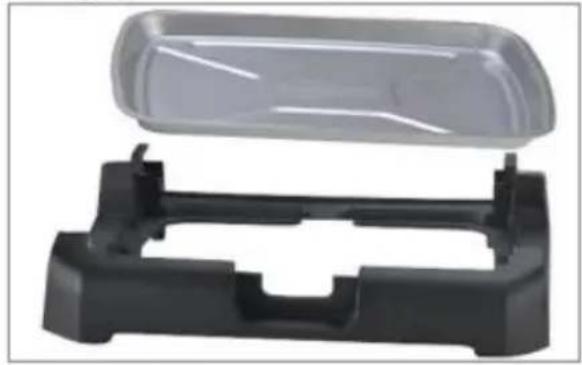
- Place the non-stick plate (C) over the drip tray (E) (Fig. 2), making sure that the handles (D) slot perfectly into the special openings in the base (F).
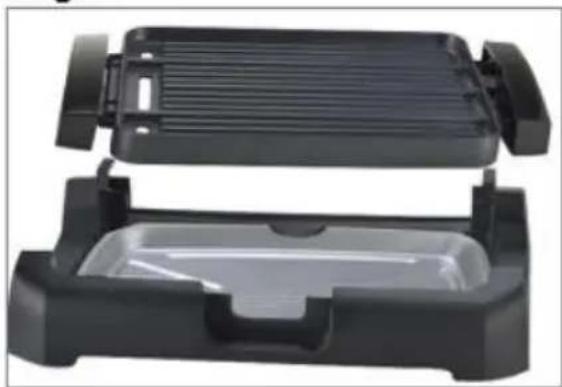
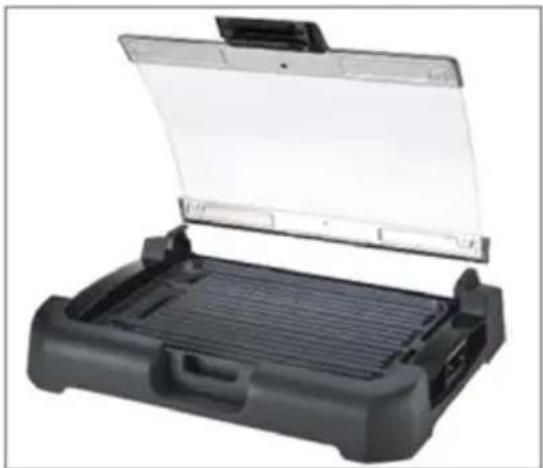
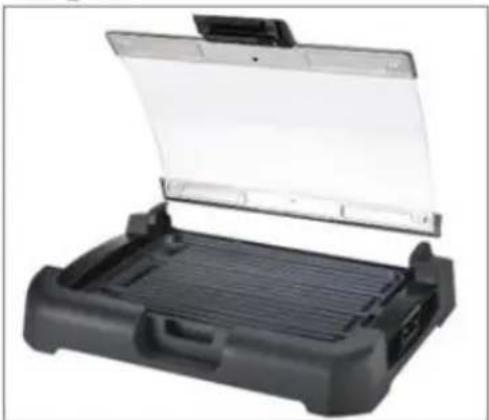
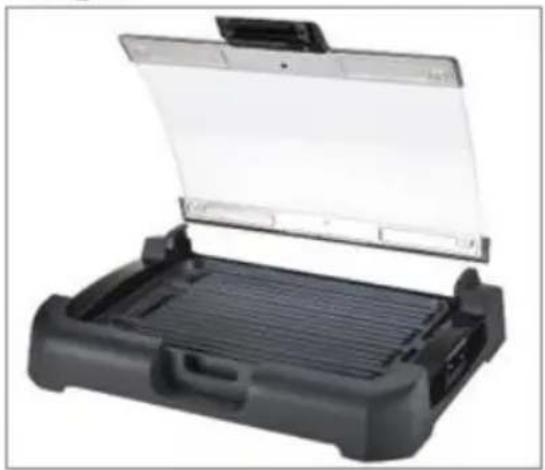
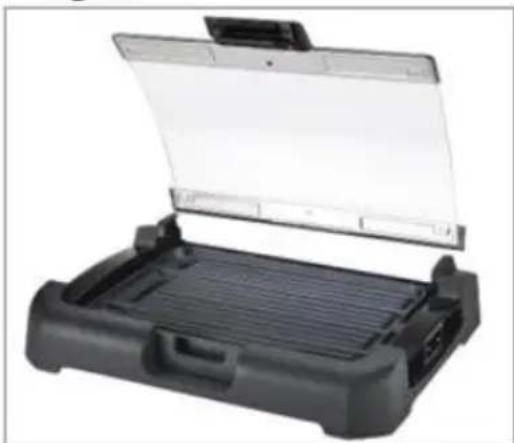
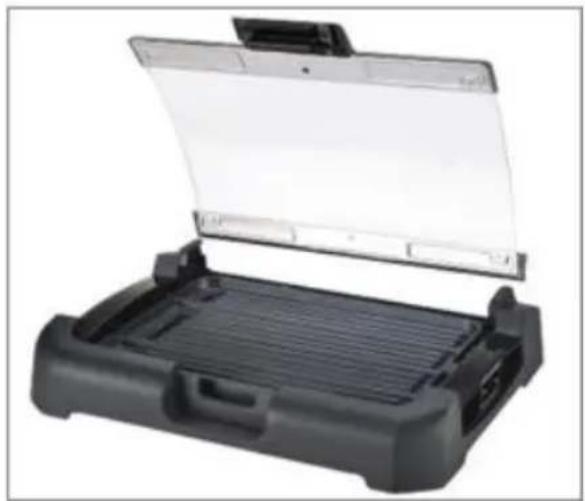
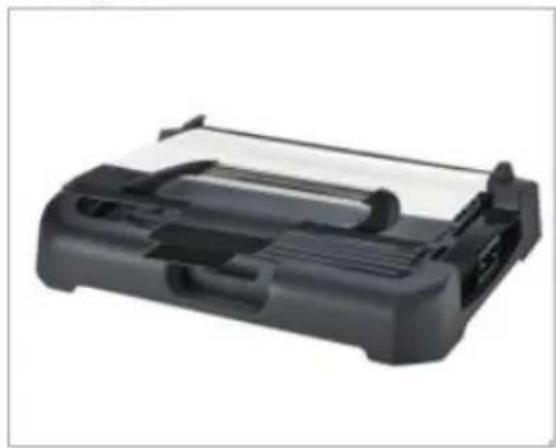
- Place the food for cooking on the plate (C) and insert the lid (A) vertically so that the side pins slot into the special openings at the back of the base (F) (Fig. 3).
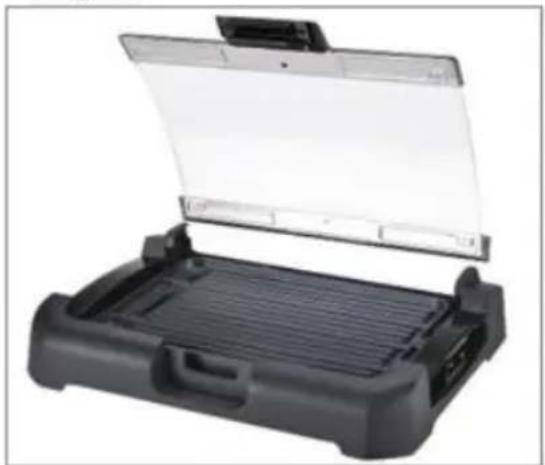
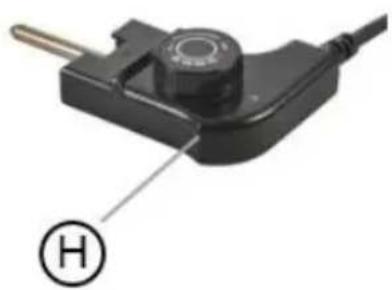
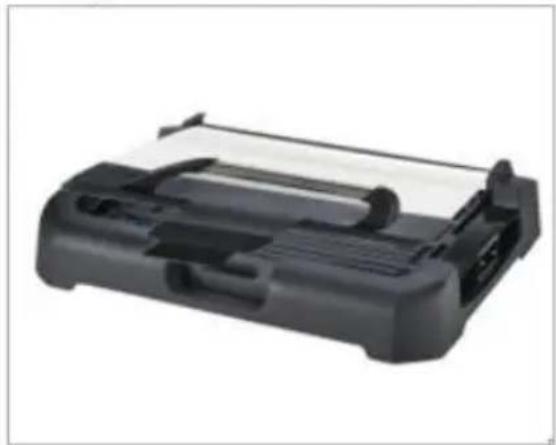
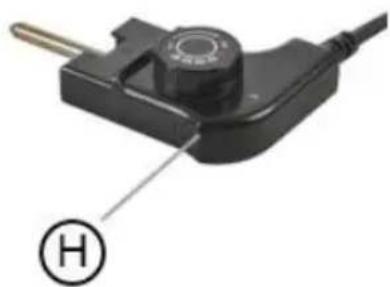
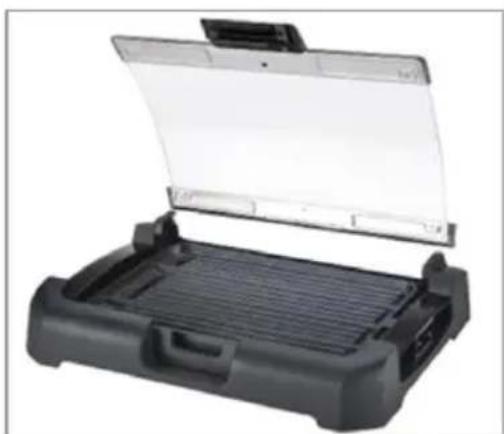
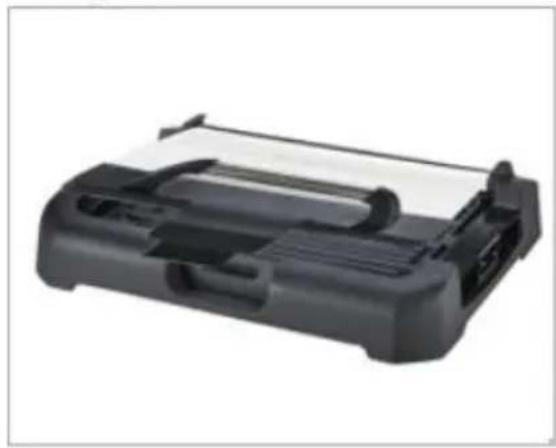
Lower the lid (A), gripping the handle and turning it gently up and forwards (Fig. 4). - Insert the temperature controller (H) into the inlet (I) on the plate (C) (Fig. 5) and plug the power cord into a mains socket.
Fig 5:
- Set the dial on the temperature controller (H) to the required heat setting. To help you, we have included the following table with different settings.
FUNCTION SETTINGS
| Setting | Function |
| 1–2 | Low heat – for keeping food warm. |
| 2–3 | Medium heat – cooking food thoroughly |
| 3–4 | High heat – for quick cooking and sealing in the juices. |
| 5 | Super heat – for browning foods quickly |
- When the indicator light on the temperature controller (H) switches off, this means that the required cooking temperature has been reached and that the grill is ready for use.
- The indicator light on the temperature controller (H) shows that the grill is heating up, and it will stay lit until the grill reaches the set temperature; after this, it will switch on and off in cycles, indicating the operation of the heater as it maintains the selected temperature.
- Pre-heating time depends on the selected heat setting.
The higher the selected temperature, the longer the pre-heating time.
When cooking is complete, remove the temperature controller (H) and lift the lid (A) using the relevant handle.
How to Use
This product is intended for household use only.
Getting started
- Remove all packing material and any stickers.
- Wipe plates with a damp cloth or sponge to remove any dust. Wipe dry with a soft cloth or paper towels.
- Select a location where the unit is to be used, leaving enough space between the back of the unit and the wall to allow heat to flow without damage to cabinets and walls.
- Turn off the temperature controller and plug it into the machine with the dial facing upwards.
26 Plug the appliance into the mains supply that corresponds to the parameters specified on the rating label.
27 Set the dial to a low setting for preheating. Then, set the controller dial to the level suitable for the food you wish to cook. There are five temperature levels.
28 Do not use metal utensils for removing the food from the grill, as they can damage the non-stick coating. Always use a spatula or utensils made of wood or heat-resistant silicone.
29 When cooking, be careful not to spill any sauce, juice or any other liquid that cannot be easily cleaned after cooling down into the gap between the grilling plate and the housing.
30 Important: steam may be released between the cooking plates. Caution should be taken to prevent hands or face from coming into contact with the steam.
31 After use, turn the temperature knob to position "0", unplug the unit from the electrical outlet and allow it to cool down to room temperature before cleaning.
32 Carefully remove the detachable grease tray and pour discard the cold oil to clean up.
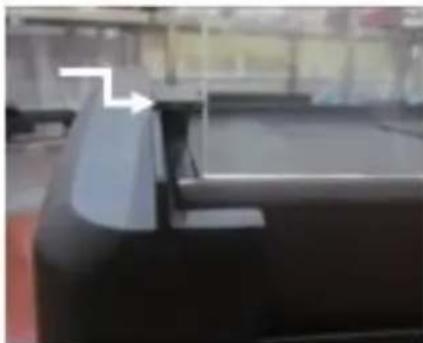
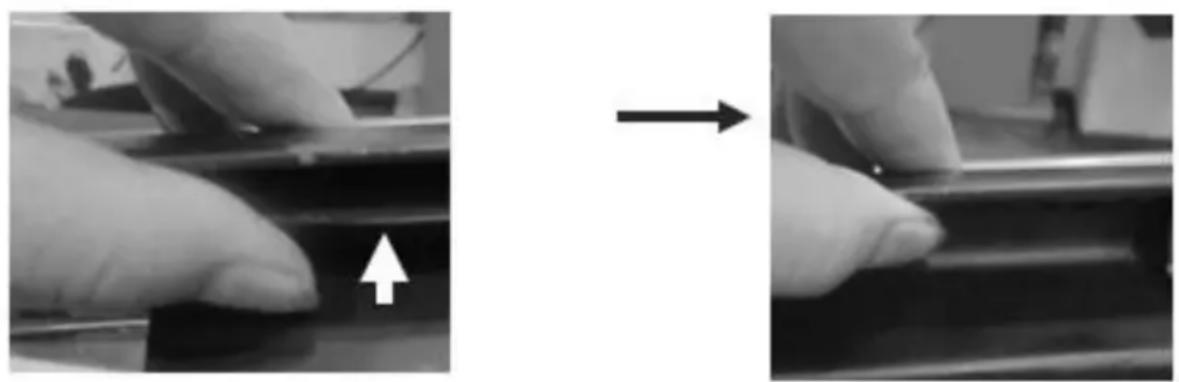
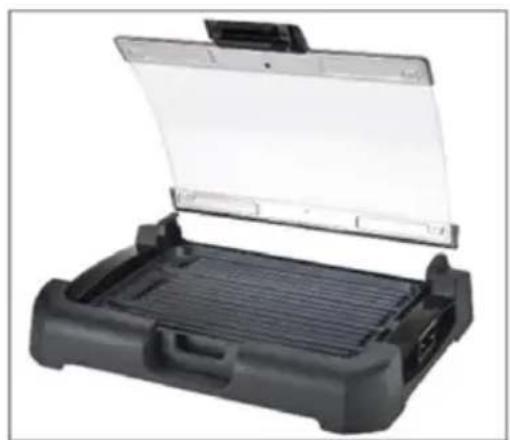
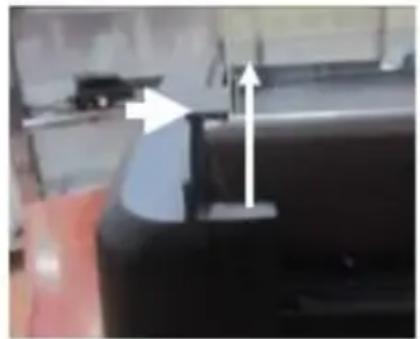
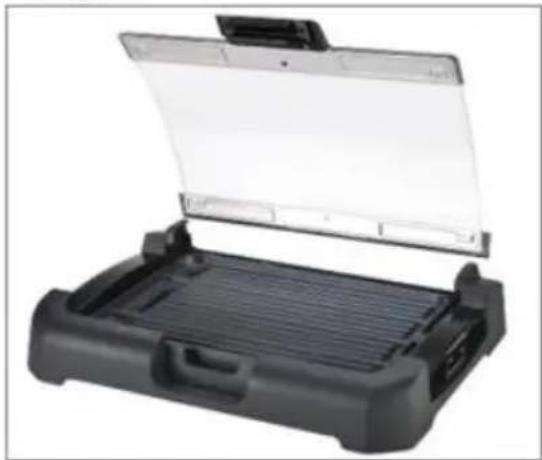
How to lock or loosen the glass lid to base:
There is a latch under the glass lid handle which locks the glass lid to the appliance base when the lid is closed. Open the latch with your hand before lifting the glass lid. Then, slide the glass lid into the slot that allows it to stand upright.
Please see the photo below:
Fig. 6:
natural_image
Close-up of gloved hands performing a process with an arrow indicating direction (no text or symbols visible)Fig. 7:
How to open the glass lid:
Pleas lift the glass lid along the slot to top position; then, push and close the glass lid lock towards the base (F). If the glass lid is not lifted to the top baffle, the appliance may be damaged. Fig 8 shows the glass lid standing in the slot. Touch the upper side of the glass lid when lifting it to close it, as seen in Fig. 9. Please see the figures below.
Fig 8:
natural_image
Interior view of a modern office or retail space with a black electronic device and glass display (no visible text or symbols)Fig 9:
natural_image
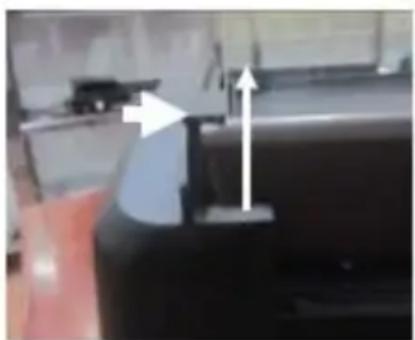
Close-up of a black object with a white arrow pointing upward and a blue arrow pointing left, no visible text or symbols.Care and Cleaning
Important: never place the thermostat, plug or power cord in water or other liquids; only wipe these parts clean with a damp cloth.
Important: always unplug the power cord from the electricity mains before fitting or removing single attachments or before cleaning the appliance.
- Wipe the lid, base, and cooking plates with a damp cloth and a non-abrasive soap or dishwashing detergent. Wipe with a clean, soft, damp cloth and towel dry.
- Storage: store cleaned appliance in a clean, dry place.
- Important: never remove the detachable grease tray for cleaning when the oil is still hot.
- Important: never store the appliance while it is still hot or still plugged in.
- Important: never wrap the cord tightly around the appliance. Do not put any stress on the cord where it enters the unit, as this could cause it to fray and break.
- The lid, the non-stick plate and the drip tray can be washed in warm soapy water. The shaped base can be wiped clean with a damp cloth or washed using lukewarm water, some mild detergent and a soft cloth, or in the top rack of a dishwasher.
Environment
Do not throw away the appliance with the normal household waste at the end of its life, but hand it in at an official collection point for recycling. By doing this, you help to preserve the environment.
Guarantee & service
If you need information or if you have a problem, please contact the Gorenje Customer Care Centre in your country (you find its phone number in the worldwide guarantee leaflet). If there is no Customer Care Centre in your country, go to your local Gorenje dealer or contact the Service department of Gorenje domestic appliances.
For personal use only!
GORENJE
WISHES YOU A LOT OF PLEASURE WHEN USING YOUR APPLIANCE
We reserve the right to any modifications!
DE
natural_image
Close-up of a black electrical connector with a circular knob and a labeled symbol (H) at the bottom, no readable text or symbols on the device itself.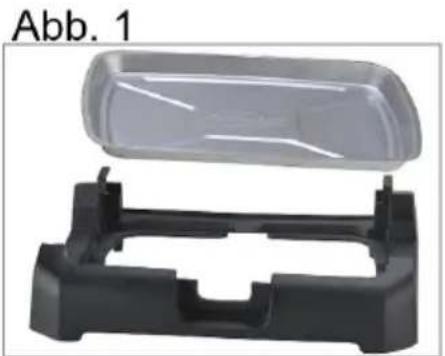
natural_image
Exterior view of a plastic device housing with black plastic casing and open lid (no text or symbols visible)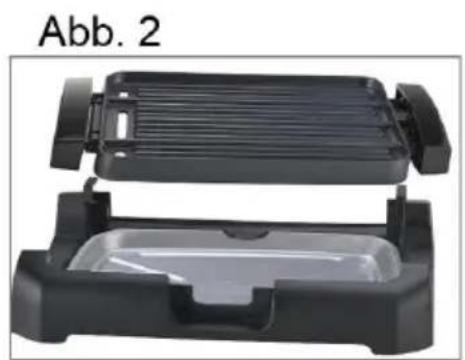
natural_image
Exterior view of a black grater with lid and side panel (no text or symbols visible)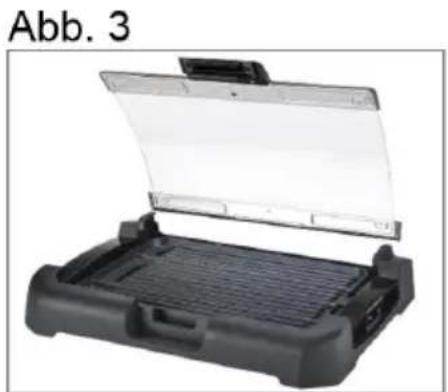
natural_image
Exterior view of a device casing with open lid and internal compartments (no text or symbols visible)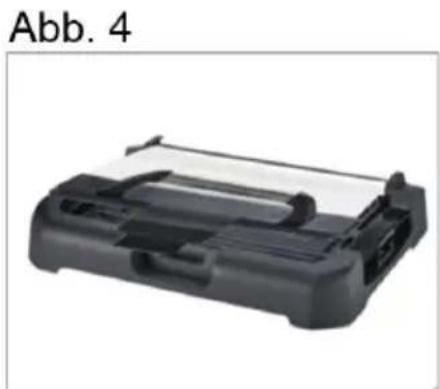
natural_image
Black plastic printer component labeled Abb. 4, shown without any text or symbols on the device itself.natural_image
Two-panel image showing hands holding a device, with arrows pointing to the top view of the device (no text or symbols present)natural_image
Interior view of a modern office or cinema space with a black desk and window (no visible text or symbols)
natural_image
Close-up of a car's front wheel and dashboard with directional arrows indicating movement (no text or symbols)natural_image
Close-up of a black mechanical component with a circular knob and a labeled symbol (H) pointing to its side (no text or symbols on the object itself)Fig 1

natural_image
Black plastic device with lid open, showing internal structure and mounting brackets (no text or symbols visible)Fig 2
natural_image
Exterior view of a black grater with lid and side panel (no text or symbols visible)Fig 3
natural_image
Exterior view of a black plastic electronic device with open lid and ventilation grilles (no text or symbols visible)Fig 4
natural_image
Black plastic printer holder with paper roll and ventilation slots (no text or symbols visible)natural_image
Close-up of hands operating a mechanical component, showing a directional arrow and a white arrow pointing to a section (no text or symbols visible)Fig. 7:
natural_image
Interior view of a modern office or cinema space with a black desk and window (no visible text or symbols)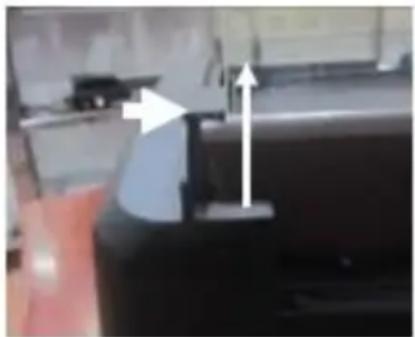
natural_image
Close-up of a hand holding a small object with an arrow pointing upward, next to a dark surface (no visible text or symbols)TYTO POKYNY NIKDY NEVYHAZUJTE.
POKYNY K POUŽITÍ
DŮLEŽITÉ: PŘED UCHYCENÍM NEBO ODSTRANĚNÍM JEDNOTLIVÝCH KOMPONENTŮ PŘÍP. PŘED ČIŠTĚNÍM ZAŘÍZENÍ VŽDY ODPOJTE NAPÁJECÍ KABEL OD ELEKTRICKÉ SÍTĚ.
Komponenty:
natural_image
Close-up of a black mechanical component with a circular knob and a labeled symbol (H) pointing to its side (no text or symbols on the object itself)Fig 1
natural_image
Black plastic mechanical component with lid open, showing internal structure (no text or symbols)Fig 2
natural_image
Exterior view of a black rectangular kitchen grater with lid and base plate (no text or symbols)Fig 3
natural_image
Exterior view of a black plastic device with open lid and ventilation slots (no text or symbols visible)Fig 4
natural_image
Black rectangular electronic device with a paper roller and ventilation slots (no visible text or symbols)natural_image
Close-up of hands holding a mechanical component, showing a process with an arrow and an arrow pointing to a section (no text or symbols visible)natural_image
Exterior view of a modern office building (no signage)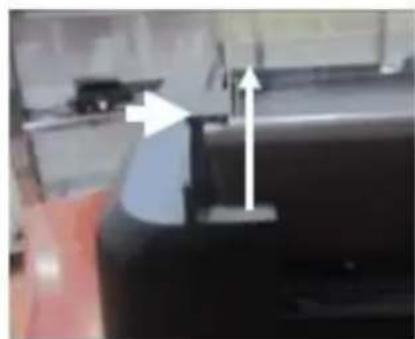
natural_image
Close-up of a mechanical component with directional arrows indicating movement or force (no visible text or symbols)Péče a čištění
TENTO NÁVOD NA OBSLUHU NEVYHADZUJTE.
NÁVOD NA OBSLUHU
DÔLEŽITÉ: PRED TÝM, AKO JEDNOTLIVÉ NÁSTAVCE UMIESTNITE ALEBO ODSTRÁNITE, ALEBO PRED ČISTENÍM SPOTREBIČA NAPÁJACÍ KÁBEL VŽDY VYPOJTE Z ELEKTRICKEJ SIETE.
Súčiastky:
natural_image
Close-up of a black electrical plug with a circular knob and a labeled pin (H), no text or symbols present.Fig 1

natural_image
Black plastic mechanical component with lid open, showing internal structure (no text or symbols)Fig 2
natural_image
Exterior view of a black and white flat-screen grater with lid and base (no text or symbols visible)Fig 3

natural_image
Exterior view of a black plastic device with open lid and ventilation slots (no text or symbols visible)Fig 4
natural_image
Black plastic printer holder with paper lid and scroll wheel (no visible text or symbols)natural_image
Close-up of gloved hands holding a dark object, with an arrow pointing to a section (no visible text or symbols)natural_image
Interior view of a modern office or retail space with a black electronic device and glass panel (no visible text or symbols)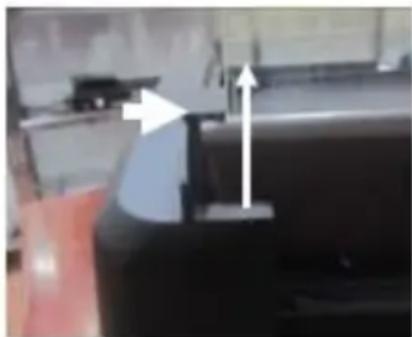
natural_image
Close-up of a black object with a white arrow pointing upward and a blue arrow pointing left, no visible text or symbols.Starostlivost' a čistenie
Dôležité: nikdy nedávajte termostat, zástrčku alebo sieťový kábel do vody alebo iných tekutín, len ich očistite vlhkou utierkou.
natural_image
Close-up of a black electrical connector with a circular knob and a labeled symbol (H) pointing to it, no readable text or symbols beyond the label.1.ábra

natural_image
Black plastic plastic tray with lid open, showing internal structure (no text or symbols)2.ábra
natural_image
Exterior view of a black and white stainless steel grater with lid and side panel (no text or symbols visible)3.ábra
natural_image
Exterior view of a black plastic appliance with open lid and internal compartments (no text or symbols visible)4.ábra
natural_image
Black plastic printer with paper roll and ventilation slots (no visible text or symbols)natural_image
Close-up of a black industrial machine component with a white arrow pointing to a section (no visible text or symbols)9.ábra

natural_image
Close-up of a black mechanical component with two white arrows pointing upward, no visible text or symbolsÁpolás és tisztítás
natural_image
Close-up of a black mechanical component with a circular knob and a labeled symbol (H) pointing to it, no readable text or symbols present.Fotografia 2
natural_image
Black plastic device with lid and mounting bracket (no text or symbols visible)Fotografia 3
natural_image
Black and white photo of a flat-screen grater or oven with lid and side panel (no text or symbols visible)Fotografia 4
natural_image
Exterior view of a black plastic appliance with open lid and internal grating (no text or symbols visible)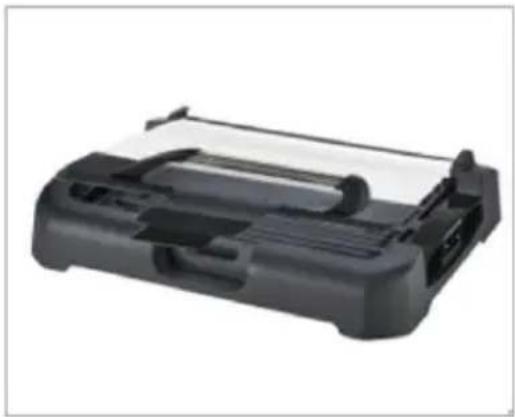
natural_image
Black plastic printer holder with paper lid and scroll wheel (no visible text or symbols)natural_image
Two-panel image showing gloved hands interacting with a mechanical component, one with an arrow pointing to a section (no text or symbols visible)natural_image
Close-up of a black industrial machine component with a white arrow pointing to a section (no visible text or symbols)natural_image
Close-up of a hand holding a small electronic device with two white arrows pointing to the top component (no visible text or symbols)natural_image
Close-up of a black electrical plug with a circular knob and a labeled pin (H), no text or symbols present.Fig 1

natural_image
Black plastic mechanical component with lid open, showing internal structure (no text or symbols)Fig 2

natural_image
Exterior view of a black and white electric cooker casing with lid and vent, showing internal components (no text or symbols)Fig 3
natural_image
Exterior view of a black plastic device with open lid and ventilation slots (no text or symbols visible)Fig 4

natural_image
Black plastic printer holder with paper lid and scroll wheel (no visible text or symbols)natural_image
Close-up of gloved hands performing a process with an arrow pointing to a component, no visible text or symbolsnatural_image
Interior view of a modern office or retail space with glass windows and a black counter (no visible text or symbols)
natural_image
Close-up of a hand pressing a component with an arrow indicating upward motion (no text or symbols visible)natural_image
Close-up of a black electrical connector with a circular knob and a metal rod, labeled with a circled number H (no text or symbols on the device itself)Fig 1
natural_image
Exterior view of a black plastic device housing with an open lid (no text or symbols visible)Fig 2
natural_image
Exterior view of a black grater with lid and side panel (no text or symbols visible)Fig 3
natural_image
Exterior view of a black plastic appliance with open lid and side panel (no text or symbols visible)Fig 4
natural_image
Black plastic electronic device with paper lid and ventilation slots (no visible text or symbols)natural_image
Close-up of gloved hands holding a dark object, with an arrow pointing to a section (no visible text or symbols)natural_image
Interior view of a modern office or lab space with glass partitions and a white arrow pointing to a component (no visible text or symbols)
natural_image
Close-up of a black mechanical component with a white arrow indicating upward motion (no visible text or symbols)Догляд і чищення
natural_image
Close-up of a black mechanical component with a circular knob and a labeled symbol (H) pointing to it, no readable text or symbols present.Рис. 1
Рис. 2

natural_image
Black plastic mechanical component with a transparent lid above it, no visible text or symbols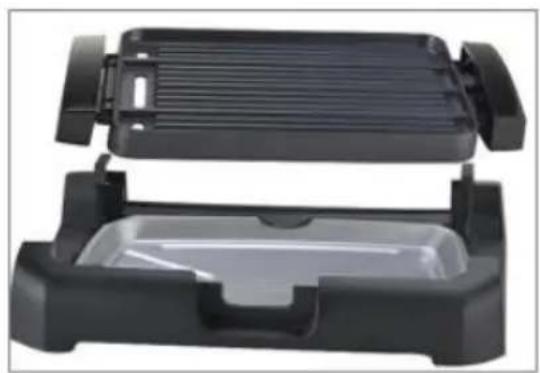
natural_image
Black and white photo of a flat-screen grater or blender with lid and side panel (no text or symbols visible)Рис. 3
Рис. 4
natural_image
Exterior view of a black plastic appliance with open lid and side panel (no text or symbols visible)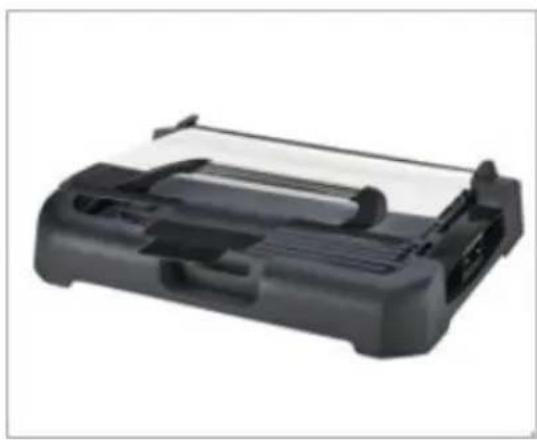
natural_image
Black rectangular electronic device with paper lid and ventilation slots (no visible text or symbols)natural_image
Close-up of a hand pressing down on a dark surface with an arrow pointing upward (no text or symbols visible)Рис. 7
natural_image
Close-up of a gloved hand pressing down on a mechanical component (no visible text or symbols)natural_image
Interior view of a modern office or retail space with glass partitions and a white arrow pointing to a section (no visible text or symbols)Рис. 9

natural_image
Close-up of a hand holding a black mechanical component with directional arrows indicating movement or force (no text or symbols visible)Очистка и уход
natural_image
Close-up of a black mechanical component with a circular knob and a labeled symbol (H) pointing to its edge, no readable text or symbols beyond the label.Fig 1

natural_image
Black plastic mechanical component with lid open, showing internal structure (no text or symbols)Fig 2
natural_image
Black and white photo of a flat-screen grater or blender with lid, showing internal structure and mounting bracket (no text or symbols visible)Fig 3

natural_image
Exterior view of a black plastic device with open lid and ventilation grilles (no text or symbols visible)Fig 4
natural_image
Black plastic electronic device with paper lid and ventilation slots (no visible text or symbols)natural_image
Close-up of hands holding a mechanical component, showing a process with an arrow indicating direction (no text or symbols visible)Fig. 7:
natural_image
Interior view of a modern office or retail space with a black counter and glass panel (no visible text or symbols)Fig 9:

natural_image
Close-up of a mechanical component with directional arrows indicating movement or force (no visible text or symbols)natural_image
Close-up of a black electrical connector with a circular knob and a labeled pin (H), no readable text or symbols beyond the label.Fig 1
natural_image
Black plastic mechanical component with lid open, showing internal structure (no text or symbols)Fig 2

natural_image
Black plastic kitchen grater with lid and side panel (no text or symbols visible)Fig 3

natural_image
Exterior view of a black plastic device with open lid and ventilation grilles (no text or symbols visible)Fig 4
natural_image
Black plastic electronic device with paper lid and ventilation slots (no visible text or symbols)natural_image
Close-up of gloved hands holding a mechanical component, showing a process with an arrow indicating direction (no text or symbols visible)Fig. 7:
natural_image
Close-up of a black industrial machine or conveyor system with a white arrow pointing to a component (no visible text or symbols)Fig 9:
natural_image
Close-up of a mechanical component with directional arrows indicating movement or force (no visible text or symbols)natural_image
Close-up of a black electrical connector with a circular knob and a labeled symbol (H) pointing to its side (no text or symbols on the device itself)Fig 1
natural_image
Two plastic electronic devices with open lids, one black and one gray, shown from different angles (no text or symbols visible)Fig 2
natural_image
Black and white photo of a flat-screen grater or oven with lid and side panels (no text or symbols visible)Fig 3

natural_image
Exterior view of a black plastic electronic device with open lid (no text or symbols visible)Fig 4
natural_image
Black plastic printer with paper roll and ventilation slots (no visible text or symbols)natural_image
Close-up of gloved hands holding a dark object, with an arrow pointing to a small white arrow on the left side (no text or symbols visible)Fig. 7:
natural_image
Close-up of a black industrial machine component in a factory setting (no visible text or symbols)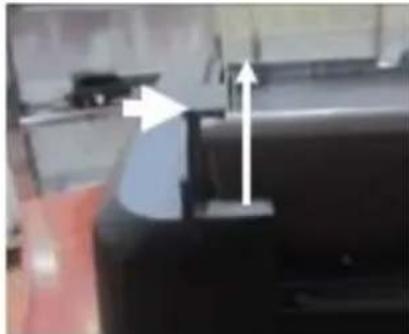
natural_image
Close-up of a black mechanical component with two white arrows pointing upward, no visible text or symbolsHoito ja puhdistus
natural_image
Close-up of a black electrical connector with a circular head and labeled symbol (H), no readable text or symbols present.Fig 1
natural_image
Black plastic mechanical component with lid open, showing internal structure (no text or symbols)Fig 2
natural_image
Exterior view of a black plastic oven or grating device (no text or symbols visible)Fig 3
natural_image
Exterior view of a black plastic electronic device with open lid and internal tray (no text or symbols visible)Fig 4

natural_image
Black rectangular electronic device with paper roll and ventilation slots (no visible text or symbols)- Fjern all emballasje og eventuelle klistremerker.
- Vask platen (C) og dryppannen (E) i varmt vann med et mildt oppvaskmiddel før bruk. Tørk dem grundig.
- Monter dryppannen (E) inni rammen (F), og sett den først under låsetappen på bakre del av rammen (fig.1) før du senker den på plass.
natural_image
Close-up of gloved hands holding a black object, with an arrow pointing to a small white object on the surface (no text or symbols visible)Åpne glasslokket:
natural_image
Interior view of a modern office or cinema space with a black desk and window (no visible text or symbols)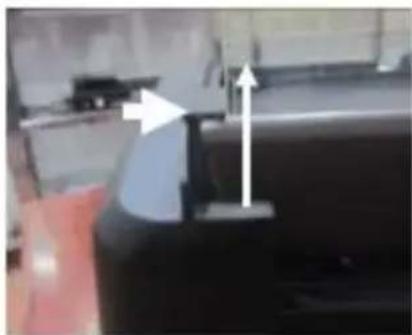
natural_image
Close-up of a hand holding a black object with an arrow pointing upward, no visible text or symbolsStell og rengjøring
GORENJE ∅NSKER DEG LYKKE TIL MED DET NYE APPARATET
- Shranite ta navodila.
- Odpiranje steklenega pokrova:
- Nega in čiščenje
- Njega i čišćenje
- Otvaranje staklenog poklopca:
- Nega i čišćenje
- Одржување и чистење
- Save these instructions.
- Main Functions:
- Important safeguards
- Components:
- How to Use
- Getting started
- How to lock or loosen the glass lid to base:
- How to open the glass lid:
- Care and Cleaning
- Environment
- Guarantee & service
- For personal use only!
- GORENJE
- WISHES YOU A LOT OF PLEASURE WHEN USING YOUR APPLIANCE
- DE
- Péče a čištění
- Súčiastky:
- Starostlivost' a čistenie
- Ápolás és tisztítás
- Догляд і чищення
- Очистка и уход
- Hoito ja puhdistus
- Åpne glasslokket:
- Stell og rengjøring
- GORENJE ∅NSKER DEG LYKKE TIL MED DET NYE APPARATET
Brand : GORENJE
Model : TG2000CB
Category : Griddle