
UR 18DSDL - Radio HiKOKI - Free user manual and instructions
Find the device manual for free UR 18DSDL HiKOKI in PDF.


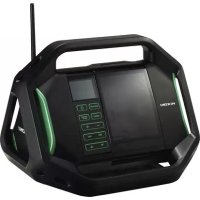
| Product type | Cordless job site radio |
| Brand | HiKOKI |
| Model | UR 18DSDL |
| Dimensions (W x H x D) | 300 x 250 x 200 mm |
| Weight (without battery) | 3.5 kg |
| Power source | HiKOKI 18 V Li-ion battery (BSL18 series) |
| Battery type | 18 V / 2.0 Ah, 5.0 Ah or 6.0 Ah (not included) |
| Main functions | AM/FM radio, Bluetooth, USB charging port, 3.5 mm auxiliary input |
| Output power | 10 W (5 W x 2 stereo) |
| Tuner | Digital with 20 FM / 10 AM presets |
| Bluetooth | Version 5.0, range 10 m |
| USB port | 5 V / 2.1 A for smartphone charging |
| Protection rating | IP54 (splash and dust resistant) |
| Battery life | Up to 30 h with 5.0 Ah battery (medium volume) |
| Care and cleaning | Wipe with a soft dry cloth; do not use solvents |
| Safety | Use only original HiKOKI batteries; do not expose to water |
| Spare parts and repairability | Parts available via HiKOKI after-sales service; repairability score 8.5/10 |
| Included accessories | Quick start guide |
Frequently Asked Questions - UR 18DSDL HiKOKI
User questions about UR 18DSDL HiKOKI
0 question about this device. Answer the ones you know or ask your own.
Ask a new question about this device
Download the instructions for your Radio in PDF format for free! Find your manual UR 18DSDL - HiKOKI and take your electronic device back in hand. On this page are published all the documents necessary for the use of your device. UR 18DSDL by HiKOKI.
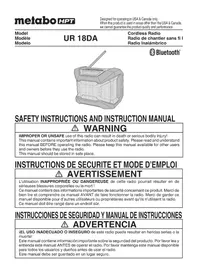
USER MANUAL UR 18DSDL HiKOKI
natural_image
Technical line drawing of a device with control panel and buttons (no readable text or symbols)
en Handling instructions
de Bedienungsanleitung
fr Mode d'emploi
it Istruzioni per l'uso
nl Gebruiksaanwijzing
es Instrucciones de manejo
pt Instruções de uso
sv Bruksanvisning
da Brugsanvisning
no Bruksanvisning
fi Käyttöohjeet
el Οδηγίες χειρισμού
pl Instrukcja obsługi
hu Kezelési utasítás
cs Návod k obsluze
tr Kullanım talimatları
ro Instructiuni de utilizare
⑤ Navodila za rokovanje
sk Pokyny na manipuláciu
bg Инструкция за експлоатация
sr Uputstvo za rukovanje
hr Upute za rukovanje
UK Інструкції щодо поводження з пристроєм
ru Инструкция по эксплуатации


1
2

3

4

5
6

7

8
9

10
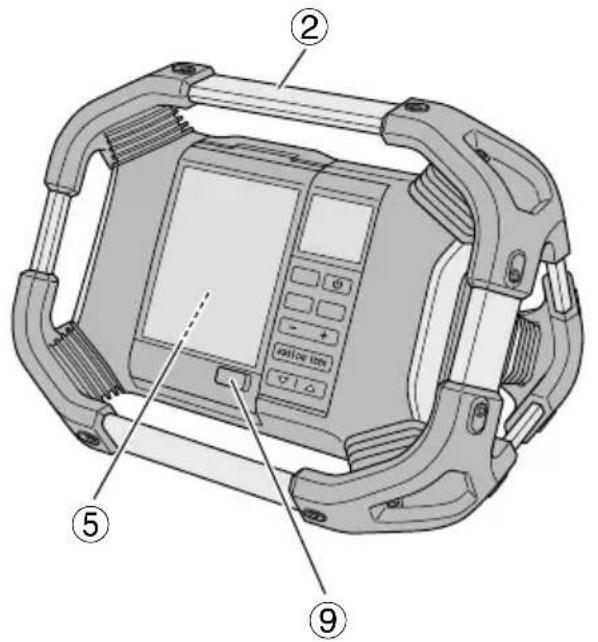
NAMES OF PARTS
| 1 | FM antenna | 18 | Select button (-) | 35 | Rubber cap |
| 2 | Handle | 19 | Select button (+) | A | DAB broadcast indicator |
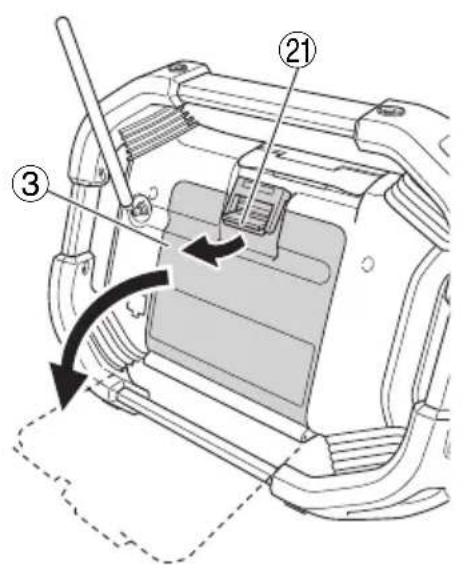
| 3 | Rear cover | 20 | Play / Stop button (for bluetooth mode) | B | Bluetooth indicator |
| 4 | Speaker | 21 | Tab | C | AM broadcast indicator |
| 5 | Storage case for external devices | 22 | AA Battery box | D | AUX indicator |
| 6 | AC adapter port | 23 | Lid | E | FM broadcast indicator |
| 7 | AUX input port | 24 | AC adapter | F | RDS indicator |
| 8 | USB charging port | 25 | Rubber cover | G | Stereo indicator |
| 9 | Cable access hole | 26 | Battery | H | Alarm indicator |
| 10 | Power button | 27 | Terminals | I | Buzzer alarm indicator |
| 11 | Source select button | 28 | Front cover | J | Radio ON alarm indicator |
| 12 | Menu button | 29 | Stereo mini plug connector cable | K | Sleep timer indicator |
| 13 | Enter / Information button | 30 | Smartphone | L | Battery exhausted indicator |
| 14 | Volume button (-) | 31 | Audio output port | M | Information indicator |
| 15 | Volume button (+) | 32 | Recharge cable holder | N | Clock |
| 16 | Search button (-) | 33 | Holder | P | AM/PM indicator |
| 17 | Search button (+) | 34 | USB charging cable |
CORDLESS RADIO SAFETY WARNINGS

WARNING
Read all safety warnings and all instructions.
Failure to follow the warnings and instructions may result in electric shock, fire and/or serious injury.
Save all warnings and instructions for future reference.
- Use only the specified power supply voltage.
- Use of any other voltage may lead to fire or electric shock.
- Avoid damaging the AC adapter cord.
- Do not modify, forcibly bend, twist or pull the cord, place heavy objects on it or place it near heating appliances.
- When not in use, remove the power plug (AC adapter) from the electric socket and from the radio. Failure to do so may lead to electric shock or fi re.
- Do not touch the power plug (AC adapter) with wet hands.
- Doing so may result in electric shock.
- Do not use the radio in the bathroom or shower.
- Do not use the radio in wet or damp places or in the rain.
- Doing so may result in electric shock, emission of smoke or malfunction.
- Do not touch the FM antenna or power plug (AC adapter) during thunderstorms.
- Doing so may result in electric shock.
- Do not disassemble or modify the radio.
- Doing so may result in electric shock or fire. Inspections and repairs should be performed by the store where purchased or by a HiKOKI power tool service center.
- Insert the power plug (AC adapter) securely as far as it will go.
- Dust or dirt between the power plug and the electric socket may lead to fi re. Remove the power plug periodically and wipe off any dust or dirt with a dry cloth.
-
Do not let any unspecified objects or water get inside the radio body.
-
With the exception of the AC adapter and the rechargeable battery, if any metal or flammable object or water gets inside the back door, it may lead to electric shock or fi re.
• Take care to prevent iron powder from the bass refl ex speakers, dust or water getting into the radio. -
Do not sit or stand on the radio.
- Doing so may lead to accidents or malfunction.
- Do not place the radio on an unstable surface or in a high place. Do not hang the radio from the handle.
- The radio may fall and cause injury or malfunction.
- When no slide battery is loaded, attach the slide terminal cover to the terminal to prevent cuts and other injuries that may result from touching the terminal area.
- Handle the backup batteries with care.
- Danger of explosion if battery is incorrectly replaced.
Replace only with the same or equivalent type.
- Incorrect handling of the batteries may result in rupture or leakage, leading to fire, injury or pollution of the surrounding area. Be sure to observe the following precautions.
- Use only the specified batteries
- Do not heat or disassemble the batteries
- Do not throw the batteries into fire or water
- Do not charge the batteries
- Make sure the batteries are correctly oriented and avoid short-circuiting
- Do not reuse batteries or use different types of battery
- Remove the batteries when the radio is not in use In the event of leakage from the batteries, wipe the battery case clean.
Should any battery fluid get on your body, wash it off carefully.
If _i is displayed when you turn the power on with the rechargeable battery inserted, the battery power is low.
Power the radio from the AC adapter or insert a charged battery.
English
- Recharge only with the charger specified by the manufacturer.
- A charger that is suitable for one type of rechargeable battery may create a risk of fire when used with another battery.
- Use the radio only with specifically designated rechargeable battery.
- Use of any other rechargeable battery may create a risk of injury and fire.
- When rechargeable battery is not in use, keep it away from other metal objects like paper clips, coins, keys, nails, screws, or other small metal objects that can make a connection from one terminal to another.
- Shorting the battery terminals together may cause burns or a fire.
- Under abusive conditions, liquid may be ejected from the battery; avoid contact. If contact accidentally occurs, fl ush with water. If liquid contacts eyes, additionally seek medical help.
- Liquid ejected from the battery may cause irritation or burns.
- Have your radio serviced by a qualified repair person using only identical replacement parts.
- This will ensure that the safety of the radio is maintained.
-
The main unit and adapter shall not be exposed to dripping or splashing and that no objects filled with liquids, such as vases, shall be placed on the unit and adapter.
-
The batteries (battery pack or batteries installed) shall not be exposed to excessive heat such as sunshine, fire or the like.
-
The MAINS plug of adapter is used as the disconnect device, the disconnect device shall remain readily operable.
PROTECTING YOUR HEARING
Continuous exposure to loud noise may result in permanent hearing loss. The louder the volume, the shorter the time in which hearing loss may occur.
If you listen to large volume sound over a long period of time, your ears will become accustomed to it. This creates the illusion that the volume level is appropriate, despite the fact that it may be damaging your hearing.
Observe the following to prevent hearing loss.
CAUTION
- Make sure you give your ears a rest by taking regular breaks and not listening for long periods of time.
Even when set at safe volume levels, listening continuously over long periods of time may cause hearing loss.
- Be careful not to increase the volume as your hearing adapts to the sound output.
Beware of being accustomed to a certain volume level. Adjust the volume to a safe level before your ears become accustomed to loud volumes.
- If your ears begin to ring, if you feel any discomfort, or if conversation seems faint or indistinct, discontinue listening to music and have your ears examined by a doctor.
PRECAUTIONS WHEN CONNECTING TO EXTERNAL EQUIPMENT
Unexpected problems may result in the loss or corruption of data stored in smartphones and other peripheral equipment connected to the radio. With this possibility in mind, a backup of the data should always be made in advance.
Note that HiKOKI cannot be held responsible for the corruption or loss of data stored within smartphones and other peripheral equipment connected to the radio, nor any damage to the equipment itself.
MAIN FUNCTIONS
○ Playback of Bluetooth devices
○ Manual/Auto select
○ Save (Memory) (10 DAB + 10 AM + 10 FM stations)
○ Radio On/Off /Alarm
- Dock for playing audio from smartphones and portable audio players
○ High-quality stereo speaker
○ Smartphone and cell phone recharging
○ Compatibility with HiKOKI power tool rechargeable battery and AC adapter
SPECIFICATIONS
| Frequency band | DAB / DAB+: 174.928 to 239.200 MHz (BAND III)FM: 87.5 to 108 MHzAM: 522 to 1629 KHz |
| Antenna | FM: Rubber antennaAM: Ferrite bar antenna (built-in) |
| Speaker | 90 mm (8 Ω) × 2 |
| Max. power output | AC adapter: 5 W × 214.4 V: 6 W × 218 V: 7 W × 2 |
| Power supply | Slide battery: DC 14.4 V, 18 V |
| Household power supply(using provided AC adapter) | |
| Backup batteries: DC 3 V, two AA batteries | |
| Bluetooth | Bluetooth Ver. 4.0Profi le:A2DP(Advanced Audio Distribution Profi le)AVRCP(AV Remoto Control Profi le)Send/receive Sensitivity: Class 2 |
| Exterior dimensions | L 405 mm x W 312 mm x H 265 mm(with antenna refracted) |
| Weight | 4.0 kg |
☐ For applicable power supplies see user instructions: Applicable power suppliers: Dong Guan Sun Hung Kin Electrical Co., Ltd. (Manufacture)
HKP12-1201200dV, HKP12-1201200dB (Model)
○ Only below slide battery could be used (Model) BSL1430: 14.4 V 3000 mAh
Lithium battery
(Model) BSL1830: 18 V 3000 mAh
Lithium battery
(Manufacture) Koki Holdings Co., Ltd.
SYMBOLS
WARNING
The following show symbols used for the machine. Be sure that you understand their meaning before use.

UR18DSDL : Cordless radio
 | For applicable power supplies see user instructions. |
 | Only for EU countriesDo not dispose of electric tools together with household waste material!In observance of European Directive 2002/96/EC on waste electrical and electronic equipment and its implementation in accordance with national law, electric tools that have reached the end of their life must be collected separately and returned to an environmentally compatible recycling facility. |
 | Power button |
 | Source select button |
 | Menu button |
 | Enter / Information button |
 | Volume button |
 | Search button |
| Select button | |
 | Play / Stop button |
 | Buzzer alarm indicator |
 | Radio ON alarm indicator |
 | Battery exhausted indicator |
STANDARD ACCESSORIES
In addition to the main unit (1 unit), the package contains the accessories listed in the below.
○ AC adapter
○ AA batteries
○ Recharge cable holder ....1
(for Apple Lightning connector)
* Android holder is built into the main unit.


natural_image
Simple line drawing of a rectangular device with two connectors and a clip (no text or symbols)Standard accessories are subject to change without notice.
PRIOR TO OPERATION
● Installing backup batteries
Time settings and radio station frequencies can be saved by installing batteries in the unit.
- To access the storage box for the backup batteries, unlatch the tab and open the rear cover. (Fig. 1)
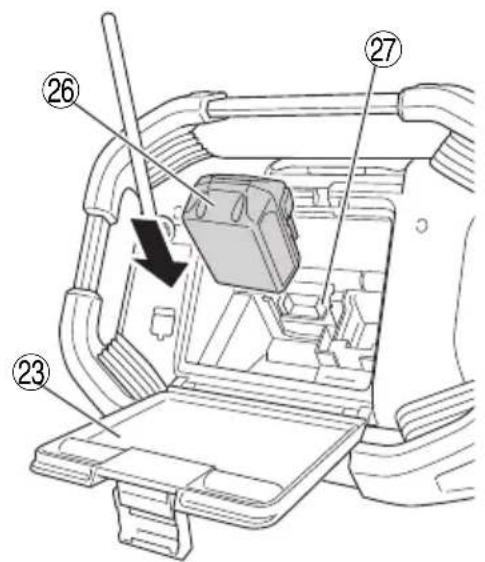
- Open the backup battery storage box and insert the two AA batteries (included) into the storage box in the direction indicated. (Fig. 2)
NOTE
○ Do not reverse battery polarity (+/-) when installing the batteries.
○ Do not mix old and new batteries. Always replace both batteries at the same time.
- Do not burn batteries or dispose them as household waste.
● AC adapter installation
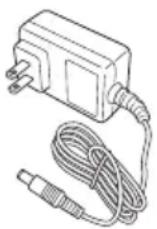
Power can be supplied by plugging the AC adapter (included) into a standard household outlet.
Pull back the rubber cover and connect the AC adapter to the AC adapter port. (Fig. 3)
Next, plug the AC adapter into an electrical outlet.
NOTE
When used together with the batteries, the AC adapter is the main power source and no battery power is consumed.
○ When used together with the AC adapter, the batteries will not recharge as this device has no recharge function.
Storing the AC adapter
The AC adapter can be stored in the compartment behind the rear cover. (Fig. 4)
● Battery installation
CAUTION
Do not touch the terminals.
Doing so may result in cuts to the hand or other injuries.
Only a 14.4 V or 18 V slide-type battery can be used with this device.
Installing the battery
Open the rear cover, align the battery with the grooves of this device and slide it all the way in. (Fig. 5)
NOTE
☐ Do not apply any excessive pressure when inserting the battery. If the battery does not easily slide into place, it is not being inserted properly.
Check to see if the battery is facing the correct direction and that there is nothing obstructing the path of insertion.
○ If ☐ is displayed when the device is switched on following battery installation, the battery charge is low.
In this situation, either use the AC adapter or install a fully charged battery.
● Changing the date display
2The following selections are available for date display.
YYYY/MM/DD (Year/Month/Day)
MM/DD/YYYY (Month/Day/Year)
DD/MM/YYYY (Day/Month/Year)
- Press the Menu button.

- Press the Select button and display "Date display
Date display
- Press the Enter / Information button.

- Press the Select button and display the date display selection of your choice.
YYYY/MM/DD
- Press the Enter / Information button.

- Set the date
Using the control panel, follow the steps below to set up the date.
- Press the Menu button.

English
- Press the Select button and display "Date adjust

Date adjust
- Press the Enter / Information button.

- Press the Select button and adjust "year" digits.

2014
- Press the Enter / Information button.

- Press the Select button and adjust "month" digits.
03 / 01
- Press the Enter / Information button.

- Press the Select button and adjust "day" digits.

03 / 31
- Press the Enter / Information button.

- Set the time
Using the control panel, follow the steps below to set up the time.
- Press the Menu button.

- Press the Select button and display "Clock adjust

Clock adjust
- Press the Enter / Information button.

- Press the Select button and adjust "hour" digits.

12:00
- Press the Enter / Information button.

- Press the Select button and adjust "minute" digits.

12:55
- Press the Enter / Information button.

- Press the Select button and select "12rH" 24 H

12H 24H
- Press the Enter / Information button.

● Synchronize the time and date (DAB mode only)
- Press the Source select button and select "DAB

DAB
- Press the Select button and display "Date Time Sync

Date Time Sync
- Press the Enter / Information button.

- Press the Select button and display "ON". OFF
ON
- Press the Enter / Information button.

If "ON selected, your radio can be synchronized the time and date.
LISTENING TO RADIO BROADCASTS
- Selecting DAB, FM or AM bandwidth
- Power ON.

- Press the Source select button and select the radio's bandwidth (DAB/FM/AM).

DAB AM FM
- Selecting stations
Auto station selection
A long press of the Search button will automatically scan and search clear station broadcast frequencies. To select the next station broadcast, long press the Search button again.

(Long Press)
Manual station selection
Press the Search button to change frequencies and select a station.

Preset station selection
Press the Select button to quickly switch between preset stations.

At the time of purchase, there are no preset stations. Follow the steps below to register preset stations.
- Tune into a radio station of your choice and press the Menu button.

- Press the Select button and display "Preset

Preset
- Press the Enter / Information button.

- Press the Select button and select a preset number from 0 to 9 for registering the station.

Preset 2
- Press the Enter / Information button to register the station.

This feature allows the automatic registration of available radio stations in the area of use.
(Maximum of 10 stations)
- Press the Menu button.

- Press the Select button and display "Auto scan".
Auto scan
- Press the Enter / Information button to begin auto preset registration of available radio stations.

NOTE
○ A broadcasting radio station will not be registered if its frequency is weak.
○ Depending on location of use, non-radio signals such as noise may be registered.
○ See page 11 when recharging with USB in "DAB" or "FM" mode.
● For better reception
FM broadcasts
Adjust reception by changing the facing and angle of the antenna.
"Stereo" will be displayed when receiving a stereo broadcast.
Switching to monaural reception can reduce noise.
- Press the Menu button.

- Press the Select button and display " Stereo

Stereo
- Press the Enter / Information button.

- Press the Select button and display "OFF
OFF
- Press the Enter / Information button to complete setup.

AM broadcasts
Move the device and face it in a direction in which the reception is best.
Use the Volume button to adjust the volume from 0 to 30.

DRC (DYNAMIC RANGE CONTROL) FOR DAB
DRC can make quieter sounds easier to hear when your radio is used in a noisy environment.
- Press the Menu button.

- Press the Select button and display "DRC

DRC
- Press the Enter / Information button.

- Press the Select button and display "OFF" "ohalf" "Full".

Half
- Press the Enter / Information button to complete adjustment.

ADJUSTING SOUND QUALITY
Sound quality (Bass/Treble) can adjusted according to preference.
- Press the Menu button.

- Press the Select button and display "Select EQ".

Select EQ
- Press the Enter / Information button.

- Press the Select button and display "Bass 0 - 5" is for maximum bass output.

- Press the Select button and display "Treble 0 - 5". "5" is for maximum treble output.

- Press the Enter / Information button to complete adjustment.

NOTE
☐ The radio does not allow Bass or Treble settings of "5" if the volume level is 25 or more.
☐ If the Bass or Treble is set at "5", the setting will be automatically adjusted down to "4" when the volume level is raised above 25. Moreover, when the volume level is lowered to 24 or less, the reduced setting will automatically revert back to "5".
USING EXTERNAL DEVICES FOR AUDIO PLAYBACK
Audio can be played back from smartphones, portable music players and other external devices.
CAUTION
Make sure to lower the volume output of the player before playback.
NOTE
There are two types of connector cable, straight type and L type.
Use an L type cable when connecting or storing large external devices.
- Open the external device storage area
Switch the radio's power OFF and open the front cover. (Fig. 6)
- Connect an external device
Using a commercially available stereo mini-plug connector cable (ø3.5 mm), connect the radio's AUX input port to the audio output port of the external device. (Fig. 7)
- Secure the external device
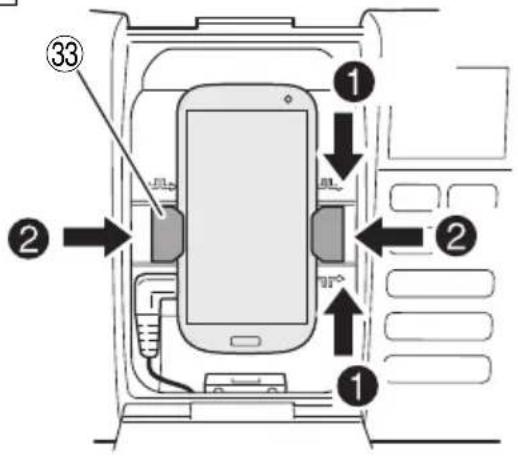
The right and left holders can be moved to the right or left by pinching the top and bottom of each holder.
Secure the external device between the two holders. (Fig. 8)
English
4. Playback
With the radio's power switched ON, press the Source select button and display "AUX".


Make sure to lower the volume output of the external device before music playback.
Volume can be adjusted through the radio.

(Volume)
Close the front cover after selecting tracks and adjusting volume.
NOTE
You may be unable to raise the volume level if the volume level of the external device is too low.
NOTE
When connecting a smartphone, please be aware that the ringtones of incoming calls for some models are not output to speaker.
○ External devices may be damaged if used in locations exposed to the sun or hot temperatures.
○ See page 11 when recharging with USB in AUX" mode.
CONNECTING WITH BLUETOOTH DEVICES
If smartphones, portable music players and other devices are Bluetooth compatible, audio can be output from this product via Bluetooth communication.
1. Pairing (Registering devices)
Pairing is required for Bluetooth communication. Set your Bluetooth device to pairing mode. (For instructions on pairing, see the manual for the Bluetooth device to be used.)
2. Set the radio for pairing mode
Press the Source select button and display "Bluetooth".


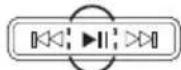
Long press the Play / Stop button (located between the Search buttons) until the displayed "Bluetooth" is flashing.
(Long Press)

Select "UR18DSDL" on your Bluetooth device's list of connected devices to complete the pairing.
3. Input pass key
Some Bluetooth devices may require pass key input when connecting.
If this should be the case, input "0000". Also, if connection authorization is requested, input "authorized".
Connection is successful once "Connected" is displayed.
NOTE
Once paired, connection will be automatically established the next time the devices are switched on. If the Bluetooth connection is lost, re-pair the devices.
○ No more than two devices can be paired simultaneously.
○ Connection with all Bluetooth devices cannot be guaranteed. Before attempting connection, always check for compatibility.
4. Playback
Make sure to lower the volume output of the Bluetooth device before music playback.
Volume can be adjusted through the radio.
Use the Bluetooth device to select tracks.
You can also select tracks with the radio's control buttons.

(Volume)

(Play / Stop, Search)
NOTE
- Some Bluetooth devices may not respond to the radio's control buttons.
○ See page 11 when recharging with USB in "Bluetooth" mode.
USING THE TIMER FUNCTION
- Setting the sleep timer
Power can be set to automatically switch OFF after a certain amount of time has elapsed by using the sleep timer function.
- Press the Menu button.

- Press the Select button and display "Sleep
Sleep
- Press the Enter / Information button.

- Press the Select button to adjust the time period to elapse (between "0 - 90" minutes) before the power is switched OFF.

30 Min
- Press the Enter / Information button.

- "Slewll be displayed on the LCD.
To check the remaining time, press the Menu button once again and select "Sleep".
To cancel the sleep timer, set the time to switch OFF at 0 minutes.
● Setting the alarm (Buzzer alarm)
The radio can be set up to activate a beeping alarm at a specific time.
- Press the Menu button.

- Press the Select button and display "Buzzer alarm".

Buzzer alarm
- Press the Enter / Information button.

- Press the Select button and display "ON".

ON
- Press the Enter / Information button.

- Press the Select button and adjust "hour" digits.

12:00
- Press the Enter / Information button.

- Press the Select button and adjust "minute" digits.

12 : 30
- Press the Enter / Information button.

- Press the Select button to set up repeat.
| Once | Once |
| Daily | Daily |
| Weekdays only | Weekday |
| Saturday and Sunday only | Weekend |
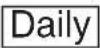
- Press the Enter / Information button to complete setup.

will be displayed on the LCD.
To cancel the alarm setting, go to "Buzzer alarm" once again and change the setting to "OFF".
The alarm sound will automatically switch off after 10 minutes. The sound can also be switched off by pressing any button.
NOTE
The volume of the buzzer alarm cannot be changed.
● Setting the radio ON alarm timer
Using the radio ON alarm timer function, the radio can be set up to switch ON at a specific time to enjoy a station broadcast.
- Press the Menu button.

- Press the Select button and display "Radio alarm

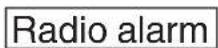
- Press the Enter / Information button.

- Press the Select button and display "ON


- Press the Enter / Information button.

- Press the Select button and adjust "hour" digits.


- Press the Enter / Information button.

- Press the Select button and adjust "minute" digits.


- Press the Enter / Information button.

- Press the Select button to set up repeat.
| Once | Once |
| Daily | Daily |
| Weekdays only | Weekday |
| Saturday and Sunday only | Weekend |


- Press the Enter / Information button.

- Select radio bandwidth.
Press the Select button to display "DAB", "AM" or "FM".

- Press the Enter / Information button.

- Press the Select button to display a preset station.


To select a station by broadcast frequency, use the Search button.

- Press the Enter / Information button to complete setup.

will be displayed on the LCD.
To cancel the radio alarm setting, go to "Radio alarm" once again and change the setting to "OFF".
NOTE
The radio's volume will be at the level when the radio was last switched OFF.
RECHARGING YOUR SMARTPHONE
Devices such as a smartphone and mobile phone can be recharged by connecting the device to this radio.
The recharge function is only available for the "DAB", "FM", "AUX" or "Bluetooth" mode. (Recharging cannot be done in "AM" mode.)
NOTE
When recharging in "AUX" or "Bluetooth" mode, set the volume output at 20 or less.
The radio is designed to deactivate USB output and disable the recharging of smartphones and mobile phones when the volume is at 21 or more. (For "DAB" or "FM" mode, USB recharging will continue even if the volume output is 21 or more.)
On rare occasions, sound output may be interrupted or power could shutdown during USB recharging. If either should occur, lower the volume level or stop recharging with the USB.
The radio is designed to deactivate USB output and disable the recharging of smartphones and mobile phones when the power level of the battery is low. Should the aforementioned occur, recharge the battery or replace with a fully charged battery.
○ If the voltage is low when the AC adapter is in use, the USB output may be cut off, discontinuing any recharging.
-
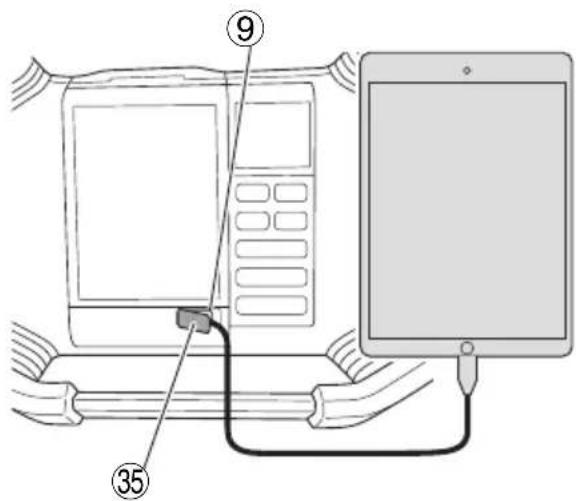
Using a commercially available USB connection/recharge cable, connect to the USB charging port located in the radio's storage case for external devices. (Fig. 9)
-
Secure the smartphone with the holders and close the cover. (Fig. 8)
(See "Secure the external device" on page 9)
NOTE
Use a fully charged battery when using a battery as this device's power source. You will not be able to recharge smartphones or mobile phones when the battery power level becomes low.
○ The time required for charging varies in accordance with the smartphone or mobile phone being recharged.
○ Do not use the recharge function for any devices other than a smartphone or mobile phone.
○ The radio may not be able to recharge some smartphone or mobile phone models.
Two recharge cable holders, one for Android and the other for Apple (Lightning connector) are included.
Select the holder that best suits your device.
Should your device be too large for the radio's external device storage case, draw the cable through the cable access hole. (Fig. 10)
English
NOTE
As the recharge cable holders are designed for standard size terminals, the holders may not be able to securely fasten certain terminals depending on the recharge cable used.
MAINTENANCE AND INSPECTION
WARNING
When not in use or during inspection and maintenance, be sure to remove the AC plug, rechargeable battery and backup batteries.
● Inspecting the mounting screws
Regularly inspect all mounting screws and ensure that they are properly tightened. Should any of the screws be loose, retighten them immediately. Failure to do so could result in serious hazard.
● Cleaning on the outside
When the radio is stained, wipe with a soft dry cloth or a cloth moistened with soapy water.
Do not use chloric solvents, gasoline or paint thinner, for they melt plastics.
● Storing the Radio
Do not store the radio in the following places.
○ Within reach of or easily accessible to children
○ In humid or dusty places
○ In high temperature such as inside a car or exposed to direct sunlight
○ In extremely cold places or directly exposed to cold draughts
○ Where the temperature changes drastically
○ Where it is exposed to smoke or steam such as near a cooking appliance or humidifier
MODIFICATIONS
HiKOKI Power Tools are constantly being improved and modified to incorporate the latest technological advancements.
Accordingly, some parts may be changed without prior notice.
GUARANTEE
We guarantee HiKOKI Power Tools in accordance with statutory/country specific regulation. This guarantee does not cover defects or damage due to misuse, abuse, or normal wear and tear. In case of complaint, please send the Power Tool, undismantled, with the GUARANTEE CERTIFICATE found at the end of this Handling instruction, to a HiKOKI Authorized Service Center.
NOTE
Due to HiKOKI's continuing program of research and development, the specifications herein are subject to change without prior notice.
natural_image
Pure technical line drawing of a mechanical component without any text, numbers, or symbolsnatural_image
Simple line drawing of a flatboard with a clip and two connectors (no text or symbols)(Lecture/Pause, Recherche)
REMARQUE
natural_image
Line drawings of three electronic components: a charging plug, two cylindrical batteries, and a battery pack (no text or symbols)(Manufacture) Koki Holdings Co., Ltd.
SYMBOLEN
WAARSCHUWING
natural_image
Simple line drawing of a clipboard with a handle and two buttons, no text or symbols present.VERBINDING MET BLUETOOTH-APPARATEN
natural_image
Simple line drawing of a rectangular frame with a central connector and two side connectors (no text or symbols)natural_image
Simple line drawing of a flatboard with a clip and two connectors (no text or symbols)RECARREGAR O SEU SMARTPHONE
natural_image
Line drawings of three electronic components: a power adapter, two batteries, and a control panel (no text or symbols)natural_image
Simple line drawing of a clipboard with a clip and two buttons (no text or symbols)DD/MM/ÄÄÄÄ (Dag/Måned/Är)
- Tryk på knappen Menu.

ORHOLDSREGLER VED TILKOPLING TIL EKSTERNT UTSTYR
natural_image
Simple line drawing of a mechanical component with no text or symbols● Stille inn radioen PÅ alarm timer
VEDLIKEHOLD OG INSPEKSJON
ADVARSEL
natural_image
Simple line drawing of a rectangular frame with a central connector and two side connectors (no text or symbols)natural_image
Simple line drawing of a rectangular frame with a central connector and two side connectors (no text or symbols)natural_image
Simple line drawing of a rectangular frame with a central connector and two side connectors (no text or symbols)natural_image
Simple line drawing of a flatboard with a clip and two connectors (no text or symbols)natural_image
Simple line drawing of a clipboard with two buttons and a clip (no text or symbols)RRRR/MM/DD (Rok/Měsíc/Den)
MM/DD/RRRR (Měsíc/Den/Rok)
DD/MM/RRRR (Den/Měsíc/Rok)
natural_image
Line drawings of three electronic components: a power adapter, two batteries, and a control panel (no text or symbols)natural_image
Simple line drawing of a mechanical component with no text or symbolsAAAA/LL/ZZ (An/Lună/Zi)
LL/ZZ/AAAA (Lună/Zi/An)
ZZ/LL/AAAA (Zi/Lună/An)
natural_image
Simple line drawing of a rectangular frame with a central connector and two side connectors (no text or symbols)natural_image
Simple line drawing of a mechanical component with two mounting brackets and a clip (no text or symbols)natural_image
Simple line drawing of a mechanical component with no text or symbolsnatural_image
Simple line drawing of a clipboard with a handle and two buttons (no text or symbols)natural_image
Line drawings of three electronic components: a charging plug, two cylindrical batteries, and a battery pack (no text or symbols)Standardna oprema može se promijeniti bez prethodne najave.
PRIJE RADA
● Instalacija rezervnih baterija
Postavke vremena i frekvencije radio stanica mogu se spremiti ugradnjom baterija u jedinicu.
- Za pristup kutiji za pohranu rezervnih baterija, oslobodite karticu i otvorite stražnji poklopac. (Slika 1)
- Otvorite kutiju za pohranu rezervnih baterija i umetnite dvije AA baterije (uključene) u kutiju za pohranu u prikazanom smjeru. (Slika 2)
NAPOMENA
○ Nemojte obrnuti polaritet baterije (+/-) prilikom instaliranja baterija.
○ Nemojte miješati stare i nove baterije. Uvijek zamijenite obje baterije istovremeno.
○ Nemojte spaljivati baterije ili ih bacati s kućnim otpadom.
● Instalacija AC adaptera
natural_image
Simple line drawing of a clipboard with a handle and two buttons (no text or symbols)natural_image
Simple line drawing of a rectangular frame with a central connector and two side connectors (no text or symbols)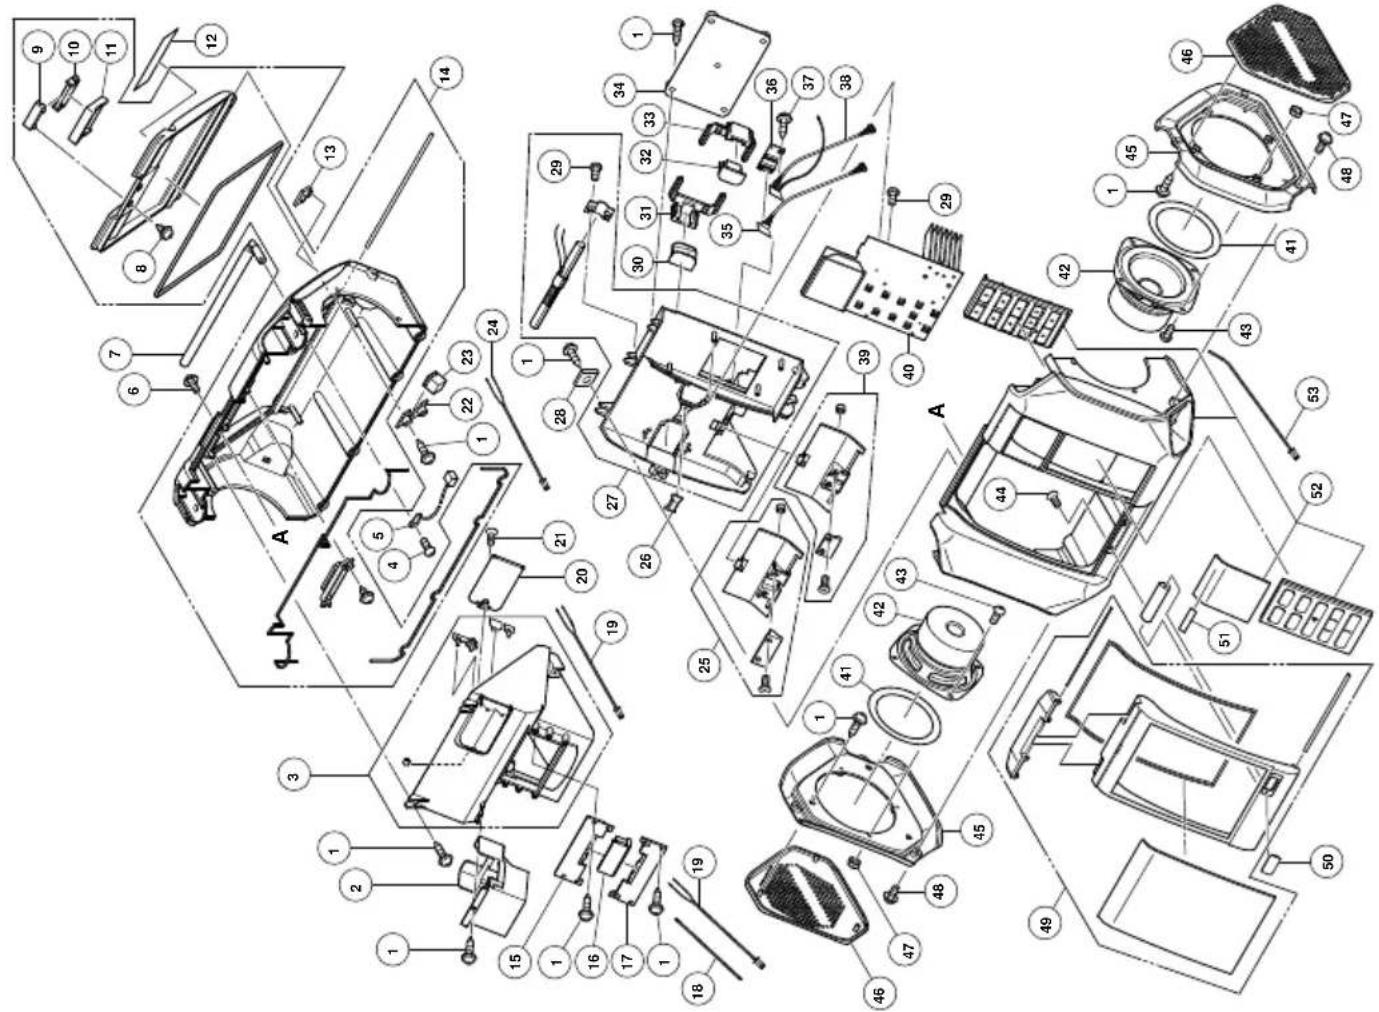
| ITEM NO. | PART NAME Q'TY | |
| 501 | AC ADAPTER | 1 |
| 502 | AA BATTERY | 2 |
| ITEM NO. | PART NAME Q'TY | |
| 31 LEFT LATCH MOUNTING | 1 | |
| 32 LIGHT LATCHING | 1 | |
| 33 RIGHT LATCH MOUNTING | 1 | |
| 34 LATCHING PLATE | 1 | |
| 35 PCB ASS'Y (USB) | 1 | |
| 36 PCB PLATE | 1 | |
| 37 TAPPING SCREW D2X10 4 | ||
| 38 PCB ASS'Y (AUX) | 1 | |
| 39 CABLE HOLDER (APPLE) | 1 | |
| 40 PCB ASS'Y (A) | 1 | |
| 41 SPEAKER RESISTNCE STRIP 2 | ||
| 42 SPEAKER (DSDL) | 2 | |
| 43 MACHINE SCREW M3X6 | 8 | |
| 44 TAPPING SCREW D2X7 | 2 | |
| 45 SIDE PLATE | 2 | |
| 46 SPEAKER GRILL SET | 2 | |
| 47 NUT M3 | 8 | |
| 48 HEX. SOCKET HD. BOLT M4X8 | 6 | |
| 49 FRONT COVER SET | 1 | |
| 50 USB EXIT COVER | 1 | |
| 51 BLUETOOTH LABEL 1 | ||
| 52 FRONT CABINET SET A | 1 | |
| 53 CONNECTOR D | 1 | |
| 71 HEX. SOCKET HD. BOLT M5X18 | 18 | |
| 72 HEX. SOCKET HD. BOLT M5X10 | 12 | |
| 73 BOLT WASHER M5 | 30 | |
| 74 UPPER PROTECTOR 6 | ||
| 75 SHORT LAVER SET 6 | ||
| 76 LOWER PROTECTOR | 6 | |
| 77 NUT M5 | 18 | |
| 78 LONG LEVER SET | 3 | |
| 79 ABSORBER SET | 6 | |
| ITEM NO. | PART NAME Q'TY | |
| 1 | TAPPING SCREW (W/FLANGE) D2.3X8 | 33 |
| 2 ADAPTER STORAGE CASE 1 | ||
| 3 BUTTERY COMPARTMENT SET 1 | ||
| 4 | MACHINE SCREW (W/FLANGE) M3X8 | 1 |
| 5 CONNECTOR A 1 | ||
| 6 TAPPING SCREW D4X12 7 | ||
| 7 RUBBER ANTENNA 1 | ||
| 8 | TAPPING SCREW (W/FLANGE) D2X8 | 2 |
| 9 LOWER BACK COVER BUTTON 1 | ||
| 10 UPPER BACK COVER BUTTON 1 | ||
| 11 BACK COVER LATCHING B 1 | ||
| 12 NAME PLATE 1 | ||
| 13 SOCKET COVER 1 | ||
| 14 BACK CABINET SET 1 | ||
| 15 UPPER CONTACT BRAKET 1 | ||
| 16 BATTERY TERMINAL 1 | ||
| 17 LOWER CONTACT BRACKET 1 | ||
| 18 INTERNAL WIRE (B) 1 | ||
| 19 CONNECTOR C | 2 | |
| 20 BATTERY COVER | 1 | |
| 21 SCREW M3 | 1 | |
| 22 DC JACK BRACKET | 1 | |
| 23 DC JACK | 1 | |
| 24 CONNECTOR B 1 | ||
| 25 CABLE HOLDER (ANDROID) | 1 | |
| 26 SUPPORT | 1 | |
| 27 BRACKET SET | 1 | |
| 28 SQUARE WASHER | 7 | |
| 29 TAPPING SCREW D2X6 | 6 | |
| 30 LEFT LATCHING | 1 | |
| English Dansk Română | ||||
| GUARANTEE CERTIFICATE1 Model No.2 Serial No.3 Date of Purchase4 Customer Name and Address5 Dealer Name and Address(Please stamp dealer name and address) | GARANTIBEVIS1 Modelnummer2 Serienummer3 Købsdato4 Kundes navn og adresse5 Forhandlers navn og adresse(Indsæt stempel med forhandlers navn og adresse) | CERTIFICAT DE GARANTIE1 Model nr.2 Nr. de serie3 Data cumpărării4 Numele și adresa clientului5 Numele și adresa distribuitorului(Vă rugăm aplicați štampila cu numele și adresa distribuitorului) | ||
| Deutsch Norsk Slovenščina | ||||
| GARANTIESCHEIN1 Modell-Nr.2 Serien-Nr.3 Kaufdatum4 Name und Anschrift des Kunden5 Name und Anschrift des Händlers(Bitte mit Namen und Anschrift des Handlers abstempeln) | GARANTISERTIFIKAT1 Modellnr.2 Serienr.3 Kjopsdato4 Kundens navn og adresse5 Forhandlerens navn og adresse(Vennligst stemple forhandlerens navn og adresse) | GARANCIJSKO POTRDILO1 Št. modela2 Serijska št.3 Datum nakupa4 Ime in naslov kupca5 Ime in naslov prodajalca(Prosimo vtsnite žig z imenom in naslovom prodajalca) | ||
| Français Suomi Slovenčina | ||||
| CERTIFICAT DE GARANTIE1 No. de modèle2 No de série3 Date d'achat4 Nom et adresse du client5 Nom et adresse du revendeur(Cachet portant le nom et l'adresse du revendeur) | TAKUUTODISTUS1 Malli nro2 Sarja nro3 Ostopáivámárá4 Asiakkaan nimi ja osoite5 Myyjän nimi ja osoite(Leimaa myyjän nimi ja osoite) | ZÁRUČNÝ LISTA1 Č. modelu2 Sériové č.3 Dátum zakúpenia4 Meno a adresa zákaznika5 Názov a adresa predajcu(Pečiatka s názvom a adresou predajcu) | ||
| Italiano Ελληγικά Български | ||||
| CERTIFICATO DI GARANZIA1 Modello2 N° di serie3 Data di acquisto4 Nome e indirizzo dell'acquirente5 Nome e indirizzo del rivenditore(Si prega di apporre il timbro con questi dati) | ПІЗТОПОІНТИКО ЕГГУНЄНЕ1 Ap. Movtėlou2 Aúξων Ap.3 Нμερομηνία αγοράς4 Όνομα και διεύθυνση πελάτη5 Όνομα και διεύθυνση μεταπωλητή(Παρακαλούμε να χρησιμοποιηθεί σφραγίδα) | ГАРАНЦИОНЕН СЕРТИФИКАТ1 Модел No2 Сериен No3 Дата за закупуване4 Име и адрес на клиента5 Име и адрес на търговеца(Моля, отпечатайте името и адрес на дильра) | ||
| Nederlands Polski Srpski | ||||
| GARANTIEBEWIJS1 Modelnummer2 Serienummer3 Datum van aankoop4 Naam en adres van de gebruiker5 Naam en adres van de handelaar(Stempel a.u.b. naam en adres vande de handelaar) | GWARANCJA1 Model2 Numer seryjny3 Data zakupu4 Nazwa klienta i adres5 Nazwa dealera i adres(Pieczęć punktu sprzedaży) | GARANTNI SERTIFIKAT1 Br. modela.2 Serijski br.3 Datum kupovine4 Ime i adresa kupca5 Ime i adresa prodavca(Molimo da stavite pečat na ime i adresu trgovca) | ||
| Español Magyar Hrvatski | ||||
| CERTIFICADO DE GARANTÍA1 Número de modelo2 Número de serie3 Fecha de adquisición4 Nombre y dirección del cliente5 Nombre y dirección del distribuidor(Se ruega poner el sello del distribuidor con su nombre y dirección) | GARANCIA BIZONYLAT1 Tipusszám2 Sorozatszám3 A vásárlás dátuma4 A Vásárló neve és címe5 A Kereskedő neve és címe(Kérjük ide elhelyezni a Kereskedő nevének és címének pecsétjét) | JAMSTVENI CERTIFIKAT1 Br modela.2 Serijski br.3 Datum kupnje4 Ime i adresa kupca5 Ime i adresa trgovca(Molimo stavite pečat na ime i adresu trgovca) | ||
| Português Čeština Український | ||||
| CERTIFICADO DE GARANTIA1 Número do modelo2 Número do série3 Data de compra4 Nome e morada do cliente5 Nome e morada do distribuidor(Por favor, carimbe o nome e morada do distribuidor) | ZÁRUČNÍ LIST1 Model č.2 Série č.3 Datum nákupu4 Jméno a adresa zákazníka5 Jméno a adresa prodejce(Prosíme o razítko se jménem a adresou prodejce) | ГАРАНТИЙНИЙ СЕРТИФИКАТ1 No моделі2 No серії3 Дата придбання4 Im'я і адреса кліента5 Im'я і адреса дилера(Будь ласка, поставте печатку з іменем і адресою дилера) | ||
| Svenska Türkçe | Русский | |||
| GARANTICERTIFIKAT1 Modellnr2 Serienr3 Inköpsdatum4 Kundens namn och adress5 Försäljarens namn och adress(Stämpla försäljarens namn och adress) | GARANTI SERTÍFÍKASI1 Model No.2 Seri No.3 Satin Alma Tarihi4 Müşteri Adı ve Adresi5 Bayi Adı ve Adresi(Lütfen bayi adını ve adresini kaşe olarak basin) | ГАРАНТИЙНЫЙ СЕРТИФИКАТ1 Модель No2 Серийный No3 Дата покупки4 Название и адрес заказчика5 Название и адрес дилера(Пожалуйста, внесите название и адрес дилера) | ||
HiKOKI
| 1 | |
| 2 | |
| 3 | |
| 4 | |
| 5 |
Siemensring 34, 47877 willich, Germany
Tel: +49 2154 49930
Fax: +49 2154 499350
URL: http://www.hikoki-powertools.de
Hikoki Power Tools Netherlands B.V.
Brabanthaven 11, 3433 PJ Nieuwegein, The Netherlands
Tel: +31 30 6084040
Fax: +31 30 6067266
URL: http://www.hikoki-powertools.nl
Hikoki Power Tools (U.K.) Ltd.
Precedent Drive, Rooksley, Milton Keynes, MK 13, 8PJ, United Kingdom
Tel: +44 1908 660663
Fax: +44 1908 606642
URL: http://www.hikoki-powertools.uk
Hikoki Power Tools France S.A.S.
Hikoki Power Tools Belgium N.V./S.A.
Koningin Astridlaan 51, B-1780 Wemmel, Belgium
Tel: +32 2 460 1720
Fax: +32 2 460 2542
URL http://www.hikoki-powertools.be
Hikoki Power Tools Italia S.p.A
Via Piave 35, 36077, Altavilla Vicentina (VI), Italy
Tel: +39 0444 548111
Fax: +39 0444 548110
URL: http://www.hikoki-powertools.it
Hikoki Power Tools Ibérica, S.A.
C/ Puigbarral, 26-28, Pol. Ind. Can Petit, 08227 Terrassa
(Barcelona), Spain
Tel: +34 93 735 6722
Fax: +34 93 735 7442
URL: http://www.hikoki-powertools.es
Kjeller Vest 7, N-2007 Kjeller, Norway
Tel: (+47) 6692 6600
Fax: (+47) 6692 6650
URL: http://www.hikoki-powertools.no
Hikoki Power Tools Sweden AB
Rotebergsvagen 2B SE-192 78 Sollentuna, Sweden
Tel: (+46) 8 598 999 00
Fax: (+46) 8 598 999 40
URL: http://www.hikoki-powertools.se
Hikoki Power Tools Denmark A/S
Lillebaeltsvej 90, 6715 Esbjerg N, Denmark
Tel: (+45) 75 14 32 00
Fax: (+45) 75 14 36 66
URL: http://www.hikoki-powertools.dk
Hikoki Power Tools Finland Oy
Tupalankatu 9, 15680 Lahti, Finland
Tel: (+358) 20 7431 530
Fax: (+358) 20 7431 531
URL: http://www.hikoki-powertools.fi
Hikoki Power Tools Hungary Kft.
Hikoki Power Tools Romania S.R.L.
Ring Road, No. 66, Mustang Traco Warehouses, Warehouse
No.1, Pantelimon City, 077145, Ilfov County, Romania
- CORDLESS RADIO SAFETY WARNINGS
- WARNING
- Save all warnings and instructions for future reference.
- English
- PROTECTING YOUR HEARING
- CAUTION
- PRECAUTIONS WHEN CONNECTING TO EXTERNAL EQUIPMENT
- MAIN FUNCTIONS
- SYMBOLS
- STANDARD ACCESSORIES
- PRIOR TO OPERATION
- ● Installing backup batteries
- NOTE
- ● AC adapter installation
- Storing the AC adapter
- ● Battery installation
- Installing the battery
- ● Changing the date display
- - Set the date
- - Set the time
- ● Synchronize the time and date (DAB mode only)
- LISTENING TO RADIO BROADCASTS
- - Selecting DAB, FM or AM bandwidth
- - Selecting stations
- Auto station selection
- Manual station selection
- Preset station selection
- ● For better reception
- FM broadcasts
- AM broadcasts
- DRC (DYNAMIC RANGE CONTROL) FOR DAB
- ADJUSTING SOUND QUALITY
- USING EXTERNAL DEVICES FOR AUDIO PLAYBACK
- Playback
- CONNECTING WITH BLUETOOTH DEVICES
- Pairing (Registering devices)
- Set the radio for pairing mode
- Input pass key
- USING THE TIMER FUNCTION
- - Setting the sleep timer
- ● Setting the alarm (Buzzer alarm)
- ● Setting the radio ON alarm timer
- RECHARGING YOUR SMARTPHONE
- MAINTENANCE AND INSPECTION
- ● Inspecting the mounting screws
- ● Cleaning on the outside
- ● Storing the Radio
- MODIFICATIONS
- GUARANTEE
- REMARQUE
- SYMBOLEN
- WAARSCHUWING
- VERBINDING MET BLUETOOTH-APPARATEN
- RECARREGAR O SEU SMARTPHONE
- ORHOLDSREGLER VED TILKOPLING TIL EKSTERNT UTSTYR
- ● Stille inn radioen PÅ alarm timer
- VEDLIKEHOLD OG INSPEKSJON
- ADVARSEL
- PRIJE RADA
- ● Instalacija rezervnih baterija
- NAPOMENA
- ● Instalacija AC adaptera
- Hikoki Power Tools Netherlands B.V.
- Hikoki Power Tools (U.K.) Ltd.
- Hikoki Power Tools France S.A.S.
- Hikoki Power Tools Belgium N.V./S.A.
- Hikoki Power Tools Italia S.p.A
- Hikoki Power Tools Ibérica, S.A.
- Hikoki Power Tools Sweden AB
- Hikoki Power Tools Denmark A/S
- Hikoki Power Tools Finland Oy
- Hikoki Power Tools Hungary Kft.
- Hikoki Power Tools Romania S.R.L.
Brand : HiKOKI
Model : UR 18DSDL
Category : Radio