
PL-2450 E - Iron FAGOR - Free user manual and instructions
Find the device manual for free PL-2450 E FAGOR in PDF.


| Product Type | Steam Iron |
| Brand | FAGOR |
| Model | PL-2450 E |
| Power Supply | 220-240 V ~ 50/60 Hz |
| Power | 2450 W |
| Weight | 1.5 kg |
| Dimensions (L x W x H) | 30 x 12 x 15 cm |
| Cord Length | 2 m |
| Functions | Dry ironing, steam, spray, extra steam, auto shut-off |
| LCD Display | Yes, with temperature and fabric type selection |
| Temperature Settings | 6 levels (Acrylic, Nylon, Polyester, Blend, Wool, Cotton, Linen) |
| Vertical Steam Function | Yes |
| Auto Shut-off | Yes (30 s horizontal, 8 min vertical) |
| Self-cleaning | Yes |
| Language Selection | FR, EN, DE |
| Safety | Auto shut-off, overheat protection |
| Included Accessories | Filling cup |
| Cleaning | Soleplate and exterior with damp cloth |
| Usage | Household use only |
| Standards | Compliant with European directives |
Frequently Asked Questions - PL-2450 E FAGOR
User questions about PL-2450 E FAGOR
0 question about this device. Answer the ones you know or ask your own.
Ask a new question about this device
Download the instructions for your Iron in PDF format for free! Find your manual PL-2450 E - FAGOR and take your electronic device back in hand. On this page are published all the documents necessary for the use of your device. PL-2450 E by FAGOR.
USER MANUAL PL-2450 E FAGOR
EN - INSTRUCTIONS FOR USE
FR - MANUEL D'UTILISATION
Fig.8 Abb. 8 Eilk. 8
- Abra Obr. 8 Rys 8
Fig.8 Png.8
Fig.9 Abb. 9 Eik. 9
- Abr. Obr. 9 Rys 9
Fig.9 Pnc.9
N.I.F. F-20.020.517 - B°. San Andrés, n° 18
Apartado 49 - 20500 MONDRAGON (Guipuzcoa) ESPANA
Fig.1 Abb. Eik. 1
A. Abr Obr. 1 Rys 1
Fig.1 PNC.1
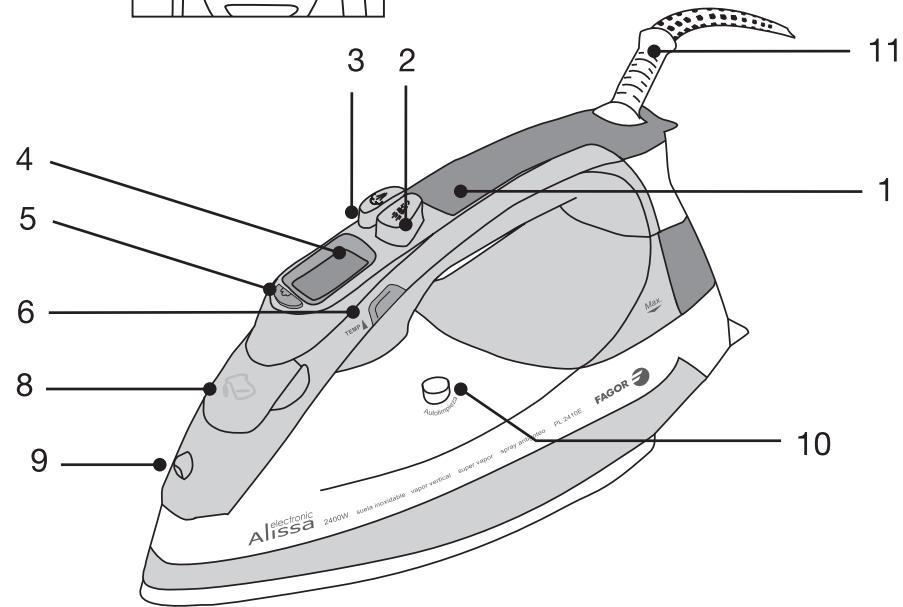
1. DESCRIPTION (FIG. 1)
- Handle
- Spray button
- Extra spray button
- LCD screen
- ON/OFF steam button
- ON/OFF "Increase temperature" setting
- LCD screen "Lower temperature" setting
- Water reservoir cover
- Spray nozzle
- Self-clean button
- Cord
2. TECHNICAL CHARACTERISTICS
See characteristics plate.
This product complies with the European Directives on Electromagnetic Compatibility and Low Voltage.
3. SAFETY PRECAUTIONS
- Before using this appliance for the first time, read the following instructions carefully and keep them for future reference. Make sure that the mains voltage in your home corresponds to that indicated on the appliance.
- In the event of incompatibility between the mains socket and the appliance plug, replace the socket with a suitable one, using a qualified professional.
- The electrical safety of the appliance is only guaranteed if it is connected to an efficient earth installation, as foreseen in applicable electrical safety regulations. If in doubt, contact a qualified professional.
- The use of adaptors, multiple sockets and or extension cables is not recommended. Where it is not possible to avoid their use, only adaptors or extensions that comply with applicable safety regulations should be used, and ensuring that the indicated voltage limit is not exceeded.
After removing the packaging, check that the appliance is in perfect condition, if in doubt, contact the nearest Technical Support Service. - Packaging elements (plastic bags, polystyrene foam, etc.), should not be left within the reach of children because they can be dangerous. - The appliance is for domestic use only. Any other use is considered unsuitable or dangerous. - The manufacturer shall not be responsible for any damages that may arise from improper or inadequate use, or for repairs conducted by non-qualified personnel. - Do not touch the appliance with wet or damp hands or feet. - Keep the appliance separate from water or other liquids, to avoid electric shock; do not connect the appliance to the mains if it is on a damp surface. - Place the appliance on a dry, firm and stable surface. - Do not allow children or the disabled to handle the appliance unsupervised. - Do not leave the appliance unattended when it is turned on because it can be dangerous. - When removing the plug never pull on the cable. - Unplug the appliance before cleaning or maintenance. - In the event of fault or malfunction where the appliance is not to be used, turn off the appliance and do not attempt to repair. If a repair is required, contact a Technical Assistance Service authorised by the manufacturer and request the use of original spare parts. - If the cable for this appliance is damaged, contact an authorised Technical Assistance Service for it to be replaced. - Do not leave the appliance exposed to the elements (rain, sun, ice, etc.). - Do not use or let any part of the appliance come into contact or near hot surfaces (kitchen gas or electric hobs or ovens). - Do not use detergents or abrasive sponges to clean the appliance. - Do not touch the hot surfaces. Use the handles. - Do not let the cable come into contact with the hot parts of the appliance.
- Do not direct the steam jet towards people.
- Do not use the iron on excessively wet fabrics.
- Do not leave the iron supported on its base while it is hot; leave it to cool down.
- Do not use stain-removing mixes or similar products on fabrics to be ironed.
- The iron must be used and rested on a stable surface.
- When placing the iron on its stand, ensure that the surface on which the stand is placed is stable.
- The iron is not to be used if it has been dropped, if there are visible signs of damage, or if it is leaking.
- Keep electrical appliances out of reach of children or infirm persons. Do not let them use the appliances without supervision.
- The user must not leave the iron unattended while it is connected to the supply.
- The plug of the supply cord must be removed from the socket-outlet before the water reservoir is filled with water.
- This appliance is not intended for use by persons (including children) with reduced physical, sensory or mental capabilities, or lack of experience and knowledge, unless they have been given supervision or instruction concerning use of the appliance by a person responsible for their safety. Children should be supervised to ensure that they do not play with the appliance.
4. FILLING THE WATER RESERVOIR
- Place the unplugged iron on a stable surface.
- Lift the water inlet cover. (8)
- Pour the water into the reservoir hole using a glass (Fig. B).
- Do not put any cleaning products or solvents into the water reservoir.
- Check that the water does not exceed the maximum level and replace the cover (8).
N.B.: If the water in the area where you live is too hard (>27°F), we recommend that you use distilled water. Do not use battery water or water with added starch, perfume, conditioner, etc.
5. SETTING THE TEMPERATURE
- Place the iron on a stable surface and plug it in. The LCD display (4) will light up for a second, and a beep will sound when it switches off.
- Press the "increase temperature" regulator to switch on the iron.
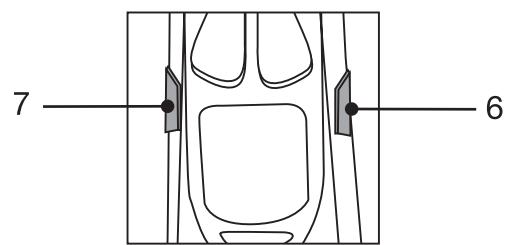
- Change the temperature with the screen settings: press the "increase temperature" regulator (6) to raise the temperature from 1 to 3 and to Maximum. Press the "lower temperature" setting (7) to lower the temperature setting (Fig C).
- To select the right temperature for each item to be ironed, select the correct point and the correct item, which will appear on the LCD screen while you move from one point to the next. Use this table as a guide:
| LCD SCREEN | APPROX. TEMP. | FABRIC | |
| ACRYL | ● | 70 - 90°C | Acrylic |
| NYLON | ● | 110 - 130°C | Nylon |
| POLYE | ●● | 115 - 135°C | Polyester |
| BLEND | ●● | 145 - 165°C | Cotton and blends |
| WOOL | ●● | 160 - 180°C | Wool |
| COTTO | ●●● | 180 - 200°C | Cotton |
| LINEN | MAX | 185 - 205°C | Linen |
- The symbol will appear and the "▲" symbol will flash when the temperature changes from lower to higher and the "▼" symbol will flash when you change from higher to lower.
- When the sole reaches the right temperature, you will hear a beeping sound and the "→" symbol will come on. The "▲" and "▼" symbols will disappear.
- The iron is ready for use.
6. DRY IRONING
- Place the iron on a stable surface and plug it in. The LCD display (4) will light up for a second, and a beep will sound when it switches off.
- Press the "increase temperature" regulator to switch on the iron. The display will then show "ACRYL" and the iron will start to heat up.
- Select the right temperature. See Section 4. "Setting the temperature"
- When you hear the beep and the "Π" symbol appears, the iron is hot and ready to use.
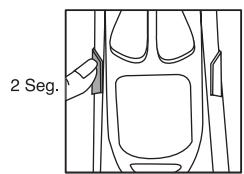
- If you want to disconnect the iron, hold the "increase temperature" setting (6) down for 2 seconds (Fig. D). The screen will go off with a beep.
- Unplug the iron and let it cool down before storing it away.
7. STEAM IRONING
- Fill the iron as described in section 3 "Filling the water tank" and plug it in. The LCD display will light up for a second, and a beep will sound when it switches off.
- Press the "increase temperature" regulator to switch on the iron. The display will show "ACRYL" and the iron will start to heat up.
- Select the right temperature. See Section 5 "Setting the temperature".
- Select the steam option by pressing the steam button (5). The iron will give a whistle and the symbol will start flashing.
- When you want to disconnect the steam, again press the steam button (5). The symbol will stop flashing.
- If you wish to disconnect the iron, hold the "increase temperature" setting (6) down for 2 seconds (Fig. D). The screen will go off with a beep.
- Unplug the iron and let it cool down before storing it away.
8. SPRAY
To use this function there must be water in the reservoir. If you wish to obtain a spray
of water to dampen dry or difficult-to-iron fabrics, press the spray button (2). The spray function is also useful to dampen creases created by accident while ironing. The spray of water will come through the spray nozzle (9) (Fig. E).
N.B.: It may be necessary to press the spray button several times to activate this function.
9. EXTRA STEAM
Switch the iron on, as indicated in Section 7 "Steam ironing". When the iron has reached the temperature selected, press the extra steam button (3) while ironing and the steam will come through the holes in the sole (Fig. F) onto the fabric, smoothing out the most difficult creases. Wait for at least 5 seconds between each use of the extra steam button so as to allow the iron to heat up again and thereby obtain the maximum amount of extra steam.
Upright steam: The extra steam function also works when the iron is in an upright position. To use this function, hold the iron upright around 15-30 cm away from the item, press the extra steam button (3), and the steam will come out of the holes in the sole (Fig. G).
CAUTION: Do not direct the iron towards people as the temperature of the steam is very high.
10. AUTOMATIC SHUT-OFF
The shut-off function will work automatically when the iron is left unattended whilst connected to the mains.
Automatic shut-off while the iron is horizontal position or lying on its side: If the iron remains immobile for 30 seconds in an ironing position (horizontal or on its side), the iron will disconnect automatically. The "II" pause symbol on the LCD screen and the light will go off. To reconnect, simply move the iron. Automatic shut-off in the upright position: If the iron remains immobile for 8 minutes on its support base (upright), the iron will
disconnect automatically. " II " will appear on the LCD screen and the light will go off. To reconnect, simply move the iron. N.B: the iron will take 60 seconds to reach its previous temperature.
11. LANGUAGE SELECTION
Hold the "lower temperature" setting down for 2 seconds (7) (Fig. H). EN will appear on the LCD screen (4). Press the "lower temperature" setting (7) again to change the language. The language will change from EN (English) to DE (German), and from DE to FR (French). To select the desired language, press the "increase temperature" setting (6) and the language selected will be set. N.B.: The default language is English.
12. CLEANING AND MAINTENANCE
Cleaning the water reservoir
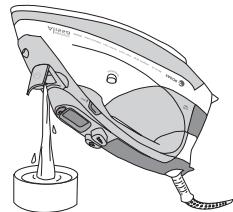
Unplug the iron. To empty the water reservoir, open the water inlet cover (8) and hold the iron with the hole facing downwards until all the water has run out (Fig. 1). Shake the iron gently to remove any drops left inside.
Storage
Leave the iron to cool down before storing it away. If you do not use the iron on a daily basis, it is a good idea to empty the water reservoir after each use to extend the useful life of the iron. Wind the cord around the support base (do not wind tightly) and store the iron away on its base.
Cleaning
Unplug the iron and wait until it has cooled down before cleaning it. Clean the outside and the sole with a damp cloth. Do not use detergent or abrasive products. Do not immerse the iron in water or run it under the tap.
Self-clean
This function will remove limescale and minerals accumulating in the steam chamber. The sole will need to be self-cleaned once
You have used the steam function for 5 hours. When this is needed, the Γ symbol will appear on the LCD screen (4).
- Half-fill the water reservoir, as described in Section 3 "Filling the water reservoir".
- Place the iron upright and plug it in. Press the "increase temperature" regulator (6) to turn on the unit.
- Set the maximum temperature. See Section 4 "Setting the temperature".
- Hold the "increase temperature" setting (6) down for 2 seconds to switch the iron off and then unplug it.
- Place the iron upright in the sink and hold the self-clean button (10) down.
- The steam and hot water will remove the limescale and minerals created in the steam chamber.
- Move the iron carefully forward until the water reservoir is empty and let go of the self-clean button.
- Place the iron on its support base and leave it to cool down completely.
- Wipe the sole with a damp cloth.
13. INFORMATION FOR THE CORRECT DISPOSAL OF ELECTRICAL AND ELECTRONIC APPLIANCES
At the end of its working life, the product must not be disposed of as urban waste. It must be taken to a special local authority differentiated waste collection centre or to
a dealer providing this service. Disposing of a household appliance separately avoids possible negative consequences for the environment and health deriving from inappropriate disposal and enables the constituent materials to be recovered to obtain significant savings in energy and resources.
To remind you that you must collaborate with a selective collection scheme, the symbol shown appears on the product warning you not to dispose of it in traditional refuse containers.
For further information, contact your local authority or the shop where you bought the product.
1. DESCRIPTION (FIG. 1)
5. TEMPERATURE SETTING
5. TEMPERATURE SETTING
- Place the heating plate on a stable surface and plug it into the socket. The LCD screen (4) lights up for a second and when it goes off again, a beep sounds.
- Press the "increase temperature" control to start the plate.
- Set the temperature on the display: press the "increase temperature" control (6) to increase the temperature from point 1 to point 3 and to maximum. Press the "decrease temperature" control (7) to decrease the temperature (Fig. C).
- The temperature suitable for the fabrics you want to iron can be set by selecting the appropriate point and the fabric will be displayed on the LCD screen, while the set points will change. You can refer to the following table:
| LCD DISPLEJ | PRIBLIžNÁ TEPLOTA | TKANINA | |
| ACRYL | ● | 70 - 90°C | Akryl |
| NYLON | ● | 110 - 130°C | Nylon |
| POLYE | ●● | 115 - 135°C | Polyestr |
| BLEND | ●● | 145 - 165°C | Bavlna a změsi |
| WOOL | ●● | 160 - 180°C | Vlna |
| COTTO | ●●● | 180 - 200°C | Bavlna |
| LINEN | MAX | 185 - 205°C | L'an |
- If the temperature changes from low to high, a symbol will appear and the "▲" symbol will flash; if the temperature changes from high to low, the "▼" symbol will flash.
- When the ironing plate reaches the set temperature, an audible signal sounds and the "$" symbol appears. The "▲" and "▼" symbols disappear.
- The iron is ready for use.
6. DRY IRONING
- Place the heating plate on a stable surface and plug it into the socket. The LCD screen (4) lights up for a second and when it goes off again, a beep sounds.
- Press the temperature increase control to turn the plate on. Finally, "ACRYL" will appear on the screen and the plate will start heating up.
- Set the inlet temperature. See section 4, "Temperature setting".
- When a beep sounds and the
symbol "一" appears, the iron is heated and ready for ironing.
- To turn off the iron, press and hold the temperature increase control (6) for 2 seconds (Fig. D). The display goes off and a beep sounds.
- Unplug the iron from the mains and let it cool down before storing.
7. STEAM IRONING
- Fill the plate as described in section 3, "Filling the water tank", and plug it into the socket. The LCD screen lights up for a second and, when it goes off again, a beep sounds.
- Press the temperature increase control to turn the plate on. Finally, "ACRYL" will appear on the screen and the plate will start heating up.
- Set the inlet temperature. See section 5, "Temperature setting".
- To set the steam function, press the steam button (5). A beep sounds and the symbol starts flashing.
- To turn off the steam, press the steam button (5) again. The symbol stops flashing.
- To turn off the iron, press and hold the temperature increase control (6) for 2 seconds (Fig. D). The display goes off and a beep sounds.
- Unplug the iron from the mains and let it cool down before storing.
8. SPRAYING
2. TECHNICAL SPECIFICATIONS
Below are the technical specifications.
This product complies with the requirements of the European Directives for electromagnetic compatibility and low voltage.
3. SAFETY INSTRUCTIONS
Before using the device for the first time, read these instructions carefully and keep them for future reference. - Make sure that the voltage of the electrical network in your home corresponds to the power of the device's plug. If the plug and the socket are not compatible, replace the plug with a suitable one, using the services of a qualified professional. - The safety of the device is guaranteed only when it is connected to a properly grounded plug, as required by the standards for electrical safety. In case of doubt, contact a qualified professional. Do not use adapters, extension cords, or connectors. If their use is absolutely necessary, only use adapters and connectors that comply with the safety standards, and be careful not to exceed the maximum power indicated on the adapter. Keep the packaging, check the
Keep the appliance in good working condition. If you have any doubts, contact the nearest technical service. - Packaging materials (plastic bags, styrofoam, etc.) should not be left within reach of children, as they are a source of danger. This appliance is intended for household use only. Any other use is considered improper and dangerous. The manufacturer is not responsible for damages resulting from improper use or repairs by unqualified personnel. Do not operate the appliance with wet or damp hands or feet. To avoid electric shock, keep the appliance away from water or other liquids. Do not turn it on if it is on a wet surface. - Place the appliance on a dry, stable surface. Do not allow children or incapacitated persons to operate the appliance without supervision. Do not leave the appliance on, as it may be a source of danger. To disconnect, never pull on the cord. - Unplug the appliance from the electrical outlet before cleaning or performing maintenance. If it malfunctions, unplug it and do not attempt to repair it yourself. If repair is necessary, contact the manufacturer's authorized technical service and insist on using original spare parts. If the appliance's cord is damaged, contact the authorized technical service to replace it. Do not leave the appliance exposed to atmospheric conditions (rain, snow, sun, etc.). Do not place any part of the appliance on or near hot surfaces (electric or gas stoves, ovens). Do not use abrasive powders or cleaners to clean it. Do not touch hot surfaces. Use the handle or the grip. Do not let the cord touch hot parts of the appliance. Do not point the steam jet at people. Do not use the iron on very damp fabrics. Do not hold the iron in a horizontal position while it is hot. Let it cool down. Do not pour descaling or other products onto the fabrics you are ironing. - USE AND STORE THE IRON ON A STABLE SURFACE.
WARNING: The surface of the appliance becomes hot during operation. Do not use the appliance if it is damaged or if there are visible signs of malfunction. Keep the appliance out of reach of children. Do not allow the appliance to be used without supervision. The appliance must be disconnected from the mains before cleaning. The appliance is not intended for use by persons (including children) with reduced physical, sensory or mental capabilities, or lack of experience and knowledge, unless they have been given supervision or instruction concerning use of the appliance by a person responsible for their safety. Children should be supervised to ensure that they do not play with the appliance.
4. FILLING THE WATER TANK
- Place the appliance, disconnected from the mains, on a stable surface. Fill the water tank (8) with clean water using a funnel (Fig. B) into the opening of the water tank. Do not add any cleaning agents or solvents to the water tank.
- Make sure the water does not exceed the maximum level indicated. Close the cap (8).
NOTE: If the water in your area is very hard, >27°F, we recommend using distilled water. Do not use water for batteries, as such water with additives like antiscalants, aromatizers, softeners, and other similar substances.
3. SAFETY PRECAUTIONS
Before first use of this appliance, carefully read the instruction manual for operation and keep it for future reference. - Make sure the voltage in your home and the power of the outlet correspond to the value indicated on the appliance. In case of incompatibility of the outlet with the plug of the appliance, have the outlet replaced by qualified specialists. The electrical safety of the appliance is guaranteed only if it is connected to an adequate grounding source, according to the current electrical safety standards. If in doubt, contact qualified specialists. It is not recommended to use extension cords,
Power adapter. If necessary, use only adapters and power supplies that comply with applicable safety standards. When doing so, make sure not to exceed the power limit indicated on the adapter. After removing the device from the packaging, make sure it is in good condition. If in doubt, contact the technical service center. Packaging components (plastic bags, polystyrene foam, etc.) should be kept away from children, as they can become potential sources of danger. This device should be used only for household purposes. Any other use is considered inappropriate or dangerous. The manufacturer is not responsible for damage caused by improper, erroneous, or careless use of the device, nor for repairs performed by unqualified personnel. Do not touch the device with wet or damp hands or feet. To avoid electric discharge, keep the device away from water or other liquids. Do not plug the device into the mains if it is installed on a damp surface. Install the device on a dry, solid, and stable surface. Do not allow children or disabled persons to use the device without supervision. Do not leave the device switched on unattended, as it can become a source of danger. Unplug the power cord from the socket, never pull on the power cord. Disconnect the device from the mains before cleaning and maintenance operations. In case of breakdown or malfunction of the device, stop using it, turn it off, and do not attempt to repair it. If repair is necessary, contact exclusively the technical service center certified by the manufacturer, requesting replacement with original parts. If the device is damaged, contact the certified technical service center for its replacement.
Do not expose the appliance to natural conditions (such as rain, sun, etc.). Do not use or place any parts of this appliance on hot surfaces (such as gas or electric burners, or ovens). Do not use abrasive agents or abrasive cloths for cleaning the iron. Do not touch the hot surfaces. Use handles or knobs. Do not allow the power cord to come into contact with hot parts of the iron. - Do not direct steam at people. - Do not use the iron on very damp fabrics. - Do not place the iron on its base until it has cooled down. - Do not use acidic detergents or similar products on fabrics that are prone to staining. - When using the iron, it must be placed on a stable surface. - When placing the iron on its heel, make sure the place is stable. Do not use the iron if it has been dropped or if there are visible signs of damage or if water leaks from it. Electrical appliances must be stored out of reach of children or infirm persons. Do not allow them to use the appliance without supervision. Do not leave the iron switched on unattended. - Before filling the water tank, unplug the iron from the electrical outlet. The appliance is not intended for use by persons (including children) with reduced physical, sensory or mental capabilities, or lack of experience and knowledge, unless they have been given supervision or instruction concerning use of the appliance by a person responsible for their safety. Do not let children play with the appliance.
4. FILLING THE WATER TANK
Place the unplugged iron on a stable surface. - Lift the lid of the water tank (8). Pour water using the measuring cup (Fig. B) into the opening of the water tank. - Do not pour detergent or solvent into the water tank. Make sure the amount of water does not exceed the maximum fill level, then close the lid of the opening (8).
NOTE: If in your area the water contains a large amount of salt, >27°F, it is recommended to use distilled water. Do not use water from batteries or water with additives such as starch, fragrances, softeners, etc.
5. TEMPERATURE ADJUSTMENT
- Place the iron on a stable surface and plug it into the outlet. The indicator light (4) will turn on for a second and then go off, after which you will hear a sound signal.
- Press the temperature increase button to turn on the iron. 3. Using the regulator, you can adjust the temperature: press the “Increase temperature” button (6) to raise the temperature from minimum to maximum. Press the “Decrease temperature” button (7) to lower the temperature (Fig. C).
- To select the appropriate temperature for each garment, adjust the current temperature and select the correct current garment on the LCD screen. You can refer to the following table:
| LCD 3KPAH | Тем. ПИБЛ. | TKAHь | |
| ACRYL | ● | 70 - 90°C | Акрел |
| NYLON | ● | 110 - 130°C | Нейлун |
| POLYE | ●● | 115 - 135°C | Полистер |
| BLEND | ●● | 145 - 165°C | Хлобок и Смеси |
| WOOL | ●● | 160 - 180°C | Шерstь |
| COTTO | ●●● | 180 - 200°C | Хлобok |
| LINEN | MAX | 185 - 205°C | Лен |
- The symbol "A" indicates that the temperature change occurs from minimum to maximum and from maximum to minimum. 6. When the set temperature is reached, a signal sounds and the symbol "一" appears. The symbols "△" and "N" disappear.
- The iron is ready for use.
6. DRY IRONING
- Place the iron on a stable surface and plug it into the mains. The display (4) will light up for a second and then go out, after which you will hear a beep.
- Press the temperature increase button to turn on the iron. After this, the display will show "ACRYL" and the iron will start heating up.
- Select the desired temperature. See section 4 "Setting the temperature".
- After the signal sounds and the symbol " " appears, the iron is heated and ready for ironing.
- If you want to turn off the iron, press and hold the temperature increase button for 2 seconds (Fig. D). The iron will turn off with a short beep.
- Unplug the iron from the socket, let it cool down before storing it.
7. STEAM IRONING
- Fill the water tank as described in section 3 "Filling the water tank" and plug the iron into the mains. The display will light up for a second and then go out, after which you will hear a beep.
- Press the temperature increase button to turn on the iron. The display will show "ACRYL" and the iron will start heating up.
- Select the desired temperature. See section 5 "Setting the temperature".
- To start steam supply, press the steam button (5). The iron will emit steam and the symbol will start flashing.
- To stop the steam supply, press the steam button (5) again. The flashing of the symbol will stop.
- If the iron is not heating up, it may be necessary to press the "Temperature Increase" button for 2 seconds (Fig. D). The iron will turn off with a sound signal.
- Unplug the iron from the outlet I, before cleaning it, wait until it cools down.
8. SPRAY
To use this function, it is necessary that the water tank is filled. Press the spray button (2), if the iron is used to remove wrinkles from dry fabrics that are difficult to iron. The spray function is also used to moisten stains that appear as a result of incorrect ironing. The spray of water is carried out through the spray nozzle (9) (Fig. E).
NOTE: To activate this function, you can press the spray button several times.
9. STEAM BURST
Turn on the iron as described in section 7 "Ironing in the steam mode", after the iron has heated to the selected temperature, press the steam burst button (3) during ironing, steam will be emitted through the holes in the soleplate
(Fig. F) on the fabric to remove wrinkles that are difficult to iron. Wait at least 5 seconds between each press of the steam burst button to allow the iron to reheat, thus achieving the maximum level of steam burst.
Vertical steam: The steam burst function also works when the iron is in a vertical position. To use this function, hold the iron in a vertical position at a distance of 15-30 centimeters from the garment and press the steam burst button (3), steam will be emitted from the holes in the soleplate (Fig. G).
WARNING: Do not direct steam at people, the steam temperature is very high.
10. AUTOMATIC SHUT-OFF
The automatic shut-off function is activated automatically if the iron is left plugged in without supervision.
- Automatic shut-off in horizontal position and on its side:
If the iron is left motionless for 30 seconds in the ironing position (horizontal or on its side), it will shut off automatically. The power symbol on the LCD screen will go out. To turn the iron back on, simply move it.
- Automatic shut-off in vertical position:
If the iron is left unused for 8 minutes (in the vertical position), it will turn off automatically. The LCD screen will show "II" and the light will go out. To turn the iron back on, simply lift it. NOTE: The iron will reach the previous temperature only after 60 seconds.
11. LANGUAGE SELECTION
Press and hold the "Decrease temperature" button (7) for 2 seconds (Fig. H). The LCD screen (4) will show "EN". To change the language, press the "Decrease temperature" button (7) again. The language will change from EN (English) to
DE (German), then to FR (French). To select the desired language, press the "Increase temperature" button (6). The selected language will be set. NOTE: The default language is English.
12. CLEANING AND CARE
Emptying the water tank
Turn off the iron. To empty the water tank, open the tank cap (8) and turn the iron upside down, waiting until the water drains out (Fig. 1). Gently shake the iron to remove any remaining water drops.
Storage
Before storing the iron, wait until it cools down. If you do not use the iron daily, it is advisable to empty the water tank after each use to extend its lifespan. Wrap the cord around the back part of the base (do not pull it too tight) and store the iron in the vertical position.
Cleaning
Turn off the iron and unplug it, and let it cool down before cleaning. Clean the exterior and the soleplate with a damp cloth. Do not use abrasive cleaners or materials. Do not immerse the iron in water or place it under the tap.
Automatic cleaning

- DESCRIPTION (FIG. 1)
- TECHNICAL CHARACTERISTICS
- SAFETY PRECAUTIONS
- FILLING THE WATER RESERVOIR
- SETTING THE TEMPERATURE
- DRY IRONING
- STEAM IRONING
- SPRAY
- EXTRA STEAM
- AUTOMATIC SHUT-OFF
- LANGUAGE SELECTION
- CLEANING AND MAINTENANCE
- CLEANING THE WATER RESERVOIR
- STORAGE
- CLEANING
- SELF-CLEAN
- INFORMATION FOR THE CORRECT DISPOSAL OF ELECTRICAL AND ELECTRONIC APPLIANCES
- TEMPERATURE SETTING
- SPRAYING
- TECHNICAL SPECIFICATIONS
- SAFETY INSTRUCTIONS
- FILLING THE WATER TANK
- TEMPERATURE ADJUSTMENT
- STEAM BURST
- CLEANING AND CARE
- EMPTYING THE WATER TANK
- AUTOMATIC CLEANING
Brand : FAGOR
Model : PL-2450 E
Category : Iron