
55 DIAMOND SELFIE, 55 DIAMOND SELFIE LITE - Smartphone ARCHOS - Free user manual and instructions
Find the device manual for free 55 DIAMOND SELFIE, 55 DIAMOND SELFIE LITE ARCHOS in PDF.
| Product type | Smartphone |
| Brand | ARCHOS |
| Model | 55 Diamond Selfie / 55 Diamond Selfie Lite |
| Dimensions | Approximately 155 x 76 x 8 mm |
| Weight | Approximately 150 g |
| Screen | 5.5 inches, HD resolution (720 x 1280 pixels) |
| Processor | Quad-core or Octa-core 1.3 GHz |
| Operating system | Android 6.0 (Marshmallow) or later |
| RAM | 2 GB |
| Internal storage | 16 GB |
| Expandable storage | MicroSD up to 128 GB (hybrid slot) |
| Rear camera | 13 megapixels |
| Front camera | 8 megapixels |
| Battery | 3000 mAh, removable |
| Charging | Micro-USB |
| Connectivity | 4G LTE, Wi-Fi 802.11 b/g/n, Bluetooth 4.0 |
| Fingerprint sensor | Yes |
| SIM | Hybrid Dual SIM (Micro-SIM + Nano-SIM or Micro-SIM + MicroSD) |
| Warranty | 1 year (subject to legal conditions) |
| Maintenance | Clean with a soft, dry cloth |
| Security | Fingerprint, PIN code, lock pattern |
| Spare parts and repairability | Removable battery, accessible SIM/SD card |
Frequently Asked Questions - 55 DIAMOND SELFIE, 55 DIAMOND SELFIE LITE ARCHOS
User questions about 55 DIAMOND SELFIE, 55 DIAMOND SELFIE LITE ARCHOS
0 question about this device. Answer the ones you know or ask your own.
Ask a new question about this device
Download the instructions for your Smartphone in PDF format for free! Find your manual 55 DIAMOND SELFIE, 55 DIAMOND SELFIE LITE - ARCHOS and take your electronic device back in hand. On this page are published all the documents necessary for the use of your device. 55 DIAMOND SELFIE, 55 DIAMOND SELFIE LITE by ARCHOS.
USER MANUAL 55 DIAMOND SELFIE, 55 DIAMOND SELFIE LITE ARCHOS
Congratulations for the purchase of an ARCHOS device! This quick start guide helps you to start using your device properly. If you have more questions concerning the use of your device, visit us at:

twitter.com/archos

www.facebook.com/archos
Blog
https://blog.archos.com/

http://faq.archos.com/

www.archos.com, click Support > After-sales support

www.archos.com, click Support > Downloads > Declaration of conformity
As we are often updating and improving our products, your device's software may have a slightly different appearance or modified functionality than presented in this quick start guide.
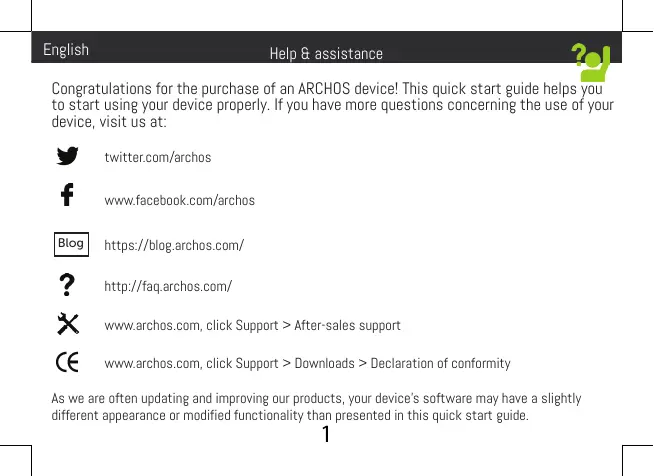
ARCHOS 55 Diamond Selfie

Warranty, legal and safety notice

Quick start guide

Charger adapter
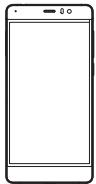
Charging cable
Describing your device


Assembling
After you have unpacked your mobile phone box:
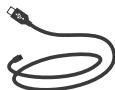
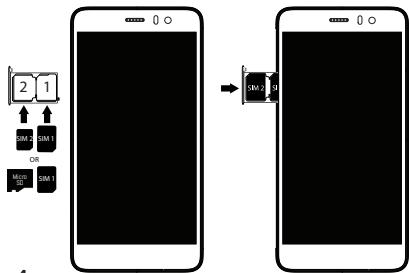
- Remove the card tray by inserting the tool provided, into the tray release hole.
- Insert 1 micro SIM card into slot 1 and a micro SD Memory card into slot 2 OR 1 micro SIM card into slot 1 and 1 nano SIM card into slot 2 as shown in the diagram.
- Replace the tray in the right position and push it inside to close.
| 4G | slot 1 | Micro-SIM |
| 4G | slot 2 | Nano-SIM |
| Micro-SD card | slot 2 |
When inserting your SIM card or micro-SD card, make sure to follow the illustration, otherwise you may damage the slot or the card.
4
Starting up
Charging your battery completely
Plug the charging cable in the micro USB port and the adapter in a power outlet.
Leave the device until the battery is fully charged. Turning ON
- Press and hold the ON/OFF button to turn on the device.
-
Follow the instructions to set up your device. Activating mobile date connection (4G)
-
Touch and pull down the status bar to display it.
- Touch again the bar to reveal the quick settings.
- Select the Settings icon.
- In Wireless & networks, select Data usage, then the SIM card tab.
-
Slide the Mobile data switch to turn on/off. Activating WiFi connection
-
Touch and pull down the status bar to display it.
- Touch again the bar to reveal the quick settings.
- Select the WiFi icon to activate the WiFi
connection
- Select "WiFi" below the WiFi icon.
- Touch the name of network you want to connect to.
Private networks are shown with a lock icon and will require you to enter your password.
Fingerprint reader
Use the fingerprint option to secure your device.
- Select Settings>Security, then Fingerprint.
- Select Continue.
- Select a pattern as an alternative in case of being not able to use the fingerprint option.
- Follow the onscreen instructions.
- Record your finger in different positions for a better detection.
- You can add up to 5 fingerprints.

Troubleshooting
- My SIM card is not detected: make sure to have a valid SIM card. Insert the SIM card according to the process shown in the Assembling page. Try to contact your provider to renew the card if it is faulty.
- My device is frozen: press the ON/OFF button for more than 10 seconds.
- My device encounters dysfunctions: go to Settings > About phone > Check for update system to check for updates. If your device is up-to-date, try to reset the device from Settings > Factory data reset > Backup & restore. We recommend to save your files before resetting.
- My WiFi reception is too low: make sure you are not far from the WiFi hotspot. Update the firmware of the device: http://www.archos.com/support. Reset and redefine your connection parameters. Contact your WiFi connection provider.
- My device bootlogo is playing in a loop: you need to completely reset your device. Go to faq.archos.com and select your device. In Backup & Recovery, select How to reinitialize my ARCHOS.
- My device doesn't recognize my password or PIN: when setting a lock screen, select a code easy to remember. In some cases, you need to enter your email or to reset totally your device. See our FAQs.
FOR MORE ANSWERS ABOUT YOUR TECHNICAL DIFFICULTIES, DO NOT HESITATE TO VISIT: FAQ.ARCHOS. COM
www.archos.com, click Support > After-sales support

www.archos.com, cliquez Support > Telechargesments > Déclaration de conformité
Activating WiFi connection
| 4G | 1 | Micro-SIM |
| 4G | 2 | Nano-SIM |
| Micro-SD card | 2 |
www.archos.com, kliknj Support > After-sales support

www.archos.com, kliknij Support > Downloads > Declaration of conformity
DE DUOC GIAI DAP THEM V E C A C V U O N G M A C K Y T H U A T, V U I L O N G T R U Y C A P: F A Q. A R C H O S. COM
Open Source Software Offer
The software bundled with this product includes software files subject to certain open source license requirements. Such open source software files are subject solely to the terms of the relevant open source software license. Such open source software is provided on an "AS IS" basis to the maximum extent permitted by applicable law.
For the open source files contained herein, please access "Open source license" section located at: Settings\About phone\Legal information on the device for the relevant copyright and licensing terms. You may obtain a copy of Apache License, Version 2.0 at http://www.apache.org/licenses/License-2.0. You may also obtain a copy of GNU General Public License, Version 2 at the Free Software Foundation, INC, 51 Franklin Street, Fifth Floor, Boston, MA 02110-1301, USA.
Until the date that is three years after our last shipment of this product, you may obtain a copy of the source code corresponding to the binaries for any GPL-Licensed file by contacting ARCHOS customer service at http://www.archos.com and ARCHOS will send you a link to such source code or will provide instructions to get the source on a physical medium.
This offer is valid to anyone in receipt of this information.
National restrictions
This device is intended for home and office use in all EU countries (and other countries following the EU directive 1999/5/EC) without any limitation except for the countries mentioned below:
| Country | Restriction | Reason/remark |
| Bulgaria | None | General authorization required for outdoor use and public service |
| France | Outdoor use limited to 10 mW e.i.r.p. within the band 2454-2483.5 MHz | Military Radiolocation use. Refarming of the 24 GHz band has been ongoing in recent years to allow current relaxed regulation. Full implementation planned 2012 |
| Italy | None | If used outside of own premises, general authorization is required. |
| Luxembourg | None | General authorization required for network and service supply (not for spectrum) |
| Norway | Implemented | This subsection does not apply for the geographical aera within a radius of 20 km from the centre of Ny-Alesund |
| Russian Federation | None | Only for indoor applications |
Note: Frequencies 2454-2483.5MHZ are restricted to indoor use in France.
SAR
After the laboratory measurements, the SAR values for this mobile are:
0.147W/Kg 10g Head Tissue 1.556W/Kg 10g Body Tissue