
Royal BHS 24 - Hedge trimmers EINHELL - Free user manual and instructions
Find the device manual for free Royal BHS 24 EINHELL in PDF.

| Product Type | Gas Hedge Trimmer |
| Brand | Einhell |
| Model | Royal BHS 24 |
| Engine Type | Air-cooled, 2-Cycle, Chrome Cylinder |
| Displacement | 24 cc |
| Dry Weight | 6.6 kg |
| Fuel Capacity | 450 ml |
| Blade Length | 55 cm |
| Max Cutting Thickness | 25 mm |
| Ignition | Electronic |
| Maximum Engine Performance | 0.8 kW |
| Noise Level | 106 dB(A) |
| Vibration | 3.93 m/s² |
| Speed (Strokes/min) | 2500 ± 150 |
| Fuel Mixture Ratio | 40:1 (gasoline to 2-cycle oil) |
| Spark Plug Gap | 0.025 in (0.635 mm) |
| Safety Features | Throttle lock, blade guard, ignition switch |
| Maintenance | Blade lubrication, air filter cleaning, spark plug replacement |
| Storage | Drain fuel, purge carburetor, store in cool dry place |
Frequently Asked Questions - Royal BHS 24 EINHELL
User questions about Royal BHS 24 EINHELL
0 question about this device. Answer the ones you know or ask your own.
Ask a new question about this device
Download the instructions for your Hedge trimmers in PDF format for free! Find your manual Royal BHS 24 - EINHELL and take your electronic device back in hand. On this page are published all the documents necessary for the use of your device. Royal BHS 24 by EINHELL.
USER MANUAL Royal BHS 24 EINHELL
GB Operating Instructions Gas Hedge Trimmers
Meaning of symbols marked on the product
| Read the user manual before using the machine | Wear gloves to protect your hands | ||
| Wear safety goggles to protect your eyes | Wear safety boots to protect against electric shock | ||
| Wear ear protector to protect against noise | Do not expose to rain | ||
| Wear dust mask to protect against dust |
natural_image
Black-and-white photo of a person operating a large mechanical device in a garden setting (no visible text or symbols)natural_image
Close-up of mechanical components labeled A, B, and C, showing hands adjusting parts (no visible text or symbols)WARNING! When using gas tools, basic safety precautions, including the following, should always be followed to reduce the risk of serious personal injury and/or damage to the unit. Read all these instructions before operating this product and save these instructions.
This unit can be dangerous! Operator is responsible for following unit manual instructions and warnings. Read entire operator's manual before using unit! Be thoroughly familiar with the controls and the proper use of the unit. Restrict the use of this unit to persons who read, understand, and follow unit, manual instructions and warnings. Never allow children to operate this unit.
Wear close fitting, tough work clothing that will provide protection, such as long slacks or trousers, safety work shoes, heavy duty work gloves, hard hat, a safety face shield, or safety glasses for eye protection and a good grade of ear plugs or other sound barriers for hearing protection.
-
Store in a safe place. Open fuel cap slowly to release any pressure which may have formed in fuel tank. To prevent a fire hazard, move at least 10 feet (3 meters) from fueling area before starting.
-
Turn unit off before setting it down.
-
Always hold unit firmly with both hands, the thumb and fingers encircling the handles.
-
Keep all screws and fasteners tight. Never operate your equipment when it is improperly adjusted or not completely and securely assembled.
-
Keep handles dry, clean and free of fuel mixture.
-
Check area you will be trimming for debris that may be struck or thrown during operation.
-
Stop the engine or disconnect from mains before:
- cleaning or when clearing a blockage.
-
checking, maintenance or working on the machine
-
Store equipment away from possible flammable materials, such as gas-powered water heaters, clothes drivers, or oil-fired furnaces, portable heaters, etc.
-
Always keep the debris shield, stringhead, and engine free of debris build-up.
-
Operation of equipment should always be restricted to mature and properly instructed individuals.
-
Never allow children to use the machine.
-
Avoid operating while people, especially children are nearby.
-
While operating the machine always be sure of a safe and secure operating position especially when using steps or a ladder.
-
Handle fuel with care; it is highly flammable. Never add fuel to a machine with a running or hot engine. Do not inhale fuel fumes as they are toxic.
-
Do not attempt to repair the machine unless you are qualified to do so.
-
Do not operate the machine with a damaged or excessively worn cutting device.
-
To reduce fire hazard keep engine and silencer free of debris, leaves, or excessive lubricant.
-
A warning of noise level and the need for ear protection.
-
Always ensure all handles and guards are fitted when using the machine. Never attempt to use an incomplete machine or one fitted with an unauthorized modification.
-
Where a hedge trimmer is provided with more than one handle always use two hands to operate it.
-
When transporting or storing the machine always fit the cutting device guard.
-
Always be aware of your surroundings and stay alert for possible hazards that you may not hear due to the noise of the machine.
What not to do
- DO NOT USE ANY OTHER FUEL than that recommended in your manual. Always follow instructions in the Fuel and Lubrication section of this manual. Never use gasoline unless it is properly mixed with 2-cycle engine lubricant. Permanent damage to engine will result, voiding manufacturer's warranty.
- DO NOT SMOKE while refueling or operating equipment.
- DO NOT OPERATE UNIT WITHOUT A MUFFLER and properly installed muffler shield
- DO NOT TOUCH or let your hands or body come in contact with the muffler. Hold unit with thumbs and fingers encircling the handles.
- DO NOT OPERATE UNIT IN AWKWARD POSITIONS, off balance, outstretched arms, or one-handed. Always use two hands when operating unit with thumbs and fingers encircling the handles.
- DO NOT RAISE BLADE above ground level while unit is operating. Injury to operator could result
- DO NOT USE UNIT FOR ANY PURPOSES OTHER than trimming lawn or garden areas.
- DO NOT OPERATE UNIT FOR PROLONGED PERIODS. Rest periodically.
- DO NOT OPERATE UNIT WHILE UNDER THE INFLUENCE OF ALCOHOL OR DRUGS.
- DO NOT ADD. REMOVE OR ALTER ANY COMPONENTS OF THIS PRODUCT. Doing so could cause personal injury and/or damage the unit voiding the manufacturer's warranty.
- DO NOT operate your unit near or around flammable liquids or gases whether in or out of doors. An explosion and/or fire may result.
General Identification (Fig. 1)
- Blades
- Protect Guide
- Shield
- Front Handle
- Choke Lever
- Ignition Switch
- Stirling Foot Box
- Starting Pool, Brass 8. Final Box
- Fuel Cap
- Primer Bulb
- Air Filter Cover
- Starter Handle
- Rear Handle
13 Throttle Lock - Throttle Tung
- Throttle Trigger
- Muffler Cover
GB
Specifications
Engine Type Air-cooled, 2-Cycle. Chrome Cylinder
| Displacement 24cc | |
| Dry Weight | 6.6 Kg |
| Fuel Capacity | 450 ml |
| Blade Length | 55cm |
| Max Cutting Thickness | 25mm |
| Ignition | Electronic |
| Maximum Enquine Performance | 0.8 kW |
| Noise | 106 dB(A) |
| Vibration | 3.93 m/s ^2 |
| Speed | 2500±150 strokes/min |
Fuel and lubrication
• Fuel
Use regular grade unleaded gasoline mixed with 2-cycle engine oil for best results. Use mixing ratios in Section FUEL MIXING TABLE.

Warning: Never use straight gasoline in your unit. This cause permanent engine damage and void the manufacturer's warranty for that product. Never use a fuelure that has been stored for over 90 days.

Warning: Do not use any 2-cycle oil product with a commended mixing ratio of 100:1. If insufficient lubrication cause of engine damage, it voids the manufacturer's warranty.
• MIXING FUEL
Mix fuel 2 cycle oil in an approved container. Use mixing table for correct ratio of fuel to oil. Shake container to ensure through mix.

Warning: Lack of lubrication voids engine warranty. Online and oil must be mixed at 40:1.
• Fuel Mixing Table
Gasoline Lubricant
5 Lilers 125 ml (cc)
Mixing Procedure 40 Parts Gasoline to
1 part Lubricant
1 ml = 1 cc
RECOMMENDED FUELS
Some conventional gasolines are being blended with oxygenates such as alcohol or an ether compound to meet clean air standards. Your engine is designed to operate satisfactorily on any gasoline intended for automotive use including oxygenated gasolines.
OPERATING INSTRUCTIONS
• STARTING A COLD ENGINE
- Place trimmer on firm flat surface.
- Place left foot on brace and stand behind rear handle of unit. Pull starter rope with right hand.
- Move Ignition switch to the "RUN (I)" position (Fig. 3A).
- Your unit is designed with a 2 position choke: CLOSE * | - | * and OPEN * f. Move choke lever (A) to CLOSE " " | - | position (Fig. 3B).
- Prime the carburetor. Pump the prime bulb (B) 10 times (Fig. 3C).
- Grip handle firmly – depress safety trigger (C) & throttle trigger (D) to the FULL THROTTLE position (Fig. 3E). (Fig. 3D).
- Pull starter rope out a short way until resistance is felt (approximately 4") (Fig. 3E). A smooth rapid pull is required for a strong spark. Pull starter rope briskly 4 times.
- Once engine starts allow to run for 10 seconds.
- Move the choke to OPEN " " position (Fig. 3F).
- If engine fails to start, repeat steps 1 through 8.
NOTE: If engine fails to start after repeated attempts, refer to Troubleshooting section.
NOTE: Always pull starter rope straight out. Pulling starter at an angle will cause rope to rub against the eyelet. This friction will cause the rope to fray and wear more quickly. Always hold starter handle when rope retracts. Never allow rope to snap back from extended position. This could cause rope to snag or fray and also damage the starter assembly.
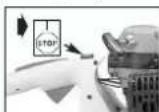
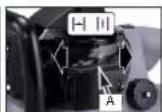
Fig. 3A Fig. 3B

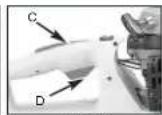
Fig. 3C


Fig. 3E Fig. 3F
• STOPPING THE ENGINE
Emergency Stopping Procedure. When it is necessary to stop engine immediately, DEPRESS the switch to stop. Normal Stopping Method. For normal stopping, release
GB
trigger and allow engine to return to idle speed. Then DEPRESS and HOLD the "OFF" switch until the engine stops completely.
• STARTING A WARM ENGINE (Engine has been stopped for no more than 15-20 minutes)
- Pull starter rope again. Engine should start with ONE or TWO pulls. If engine fails to start after 6 pulls, repeat steps 2 through 8.
- If engine does not start, or starts and then stops after 5 rope pulls, follow procedure 'STARTING A COLD ENGINE'.
TRIMMING INSTRUCTIONS
• ADDITIONAL SAFETY PRECAUTIONS
Before operating your unit, review ALL SAFETY PRECAUTIONS in this manual.
WARNING / CAUTION
- IF UNFAMILIAR WITH TRIMMING techniques, practice the procedures with ENGINE in "OFF" position.
- ALWAYS CLEAR WORK area of debris such as cans, bottles, rocks, etc. Striking objects can cause serious injury to operator or bystanders and also damage equipment. If an object is accidentally hit, immediately TURN ENGINE OFF and examine equipment. Never operate unit with damaged or defective equipment.
- ALWAYS TRIM OR CUT AT HIGH ENGINE SPEEDS. Do not run engine slowly at start or during trimming operations.
- DO NOT use equipment for purposes other than trimming shrubs, hedges, or bushes.
- NEVER raise stringhead above knee height during operation.
• DO NOT operate unit with other people or animals in the immediate vicinity. - IF OPERATING UNIT ON A SLOPE, stand below the cutting attachment. DO NOT OPERATE on a slope or hilly incline if there is the slightest chance of slipping or losing your footing.
• TRIMMING INSTRUCTIONS
- WORKING POSITION. Maintain proper footing and balance and do not overreach. Wear safety goggles, nonskid footwear and rubber gloves when trimming. Hold the tool firmly in both hands and turn the tool ON. Always hold the trimmer, as shown in the illustrations, with one hand on the body handle and one hand on the front handle. Never hold the tool by the blade guard.
- TRIMMING NEW GROWTH. A wide, sweeping motion, feeding the blade teeth through the twigs is most effective. A slight downward till of the blade, in the direction of motion gives the best cutting.
- LEVEL HEDGES. To obtain exceptionally level hedges, a piece of string can be stretched along the length of the hedge as a guide.

CAUTION: Do not use the trimmer for cutting stems greater than 25mm. Use the trimmer only for cutting normal shrubbery found around houses and buildings.
- SIDE-TRIMMING HEDGES. Hold the trimmer as shown and begin at the bottom and sweep up.

natural_image
Person using a measuring tool to measure vegetation in a field (no visible text or symbols)MAINTENANCE
Your trimmer should be stopped, disconnected and oiled occasionally during use.
- The cutting blades are made from high quality, hardened steel and with normal usage, they will not require resharpening. However, if you accidentally hit a wire fence, stones, glass or other hard objects, you may put a nick in the blade. There is no need to remove this nick as long as it does not interfere with the movement of the blade. If it does interfere, unplug unit and use a fine toothed file or sharpening stone to remove the nick.
- If you drop the trimmer, carefully inspect it for damage. If the blade is bent, housing cracked, or handles broken or if you see any other condition that may affect the trimmer's operation contact an authorized service center for repairs before putting it back into use.
- Fertilizers and other garden chemicals contain agents which greatly accelerate the corrosion of metals. Do not store the tool on or adjacent to fertilizers or chemicals.
- With the unit unplugged, use only mild soap and a damp cloth to clean the tool. Never let any liquid get inside the tool; never immerse any part of the tool into a liquid.
• BLADE LUBRICATION
WARNING: Before lubricating, be sure your unit is switched off and blades have come to a complete stop.

For easier operation and longer blade life, lubricate the blade before and after each use. Apply light machine oil along the edge of the blade bar.
A IR FILTER
To Clean Air Filter:
- Press down on lab (A) holding air filter cover in place, remove cover (B) and lift filter (C) from air box (Fig. 6).
- Wash filter in soap and water. DO NOT USE GASOLINE!
- Air dry filter.
GB
- Reinstall filter.
CAUTION: NEVER operate unit without the air filter or dust and dirt will be sucked into the engine and damage it. The air filter must be kept clean. If it becomes damaged, install a new filter.
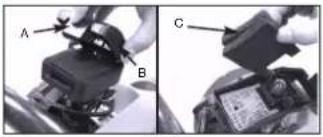
Fig. 6
• CARBURETOR ADJUSTMENT
The carburetor was pre-set at the factory for optimum performance. If further adjustments are necessary, please take your unit to the nearest professional.
• SPARK PLUG
- Spark plug gap = .025 in. (.635mm) (Fig. 7).
- Torque to 105 to 130 inch pounds (12 to 15 N•m). Connect spark plug boot.

• STORING A UNIT
WARNING: Failure to follow these steps may cause vanish to form in the carburetor and difficult starting or permanent damage following storage.
- Perform all the general maintenance recommended in the Maintenance Section of your User Manual.
- Clean outside surface of unit
- Drain fuel from the fuel tank.
- After fuel is drained, start engine.
- Run engine at idle until unit stops. This will purge the carburetor of fuel.
- Allow engine to cool (approx. 5 minutes).
- Using a spark plug wrench, remove the spark plug.
- Pour 1 teaspoon of clean 2-cycle oil into the combustion chamber. Pull starter rope slowly several times to coat internal components. Replace spark plug.
- Store unit in a cool, dry place away from any source of ignition such as an oil burner, water heater, etc.
- REMOVING A UNIT FROM STORAGE
- Remove spark plug.
- Pull starter rope briskly to clear excess oil from combustion chamber.
- Clean and gap spark plug or install a new spark plug with proper gap.
- Prepare unit for operation.
14
- Fill fuel tank with proper fuel / oil mixture. See Fuel and Lubrication Section.
TROUBLE SHOOTING THE ENGINE
| PROBLEM | PROBABLE CAUSE | CORRECTIVE ACTION |
| Unit won't start or starts but will not run. | Incorrect starting procedures. | Follow instructions in the User Manual. |
| Incorrect carburetor mixture adjustment setting. | Have carburetor adjusted by an Authorized Service Center. | |
| Foulled spark plug. | Clean / gap or replace plug. | |
| Fuel filter plugged. | Replace fuel filter. | |
| Unit starts, but engine has low power. | Incorrect lever position on choke. | Move to RUN position. |
| Dirty air filter. | Remove, clean and rentail filter. | |
| Incorrect carburetor mixture adjustment selling. | Have carburetor adjusted by an Authorized Service Center. | |
| Engine hesitates. | Incorrect carburetor mixture adjustment setting. | Have carburetor adjusted by an Authorized Service Center. |
| No power under load. | ||
| Runs erratically. | Incorrectly gapped spark plug. | Clean / gap or replace plug. |
| Smokes excessively. | Incorrect carburetor mixture adjustment setting. | Have carburetor adjusted by an Authorized Service Center. |
| Incorrect fuel mixture. | Use properly mixed fuel (40:1 mixture). |
E
| Engine Type | Air-cooled, 2-Cycle, Chrome Cylinder |
| Displacement | .24cc |
| Dry Weight | .6.6 Kg |
| Fuel Capacity | .450 ml |
| Blade Length | .55cm |
| Max Cutting Thickness | .25mm |
| Ignition | .Electronic |
| Maximum Enquine Performance | 0.8 kW |
| Noise | .106 dB(A) |
| Vibration | .3.93 m/s ^2 |
| Speed | 2500+150 strokes/min |
CARBURANT ET HUILE
MELANGE 2-TEMPS
natural_image
Black-and-white photo of a vehicle parked in a row beside a leafy ground area (no visible text or symbols)natural_image
Person using a tool to cut or trim a plant stem, no visible text or symbolsFig. 4B
natural_image
Close-up of mechanical components labeled A, B, and C showing assembly or assembly (no readable text or symbols)Fig. 6
natural_image
Black-and-white photo of a garden with rows of shrubs and a utility pole, no visible text or symbolsFig. 6
FÖRVARA MASKINEN
natural_image
Black-and-white photo of a person standing near a utility pole with plants in the foreground (no visible text or symbols)natural_image
Person wearing gloves handling a long pole with a measuring tape, surrounded by dense foliage (no visible text or symbols)Fig. 4B
natural_image
Two-panel image showing a mechanical assembly with labeled parts A, B, and C (no readable text or symbols)Fig. 6
KAASUTTIMEN SÄÄDÖT
natural_image
Black-and-white photo of a grassy field with a utility pole and a small vehicle, no visible text or symbolsFig. 4A
natural_image
Person using a tool to cut or trim a plant stem, no visible text or symbolsFig. 4B
- SIDEVÆRTS TILSKÆRING AF HÆK. Hold trimmeren som vist på fig. 4B, og start med at stryge nedefra og op.

DK
VEDLIGEHOLDELSE
INDSTILLING AF KABURATOR
natural_image
Black-and-white photo of a person operating a manual pump in a field with rows of plants (no visible text or symbols)Fig. 4A
natural_image
Person using a tool to cut or trim a plant stem in dense soil (no visible text or symbols)Fig. 4B
MANUTENZIONE
natural_image
Two-panel image showing mechanical components labeled A, B, and C, with no visible text or symbols.Fig. 6
CANDELE DI ACCENSIONE
natural_image
Black-and-white photo of a garden with rows of shrubs and a person standing near a tree (no visible text or symbols)Fig. 4A
natural_image
Person using a tool to cut leafy plants in a field (no visible text or symbols)Fig. 4B
ÚDRŽBA
natural_image
Exterior view of a garden with shrubs and a paved walkway (no signage or text visible)Fig. 4A
natural_image
Person using a long-handled tool to cut a tree trunk in dense foliage (no visible text or symbols)Fig. 4B
Konserwacja
NAPRAWA I KONSERWACJA
natural_image
Black-and-white photo of a person operating a large agricultural machine in a field (no visible text or symbols)Fig. 4A
Vypnutie motora
natural_image
Person using a tool to cut or brush on a leafy plant (no visible text or symbols)Fig. 4B

SK
Údržba
natural_image
Black-and-white photo of a grassy field with a person standing near a tree (no visible text or symbols)Fig. 4A
natural_image
Person using a tool to cut tree branches, no visible text or symbolsFig. 4B
ΣΥΝΤΗΡΗΣΗ
natural_image
Person using a tool to cut or trim a plant stem, no visible text or symbolsТехнический уход
2000/14/EG: L_WM = 104 dB; L_WA = 108 dB P = 0.6 kW

89/336/EWG_93/68/EEC

95/54/EG:

90/396/EWG

97/68/EG: e4*97/68SH2G3*2002/88*0109*00

89/686/EWG
EN 774:1996; EN ISO3744:1995; EN ISO14982; KBV V
Subject to change without notice
The product described in these instructions comes with a 2 year warranty
scovring defects. This 2-year warranty period begins with the passing of risk or
when the customer receives the product. For parents arising is he commented, the end of how to receive the owner
For warranty claim is to be accepted, the product has to receive the current maintenance and be put to the proper use as described in the operating
instruments which are part of the proper use as described in this operating instructions.
Your statutory rights of warranty are naturally unaffected during these 2
years.
This warranty applies in Germany, or in the respective country of the
manufacturer's main regional sales partner, as a supplement to local
regulations. Please note the details for contacting the customer service comor responsibility for your pension or the service address later before.
⑤ GARANTIBEVIS
E. Multilaminating for all germline sodium KIFAs has transport of all palmitazol in water. His salt is produced by
a l'oei anis emi, macekemama i bubaca var ingen sami al proacieni na serviene pà andemabentie xist.
The following table provides the original data:
NCK GARANTIBEVIS
I ilbseüs al, al vort product skalls versre lejbelneffs), ydsc vi 2 ans perselti pi di sl
19 September 2018, Finland produced. German press conference: par 2 at Leipzig, Germany.
går over på kattar, eller har produktet ovensnagles til kattar. For at sujno stette krav på gæration er dit en Inudsselmire
bievel ordentiet voelgeholdi | henhold til beleninesvoeldeinogens anvisninger.
The reprinting or reproduction by any other means, in whole or in part, of documentation and papers accompanying products is permitted only with the express consent of ISO GmbH.