RG-CH 18 Li - Hedge trimmers EINHELL - Free user manual and instructions
Find the device manual for free RG-CH 18 Li EINHELL in PDF.

| Product Type | Cordless Hedge Trimmer |
| Brand | Einhell |
| Model | RG-CH 18 Li |
| Cutter Rail Length | 580 mm |
| Cutting Length | 520 mm |
| Tooth Spacing | 15 mm |
| Max Cutting Thickness | 11 mm |
| Cuts per Minute | 1200 |
| Battery Voltage | 18 V d.c. |
| Battery Capacity | 1.4 Ah |
| Charging Time | 3–5 hours |
| Charger Input | 230 V ~ 50 Hz |
| Charger Output | 21 V d.c., 500 mA |
| Weight | 3.3 kg |
| Sound Pressure Level (L_pA) | 82.5 dB |
| Sound Power Level (L_WA) | 90 dB |
| Vibration Level (a_hv) | ≤ 2.5 m/s² |
| Safety Features | Two-hand safety switch, hand guard, impact guard |
| Included Accessories | Battery pack, charger, cutter guard, cuttings collector |
| Recommended Use | Cutting hedges, bushes, shrubs (domestic use only) |
| Maintenance | Clean and lubricate cutters regularly; carbon brushes replacement by qualified electrician |
| Warranty | 2 years Einhell Express Guarantee |
Frequently Asked Questions - RG-CH 18 Li EINHELL
User questions about RG-CH 18 Li EINHELL
0 question about this device. Answer the ones you know or ask your own.
Ask a new question about this device
Download the instructions for your Hedge trimmers in PDF format for free! Find your manual RG-CH 18 Li - EINHELL and take your electronic device back in hand. On this page are published all the documents necessary for the use of your device. RG-CH 18 Li by EINHELL.
USER MANUAL RG-CH 18 Li EINHELL
Cordless Hedge Trimmer
Einhell®

CE
Read and follow the operating instructions and safety information before using for the first time.
natural_image
Close-up of a hand holding a car tire with a small mechanical component inserted, showing arrows indicating parts (no text or symbols visible)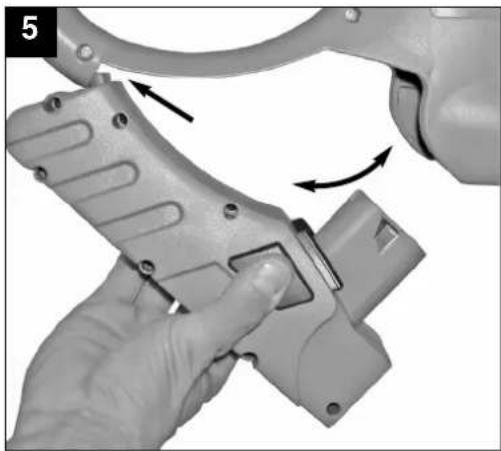
natural_image
Close-up of a hand holding a handheld device with arrows indicating motion or adjustment (no text or symbols visible)
natural_image
Close-up of a mechanical tool with a spring scale and handle, showing motion arrows (no text or symbols)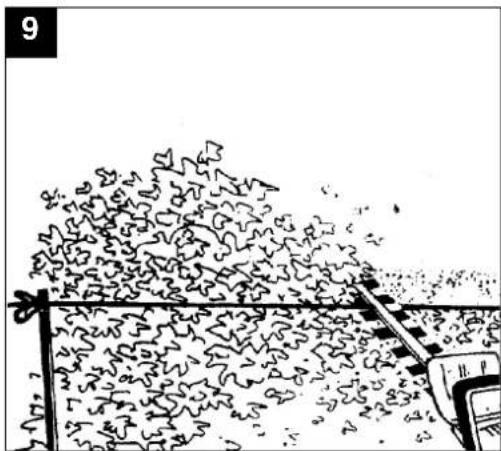
natural_image
Black-and-white sketch of a train with a flagpole and scattered debris, no text or symbols present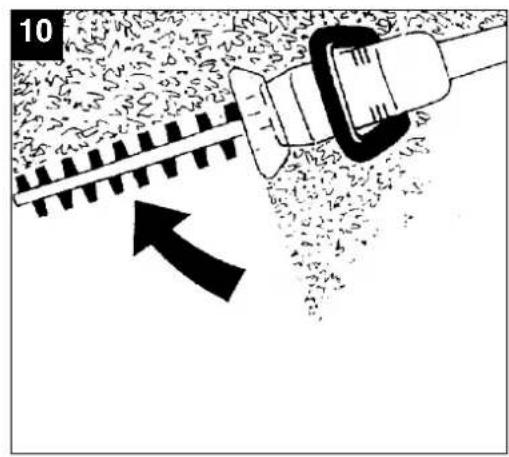
natural_image
Technical line drawing of a mechanical assembly with a cylindrical component inserted into a shaft (no text or symbols)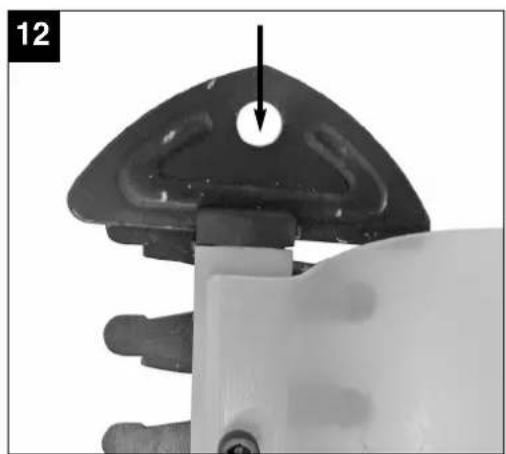
natural_image
Close-up of a mechanical component with a black triangular top and arrow indicating a point of interest (no text or symbols visible)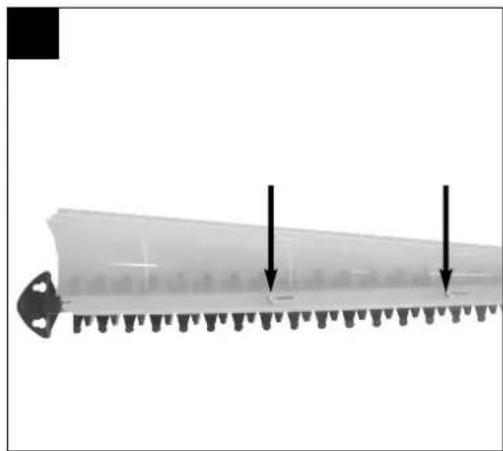
natural_image
Close-up of a mechanical part with two black arrows pointing to features, no visible text or symbols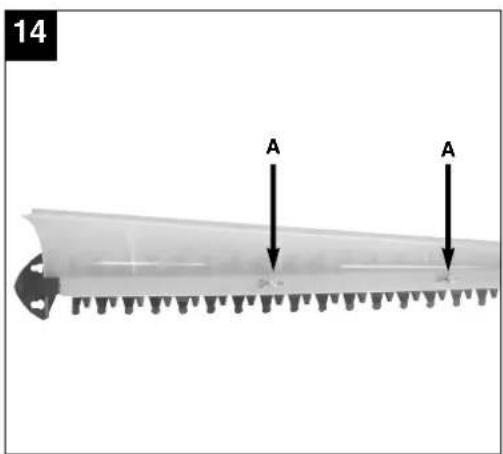
natural_image
Black-and-white photo of a field with young plants and a person holding a tool, no visible text or symbols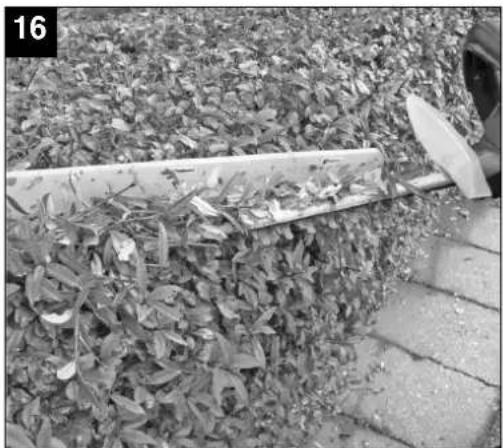
natural_image
Black-and-white photo of a paved sidewalk with leafy ground and a wooden fence, no visible text or symbolsGB
⚠️ Important!
When using equipment, a few safety precautions must be observed to avoid injuries and damage. Please read the complete operating manual with due care. Keep this manual in a safe place, so that the information is available at all times. If you give the equipment to any other person, give them these operating instructions as well.
We accept no liability for damage or accidents which arise due to non-observance of these instructions and the safety information.
1. Safety information
Please refer to the booklet included in delivery for the safety instructions.
CAUTION!
Read all safety regulations and instructions.
Any errors made in following the safety regulations and instructions may result in an electric shock, fire and/or serious injury.
Keep all safety regulations and instructions in a safe place for future use.
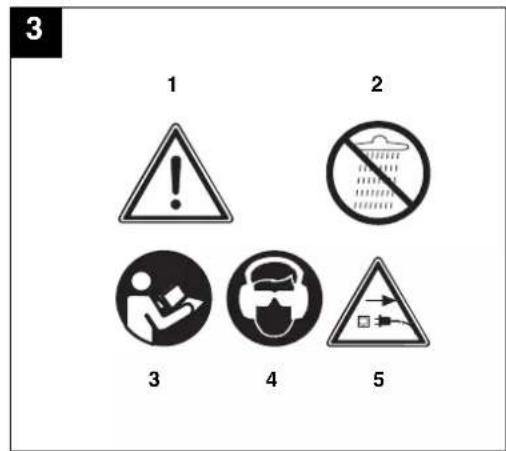
Explanation of the warning signs on the machine (Figure 3)
- Warning!
- Do not expose the hedge trimmer to rain or wet conditions!
- Read the instructions for use before use!
- Wear eye protection and ear plugs!
- If the cable is damaged or cut, pull out the power plug from the mains immediately.
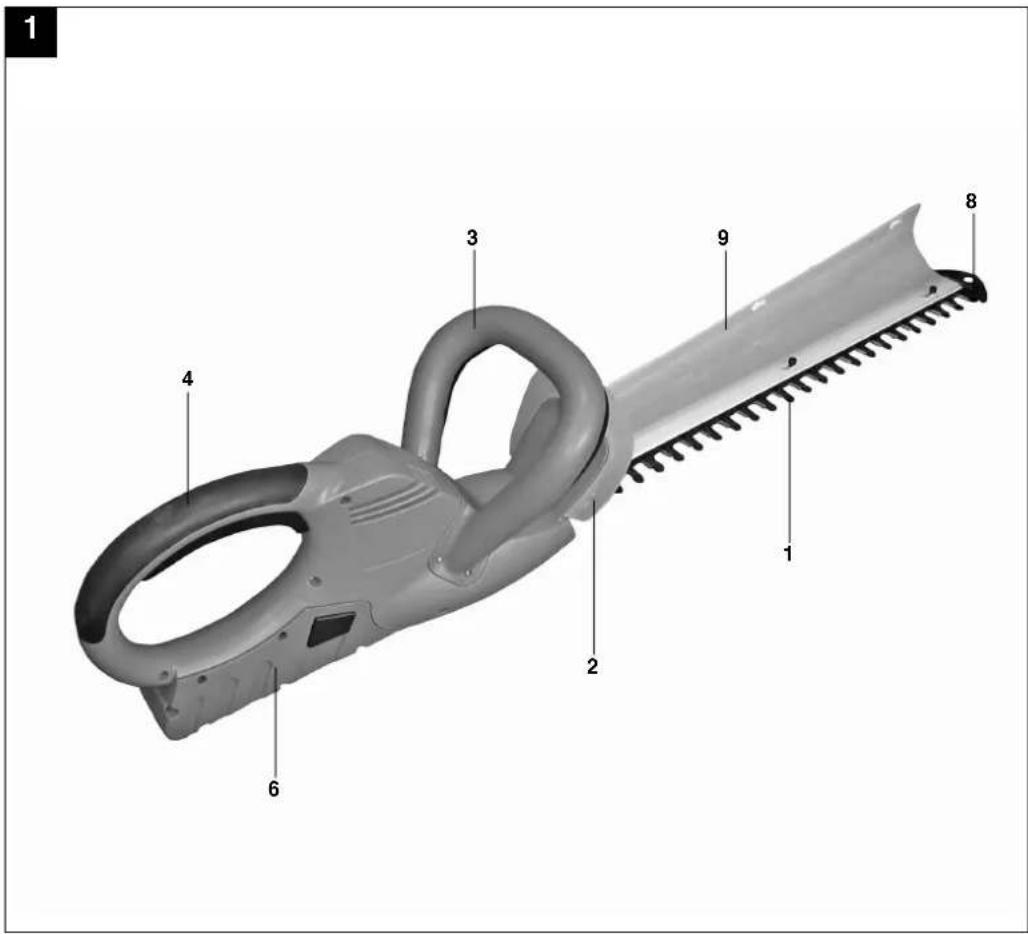
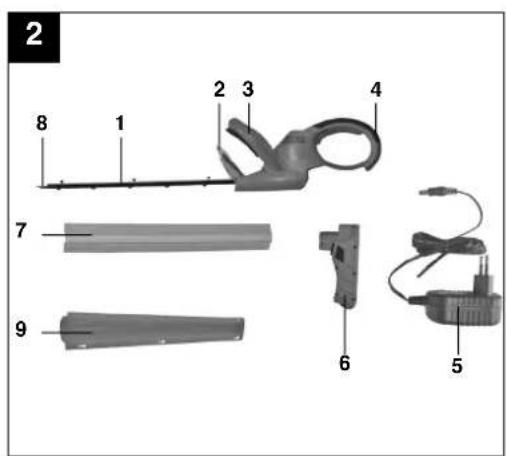
2. Layout (Fig. 1/2)
- Cutter rail
- Hand guard
- Steady grip with button switch
- Handle with button switch
- Battery charger
- Battery pack
- Cutter guard
- Impact guard
- Cuttings collector
3. Proper use
This hedge trimmer is suitable for cutting hedges, bushes and shrubs.
The machine is to be used only for its prescribed purpose. Any other use is deemed to be a case of misuse. The user / operator and not the manufacturer will be liable for any damage or injuries of any kind caused as a result of this.
Please note that our equipment has not been designed for use in commercial, trade or industrial applications. Our warranty will be voided if the machine is used in commercial, trade or industrial businesses or for equivalent purposes.
4. Technical data
Cutter rail length 580 mm
Cutting length 520 mm
Tooth spacing 15 mm
Cutting thickness max. 11 mm
Cuts/min 1200
Charging time 3-5 h
Sound pressure level, L_pA 82.5 dB
Sound power level, L_WA 90 dB
Vibration a_hv ≤ 2.5 m/s^2
Weight 3.3 kg
Battery pack
Voltage 18 V d. c.
Capacity 1.4 Ah
Battery charger
Mains voltage 230 V \~ 50 Hz
Output voltage/current 21 V d. c. / 500 mA
5. Before starting
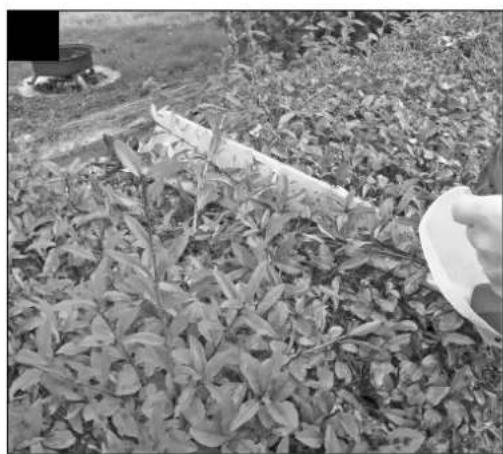
Fitting the cuttings collector (Figure 13-16).
For horizontal cutting we recommend that you fit the cuttings collector. This enables you to remove the cuttings easily. The surface of the hedge thus remains clear (Fig. 15/16). Position the cuttings collector on the cutter rail (Figure 13). Then push the cuttings collector as far as possible towards the tip of the cutter rail and secure it with the screws (Fig. 14 / Item A). The cuttings collector can be fitted on either the right or left side.
Charging the battery
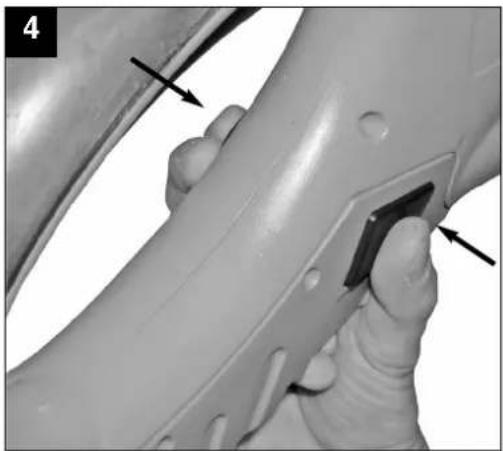
- Take the battery pack out of the equipment. Press the locking buttons on the side to release the battery pack (Fig. 4-5).
- Check that your mains voltage is the same as that marked on the rating plate of the battery charger. Connect the charger's power cable to a socket outlet and insert the plug (Fig. 6/Item A) into the charging jack of the battery pack. The red LED indicates the charging process.
- The charger will end the charging process automatically when the battery is fully charged (after 3-5 h). The green LED will come on.
- To insert the battery pack again, first hook it in the guide lug on the hedge trimmer handle and then swing it upwards until it locks in place (Fig. 5). The rechargeable battery can become a little warm during the charging process. This is normal.
If the battery pack fails to charge, please check
●whether there is voltage at the socket-outlet
●whether there is good contact at the charging contacts
If the battery pack still fails to charge, send
●the battery charger with charging adapter
●and the battery pack
to our customer services department.
To ensure that the NC battery pack provides long service you should take care to recharge it promptly. Recharging is always necessary when you notice a drop in the performance of your cordless grass trimmer.
Never fully discharge the battery pack. This will cause it to develop a defect.
6. Operation
Switching ON/OFF.
The hedge trimmer is equipped with a two-handed safety switch. The machine works only when the switch on the steady grip (Figure 1 / Item 3) is pressed with one hand and the switch on the handle (Figure 1 / Item 4) is pressed with the other hand. If either switch is released, the cutters will stop moving. Please watch out for the cutters as they slow down to a standstill.
Notes on working practice
●A hedge trimmer can be used to cut shrubs and bushes as well as hedges.
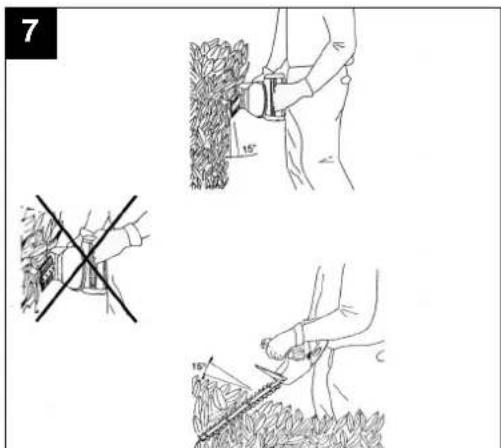
- To obtain the best cutting results, hold the hedge trimmer so that the cutter teeth are at an angle of approx. 15^ in relation to the hedge (see Figure 7).
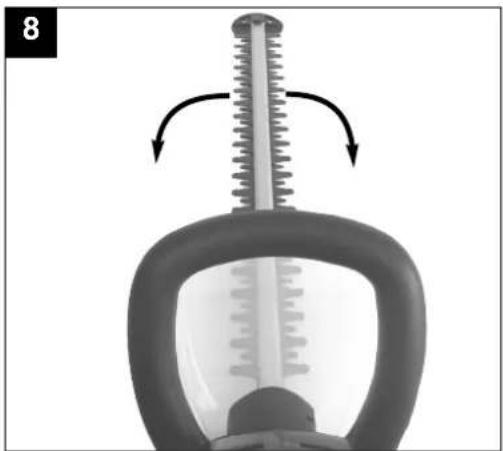
●The twin-bladed cutters rotate in opposite directions, thus enabling cutting in both directions (see Figure 8).
- It is recommended to tie a guide line of string or the like along the hedge so that you cut the hedge to a level height. Cut off all branches which protrude beyond the guide line (see Figure 9).
●Cut the sides of the hedge with curve-shaped movements from the bottom up (see Figure 10).
●Using with the cuttings collector (Fig. 15/16)
For horizontal cutting we recommend that you fit the cuttings collector. This enables you to remove the cuttings easily. The surface of the hedge thus remains clear.
7. Cleaning, maintenance and ordering of spare parts
Turn off and remove the rechargeable battery from the hedge trimmer, before putting down or cleaning.
7.1 Cleaning
- Keep all safety devices, air vents and the motor housing free of dirt and dust as far as possible. Wipe the equipment with a clean cloth or blow it with compressed air at low pressure.
●We recommend that you clean the device immediately each time you have finished using it.
●Clean the equipment regularly with a moist cloth and some soft soap. Do not use cleaning agents or solvents; these could attack the plastic parts of the equipment. Ensure that no water can seep into the device. - Remove deposits from the guard hood with a
GB
brush.
7.2 Carbon brushes
In case of excessive sparking, have the carbon brushes checked only by a qualified electrician. Important! The carbon brushes should not be replaced by anyone but a qualified electrician.
7.3 Maintenance
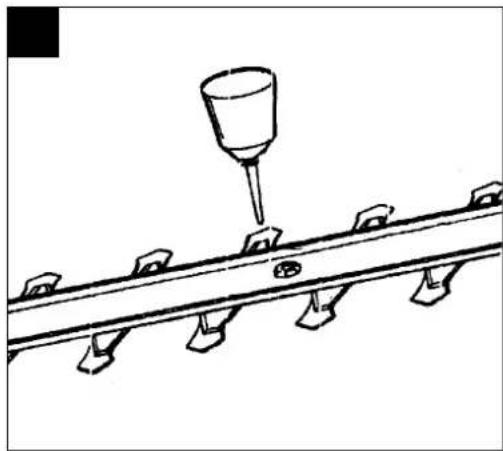
●The cutters should be cleaned and lubricated at regular intervals in order to ensure best performance at all times. Remove deposits with a brush and apply a thin film of oil (Figure 11).
●There are no parts inside the equipment which require additional maintenance.
●The hedge trimmer with the cutter guard and cuttings collector fitted can be hung on a nail, screw or the like for storage using the hole in the impact guard (Fig. 12).
7.4 Ordering replacement parts:
Please quote the following data when ordering replacement parts:
●Type of machine
●Article number of the machine
●Identification number of the machine
●Replacement part number of the part required For our latest prices and information please go to www.einhell.com.au
8. Disposal and recycling
The unit is supplied in packaging to prevent its being damaged in transit. This packaging is raw material and can therefore be reused or can be returned to the raw material system.
The unit and its accessories are made of various types of material, such as metal and plastic.
Defective components must be disposed of as special waste. Ask your dealer or your local council.
9. Faults
The device does not operate:
Check whether the rechargeable battery is charged and whether the battery charger works. If the device still does not work even with a voltage supply, please send it to our customer services department at the address indicated.
The guarantee provided in this Guarantee Certificate is given by Einhell Australia Pty Limited ACN 134 632 858 of 6/166 Wellington Street, Collingwood, Victoria (Telephone number 1300 922 271) (Einhell Express Guarantee).
GB GUARANTEE CERTIFICATE
Dear Customer,
All of our products undergo strict quality checks. In the unlikely event that your device develops a fault, please contact our service department at the address shown on this guarantee certificate. Of course, if you would prefer to call us then we are also happy to offer our assistance under the service number printed below. Please note the following terms under which claims under the Einhell Express Guarantee can be made:
- The benefits conferred by the Einhell Express Guarantee are in addition to all rights and remedies which you may be entitled to under the Australian Consumer Law, and any other statutory rights you may have under other applicable laws. This Einhell Express Guarantee does not exclude, restrict or modify any such rights or remedies.
We do not charge you for the Einhell Express Guarantee. - Our goods come with guarantees that cannot be excluded under the Australian Consumer Law. You are entitled to a replacement or refund for a major failure and for compensation for any other reasonably foreseeable loss or damage. You are also entitled to have the goods repaired or replaced if the goods fail to be of acceptable quality and the failure does not amount to a major failure.
- The Einhell Express Guarantee only covers problems caused by material or manufacturing defects, and our liability under the Einhell Express Guarantee is limited, at our discretion, to the rectification of these defects or replacement of the product. Please note that the product has not been designed for use in commercial, trade or industrial applications. Consequently, the Einhell Express Guarantee will not apply if the product is used in commercial, trade or industrial applications or for other equivalent activities.
- The following are also excluded from the Einhell Express Guarantee: compensation for transport damage, damage caused by failure to comply with the installation/assembly instructions or damage caused by unprofessional installation, failure to comply with the operating instructions (e.g. connection to the wrong mains voltage or current type), misuse or inappropriate use (such as overloading of the product or use of non-approved tools or accessories), failure to comply with the maintenance and safety regulations, ingress of foreign bodies into the product (e.g. sand, stones or dust), effects of force or external influences (e.g. damage caused by the product being dropped) and normal wear resulting from proper operation of the product. The Einhell Express Guarantee will also not apply if any attempt is made to tamper with the product.
- The Einhell Express Guarantee is valid for a period of 2 years starting from the purchase date of the product. Claims made under the Einhell Express Guarantee should be submitted before the end of this guarantee period and within two weeks of the defect being noticed. No claims under the Einhell Express Guarantee will be accepted if submitted after the end of this guarantee period. The original guarantee period remains applicable to the device even if repairs are carried out or parts are replaced. In such cases, the work performed or parts fitted will not result in an extension of the guarantee period for the Einhell Express Guarantee, and the Einhell Express Guarantee will not apply for the work performed or parts fitted. This also applies when an on-site service is used.
- To make a claim under the Einhell Express Guarantee, please send the relevant product postage-free to the address shown below and enclose either the original or a copy of your sales receipt or another dated proof of purchase. It would help us if you could describe the nature of the problem in as much detail as possible. If the defect is covered by the Einhell Express Guarantee, your product will be repaired immediately and returned to you, or we will send you a new device (at our election).
Any costs incurred by you in making a claim under this Einhell Express Guarantee, unless specified otherwise in this guarantee certificate, must be borne by you.
Of course, we are also happy to offer a chargeable repair service for any defects which are not covered by the scope of the Einhell Express Guarantee or for products which are no longer covered by the Einhell Express Guarantee. To take advantage of this service, please send the product to our service address.
EINHELL AUSTRALIA PTY LTD
6/166 Wellington Street
Collingwood VIC 3066
Australia
Phone: 1300 922 271