
R900 4K - Caméra auto Navitel - Free user manual and instructions
Find the device manual for free R900 4K Navitel in PDF.


| Type de produit | Dashboard Camera (Dashcam) |
| Marque | Navitel |
| Modèle | R900 4K |
| Résolution d'enregistrement | 4K (3840x2160) à 30 ips |
| Angle de vue | 150° (grand angle) |
| Écran | Écran LCD 2,0 pouces |
| GPS | Intégré (enregistrement de la vitesse et de la position) |
| Wi-Fi | Intégré (connexion à l'application mobile) |
| Capteur d'image | Capteur Sony (estimation) |
| Stockage | Carte microSD jusqu'à 128 Go (Classe 10 ou U3 recommandée) |
| Enregistrement en boucle | Oui |
| Détection de mouvement | Oui |
| Capteur G | Oui (détection de collision, verrouillage des fichiers) |
| Mode stationnement | Oui (surveillance en l'absence de mouvement, nécessite un câble d'alimentation constante) |
| Alimentation | USB 5V / 1,5 A (adaptateur allume-cigare fourni) |
| Batterie | Condensateur intégré (pour une meilleure résistance à la chaleur) |
| Dimensions | Environ 100 x 60 x 40 mm |
| Poids | Environ 150 g |
| Température de fonctionnement | -10°C à 60°C |
| Entretien et nettoyage | Nettoyer la lentille avec un chiffon doux ; formater la carte SD régulièrement dans l'appareil |
| Sécurité | Utiliser une carte SD de haute qualité ; ne pas obstruer la vue du conducteur ; fixer solidement |
| Pièces détachées et réparabilité | Support de montage et câble USB disponibles ; réparation par un centre agréé recommandée |
| Informations générales | Fabriquée par Navitel (Russie) ; manuel disponible en plusieurs langues |
Frequently Asked Questions - R900 4K Navitel
User questions about R900 4K Navitel
0 question about this device. Answer the ones you know or ask your own.
Ask a new question about this device
Download the instructions for your Caméra auto in PDF format for free! Find your manual R900 4K - Navitel and take your electronic device back in hand. On this page are published all the documents necessary for the use of your device. R900 4K by Navitel.
USER MANUAL R900 4K Navitel
Seadme skeem
Thank you for purchasing this NAVITEL® product.
NAVITEL R900 4K is a high-definition DVR with many functions and features that are described in this User Manual. Please read the manual carefully before using the device and keep it for future reference.
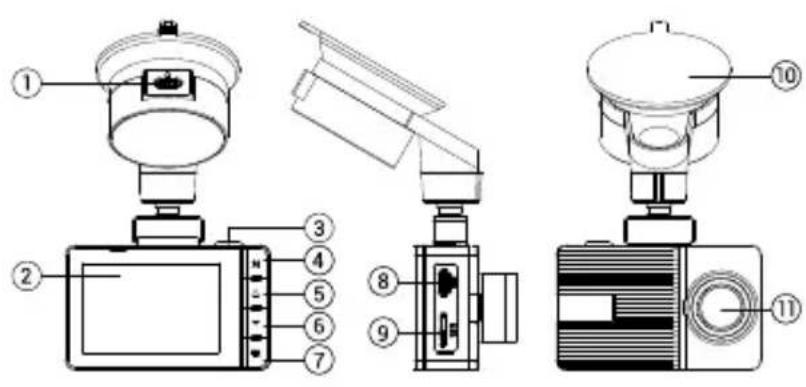
Device layout
- Type-C port
- Display
- Power
- Menu
- Up
-
Down
-
Ok
- Type C port for
connecting to PC - MicroSD slot
- Windshield mount
- Lens
Package contents
• DVR NAVITEL R900 4K
• Car charger 12/24 V
- Windshield mount
- Type-C -USB cable
- Microfiber cloth
- User manual
- Warranty card
- Gift voucher
- Card reader
Specifications
| Processor Mstar 8629Q | |
| Display 2.35", 480x320, IPS | |
| Camera SONY 415(4K) | STARVIS |
| Recording format TS | |
| Video resolution 3840×2160 | |
| View angle 140° | |
| Lens 7-layer glass + IR | |
| Storage microSD card | |
| MicroSD card capacity Max. 256 GB | |
| USB Type-C | |
| Supercapacitor 1,5 F | |
| Power 5 V, 2,5 A | |
| G-sensor Yes | |
| Microphone / speaker Yes | |
| Language* | CzechDeutschEnglishFrenchHungarianItalianLatvianPolishPortugueseRomanianRussianSlovakSpanishUkrainianVietnamese |
Note: the package, appearance, specifications that do not change the overall functionality of the device may be changed by the manufacturer without prior notice.
* in future updates, the choice of languages may be expanded
Installation
- Put the microSD card into the DVR. Use a high-speed SD card (Class U3 or above); capacity should be within 8-256 GB.

- To avoid malfunctions of the DVR and / or SD-card, don't insert and remove SD-card during DVR operation.
-
Before using a microSD card, please format it inside the DVR to avoid data errors. For formatting the SD-card in Menu mode select Format SD-card and confirm it.
-
Secure the device on the windshield with the holder.
- Connect the car charger to the cigarette lighter socket.
- Connect the car charger to the DVR (Type-C).
- Adjust the camera position.
- Turn the power on; check whether the device is installed correctly. If the device is installed correctly, it will start up and begin recording.
Precautions
- The built-in supercapasitor is only designed to properly turn off the device when the power is turned off and save the last recorded file; For the full operation of the device in any of the modes, a constant power connection is required.
- Permissible ambient temperature in operating mode: -10 to +60 °C. Storage temperature: -20 to +80 °C. Relative humidity: 5% to 90% without condensation (25 °C).
- Put the device away from fire sources to avoid explosion or fire.
- Do not expose the device to physical impacts.
- Avoid contacting the device with sources of electromagnetic radiation.
- Keep the lens clean. Do not use chemicals or detergents to clean the product; always turn off the device before cleaning.
- Strictly follow the laws and regulatory acts of the region where the device is used. This device can not be used for illegal purposes.
- Do not disassemble or repair device by yourself. In case of device failure, contact the service center.
- Use only the original charger adapter. Using another adapter may negatively affect the device's work. Use accessories only approved by manufacturer.
Buttons
| Button Functions | |
 | Press to enter Menu mode.In Menu mode press to reurn back. |
 | In Record mode, press Up to turn the microphone on / off.In Menu, press to select the previous menu item.In Playback mode, press to select the previous file. |
 | In Capture mode, press to take a picture.In Menu, press to select the next menu item.In Playback mode, press to select the next file. |
 | In Record mode, press to lock a file (protected file cannot be deleted or overwritten).In Playback mode, press to select a file, or pause / resume video. |
Device functions
| Format SD-card | Formatting a microSD card in the DVR is necessary for the correct operation of the device. Before using a microSD card or in case of data error, please format the microSD card. For formatting the SD-card in Menu mode select Format SD-card and confirm it. |
| Record | Connect the device to an external power supply and it will start recording automatically (the recording indication will be displayed on the screen). Press the OK button to stop recording. Press again to record another video. Each video will be saved automatically. |
| Capture | In Record mode, press the ▼ button to take a photo (it will be saved automatically). |
| Playback | In Record mode, press M to switch between Record, Capture and Playback modes.; press the Up and Down buttons to select a file; press button to play a file. During playback, press to pause/unpause. |
| Loop recording | This feature allows you to save a video as a set of files given in the duration menu. If the memory card runs out of space, the unprotected files will be overwritten in the order in which they were created. |
| Record audio | Record video with or without sound. In Record mode, press ▲ to turn the microphone on / off. |
| Lock file | To protect the current file in the Video Recording mode, press OK and color of the recording indicator will turn yellow. When you press OK again, the protection of the current file is released, the recording indicator turns red. Protected files cannot be overwritten. |
| G-sensor If the vehicle is hit by something, the DVR will automatically lock the current video. | |
| LCD OFF | The device can automatically shut off the screen to reduce power consumption; time interval can be set in the LCD OFF menu. |
Bevezetés
Tisztelt Ügyfelünk!
Eszköz elrendezése
Wygląd Zewnętrzny
Внешний вид
natural_image
Green globe with orbiting rings, no text or symbols presentNAVITEL


Brand : Navitel
Model : R900 4K
Category : Caméra auto