MM1000 - Food processor Zelmer - Free user manual and instructions
Find the device manual for free MM1000 Zelmer in PDF.

| Product type | Food processor / Mincer with optional attachments |
| Brand | Zelmer |
| Model | MM1000 |
| Power supply | 230 V ~ 50 Hz |
| Peak power | 1500 W |
| Max continuous operation | 10 minutes |
| Break time between cycles | 30 minutes |
| Noise level (LWA) | 77 dB(A) |
| Main functions | Mincing, shredding (4 drums), juicing, burr grinding (model-dependent) |
| Mincer accessories included | Mincer body, feed screw with coupling, knife, screens (4 mm, 2.7 mm, 8 mm), threaded ring, tray, pusher |
| Shredder drums | Fine grating, coarse grating, slicing, pulping |
| Juicer parts | Chamber, worm, body, nut, juice channel, adjusting screw, screens (2 sizes), sealing rings, hook |
| Burr grinder | Nut, burr regulator, body with knob, internal and external burrs, worm, chamber, pan |
| Safety features | Mechanical coupling break protection; lock button; ventilation openings |
| Material | Plastic housing, stainless steel cutting parts (knife, screens) |
| Cleaning | Hand wash only (metal parts); do not immerse drive unit; do not use dishwasher for metal parts |
| Storage | Integrated cord storage; compartment for accessories |
| Weight (approx.) | 4.5 kg |
| Dimensions (approx.) | 300 x 220 x 380 mm |
| Color | White (typical) |
Frequently Asked Questions - MM1000 Zelmer
User questions about MM1000 Zelmer
0 question about this device. Answer the ones you know or ask your own.
Ask a new question about this device
Download the instructions for your Food processor in PDF format for free! Find your manual MM1000 - Zelmer and take your electronic device back in hand. On this page are published all the documents necessary for the use of your device. MM1000 by Zelmer.
USER MANUAL MM1000 Zelmer
A. 100% of the population in China
(1) A Veritas Group, 2014, 95: 2006 Vol
60.
(1) 2017年1月1日
(6) You want to use your own computer, or what
图 1-4
The following table is in English:
-
3,000 m a wide (a narrow) range to are on
-
- 10.
(1) 本报告的披露文件如下表所示
(1) 2023年1月1日
natural_image
White kitchen electric shaver with fresh ingredients and a glass of juice (no visible text or symbols)
- MURLEY, 1970. MARRISON, 1965.
- ZHIJIQIA, 1983.
- KONJAL, 1984.
- KONJAL, 1985.
→产→产→产→产
B
zelmer
Write on the
[Unreadable]
zelmer
www.csc108.com
图 1-3. 求国经济贸易
+
11
Notes
PL
Szanowni Klienci!
PŘÍPRAVA K POUŽITÍ A OBSLUHA LISU (Obr. H)
No. 1 – kisebb lyukakkal
Congratulations on your choice of our appliance, and welcome among the users of Zelmer products.
In order to achieve best possible results we recommend using exclusively original Zelmer accessories. They have been specially designed for this product.
Please read this user manual carefully. Pay special attention to important safety instructions. Keep this user manual for future reference.
Appliance features
Shred, grind, squeeze, grate – Zelmer – one choice and so many options.
If one appliance could mince meat, shred and slice nuts and vegetables, sieve fruit to prepare delicious meals for babies or seasonal preserves, and even grind grain, seeds, nuts or coffee beans ... Now, all this is within your reach thanks to Zelmer mincers. Zelmer, an undisputed leader in the mincer category, presents the full range of MM1000 products. These appliances can cope with each, even the most difficult task. Owing to the unique motor cooling system, the Zelmer mincer easily achieves "exceptionally large power", with the Peak Power value amounting to 1500 W. Thanks to its perfect design solutions, after disengaging the standard mincer body and attaching a suitable module, the appliance can be transformed into a shredder, fruit juicer or burr grinder (model-dependent accessories, also available as options). Having only one appliance in the kitchen, you will delight the household members and guests with a range of refined meals. The Zelmer mincer will prove to be ideal during the fruit season: thanks to the fruit juicer you will prepare homemade juices, puree or fruit jellies. The shredder will help you prepare vegetables for soup, which, after being stored in a freezer, will delight you with the summer bouquet of tastes when it is grey and cold outside your window. The foodstuff mincer is intended for use in households.
Zelmer – Your invaluable helper in the kitchen.
Safety precautions and instructions for proper use of the appliance
Before starting to use the appliance, become familiar with the whole content of this user manual.
Make sure that you understand the instructions given below.

Danger! / Warning! Risk of injury
Do not operate the appliance when the power cord is damaged or the housing shows visible damage.
the non-detachable power cord is damaged, it should be replaced by the manufacturer or at specialist service centre or by a qualified person in order to avoid any hazards.
The appliance may only be repaired by qualified service personnel. Improper servicing may cause a serious hazard to the user. In case of defects contact ZELMER specialist service centre.
Take special care when operating the appliance in the presence of children.
Turn off and unplug the appliance before replacing accessories or approaching its movable parts.
Always unplug the appliance before cleaning.
This appliance is not intended for use by persons (including children) with impaired physical, sensory or mental abilities, or those with lack of experience or knowledge, unless they have been given supervision or instruction how to use the appliance by a person responsible for their safety.
- Prevent children from playing with the appliance.
The appliance must only be used with the feeder tray.

Warning! Risk of property damage
Do not disconnect the plug from the socket by pulling the power cord.
Connect the appliance to the 230 V alternating current mains only.
Do not expose the appliance to temperatures above 60°C. The appliance can be damaged.
use the pusher only when pushing the food. Using objects other than the pusher may cause damage to the mincer and the motor.
Do not overload the appliance with too much product or by pushing too hard with the pusher.
Carefully assemble the mincer unit, as the improper assembly results in poor mincing quality and may cause the knife and the screen to blunt. Replace the blunt cutter or screen with the new ones.
Do not obstruct the ventilation openings in the housing during operation.
Do not place the appliance on a soft surface.
Do not immerse the appliance drive unit in water and do not wash it under running water.
Do not wash accessories when mounted on the drive unit. Do not use abrasive cleaning agents such as emulsions, creams, pastes, etc. for cleaning the appliance housing. They may remove graphical symbols, such as scales, markings, warning signs, etc.

Information on the product and hints on its use
Unplug the appliance after you finish using it. Put away the cord, pushing it gently through the opening and place the plug in the compartment.
the appliance cannot be switched on, bring it to a service centre.
Separate the meat to be minced from bones, sinews, gristles and veins.
Cut large portions of the product into smaller pieces before mincing.
Do not grind dry poppy seed. The poppy seed must be scalded and soaked for dozen or so hours before mincing.
Use a soft brush for cleaning the metal parts.
- Do not wash the metal parts in dishwashers. Abrasive detergents used in dishwashers may cause the metal parts to become dark. Wash them manually using traditional washing-up liquids.
Technical data
The technical parameters are given on the rating plate of the product.
Maximum time of non-stop operation: 10 minutes
An interval between repeated operation: 30 minutes
Noise level (LWA): 77 dB(A)
The appliance is built in insulation class II and does not require earthing.
ZELMER mincers meet the requirements of the applicable standards.
The appliance complies with the requirements of the following directives:
– Low Voltage Directive (LVD) – 2006/95/EC.
– Electromagnetic Compatibility (EMC) – 2004/108/EC.
The product is marked with CE symbol on the rating plate.
Appliance description (Fig. A)
The foodstuff mincer consists of:
1 Drive unit – each drive unit is designed to work with each mincing unit and shredder manufactured by ZELMER. There are ventilation openings in the rear cavity of the MM1000 drive unit compartment.
Mincer unit consisting of:
② Mincer body
3 Feed screw with attached coupling
4 Knife
5 Screen with 4 mm holes
6 Threaded ring
7 Tray
8 Pusher
TYPES OF ZELMER MINCERS
The table below shows a range of accessories available for the mincers and covered by this user manual.
| Type | Accessories | |||
| Mincer unit No. 8 Shredder Juicer Burr grinder | ||||
| MM1000.80 | ● ● ● ● | |||
| MM1000.82 | ● | ○ ● | ○ | |
| MM1000.83 | ● ● ● | ○ | ||
| MM1000.84 | ● ● | ○ | ○ | |
| MM1000.88 | ● | ○ | ○ | ○ |
| ● - basic accessories, ○ - additional accessories available in shops | ||||
Parts and accessories comprising:
9 Screen with 8 mm holes
10 Screen with 2.7 mm holes
11 Sausage stuffing tube
12 Insert
13 Switch
14 Lock button
Mechanical safety device for the motor (Fig. A)
15 Scroll
16 Coupling
17 Screw M5x20
The mincer is equipped with mechanical protection, which secures the motor against damage – the teeth of the scroll coupling will break when the mincer is overloaded (e.g., when bones have entered inside the mincer body).
Replace the broken coupling with the new one:
●nscrew the screw (17) in the scroll (3) with the broken coupling,
- remove the broken coupling (16),
the new coupling (16) and tighten it with the screw (17).
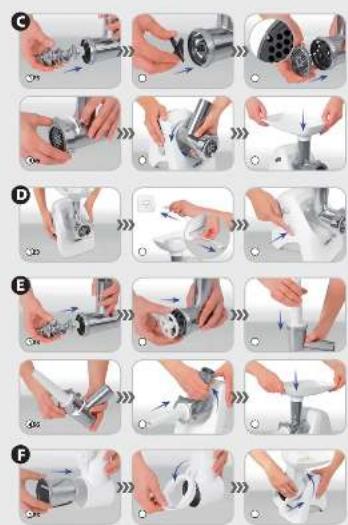
Working with the mincer unit (Fig. C)
Insert the following parts into the mincer body (2):
① Insert the scroll (3) with the coupling (16) facing inside.
② Fit the knife (4) onto the pin of the scroll (3) with the blades facing the screen.
③ Place the screen (e.g. 5) over the knife so that the protrusion in the mincer body will fit into the groove in the circumference of the screen.
④ Tightly fit all the elements of the mincer unit.
⑤ Fit the assembled mincer unit onto the drive unit (1) and turn it until you hear a click of the lock.
⑥ Place the tray (7) on the mincer body (2).
Preparing the mincer for operation and starting the mincer (Fig. D)
① Place the drive unit (1) near the mains socket on a hard, stable surface. Do not obstruct the ventilation openings in the housing.
Wash all parts and accessories before the first use.
assemble all the required parts and attach them to the drive unit.
② Carefully pull out the power cord, and then insert the plug in the mains socket.
③ Start the mincer by means of the switch button (13).
Working with the sausage stuffing tube (Fig. E)
Insert the following parts into the mincer body (2):
① Insert the scroll (3) with the coupling (16) facing inside.
② Fit the insert (12) onto the pin of the scroll (3).
③ Fit the sausage stuffing tube (11).
④ Tightly fit all the elements with the threaded ring (6).
⑤ Fit the assembled mincer unit onto the drive unit (1) and turn it until you hear a click of the lock.
⑥ Place the tray (7) on the mincer body (2).
Before fitting the casing, soak it in warm water for about 10 minutes.
- it the wet casing onto the sausage stuffing tube (11). Make sure not to clog the ventilation openings in the tube.

meat mass filling the casing cannot be "too rare". Large amount of fluids can cause their leakage and penetration inside the mincer.
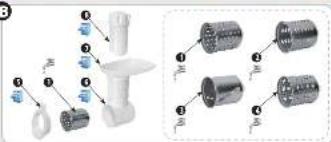
Shredder (Fig. B)
1 Fine grating drum
2 Coarse grating drum
3 Slicing drum
4 Pulping drum
5 Locking tab
6 Body
7 Tray
8 Pusher
The shredder is equipped with two drums to grate into small and bigger chips (cheese, carrot, celery, baked beetroots, etc.). The third grating drum (slicing drum) is used to grate vegetables (potatoes, onions, cucumbers, etc.). The fourth grating drum (pulping drum) is used to grate fruit and vegetables (potatoes, beetroots, etc.) into pulp.
WORKING WITH THE SHREDDER (Fig. F)
① Release the locking tab (5) and insert one of the grating drums with the coupling facing the inside of the body.
② Snap the locking tab (5).
③ Attach the shredder body (6) in the same way as the mincer body.
- Out large products into smaller elements, which you can be easily put into the shredder body.
Do not grate soft fruits containing hard stones.
When the work is finished turn off and unplug the appliance.
Remove the food remaining in the shredder body or inside the grating drum with a wooden spoon.

The blades of the drums do not require any regeneration.
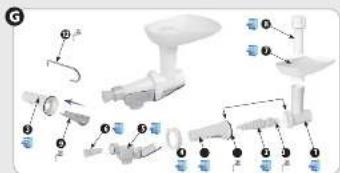
Juicer (Fig. G)
The juicer is an accessory for some types of mincers. It allows squeezing juice from fruits such as: raspberries, currants, strawberries, gooseberry and additionally from grapes and tomatoes. Berry fruits such as currants can be squeezed with stalks. Fruits with large stones, such as plums, cherries etc. can be squeezed in the appliance after removing the stones.
Parts of the juicer:
1 Chamber
2 Worm
3 Body
4 Nut
5 Juice channel
6 Adjusting screw
7 Bowl (from the mincer unit)
8 Pusher (from the mincer unit)
9 Screen - 2 pieces
No. 1 – smaller openings
No. 2 – larger openings
10 Large sealing ring for the body (3)
11 Small sealing ring for the worm (2)
12 Hook

Use only the pusher to push fruits (8).
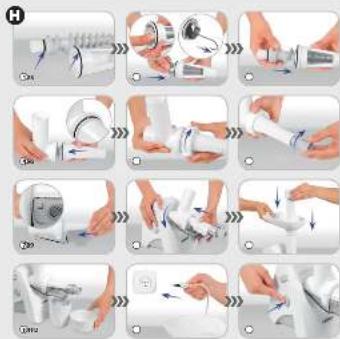
PREPARING THE JUICER FOR OPERATION AND ITS OPERATION (Fig. H)
① Make sure that the sealing rings (10) and (11) are fitted onto the body (3) and the worm (2). If not, insert them into the sealing grooves in these elements (the body and the worm).
② Insert the screen (9) into the body (3) and press firmly home.
③ Insert the worm (2) into the chamber (1).

der to remove the sieve (9) out of the body (3), it is helpful to use the hook (12). Put the shorter end of the hook (12) into the hole of the sieve (9), and pull the sieve (9) outside.
④ Insert the body with the screen onto the worm making sure that the sieve faces downwards, and the positioning slot fits into the protrusion in the chamber.
⑤ Screw on the nut (4) to attach the body to the chamber (1).
⑥ Screw the adjusting screw (6) into the body (3).
⑦ Slide the juice channel (5) over the adjusting screw until it snaps on the body (3) – “click”.
⑧ Attach the assembled juicer to the drive unit in the same way as the mincer body.
⑨ Insert the bowl (7) and the pusher (8) – from the mincer unit – onto the feeding tube.
10 Place the appropriate dishes for the juice and pomace under the outlet of the juice channel (5) and the adjusting screw (6).
⑪ Plug in the appliance.
⑫ Turn the appliance on by means of the switch button, and then feed the fruit, pushing with the pusher.

der for the juice squeezing process to run properly do not screw the adjustment screw too deeply in the initial operation phase. After assessing the amount of juice in the processed fruits, adjust the screw in order to obtain an adequate effectiveness and to avoid clogging the appliance.
Observe the pomace dryness during squeezing. If it is too dry, unscrew the adjusting screw (6), to avoid clogging the appliance with the pomace.

screw adjustment depends on the type of processed fruits, in case of juicy and ripe fruits adjust the screw deeper, and for fruits that are not as juicy, the level of screw adjustment should be lower.

If the screw adjustment does not provide an adequate squeezing effectiveness, you can process the pomace once again.

clogging of the chamber outlet (in the adjustment screw (3)) with the pomace of juicy fruits can cause the flooding of the drive unit.
Unplug the appliance if the chamber outlet becomes clogged. Pay special attention on the juice squeezing process, make sure the screen openings are not clogged. Disconnect the juicer from the drive unit (as in the case of the mincer body), dismantle the juicer, clean (wash) the juicer elements. Use the included brush to clean the appliance, especially the screen.
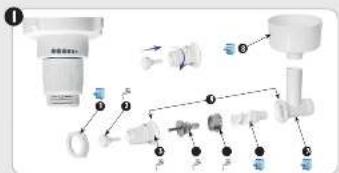
Burr grinder (Fig. I)
1 Nut
2 Burr regulator
3 Body with knob
4 Internal burr
5 External burr
6 Worm
7 Grinder chamber
8 Pan
9 The groove of the body must fit into the protrusion of the grinder chamber
DEVICE DESCRIPTION
The device can be used for grinding such products as: food grains, oily seeds and dry foodstuffs.
The burr grinder enables grinding such products as: wheat, oat, rice, granular coffee, all-spice, charlock, walnuts, hazelnuts dried mushrooms, almonds, soya, linseed, buckwheat groats, peeled sunflower seeds, etc.

ot grind the oily products by the minimal granulation set up. Grinding device can be glued or blocked.

device is not dedicated for grinding very hard products such as dried pea, maize.
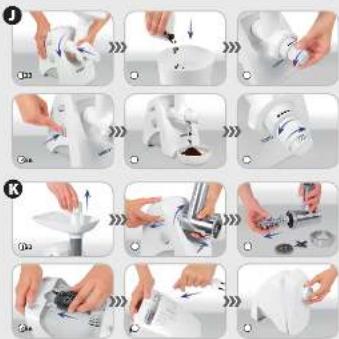
THE INSTALLATION OF THE GRINDER ON THE DEVICE (Fig. J)
① When the grinder chamber (7) is turned right by about 45^ , fit the assembled grinder onto the drive unit by inserting the protrusions of the grinder chamber (7) into the recesses in the drive unit, and then turn it left until you hear a “click” of the lock. It means that the grinder has been attached correctly.
USAGE AND REGULATION OF THE GRINDER (Fig. J)
Before the first use, wash (see "CLEANING") and dry the disassembled grinder, and then grind around 50 grams of product (e.g. food grain) with the grinder set to medium grinding. The ground product must not be used because it is contaminated and must be thrown away.

imum time of non-stop operation of the grinder is 10 minutes. This condition corresponds to the maximum time of non-stop operation of the mincer for which a 45-minute break is required after 10 minutes of non-stop operation.

device must not be operated without load. unloaded. Each time before staring the device, fill it with the product.
② Fill the pan (8) with grain.
③ Set the body handle (3) to coarse grinding.
④ Turn on the mincer motor.
⑤ The ground product will pour out through the opening.
⑥ Depending on the desired grinding level or the type of grain, adjust the burr regulator (2) with the body handle in order to obtain the product with the adequate granulation level. By turning it clockwise you will obtain a finer ground product, by turning it counter-clockwise – coarser ground product.
The finest (minimum) grinding level is achieved by setting the handle to line 1, and the coarsest (maximum) grinding level by setting it to the STOP line. See the graphic on the body (3) and burr regulator (2).
By attempting to twist or turn the handle beyond the STOP line during the operation you can damage the device.

recommended that the burr regulator (2) is set between line 1 and the STOP line during the grinder operation.

Remember to wash the grinder thoroughly before grinding different types of product. It will prevent mixing of odours.

soft grain such as oat or linseed it is necessary to select the coarse-graining setting.

Do not look into the grinding chamber during operation, as the grains which pop out sometimes, can hurt you (e.g. your eye).
CLEANING AND MAINTENANCE
The grinder does not require cleaning after each operation (if one type of product is ground only), because the worm (6) prevents the grain residues from depositing in the grinder. Dry the steel burrs (4, 5) using a soft cloth after cleaning to prevent corrosion. In case of long-term storage, conserve the burrs by greasing them (you can use edible oil). Do not immerse the burr in boiling water. The plastic parts (without the graphic) can be washed in the dishwasher (max. 60°C).
After the work has been finished
(Fig. K)
- Turn off and unplug the appliance.
① Remove the pusher and take out the tray from the mincer body.
② Press the lock button, turn the mincer unit right and remove it.
③ Disassemble the elements of the mincer unit, sausage stuffing tube.
Place the power cord as well as the cleaned and dried parts in the storage compartment.
④ Place the screen in the recess.
⑤ Put away the power cord.
⑥ Store the tray.
Cleaning and maintenance
- Clean the drive with a wet cloth, with an addition of dishwashing liquid.
- Wash the plastic parts in warm water, with addition of the dishwashing liquid.
- Wash the metal parts in hot water, with addition of the dishwashing liquid.
- Carefully dry the washed elements.
- Grease the screens and the knife with edible oil in order to protect them against corrosion.
- Assemble the dry parts of the mincer unit or the shredder.
Ecology – Protect the environment
Each user can contribute to protecting the environment. It is neither difficult nor too expensive. To this end: have the carton
packaging recycled at the recycling centre, put the plastic bags into the plastic (PE) waste container. When worn out, bring the appliance to the appropriate waste collection centre as some of its components can be hazardous to the environment.
Do not dispose of it together with household wastes!!!
The manufacturer does not accept any liability for any damages resulting from unintended use or improper operation of the appliance. The manufacturer reserves the right to modify the product at any time, without prior notice, in order to adjust it to legal regulations, standards and directives or due to constructional, commercial, aesthetic and other reasons.
Notes
- PL
- Szanowni Klienci!
- PŘÍPRAVA K POUŽITÍ A OBSLUHA LISU (Obr. H)
- Appliance features
- Shred, grind, squeeze, grate – Zelmer – one choice and so many options.
- Safety precautions and instructions for proper use of the appliance
- Danger! / Warning! Risk of injury
- Warning! Risk of property damage
- Information on the product and hints on its use
- Technical data
- Appliance description (Fig. A)
- TYPES OF ZELMER MINCERS
- Mechanical safety device for the motor (Fig. A)
- Working with the mincer unit (Fig. C)
- Preparing the mincer for operation and starting the mincer (Fig. D)
- Working with the sausage stuffing tube (Fig. E)
- Shredder (Fig. B)
- WORKING WITH THE SHREDDER (Fig. F)
- Juicer (Fig. G)
- PREPARING THE JUICER FOR OPERATION AND ITS OPERATION (Fig. H)
- Burr grinder (Fig. I)
- DEVICE DESCRIPTION
- THE INSTALLATION OF THE GRINDER ON THE DEVICE (Fig. J)
- USAGE AND REGULATION OF THE GRINDER (Fig. J)
- CLEANING AND MAINTENANCE
- After the work has been finished
- Ecology – Protect the environment
- Notes
Brand : Zelmer
Model : MM1000
Category : Food processor