
MCB6BA EU - Multicooker GORENJE - Free user manual and instructions
Find the device manual for free MCB6BA EU GORENJE in PDF.


| Product Type | Electric Multi-Cooker / Pressure Cooker |
| Model | Gorenje MCB6BA EU |
| Capacity | Approximately 5-6 liters (based on typical design) |
| Power Consumption | Approximately 900-1200 W (estimated) |
| Voltage | 220-240 V ~ 50/60 Hz (EU standard) |
| Pressure Range | 50-60 kPa (for most programs); up to 0 kPa for slow cook |
| Programs | Fry, Saute/Brown, Slow Cook, Cake, Steam, Stew, Rice, Soup, Braise, Warming |
| Cooking Time Adjustment | Adjustable for all programs (range varies per program) |
| Delayed Start | Yes, up to 24 hours (hours and minutes separate settings) |
| Manual Cooking | Yes, adjustable pressure holding time up to 99 min |
| Lid Type | Removable lid with sealing ring, safety lock |
| Safety Features | Float valve, safety valve, anti-blockage cover, over-temperature protection (E3 error) |
| Display | Digital display with program, time, pressure indicators |
| Power Consumption Monitor | Yes, approximate kWh usage shown on display |
| Accessories Included | Fry basket, measuring cup, meal spoon, power cord, steam rack |
| Cleaning | Not dishwasher safe; hand wash removable parts; clean heating plate with damp cloth |
| Sealing Ring Maintenance | Clean with warm water and detergent; replace if damaged (contact Gorenje service) |
| Error Codes | E1 (sensor cut), E2 (sensor short), E3 (over temp), E4 (signal switch failure) |
| Warranty | Standard Gorenje warranty; contact local service center |
| Dimensions (approx) | Height: ~30 cm, Width: ~28 cm, Depth: ~28 cm (estimated) |
| Weight (approx) | ~5-6 kg (estimated) |
Frequently Asked Questions - MCB6BA EU GORENJE
User questions about MCB6BA EU GORENJE
0 question about this device. Answer the ones you know or ask your own.
Ask a new question about this device
Download the instructions for your Multicooker in PDF format for free! Find your manual MCB6BA EU - GORENJE and take your electronic device back in hand. On this page are published all the documents necessary for the use of your device. MCB6BA EU by GORENJE.
USER MANUAL MCB6BA EU GORENJE
Sautee/Brown program
Press the Cancel/Warming button.
The appliance heats the food or keeps it warm at a temperature between 60°C and 80°C.
The program is interrupted by pressing the Cancel/Warming button.
Program table
| Programi | Originalni čas kuhanja pod priskom (min) | Nastavljanje časa (min) | Prisk (Kpa) |
| Fry | 00:25 | 18 - 40 | Odprt pokrov |
| Cake | 00:30 | 0 – 99 | 50 - 60 |
| Soup | 00:25 | 0 – 99 | 50 - 60 |
| Rice | 00:10 | 0 – 99 | 50 - 60 |
| Stew | 00:20 | 0 – 99 | 50 - 60 |
| Slow cook | 02:00 | 1h - 9h | 0 |
| Steam | 00:15 | 0 – 99 | 50 - 60 |
| Sautee Brown | 00:30 | 18 – 40 | Odprt pokrov |
| Braise | 00:30 | 0 – 99 | 50 - 60 |
| Warming | / | / | 0 |
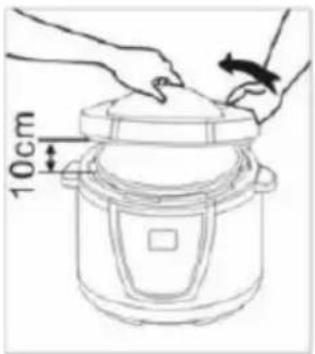
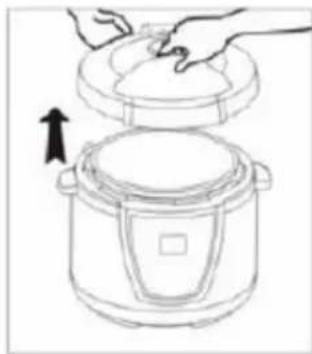
Place the ingredients into the cooking pot. The amount of ingredients must not exceed 4/5 of the volume of the cooking pot. Ingredients that swell during cooking (such as beans) must not exceed 1/5 of the volume of the pot.
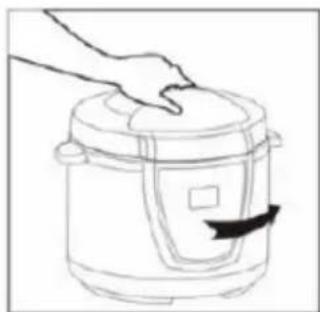
Turn the steam release valve to the "Sealed" position, and check that the float valve is down.
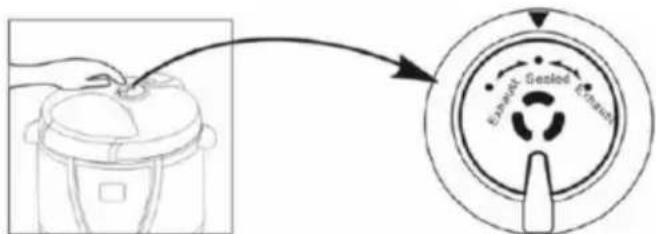
When cooking meat that requires a longer cooking time (such as beef), leave the valve in the "Sealed" position and wait for the appliance to cool down on its own and for the float valve to drop.
Setting delayed cooking
Press the "Time setting" option. The display shows 00:00 and the "Preset" symbol. Use the + and – buttons to select the number of delay hours. Press the "Time setting" function again, and use the + and – buttons to select the number of delay minutes, i.e., the delayed start. Now select the cooking program. You can do this directly or via the "Multifunction" button. The selected program and F: with a number flash on the display, where the number shows the cooking time. After 30 seconds, the countdown begins. The display shows the time until cooking starts, the selected program, and the "Preset" symbol. When the time expires, the appliance starts cooking.
If you want to cancel the set delayed cooking, press "Cancel".
When the appliance starts cooking, the heating indicators flash on the display, and the letter F and the remaining minutes until the end of cooking are also shown.
The cooking time starts when the pressure in the pot reaches the required value and the float valve rises to the upper position. The "Pressure" symbol appears on the display.
Manual cooking
Manual cooking is used when cooking larger quantities of food or larger pieces of meat, and the cooking program does not allow changing the cooking time.
Press the "Pressure holding time" function and use the + and – buttons to select the desired cooking time. The display flashes the symbol P: and a number. That number represents the cooking time. At the same time, the heating elements turn on. After 30 seconds, the P: symbol and the number stop flashing.
The cooking time starts counting when the pressure in the pot reaches the required value and the floating valve rises to the upper position. The "Pressure" symbol appears on the display.
Program "Stew"
This program is used for preparing stews!
The basic cooking time is set to 20 minutes.
Use the "Multifunction" button to select the "Stew" program.
Program "Rice"
This program is used for cooking rice.
- Clean the safety valve.
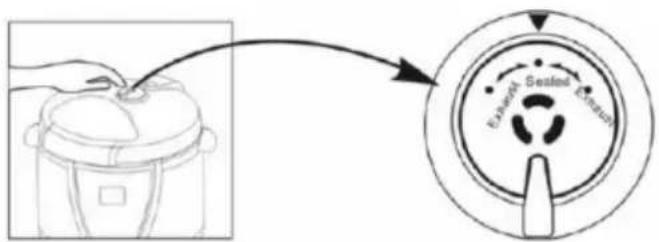
Switch the steam release valve to the "Sealed" position and check that the floating valve is lowered.
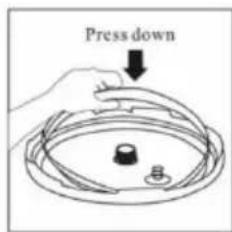
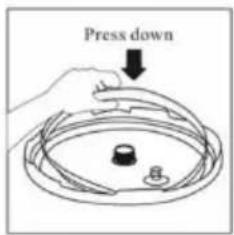
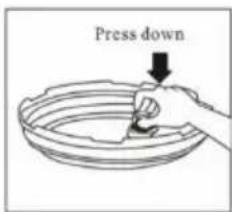
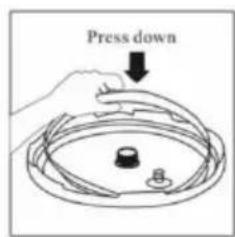
Clean the gasket by washing it under running warm water with a little detergent, then dry it well. Place the gasket back on the lid and check that it sits properly under the steel ring. Make sure there are no wrinkles in the gasket after assembly. If the gasket is not properly seated, the appliance will not function and may be damaged. If you notice that the gasket is damaged or cracked during cleaning, do not use the appliance anymore and immediately call Gorenje service to replace the gasket!
- Remove the metal filter, clean it, and place it back on the lid.
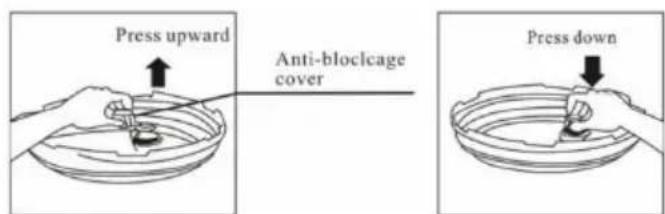
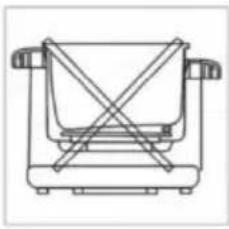
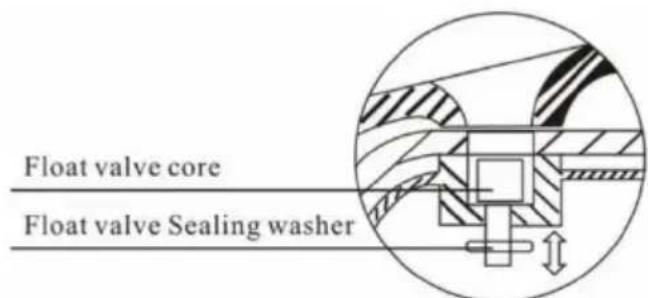
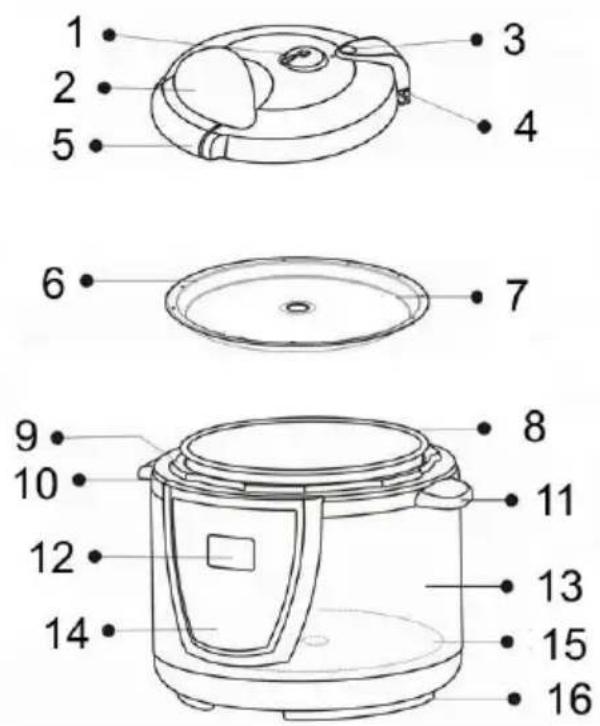
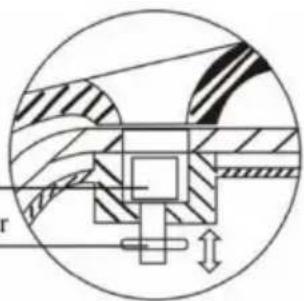
Float valve Sealing washer
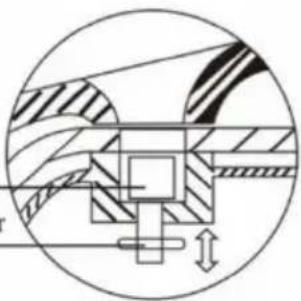
- Operating valve
- Handle
- Safety valve
- Lid hinge
- Lid
- Seal ring
- Seal ring support
- Cooking pot
- Inner ring
- Handle
- Handle
- Display
- Housing
- Control panel
- Heating panel
- Lower panel
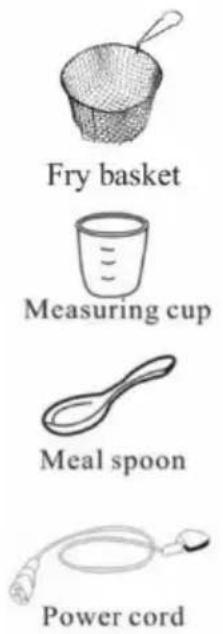
Accessories:
Important
Before using the appliance for the first time, carefully read this instruction manual and save it for future reference.
Danger
Do not immerse the unit with electrical components in water and do not wash it under running water.
Warning
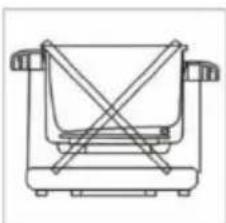
Before connecting the appliance to the power mains, make sure the voltage specified on the bottom of the appliance matches the voltage of the power mains in your home. If the power cord is damaged, it may only be replaced by Gorenje, Gorenje's authorized service and repair center, or an adequately trained professional. Do not use the appliance if the plug, power cord, or any other component is damaged. The appliance should not be used by children or persons with impaired physical or psychological skills, or persons with lacking experience and knowledge, unless such persons are supervised or advised by a person responsible for their safety. Do not let children play with the appliance. Do not touch the appliance housing during use, as it will get hot. To move the appliance, hold it by the handles.
Be careful when releasing the pressure and opening the pressure cooker; there is a danger of scalding. Do not use force to open the lid. To avoid hazard, do not connect the appliance to an external timer or a remote control system.
This equipment is labelled in compliance with the European Directive 2012/19/EU on waste electric and electronic equipment. The Directive specifies the requirements for collection and management of waste electric and electronic equipment effective in the entire European Union.
Caution!
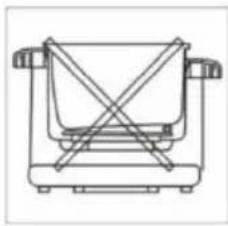
Place the appliance on a level and stable surface. The appliance is intended solely for household use.
Do not use attachments, accessories, or other parts provided by other manufacturers not expressly recommended by Gorenje. In case of use of such attachments or accessories, the warranty shall be void.
Preparing for use
- Remove the packaging
- Clean the appliance as instructed in the chapter "Cleaning".
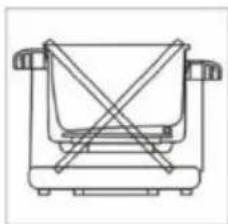
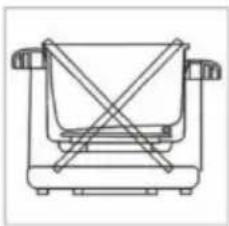
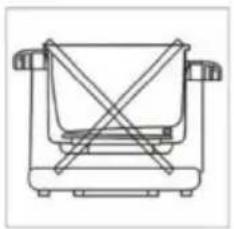
- When inserting the inner pot, make sure the bottom is clean. When the inner pot is inserted into the pressure cooker, rotate it slightly in both directions to make sure it sits correctly in place.
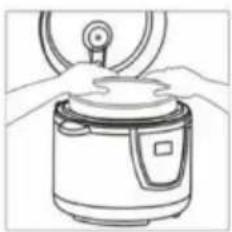
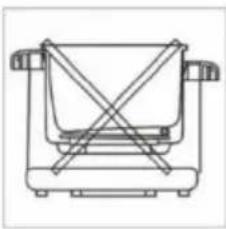
- Make sure the sealing ring is correctly installed. To check whether the sealing ring is correctly installed, fill one third of the cooking pot with water and set the pressure holding time to 15 minutes.
- When the time runs out, release the steam by setting the safety steam release valve into Exhaust position, and wait for the floating valve to drop.
- Wait until the appliance cools down and clean it.
Using the appliance
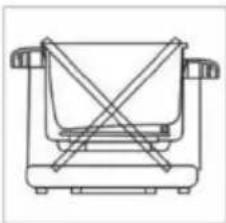
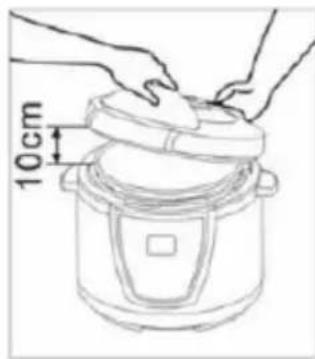
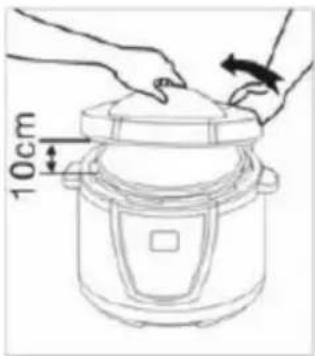
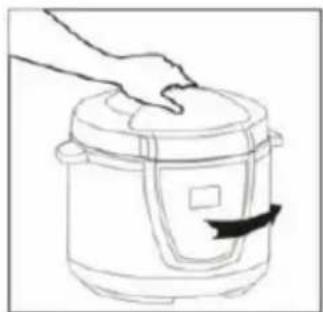
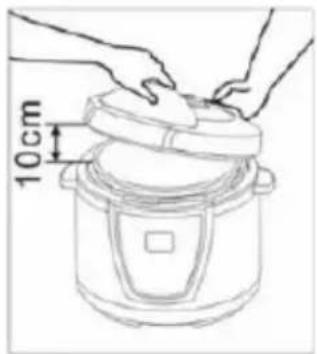
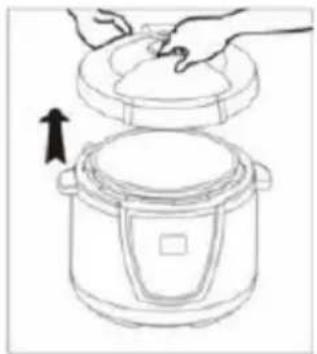
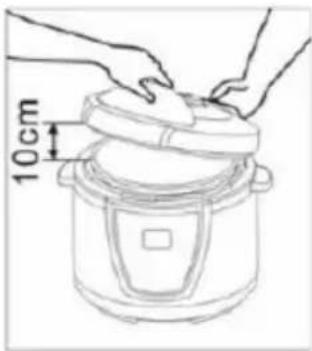
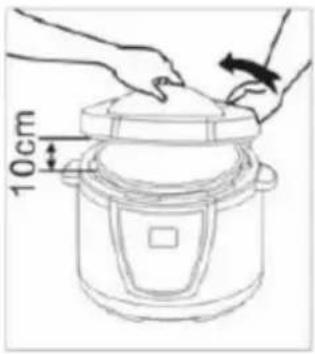
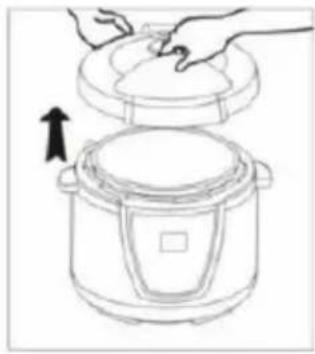
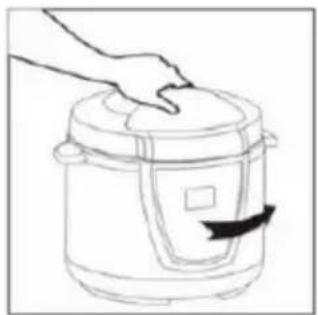
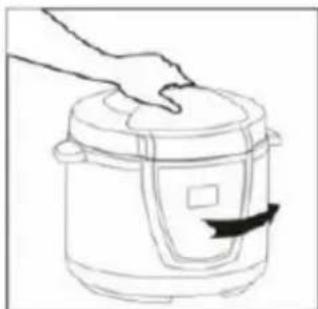
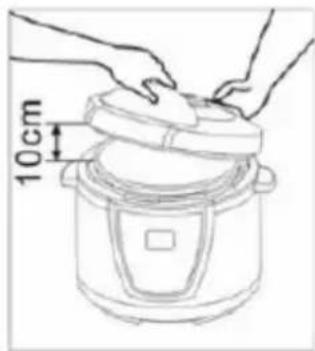
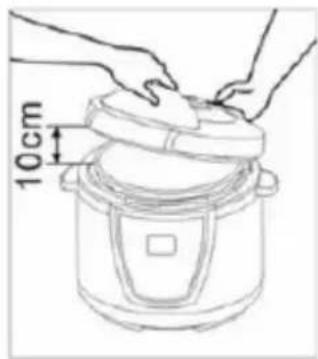
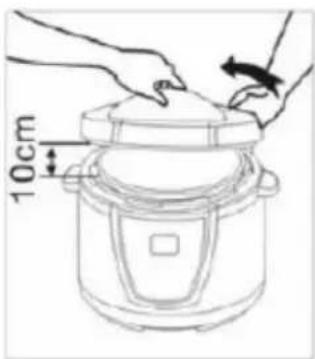
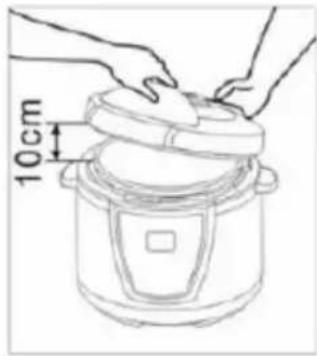
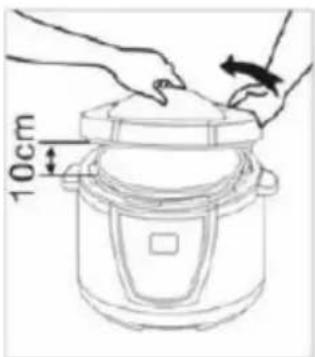
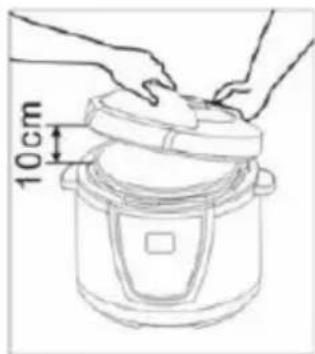
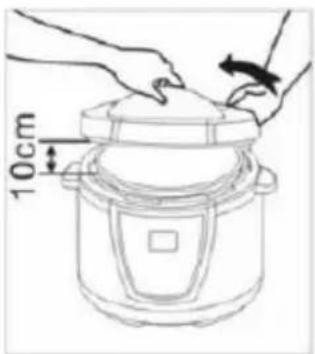
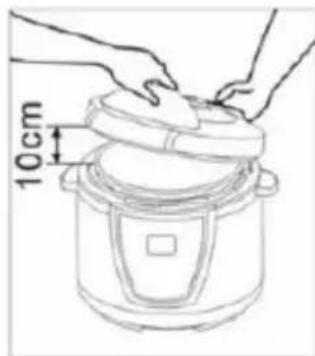
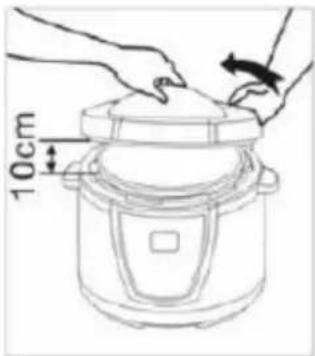
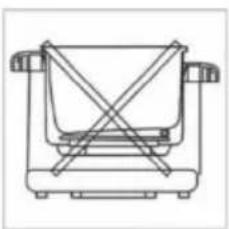
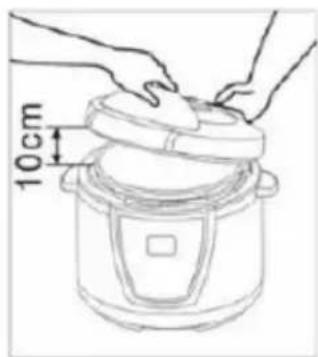
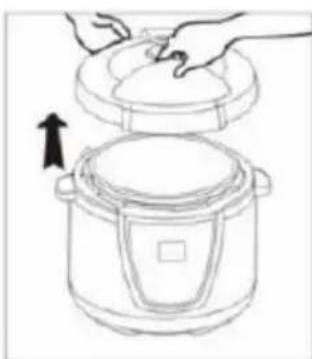
Open the appliance lid as shown in the figure.
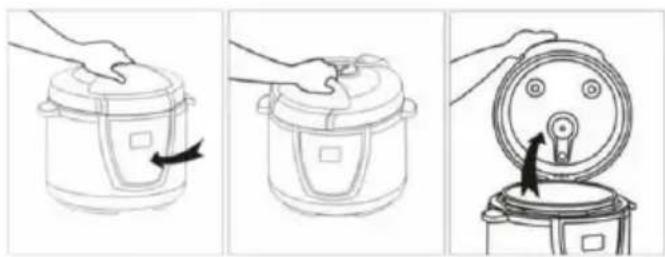
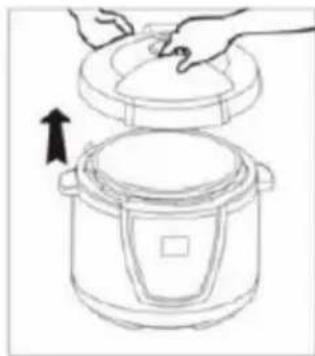
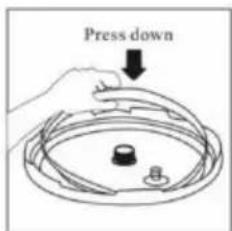
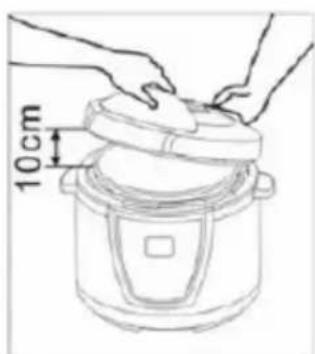
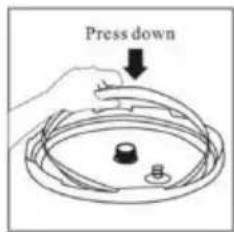
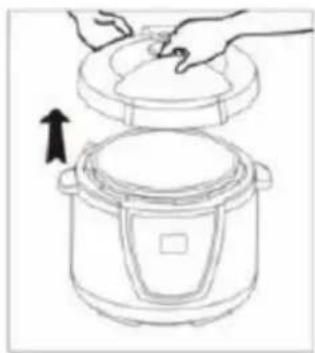
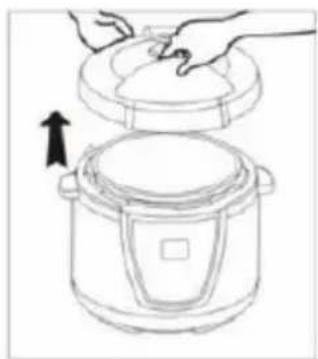
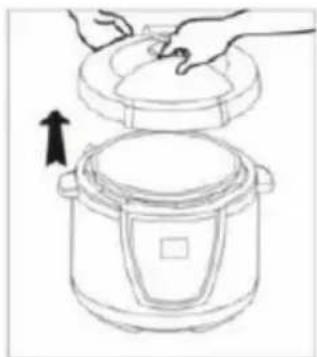
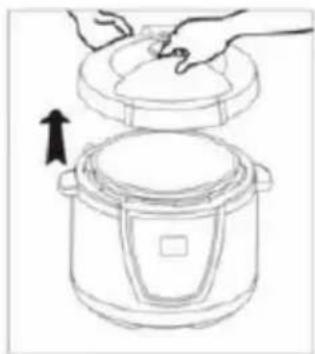
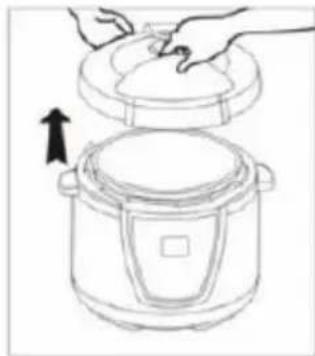
If required, the lid can be completely removed as shown in the figure.
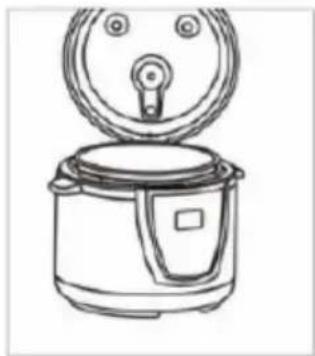
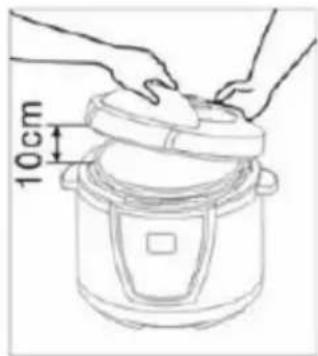
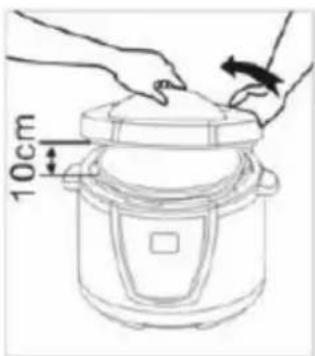
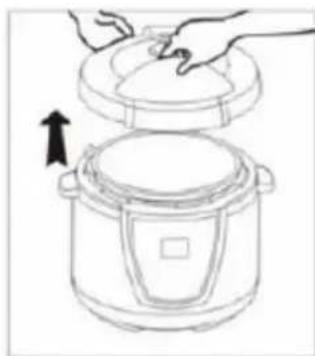
Place the ingredients into the pressure cooker. The ingredients should not fill more than 4/5 of the cooker. Ingredients that tend to expand or swell during cooking (such as beans) should not fill more than 1/5 of the cooker.
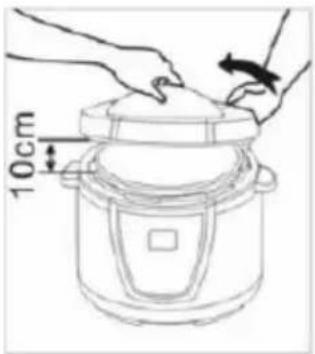
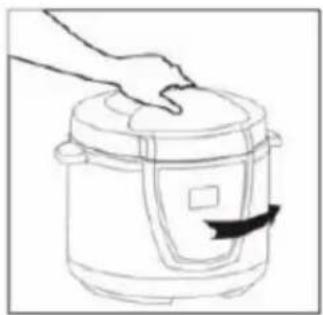
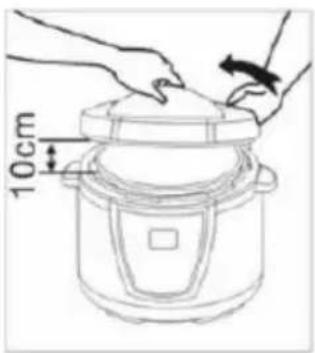
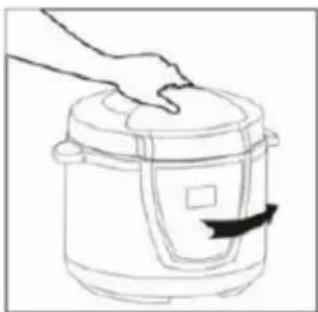
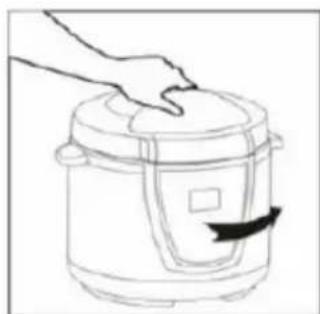
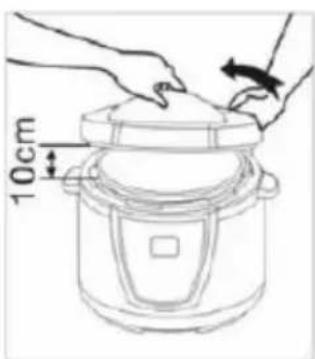
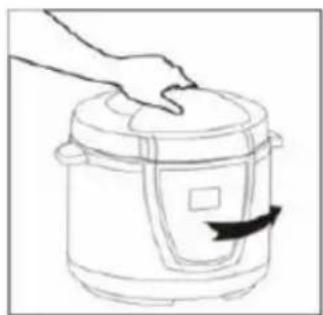
Close the appliance lid as shown in the figure. Before closing the lid, make sure the sealing ring is correctly installed.
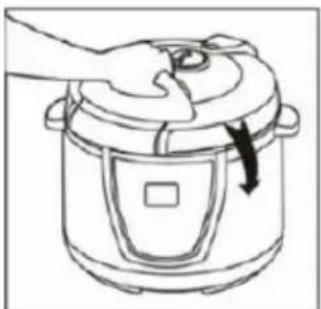
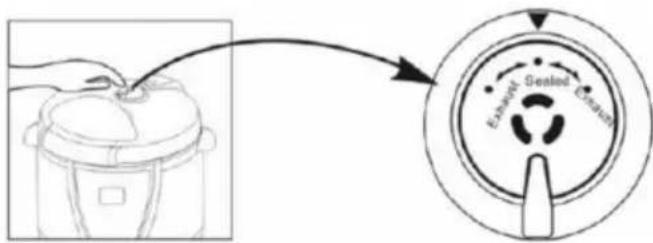
Move the steam release valve to the "sealed" position and make sure the floating valve is not lifted.
Select the desired program.
Selected program, symbol "F:", and a number will flash on the display. The number represents cooking time. In 30 seconds, the display will stop flashing and the cooking process will start.
Cooking time will start counting down when the pressure in the cooker reaches the desired value. "Pressure" will appear on the display.
When the cooking process is over, the appliance will switch to "warming" mode. To end the cooking process, press the "Cancel" key.
Move the pressure release valve to "Exhaust" position and wait for the floating valve to drop.
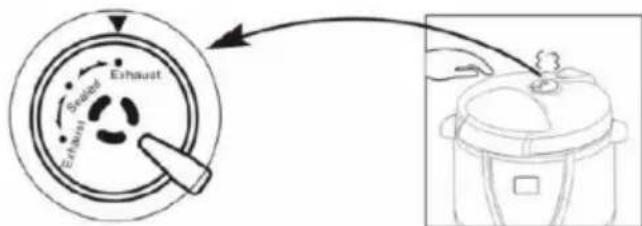
Tip: When cooking meat which requires a longer cooking time (such as beef), leave the valve in the "sealed" position and wait for the appliance to cool and for the floating valve to drop.
Programs, Cake, Slow cook, Fry and Suatee/Brown are selected directly through the buttons on front panel.
Programs, Stew, Braise, Steam, Rice and Soup are selected with Multifunction button on the front panel!
Setting the delayed start
Press "Time setting". "00:00" and "preset" will appear on the display. Use the + and - keys to set the number of hours before the cooking process is to start. Press the "time setting" again and use the + and - keys to set the minutes of delay. Select the cooking program, either directly or with the "Multifunction" key. Selected program, symbol "F:", and a number will flash on the display. The number indicates the cooking time. After thirty
seconds, time will start counting down. The display will show the time remaining to the start of the cooking program, the selected program, and the "Preset" sign. When the delay time expires, the cooking program will start.
To cancel the delayed start setting, press "Cancel".
When the cooking starts, the heating symbols will flash on the display. In addition, letter F and the remaining cooking time in minutes will be shown. Cooking time starts counting down when the pressure in the cooker reaches the required level and the floating valve is lifted into its upper position. "Pressure" will appear on the display.
Manual cooking
Use manual cooking for large amounts of food or larger chunks of meat, if the desired cooking program does not allow changing the cooking time.
When using manual cooking the temperature inside the pot is 100 °C with open lid and 115-120 °C if the lid is closed and under pressure.
Press "Pressure holding time" and use the + and – keys to set the cooking time. A flashing P: and a number will appear on the display. The number represents cooking time. At the same time, the heaters will be activated. After 30 seconds, the P: sign and the number will stop flashing.
Cooking time starts counting down when the pressure in the cooker reaches the required level and the floating valve is lifted into its upper position. "Pressure" will appear on the display.
Fry program
This program is used for frying.
Cooking time is preset to 25 minutes.
When using this program, remove the lid or keep it open.
During this cooking program, oil can reach a very high temperature between 160°C and 170°C.
Press the "Fry" key.
Start frying when the oil heats up.
To end the cooking process prematurely, press the "Cancel" key. When you are done frying, it is recommended to wait for 30 minutes for the appliance to cool down before using it again.
Sauté/Brown program
This program is used for frying meat and vegetables. The temperature is lower than with the "Fry" program (120°C – 130°C).
Cooking time is preset to 30 minutes.
When using this program, remove the lid or keep it open.
Press the "Sauté/Brown" key.
"F:30" will flash on the display. After 30 seconds, F:30 will stop flashing. When the "Pressure" symbol lights up, the oil has reached a temperature that is suitable for sautéing or browning.
To end the cooking process prematurely, press the "Cancel" key.
Slow cook program
This program is used to slowly cook meat and vegetables.
A temperature between 85°C and 100°C is maintained.
Press the "Slow cook" key. Cooking time will flash on the display. The cooking time can be adjusted if necessary using the + and - keys. After 30 seconds, cooking time will stop flashing and the program will start. The cooker will operate regardless of the pressure!
When cooking time expires, the appliance will switch to "Warming" mode.
Cake program
This program is used for baking bread or pastry. Cooking temperature inside the pot is set to 115-120°C.
Press the "Cake" key. "F:" and a number will flash on the display. The number indicates the cooking time which is preset to 30 minutes. The cooking time can be adjusted if necessary using the + and - keys. After 30 seconds, cooking time will stop flashing and the program will start.
Cooking time starts counting down when the pressure in the cooker reaches the required level and the floating valve is lifted into its upper position. "Pressure" will appear on the display. When cooking time expires, the appliance will switch to "Warming" mode.
Steam program
This program is intended for steam cooking.
Cooking temperature inside the pot is set to 115-120°C.
Fill 1/5 or 2/5 of the cooking vessel with water.
Amount of water depends on the cooking time.
Insert the steam cooking grid and place the ingredients to be cooked onto the grid.
Use the "Multifunction" key to select the "Steam" program.
"F:" and a number will flash on the display. The number indicates the cooking time which is preset to 15 minutes. The cooking time can be adjusted if necessary using the + and - keys. After 30 seconds, cooking time will stop flashing and the program will start.
Cooking time starts counting down when the pressure in the cooker reaches the required level and the floating valve is lifted into its upper position. "Pressure" will appear on the display. When cooking time expires, the appliance will switch to "Warming" mode.
Stew program
This program is used for cooking stews.
Cooking time is preset to 20 minutes.
Cooking temperature inside the pot is set to 115-120°C.
Use the "Multifunction" key to select the "Stew" program.
"F:", a number, and "Stew" will flash on the display. The number indicates the cooking time which is preset to 20 minutes. The cooking time can be adjusted if necessary using the + and - keys.
After 30 seconds, the display will stop flashing.
Cooking time starts counting down when the pressure in the cooker reaches the required level and the floating valve is lifted into its upper position. "Pressure" will appear on the display.
When cooking time expires, the appliance will switch to "Warming" mode.
Rice program
This program is used for cooking rice.
Cooking temperature inside the pot is set to 115-120°C.
Use the "Multifunction" key to select the "Rice" program.
"F:" and a number will flash on the display. The number indicates the cooking time which is preset to 10 minutes. The cooking time can be adjusted if necessary using the + and - keys. After 30 seconds, cooking time will stop flashing and the program will start.
Cooking time starts counting down when the pressure in the cooker reaches the required level and the floating valve is lifted into its upper position. "Pressure" will appear on the display.
When cooking time expires, the appliance will switch to "Warming" mode.
Soup program
This program is used for cooking soups and porridges.
Cooking temperature inside the pot is set to 115-120°C.
Use the "Multifunction" key to select the "Soup" program.
"F:" and a number will flash on the display. The number indicates the cooking time which is preset to 30 minutes. The cooking time can be adjusted if necessary using the + and - keys. After 30 seconds, cooking time will stop flashing and the program will start.
Cooking time starts counting down when the pressure in the cooker reaches the required level and the floating valve is lifted into its upper position. "Pressure" will appear on the display.
When cooking time expires, the appliance will switch to "Warming" mode.
Braise program
This program is used for cooking braising.
Cooking temperature inside the pot is set to 115-120°C.
Use the "Multifunction" key to select the "Braise/Tendon" program.
"F:" and a number will flash on the display. The number indicates the cooking time which is preset to 30 minutes. The cooking time can be adjusted if necessary using the + and – keys. After 30 seconds, cooking time will stop flashing and the program will start.
Cooking time starts counting down when the pressure in the cooker reaches the required level and the floating valve is lifted into its upper position. "Pressure" will appear on the display. When cooking time expires, the appliance will switch to "Warming" mode.
Warming program
This program is used to warm up the food or to keep it warm.
Press the Cancel/Warming key.
The appliance will heat up the food or maintain a temperature between 60°C and 80°C.
To cancel the program, press the
"Cancel/Warming" key.
Program table
| Programs | Original pressure cooking me (min) | Time sengs (min) | Pressure (kPa) |
| Fry | 00:25 | 18 - 40 | Lid open |
| Cake | 00:30 | 0 – 99 | 50 - 60 |
| Soup | 00:25 | 0 – 99 | 50 - 60 |
| Rice | 00:10 | 0 – 99 | 50 - 60 |
| Stew | 00:20 | 0 – 99 | 50 - 60 |
| Slow cook | 02:00 | 1h - 9h | 0 |
| Steam | 00:15 | 0 – 99 | 50 - 60 |
| Sauté Brown | 00:30 | 18 – 40 | Lid open |
| Braise | 00:30 | 0 – 99 | 50 - 60 |
| Warming | / | / | 0 |
Tip: Clean the appliance immediately after use (see chapter "Cleaning").
Power button
The power button tells you how much power the machine used, since the machine plug it. Display shows power consumption in kWh.
The readings are only approximate.
Cleaning
The appliance and its parts are not dishwasher safe.
Thoroughly clean the appliance after each use, and also before use if it has not been used for a while.
- Before cleaning, disconnect the appliance from the power supply and wait for it to cool down.
- Rinse the cooking pot with hot water and some liquid detergent, then dry it thoroughly.
- Wipe the housing with a damp cloth. Do not wash the housing under running water or immerse it in water.
- After use, remove the condensate tank and rinse it.
- Remove the lid and clean it. Remove the sealing ring by gently pulling it upwards.
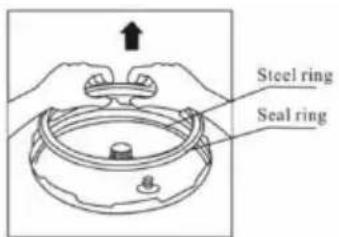
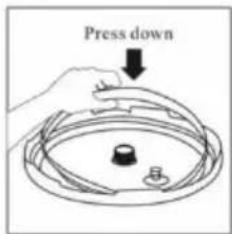
Clean the sealing ring under running hot water with some detergent. Dry the sealing ring thoroughly. When putting the sealing ring back on, make sure it is correctly fitted under the sealing ring holder. Ensure there are no wrinkles on the gasket. If the sealing ring is not fitted correctly, the appliance will not work and may be damaged. If you notice during cleaning that the sealing ring is damaged or cracked, do not use the appliance and call a Gorenie service center to replace it.
- Remove the metal filter, clean it, and replace it onto the lid.
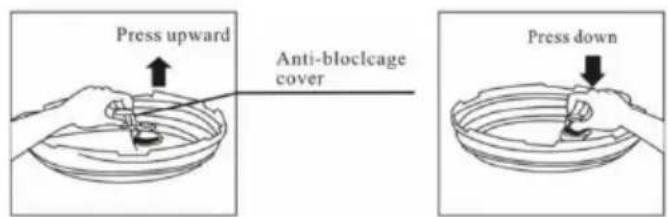
- Clean the safety valve.
- To ensure the appliance works properly, make sure the heating plate is clean. Clean the heating plate with a damp cloth and dry it thoroughly.
- Do not use aggressive cleaners or metal accessories for cleaning, as these may damage the appliance.
Tip: Sometimes it is hard to fit the sealing ring into the sealing ring holder after cleaning. We suggest that you put the sealing ring back into the sealing ring holder just before you start to use the machine, and before putting it back, apply a bit of cooking oil onto the sealing ring. Oiling the ring makes it slip into position much easier.
Storage
Store the appliance in a safe and dry place.
Environment
After the expiry of its useful life, do not discard the appliance with common household waste. Take it to an authorized recycling center. This will help preserve the environment.
Warranty and repair
If the multi cooker stops working, please check the display for an error code. Write down this code and inform the Gorenje Call Center.
| Shown code | Fault |
| E1 | sensor cut circuit |
| E2 | sensor short circuit |
| E3 | over temperature |
| E4 | signal switch failure |
For more information or in case of problems, please contact the Gorenje Call Center in your country (phone number listed in the International Warranty Sheet). If there is no such center in your country, please contact the local Gorenje dealer or Gorenje's small domestic appliance department.
For personal use only!
GORENJE WISHES YOU A LOT OF PLEASURE IN USING YOUR APPLIANCE.
We reserve the right to any modifications.
General description
Important
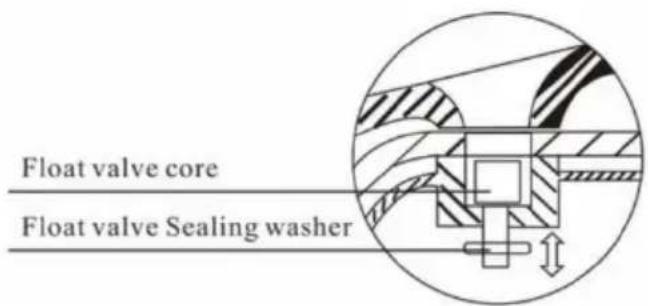
Float valve, sealing washer
Warranty and repair
Steel ring, sealing ring
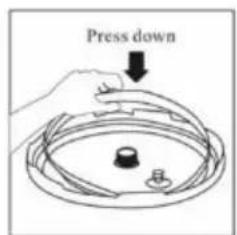
Press
Float valve sealing washer
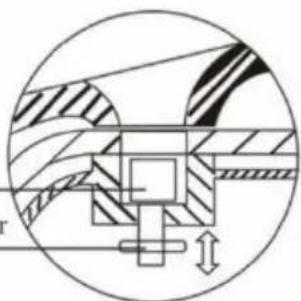
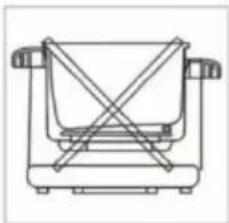
Press upward
Anti-blockage cover
Press down
If the multi cooker stops working, please check the display for an error code. Write down this code and inform the Gorenje Call Center.


- SAUTEE/BROWN PROGRAM
- SETTING DELAYED COOKING
- MANUAL COOKING
- PROGRAM "STEW
- PROGRAM "RICE
- IMPORTANT
- DANGER
- WARNING
- CAUTION
- PREPARING FOR USE
- USING THE APPLIANCE
- SETTING THE DELAYED START
- FRY PROGRAM
- SAUTÉ/BROWN PROGRAM
- WHEN USING THIS PROGRAM, REMOVE THE LID OR KEEP IT OPEN
- SLOW COOK PROGRAM
- CAKE PROGRAM
- STEAM PROGRAM
- STEW PROGRAM
- RICE PROGRAM
- SOUP PROGRAM
- BRAISE PROGRAM
- WARMING PROGRAM
- POWER BUTTON
- CLEANING
- STORAGE
- ENVIRONMENT
- WARRANTY AND REPAIR
- GORENJE WISHES YOU A LOT OF PLEASURE IN USING YOUR APPLIANCE
- GENERAL DESCRIPTION
Brand : GORENJE
Model : MCB6BA EU
Category : Multicooker