
MC2SBK - Multicooker GORENJE - Free user manual and instructions
Find the device manual for free MC2SBK GORENJE in PDF.


| Product Type | Microwave Oven |
| Brand | Gorenje |
| Model | MC2SBK |
| Capacity | 20 liters |
| Dimensions (W x H x D) | 450 x 260 x 350 mm |
| Weight | 12 kg |
| Power Output | 800 W |
| Power Consumption | 1200 W |
| Control Type | Rotary and push buttons |
| Display | LED digital display |
| Functions | Defrost, auto cook, timer, child lock |
| Interior Light | Yes |
| Turntable Diameter | 24.5 cm |
| Door Type | Drop-down door with handle |
| Color | Black |
| Safety Features | Child lock, auto shut-off, door interlock |
| Cleaning | Wipe with damp cloth, avoid abrasive cleaners |
| Spare Parts | Turntable, glass tray, fuse, door latch |
| Warranty | 2 years |
| Energy Efficiency Class | A |
Frequently Asked Questions - MC2SBK GORENJE
User questions about MC2SBK GORENJE
0 question about this device. Answer the ones you know or ask your own.
Ask a new question about this device
Download the instructions for your Multicooker in PDF format for free! Find your manual MC2SBK - GORENJE and take your electronic device back in hand. On this page are published all the documents necessary for the use of your device. MC2SBK by GORENJE.
USER MANUAL MC2SBK GORENJE
Important safety instructions
Please read the User Manual carefully before using this product.
- This appliance is not intended for use by persons (including children) with reduced physical, sensory or mental capabilities, or lack of experience and knowledge, unless they have been given supervision or instruction concerning use of the appliance by a person responsible for their safety.
- Children should be supervised to ensure that they do not play with the appliance.
- This appliance can be used by children aged from 8 years and above and persons with reduced physical, sensory or mental capabilities or lack of experience and knowledge if they have been given supervision or instruction concerning use of the appliance in a safe way and understand the hazards involved. Children shall not play with the appliance. Cleaning and user maintenance shall not be made by children unless they are older than 8 and supervised. Keep the appliance and its cord out of reach of children aged less than 8 years.
- This appliance is intended to be used in household and similar applications such as
- Staff kitchen areas in shops, offices and other work environments.
- Farmhouses.
- By customers in hotels, motels and other residential environments as well as
- Bed and Breakfast type environments.
- Please turn off and unplug the appliance before cleaning, maintenance or relocation and whenever it is not in use.
- The heating element surface is subject to residual heat after use, do not touch.
- Warning: Avoid spillage on the connector.
- Warning: Misuse may cause potential injury. The appliance is not intended to be operated by means of an external timer or a separate remote-control system.
- Do not immerse any part of the appliance in water or other liquid.
- This appliance is for household use only. Do not use outdoors.
- If the supply cord is damaged, it must be replaced by a special cord or assembly available from the manufacturer or its service agent.
- Keep the appliance away from combustibles. During operation, stay away from curtains, drapes, or similar articles to avoid the risk of fire.
- Do not use the appliance for food that may cause vent clogging: food in sheets, food in bands, food in pieces, to avoid accident and damage to the appliance.
- During operation, do not place your hands or face close to the steam vent to avoid burns.
- During operation, do not cover the steam vent with cloth or other articles to avoid accident and damage to the appliance.
- Do not reform the appliance: except for maintenance technicians, persons are not allowed to disassemble or repair the appliance to avoid the risk of fire, electric shock, and injury to persons.
- Do not use the appliance on any voltage except for 220-240 AC to avoid the risk of fire and electric shock. In case of power wire damage, do not use the appliance.
- Independently use grounding socket with rated current of above 10 A. When used with other electrical appliances, the socket will go wrong and lead to dangers such as fire disaster.
- If the power line is too short, the user should use an extension socket for connection. Please do not use a poor-quality socket. The power consumption of the appliances must not exceed the maximum load of the extension socket.
- Clean the dust and water on both ends of the power line and the socket of the appliance to avoid the risk of fire, electric shock, and short circuit.
- When maintenance or parts replacement is necessary, please deliver the product to the authorized professional service center for maintenance. To avoid hidden dangers caused by improper maintenance or improper selection of accessories.
- The plug should be thoroughly inserted into the socket to avoid the risk of fire, electric shock, and short circuit.
- In case of supply cord damage, the cord should be replaced with a special cord or specialized component purchased from the Manufacturer or the Maintenance Department.
- Improper repair or short-circuiting without permission of some important accessories including fuse may lead to protection failure of the appliance and cause overheating or fire.
- The appliance can only use the original cooking pot to avoid overheating and anomaly.
- Do not drop the cooking pot to avoid deformation.
- Do not impact the cooking pot with hard materials to avoid deformation.
- When operation is being performed or just finished, do not directly touch the inner cooking pot to avoid burns.
- Before operation, wipe dry the water outside the cooking pot to avoid malfunction.
- Before operation, clean the foreign materials including water drops and rice to avoid overheating and short circuit.
- Any discrepancy between the picture and the product is subject to the real object.
- Before operation, check whether the cooking pot and steam valve are in place to avoid accident.
- During use, it is normal that the appliance slightly ticks or fizzes. Please do not panic.
- Do not use the appliance immediately after the first cooking, press the "Cancel" button and wait above 15 minutes for the heating plate to cool down.
- Do not boil rice with hot water to avoid affecting the judgement of the temperature control and worsening the result.
- Please regularly clean the steam valve.
- Please regularly clean the countertop on which the appliance is placed.
- When maintenance or parts replacement is necessary, please deliver the product to the authorized service centre for maintenance to obtain professional quality service.
This product is labelled in compliance with the European Directive 2012/19/EC on Waste Electrical and Electronic Equipment – WEEE. The Directive sets out the requirements for the collection and management of waste electrical and electronic equipment across the European Union.
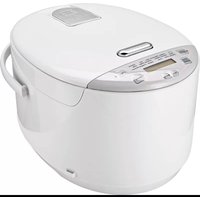
General Description
Lid release button
Handle
Lid
Condensate collector
Digital display
Control panel

Accessories
 | Rice spoon |
 | Soup spoon |
 | Measurement cup |
 | Steamer |
Control Panel

Instructions For Use
Wipe dry the exterior of the cooking pot with a kitchen cloth and place it in the appliance; rotate the pot around 2-3 times to ensure that the pot bottom is firmly attached to the heating plate; push it down until you hear a click.

- Do not try to heat up the cooking pot on other stoves to avoid deformation due to high temperature; do not substitute the cooking pot with other containers or use them on the heating plate. Use a kitchen cloth to remove any water from the housing cover.
- Plug in the power supply. Ensure that the appliance and the power source are properly connected.
- Press the function button to select the desired function and then press the "ON/OFF" button to start operation.
How To Use Function Buttons
ON/OFF

After you have connected the appliance to power supply, press the "ON/OFF" button to turn on the power. The LED display will show "——", and the MultiCooker will enter the "ON" state (standby mode). Press the "ON/OFF" button again to switch the appliance back to the "OFF" state (ECO mode, the display shuts down). In the "ON" state (standby mode), select the desired function and press the "ON/OFF" button to start the programme. If there is no operation for more than two minutes in the "ON" state, the appliance will enter the "OFF" state automatically.
Keep Warm/Cancel

- In the "ON" state (standby mode), press the "Keep Warm/Cancel" button to start the heat preservation programme.
- In the working state, press the "Keep Warm/Cancel" button to exit the working state and return to the "ON" state (standby mode).
- The heat preservation mode will start when cooking is completed, and the displayed timer will show between 0 and 12 hours. The LED display will show "— —" after 12 hours have elapsed and return to the "ON" state (standby mode). It is best to consume the food within 5 hours after cooking, so that flavour and taste do not deteriorate.
- During operation (steam, rice, DIY or stew functions), long press the start button for two seconds to change the status of the heat preservation lamp. The heat preservation lamp will now be turned on and you will be able to enter the heat preservation mode after cooking, otherwise you will be unable to do so.
Note: The FRY function cannot be used to keep your food warm.
DIY

• In the "ON" state (standby mode), press the "DIY" button to select the corresponding function.
- After selecting your function to pre-set the cooking time, press the "TEMP/TIMER" button. Both "TEMP/TIMER" and the corresponding function light will turn on. Set the time and press the "ON/OFF" button. The pre-set time represents the time after which the cooking will be complete. In the "ON" state (standby mode), press the "DIY" button to select the function.
"<" and ">" buttons < >
- After selecting the required function, use the "<" or ">" button to adjust the pre-set timer and set the cooking completion time.
- In the manual function, use the "<" or ">" button to select the temperature value in the temperature setting state.
- Adjust the cooking time.
Note: Press the DIY button and the display will start flashing.
Mode 1: To adjust the cooking time, short press the button for 1 minute steps or long press it for 5 minute steps. The setting range is between 1 and 90 minutes.
Mode 2: The temperature can be adjusted in 10 °C steps. The setting range is between 30 °C and 150 °C.
The default temperature is 100 °C.
Mode 3: Delay the start time adjustment.
Press again to enter the loop.
Instructions for Use
Stew

- In standby mode, press the "Stew" button to select the "Stew" function. The "Stew" light will turn on.
- Press the "<" or ">" button to adjust the cooking time. The default time is 30 minutes and it can be adjusted between 10 minutes and 99 minutes.
- Press the "ON/OFF" button to start the "Stew" function. The "Stew" light will stay on. Approximately 32 seconds after the start of the operation, the digital display will show a countdown.
- The Stew function automatically enters the heat preservation mode after the programme has been completed.
Rice

• In standby mode, press the "Rice" button. The "Rice" light will turn on. - Press the "<" or ">" button to adjust the cooking time. The default time is 20 minutes and it can be adjusted between 5 and 90 minutes. - Press the "ON/OFF" button to start the "Rice" function. The "Rice" light will stay on. Approximately 32 seconds after the start of the operation, the digital display will show a countdown. - The Rice function automatically enters the heat preservation mode after the programme has been completed.
Steam

• In standby mode, press the "Steam" button. The "Steam" light will turn on. - Press the "<" or ">" button to adjust the cooking time. The default time is 10 minutes and it can be adjusted between 5 and 60 minutes. - Press the "ON/OFF" button to start the "Steam" function. The "Steam" light will stay on and the digital display will show a "running circle". When the water is nearly boiling, the digital display will show a countdown.
- The Steam function automatically enters the heat preservation mode after the programme has been completed.
Fry

• In standby mode, press the "Fry" button. The "Fry" light will turn on. - Press the "<" or ">" button to adjust the frying time. The default time is 20 minutes and it can be adjusted between 1 and 90 minutes. - Press the "ON/OFF" button to start the "Fry" function. The "Fry" light will stay on and the digital display will show a "running circle". - Approximately 32 seconds after the start of the operation, the digital display will show a countdown. - The Fry function automatically enters the standby mode after the programme has been completed.
Note: Do not close the lid during cooking.
This function is used for frying, and the amount of oil should not exceed 10 mm.
DIY

- In the "ON" state (standby mode), press the "DIY" button to select the function.
- Press the "<" or ">" button to adjust the DIY programme time. The default time is 30 minutes and it can be adjusted between 1 and 90 minutes.
- Press the "Temp/Timer" button to select the cooking temperature. The default temperature is 100 °C (other options include 30 °C, 40 °C, 50 °C, 60 °C, 70 °C, 80 °C, 90 °C, 100 °C, 110 °C, 120 °C, 130 °C, 140 °C and 150 °C). The digital display will show the selected temperature value. (Note: the number 10 on the display indicates 100 °C, 03 indicates 30 °C, 15 indicates 150 °C, etc.)
- Press the "ON/OFF" button to start the "DIY" function. The "DIY" indicator light will turn on and the digital display will show a "running circle" before reaching the specified cooking temperature. After reaching the specified cooking temperature, the display will show the countdown timer. (During the cooking process, press the "Temp/Timer" button to reset the cooking time and adjust it with the "<" or ">" buttons. Press the "Temp/Timer" button a second time to set the temperature and adjust it with the "<" and ">" buttons. After selecting the time and temperature, press the "ON/OFF" button to confirm your selection, otherwise the appliance will return to its previous state after 15 seconds.)
- When the DIY temperature setting is greater than 70 °C, the manual function will automatically enter the heat preservation mode after the programme has been completed, otherwise the appliance will return to standby mode.
Setting the cooking time
- Steam cooking time: default setting is 30 minutes and is adjustable between 5 and 60 minutes. Short press ">" to increase by 1 minute, short press "<" to decrease by 1 minute. Long press ">" to increase by 5 minutes, long press "<" to decrease by 5 minutes. After setting the cooking time, press the "ON/OFF" button to start the programme.
- Fry cooking time: default setting is 15 minutes and is adjustable between 1 and 90 minutes. Short press ">" to increase by 1 minute, short press "<" to decrease by 1 minute. Long press ">" to increase by 5 minutes, long press "<" to decrease by 5 minutes. After setting the cooking time, press the "ON/OFF" button to start the programme. • Stew cooking time: default setting is 2 hours and is adjustable between 2 and 10 hours. Press ">" to increase by 1 hour, press "<" to decrease by 1 hour. After setting the cooking time, press "ON/OFF" button to start the programme. • Rice cooking time: default setting is 60 minutes and is adjustable between 5 and 90 minutes. Short press ">" to increase by 1 minute, short press "<" to decrease by 1 minute. Long press ">" to increase by 5 minutes, long press "<" to decrease by 5 minutes. After setting the cooking time, press the "ON/OFF" button to start the programme.
- DIY cooking time: default setting is 30 minutes and is adjustable between 1 and 90 minutes. Short press ">" to increase by 1 minute, short press "<" to decrease by 1 minute. Long press ">" to increase by 5 minutes, long press "<" to decrease by 5 minutes. After setting the cooking time, press the "ON/OFF" button to start the programme.
Pre-setting the timer
- Select the function for which you wish to pre-set a timer, then press the "TEMP/TIMER" button. The "TEMP/TIMER" light will turn on and the appliance will enter the setting mode. Press "<" or "> " to pre-set the completion time. Press "> " once to increase it by 1 hour, press "<" once to decrease it by 1 hour. Long press to increase the time automatically.
- Press the "ON/OFF" button to start the pre-set timer function. The display will show the completion time and start the countdown.
- Timer can be pre-set up to 24 hours.
- Heat preservation: available with Steam, Rice, Stew, and DIY functions. The cooker will enter the heat preservation mode once the cooking is completed. The heat preservation mode can last up to 12 hours. After that, the cooker will return to standby mode. The shorter the preservation time, the better the food will taste.
Note: We recommend you pre-set the timer to a maximum of 12 hours to avoid food deterioration.
When the set heat preservation time is greater than 1 hour and longer than the set cooking time, the time will be displayed in hours, otherwise it will be displayed in minutes.
Cleaning After Use
- Clean the appliance after each use.
- Before cleaning and maintenance, unplug the appliance from the wall outlet until it has cooled down.
- Remove the upper lid and inner pot and clean the appliance with detergent first, then rinse it well with water and wipe dry with a soft cloth.
Troubleshooting
| Error code | Problem | Solution |
| E1E2E5E6 | Bottom sensor is open-circuitedBottom sensor is short-circuitTop lid sensor is open-circuitedTop lid sensor is short-circuited | Pull out and reconnect the power cord. If the displays still shows the same error code, please send the appliance to the local after-sales service centre for maintenance. |
ENVIRONMENT
At the end of its useful life, do not dispose of the appliance with other household waste. Dispose of it at an authorized recycling center. This will help protect the environment.
WARRANTY AND REPAIR
For more information or in case of problems, please contact the Gorenje Call Center in your country (phone number listed in the International Warranty Sheet). If there is no such center in your country, please contact the local Gorenje dealer or the Gorenje small domestic appliances department.
For personal use only!
Button "<" and ">" < >
- When you select the desired function, use the "<" or ">" button to adjust the preset timer and set the cooking end time.
- In manual function, use the "<" or ">" button to select the temperature value in the temperature setting state. • Adjust the cooking time.
Note: Press the DIY button and the display will start flashing.
Cooking pot
Accessories
| [G4YW] | Žlica za rižu |
 | Žlica za juhu |
 | Mjerna šalica |
 | Košarica za kuhanje na pari |
Control panel

Instructions for use
- Wipe the outside of the cooking pot with a kitchen cloth and place it in the appliance; turn the pot about 2-3 times to make sure the bottom of the pot is firmly attached to the heating plate; press it down until you hear a click.



Brand : GORENJE
Model : MC2SBK
Category : Multicooker