
MMC1000W - Blender GORENJE - Free user manual and instructions
Find the device manual for free MMC1000W GORENJE in PDF.

| Product Type | Stand Mixer with Blender Attachment |
| Brand | Gorenje |
| Model | MMC1000W |
| Color | White |
| Bowl Material | Stainless Steel |
| Bowl Capacity | Up to 2 kg of dough |
| Functions | Kneading, Beating, Whisking, Blending, Mincing |
| Speed Control | Rotary knob, variable from Min to Max |
| Power | 1000 W (estimated from model) |
| Voltage | 220-240 V |
| Noise Level | 72 dB(A) |
| Continuous Operation | 10 minutes maximum |
| Rest Period | 30 minutes before next use |
| Attachments Included | Whisk, Dough Hook, Mixer Blade, Blender Jar with Lid, Meat Grinder |
| Safety Features | Safety lock on multifunction head, non-slip feet, automatic shut-off (if overload) |
| Cleaning | Detachable parts dishwasher safe except metal components; wipe motor unit with damp cloth |
| Certifications | CE, WEEE (2012/19/EU) |
| Guarantee | 2 years (standard, refer to local Gorenje Customer Care) |
| Dimensions | Approx. 35 x 20 x 30 cm (estimated) |
| Weight | Approx. 5 kg (estimated) |
Frequently Asked Questions - MMC1000W GORENJE
User questions about MMC1000W GORENJE
0 question about this device. Answer the ones you know or ask your own.
Ask a new question about this device
Download the instructions for your Blender in PDF format for free! Find your manual MMC1000W - GORENJE and take your electronic device back in hand. On this page are published all the documents necessary for the use of your device. MMC1000W by GORENJE.
USER MANUAL MMC1000W GORENJE
natural_image
White modern kitchen mixer with stainless steel bowl and control panel (no visible text or symbols)MMC1000W
| Navodilo za uporabo | SI |
| Upute za uporabu | BIH HR |
| Uputstva za upotrebu | BIH SRB MNE |
| Упатства за употреба | MK |
| Instructions for Use | GB |
| Instrucțiuni de utilizare | RO |
| Használati útmutató | H |
| Инструкции за употреба | BG |
| Інструкці з експлуатаціїя | UA |
| Руководство по эксплуатации | RUS |
| Gebrauchsanweisung | D |
SI Navodila za uporabo....4
natural_image
Two 3D renderings of a kitchen mixer with red directional arrows indicating motion (no text or symbols)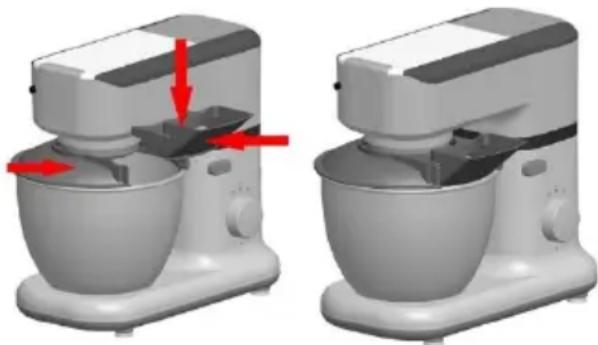
natural_image
Two 3D renderings of a kitchen mixer with red arrows indicating motion or force, shown from different angles (no text or symbols present)natural_image
Two 3D renderings of a kitchen mixer with red arrows indicating motion direction (no text or symbols)natural_image
Four-panel diagram showing a kitchen mixer with red arrows indicating motion, no text or symbols present.natural_image
Two 3D renderings of a kitchen mixer with red arrows indicating motion direction (no text or symbols)- Najprije stavite brtveći obruč vrča preko kompleta oštrica za miksanje.

natural_image
Four-panel diagram showing a kitchen mixer with red arrows indicating motion, no text or symbols present.Ovisno o vrsti sastojaka, činiju s poklopcem možete koristiti za pripremu približno 2 kg testa.
-
Pre prve upotrebe operite i očistite sve delove dodataka najpre sapunicom, a zatim ih temeljito isperite tekućom vodom i dobro osušite.
-
Pritiskom na dugme (2) oslobodite višenamensku glavu (8), te je podignite u vertikalan položaj.
-
Stavite činiju (7) na aparat i obrnite je da se uglavi u pravilan položaj. Nakon toga unutra stavite sastojke koje ćete prethodno izvagati u skladu s uputstvima iz poglavlja o vaganju.
-
Činiju poklopite poklopcem tako da otvor za punjenje bude na prednjoj strani aparata.
-
Sada u pogonski otvor zakačite izabrani nastavak (9), (10), ili (11), i to tako da vreteno nastavka gurnete do kraja i obrnete ga za četvrt obrtaja prema vama, čime se nastavak uglavi u svoje ležište.
-
Spustite višenamensku glavu aparata u horizontalan položaj i ponovno pritisnite dugme (začuje se klik).
-
Tokom pripreme možete i dodavati sastojke kroz otvor u poklopcu.
-
Delovanje aparata zaustavljate tako da dugme (1) obrnete nazad na 0.
-
Aparat položite na čistu, ravnu i suvu površinu, a zatim ga ukopčajte u električnu mrežu.
UPOTREBA BLENDERA:
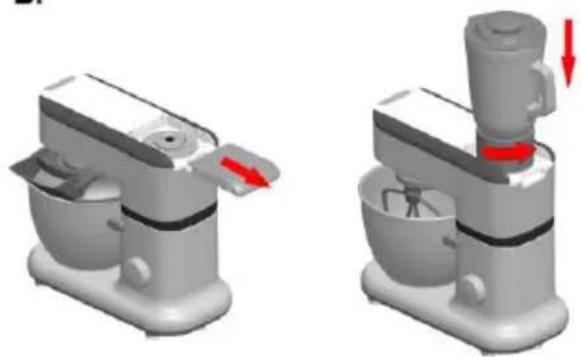
B.
natural_image
3D rendering of a kitchen mixer with red directional arrows indicating motion (no text or symbols)- Najpre stavite okrugao zaptivač vrča preko kompleta sečiva za miksanje.

natural_image
Four-panel diagram showing a kitchen mixer with red arrows indicating motion, no text or symbols present.natural_image
Two 3D renderings of a kitchen mixer with red arrows indicating motion direction (no text or symbols)natural_image
Line drawing of a blender with a lid and handle (no text or symbols)- Speed control switch
- Power outlet for mincer
- Bowl cover
- Stainless steel bowl
- Multifunction head
- Whisk
- Dough hook
- Mixer blade
- Power outlet for blender
-
Jar
-
Release button for multifunction head
-
Removable cover for mincer power outlet
-
Release button for Cutter housing
Danger
Do not immerse the motor unit in water nor rinse it under the tap.
Warning
- Carefully read the instructions before using your appliance.
- Switch off the appliance before fitting and removing the attachment.
- Keep your fingers away from moving parts and the opening on the attachment.
- Only use the appliance for its intended domestic use. The manufacture will not accept any liability if the appliance is subject to improper use or failure to comply with these instructions.
- Check that the voltage rating of the appliance matches that of your electrical system.
- Any connection error will nullify the guarantee.
- The appliance must be plugged into an earthed electrical socket.
- If you have to use an electrical extension lead, it must be earthed
and you should make sure that noone can trip over it.
- Unplug the appliance as soon as you have finished using it and before cleaning it.
- Don't use your attachment and/or appliance if it has been damaged. Contact an approved service centre.
- Any work on the appliance other than normal care and cleaning by the customer must be carried out by an approved service centre.
- Do not immerse the appliance, the power cord or the plug in water or in any other liquid.
- Do not allow the power cord to hang within the reach of children, to come close to or into contact with hot parts of your appliance, any other source of heat or any sharp edge.
- Switch off the appliance and disconnect it from power supply before changing accessories or approaching any moving parts.
- Do not touch the whisk, mixer blade or kneading hook while the appliance is in operation.
- Only use one attachment at a time.
- Do not operate the appliance continuously for more than 10 minutes at a time. Allow 30 minutes rest before next use.
- Appliances can be used by persons with reduced physical, sensory or mental capabilities or lack of experience and knowledge if they
have been given supervision or instruction concerning use of the appliance in a safe way and if they understand the hazards involved.
- Children should be supervised to ensure that they do not play with the appliance.
- If the supply cord is damaged, it must be replaced by the manufacturer, service agent or a similarly qualified person, in order to avoid a hazard.
- This appliance may not be used by children. Keep the appliance and its cord out of reach of children.
• Children may not play with the appliance. - Children may not clean the appliance or perform user maintenance tasks on it without supervision.
- When you use one power outlet for blender 5 it is necessary to use protective cover on the other power outlet.
- Be careful when handling the sharp cutting blades, emptying the bowl and during cleaning
- Be careful when pouring hot blender as it can be ejected out of the appliance due to sudden steaming.
- Do not use the appliance if the rotating sieve or the protecting cover is damaged or has visible cracks.
- This appliance is intended to be used in household and similar applications.
- Noise level: 72 dB(A)
This appliance is marked according to the European directive 2012/19/EU on Waste Electrical and Electronic Equipment (WEEE). This guideline is the frame of a European-wide validity of return and recycling on Waste Electrical and Electronic Equipment.
Caution
Always place the appliance on a flat, stable surface.
Do not use the citrus press longer than 10 minutes without interruption.
This appliance is intended for household use only.
Never use any accessories or parts from other manufacturers unless they are authorized by Gorenje. In case you use these accessories the warranty will be canceled.
Before use
Clean all detachable parts before using the appliance for the first time (see chapter 'Cleaning').
Make sure the appliance is assembled properly (see chapter ‘General description’) before you plug it in the wall socket.
Put the plug in the wall socket.
Using the appliance
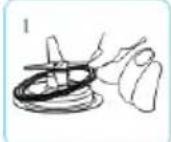
KNEADING/BEATING/WHISKING:
A.
natural_image
Two 3D renderings of a kitchen mixer with red directional arrows indicating motion (no text or symbols)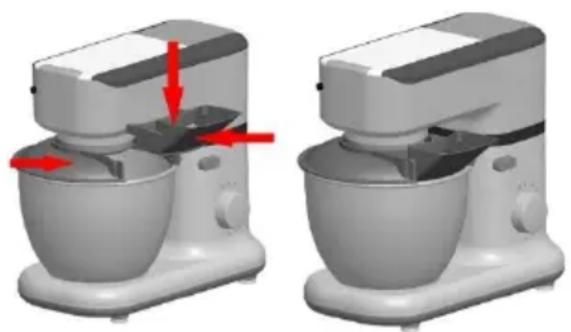
natural_image
Two 3D renderings of a kitchen mixer with red arrows indicating motion or force, shown from different angles (no text or symbols present)Depending on the nature of the ingredients, the bowl (4) with its cover can be used to prepare up to 2 kg of dough.
- Before using for the first time, clean all parts of the accessories with soapy water rinse and dry.
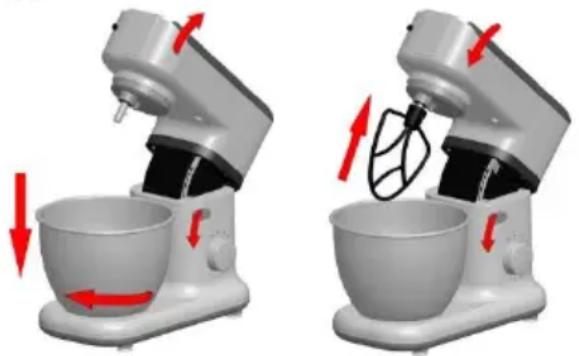
- Press button (2) to release the multifunction head (5) and raise it to a vertical position.
- Fit the bowl(4) onto the appliance by turning until it locks in position and place the ingredients in it, weighting them as indicated under the weighing function.
- Position the cover on the bowl with the filling opening at the front of the appliance.
- Fit the desired accessory (6), (7), (8) in the power outlet, pushing the shaft of the accessory home and turn it a quarter towards you to lock it in position.
- Lower the multifunction head of the appliance to horizontal position and press button again (you will hear a click).
- During preparation, you can add ingredients through the opening of the cover.
- To stop the appliance, turn the knob (1) back to 0.
- Place the appliance on a flat, clean and dry surface and then plug in your appliance.
USING BLENDER:
B.
natural_image
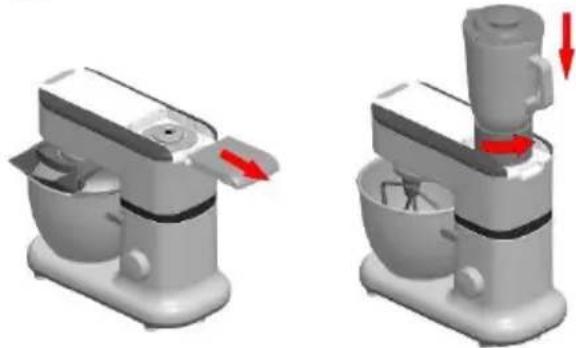
Two 3D renderings of a kitchen mixer with red arrows indicating motion direction (no text or symbols)- Install the jar sealing ring over the blending blade assembly.
- Install the blending blade assembly over the jar base.
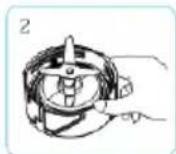
- Attach the jar base to the jar by turning it in the direction of the arrow.
- Put the ingredients that are not bigger than 2 centimeter in the jar.
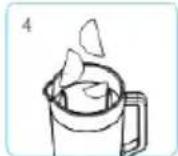
- Press the lid into place.
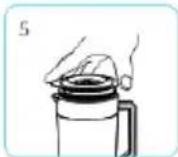
- Install the jar onto the base.
Tips: While the motor is running, if you want to add ingredients you can:
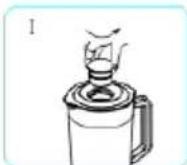
I: Turn the inner lid off the lid in the direction of anticlockwise
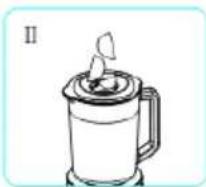
II. Add the ingredients into the jar through the opening in the lid
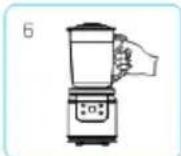
- After you have done you work, push "ON/OFF button", unplug the appliance, and pour out the content.
Cleaning
- Unplug the appliance.
- Never immerse the motor until in water or put it under running water. Wipe it with a soft dry or slight damp cloth.
- For easier cleaning, quickly rinse the accessories after use. Completely dismantle the mixer attachment. Handle the blades with care, as some have sharp cutting edges.
- Wash, rinse and wipe the accessories or put them in the dishwasher, except for the metal components.
- If your accessories change color because of the food (carrots, oranges etc), rub them gently with kitchen towel dipped in cooking oil and then clean it in the usual way.
CAUTION:
Don't wash the pasta attachment in the dishwasher, wipe them clean with a damp cloth. Do not immerse in water.
RECIPES
Basic pasta dough
500g flour or plain flour
4 eggs
2.5ml salt
2.5ml oil
Water if necessary
WHOLEMEAL PASTA
500g whole meal flour
4 eggs
2.5ml salt
2.5ml oil
Water if necessary
PASTA ROSSA
500g flour or plain flour
3 eggs
75g pureed tomato
2.5ml salt
2.5ml oil
Water if necessary
METHOD
- Put the flour, salt, oil and beaten eggs (eggs should be mixed with tomato puree) into the mixing bowl.
- Mix with the dough hook on speed 1-2 for approximately 2-3 minutes, adding water if the mix is too dry.
- Switch off the machine and gather the ingredients together and knead by hand until you get smooth dough.
- For best results, wrap the dough then let it rest for approximately 15 minutes before rolling out with the pasta attachment.
- Fit the flat pasta making attachment and follow the previous instructions.
| Accessory | Food | Maximum | Operation time | Speeds | Preparation |
| whisk | Cream(include 38%fat) | 250ml | 10minutes | Min-Max | / |
| Egg white | 12pcs | 3minutes | / | ||
| Dough hook | Flour | 1350g | 10minutes | Min-Max | / |
| Salt | 15g | ||||
| Yeast | 20g | ||||
| Sugar | 10g | ||||
| Water | 936g | ||||
| Lard | 20g | ||||
| Mixer blade | Flour | 100g | 5minutes | Min-Max | / |
| Castor sugar | 100g | ||||
| Margarine | 100g | ||||
| Egg | 2pcs | ||||
| Meat Grinder | Beef | 2000g | 3minute | Min-Max | 20×20×60 mm |
| Pork | 2000g | 3minute |
Environment
Do not throw away the appliance with the normal household waste at the end of its life, but hand it in at an official collection point for recycling. By doing this, you help to preserve the environment.
Guarantee & service
If you need information or if you have a problem, please contact the Gorenje Customer Care Centre in your country (you find its phone number in the worldwide guarantee leaflet). If there is no Customer Care Centre in your country, go to your local Gorenje dealer or contact the Service department of Gorenje domestic appliances.
For personal use only!
GORENJE WISHES YOU A LOT OF PLEASURE WHEN USING YOUR APPLIANCE
We reserve the right to any modifications!
MANUAL DE INSTRUCTIUNI
RO
natural_image
Four-panel diagram showing a kitchen mixer with red arrows indicating motion, no text or symbols present.natural_image
Two 3D renderings of a kitchen mixer with red arrows indicating motion direction (no text or symbols)natural_image
Four-panel diagram showing a kitchen mixer with red arrows indicating motion, no text or symbols present.natural_image
Two 3D renderings of a kitchen mixer with red directional arrows indicating motion (no text or symbols)natural_image
Line drawing of a blender with a lid and handle, no text or symbols presentnatural_image
Four-panel diagram showing a kitchen mixer with red arrows indicating motion, no text or symbols present.natural_image
Two 3D renderings of a kitchen mixer with red arrows indicating motion direction (no text or symbols)natural_image
Four-panel diagram showing a kitchen mixer with red arrows indicating motion, no text or symbols present.natural_image
Two 3D renderings of a kitchen mixer with red arrows indicating motion, no text or symbols present.Gorenje Domestic Appliances.