
PLLL 16 A2 - Soldering iron PARKSIDE - Free user manual and instructions
Find the device manual for free PLLL 16 A2 PARKSIDE in PDF.

| Brand | Parkside |
| Model | PLLL 16 A2 |
| Product type | Soldering iron with illuminated magnifier and third hand |
| Rated voltage | 230 V |
| Rated frequency | 50 Hz |
| Rated power | 30 W |
| LED lighting of magnifier | 16 LEDs |
| Magnification | 2x (3.5 dioptres) and 4x (11.8 dioptres) |
| Base dimensions (L x W) | 200 x 200 mm |
| Gooseneck length (magnifier) | 265 mm |
| Gooseneck length (third hand) | 250 mm |
| Magnifier diameter | 100 mm |
| Pin roller diameter | 10.5 mm and 19 mm |
| Weight | Approx. 2 kg |
| Environmental conditions | -20 to +40 °C, humidity < 95% (non-condensing) |
| Supplied items | Soldering iron with tip, 2 pin rollers, sponge, magnifier protective cover, user manual |
| Main functions | Soldering electronic components, LED lighting, magnification, third hand with crocodile clips, iron stand, wire guide |
| Maintenance and cleaning | Unplug and cool down before cleaning; iron: soft cloth without solvent; magnifier: compressed air and lens cloth |
| Warranty | 3 years from date of purchase |
| After-sales service France | Phone: 0800 919270, Email: kompernass@lidl.fr |
Frequently Asked Questions - PLLL 16 A2 PARKSIDE
User questions about PLLL 16 A2 PARKSIDE
0 question about this device. Answer the ones you know or ask your own.
Ask a new question about this device
Download the instructions for your Soldering iron in PDF format for free! Find your manual PLLL 16 A2 - PARKSIDE and take your electronic device back in hand. On this page are published all the documents necessary for the use of your device. PLLL 16 A2 by PARKSIDE.
USER MANUAL PLLL 16 A2 PARKSIDE
LÖT-ARBEITSSTATION / SOLDERING STATION FER À SOUDER PLLL 16 A2
DE AT CH
LÖT-ARBEITSSTATION
Translation of the original instructions
NL BE
SOLDEERWERKSTATION
Before reading, unfold the page containing the illustrations and familiarise yourself with all functions of the device.
FR BE
GB/IE Translation of the original instructions Page 11
natural_image
Mechanical component with a numbered label '15' pointing to a cylindrical shaft (no other text or symbols visible)
natural_image
3D rendered object resembling a dome or bowl with two small holes, labeled with number 16 (no text or symbols on the object itself)Inhaltsverzeichnis
Einleitung 2
KOMPERNASS HANDELS GMBH
BURGSTRASSE 21
44867 BOCHUM
GERMANY
www.kompernass.com
Contents
Introduction....12
Intended use 12
Features 12
Package contents 12
Technical details 13
General Power Tool Safety Warnings 13
- Work area safety 13
- Electrical safety 13
- Personal safety 14
- Power tool use and care 15
- Service 15
Original accessories/auxiliary equipment 15
Appliance-specific safety instructions 15
Before use....16
Setting up the appliance 16
Inserting/replacing the soldering tip 16
Operation 16
Switching the soldering iron on and off 16
Switching the LED light on and off 17
Soldering iron stand 17
Third hand 17
Soldering sponge 17
Fitting the spindle roll 17
Soldering 18
Maintenance and cleaning 18
Disposal....19
Disposal of the appliance....19
Notes on the Declaration of Conformity 19
Kompernass Handels GmbH warranty 19
Service....20
Importer 20
SOLDERING STATION PLLL 16 A2
Introduction

ulations on the purchase of your new appliance. You have selected a high-quality product. The operating instructions are part of this product. They contain important information about safety, usage and disposal. Before using the product, please familiarise yourself with all operating and safety instructions. Use the product only as described and for the range of applications specified. Please also pass these operating instructions on to any future owner.
Intended use
This soldering iron is intended for electronic soldering in the hobby and DIY segments. The illuminated magnifying glass with integrated 3rd hand as well as the magnifying glass itself make it easier to work with the soldering iron. The illuminated magnifying glass is not suitable for lighting rooms in houses. In addition, the appliance has a soldering-iron stand, a wire-spool holder for solder, a three-stage wire assembly, and also a so-called third hand as an aid during soldering work. The illuminated magnifying glass is designed to create an enlarged view of objects. The appliance must be firmly set up on a suitable surface such as a table or a window sill.
liance is only to be used in enclosed spaces. Avoid contact with moisture at all costs. Use this product only as described and for the areas of applications specified. The appliance is not intended for commercial use. Any other usage is deemed improper and carries a significant risk of accidents. The manufacturer accepts no responsibility for damage attributable to misuse.
Features
① Illuminated magnifying glass
2 Gooseneck for adjusting the magnifying glass
③ Third hand with crocodile clip and gooseneck
4 Soldering iron stand
5 Crocodile clip
6 Solder guide
⑦ Soldering sponge
8 On/Off switch (soldering iron)
9 Solder coil mount
⑩ Spindle roll (∅ 19 mm)
⑪ Mains plug
12 On/Off switch (illuminated magnifying glass)
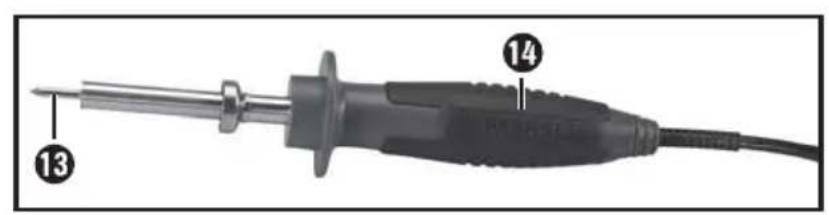
13 Soldering tip
14 Soldering iron
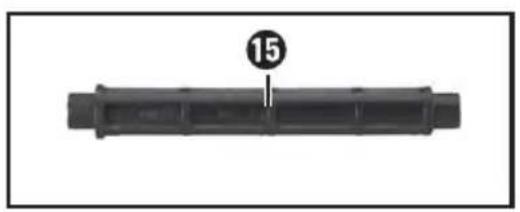
15 Spindle roll (∅ 10.5 mm)
16 Magnifier cover
Package contents
1 soldering station PLLL 16 A2
1 soldering iron with soldering tip
2 spindle rolls
1 soldering sponge
1 magnifier cover
1 set of operating instructions
Technical details
Rated voltage: 230 V \~
Nominal frequency: 50 Hz
Nominal power: 30 W
Soldering iron:
Nominal power: 30 W
Illuminated magnifying glass with third hand:
Lighting: 16 LEDs
Magnification: 2x, 3.5 dioptres / 4x, 11.8 dioptres
Ambient conditions: -20 to +40°C <95% (non-condensing)
Dimensions:
Stand (L × B): 200 × 200 mm
Length gooseneck
(magnifying glass): 265 mm
Length gooseneck
(third hand): 250 mm
Magnifier diameter: 100 mm
Spindle holder ( × L ): 10.5 x 82 mm / 19 x 82 mm
Weight: approx. 2 kg

General Power Tool Safety Warnings

WARNING!
Read all safety warnings and all instructions. Failure to follow the warnings and instructions may result in electric shock, fire and/or serious injury.
Save all warnings and instructions for future reference.
The term "power tool" in the warnings refers to your mains-operated (corded) power tool or battery-operated (cordless) power tool.
1. Work area safety
a) Keep work area clean and well lit. Cluttered or dark areas invite accidents.
b) Do not operate power tools in explosive atmospheres, such as in the presence of flammable liquids, gases or dust. Power tools create sparks which may ignite the dust or fumes.
c) Keep children and bystanders away while operating a power tool. Distractions can cause you to lose control.
2. Electrical safety
a) Power tool plugs must match the outlet. Never modify the plug in any way. Do not use any adapter plugs with earthed (grounded) power tools. Unmodified plugs and matching outlets will reduce risk of electric shock.
b) Avoid body contact with earthed or grounded surfaces, such as pipes, radiators, ranges and refrigerators. There is an increased risk of electric shock if your body is earthed or grounded.
c) Do not expose power tools to rain or wet conditions. Water entering a power tool will increase the risk of electric shock.
d) Do not abuse the cord. Never use the cord for carrying, pulling or unplugging the power tool. Keep cord away from heat, oil, sharp edges or moving parts. Damaged or entangled cords increase the risk of electric shock.
e) When operating a power tool outdoors, use an extension cord suitable for outdoor use. Use of a cord suitable for outdoor use reduces the risk of electric shock.
f) If operating a power tool in a damp location is unavoidable, use a residual current device (RCD) protected supply. Use of an RCD reduces the risk of electric shock.
g) Always hold the power cord away from the working area of the appliance and run it to the rear away from the appliance.
h) Always pull out the plug if you leave the appliance unattended or carry out work on the appliance.
3. Personal safety
This appliance may be used by children aged 8 years and above and by persons with limited physical, sensory or mental capabilities or lack of experience and knowledge, provided that they are under supervision or have been told how to use the appliance safely and are aware of the potential risks. Do not allow children to use the appliance as a plaything. Cleaning and maintenance tasks may not be carried out by children unless they are supervised.
a) Stay alert, watch what you are doing and use common sense when operating a power tool. Do not use a power tool while you are tired or under the influence of drugs, alcohol or medication. A moment of inattention while operating power tools may result in serious personal injury.
RISK OF BURNS! Do not touch the heated soldering tip or the molten solder. There is a risk of being burnt. Always allow the appliance to cool down completely before changing components, cleaning or checking it.
■ After work, allow the soldering iron to cool down in the air only. Do not attempt to quench it with water.
■ CAUTION! RISK OF FIRE! Use only the special multi-functional holder or another fireproof surface when putting down the soldering iron.
During breaks in work, the soldering iron must be placed in the multi-functional holder.
- Keep the appliance away from flammable material.
■ Never leave a switched-on appliance unsupervised.
■ CAUTION! RISK OF INJURY! Keep your hands away from the heated workpiece. The heat can be emitted through the workpiece. Therefore use the third hand to hold small workpieces.
■ Avoid contact between the hot soldering tip and the plastic parts of the multi-functional holder. Otherwise, the appliance might be damaged.
In case of danger, remove the plug from the socket immediately.
■ CAUTION! RISK OF POISONING!
Avoid inhaling vapours!
During work over an extended period in which hazardous vapours can be created, always ensure sufficient ventilation of the workplace. In addition, protective gloves, a face mask and work apron are recommended.
■ Avoid eating, drinking and smoking in rooms where soldering work is taking place. Otherwise, lead residues on your hands might contaminate the food, drink or cigarettes and be absorbed into your body.
■ Always wash your hands thoroughly after soldering.
- Do not dispose of solder waste in normal domestic waste! Solder waste should be disposed of with hazardous waste.
4. Power tool use and care
a) Store idle power tools out of the reach of children Do not allow persons unfamiliar with the power tool or these instructions to operate the power tool. Power tools are dangerous in the hands of untrained users.
b) Maintain power tools. Check for misalignment or binding of moving parts, breakage of parts and any other condition that may affect the power tool's operation. If damaged, have the power tool repaired before use. Many accidents are caused by poorly maintained power tools.
c) Use the power tool, accessories and tool bits etc. in accordance with these instructions, taking into account the working conditions and the work to be performed. Use of the power tool for operations different from those intended could result in a hazardous situation.
5. Service
■ Have the power tool repaired by the Service centre or a qualified electrician and only using genuine replacement parts. This will ensure that the safety of the appliance is maintained.
■ Always ensure that the power plug or the power cord is replaced only by the manufacturer of the appliance or by an approved customer service provider. This will ensure that the safety of the appliance is maintained.
Original accessories/auxiliary equipment
■ Use only the additional equipment and accessories specified in the operating instructions. Using attachments or accessory tools other than those recommended in the operating instructions can lead to a risk of injury.
Appliance-specific safety instructions
■ This product is not a toy and should not be played with by children.
■ Never look directly into the light source while it is in operation.
- Do not use the magnifying glass on the luminaire head to look at light sources such as LED lamps or laser beams. The optical magnification can cause damage to your eyes.
■ When not in use, cover the magnifying glass in the head with the cover, otherwise there is a fire risk caused by concentrated sunlight.
■ Do not operate the light unsupervised.
- Check the light from time to time for damage. If the light or the mains plug is damaged, do not touch the appliance. Disconnect the appropriate power outlet (e.g. via the associated circuit breaker) and then pull the mains plug carefully from the outlet. Do not operate the appliance again; have it repaired in a specialist workshop.
■ Avoid any heavy mechanical stresses on the lamp. Do not expose the appliance to high temperatures, extreme vibrations, high humidity, dripping or splashing water.
■ Never pour liquids over the lamp. There is a real danger of fire or fatal electrical shock. If, however, liquids do get inside the appliance, pull the plug out of the socket immediately and contact a professional.
■ Never leave the packaging material unattended. This could be a danger if children play with it.
■ Treat the appliance with great care. It can be damaged by bumps, impacts or a fall even from a low height.
- Consult a professional if you are in any doubt about the operation or the safety of this product.
Before use
Setting up the appliance

CAUTION!
▶ Never set up the appliance near easily flammable materials (e.g. curtains, furnishing fabrics, etc.). When using the illuminated magnifying glass ① in conjunction with soldering work, there may be a risk of fire. Keep the entire appliance out of the reach of children. Children could knock down the appliance and be injured.
▶ Never cover the illuminated magnifying glass while it is in operation.
▶ Never set up the appliance on an unstable surface. If the appliance falls, it could cause an injury.
Remove the product from its packaging and place it on a flat and level surface.
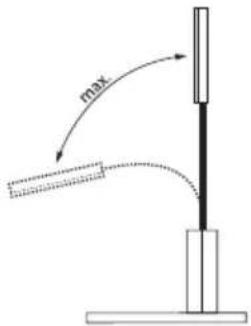
◆ Direct the illuminated magnifying glass 1 using the gooseneck 2 is required.
NOTE
▶ If the illuminated magnifying glass ^① is switched off and not in use, place it in the maximum vertical position.
Inserting/replacing the soldering tip

CAUTION! RISK OF BURNS!
▶ Never heat the soldering iro ^14 without a soldering tip ^13
■ The soldering tip may only be removed when the appliance is switched off and the soldering tip is cooled down.
■ The soldering tip has a screw thread and can thus be removed quickly from the soldering iron.
◆ Unscrew the soldering tip anticlockwise.
♦ Screw the soldering tip in clockwise.
Operation
Switching the soldering iron on and off
Switching on:
◆ Plug the mains plug into an appropriate wall socket and press the On/off switch to the "ON" position.
Switching off:
NOTE
▶ After use, always replace the soldering iron 14 in the soldering iron stand 4
◆ Press the On/Off switch 8 to the "OFF" position. Always remove the plug 11 from the socket when not in use.

Switching the LED light on and off
Switching on:
◆ Plug the mains plug into an appropriate wall socket and press the On/Off switch to the "ON" position.
Switching off:
◆ Set the On/Off switch ^12 to "OFF" to turn off the illuminated magnifying glass 1
◆ Always remove the plug from the socket when not in use.
To protect the illuminated magnifying glas ^1 , fit the supplied magnifier cover ^16
NOTE
- Avoid touching the magnifying glass with your fingernails or other sharp objects.
Soldering iron stand
NOTE
▶ During breaks in work, the soldering iron must be placed in the soldering iron stand 4
▶ Use only the soldering iron stand or another fireproof surface when putting down the soldering iron.
Third hand

CAUTION! RISK OF BURNS!
The crocodile clip 3 can get very hot during use.
♦ Fold the third hand 3 upwards.
♦ Turn the crocodile clip⑤ in the desired direction.
- Clamp the workpiece between the two crocodile clips.
Soldering sponge

CAUTION!
The hot soldering tip must never come into contact with a dry soldering sponge ⑦ Otherwise, the soldering sponge can be damaged.
NOTE
▶ The soldering sponge is used to clean the soldering tip.
▶ Dampen the soldering sponge before use.
Fitting the spindle roll
Select the correct diameter of spindle roll for the solder roll that you are using.
Place the spindle roll on the solder coil moun and guide the solder wire through one of the three holes in the solder guide
Soldering

Vapours can lead to headaches and fatigue if inhaled.
■ The soldering iron has a rated power output of 30 watts and is ideal for electronic solders.
The best results are achieved with electronic solder, 1.0 or 1.5 mm diameter, 60% Sn, 40% Pb. We recommend using contact solder paste as a flux (not solder paste or soldering fluid).
- Clean the soldering tip ③ on the moist soldering sponge ⑦
After cleaning, the soldering tip must be tinned. Tin the hot soldering iron by melting some solder.
◆ Guide the soldering tip to the solder joint and heat it.
◆ Place the solder (with flux) between the solder joint and soldering tip to melt it.
- Keep feeding in solder until the entire solder joint is moistened.
- Then withdraw the soldering tip immediately to prevent overheating the molten solder.
Allow the solder to harden and avoid vibrations.
NOTE
The flux is either included in the solder or it is applied separately. When buying the solder ask about its use and the appropriate flux.
Maintenance and cleaning

WARNING! RISK OF INJURY! Always pull the plug out of the socket and let the appliance cool down before you carry out any work on the appliance.
Soldering iron:
■ Always clean the appliance after completion of work.
■ To clean the housing, use a cloth and a mild detergent if necessary.
■ Never use sharp objects, petrol, solvents or cleaning agents that can damage plastic.
■ Do not allow any liquids to get into the interior of the appliance.
NOTE
▶ You can order spare parts (such as solder tips) via our service hotline.
Illuminated magnifying glass:
■ Remove loose particles with clean compressed air and then brush off the remaining deposits with a soft lens brush.
■ Clean the surface with a lens cleaning tissue or a clean, soft and lint-free cloth. To remove fingerprints and other fatty deposits, the cloth may be moistened with water or a lens-cleaning fluid.
■ Do not use any acid, alcohol or other solvents or rough, linty cloths to clean the lens. Avoid excessive cleaning and pressure.
NOTE
- Avoid touching the illuminated magnifying glass ① with your fingernails or other sharp objects.
Disposal
Disposal of the appliance

The packaging is made from environmentally friendly material and can be disposed of at your local recycling plant.

ot dispose of power tools in your normal household waste!
European Directive 2012/19/EU requires that worn-out power tools be collected separately and recycled in an environmentally compatible manner. Your local community or municipal authorities can provide information on how to dispose of the worn-out appliance.
Notes on the Declaration of Conformity
This appliance complies with the basic requirements and other relevant provisions of the Electromagnetic Compatibility Directive 2004/108/EC, the Low Voltage Directive 2014/35/EU, the Ecodesign Directive 2009/125/EC and also the RoHS Directive 2011/65/EU.
The complete original Declaration of Conformity is available from the importer.

This appliance has a 3-year warranty valid from the date of purchase. If this product has any faults, you, the buyer, have certain statutory rights. Your statutory rights are not restricted in any way by the warranty described below.
Warranty conditions
The validity period of the warranty starts from the date of purchase. Please keep your original receipt in a safe place. This document will be required as proof of purchase.
If any material or production fault occurs within three years of the date of purchase of the product, we will either repair or replace the product for you at our discretion. This warranty service is dependent on you presenting the defective appliance and the proof of purchase (receipt) and a short written description of the fault and its time of occurrence.
If the defect is covered by the warranty, your product will either be repaired or replaced by us. The repair or replacement of a product does not signify the beginning of a new warranty period.
Warranty period and statutory claims for defects
The warranty period is not prolonged by repairs effected under the warranty. This also applies to replaced and repaired components. Any damage and defects present at the time of purchase must be reported immediately after unpacking. Repairs carried out after expiry of the warranty period shall be subject to a fee.
Scope of the warranty
This appliance has been manufactured in accordance with strict quality guidelines and inspected meticulously prior to delivery.
The warranty covers material faults or production faults. The warranty does not extend to product parts subject to normal wear and tear or fragile parts such as switches, batteries, baking moulds or parts made of glass.
The warranty does not apply if the product has been damaged, improperly used or improperly maintained. The directions in the operating instructions for the product regarding proper use of the product are to be strictly followed. Uses and actions that are discouraged in the operating instructions or which are warned against must be avoided.
This product is intended solely for private use and not for commercial purposes. The warranty shall be deemed void in cases of misuse or improper handling, use of force and modifications/repairs which have not been carried out by one of our authorised Service centres.
Warranty claim procedure
To ensure quick processing of your case, please observe the following instructions:
- Please have the till receipt and the item number (e.g. IAN 12345) available as proof of purchase.
- You will find the item number on the type plate, an engraving on the front page of the instructions (bottom left), or as a sticker on the rear or bottom of the appliance.
- If functional or other defects occur, please contact the service department listed either by telephone or by e-mail.
- You can return a defective product to us free of charge to the service address that will be provided to you. Ensure that you enclose the proof of purchase (till receipt) and information about what the defect is and when it occurred.
You can download these instructions along with many other manuals, product videos and software on www.lidl-service.com.
Service

Service Great Britain
Tel.: 0871 5000 720 (£ 0.10/Min.)
E-Mail: kompernass@lidl.co.uk
IAN 275637

Service Ireland
Tel.: 1890 930 034
(0,08 EUR/Min., (peak))
(0,06 EUR/Min., (off peak))
E-Mail: kompernass@lidl.ie
IAN 275637
Importer
Please note that the following address is not the service address. Please use the service address provided in the operating instructions.
KOMPERNASS HANDELS GMBH
BURGSTRASSE 21
44867 BOCHUM
GERMANY
www.kompernass.com
Table des matières
Introduction....22
KOMPERNASS HANDELS GMBH
BURGSTRASSE 21
44867 BOCHUM
GERMANY
www.kompernass.com
Inhoud
Inleiding 32
KOMPERNASS HANDELS GMBH
BURGSTRASSE 21
44867 BOCHUM
GERMANY
www.kompernass.com
Obsah
Úvod 42
KOMPERNASS HANDELS GMBH
BURGSTRASSE 21
44867 BOCHUM
GERMANY
www.kompernass.com
Índice
Introducción 52
Uso previsto 52
Equipamiento 52
KOMPERNASS HANDELS GMBH
BURGSTRASSE 21
44867 BOCHUM
GERMANY
www.kompernass.com
(diâm. x C): 10,5 x 82 mm / 19 x 82 mm
Peso: aprox. 2 kg
KOMPERNASS HANDELS GMBH
BURGSTRASSE 21
44867 BOCHUM
GERMANY
www.kompernass.com
KOMPERNASS HANDELS GMBH
BURGSTRASSE 21
44867 BOCHUM
DEUTSCHLAND / GERMANY
www.kompernass.com
Stand der Informationen · Last Information Update · Version des informations
Stand van de informatie · Stav informací · Estado de las informaciones


- LÖT-ARBEITSSTATION / SOLDERING STATION FER À SOUDER PLLL 16 A2
- LÖT-ARBEITSSTATION
- SOLDEERWERKSTATION
- FR BE
- Inhaltsverzeichnis
- Einleitung 2
- Contents
- Introduction....12
- General Power Tool Safety Warnings 13
- Before use....16
- Operation 16
- Maintenance and cleaning 18
- Disposal....19
- Notes on the Declaration of Conformity 19
- Kompernass Handels GmbH warranty 19
- Service....20
- Importer 20
- SOLDERING STATION PLLL 16 A2
- Introduction
- Intended use
- Features
- Package contents
- Technical details
- Soldering iron:
- Illuminated magnifying glass with third hand:
- Dimensions:
- General Power Tool Safety Warnings
- WARNING!
- Save all warnings and instructions for future reference.
- Work area safety
- Electrical safety
- Personal safety
- Power tool use and care
- Service
- Original accessories/auxiliary equipment
- Appliance-specific safety instructions
- Before use
- Setting up the appliance
- CAUTION!
- NOTE
- Inserting/replacing the soldering tip
- CAUTION! RISK OF BURNS!
- Operation
- Switching the soldering iron on and off
- Switching on:
- Switching off:
- Switching the LED light on and off
- Soldering iron stand
- Third hand
- Soldering sponge
- Fitting the spindle roll
- Soldering
- Maintenance and cleaning
- Illuminated magnifying glass:
- Disposal
- Disposal of the appliance
- Notes on the Declaration of Conformity
- Warranty conditions
- Warranty period and statutory claims for defects
- Scope of the warranty
- Warranty claim procedure
- Service
- Importer
- Table des matières
- Introduction....22
- Inhoud
- Inleiding 32
- Obsah
- Úvod 42
- Índice
- Introducción 52
Brand : PARKSIDE
Model : PLLL 16 A2
Category : Soldering iron