
HOZP9177BI - Oven HOOVER - Free user manual and instructions
Find the device manual for free HOZP9177BI HOOVER in PDF.

| Product Type | Built-in Electric Oven |
| Brand | Hoover |
| Model | HOZP9177BI |
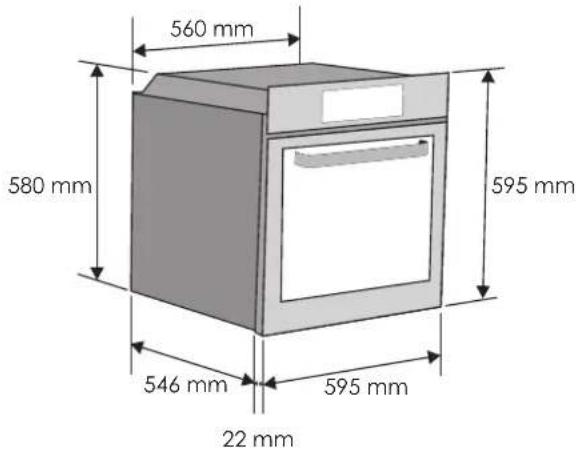
| Dimensions (W x H x D) | 595 x 595 x 560 mm (approx.) |
| Weight | Approx. 35 kg |
| Power Supply | 220-240 V, 50 Hz |
| Power Connection | Plug or omnipolar breaker with earth |
| Functions | Convection + Fan, Grill, Grill + Fan, Bottom Heat, Defrost, Bread, Pizza, Paella, Hydroeasycleaning, Pyrolytic Cleaning |
| Control Interface | TFT touch display with manual, My Chef, and Recipes modes |
| Wi-Fi Connectivity | Yes (802.11 b/g/n, 2.4 GHz) and Bluetooth 4.2 |
| Meat Probe | Included, measures internal temperature up to 90°C |
| Accessories | Metal grill, drip pan, lateral wire grids, meat probe, Chef panel |
| Cleaning | Hydroeasycleaning (steam) and Pyrolytic self-cleaning |
| Safety Features | Child lock, automatic shut-off on door open? (not specified), residual heat indicator |
| Lighting | LED vision system (long life, low energy) |
| Energy Class | Not specified (tested per EN 60350-1 for ventilated function) |
| Spare Parts Availability | Power cable, bulb, side racks, door glass available from manufacturer |
| Installation Type | Built-in, requires proper ventilation openings |
Frequently Asked Questions - HOZP9177BI HOOVER
User questions about HOZP9177BI HOOVER
0 question about this device. Answer the ones you know or ask your own.
Ask a new question about this device
Download the instructions for your Oven in PDF format for free! Find your manual HOZP9177BI - HOOVER and take your electronic device back in hand. On this page are published all the documents necessary for the use of your device. HOZP9177BI by HOOVER.
USER MANUAL HOZP9177BI HOOVER
- During cooking, moisture may condense inside the oven cavity or on the glass of the door. This is a normal condition. To reduce this effect, wait 10-15 minutes after turning on the power before putting food inside the oven. In any case, the condensation disappears when the oven reaches the cooking temperature.
- Cook the vegetables in a container with a lid instead of an open tray.
- Avoid leaving food inside the oven after cooking for more than 15/20 minutes.
- WARNING: the appliance and accessible parts become hot during use. Be careful not to touch any hot parts.
- WARNING: the accessible parts can become hot when the grill is in use. Children should be kept at a safe distance.
- WARNING: ensure that the appliance is switched off before replacing the bulb, to avoid the possibility of electric shocks.
- WARNING: in order to avoid any danger caused by the accidental resetting of the thermal interruption device, the appliance should not be powered by an external switching device, such as a timer, or be connected to a circuit that is regularly switched on and off.
•Children under 8 should be kept at a safe distance from the appliance if not continuously supervised.
- Children should not play with the appliance. The appliance can be used by those aged 8 or over and by those with limited physical, sensorial or mental capacities, without experience or knowledge of the product, only if supervised or provided with instruction as to the operation of the appliance, in a safe way with awareness of the possible risks.
- Cleaning and maintenance should not be carried out by unsupervised children.
- Do not use rough or abrasive materials or sharp metal scrapers to clean the oven door glasses, as they can scratch the surface and cause the glass to shatter.
- The oven must be switched off before removing the removable parts.
•After cleaning, reassemble them according the instructions.
- Only use the meat probe recommended for this oven.
- Do not use a steam cleaner for cleaning operations
- Connect a plug to the supply cable that is able to bear the voltage, current and load indicated on the tag and having the earth contact. The socket must be suitable for the load in dicated on the tag and must have ground contact connected and in operation. The earth conductor is yellow-green in colour. This operation should be carried out by a suitably qualified professional. In case of incompatibility between the socket and the appliance plug, ask a qualified electrician to substitute the socket with another suitable type. The plug and the socket must be conformed to the current norms of the installation country.
Connection to the power source can also be made by placing an omnipolar breaker between the appliance and the power source that can bear the maximum connected load and that is in line with current legislation. The yellow-green earth cable should not be interrupted by the breaker. The socket or omnipolar breaker used for the connection should be easily accessible when the appliance is installed.
- The disconnection may be achieved by having the plug accessible or by incorporating a switch in the fixed wiring in accordance with the wiring rules.
- If the power cable is damaged, it should be substituted with a cable or special bundle available from the manufacturer or by contacting the customer service department.
•The type of power cable must be H05V2V2-F
- This operation should be carried out by a suitably qualified professional. The earth conductor (yellow-green) must be approximately 10 mm longer than the other conductors. For any repairs, refer only to the Customer Care Department and request the use of original spare parts.
- Failure to comply with the above can compromise the safety of the appliance and invalidate the guarantee.
- Any excess of spilled material should be removed before cleaning.
- A long power supply failure during an occurring cooking phase may cause a malfunction of the monitor. In this case contact customer service.
•The appliance must not be installed behind a decorative door in order to avoid overheating.
- When you place the shelf inside, make sure that the stop is directed upwards and in the back of the cavity. The shelf must be inserted completely into the cavity
- WARNING: Do not line the oven walls with aluminum foil or single-use protection available from stores. Aluminum foil or any other protection, in direct contact with the hot enamel, risk melting and deteriorating the enamel of the insides.
- WARNING: Never remove the oven door seal.
- CAUTION: Do not refill the cavity bottom with water during cooking or when the oven is hot.
- No additional operation/setting is required in order to operate the appliance at the rated frequencies.
- WARNING: before initiating the automatic cleaning cycle:
- Clean the oven door;
- Remove large or coarse food residues from the inside of the oven using a damp sponge. Do not use detergents;
- Remove all accessories and the sliding rack kit (where present);
-Do not place tea towels
- In ovens with meat probe it is necessary, before making the cleaning cycle, close the hole with the nut when the meat probe is not used.
- During the pyrolytic cleaning process, surfaces can heat up more than usual, children must therefore be kept at a safe distance.
General Instructions
4
1.1 Safety indications
1.2 Electrical safety
1.3 Recommendations
1.4 Installation
1.5 Waste management and environmental protection
1.6 Declaration of compliance
Product Description
5
2.1 Overview
2.2 Accessories
Use of the Oven
6
3.1 User interface description
3.2 Product setting
3.3 First use
3.4 Operating in manual mode
3.5 Operating in My Chef Mode
3.6 Operating in Recipes Mode
3.7 Function Descriptions
3.8 Cooking Modes
3.9 Special Modes
3.10 Recipes
Wizard oven enrollment
11
4.1. Meat Probe
Oven Cleaning and Maintenance
13
5.1 General notes on cleaning
5.2 Maintenance
- Removal and cleaning of the side racks
- Cleaning of the interior glass door only
1. General Instructions
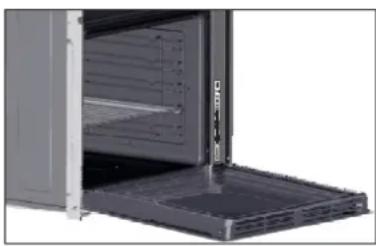
We thank you for choosing one of our products. For the best results with your oven, you should read this manual carefully and retain it for future reference. Before installing the oven, take note of the serial number so that you can give it to customer service staff if any repairs are required. Having removed
natural_image
Exterior view of a modern kitchen oven with open door and side panel (no text or symbols visible)the oven from its packaging, check that it has not been damaged during transportation. If you have doubts, do not use the oven and refer to a qualified technician for advice. Keep all of the packaging material (plastic bags, polystyrene, nails) out of the reach of children. When the oven is switched on for the first time, strong smelling smoke can develop, which is caused by the glue on the insulation panels surrounding the oven heating for the first time. This is absolutely normal and, if it occurs, you should wait for the smoke to dissipate before putting food in the oven. The manufacturer accepts no responsibility in cases where the instructions contained in this document are not observed.
NOTE: the oven functions, properties and accessories cited in this manual will vary, depending on the model you have purchased.
1.1 Safety Indications
Only use the oven for its intended purpose, that is only for the cooking of foods; any other use, for example as a heat source, is considered improper and therefore dangerous. The manufacturer cannot be held responsible for any damage resulting from improper, incorrect or unreasonable usage.
The use of any electrical appliance implies the observance of some fundamental rules:
- do not pull on the power cable to disconnect the plug from the socket;
- do not touch the appliance with wet or damp hands or feet;
- in general the use of adaptors, multiple sockets and extension cables is not recommended;
- in case of malfunction and/or poor operation, switch off the appliance and do not tamper with it.
1.2 Electrical Safety
ENSURE THAT AN ELECTRICIAN OR QUALIFIED TECHNICIAN MAKES THE ELECTRICAL CONNECTIONS.
The power supply to which the oven is connected must conform with the laws in force in the country of installation. The manufacturer accepts no responsibility for any damage caused by the failure to observe these instructions. The oven must be connected to an electrical supply with an earthed wall outlet or a disconnector with multiple poles, depending on the laws in force in the country of installation. The electrical supply should be protected with suitable fuses and the cables used must have a transverse section that can ensure correct supply to the oven.
CONNECTION
The oven is supplied with a power cable that should only be connected to an electrical supply with 220-240 Vac 50 Hz power between the phases or between the phase and neutral. Before the oven is connected to the electrical supply, it is important to check:
- power voltage indicated on the gauge;
- the setting of the disconnector.
The grounding wire connected to the oven's earth terminal must be connected to the earth terminal of the power supply.
WARNING
Before connecting the oven to the power supply, ask a qualified electrician to check the continuity of the power supply's earth terminal. The manufacturer accepts no responsibility for any accidents or other problems caused by failure to connect the oven to the earth terminal or by an earth connection that has defective continuity.
NOTE: as the oven could require maintenance work, it is advisable to keep another wall socket available so that the oven can be connected to this if it is removed from the space in which it is installed. The power cable must only be substituted by technical service staff or by technicians with equivalent qualifications.
A low light around the central main switch could be present when the oven is off. This is a normal behavior. It can be removed just turning the plug upside down or swapping the supply terminals.
1.3 Recommendations
After each use of the oven, a minimum of cleaning will help keep the oven perfectly clean.
Do not line the oven walls with aluminium foil or single-use protection available from stores. Aluminium foil or any other protection, in direct contact with the hot enamel, risks melting and deteriorating the enamel of the insides. In order to prevent excessive dirtying of your oven and the resulting strong smokey smells, we recommend not using the oven at very high temperature. It is better to extend the cooking duration and lower the temperature a little. In addition to the accessories supplied with the oven, we advise you only use dishes and baking moulds resistant to very high temperatures.
1.4 Installation
The manufacturers have no obligation to carry this out. If the assistance of the manufacturer is required to rectify faults arising from incorrect installation, this assistance is not covered by the guarantee. The installation instructions for professionally qualified personnel must be followed. Incorrect installation may cause harm or injury to people, animals or belongings. The manufacturer cannot be held responsible for such harm or injury.
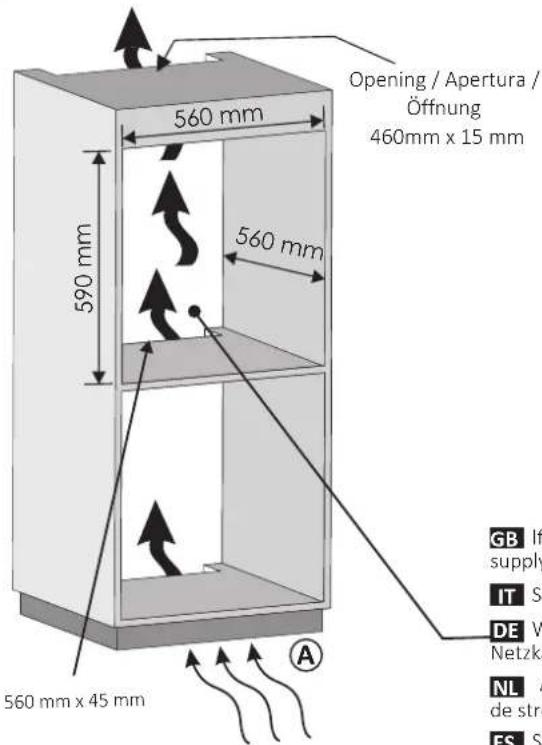
Before fixing, you must ensure good ventilation in the oven space to allow proper circulation of the fresh air required for cooling and protecting the internal parts. Make the openings specified on last page according to the type of fitting.
1.5 Waste management and environmental protection

This appliance is labelled in accordance with European Directive 2012/19/EU regarding electric and electronic appliances (WEEE). The WEEE contain both polluting substances (that can have a negative effect on the environment) and base elements (that can be reused). It is important that the WEEE undergo specific treatments to correctly remove and dispose of the pollutants and recover all the materials. Individuals can play an important role in ensuring that the WEEE do not
become an environmental problem; it is essential to follow a few basic rules:
- the WEEE should not be treated as domestic waste;
- the WEEE should be taken to dedicated collection areas managed by the town council or a registered company.
In many countries, domestic collections may be available for large WEEEs. When you buy a new appliance, the old one can be returned to the vendor who must accept it free of charge as a one-off, as long as the appliance is of an equivalent type and has the same functions as the purchased appliance.
SAVINGAND RESPECTING THE ENVIRONMENT
Where possible, avoid pre-heating the oven and always try to fill it. Open the oven door as infrequently as possible, because heat from the cavity disperses every time it is opened. For a significant energy saving, switch off the oven between 5 and 10 minutes before the planned end of the cooking time, and use the residual heat that the oven continues to generate. Keep the seals clean and in order, to avoid any heat dispersal outside of the cavity. If you have an electric contract with an hourly tariff, the "delayed cooking" programme makes energy saving more simple, moving the cooking process to start at the reduced tariff time slot.
1.6 Declaration of compliance
- By placing the CE mark on this product, we are confirming compliance to all relevant European safety, health and environmental requirements which are applicable in legislation for this product.
- With this the Candy Hoover Group, declares that this appliance marked with complies with the essential requirements of the Directive 2014/53/EU.
To receive a copy of the declaration of conformity, please contact the manufacturer at: www.candy-group.com.
2. Product Description
2.1 Overview
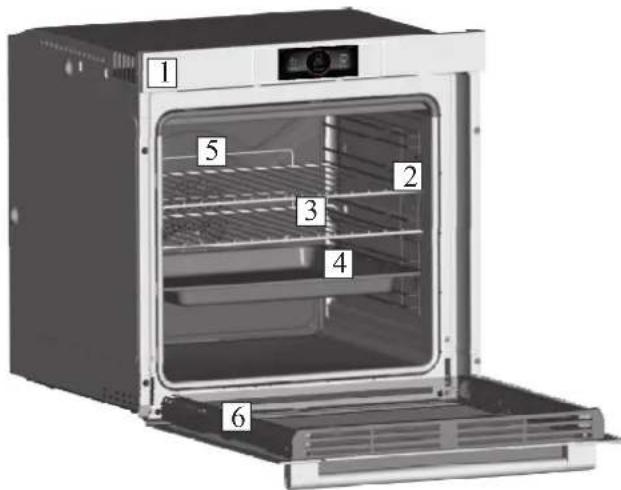
- Control panel
- Shelf positions
- Metal grill
- Drip pan
- Fan (behind the steel plate)
- Oven door
2.2 Accessories
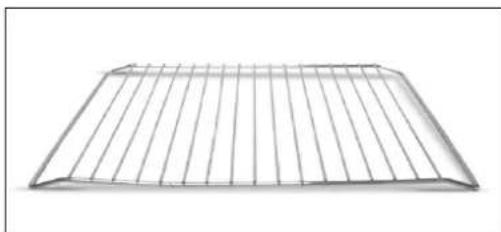
1 Metal grill
natural_image
Simple wire mesh grid structure with no text or symbolsIt holds baking trays and plates.
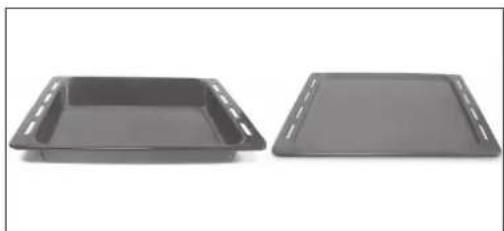
2 Drip pan
natural_image
Two rectangular kitchen or baking trays, one open and one closed, shown against a plain white background (no text or symbols visible)It collects the residues that drip during the cooking of foods on the grills.
3 Lateral wire grids
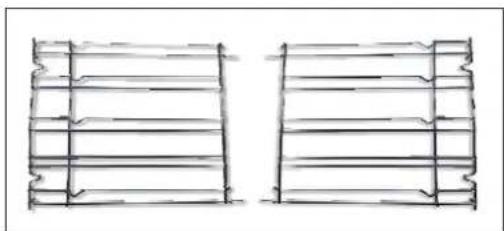
natural_image
Two identical hand-drawn grid-like structures with horizontal lines and wavy top/bottom edges, no text or symbols present.It located at both sides of the oven cavity. It holds metal grills and drip pans.
4 Led vision
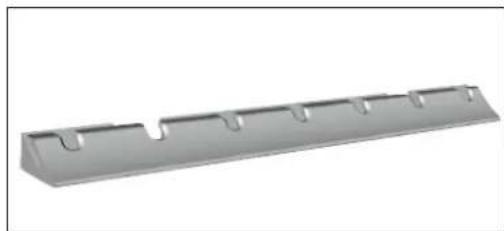
natural_image
Metallic rectangular object with a V-shaped notch and four notches, shown in gray (no text or symbols)These produce white high quality illumination which enables to view the inside of the oven with clarity without any shadows on all the shelves.
ADVANTAGES :
This system, besides providing excellent illumination inside the oven, lasts longer than the traditional light bulb its easier and to maintain and most of all saves energy.
- Optimum view
- Long life illumination
- Very low energy consumption, -95% in comparison with the traditional illumination.
5 Meat probe
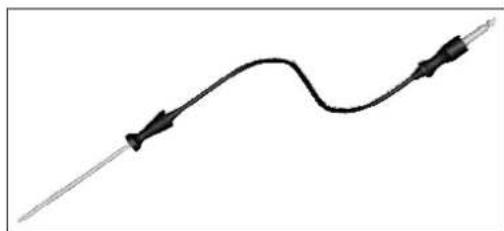
natural_image
Pure electrical circuit lines without any symbolsIt measures the internal temperature of food during cooking.
- Insert the meat-probe into the hole on the top of the cavity.
- Prepare the food and properly insert the meat probe into the food.
WARNINGS:
- Do not preheat or start cooking before properly inserting the meat probe.
- Do not insert the meat probe in the frozen food.
NOTE: Probe should be inserted into the food and receptacle while the oven is still cool.
6 Chef Panel
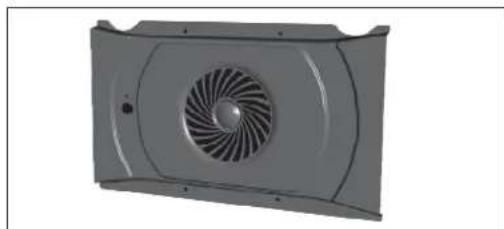
natural_image
3D rendering of a gray industrial fan or vent with a spiral blade pattern (no text or symbols visible)It is an air conveyor that increases air circulation inside the oven. This allows an increase in oven cooking performance, more standard cooking of food at all temperatures, shorter cooking times and, lastly, a uniform temperature distribution inside the oven.
3. Use of the Oven
3.1 User interface description
- Main switch on/off
- TFT touch interface (Figure 1)
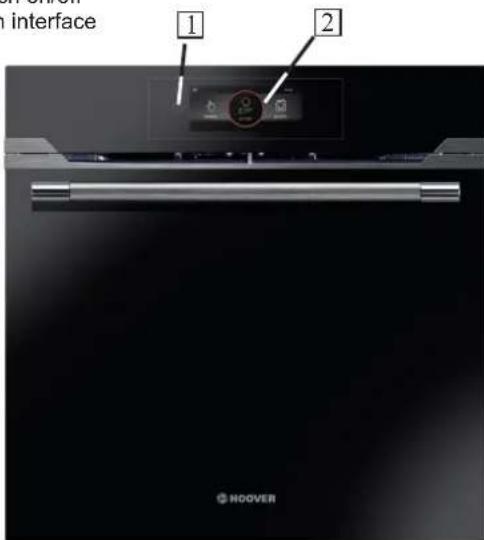
Figure 1
3.2 Product Setting
- At first launch you need to follow an installation process in order to be able to use the oven. Press ON/OFF to go ahead. (Figure 2)
- Select the language from the drop down menu.
- Press OK to go ahead.
- TFTScroll on the touch interface or press the arrows to show more languages.
NOTES:
- After 10min of inactivity (excluding during cooking and in remote control) TFT goes in standby mode and touch screen is switched off. To wake up TFT press on the ON/OFF button TFT will go back to previous screen.
- Set the time by scrolling circularly on the red dot. Press OK to go ahead.
- The installation process is completed.
- Press OK then go to home page in order to start to use the oven.
- Sliding on the red dot implies action on highlighted red number.
- It is suggested to use the total area of the finger to press on display

Figure 2
3.3 First Use
PRELIMINARY CLEANING
- Clean the oven before using for the first time.
- Wipe over external surfaces with a damp soft cloth.
- Wash all accessories and wipe inside the oven with a solution of hot water and washing up liquid.
- Set the empty oven to the maximum temperature and leave on for about 1 hour, this will remove any lingering smells of newness.
3.4 Operating In Manual Mode
In this mode, it is possible to access to:
- Cleaning System – please view chapter8.9
Note6.7
- Special Functions – please view chapter8.9
Below, a detail related to the access to Functions section.
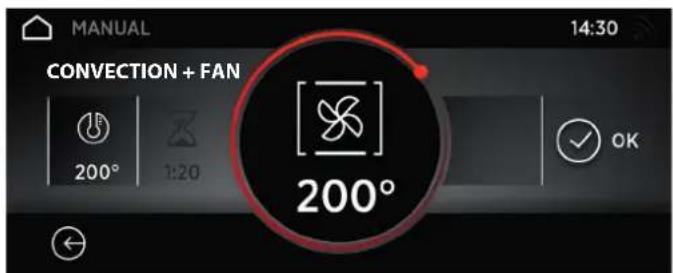
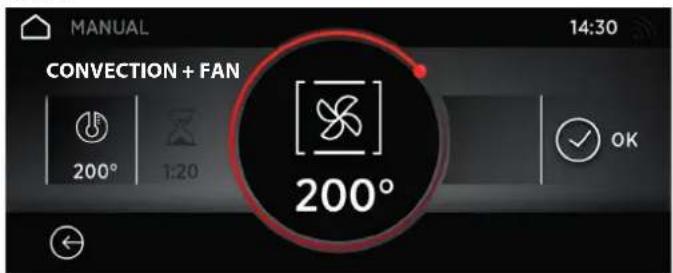
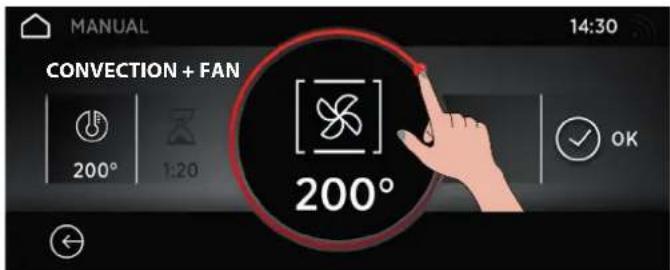
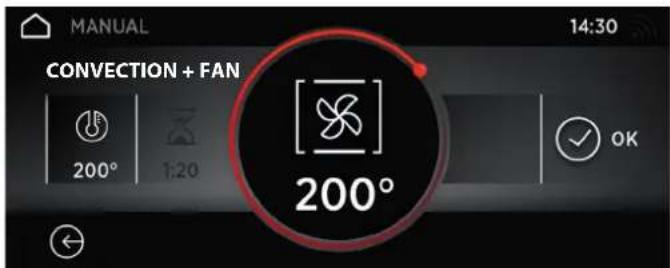
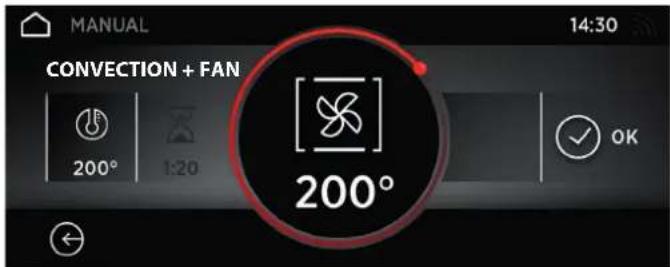
- Press the Manual Mode tab to set a cooking in 3 simple steps. (Figure3)
- Select the desired .function from the MENU
- Scroll to select the desired temperature. Press OK to go ahead or BACK to return to the cooking functions selection. (Figure 4)
- Scroll to select the cooking duration Press OK to begin the cooking or BACK to return to the temperature setting. (Figure 5)
NOTES:
- In this screen it is possible to adjust bellow paramerts by entering the options menu.
- exclude preheating (set by default)
- set delayed start
- When a cooking cycles running you can:
- change the temperature
- change the cooking duration
- press STOP to finish cooking
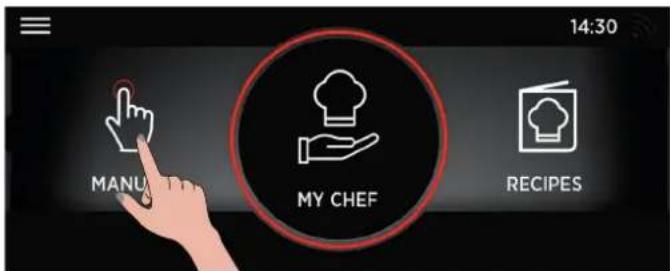
Figure 3

Figure 4
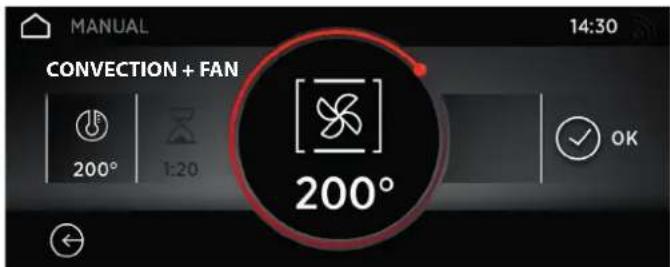
Figure 5
3.5 Operating In My Chef Mode

Figure 6
The detailed description is given in the "3.7 Function Descriptions table". (Figure 6)
3.6 Operating In Recipes Mode
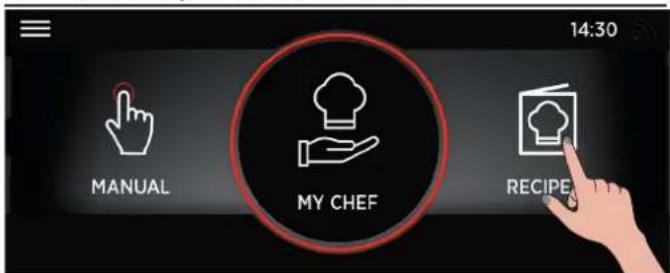
Figure 7
The detailed description is given in the "3.7 Function Descriptions table". (Figure 7)
3.7 Function Descriptions
| FUNCTIONDESCRIPTION | |
 | MANUAL MODE:In this mode it is possible to chose cooking functions, temperature and cooking duration, by 3 simple steps In this mode it is also possible to set a cooking delay.NOTE: By default the preheating option is active: to turn it off click on the symbol in option the menu |
 | MY CHEFIn this mode it is possible to save and, in a second time, to select customized cooking programs. It is possible to generate customized recipes and have direct access to last used programs.Last used function: it is possible to see the last 5 programs used with related duration, temperature and preheating (if selected)Personal programs: it is possible to create a maximum of 5 personal programs for each category with a maximum of 3 steps for each program.My wizard: shows last program with related temperature and duration launched from mobile appMy programs: shows programs created with personal programs feature. Categories are: meat, vegetables, fish, main course, cake and bread. It is possible to delete a personal program by pressing the corresponding thumbnail for 3 seconds and then press the X that appears .replace it with after it |
 | MY RECIPESIn this mode it is possible to select one of the suggested cooking program saved as favourites. |
 | INTERNET CONNECTION:If the icon is active the oven is connect to the net. |
 | SETTINGS:By selecting this icon it will be possible to set language and time, wi-fi, bluetooth, sound, brightness. |
  | OVEN DEVICE CONNECTION (WIZARD):On the first use, with a long press on the icon you enroll the oven on the net.With a short press on the icon, the remote control of the oven it activated.WARNING: If this option is activated the oven is driven ONLY by the connected device.NOTE: To control again the oven directly on the door screen click again on the icon. |
 | CHILD LOCK:To enable related lock the corresponding icon has to be pressed for 3 seconds.A child icon appears on the screen, the user can only navigate through setting menu.Stand by is managed during child lock.NOTES:When user disables child lock and presses the back arrow or exit button from option, TFT goes to home page.To unlock the oven same procedure must be applied.WARNINGS:For normative reasons if the ON/OFF button is pressed while child lock is enabled the oven is switched oWhen the oven is switched on again it returns to setting screen and child lock is active.Child lock is disabled only if supercapacitor is discharged.First power up procedure is then valid.If user enables child lock while cooking is running the cooking is aborted and all saved data (function, temperature, time ecc) are deleted. |
 | HOME PAGE:By touching this icon you go back to home page. |
| Function Dial | Function (Depends on the oven model) |
* | CONVENTIONAL: This function uses both top and bottom heating elements. Preheat the oven for about ten minutes. This method is ideal for all roasted meat (180/200°C) and fish (160-170°C). Place the food and its dish on a shelf in mid position. |
 | GRILL: Use the grill with the door closed. The top heating element is used alone and you can adjust the grill level.NOTES:Five minutes preheating is required to get the elements hot.Success is guaranteed for grills, kebabs and gratin dishes.White meats should be put at a distance from the grill; the cooking is longer, but the meat will be tastier.durationYou can put red meats and fish fillets on the shelf with the drip tray underneath. |
 | MULTI-LEVEL: This function ensures cooking different food at the same time in one or more shelf positions. Heat penetrates into the food better and both cooking and preheating times are reduced. This cooking method gives better heat distribution and smells are not mixed.Allow about ten minutes extra when cooking food at the same time This function is particularly indicated also for gratin and lasagna (200°C). |
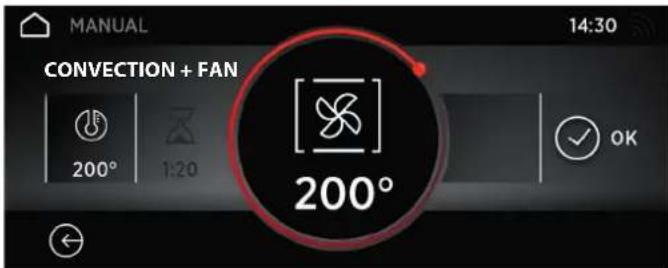
 | CONVECTION + FAN: This function gives better heat distribution thanks to the combination of the fan and heating elements. This function is ideal for bakery such as bread, pizza and focaccia, ensuring an homogeneous cooking result thanks to assisted heat distribution. |
 | GRILL + FAN: The top heating element is used with the fan circulating the air inside the oven. Ideal for cooking thick food items, whole pieces such as roast pork, poultry, etc.Place the food to be grilled directly on the shelf centrally, at the middle level.Slide the drip tray under the shelf to collect the juices.Turn the food over halfway through cooking.WARNINGS:Preheating is necessary for red meats but not for white meats.Use the turbo-grill with the door closed.Make sure that the food is not too close to the grill. |
 | BOTTOM HEATING + FAN: The bottom heating element is used with the fan circulating the air inside the oven. This function is ideal for cakes, tarts and croissants. It prevents food from drying and encourages rising process for a perfect cooking result. Place the shelf in the bottom position. |
 | BOTTOM HEATING: Use the lower element. Ideal for cooking all pastry based dishes such as flans, quiche, etc. |
* | MASTER BAKE: This function allows to cook in a healthier way, by reducing the amount of fat or oil required. The combination of heating elements with a pulsating cycle of air ensured a perfect baking result. This function is particularly indicated for gratin. |
*Tested in accordance with the CENELEC EN 60350-1 used for definition of energy class for ventilated function.
3.9 Special Modes
| Function Dial | Function |
 | DEFROST: The fan circulates air at 40°C around the frozen food so that it defrosts in a few minutes without the protein content of the food being changed or altered. |
 | PAELLA: This function allows to cook paella ensuring perfect cooking results using a convection + fan cycle.We suggest a specific recipe tested by our Chef to cook a perfect paella*. |
 | BREAD: This function allows to cook bread in different steps ensuring perfect cooking results using a convection + fan cycle.We suggest a specific recipe tested by our Chef to cook a perfect bread**. |
 | PIZZA: This function with hot air circulated in the oven ensures perfect results for dishes such as pizza or focaccia. |
 | LEAVENING: Thanks to a very gentle warming of the cavity, this function uses bottom and top heating at 40°C to ensure bread or bakery food rising during cooking process. |
 | HYDROEASYCLEANING:This function helps the cleaning process of oven by melting residual of food present in the cavity.WARNINGS·Awarning message informing user to place 300ml of water in lower cavity of oven appears.·Preheating option is not managed for hydroeasy.·Duration cannot be changed. |
\*PAELLA: Recipe for approximately 10 people
Put in the dripping pan:
-1oignon chopped
- 500g of rice ( fast cooking)
- 1 bag of 500g of mixture of frozen seafoods (small tails of shrimps, peeled mussels, small strips of squid, ...)
- 2 handfuls of deep-frozen peas
- 1/2 red pepper cut in small pieces- slices of chorizo
- 2 soup spoons of powder fish (or, better, 1 bag of dehydrated fish soup) 1 bag of spices in paélla 1 soup spoon of tomato puree
- 1 dose of powder saffrona few beautiful whole mussels
- 700g of water
Cover the dripping-pan with an aluminum foil and install the dripping-pan on the first level
Put in the pastry baking tray:
- 10 portions of fish filets (of your choice)
- 10 (or 20) beautiful tails of shrimps (or scampi)
- Cover the dripping-pan with an aluminum foil and install it on the third level
Put on the oven rack
- a pie plate (or other mold on board little raised) with 10 pieces of tops of chicken legs covered with paella spices
Install the mold on the rack on the 4th level
Close the door of the oven and engage the function "Paella".
\*\*BREAD:
- With simple bread flour:
1 kilo of special flour for bread
18g of salt
2 bags of baker's dehydrated yeast
Approximately 550g of water in 40°C
- With bread flour with yeast and salt incorporated (to recommend):
1 kilo of flour
1 bag of dehydrated baker's yeast (it's better to add a bag) Approximately 550g of water in 40°C
Method
Dilute the yeast in the waterIn a salad bowl, put the flour, salt (if necessary) and water
Mix the whole to form a homogeneous dough
Put the dough on the work plan, and with the palm of the hand, stretch the dough and pull it down on itself (the objective being to lock a maximum of air into the dough). Repeat this movement during approximately 5 minutes.
Put the dough in the bowl and cover it with a clingfilmlet the dough rise (in proving function of the oven) during approximately 1 H (it has to double in volume)
Take back the dough, fold up it 2 or 3 times on itself (to push away the air) and shape the breads (baguette, farmhouse bread, round loaf.)
Put breads on the pastry baking tray of the oven covered before with a baking paper
Sprinkle slightly breads of flour (optional, only to give an effect farmhouse bread)
Give some net knocks of razor blade razor (or well sharpened knife) on the top of breads
Let rest about ten minutes before putting in the oven install the tray with breads in the 2nd level (from the bottom) of the oven
Measure exactly 1 dl (10cl or 100g) of water and pour it directly on the bottom of the oven
Close the door and engage the function " automatic bread "
3.10 Recipes
| RECIPE NAME | CATEGORY | N. PEOPLE | Weight (kg) | COOKING TYPE (STEP 1) | COOKING DURATION (hh:mm) | COOKING TEMPERATURE (°C) / grill level | COOKING TYPE (STEP 2) | COOKING DURATION (hh:mm) | COOKING TEMPERATURE (°C) |
| COFFEE CREPES | First course | 4 | static | 00:10 | 180 | grill | 00:05 | L3 | |
| RICE PILAF WITH CUTTLEFISH AND PEAS | First course | 4 | static | 00:20 | 200 | ||||
| BLACK RICE TIMBALLO | First course | 4 | static | 00:15 | 160 | ||||
| RICE RING WITH SHRIMP, FAVA BEANS AND PEAS | First course | 8 | static | 00:18 | 180 | grill | 00:05 | L3 | |
| ENCHILADAS LASAGNA | First course | 4 | static | 00:30 | 175 | grill | 00:10 | L3 | |
| FIVE-GRAIN FOCACCIA | Bread | 4 | static | 00:15 | 200 | ||||
| BROWN BREAD | Bread | 4 | static | 00:15 | 190 | ||||
| NICE-STYLE FOCACCIA | Bread | 6 | static | 00:30 | 220 | ||||
| BREADSTICKS WITH SUN-DRIED TOMATOES AND THYME | Bread | 6 | static | 00:10 | 180 | fan cooking | 00:02 | 180 | |
| VEGETABLE-STUFFED CALAMARI | Fish | 4 | static | 00:30 | 180 | grill | 00:30 | L3 | |
| PRAWN HAMBURGER | Fish | 4 | static | 00:06 | 200 | ||||
| SEA BREAM MADRID STYLE | Fish | 4 | static | 00:20 | 160 | ||||
| POTATOES COOKED IN FOIL WITH PRAWNS AND WASABI | Fish | 4 | static | 00:40 | 180 | ||||
| THAI FISHCAKES | Fish | 4 | static | 00:08 | 180 | ||||
| FILLET OF SEA BASS BAKED IN FOIL | Fish | 4 | static | 00:20 | 170 | ||||
| FILLETS OF TROUT | Fish | 4 | static | 00:30 | 180 | ||||
| SWORDFISH ROLLS | Fish | 4 | static | 00:10 | 180 | ||||
| GILTHEAD BREAM ROLLS WITH COURGETTES | Fish | 4 | static | 00:10 | 180 | ||||
| ROAST BEEF IN ONION SAUCE | Meat | 1 | static | 00:25 | 180 | ||||
| ROAST TURKEY AND SPINACH ROLL | Meat | 1 | Static | 01:00 | 150 | ||||
| VEAL BITES OVER RATATOUILLE | Meat | 0,6 | static | 00:15 | 160 | ||||
| ROAST LAMB WITH CHICORY | Meat | 0,7 | static | 02:00 | 150 | ||||
| EYE ROUND OF VEAL OVER RATATOUILLE | Meat | 0,6 | static | 00:15 | 160 | ||||
| MARINATED BREAST OF DUCK | Meat | 4 | static | 00:08 | 200 | ||||
| ROAST BEEF | Meat | 0,6 | static | 01:30 | 200 | ||||
| VEAL CHEEK WITH RED CABBAGE | Meat | 4 | Static | 04:00 | 130 | ||||
| ROAST WITH BACON | Meat | 1 | Static | 01:15 | 200 | ||||
| ASPARAGUS AU GRATIN WITH TARTAR SAUCE | Veggies | 4 | grill | 00:08 | L3 | ||||
| SQUASH FLAN WITH PARMIGIANO REGGIANO FONDUE | Veggies | 4 | fan cooking | 00:25 | 180 | ||||
| AUBERGINES GREEK STYLE | Veggies | 4 | static | 00:30 | 200 | ||||
| BAKED TOMATOES | Veggies | 6 | fan cooking | 00:40 | 200 | ||||
| ASPARAGUS FLANS | Veggies | 4 | static | 00:20 | 180 | ||||
| POTATO SOUFFLE | Veggies | 6 | static | 00:20 | 200 | fan cooking | 00:05 | 180 | |
| BROWNIES WITH COFFEE SAUCE | Desserts | 6 | static | 00:35 | 160 | ||||
| CROISSANTS | Desserts | 10 | static | 00:05 | 200 | fan cooking | 00:10 | 180 | |
| APPLE CRUMBLE | Desserts | 8 | static | 00:40 | 180 | ||||
| CHOCOLATE TART WITH BERRY COULIS | Desserts | 4 | static | 00:08 | 200 | ||||
| COCOA TARTE | Desserts | 6 | static | 00:20 | 180 | ||||
| SACHER CAKE | Desserts | 6 | static | 00:40 | 180 | ||||
| CHOCOLATE AND PEAR CAKE | Desserts | 6 | static | 00:30 | 180 |
4. Oven enrollment
For all the details related to the link between app and product, available also online at the following link: http://go.candy-group.com/hoover-ov
Wifi icon is managed the following way:
• (Figure 8)when WiFi is off the icon is off
- after a reset the icons blinks 1 seconds on and 1 seconds off and the oven starts a new enrollment. There is a time slot of 5 minutes to complete the enrolment starting from when user presses ok button on standard or easy enrollment. Elapsed this time the WiFi is switched off wifi icon disappears.
- if the oven is connected to a router the icon is switched on fix oven is only controlled by remote.
TFT shows following image:
- welcome oven is in read only mode the icon blinks 1 on and 3 seconds off.

Figure 8
NOTE: Press smartphone icon to go to READ ONLY MODE.
READ ONLY MODE
You can read oven status related to temperature cooking duration and program.
| BLINKING BEHAVIOUR | MEANING |
| 1s on 1s off | oven is enrolling please follow quick guide for details on procedure |
| 1s on 3s off | oven is in read only mode |
| 3s on 1s off | oven is enrolled but has lost connection with router. It is not possible to send remotee control command. Please check your router connection |
| always off | oven is not enrolled. You can only start a new enrollment. |
WIRELESS PARAMETERS
| Parameter | Specifications (Wi-Fi) | Specifications (Bluetooth) |
| Wireless Standart | 802.11 b/g/n | Bluetooth v4.2 |
| Frequency Range | 2,412 GHz. - 2,484 GHz | 2,412 GHz. - 2,484 GHz |
| Max Transmit Power | 802.11b. DSSS 1 Mbps= +19.5 dBm | Basic data rate: RF Transmit Power (Typ): +4 dBmEnhanced data rate: RF Transmit Power (Typ): +2 dBmBLE: RF Transmit Power (Typ): +7.5 dBm |
| 802.11b. CCK 11 Mbps= +18.5 dBm | ||
| 802.11g. OFDM 54 Mbps= +18.5 dBm | ||
| 802.11n. MCS7= +14dBm | ||
| Minimum Receiving Sensitivity | 802.11b =1024 bytes, -80 dBm | Basic data rate: Sensitivity@ 0.1% BER: -98 dBmEnhanced data rate: Sensitivity@ 001% BER: -98 dBmBLE: Sensitivity@ 0.1% BER: -98 dBm |
| 802.11g =1024 bytes, -70 dBm | ||
| 802.11n =1024 bytes, -65 dBm | ||
| 802.11n HT40 =1024 bytes, -65 dBm |

| Product information for networked equipment | |
| Power consumption of the product in networked standby if all wired network ports are connected and all wireless network ports are activated: | 2,0 W |
| How to activate wireless network port: | Navigate to settings -> ONE-FI -> press for 3 seconds the ONE-FI icon Display shows 2 possible ways to enroll the oven: standard and easy Press the ok button on one of them. WiFi module is switched on and WiFi icon blinks 1s on 1s off. |
| How to deactivate wireless network port: | Navigate to settings -> ONE-FI -> press for 3seconds the ONE-FI icon Display shows 2 possible ways to enroll the oven: standard and easy Do not press the ok button. WiFi module is switched off and WiFi is not shown. Note: WiFi data if present are deleted. |
Quick Guide Hoover OVEN -Enrollment on App Procedure for devices with Bluetooth 4.0 (or higher)
This quick guide illustrates the steps to follow to enroll your appliance on the App Hoover Wizard, using a device with Bluetooth 4.0 (or higher) technology. In this case, the procedure is simplified and faster (Easy Enrollment).
If you are using a device without Bluetooth technology (or less than 4.0), please follow the instructions described in the next section.
STEP 1
- Mark down the appliance Serial Number.
- Mark down the Wi-Fi Name and Password (WPA/WEP Key) which are normally placed on the back of your Wi-Fi router.
NOTES
- The frequency of the home Wi-Fi network has to be set on the 2.4 GHz band. You cannot configure the appliance if your home network is set to the 5 GHz band.
- If you are having trouble locating the WPA/WEP Password, please contact your Internet Provider. Please make sure your smartphone is connected to the same Wi-Fi network and has the Bluetooth enabled within the "Settings". Refer to the manual for more details.
STEP 2
- Download the Hoover Wizard App from the Store.
- Open the Hoover Wizard App and create your user profile by taping on "Register".
- Accept the privacy policy and fill in the required fields.
NOTES
-The App is available for Android (version 4.4 or higher) and iOS (version 8.0 or higher) devices.
-If you already have a Hoover Wizard user profile, you can login using your credentials.
STEP 3
In the homepage, tap on the icon with the three bars on the top left to enter your profile, then tap on "REGISTER NEW APPLIANCE" and select the name of the product that you want to enroll.
STEP 4
- Insert the purchase date of your appliance
•(DD/MM/YYYY), then tap on "Proceed".
STEP 5
- Insert the 16 digits of the serial number or scan the QR code on the appliance.
- Tap on "Next".
- Check data correctness of the data and tap on "Confirm". Once the system has recognized the product, tap on "Next".
STEP 6
- Tap on the icon


- Press and hold the One-Fi icon for 3 seconds
- Click the "OK" of Easy Enrollment
InApp - Tap on "Confirm". Wait forAPP to connect to the appliance. NOTES
-Enrollment must be completed within 5 minutes.
-In case of any issue, tap "Retry", making sure you have enabled Bluetooth on your device (smartphone / tablet). If the process has not been completed correctly yet, tap on "Proceed with Standard Enrollment".
- To ensure correct data transfer, we recommend you to stay with the device close to the appliance.
STEP 7
- Insert the password of your home Wi-Fi network.
- Select the type of password (WEP or WPA), then tap on "Confirm".
•The enrollment process is now finished.
NOTES
If this is not automatically synchronised by the App, please insert the name of your home Wi-Fi network in the first box; pay attention to the difference between lowercase and uppercase.
IF THE SET UP IS NOT SUCCESSFUL
It's important to establish a good Wi-Fi signal strength between the home router and the appliance: low Wi-Fi signal strength would cause the failure of the final stage of the set up. To assess if this is the case, start the connection process again from Step 1; when you get to Step 6, when you get to Step 6, place your device (smartphone or tablet) next to the router and search for "WIFIOVEN-xyzk" net generated by the appliance. If this does not come up as an option, it means that the router cannot see the appliance. In this case, we highly recommend you to bring the router near the appliance (if possible) or contact your internet provider to purchase a compatible "Wi-Fi Range Extender" to increase the signal strength.
REMOTE CONTROL MODE
- Tap on One-Fi icon

•.To stop any cooking in progress please turn off remote control mode
Quick Guide Hoover OVEN - Enrollment on App Procedure for devices without Bluetooth 4.0 (or less than 4.0)
This quick guide outlines the steps you should follow to enroll your appliance using the App Hoover Wizard, utilizing a device without Bluetooth technology. We recommend you to proceed with a smartphone/tablet equipped with this technology to make the procedure simpler.
STEP 1
- Make a note of the appliance Serial Number and Wi-Fi Name and Password (WPA/WEP Key), which are normally found on the back of your Wi-Fi router.
- Please make sure that your smartphone/tablet is connected to the same Wi-Fi network.
NOTES
-The frequency of the home Wi-Fi network has to be set on the 2.4 GHz band. You can not configure the appliance if your home network is set to the 5 GHz band.
-If you are having trouble locating the WPA/WEP Password, please contact your Internet Provider.
STEP 2
- Download the Hoover WizardApp from the Store.
- Open the Hoover Wizard App and create your user profile by taping on "Register". Accept the privacy policy and fill in the required fields. NOTES
-The App is available for Android (version 4.4 or higher) and iOS (version 8.0 or higher) devices.
-If you already have a Hoover Wizard user profile, you can login using your credentials.
STEP 3
In the homepage, tap on the icon with the three bars on the top left to enter your profile, then tap on "REGISTER NEW APPLIANCE" and select the name of the product that you want to enroll.
STEP 4
- Insert the purchase date of your appliance (DD/MM/YYYY), then tap on "Proceed".
- Insert the 16 digits of the serial number or scan the QR code on the appliance. Tap on "Next". Check data correctness and tap on
"Confirm". Once the system has recognized the product, tap on "Next".
STEP 5
- Tap the icon
- Press and hold the One-Fi icon for 3 second
- Click the "OK" of Standard Enrollment
InApp - Tap on "Confirm".
NOTES
-Enrollment must be completed within 5 minutes.
-To ensure correct data transfer, we recommend that you stay with the device close to the appliance.
STEP 6
- Exit the Hoover WizardApp.
- Go to your device Wi-Fi settings.
STEP 7
In the list of available Wi-Fi networks, select "WIFIOVEN-xyzk".
NOTES
- If you do not find it, wait few more seconds or proceed with a new scan.
-Exit from the settings of your device.
- Return to the Hoover Wizard App and wait for the App to detect the appliance
-Once the "Wi-Fi Network is active" screen appears, tap on "Next".
STEP 8
- Exit from the settings of your device.
- Return to the Hoover Wizard App and wait for the App to detect the appliance.
- Once the "Wi-Fi Network is active" screen appears, tap on "Next".
STEP 9
- Insert the password of your home Wi-Fi network.
- Select the type of password (WEP or WPA), then tap on "Confirm". NOTES
If this is not automatically synchronised by the App, please insert the name of your home Wi-Fi network in the first box; pay attention to the difference between lowercase and uppercase.
STEP 10
- Wait until the end of the data transfer process between the App and the product, then tap on "Confirm". "CONNECTED" appears on the appliance display and then "REMOTE CONTROLON".
•The enrollment process is now finished.
NOTES
IF THE SET UP IS NOT SUCCESSFUL
It's important to establish a good Wi-Fi signal strength between the home router and the appliance: low Wi-Fi signal strength would cause the failure of the final stage of the set up. To assess if this is the case, start the connection process again from Step 1; when you get to Step 5, place your device (smartphone or tablet) next to the router and search for "WIFIOVEN-xyzk" net generated by the appliance. If this does not come up as an option, it means that the router cannot see the appliance. In this case, we highly recommend you to bring the router near the appliance (if possible) or contact your internet provider to purchase a compatible "Wi-Fi Range Extender" to increase the signal strength.
REMOTE CONTROL MODE
- Tap on One-Fi icon

- To stop any cooking in progress please turn off remote control mode.
4.1. Meat Probe
After meat probe is inserted the display shows a message informing the user that only manual program are available. Press ok at the following pop up message to show available cooking modes. (Figure 9)
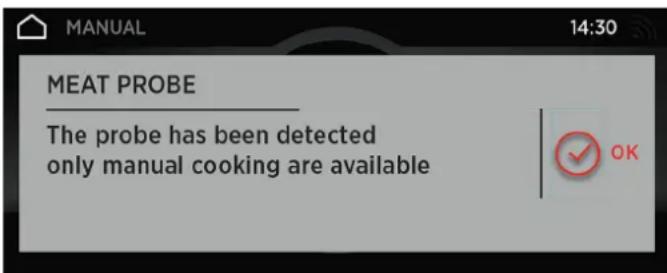
Figure 9
- The user can now select oven temperature (max 200 degrees) and meat probe temperature (max 90 degrees). (Figure 10)
- Cooking stops when meat probe temperature reaches the selected one.
- After removing meat probe TFT shows home screen and all cooking are now possible.
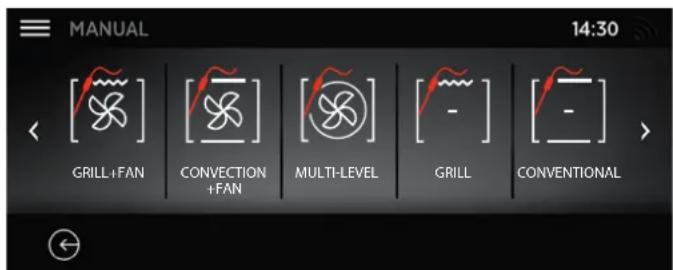
Figure 10
5. Oven cleaning and maintenance
5.1 General notes on cleaning
The lifecycle of the appliance can be extended through regular cleaning. Wait for the oven to cool before carrying out manual cleaning operations.
WARNING: Never use abrasive detergents, steel wool or sharp objects for cleaning, so as to not irreparably damage the enamelled parts. Use only water, soap or bleach-based detergents (ammonia).
GLASS PARTS
It is advisable to clean the glass window with absorbent kitchen towel after every use of the oven. To remove more obstinate stains, you can use a detergent-soaked sponge, well wrung out, and then rinse with water.
OVEN WINDOW SEAL
If dirty, the seal can be cleaned with a slightly damp sponge.
ACCESSORIES
WARNING: Clean accessories with a wet, soapy sponge before rinsing and drying them: avoid using abrasive detergents.
DRIP PAN
• After using the grill, remove the pan from the oven.
- Pour the hot fat into a container and wash the pan in hot water, using a sponge and washing-up liquid. Alternatively, you can wash the pan in the dishwasher or use a commercial oven detergent.
NOTE: If greasy residues remain, immerse the pan in water and detergent.
WARNING: Never put a dirty pan back into the oven.
5.2 Maintenance
REMOVALAND CLEANING OF THE SIDE RACKS
1- Remove the wire racks by pulling them in the direction of the arrows (see below)
2- To clean the wire racks either put them in the dishwasher or use a wet sponge, ensuring that they are dried afterwards.
3-After the cleaning process install the wire racks in reverse order.

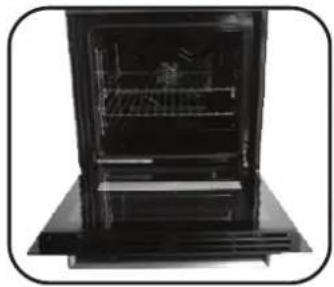
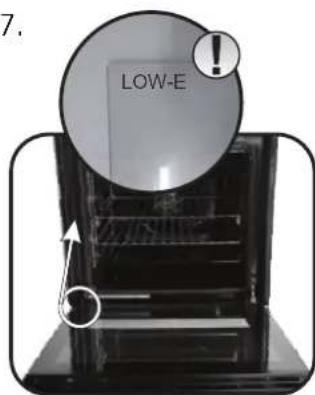
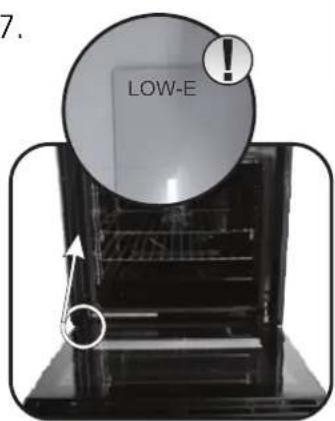
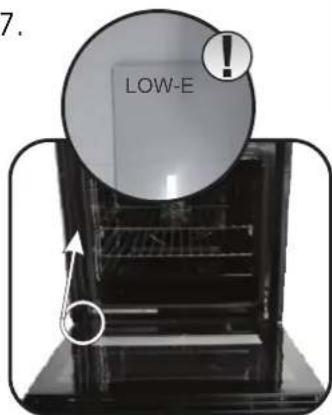
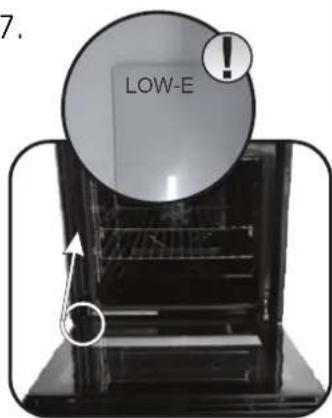
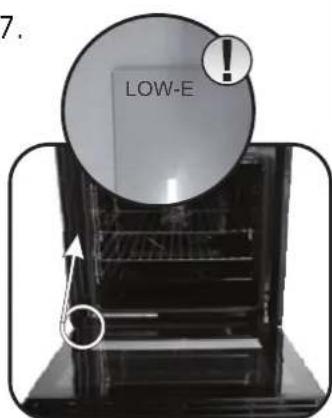
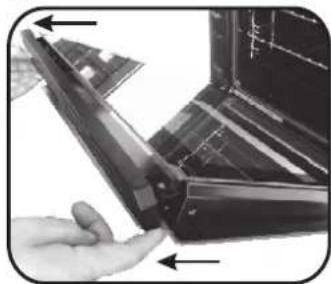
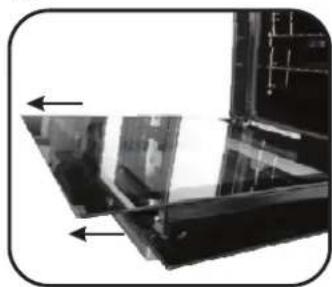
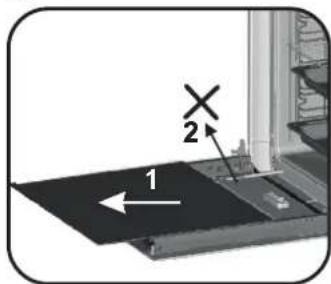
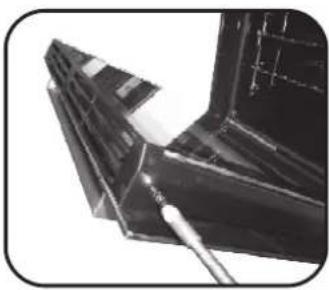
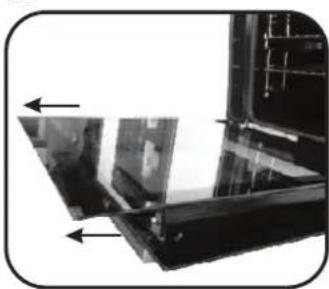
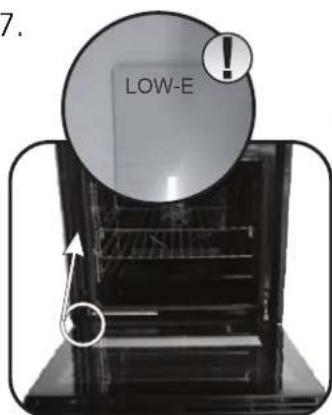
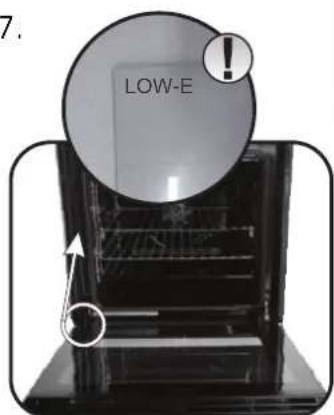
CLEANING OF THE INTERIOR GLASS DOOR ONLY
- Open the oven door.
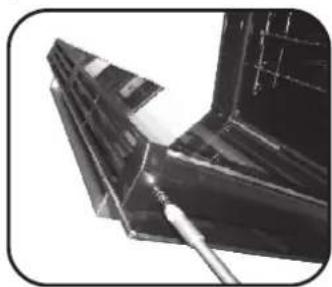
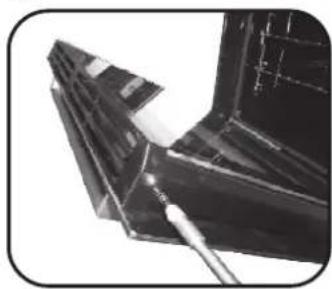
2.3.4. Lock the hinges, remove the screws and remove the upper metal cover by pulling it upwards.
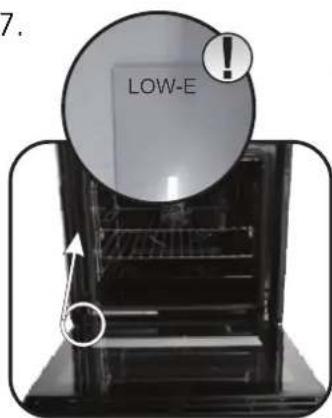
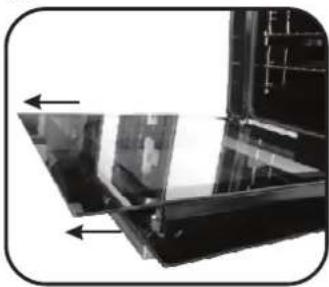
5.6. Remove the glass, carefully extracting it from the oven door (NB: don't remove any other glass or component). - At the end of cleaning or substitution, reassemble the parts in reverse order.
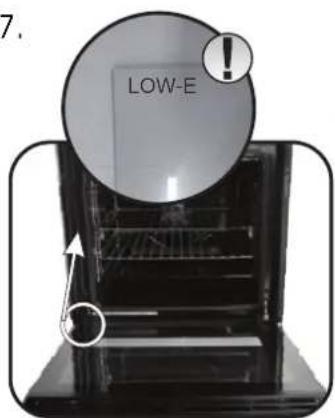
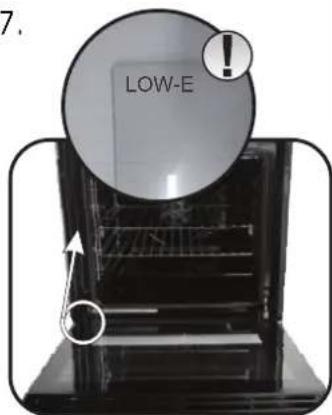
NOTE: On all glass, the indication "Low-E" must be legible and positioned on the left side of the door, close to the left-hand lateral hinge. In this way, the printed label of the first glass will be inside the door.
natural_image
Interior view of a black oven with open door and side panel (no visible text or symbols)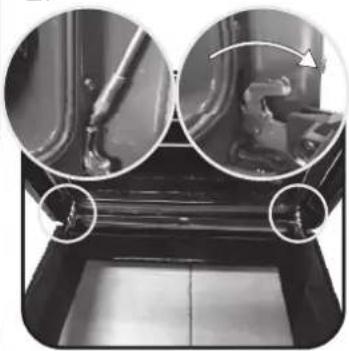
natural_image
Close-up of mechanical components with circular insets showing internal details (no visible text or symbols)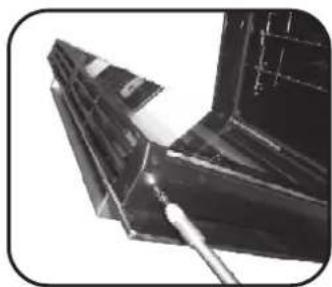
natural_image
Close-up of a metallic bracket with a tool inserted, no visible text or symbols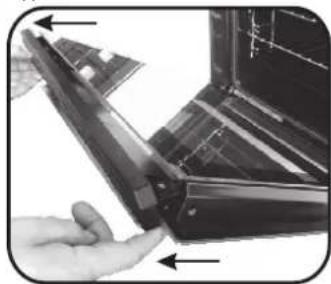
natural_image
Close-up of a hand holding a dark rectangular object with arrows pointing to it, next to an open laptop (no visible text or symbols)
natural_image
Close-up of a mechanical component with two arrows indicating direction (no visible text or symbols)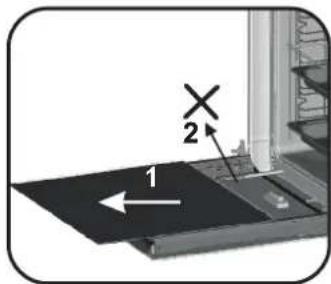
natural_image
Exterior view of a modern kitchen appliance with open door and side panel (no text or symbols visible)natural_image
Simple wire mesh grid on a flat surface (no text or symbols)natural_image
Two gray rectangular kitchen or baking trays with side handles, shown against a white background (no text or symbols visible)natural_image
Two hand-drawn sketch-style grid-like structures with wavy lines, no text or symbols presentnatural_image
Metallic rectangular object with four recessed slots and a flat top, no visible text or symbols.natural_image
Pure electrical circuit lines without any symbolsnatural_image
3D rendering of a gray industrial fan or vent with a spiral airflow pattern (no text or symbols visible)Figura 2
3.3 Primo utilizzo
PULIZIAPRELIMINARE
Figura 3
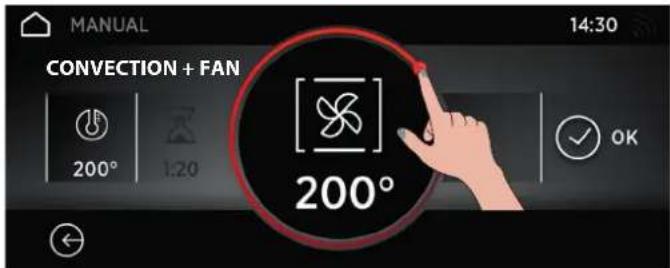
Figura 4
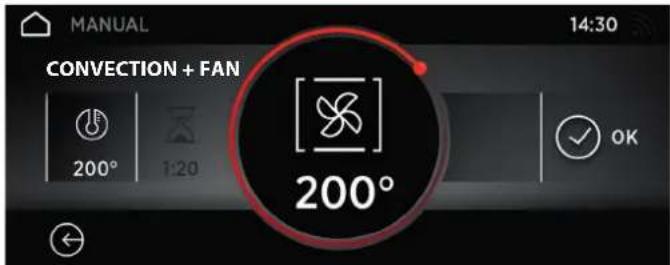
Figura 5
Figura 6
Figura 7
Figura 9
Figura 10
PULIRE SOLO IL VETRO INTERNO DELLAPORTA
natural_image
Exterior view of a black oven or oven unit with visible internal structure (no text or symbols)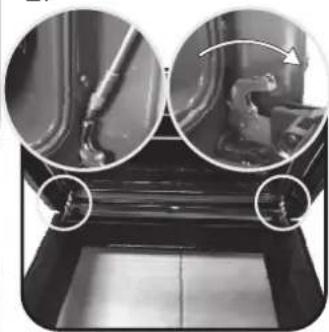
natural_image
Close-up of a mechanical component with circular insets showing internal details (no visible text or symbols)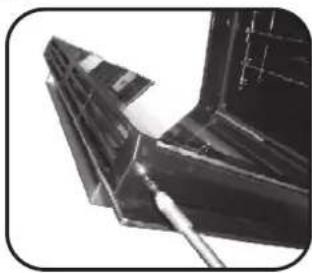
natural_image
Close-up of a metallic bracket with a metal tool inserted, showing internal structure (no text or symbols visible)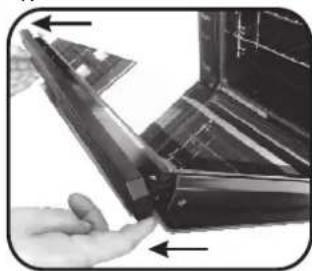
natural_image
Close-up of a hand interacting with a dark electronic component, showing internal structure and arrows indicating direction (no text or symbols visible)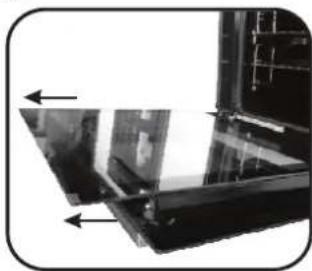
natural_image
Close-up of a mechanical component with two arrows indicating direction (no visible text or symbols)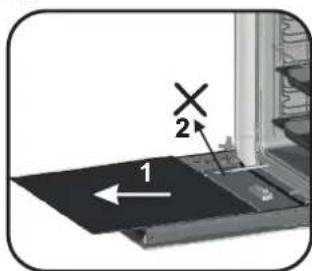
natural_image
Exterior view of a stainless steel oven with open door and side panel (no text or symbols visible)natural_image
Simple wire mesh grid structure with no text or symbolsnatural_image
Two empty rectangular kitchen or baking trays, one with a side tab and the other closed (no text or symbols visible)natural_image
Two hand-drawn sketch-style panels showing horizontal lines with wavy ends, no text or symbols presentnatural_image
Metallic rectangular object with four recessed slots and a central slot, shown against a plain background (no text or symbols)natural_image
Pure electrical circuit lines without any symbolsAbbildung 2
Abbildung 3
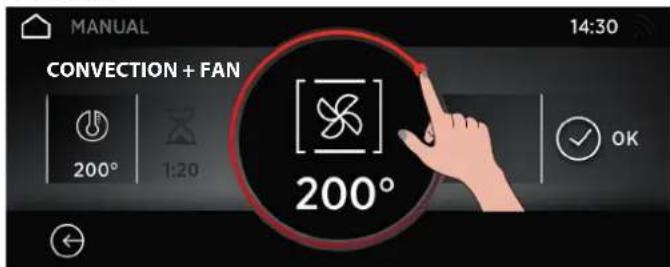
Abbildung 4
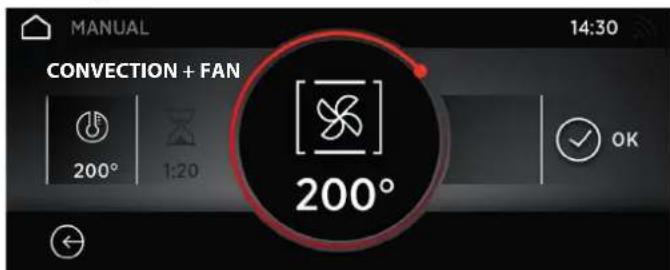
Abbildung 5
Abbildung 6
Abbildung 7
Abbildung 8
Abbildung 9
Abbildung 10
natural_image
Interior view of a black oven with open door and side panel (no visible text or symbols)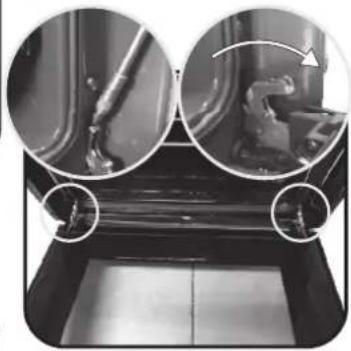
natural_image
Close-up of mechanical components with circular annotations highlighting features (no visible text or symbols)
natural_image
Close-up of a metallic structural joint or bracket component (no visible text or symbols)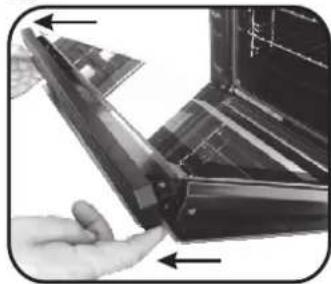
natural_image
Close-up of a hand holding a flexible electronic component with arrows indicating direction (no visible text or symbols)
natural_image
Close-up of a metallic panel or fixture with two arrows pointing to features, no visible text or symbols.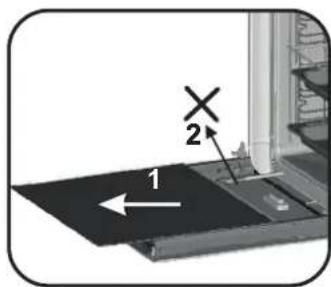
natural_image
Exterior view of a modern kitchen appliance with a door open and a tray on the front (no visible text or symbols)natural_image
Simple wire mesh grid on a flat surface (no text or symbols)natural_image
Two gray rectangular plastic trays, one open and one closed, shown against a white background (no text or symbols)natural_image
Two hand-drawn sketch of vertical grid-like structures with no text or symbolsnatural_image
Metallic rectangular object with four recessed slots and a flat top edge (no text or symbols)natural_image
Pure electrical circuit lines without any symbolsnatural_image
3D rendering of a gray industrial fan or vent with a central hub and mounting brackets (no text or symbols visible)Figuur 1
Figuur 2
3.3 Eerste gebruik
VOORAFGAANDE REINIGING
Figuur 3

Figuur 4
Figuur 5
Figuur 6
Figuur 7
Figuur 9
Figuur 10
REINIGING VAN ALLEEN DE GLAZEN BINNENDEUR
natural_image
Interior view of a black oven or oven with visible grilles and ventilation slots (no text or symbols)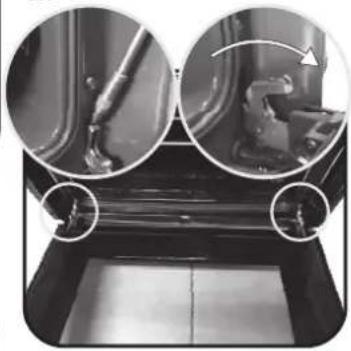
natural_image
Close-up of mechanical components with magnified views showing internal structure (no text or symbols visible)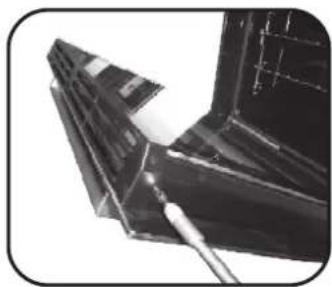
natural_image
Close-up of a metallic bracket with a metal rod inserted, showing internal structure (no text or symbols visible)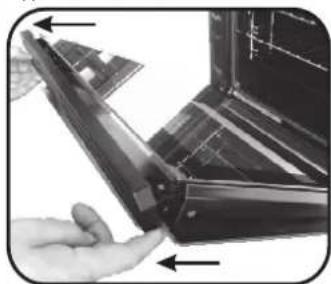
natural_image
Close-up of a hand holding a black plastic component with arrows indicating direction (no visible text or symbols)
natural_image
Close-up of a metallic panel or fixture with two arrows pointing to features, no visible text or symbols.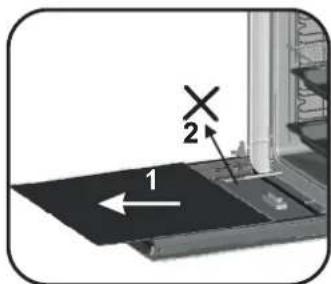
natural_image
Interior view of a stainless steel oven with open door and side panel (no visible text or symbols)natural_image
Simple wire mesh grid structure with no text or symbolsnatural_image
Two empty rectangular plastic trays, one open and one closed, shown against a plain white background (no text or symbols)natural_image
Two hand-drawn sketch-style grid-like structures with horizontal lines and wavy top/bottom edges, no text or symbols present.natural_image
Metallic rectangular object with multiple recessed slots and a notch, shown in gray (no text or symbols visible)natural_image
Pure electrical circuit lines without any symbolsFigura 1
Figura 2
3.3 Primer uso
LIMPIEZAPRELIMINAR
Figura 3

Figura 4
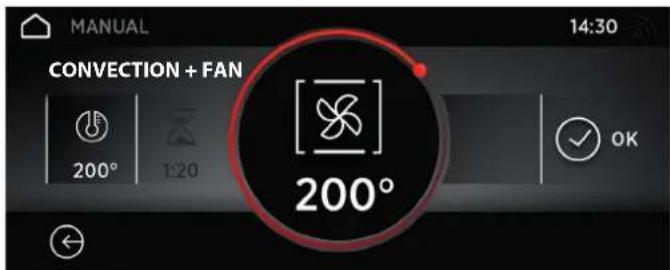
Figura 5
Figura 6
Figura 7
Figura 9
Figura 10
natural_image
Interior view of a black oven with visible grilles and insulation (no text or symbols)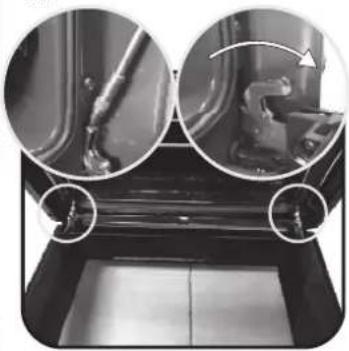
natural_image
Close-up of mechanical components with circular insets showing internal details (no visible text or symbols)3.
natural_image
Close-up of a metallic bracket with a tool inserted, no visible text or symbols
natural_image
Close-up of a hand holding a dark electronic device with arrows pointing to its components (no visible text or symbols)5.
natural_image
Close-up of a mechanical component with directional arrows indicating movement or force (no visible text or symbols)
7.
natural_image
Interior view of a stainless steel oven with open door and side panel (no visible text or symbols)natural_image
Simple wire mesh grid on a flat surface (no text or symbols)natural_image
Two black rectangular baking trays side by side, one open and one closed, both on a plain white background (no text or symbols visible)natural_image
Two hand-drawn sketch-style panels showing horizontal lines with rounded ends, no text or symbols presentnatural_image
3D rendering of a gray metal bracket with four notches and a notch, no text or symbols visiblenatural_image
Pure electrical circuit lines without any symbolsMede a temperatura interna dos alimentos durante a cozedura.
Figura 2
Figura 3

Figura 4
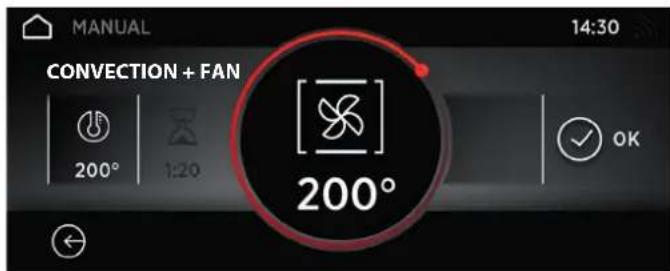
Figura 5
Figura 6
Figura 7
Figura 8
NOTA: Pressione o ícone do smartphone para passar para MODO APENAS PARALEITURA
MODO APENAS PARA LEITURA
Figura 9
Figura 10
LIMPEZAAPENAS DAPORTADE VIDRO INTERIOR
natural_image
Interior view of a black oven with open door and side panel (no visible text or symbols)
natural_image
Close-up of a mechanical component with circular insets showing internal details (no visible text or symbols)3.

natural_image
Close-up of a metallic tool interacting with a dark metal panel or bracket (no visible text or symbols)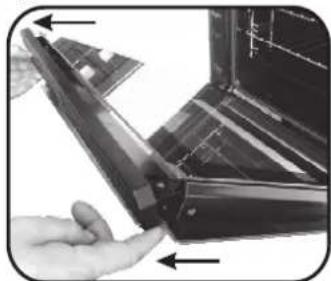
natural_image
Close-up of a hand holding a dark mechanical component with directional arrows indicating movement (no text or symbols visible)5.

natural_image
Close-up of a mechanical component with two arrows indicating direction (no visible text or symbols)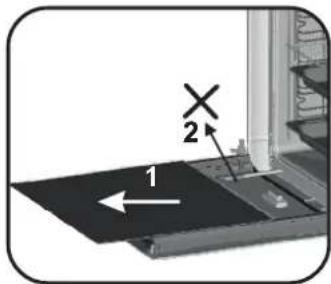
7.
natural_image
Exterior view of a modern kitchen oven with open door and side panel (no visible text or symbols)natural_image
Simple wire mesh grid on a flat surface (no text or symbols)natural_image
Two gray rectangular kitchen or baking trays with side handles, shown from different angles (no text or symbols visible)natural_image
Two hand-drawn sketch-style grid-like structures with no text or symbolsnatural_image
Metallic rectangular object with a recessed slot and four notches, shown in gray (no text or symbols)natural_image
Pure electrical circuit lines without any symbolsMeri notranjo temperaturo hrane med kuhanjem.
natural_image
3D rendering of a gray industrial fan or vent with a circular grille and mounting brackets (no text or symbols visible)Slika 2
3.3 Prva uporaba
UVODNO ČIŠČENJE
- Pečico očistite pred prvo uporabo.
- Obrišite zunanje površine z vlažno mehko krpo.
- Operite vso dodatno opremo in obrišite notranjost pečice z raztopino tople vode in sredstva za pomivanje.
- Nastavite prazno pečico na najvišjo temperaturo in pustite delovati približno 1 uro, s tem boste odstranili neprijetne vonjave novega aparata.
Slika 3

Slika 4
Slika 5
Slika 6
Slika 7
Slika 8
OPOMBA: Pritisnite na ikono za pametni telefon, da se pomaknete v NAČIN SAMO ZABRANJE.
NAČIN SAMO ZA BRANJE
Slika 9
Slika 10
ČIŠČENJE SAMO NOTRANJIH STEKLENIH VRAT
natural_image
Interior view of a black oven with open door and side panel (no visible text or symbols)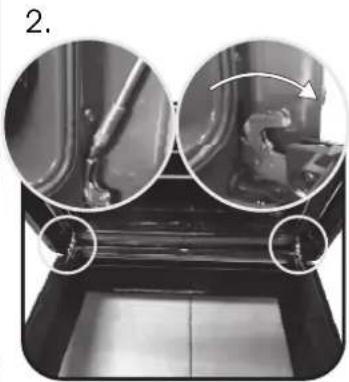
natural_image
Close-up of mechanical components with circular arrows indicating motion or assembly (no visible text or symbols)3.
natural_image
Close-up of a metallic mechanical component with a tool inserted, no visible text or symbols4.
natural_image
Close-up of a hand holding a flexible electronic component with arrows indicating direction (no visible text or symbols)5.
natural_image
Close-up of a metallic mechanical component with two arrows indicating direction (no visible text or symbols)6.
7.
natural_image
Interior view of a stainless steel oven with open door and tray (no visible text or symbols)natural_image
Simple wire mesh grid structure with no text or symbolsnatural_image
Two gray rectangular kitchen or baking trays, one open and one closed, shown against a white background (no text or symbols)natural_image
Two hand-drawn sketch of rectangular metal frames or structural panels, no text or symbols presentnatural_image
Metallic rectangular object with four recessed slots and a central notch, shown against a plain background (no text or symbols)natural_image
Pure electrical circuit lines without any symbolsnatural_image
3D rendering of a gray industrial fan or vent with a circular grille and mounting brackets (no text or symbols visible)Obrázek 2
3.3 První použití
PŘEDBĚŽNÉ ČIŠTĚNÍ
Obrázek 3

Obrázek 4
Obrázek 5
Obrázek 6
Obrázek 7
Obrázek 9
Obrázek 10
ČIŠTĚNÍ POUZE VNITŘNÍHO SKLADVÍŘEK
natural_image
Interior view of a black oven or oven with visible internal structure and tray (no text or symbols)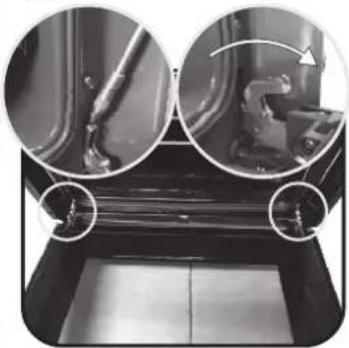
natural_image
Close-up of mechanical components with circular insets showing internal features (no visible text or symbols)
natural_image
Close-up of a metallic structural joint or bracket component (no visible text or symbols)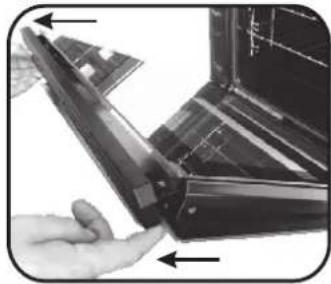
natural_image
Close-up of a hand holding a dark electronic device with a handle, showing internal components and wiring (no text or symbols visible)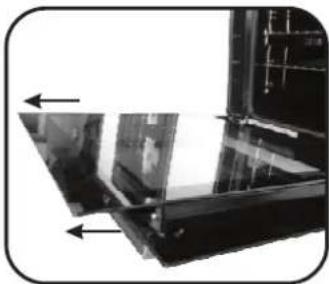
natural_image
Close-up of a glass panel with two arrows pointing to the edges (no visible text or symbols)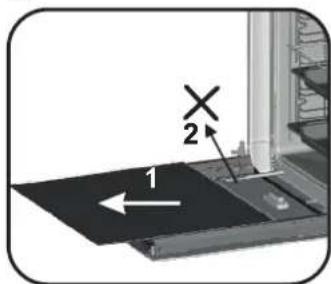
natural_image
Exterior view of a stainless steel oven with open door and side panel (no visible text or symbols)službám, ak bude potrebná nejaká oprava. Po vybratí rúry z obalu skontrolujte, či nebola počas prepravy poškodená. Ak máte pochybnosti, rúru nepoužívajte a porad'te sa s kvalifikovaným technikom.
natural_image
Simple wire mesh grid on a flat surface (no text or symbols)natural_image
Two gray rectangular kitchen or baking trays with side handles, shown from different angles (no text or symbols visible)natural_image
Two hand-drawn sketch of vertical grid lines, no text or symbols presentnatural_image
Metallic rectangular object with a V-shaped notch and multiple notches, shown in gray (no text or symbols visible)natural_image
Pure electrical circuit lines without any symbolsnatural_image
3D rendering of a gray industrial fan or vent with a spiral airflow pattern (no text or symbols)Obrázok 1
Obrázok 2
3.3 Prvé použitie
PREDČISTENIE
3.4 Operating In Manual Mode
Obrázok 3
Obrázok 4
Obrázok 5
Obrázok 6
Obrázok 7
Obrázok 8
POZNÁMKA: Stlačte ikonu smartfónu na prechod do REŽIMU IBA NA ČÍTANIE.
REŽIM IBA NA ČÍTANIE
Obrázok 9
Obrázok 10
ČISTENIE INTERIÉROVÝCH SKLENENÝCH DVIEROK
natural_image
Interior view of a black oven or oven with visible tray and vent (no text or symbols)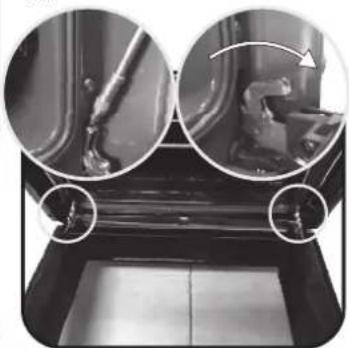
natural_image
Close-up of mechanical components with magnified views showing internal structure (no text or symbols visible)3.
natural_image
Close-up of a metallic tool interacting with a dark metal bracket (no visible text or symbols)
natural_image
Close-up of a hand interacting with a mechanical component, showing a curved edge and internal structure (no text or symbols visible)5.
natural_image
Close-up of a metallic structural component with two arrows indicating direction (no text or symbols visible)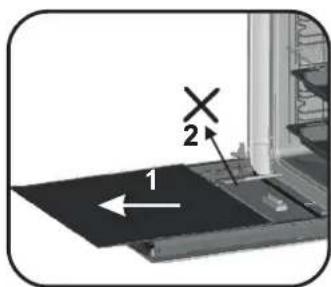
7.
natural_image
Interior view of a stainless steel oven with open door and side panel (no visible text or symbols)natural_image
Simple wire mesh grid on a flat surface (no text or symbols)natural_image
Two gray rectangular plastic trays, one open and one closed, shown against a white background (no text or symbols)natural_image
Two identical hand-drawn grid-like structures with vertical lines, no text or symbols presentnatural_image
Metallic rectangular object with four recessed slots and a flat top edge (no text or symbols)natural_image
Pure electrical circuit lines without any symbolsRysunek 2
3.3 Pierwsze użycie
CZYSZCZENIE WSTĘPNE
Rysunek 3

Rysunek 4
Rysunek 5
Rysunek 6
Rysunek 7
Rysunek 8
Rysunek 9
Rysunek 10
natural_image
Interior view of a black oven or oven with visible internal structure and tray (no text or symbols)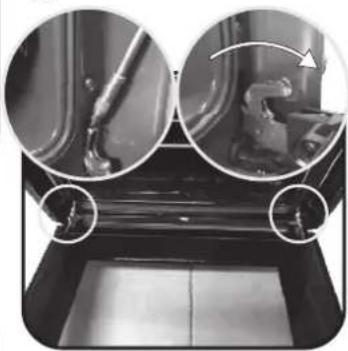
natural_image
Close-up of mechanical components with circular arrows indicating motion or assembly (no visible text or symbols)
natural_image
Close-up of a metallic tool interacting with a metal bracket (no visible text or symbols)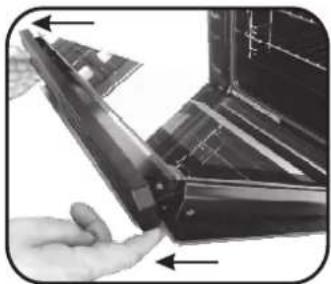
natural_image
Close-up of a hand holding a black electronic device with a handle, showing internal components and wiring (no text or symbols visible)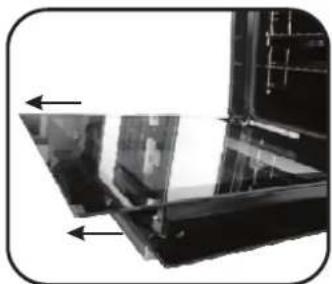
natural_image
Close-up of a metallic panel or fixture with two arrows pointing to features, no visible text or symbols.
INSTALLATION
EN
INSTALLAZIONE
IT
MONTAGE
DE
INSTALLATIE
NL
INSTALACIÓN
ES
GB If the furniture is equipped with a bottom at the back part, provide an opening for the power supply cable.
IT Se il mobile ha un fondo posteriore, praticare un foro per il passaggio del cavo di alimentazione.
DE Wenn das Möbel mit einem Boden im hinteren Teil ausgestattet ist, sehen Sie eine Öffnung für das Netzkabel vor.
NL Als het meubel een paneel heeft aan de achterkant, moet er een opening worden gemaakt voor de stroomkabel.
ES Si el mueble tiene panel posterior, haga un orificio para el cable de alimentación.
A GB If the mounting of the plinth does not allow air circulation, to obtain the maximum performance of the oven it is necessary to create an opening of 500x10mm or the same surface in 5.000 mm2
A IT Se il montaggio dello zoccolo non consente la circolazione dell'aria, per ottenere il massimo rendimento del forno è necessario creare un'apertura di 500x10 mm o la stessa superficie in 5.000 mm2
A DE Wenn die Montage des Sockels keine Luftzirkulation erlaubt, ist es notwendig, eine Öffnung von 500 x 10 mm oder die gleiche Oberfläche in 5.000 mm ^2 zu schaffen, um die maximale Leistung des Ofens zu erhalten
The manufacturer will not be responsible for any inaccuracy resulting from printing or transcript errors contained in this brochure. We reserve the right to carry out modifications to products as required, including the interests of consumption, without prejudice to the characteristics relating to safety or function.