
EF-630 - Flash SIGMA - Free user manual and instructions
Find the device manual for free EF-630 SIGMA in PDF.

User questions about EF-630 SIGMA
0 question about this device. Answer the ones you know or ask your own.
Ask a new question about this device
Download the instructions for your Flash in PDF format for free! Find your manual EF-630 - SIGMA and take your electronic device back in hand. On this page are published all the documents necessary for the use of your device. EF-630 by SIGMA.
USER MANUAL EF-630 SIGMA
J E D F E s I D k N C s C t K R P
F50E21905
SIGMA
ELECTRONIC FLASH EF-630
FOR CANON
FW Ver.1.05\~
使用説明書/INSTRUCTIONS
natural_image
Diagram of a device with a curved arrow indicating rotation or movement (no text or symbols present)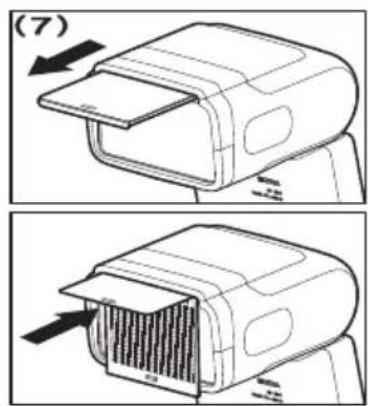
natural_image
Diagram of a vehicle with directional arrows indicating motion or rotation (no text or symbols)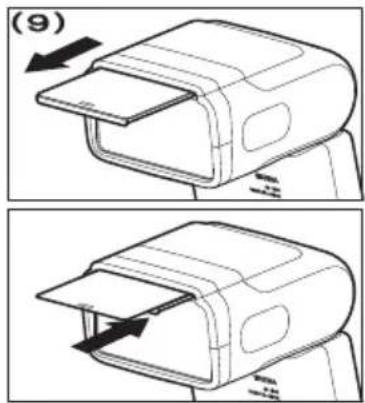
natural_image
Line drawing of a device casing with an open lid, showing internal compartments and a handle (no text or symbols)日本語

セットアップメニューでの
基本操作
| ± 0.0 | 1:1 | ||
| ON | ± 0.0 | ch.1 | |
レシーバーの設定
レシーバー(RX)の設定
ワイドパネル
sigma-global.com/jp/support/
sigma-global.com/jp/

Thank you very much for purchasing the Sigma Electronic Flash EF-630 (FOR CANON). To add to your enjoyment of photography, the flash has a variety of features. To make the most of all these features and to get the maximum performance and enjoyment from your flash, please read this instruction booklet together with your camera's instruction manual before using the flash, and also keep it handy for your future reference.
SAFETY PRECAUTIONS
| To avoid causing damage or injury, please read this instruction manual carefully, before using the flash. Please take special note of the following two cautionary symbols. | |
| Warning !! | Using the product and disregarding this warning sign may cause serious injury or other dangerous results. |
| Caution !! | Using the product disregarding this caution sign may cause injury or damage. |
| This symbol denotes a warning or point, where caution is required.This Symbol contains information regarding the actions that must be avoided. | |

Warning !!

This flash contains high voltage circuits. To avoid electric shock or burns, do not attempt to disassemble the flash. If the outside shell of the unit is broken or cracked, do not touch the mechanism inside.

Do not fire the flash close to eyes. Otherwise the bright light could damage the eyes. Keep at least 1m/3feet distance between face and the flash unit when taking a picture with flash.
Do not touch the synchro terminal of your camera when the flash is attached to the hot shoe. High voltage circuitry could cause an electric shock.
Never use your camera in an environment where flammable, burnable, gas, liquids or chemicals, etc, exist. Otherwise it might cause fire or explosion.
Do not cover the Flash Head with your hands or fire the flash when it is next to your skin as it could cause burns.
Do not fire the flash toward car drivers as it could cause an accident.
Do not use this flash unit on any camera other than the Canon EOS series cameras, otherwise the flash may damage the circuitry of these cameras.
This flash unit is not waterproof. When using the flash and camera in the rain or snow or near water, keep it from getting wet. It is often impractical to repair internal electrical components damaged by water.
Never subject the flash and camera to shock, dust, high temperature or humidity. These factors might cause fire of malfunctioning of your equipment.
When the flash is subjected to sudden temperature change as when the flash unit is brought from a cold exterior to warm interior, condensation might form inside. In such a case, place your equipment in a sealed plastic bag before such a change and do not use the flash unit until it reaches room temperature.
Do not store your flash in a drawer or cupboard etc containing naphthalene, camphor or other insecticides. These chemicals will have a negative effects on the flash unit.
Do not use a thinner, Benzene or other cleaning agents to remove dirt or finger prints from the component. Clean with a soft, moistened cloth.
Caution !!

For extended storage, choose a cool dry place, preferably with good ventilation. It is recommended that the flash be charged and fired several times a month, to maintain proper capacitor functioning.

Do not fire the flash while covering the Flash Head with cloths or clothes as it could cause fire.
ABOUT THE BATTERY
This flash unit uses four "AA" type Ni-MH rechargeable batteries or alkaline dry cell batteries.
- To assure proper electrical contact, clean the battery terminals before installing the batteries.
- To prevent battery explosion, leakage or overheating, use four new AA batteries of the same type and brand. Do not mix the type or new and used batteries.
- Do not disassemble or short-circuit the batteries, or expose them to fire or water; they may explode. Do not recharge the batteries other than Ni-MH rechargeable batteries.
- When the flash will not be used for an extended period of time, remove the batteries from the flash to avoid the possibility of damage from leakage.
- As with any flash, it is recommended you carry spare batteries when on a long trip or when photographing outdoors in cold weather.
- Do not use Lithium AA/R6 Batteries. It may cause your equipment to malfunction.
- Please follow all guidelines, rules and regulations of your community regarding the disposal of batteries.
DESCRIPTION OF THE PARTS (P.2)
| 1. Flash Head | 10. Power Switch |
| 2. Wireless Signal Receiving Window | 11. Ready Light /TEST Button12. OKButton |
| 3. BEEP Switch | 13. Selector |
| 4. AF Assist Light | 14. Shoe Lock Lever |
| 5. Battery Cover | 15. Dial |
| 6. Shoe | 16. Sync. Terminal |
| 7. LCD Panel | 17. Catch Light Panel |
| 8. Backlight Switch | 18. Wide Panel |
| 9. MENU Button |
SELECTOR (13)
In this instruction manual, each position of selector is shown as

- The buttons are used as follows: To operate Up and Down buttons: ◆To operate Left and Right buttons: . <>
COM PATIBLE CAMERAS
This flash is compatible with the following cameras.
E-TTL II / E-TTL auto flash system EOS digital camera
LOADING THE BATTERIES
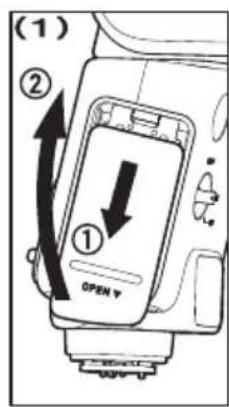
- Turn the power switch to [OFF] and open the battery compartment by sliding the cover. P. 3-(1)
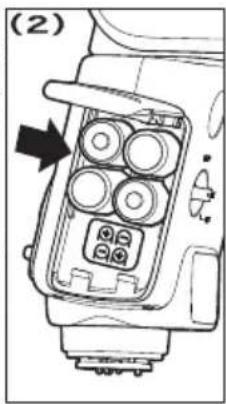
- Follow the indication in the battery compartment and insert the batteries with the "+" and "-" electrodes in the correct direction. P.3-(2)
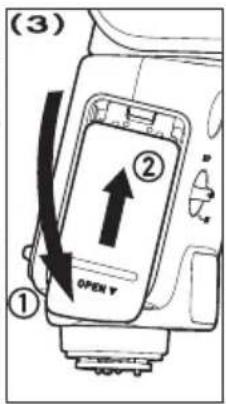
- Close the battery compartment cover. P.3-(3)
- Turn the power switch to [ON]. When the flashgun is charged to the level that flash firing is possible, the Ready light starts blinking in green. When the flashgun is fully charged, the light lights up in red.
Caution!!
When the battery capacity gets low, the mark is indicated on the LCD panel. When the battery capacity decreases to zero, the display indicates the mark on the right, and the flash will no longer function. Please replace the batteries.

ERROR WARNING
When the ER mark is indicated on the LCD panel, the flash may have failures. Reset the power switch or check the battery. If the indication remains, contact our sales office.
AUTO POWER OFF
To conserve battery power, the flash unit automatically turns itself off when the flash has not been used for approximately 1.5 minutes. To turn the flash on again, depress the TEST button or the camera shutter button halfway. However, the auto power off does not work in [WL RX] mode, [R&FL NORMAL] mode and [R&FL RX] mode.
ATTACHMENT TO THE CAMERA
- Turn the power switch to [OFF].
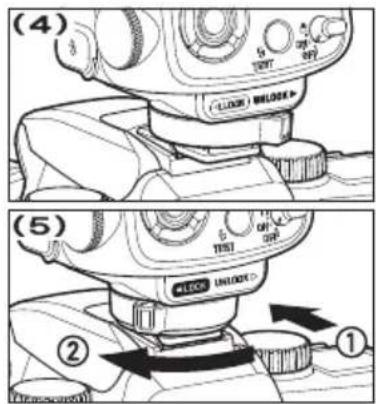
- Confirm that the shoe lock lever is in the [UNLOCK ▶] position. P3-(4)
- Insert the flash on to the hot shoe of the camera until it stops. Slide the shoe lock lever to the [◀LOCK] direction until the lever is locked with a clicking sound. P.3-(5)
When removing the flash, slide the shoe lock lever to the [UN LOCK▶] direction until it stops while continuing to press the shoe lock lever button. Then pull out the flash.
Caution!!
If the flash is pulled out while the shoe lock lever is not in the [UNLOCK▶] position, the hot shoe of the camera and the attachment shoe of the flash could be damaged.
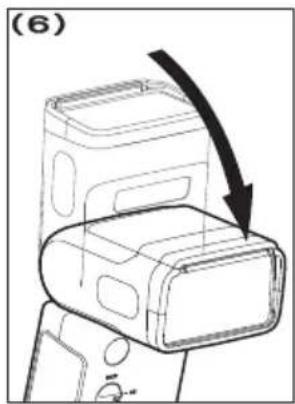
ADJUSTING THE FLASH HEAD
In regular shooting, set the flash head to face forwards. P.3-(6)
Caution!!
After the power switch is turned to ON, if the BOUNCE mark is indicated in the Status area, or if the distance indication in the Status area is blinking, the flash head is not correctly set to the front direction.
LIMITS OF CONTINUOUS SHOOTING
To prevent overheating of the flashgun's circuitry, do not use your flash unit for at least 10 minutes after continuously firing the flash for the number of exposures shown in the table below.
| Mode | Number of Flash Exposures |
| TTL, M(1/1, 1/2) | 20 Continuous Flash Shots |
| M(1/4, 1/8) | 25 Continuous Flash Shots |
| M(1/16~1/32) | 40 Continuous Flash Shots |
| MULTI | 10 Cycle |
Caution!!
In case the icon 🖼️appears on the display, the amount of light will be limited to prevent overheating of the flashgun's circuitry. Refrain from using the flashgun until the icon 🖼️ disappears.
BASIC STEPS OF SETTING
This section describes the basics of the settings. With EF-630, most settings can be conducted easily by the following steps.
Caution!!
When the power switch is at the 🔒 (lock) position, the settings cannot be changed. Be sure to set to [ON] to change the settings.
[Flash function settings] and [Flash C.Fn settings] where the flash settings can be changed on the Menu screen of the camera are not supported. Please perform the settings at the flash side.
Switchover between the Main screen and the Setup menu by using the MENU button. (When the power is set to [ON], always start from the Main screen.)
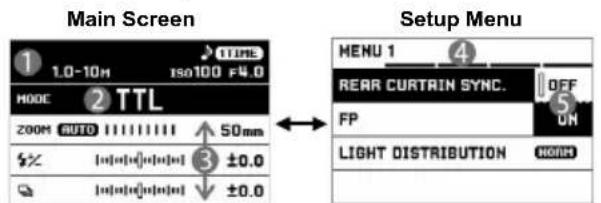
Changes the Flash mode and sets the details of each Flash mode.
Adds the optional functions of flash shooting and sets the basic conditions of the flash.
① Status area
② Flash mode area
③ Mode details area
④ Tab area
⑤ Sub menu
BASIC OPERATIONS ON MAIN SCREEN
SELECTING FLASH MODE
Select the Flash mode area by using the buttons and change the Flash mode by using the buttons or the dial.
SETTING DETAILS OF FLASH MODE
Select Mode details area by using the ◆ buttons and change the setting values by using the buttons or the dial.
BASIC OPERATION IN SETUP MENU
To move to the next tab, turn the Dial. (When the icon in the tab area is selected, it is possible to change the setting menu by pressing the <> buttons as well.)
While in the Set-up Menu:
Use the ↗ buttons to select menu items. Press the OK or > button to open sub-menus or dialogs. (In some items, a special screen or a dialog message may open.)
While in set-up sub-menus:
Use the
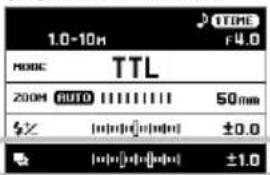
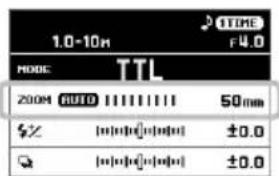
E-TTL II / E-TTL AUTO EXPOSURE
This uses the E-TTL II / E-TTL auto flash system. Use this mode for general photo shooting.
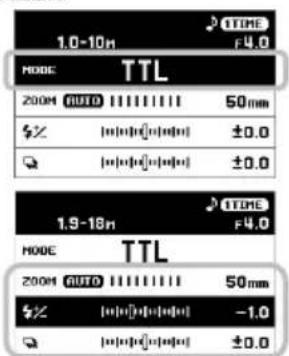
- Set the Flash mode to [TTL].
- Confirm that the subject is within the shooting range by checking the distance indication in the Status area.
![1.0-10m TTL F4.0 MODE 200M AUTO 1111111 50mm $X [0][0][0][0][0] ±0.0 Q [0][0][0][0][0] ±0.0](/content/2026/05/760396/images/e0e8b0286e4b3fee0a0ea201b566c83c71d9a617eacc87750e43e48a8fc0ef31.jpg)
- Check the flashgun status with the Ready light and start shooting.
When shooting with a flash is correctly conducted, the OK mark is indicated for approximately five seconds in the Status area. When the OK mark is not displayed, the light amount may be insufficient or too much. Change the condition and conduct shooting again.
SHUTTER SPEED AND APERTURE
The relationships between the shutter speeds and apertures in different exposure modes of the camera are as follows.
| Shutter Speed | Aperture | |
| P | Automatically set(1/60sec - flash synchronized speed*) | Automatically set. |
| Av | Automatically set(30sec - flash synchronized speed*) | Can be set freely. |
| Tv | Enables you to freely set the speed in a range equal to or below the flash synchronized speed * . | Automatically set. |
| M | Can be set freely. |
* When the FP flash is set to [ON], the restriction of the shutter speed at the high speed side becomes disabled.
Caution!!
When shooting while the shutter speed and aperture values are blinking, the exposure may be mismatched. In that case, change the conditions before you start shooting.
- When the shooting mode of the camera is set to [Basic Zone], the screen changes to that shown in the diagram. Buttons are disabled other than the TEST and ● buttons.

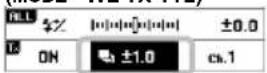
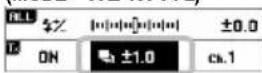
FLASH EXPOSURE COMPENSATION
Compensating only the light amount of the flash is possible without affecting exposure of the background.
It can be used with [TTL], [WL TX-TTL], and [WL RX] flash modes.
Set the compensation amount in the Mode details area. The compensation amount has 1/3 steps (when the camera has 1/2 steps, it is changed to 1/2 steps) and up to ±3 steps can be set
![1.9-18m TTL F4.0 MODE TTL 200M AUTO 50mm % [●●●●●●●●●●] -1.0 □ [●●●●●●●●●●] ±0.0](/content/2026/05/760396/images/9b0f6998ba65d1b129fbf64c0ae0922a205b24fc0a4c30cfb98f52c0802059ca.jpg)
- Do not use the flash exposure compensation function on the camera.
FEB SHOOTING (Flash Exposure Bracketing)
Three photographs can be taken by changing the flash amount.
It can be used with [TTL], and [WL TX-TTL] flash modes.
Set the compensation amount in the Mode details area. The compensation amount has 1/3 steps (when the camera has 1/2 steps, it is changed to 1/2 steps) and up to ±3 steps can be set.
Take three photographs while checking the charged amount with the ready light.
(MODE WL TX-TTL)

- The three photographs are in an order of appropriate exposure → under exposure → over exposure.
- FEB icon will change as follows depending on the frame number.
| 1st Frame | 2nd Frame | 3rd Frame |
- When three photographs have been taken, FEB is automatically released.
- FEB can be combined with the flash exposure compensation.
FE LOCK SHOOTING
This is a shooting method that exposes any desired section of the subject with the correct flash exposure.
It can be used with [TTL], and [WL TX-TTL] flash modes.
- Focus on the subject.
- Align the section of the scene which you require the flash exposure to be correct to the center of the image. Press the [M-Fn] button on the camera.
- The flash preflashes, and the flash amount necessary for the subject is stored.
- [FEL] is displayed for approximately 0.5 seconds in the finder.
- Decide the composition and take pictures.
- If [7] blinks in the finder, the flash amount is insufficient. Change the conditions and re-lock the FE.
- The allocated FE lock button varies depending on the actual camera. Please refer to the instruction manual of your camera.
MANUAL FLASH
Discretional setting of the flash amount is possible.
- Setthe Flash mode to [MANUAL].
- Set the flash amount in the Mode details area. (Available range for setting: 1/128 to 1/1, Available pitch
![1.0m ISO100 F4.0 MODE MANUAL 200H AUTO 50mm $ [J=0] = 1/128](/content/2026/05/760396/images/51fe5794a0049d7166b9dffb5988ffe30247a2b22f4e42bedbb3b854f8b94c27.jpg)
for setting: 1/3EV.)
- Check the flashgun status with the Ready light and start shooting.
In the distance display section in the Status area, the distance that appropriate exposure can be obtained is calculated and displayed. Even with the same flashing amount, the distance to obtain the appropriate exposure varies if the camera's ISO sensitivity or the aperture value is changed.
An appropriate exposure when using manual flash can be calculated using the following formula.
Guide Number(GN) /Shooting distance (m) =Aperture value (F)
For the GN (Guide Number) of this flash, refer to [Table 1] attached at the end of this manual.
MULTI FLASH
Displaying movement of the subject in one frame as if the image is a photographic playback is possible by continuously emitting light with the flash while the shutter is open.
Use the camera's manual ("M") exposure mode.
- Set the Flash mode to [MULTI].
- In the Mode details area, set the flash amount, flash interval in "Hz" (eg.: 10 Hz = Emits light with the frequency of 10 times per second), and the number of flashes in "x".
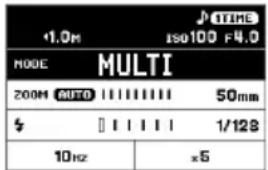
-
Set a shutter speed that is slower
than the value of the "number of flashes" / "flash frequency." -
Check the flashgun status with the Ready light and start shooting.
The number of flashes that can be fired continuously varies depending on the combination of the flash amount and the flash frequency. Refer to [Table 2] at the end of this manual.
WIRELESS FLASH
When the flash is used at a location far from the camera, the creative possibilities are expanded. The EF-630 is controlled remotely by the camera's built-in flash or a separate Transmitter flash unit.
- EF-630 has three wireless flash modes for different applications.
| WL TX-TTL | Wireless E-TTL II / E-TTL auto flash |
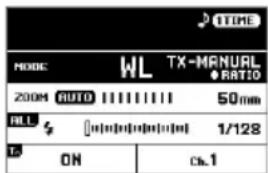
| WL TX-MANUAL | Wireless manual flash |
| WL TX-MULTI | Wireless multi-flash |
- The flash attached to the camera is called [Transmitter (TX) unit], and the flash used at a distance from the camera is called [Receiver (RX) unit].
- Please set the flash unit between 0.5m\~ 5m (1.6\~ 16ft) from the subject, and set the camera body between 1m\~ 5m (1.6\~ 16ft) from the subject.
- When setting a Receiver unit at the desired position, you can use mini-stand. This mini-stand has a screw hole for a tripod.
- Wireless flash can be used with the camera's integrated flash (only in case of models that have the transmitter function of wireless flash shooting). For the camera settings, refer to the camera's instruction manual.
- The EF-630 can also be used in combination with the EF-610 DG SUPER EO-ETTL II. In this case, use the EF-610 DG SUPER as the Receiver unit. When setting EF-610 DG SUPER, refer to the instruction manual of EF-610 DG SUPER (notation method of the EF-610 DG SUPER receiver ID is different. Refer to the following table.)
| EF-630 receiver ID | A | B | C |
| EF-610 DG SUPER receiver ID | 1 | 2 | 3 |
PREPARATION OF WIRELESS FLASH (TRANSMITTER UNIT)
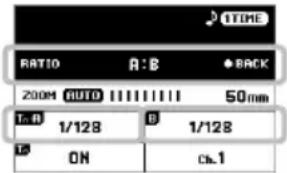
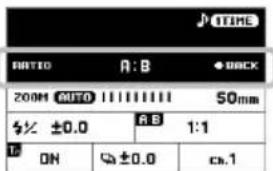
RECEIVER GROUP SETTING
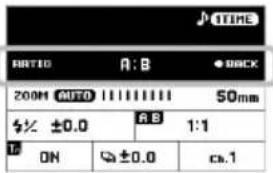
Shooting with different flash ratios and flash amounts is available by dividing the receivers into two groups [A, B] or three groups [A, B, C].
- When the desired wireless flash mode is set, and when the flash mode area is selected, pressing the OK button opens the Receiver group setting screen.
- The receiver group setting can be switched by using the dial or the <> button. (When OFF is selected, flash ratio shooting is not performed.)
- After setting, press the OK button to return to the normal screen.
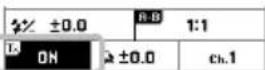
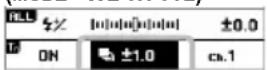
TRANSMITTER FLASH SETTING
It sets whether "Transmitter" is set for the control function only or for the control function and light emission as a
| ON | Control function + Flash* |
| OFF | Control function only |
*During wireless shooting where the flash ratio is set, "Transmitter" belongs to Group [A].
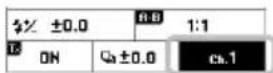
CHANNEL SETTING
When another person is performing wireless flash, setting a different channel prevents malfunctions (selecting from channels 1 to 4 is possible).
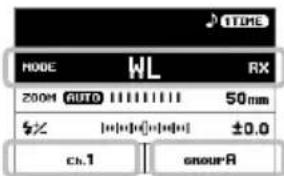
PREPARATION OF WIRELESS FLASH (RECEIVER UNIT)
- Set the flash mode to [WL RX].
- In the Mode details area, set a channel that is the same as Transmitter.
- When using wireless flash with the flash ratio setting, set the receiver ID to that of the desired group in the Mode details area (if shooting using then either one of A, B, or C can be
WIRELESS E-TTL II/E-TTL AUTO FLASH
In the wireless E-TTL II / E-TTL auto flash, the camera automatically controls the exposure to an appropriate value.
Auto flash with one flash or all receiver flashes with the same flash amount
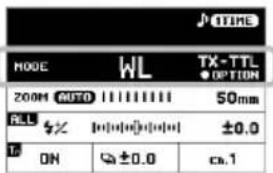
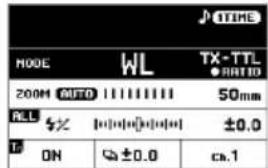
TRANSMITTER UNIT SETTING
- Set the Flash mode to [WL TX-TTL].
- When necessary, perform "Setting the channel" and "Transmitter unit flash setting" in the Mode details area.
RECEIVER UNIT SETTING
- Perform the setting by following "PREPARATION OF WIRELESS FLASH (RECEIVER UNIT)".
- Place the receiver unit, confirm the completion of charging, and then start shooting (the receiver notifies the completion of charging by blinking the AF assist light.)
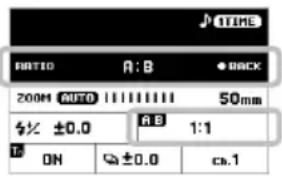
Auto flash with flash ratio setting (two groups)
Flash is controlled so the total sum of Group [A] and Group [B] becomes an appropriate exposure.
TRANSMITTER UNIT SETTING
-
Set the receiver group setting to [A:B] by following "PREPARATION OF WIRELESS FLASH (TRANSMITTER UNIT)".
-
Set the flash ratio in the Mode details area. (Setting from 8:1 to 1:8 is possible.)
RECEIVER UNIT SETTING
- Perform the setting by following "PREPARATION OF WIRELESS FLASH (RECEIVER UNIT)".
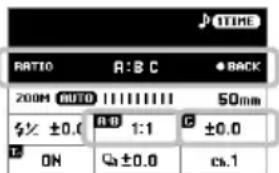
Auto flash with flash ratio setting (three groups)
Use Group [C] as a secondary light source, such as for eliminating a background shade of a subject.
TRANSMITTER UNIT SETTING
-
Set the receiver flash group to [A:B C] by following "PREPARATION OF WIRELESS FLASH (TRANSMITTER UNIT)".
-
Set the flash ratio of [A:B] in the Mode details area (setting from 8:1 to
-
Set the flash exposure compensation of [C] in the Mode details area.
RECEIVER UNIT SETTING
- Perform the setting by following "PREPARATION OF WIRELESS FLASH (RECEIVER UNIT)".
WIRELESS MANUAL FLASH
As well as manual flash photography, wireless shooting whereby the flash output can be manually set is also available. Decide the exposure by using a commercially-available flash meter.
Manual flash with one flash or all receiver flashes with the same flash amount
TRANSMITTER UNIT SETTING
- Setthe Flash mode to [WL TX-MANUAL].
- When necessary, perform "Setting the channel" and "Transmitter unit flash setting" in the Mode details area.
- Set the flash amount in the Mode details area. (Available range for setting: 1/128 to 1/1, Available pitch for setting: 1/3EV.)
RECEIVER UNIT SETTING
- Set the Flash mode to [WL RX].
- Perform the setting by following "PREPARATION OF WIRELESS FLASH (RECEIVER UNIT)".
- Place the receiver unit, confirm the completion of charging, and then start shooting (the receiver notifies the completion of charging by blinking the AF assist light.)
Manual flash where the flash amount is set for each group
Manual flash with the flash amount setting is available for each of the two or three groups.
TRANSMITTER UNIT SETTING
- Set [Flash group setting] to [A:B] or [A:B:C] by following "PREPARATION OF WIRELESS FLASH (TRANSMITTER UNIT)".
- Set the flash amount of each group in the Mode details area.
RECEIVER UNIT SETTING
- Perform the setting by following "PREPARATION OF WIRELESS FLASH (RECEIVER UNIT)".
WIRELESS MULTI FLASH
Wireless multi-flash is available for one flash or for multiple flashes. Use the camera's manual ("M") exposure mode.
Multi-flash with one flash or all receivers with the same flash amount
TRANSMITTER UNIT SETTING
- Set the Flash mode to [WL TX-MULTI].
- When necessary, perform "Setting the channel" and "Transmitter unit flash setting" in the Mode details area.
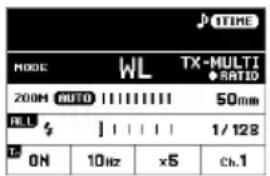
- In the Mode details area, set the flash amount, flash interval in "Hz" (eg.: 10 Hz = Emits light with the frequency of 10 times per second), and the number of flashes in "x".
RECEIVER UNIT SETTING
- Perform the setting by following "PREPARATION OF WIRELESS FLASH (RECEIVER UNIT)".
- Set a shutter speed that is slower than the value of the "number of flashes" / "flash frequency."
- Place the receiver unit, confirm the completion of charging, and then start shooting (the receiver notifies the completion of charging by blinking the AF assist light.)
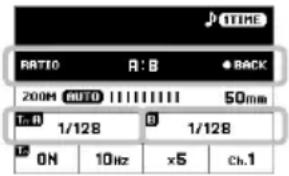
Multi-flash with flash amount setting for each group
Multi-flash with the flash amount setting is available for two or three groups.
TRANSMITTER UNIT SETTING
- Set "Flash group setting" to [A:B] or [A:B:C] by following "PREPARATION OF WIRELESS FLASH."
-
Set the flash amount of each group in the Mode details area.
-
In the Mode details area, set the flash amount, flash interval in "Hz" (eg.: 10 Hz = Emits light with the frequency of 10 times per second), and the number of flashes in "x".
RECEIVER UNIT SETTING
- Perform the setting by following "PREPARATION OF WIRELESS FLASH (RECEIVER UNIT)".
Continue with the procedures from Step 5 of the previous item to take photographs.
RECEIVE & FLASH FUNCTION
The EF-630 includes a function which allows it to fire by reacting to the flash from another flash unit. This allows for easy and convenient shooting with the flash positioned at a distance from the camera. The light output, however, is not automatically adjusted in this mode.
NORMAL RECEIVE & FLASH FUNCTION
The Transmitter unit attached to the camera can be used to trigger a synchronized flash with the EF-630, even when it's positioned at a distance from the camera.
- The camera's built-in flash operates erroneously with the pre-flash,
therefore, synchronized flash is not possible.
Set the Transmitter flash to manual mode and set the flash output to approximately 1/16.
Set the camera's exposure mode to M, the shutter speed to 1/30
second or shorter, and the aperture and ISO at discretionary values.

- Set the Flash mode of the Receiver EF-630 to [R&FL NORMAL].
- In the Mode details area, set the ISO and the aperture values to match those of the camera settings.
- Adjust the flash amount in the Mode details area so the distance between the Receiver flash and the subject is approximately the same as the distance indicated in the Status area.
- Check the completion of charging and start shooting.
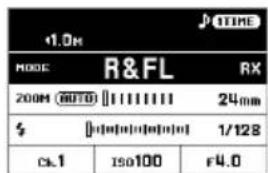
DEDICATED RECEIVE & FLASH FUNCTION
If using two or more EF-630 flash units, you can designate which flash units will fire together by using the channel settings. In this mode, one flash unit will be used as the Receiver Controller and the others for firing as Receivers.
Set the camera exposure mode to M, the shutter speed to 1/30 second or shorter, and the aperture and ISO at discretionary values.
SETTING THE CONTROL (TRANSMITTER) FLASH
- Set the Flash mode to [R&FL TX].
- Set the channel as needed. (In the Mode details area, select Ch.1 to Ch.3.)
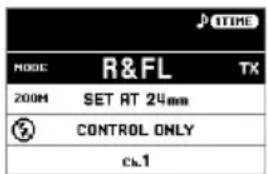
SETTING THE FIRING (RECEIVER) FLASH
- Set the Flash mode to [R&FL RX].
- In the Mode details area, set the channel to match that of the Control flash.
- In the Mode details area, set the ISO and aperture value to match those of the Control flash.
- Adjust the flash amount on the Mode details area so the distance between the Receiver flash and the subject is approximately the same as the distance indicated in the Status area.
- Check the completion of charging and start shooting.
- In Receiver mode, this flash can also be used in combination with the EF-630 and / or EF-610 DG SUPER for other camera fittings. (For details on setting up the EF-610 DG SUPER, please follow its instruction manual.)
![1.0h MODE R&FL RX 2004 AUTO 24mm $ [0.000000] 1/128 cs.1 ISO100 F4.0](/content/2026/05/760396/images/246201391a35467551034e2837e415a924a53fc36cf61dbe020aed595fe77c1b.jpg)
OPTIONAL FUNCTIONS
This section describes optional functions that can be set and added from the Setup menu.
REAR CURTAIN SYNCHRONIZATION (MENU 1)
The flash fires just before the shutter is closed. The light behind the moving subject and the path of the light can be captured; therefore, the photos can express the subject's natural movement.
It can be used with the camera's P, Av, Tv, and M exposure modes. It can be used with [TTL], [MANUAL], and [WL] Flash modes.
-
Set [MENU 1] → [REAR CURTAIN SYNC] → [ON].
-
Return to the Main screen. (In the Status area, the ▶ mark appears.)
Caution!!
This function cannot be set to "ON" in Flash modes that are not compatible with Rear curtain synchronization.
FP FLASH (High-speed Sync) (MENU 1)
The FP flash keeps firing while the shutter curtain is running. Thus you can use a shutter speed faster than the synchronized speed.
It can be used with the camera's P, Av, Tv, and M exposure modes. It can be used with [TTL], [MANUAL], [WL TX-TTL] and [WL TX-MANUAL] Flash modes.
-
Set [MENU 1] → [FP] → [ON].
-
Return to the Main screen. (In the Status area, the FP mark appears.)
In [TTL] mode, confirm that the subject is within the shooting range by checking the distance indicated in the Status area before you start shooting.
In [MANUAL] mode, adjust the aperture, etc. before you start shooting so the distance to the subject and the distance indicated in the Status area match each other.
The Guide Number will change depending on the shutter speed. (Please refer to [Table 3] on the last page.)
Caution!!
This function cannot be set to "ON" in the Flash modes that are not compatible with the FP flash.
LIGHT DISTRIBUTION MODE (MENU 1)
The EF-630 has three Light Distribution modes that can be selected according to the purpose of use.
[MENU 1] → [LIGHT DISTRIBUTION]
| NORMAL- (Default) | Normal light distributionBasic light distribution characteristics for general shooting. |
| GNGN | Guide number prioritized light distributionThe flash beam's angle is decreased but a larger guide number is available. |
| DIFFUSEDF | Flat light distributionPrevents a decrease of the surrounding light amount providing a more uniform light distribution. |
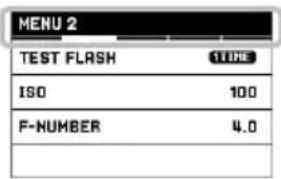
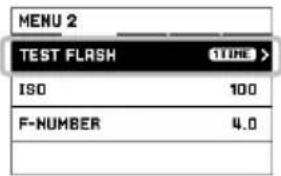
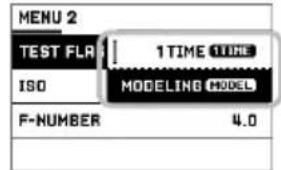
TEST FLASH (MENU 2)
EF-630 has two Test flash modes. One of the Test flash modes can be allocated to the TEST button.
[MENU 2] → [TEST FLASH]
| 1 TIME1TIME(Default) | Test flashExecutes a single test flash. |
| MODELINGMODEL | Modeling flashIt can be used with [TTL], [MANUAL] and [MULTI] flash modes.When the TEST button is kept pressed, continuous flashing of approximately 1.5 seconds is conducted so the subject's shadows can be checked. |
Caution!!
The [MODELING] Setting can not be selected in any flash mode where the modeling flash is not available.
When the camera and flash are communicating, operation of the TEST button is not available. (Pressing the camera's Depth-of-field preview button emits the modeling flash regardless of the TEST button allocation).
CUSTOM MODE (MENU 3)
It is possible to store and recall custom settings. (Two series of custom settings can be stored.)
![1.9-18H TTL MODE CT 200M AUTO 11111111 50mm $X [0] [0] [0] [-1.0] Q [0] [0] [0] [0] ±0.0](/content/2026/05/760396/images/6c40b1f68016f974afa06ca6cc0e3517d3dd3aaa107fb6af35882c7e6c8725d1.jpg)
STORING AND RECALLING CUSTOM SETTINGS
- Set the Flash mode, Mode details area, and Setup menu contents as desired.
- From [MENU 3] → [CUSTOM MODE SETTING], select [C1] or [C2] and press the OK button.
- Select [OK] and confirm with the OK button.
The registered contents are added to the Flash mode as the Custom mode. (The Custom mode is indicated with the C1 or C2 mark in the Flash mode area.)
DELETING THE REGISTERED CUSTOM MODE
- From [MENU 3] → [CUSTOM MODE DELETE], select [C1] or [C2] and press the OK button.
- Select [OK] and confirm with the OK button.
AF ASSIST LIGHT (MENU 4)
The AF assist light will turn on automatically as you focus on a subject in a dark area. The effective range of the AF assist light is from about 0.7 to 10 meters (2.3-29.5 feet).
- When the AF assist light is not necessary, set [MENU 4] → [AF ASSIST LIGHT] → [OFF].
LCD PANEL LIGHT (MENU 4)
When the power supply is turned to ON, the LCD panel lights up. The ON/OFF settings of the light can be changed.
[MENU 4] → [LCD LIGHT]
| AUTO(Default) | After 8 seconds of non-operation, the light will turn off. When a button or dial is used while the light is off, the light will automatically turn on. |
| 8 SEC | Regardless of whether a button or dial is being pressed, the light will turn off after 8 seconds from when the light initially turned on. |
| ON | The light is kept ON continuously. |
- Regardless of the setting, the light can be turned on/off with the button.
LCD PANEL ADJUSTMENT (MENU 4)
The contrast and brightness of the LCD panel can be adjusted.
[MENU 4] → [DISPLAY SETTING]
| BRIGHTNESS | BRIGHTNESSAdjust the brightness to the desired level by using thebuttons. |
| CONTRAST | CONTRASTAdjust the contrast to the desired level by using thebuttons. |
When finalizing the adjustment, select [OK] and confirm with the button.

When cancelling the adjustment, select [CANCEL] and confirm with the OK button.
CHANGING THE UNIT OF MEASUREMENT INDICATION (MENU 4)
The unit of measurement in the Status area can be changed.
[MENU 4] → [M / FEET]
| M (Default) | Meter indication |
| FEET | Feet indication |
FLASH UNIT INFORMATION (MENU 5)
The following information can be checked.
[MENU 5] → [INFORMATION]
| MODEL | Model name |
| SERIAL No. | Serial number |
| VERSION | Firmware version |
INITIALIZATION OF SETTINGS (MENU 5)
It is possible to reset the flash unit back to factory settings.
[MENU 5] → [RESET SETTINGS]
To initialize the setting, select [OK] and confirm with the OK button.
- When the settings are reset, stored custom modes are deleted.
OTHER USEFUL FUNCTIONS
FLASH HEAD SETTING
When the flash head setting is used with AUTO the flash head is automatically set to the flash angle that is the optimal to the lens's focal length.
- The flash head takes into account the size of the camera's image sensor, therefore the focal length displayed on the flash may be different to that of the lens.
- Depending on the Flash mode, the flash head setting may be fixed regardless of the focal length of the lens.
The flash head setting can be changed manually. Press the <> buttons in the Mode details area.
- Depending on the flash head setting, the flash's Guide Number will change.
WIDE PANEL
This flashgun is equipped with a built-in wide panel, which can provide an ultra-wide 17mm angle of coverage. Slide out the wide panel and catch light panel and flip it down to cover the flash's head. (Be careful to slide the panels out smoothly.) Then put the catch light panel back in its place. P3-(7)
- The Flash head indicating section within the Mode details area may display the WP mark when the wide panel is in use.
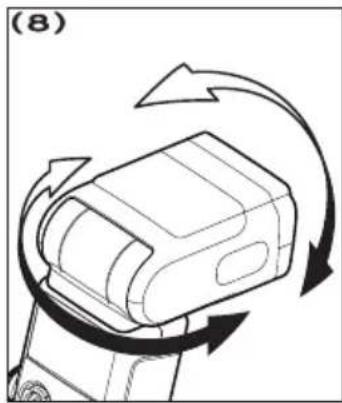
BOUNCE FLASH
By firing the flash toward the ceiling or a wall, it is possible to disperse the light and take pictures with soft light and reduced shadows.
The flash head can be set to the upper side at 90^ , the lower side at 7^ , and the right and left sides at 180^ . P.3-(8)
- During bouncing, the BOUNCE mark is indicated in the Status area.
- Choose a white surface for bouncing the flash, otherwise the image's colour may be incorrect. Depending on the reflecting surface, the subject distance and other factors, the effective distance range for TTL AUTO may change.
CLOSE-UP EXPOSURES
By tilting the flash head down to the 7^ position, the lower section of the frame can be bright enough for close-up exposures.
- When it is bounced to the lower side at 7^ , the distance indication in the Status area blinks.
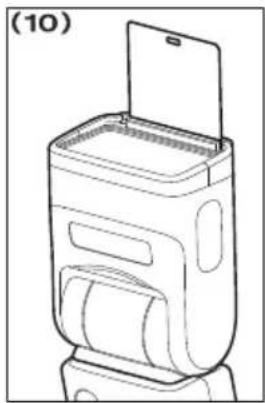
CATCH LIGHT PANEL
This flash is equipped with a built-in catch light panel, which can create a catch light in the eyes of the subject when the bounce flash mode is activated. Slide out the wide panel and catch light panel, then put the wide panel back in its place. (Be careful to slide the panels out smoothly.) P3-(9)
- To create a catch light effectively, tilt the flash head upward 90 degrees and take pictures at a close distance. P.3-(10)
SYNC.TERMINAL
EF-630 has a synchro terminal that can connect to the camera by a commercially available flash synchro cable.
When shooting with a synchro cable, use the Flash in [MANUAL] mode.
With [MENU 2] → [ISO] [F-NUMBER], set the ISO and the aperture (F) value to match that of the camera. Adjust the flash power output in the Mode details area until the distance displayed in the Status area is approximately the same as the distance between the flash and the subject.
Caution!!
E-TTL II / E-TTL auto flash does not work if the Sync.Terminal is used.
The EF-630's Sync.Terminal is compatible with plugs that have a positive (+) polarity on the central pin and a negative (-) polarity on the shield. If the plug has reverse polarity, use a commercially-available polarity conversion cord.
ACCIDENTAL OPERATION PREVENTION
When the power switch is set to the ■ position, operations other than the TEST button and the ● button become disabled, preventing accidental changes to the flash settings.
- Whilst the flash is locked, the mark is displayed in the Status area.
BEEP SOUNDS
Certain conditions of the flash are indicated by a sound, making them easy to recognize without having to look at the LCD panel.
Turn the BEEP switch on the front side of the main body to [ON]. (When it is turned to ON, the ♪ mark is displayed in the Status area.)
| One short beep | Indicates the completion of charging. |
| Two short beeps | Indicates the light adjustment is OK. |
| Onelong beep (2sec.) | Error warning |
SPECIFICATIONS
TYPE: Clip-on type serial-controlled TTL auto zoom electric flash GUIDE NUMBER: 63(ISO100/m, 200mm head position)
POWER SOURCE: Four AA type alkaline batteries or Four AA type Ni-MH rechargeable batteries
RECYCLING TIME: about 3.0 sec. (Alkaline batteries): about 1.8 sec. (Ni-MH rechargeable batteries)
NUMBER OF FLASHES : about 120 flashes (Alkaline batteries) : about 185 flashes (Ni-MH rechargeable batteries)
FLASH DURATION: about 1/700sec. (full power firing)
FLASH ILLUMINATION ANGLE: 24\~200mm motor powered control (17mm with Built-in Wide Panel)
WEIGHT: 490g/17.28oz.
DIMENSIONS: (W)79.4mm/3.13in. x (H)148.4mm/5.84in. x (L)121.5mm/4.78in.

This device complies with Part 15 of the FCC Rules. Operation is subject to the following two conditions: (1) this device may not cause harmful interference, and (2) this device must accept any interference received, including interference that may cause undesired operation.


The CE Mark is a Directive conformity mark of the European Community (EC). SIGMA (Deutschland) GmbH
Carl Zeiss Str. 10/2, D 63322 Rödermark, F.R.GERMANY Sales: 06074 / 865 16 0 Service: 06074 / 865 16 65
Support: 06074 / 865 16 88 E-Mail: info@sigma-foto.de


Disposal of Electric and Electronic Equipment in Private Households Disposal of used Electrical & Electronic Equipment (Applicable in the European Union and other European countries with separate collection systems)
This symbol on the product, in the manual/warranty, and/or on the packaging indicates that this product must not be treated as household waste. Instead it should be handed over to the appropriate collection point for the recycling of electrical and electronic equipment. If your equipment contains easy removable batteries, please dispose of these separately according to your local legislation. It is your responsibility to ensure that this product is recycled correctly. In doing so you will help conserve natural resources, protect the environment and human health. For more detailed information about recycling this product, please contact your local city office, your household waste disposal service or the shop where you purchased the product.
DEUTSCH
| MODE | TTL | |
| 200M AUTO | HHHHH | 50mm |
| $Z | [=][=][=][=] | ±0.0 |
| Q | [=][=][=][=] | ±0.0 |
[MENU 4] → [DISPLAY SETTING]
SELECTION DES DÉTAILS DU MODE FLASH
| MODE | TTL | |
| 200M AUTO | 1111111 | 50mm |
| $Z | [0] | ±0.0 |
| Q | [0] | ±0.0 |
d'État.
CORRECTION D'EXPOSITION AU FLASH
(MODE WL TX-TTL)
FLASH DISTANT AUTOMATIQUE ETT-L / E-TTL II

RÉGLAGE DU FLASH RECEPTEUR
FONCTION FLASH ET RÉCEPTEUR DÉDIÉ
FONCTIONS OPTIONNELLES
[MENU 4] → [DISPLAY SETTING]
DIMENSIONS : 79.4mm(I) x 148.4mm(H) x 121.5mm(L)


AJUSTE DEL DISPARO DE FLASH (RECEPTOR)
[MENU 4] → [DISPLAY SETTING]
DIMENSIONES: 79.4mm x 148.4mm x 121.5mm

| WL TX-TTL | E-TTL II / E-TTL auto flash |
| WL TX-MANUAL | Wireless manual flash |
| WL TX-MULTI | Multi flash wireless |
Auto flash with flash ratio setting (two groups)
IMPOSTARE IL LAMPEGGIATORE FLASH (RICEVITORE)
MEMORIZZARE E RICHIAMARE SETTAGGI PERSONALIZZATI
| Mode | Number of Flash Exposures |
| TTL, M(1/1, 1/2) | 20 Continuous Flash Shots |
| M(1/4, 1/8) | 25 Continuous Flash Shots |
| M(1/16~1/32) | 40 Continuous Flash Shots |
| MULTI | 10 Cycle |
Advarsell!!
I set-up undermenuerne:
FEB OPTAGELSE (Flash Exposure Bracketing)
| EF-630 receiver ID | A | B | C |
| EF-610 DG SUPER receiver ID | 1 | 2 | 3 |
KLARG∅RING AF TRÅDL∅S BLITZ (TRANSMITTER ENHED)
RECEIVER GRUPPE INDSTILLING
TRÅDL∅S E-TTL II / E-TTL AUTO BLITZ
RECEIVER ENHED INDSTILLING
TRÅDL∅S MANUEL BLITZ
RECEIVER ENHED INDSTILLING
INDSTIL DEN UDL∅SENDE (RECEIVER) BLITZ
FP BLITZ (High-speed Sync) (MENU 1)
[MENU 4] → [DISPLAY SETTING]
Blitz varighed: Omkring 1/700sec. (full power firing)
Blitz udlysnings vinkel: 24\~200mm motorkontrolleret (17mm med
Dimensioner: (W)79.4mm x (H)148.4mm x (L)121.5mm

BELICHTINGSCOMPENSATIE
(MODE WL TX-TTL)
ONTVANGER UNIT INSTELLING
WIRELESS MANUAL FLASH
| 1.0M | J TIME | |
| MODE | R&FL | NORMAL |
| 200M (AUTO) | II I I I I I I I I | 24mm |
| $ | [0] [0] [0] [0] [0] | 1/128 |
| ISO100 | F4.0 | |
TOEGEWEZEN ONTVANG & FLITSFUNCTIE
DE VURENDE (ONTVANGER) FLITSER INSTELLEN
[MENU 4] → [DISPLAY SETTING]
设置菜单的基本操作
态,做好准备后开始拍摄。
闪光输出补偿
B或C任意组别。)
接收器单元的设置
设置闪光(接收器)闪光灯
存储和调出自定义设置
体积: (W)79.4mm x (H)148.4mmx (L)121.5mm
产品中有害物质的名称及含量
設定發射閃光燈(接收器)
[MENU 4] → [DISPLAY SETTING]

설정 메뉴의 기본 조작
수신기 유닛 설정
플래시와 동일한 채널을 설정합니다.
크기:79.4mm(W)×148.4mm×121.5mm

DEFINIR OS DETALHES DO MODO DE FLASH
(MODE WL TX-TTL)
The Ground Truth image displays a single, solid horizontal line. According to Rule 2 (UNDERSCORE & LINE RULES), this is a stylistic or background line, not a placeholder underscore. Therefore, the OCR result must ignore it and output nothing or only meaningful text. The provided OCR content is "____", which consists of four underscores. This is an incorrect interpretation of the line as a placeholder, violating the rule that stylistic lines must be ignored. The OCR has hallucinated placeholder underscores where none exist in the GT. Hence, the OCR result is inconsistent with the Ground Truth.
DEFINIÇÕES UNIDADE RECEPTOR
DEFINIR O DISPARO (RECEPTOR) FLASH
[MENU 4] → [DISPLAY SETTING]
PAINEL LARGO
DIMENSÕES: (L)79.4mm x (A)148.4mm x (C)121.5mm
