PerfectCountry 2000 EasyMove - Barbecue CECOTEC - Free user manual and instructions
Find the device manual for free PerfectCountry 2000 EasyMove CECOTEC in PDF.

| Product type | Electric barbecue |
| Brand | Cecotec |
| Model | PerfectCountry 2000 EasyMove |
| Reference | 03113 |
| Power supply | 220-240 V~, 50/60 Hz |
| Power | 1680-2000 W |
| Protection degree | IPX4 |
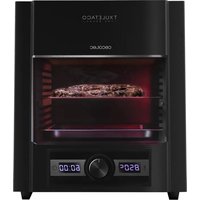
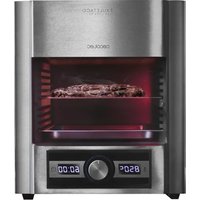
| Maximum temperature (with lid) | 215 ± 25 °C |
| Maximum temperature (without lid) | 195 ± 25 °C |
| Temperature settings | 5 levels (1 low to 5 high) |
| Plate type | Non-stick grill |
| Included accessories | Lid, handle, drip tray, side tables, food tray, wheels, wheel covers, screws and pins |
| Use | Indoor and outdoor |
| Plate cleaning | Dishwasher safe |
| Drip tray cleaning | Dishwasher safe |
| Warranty | 2 years |
| Manufacturing | Designed in Spain, made in China |
| Weight | Approximately 12 kg (estimate) |
| Dimensions (LxWxH) | Approximately 80 x 50 x 90 cm (estimate) |
Frequently Asked Questions - PerfectCountry 2000 EasyMove CECOTEC
User questions about PerfectCountry 2000 EasyMove CECOTEC
0 question about this device. Answer the ones you know or ask your own.
Ask a new question about this device
Download the instructions for your Barbecue in PDF format for free! Find your manual PerfectCountry 2000 EasyMove - CECOTEC and take your electronic device back in hand. On this page are published all the documents necessary for the use of your device. PerfectCountry 2000 EasyMove by CECOTEC.
USER MANUAL PerfectCountry 2000 EasyMove CECOTEC
natural_image
Black outdoor table with wheels and a top-mounted device, no visible text or symbolsSafety instructions 6
-
Parts and components 31
-
Before use 31
-
Product assembly 32
-
Operation 33
-
Cleaning and maintenance 35
-
Technical specifications 35
-
Disposal of old electrical appliances 35
-
Technical support and warranty 36
SOMMAIRE
Read these instructions thoroughly before using the appliance. Keep this instruction manual for future reference or new users. Make sure that the mains voltage matches the voltage stated on the rating label of the appliance and that the wall outlet is grounded.
This product is designed for household use only. Do not use it for industrial or commercial purposes.
Place the appliance on a dry, stable, flat, heat-resistant surface. Avoid placing it close to edges.
Keep a minimum free distance of 30 cm from the device to walls or other objects.
Make sure the product is properly assembled before operating it.
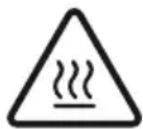
The appliance will be very hot during and immediately after operating. Use gloves or other convenient protection accessories in order to avoid burns and injuries. Keep it away from flammable substances and objects.
Do not immerse the cord, plug, or any non-removable part of the appliance in water or any other liquid, nor expose the electrical connections to water. Make sure your hands are dry before handling the plug or switching on the appliance.
Do not twist, bend, strain, or damage the power cord in any way.
Protect it from sharp edges and heat sources. Do not let it touch hot surfaces. Do not let the cord hang over the edge of the working surface or countertop.
Do not cover the plate with aluminium foil, this could damage the non-stick coating.
Do not leave the appliance unattended when switched on or still hot.
Charcoal or similar combustible fuels must not be used with this appliance.
Pull from the plug, not from the cord, to disconnect the device from the power supply.
Check the power cord regularly for visible damage. If the cord is damaged, it must be replaced by the official Technical Support Service of Cecotec in order to avoid any type of danger.
Switch off and disconnect the device from the main plug: In case of faults during use.
Before cleaning or moving the appliance from place to place. After use.
Turn off all controls before disconnecting it from the power supply.
Keep the device out of the reach of water. Do not expose it to rain, snow or other moisture conditions.
Use only parts and components provided with the original product by Cecotec.
The appliance must not be operated (disconnect the mains plug immediately) when:
The appliance, casing or power cord is damaged.
The appliance shows visible signs of damage.
A fault is suspected after the appliance has been dropped or similar.
Pay special attention to the positioning of the cord and avoid it from touching hot parts.
Allow the device to cool down completely before assembling or disassembling any of its parts.
The appliance is not intended to be used by children under the age of 12. It can be used by children over the age of 12, as long as they are given continuous supervision.
This appliance can be used by children aged 12 and above, and persons with reduced physical, sensory or mental capabilities or lack of experience and knowledge, as long as they have been given supervision or instruction concerning the use of the appliance in a safe way and understand the hazards involved. Do not allow children to play with the appliance.
Supervise children, they shall not play with the appliance. Close supervision is necessary when the appliance is being used by or near children.
INSTRUCTIONS DE SÉCURITÉ
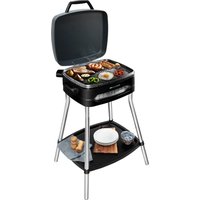
- Lid handle
- Barbecue lid
- Detachable temperature regulator with power cord
- Temperature light indicator
- Power socket
- Grill plate
- Fat-drip tray
- Grill holder
- Side food tables
- Hook
- Support tube A
- Food tray holder
- Food tray
- Support feet
- Support tube I
- Support tube J
- Wheel axis
- Wheel
- Wheel cover
Fig. 2.
A. ST4 x 12 screw (x8)
B. Pin (x2)
C. M6 x 70 screw (x4)
D. d20 × 5.2 nut (×2)
E. ST4 x 14 screw (x2)
2. BEFORE USE
Take the product out of the box.
Remove all packaging material.
Clean plates, fat drip tray and the grill cover with a soft, dampened cloth.
Dry them with a cloth or paper towel.
Operate the device at maximum temperature for 3-5 minutes without food.
Note: Smoke might be observed during first use due to residual wastes from manufacture.
Make sure the grill and the fat-drip tray are clean and dry before operating.
ENGLISH
3. PRODUCT ASSEMBLY
The food tables (9) are fixed on the grill holder (8) with a ST4*12 screw (A).
Fig. 3.
Introduce the support tubes in the holes on the grill holder. There is a fixing pin at the end of the support tube, align it with the slot on the grill holder's lower part and push it until fitted into place. A click will indicate it has been properly assembled.
Fig. 4.
Put the axle (17) through the support tube (15)(16).
Install a wheel (18) at each end of the axle (17).
Then fix the wheel (18) with the pins (B) inserted into the positioning holes at both ends of the axle (17).
Install the wheels (18) on both sides with the wheel cover (19).
Fig. 5.
The food plates (13) are respectively buckled on the food tray holder (12) of the support pipe assembly (11), (15), 16.
Set the grill holder (8) with the oil collecting tray (7) into the hook (10).
Fix the grill holder (8) and the hook (10) with M6*70(C) nuts.
Fig. 6.
Place the grill plate (6) in the grill holder (8).
Insert the power socket (5) of the grill plate into the grill holder of the socket hole. Then, lower the grill plate onto the grill holder.
Make sure it is cool and disconnected from the power.
Fig. 7.
The grill plate can only be used with this grill holder.
Warning: Do not unscrew these plastic feet under the grill plate. Removing the plastic feet would reduce the gap between the grill plate and the base, which could cause the base to melt.
Use two m4x14 screws and stainless-steel flat washers to screw clockwise the grill handle and cover.
Fig. 8.
Insert the power plug into the wall socket.
Make sure the product is properly assembled before operating it.
Fig. 9.
If there is no need to use the barbecue feet, just assemble the grill plate to the grill holder and connect the power cord.
4. OPERATION
Connect the appliance to the power supply.
Set the temperature regulator to the required temperature level. There are 5 temperature settings, from 1 (low) to 5 (high).
The product reaches a maximum temperature of 215 +/- 25 °C with the cover in place and of 195 +/- 25 °C without it.
The BBQ electric grill with the grill plate (6) and grill holder (8) can be used separately and can be moved indoors.
Recommendation: Do not place the lid to use the barbecue inside the house.
Warning: The grill plate (6) must only be used together with the product's grill holder (8).
Fig. 10.
Note: It usually takes about 3 minutes to preheat. Preheating is faster with the cover in place. The temperature indicator light will turn off as soon as the required temperature has been reached.
Place the food to be grilled on the grill plate.
To turn the device off, turn the temperature regulator to the minimum position and then disconnect it form the power supply.
Fig. 11.
Cooking time and temperature table
Note: The cooking time will depend on different factors.
| Food Temperature Cooking time (minutes) | ||
| Steak/beef High 10-15 | ||
| Lamb High 8-13 | ||
| Chicken thighs High 15-20 | ||
| Chops High 20-25 | ||
| Chicken wings High 9-15 | ||
| Pork fillets Medium-high 7-8 | ||
| Whole fish High 8-11 | ||
| Kebab Medium-high 7-9 | ||
| Sausages | Medium-high 8-10 | |
| Green bell pepper | Medium-high 5-10 | |
| Onion | Medium-high 10-15 |
ENGLISH
| Mushrooms Medium-high 5-10 | ||
| Potato Medium-high 10-15 |
Indoor or outdoor use
Do not screw down the plastic feet under the grill plate. This would reduce the reasonable gap between the grill plate and the grill holder, which would lead to melting of the plastic parts.
This could lead to serious injuries and damage to the appliance.
Warnings:
Place the cord in such way that it is not dangerous and people do not trip over.
Remember to disconnect the device after use.
The barbecue can also be used indoors as a griddle.
If the device is going to be used inside the house, make sure to place at a minimum distance of 30 cm from walls and other objects.
To remove it from the rest of the unit, hold it from the handles and lift it.
Place it on a heatproof surface.
The device can be used indoors as a grill-griddle. Simply hold the product from the handles and take it inside.
Note: It is not recommended to place the cover when using it indoors.
Outdoors use
Fig. 13.
Grilling tips
Always use tongs to turn grilled food. Using a fork to turn
the food will dry it out and damage the non-stick coating.
Only turn meat and fish once during grilling. There is no need to turn it more than once, as it dries food out.
Never cook meat for too long. Even pork is better if it is served when it is still a little pink and juicy.
If cooked food sticks to the grill plate, rub the plate with a piece of kitchen paper soaked in oil from time to time.
Meat will be more tender when marinated in the refrigerator over night before cooking. You can make your own marinade from oil (to aid moistness), vinegar, fruit juice or wine (to tenderise) and a mixture of seasonings for flavor.
5. CLEANING AND MAINTENANCE
Turn off, unplug the product and allow it to cool down before cleaning.
Remove the temperature regulator and power cord from the device.
Clean the handle with warm water and a damp cloth.
Fat splashes can be removed with a mild cleaning agent.
Do not immerse the product in water or other liquid.
Never use strong detergents, gasoline, abrasive powder or metal brush to clean any part of the product.
Do not hold or transport the device while it is hot.
Protect the appliance from dust and dirt if it is not to be used for a prolonged period of time.
Dry thoroughly and wrap it in a plastic bag or store it in its original box.
Store it in a cool and dry place.
The plate and fat-drip tray are dishwasher safe.
6. TECHNICAL SPECIFICATIONS
Model: PerfectCountry 2000 EasyMove
Product reference: 03113
1680-2000 W, 220-240 V\~50/60 Hz
Degree of protection: IPX4
Made in China | Designed in Spain
7. DISPOSAL OF OLD ELECTRICAL APPLIANCES
The European directive 2012/19/EU on Waste Electrical and Electronic Equipment (WEEE), specifies that old household electrical appliances must not be disposed of with the normal unsorted municipal waste. Old appliances must be collected separately, in order to optimise the recovery and recycling of the materials they contain and reduce the impact on human health and the environment.
The crossed out "wheeled bin" symbol on the product reminds you of your obligation to dispose of the appliance correctly.
Consumers must contact their local authorities or retailer for information concerning the correct disposal of old appliances and/or their batteries.
ENGLISH
8. TECHNICAL SUPPORT AND WARRANTY
This product is under warranty for 2 years from the date of purchase, as long as the proof of purchase is submitted, the product is in perfect physical condition, and it has been given proper use, as explained in this instruction manual.
The warranty will not cover the following situations:
The product has been used for purposes other than those intended for it, misused, beaten, exposed to moisture, immersed in liquid or corrosive substances, as well as any other fault attributable to the customer.
The product has been disassembled, modified, or repaired by persons, not authorised by the official Technical Support Service of Cecotec.
Faults deriving from the normal wear and tear of its parts, due to use.
The warranty service covers every manufacturing defects of your appliance for 2 years, based on current legislation, except consumable parts. In the event of misuse, the warranty will not apply.
If at any moment you detect any problem with your product or have any doubt, do not hesitate to contact Cecotec Technical Support Service at +34 963 210 728.
1. PIÈCES ET COMPOSANTS
Img. 1.
Made in China | Designed in Spain
7. RECYKLING SPRZĘTU AGD
Fig./Img./Abb./Rys./Obr.1
| A ST4×12_8PCS | B Pin_2PCS | C M6×70_4PCS | D φ20*φ5.2 2PCS |
| E ST4×14_2PCS |
Fig./Img./Abb./Rys./Obr. 2
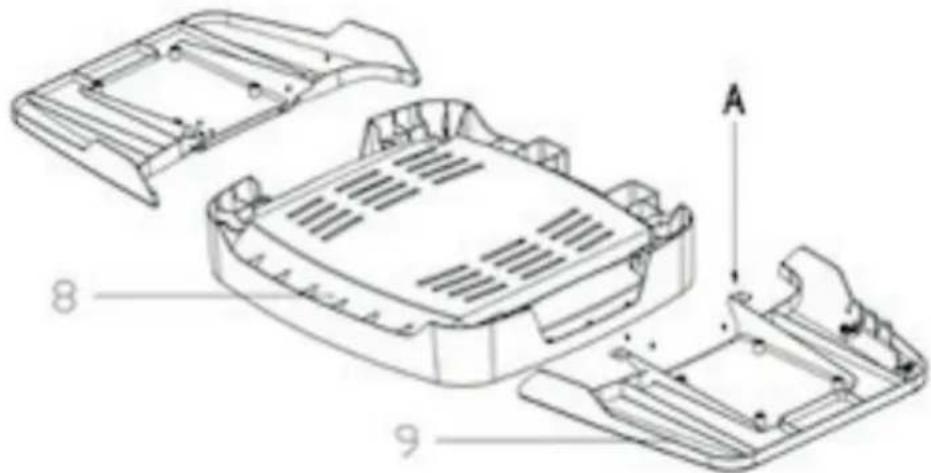
Fig./Img./Abb./Rys./Obr. 3
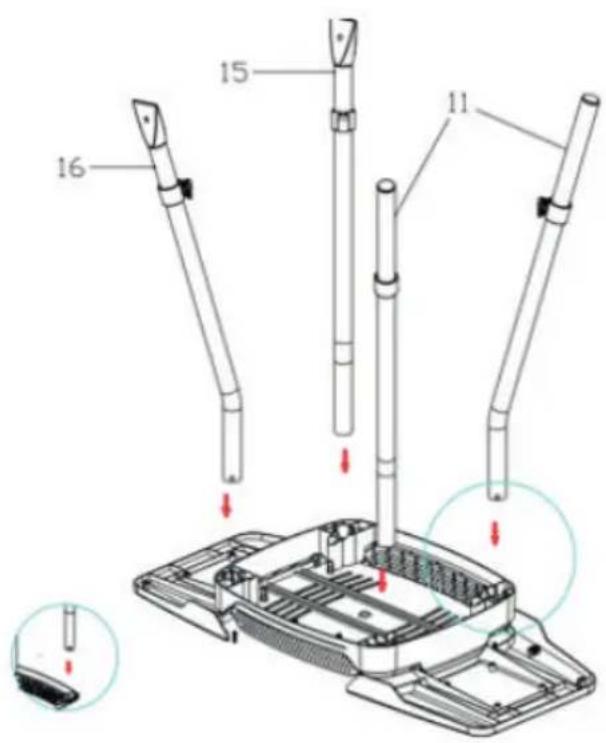
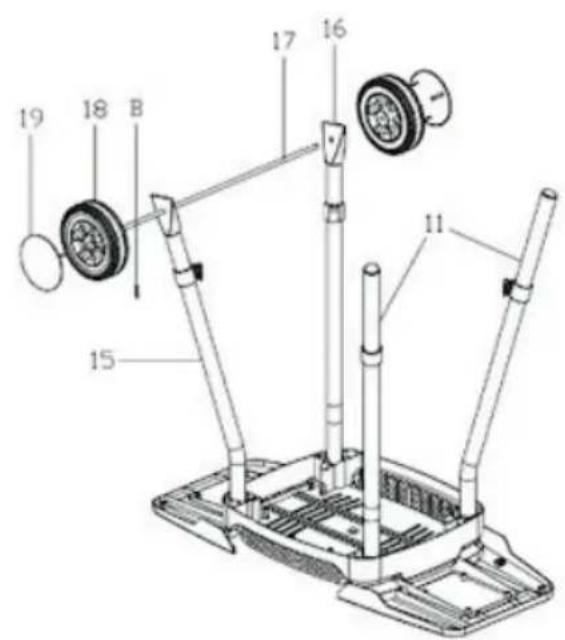
Fig./Img./Abb./Rys./Obr. 4 Fig./Img./Abb./Rys./Obr. 5
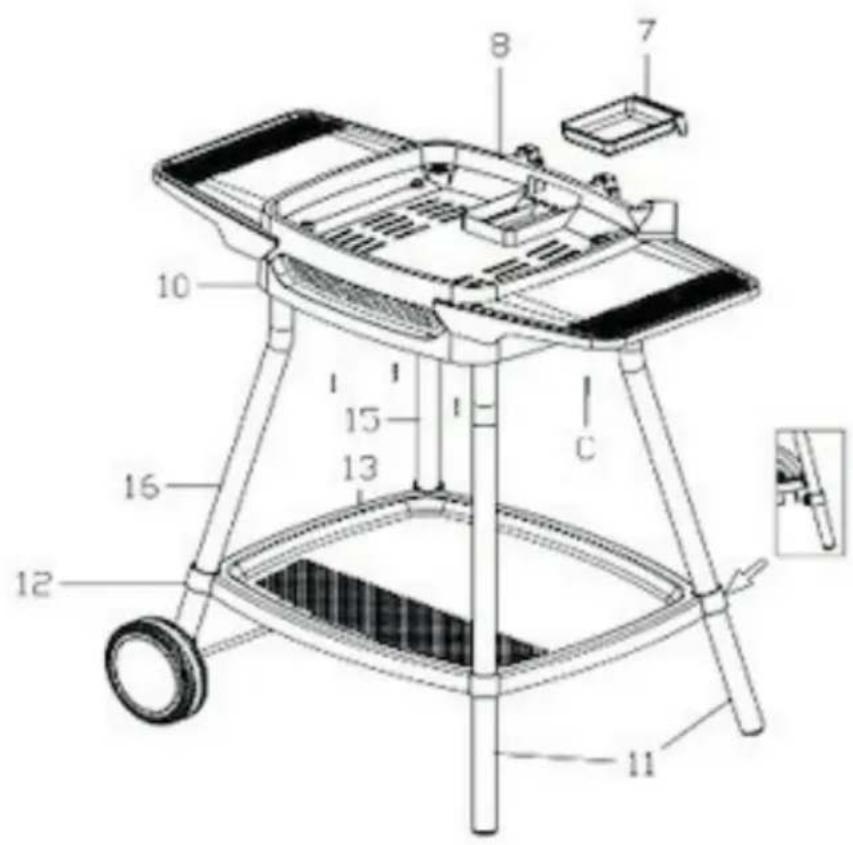
Fig./Img./Abb./Rys./Obr. 6
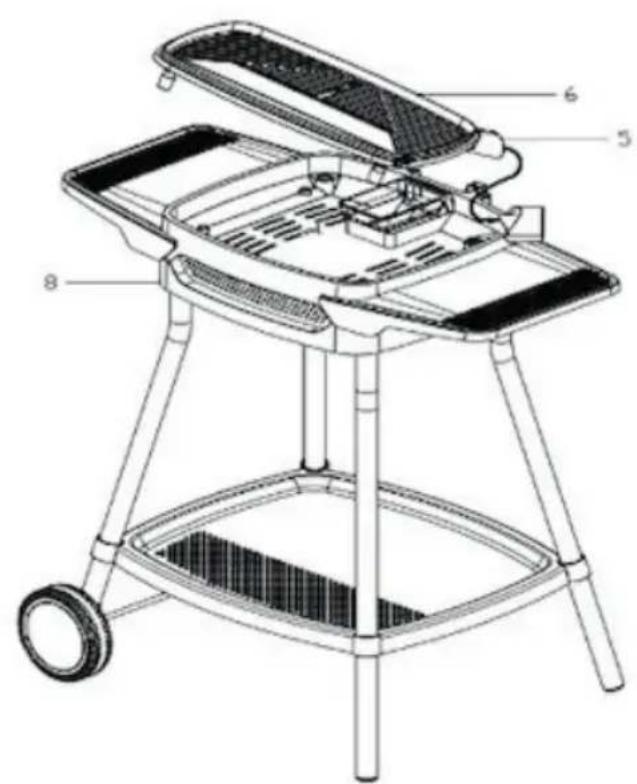
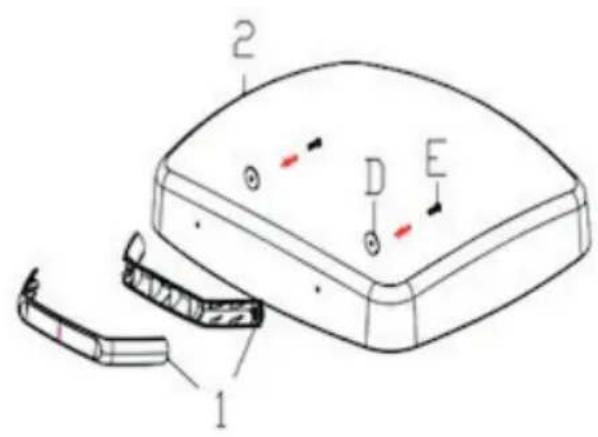
Fig./Img./Abb./Rys./Obr. 8
Fig./Img./Abb./Rys./Obr.7

natural_image
Technical line drawing of a two-tiered outdoor grill with labeled components (no text or symbols present)Fig./Img./Abb./Rys./Obr. 9 Fig./Img./Abb./Rys./Obr. 10

natural_image
Line drawings of a camera module, a house icon, and a car table (no text or symbols)Fig./Img./Abb./Rys./Obr. 11 Fig./Img./Abb./Rys./Obr. 12

natural_image
Line drawing of a portable grill with a side-mounted dish and wheels, no text or symbols presentFig./Img./Abb./Rys./Obr.13
www.cecotec.es