
8000 Series EP8757 - Coffee machine PHILIPS - Free user manual and instructions
Find the device manual for free 8000 Series EP8757 PHILIPS in PDF.

| Product Type | Fully automatic coffee machine |
| Brand | Philips |
| Model | 8000 Series EP8757 |
| Dimensions (W x H x D) | 251 x 389 x 452 mm |
| Weight | 8.5 - 9 kg |
| Water tank capacity | 1.9 L |
| Bean hopper capacity | 275 g |
| Grounds container capacity | Up to 12 portions |
| LatteGo Pro capacity | 250 ml |
| Maximum cup height | 88 - 145 mm |
| Power cord length | 800 - 1200 mm |
| Power supply voltage | 220 - 240 V, 50 - 60 Hz |
| Main functions | Beans and ground coffee, hot water, hot and cold lattes, cold and frappe drinks, extra shot, barista assistant, Wi-Fi, HomeID app, personalized profiles, 12 grind levels |
| Cleaning and maintenance | Removable brew group (partial dishwasher-safe), LatteGo Pro (dishwasher-safe), AquaClean filter, automatic descaling, rinse program |
| Safety | Adjustable auto switch-off (15, 30, 60 or 180 min), Eco mode |
| Spare parts and accessories | AquaClean filter, degreasing tablets, Philips descaling solution |
| Connectivity | Wi-Fi 2.4 GHz, HomeID app (iOS/Android), Alexa compatible |
| Beverage types | Espresso, cappuccino, latte macchiato, filter coffee, ristretto, iced coffee, etc. |
Frequently Asked Questions - 8000 Series EP8757 PHILIPS
User questions about 8000 Series EP8757 PHILIPS
0 question about this device. Answer the ones you know or ask your own.
Ask a new question about this device
Download the instructions for your Coffee machine in PDF format for free! Find your manual 8000 Series EP8757 - PHILIPS and take your electronic device back in hand. On this page are published all the documents necessary for the use of your device. 8000 Series EP8757 by PHILIPS.
USER MANUAL 8000 Series EP8757 PHILIPS
BrewExtract Technology
English 5
Čeština 23
Dansk 42
Deutsch 61
Eesti 82
Español 100
Français 120
Hrvatski 140
Italiano 160
Latviešu 181
Lietuviškai 200
Magyar 219
Nederlands 239
Norsk 259
Polski 277
Português 296
Română 316
Shqip 336
Slovenščina 356
Slovensky 375
Srpski 395
Suomi 414
Svenska 433
Türkçe 452
Ελληνικά 471
Български 494
Македонски 516
Українська 537
הכלה 558
Contents
Machine overview (Fig. A) 5
Control panel (Fig. C) 5
Introduction 6
Before first use 6
AquaClean water filter 8
Brewing drinks 8
Personalizing drinks 11
Creating a profile 11
Adjusting machine settings 11
Removing and inserting the brew group 12
Cleaning and maintenance 13
Descaling procedure 14
Ordering accessories 15
Troubleshooting 15
Technical specifications 22
Machine overview (Fig. A)
A1 Control panel A10 Service door
A2 Cup holder A11 Data label with type number
A3 Pre-ground coffee compartment A12 Water tank
A4 Lid of bean hopper A13 Hot water spout
A5 Adjustable coffee spout A14 Coffee grounds container
A6 Socket for power cord A15 Front panel of coffee grounds container
A7 Grind setting knob A16 Drip tray cover
A8 Coffee bean hopper A17 Drip tray
A9 Brew group A18 'Drip tray full' indicator
Accessories
A19 Power cord A22 Water hardness test strip
A20 AquaClean water filter A23 LatteGo Pro hot milk system
A21 Measuring scoop A24 LatteGo Pro cold milk system
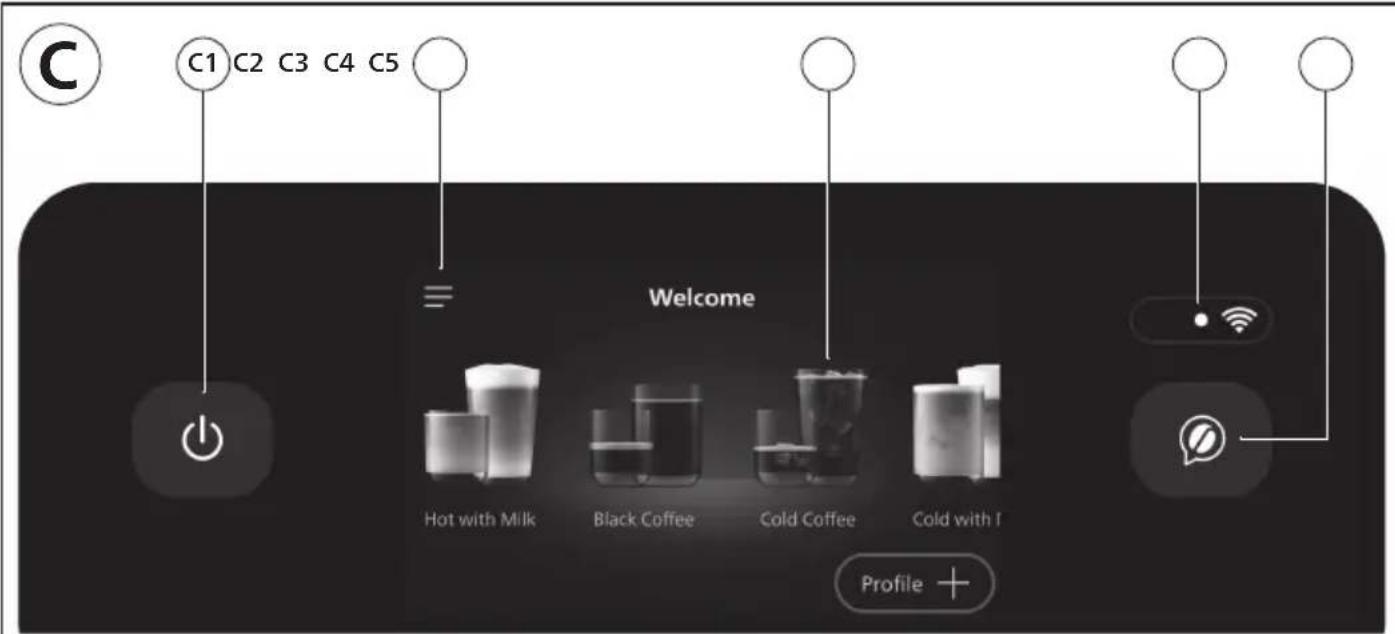
Control panel (Fig. C)
Refer to figure C for an overview of all buttons and icons. Below you find the description.
C1 On-off C2 Menu C3 Drink categories
C4 Wi-Fi icon C5 Barista assistant
Introduction
Congratulations on your purchase of a Philips fully automatic coffee machine! To fully benefit from the support that we offer, please register your product at www.home.id.
Read the separate safety booklet carefully before you use the machine for the first time and save it for future reference.
i Ensure that the drip tray cover (A16) is properly fitted into the drip tray (A17) by simply pressing it.
Before first use, rinse with hot water all removable accessories destined to come into contact with water or milk. Switch on the machine and follow the instructions displayed to set up the machine. To help you get started and to get the best out of your machine, Philips offers support in multiple ways.
1 The Quick Start Guide with picture-based usage instructions and information on cleaning and maintenance.
2 The separate safety booklet with instructions on how to use the machine in a safe way.
3 For online support (this extended user manual, frequently asked questions, videos, etc.), scan the QR code on the cover of this booklet to download the HomeID App, or visit www.home.id/support.
i This machine has been tested with coffee. Although it has been carefully cleaned, there may be some coffee residues left. We guarantee, however, that the machine is absolutely new.
The machine automatically adjusts the amount of ground coffee that is used to make the best-tasting coffee. You should brew 5 coffees initially to allow the machine to complete its self-adjustment.
When the machine has finished brewing, it switches off automatically to save energy after default time of 15 minutes.
Before first use
Setting up the machine
Assembling LatteGo Pro

flowchart
graph LR
    A["Start"] --> B["Insert Seatbelt"]
    B --> C["Close Pin"]
    C --> D["Click"]
    D --> E["Close Pin"]
    E --> F["Close Pin"]
    F --> G["Check Button"]
Setting the water hardness
For best coffee experience, use fresh water. For the best coffee taste and the machine longevity, do not fill water tank with demineralized, distilled or mineral water.
We advise you to adjust the water hardness setting to the water hardness level in your region for optimal performance and a longer lifetime of the machine. This also prevents you from having to descale the machine too often. The default water hardness setting is 4 red squares; hard water.
Use the water hardness test strip supplied in the box to determine the water hardness in your region:
1 Immerse the water hardness test strip in tap water or hold it under the tap for 1 second (Fig. 1).
2 Wait 1 minute (Fig. 2).
3 Scroll to select the water hardness level. The number of red squares on the screen should match the number of red squares on the test strip.
4 Confirm.
i Yon can re-set water hardness later under the Menu by tapping "Machine Settings" and scrolling to select "Water Hardness".
Connecting the machine to the HomeID App
i Make sure that you connect your machine to a 2.4 GHz home Wi-Fi network.
1 Download the Philips HomeID App.
- Scan the QR code on the cover or on your Quick Start Guide, or search for Philips HomeID in the Google Play Store (Android) or App Store (iOS).
2 Add your machine.
- Open the HomeID App on your smartphone and follow the instructions until you see "Add Appliance
- Select your coffee machine.
3 Pair via Wi-Fi.
- Make sure your smartphone's Wi-Fi is enabled.
- Follow the steps on your App to complete setup.
Once connected, you become the owner of the machine. You can share access with others by inviting them via the App.
We recommend downloading the HomeID App and adding your machine to the App as soon as you set up your machine for the first time. This enables you to get the best coffee experience, such as:
- Barista assistant feature to get personal recommendations and help on adjusting coffee to your taste, choosing the right beans, exploring new drinks and much more
- Customize and brew drinks remotely
-
Set a timer for your machine to wake up
-
Access over 75 coffee-based recipes
- Use Alexa if available in your country to turn your machine on and brew
- Personalize your profile even more
- Get access to customer support
- Receive latest firmware updates
AquaClean water filter
Your machine is AquaClean enabled. You can place the AquaClean water filter in the water tank to preserve the taste of your coffee. It also diminishes the need for descaling by reducing limescale build-up in your machine. You can purchase an AquaClean water filter from your local retailer*, from authorized service centers or online at https://www.home-appliances.philips/parts-accessories.
i *Availability varies per country.
Activating the AquaClean water filter (5 min.)
i The machine does not automatically detect that a filter has been placed in the water tank. Therefore you need to activate each new AquaClean water filter that you install in the "Maintenance" menu.
When the machine stops showing the filter activation message, you can still activate an AquaClean water filter, but you will need to descale the machine first.
Your machine has to be completely limescale-free before you start using the AquaClean water filter.
Before activating the AquaClean water filter, you have to prepare it as described on the screen.
1 Under the Menu, tap "Maintenance" and "Remove limescale".
2 Tap "AquaClean", tap "Install" and follow the steps on the screen.
i Soak the filter in water. Otherwise, air might be drawn into the machine instead of water, which makes a lot of noise and prevents the machine from being able to brew coffee.
Replacing the AquaClean water filter (5 min.)
After 95 liters of water have flowed through the filter, the filter will cease to work. The machine will remind you to replace the filter. If you do not replace the filter in time, you need to descale the machine.
1 Take out the old AquaClean water filter.
2 Install a new filter and activate it as described in chapter 'Activating the AquaClean water filter (5 min).'
i We advise you to replace the AquaClean water filter at least every 3 months, even if the machine does not yet indicate that replacement is required.
Brewing drinks
General steps
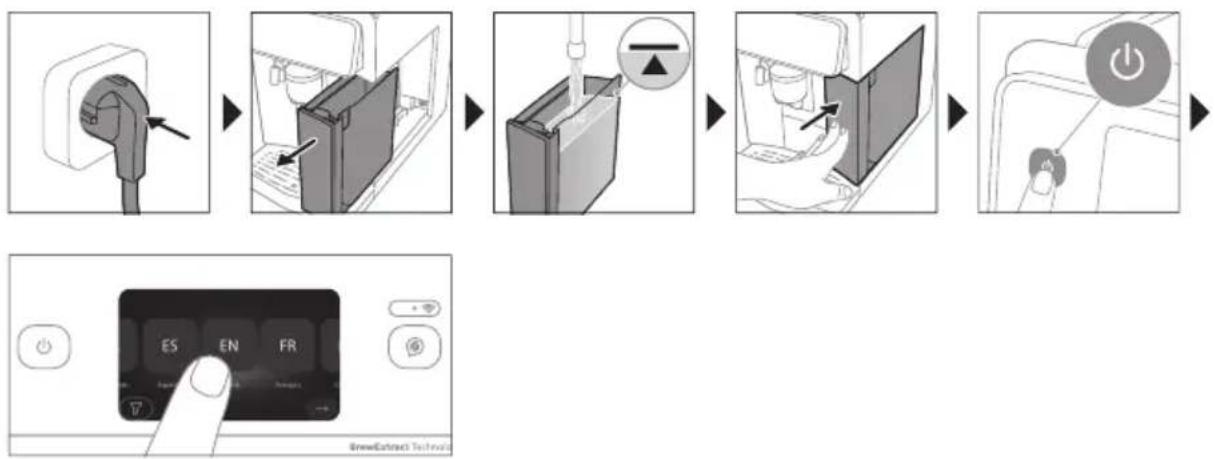
1 Switch on the machine and follow the guidelines from the screen (Fig. 3).
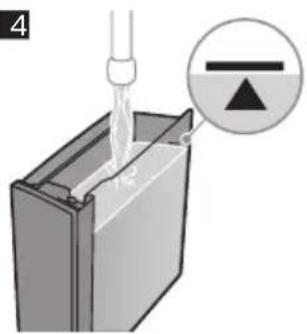
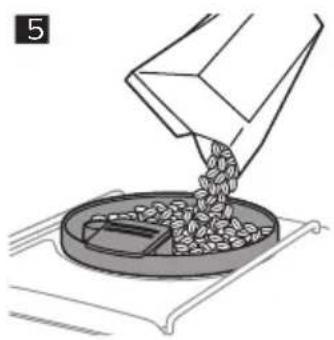
2 Fill the water tank with fresh cold water (Fig. 4) and fill the bean hopper with fresh beans (Fig. 5).
3 Place a cup under the adjustable coffee spout (Fig. 6).
Use the water in the water tank within 1 to 2 days. If the machine is not used for 3 days or longer, empty the water tank, rinse it thoroughly and refill with fresh potable water before making any drink.
Brewing coffee with beans
1 To brew a coffee, tap a category and select a drink.
- You can now adjust the drink to your personal taste using the Customize Icon.
2 Tap the Play ▶ on at any time to start brewing the selected drink.
3 To stop dispensing drink before the machine has finished, tap the Stop icon.
Do not use caramelized or flavored coffee beans to avoid damage of your coffee machine.
Brewing milk-based drinks with LatteGo Pro
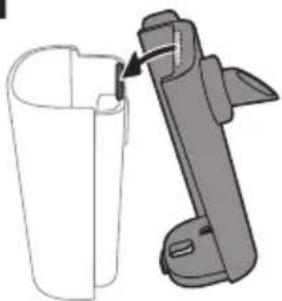
LatteGo Pro hot and cold milk systems consist of a milk container, a frame and a storage lid. To avoid leakage, make sure the frame and the milk container are properly assembled before you fill the milk container.
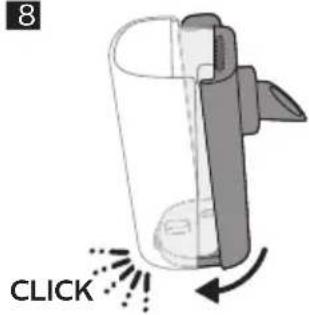
1 To assemble LatteGo Pro, first insert the top of the milk container under the hook at the top of the frame (Fig. 7). Then press home the bottom part of the milk container. You hear a click when it locks into place (Fig. 8).
i Make sure that the milk container and the frame are clean before you connect them.
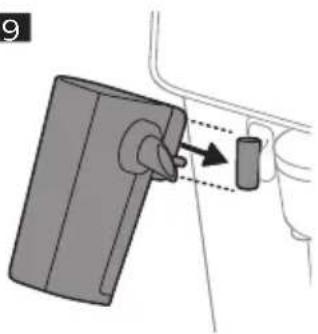
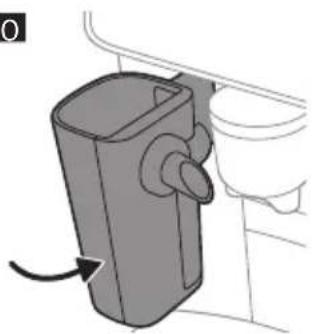
2 Slightly tilt LatteGo Pro and put it on the hot water spout (Fig. 9). Then press it home until it locks into place (Fig. 10).
3 Fill the milk container with milk. Do not fill it beyond the maximum indication (Fig. 11).
Always use milk coming directly from the fridge for optimal results.
4 Place a cup on the drip tray under the LatteGo Pro and adjustable coffee spout.
5 Tap a category and select a drink.
- You can now adjust the drink using the Customize icon.
6 Tap the Playlon.
- To stop dispensing milk before the machine has dispensed the preset amount, tap the Skip icon.
- To stop dispensing the complete drink before the machine has finished, tap the Stop icon.
LatteGo Pro cold system is the best choice for cold drinks, together with fully-skimmed milk.
Brewing cold drinks
Cold drinks are brewed slowly (some minutes) without heat. You will enjoy a smooth, sweet and less acidic coffee.
i We recommend to fill water tank with fresh cold water before making any cold drinks.
Brewing iced drinks
Iced drinks are brewed at a lower temperature and slower speed, resulting in a slightly sweeter and tangy flavor.
Add ice cubes for a more refreshing result.
Match with cold milk froth for the best taste experience.
Special functions
ExtraShot
When you have selected the ExtraShot function, you can only brew one coffee at the time.
Your machine offers you the possibility to add an extra shot of Ristretto to your coffee and milk drinks, for example if you want to have a stronger coffee.
1 Place a cup under the the adjustable coffee spout.
2 Select a drink by scrolling and tapping on the screen.
3 Tap the Customize icon on the screen.
4 Tap the ExtraShot Icon and tap the Play ic to start brewing the drink.
5 To stop dispensing the drink before the machine has finished, tap the Stop icon.
Pre-Ground coffee
When you have selected the Pre-Ground function, you can only brew one coffee at the time.
i Never load more than one level measuring scoop of pre-ground coffee. We advise you to use the provided measuring scoop and use fine ground coffee which is used for espresso.
You can choose to use pre-ground coffee instead of beans, for example if you prefer a different coffee variety or decaffeinated coffee.
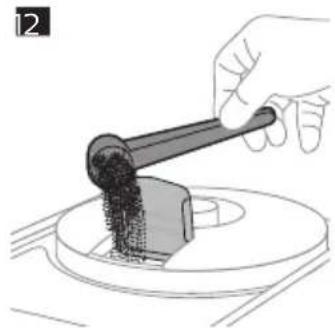
1 Open the lid of the pre-ground coffee compartment and pour one leveled measuring scoop of pre-ground coffee into it (Fig. 12). Then close the lid.
2 Select a drink by scrolling and tapping on the screen.
3 Tap the Customize 🏠️ icon on the screen.
4 Tap the pre-ground coffee icon and tap the Play icon to start brewing the drink.
5 To stop dispensing coffee before the machine has finished, tap the Stop icon.
Barista assistant
To fully benefit from this feature and get the best experience, ensure your coffee machine is connected to the HomeID App.
Barista assistant is your personal coffee guide, helping you get the most out of every cup through tailored settings, expert tips and bean recommendations, including:
- Adjusting settings to your beans
- Drink rate and review
- Bean suggestions
- Grinding settings information
- Tips and Tricks
- Special recipes
1 Open the HomeID App on your phone.
2 Tap the pop-up barista 🔒 icon to start interacting with the barista assistant to personalize your coffee experience.
Barista assistant helps you get the best taste from your coffee beans by automatically fine-tuning machine settings based on the bean type and roast level you use.
1 Press the barista assistant @ button on the machine.
2 Tap "Start now" and follow the guided questions from the barista assistant.
3 Select the type of beans. You can choose between 100% Arabica and mix of Arabica/Robusta.
4 Select the roasting level of your beans among light, medium and dark.
5 Tap "Adjust now". The brewing settings are optimized automatically.
- Enjoy your next coffee.
i You can simply press the barista assistant ⓣ button again when you change your coffee beans.
Dispensing hot water
i Hot water cannot be dispensed from the App.
1 If attached, remove LatteGo Pro.
2 Place a cup under the hot water spout.
3 Tap "Hot water".
4 Adjust quantity and temperature using the Customize Icon.
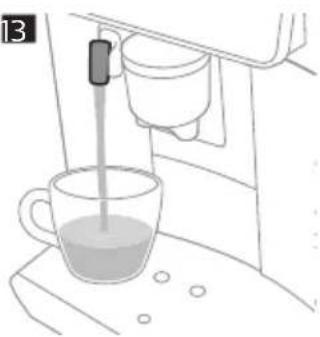
5 Tap the Play 📋. Hot water is dispensed from the hot water spout (Fig. 13).
6 To stop dispensing hot water before the machine has finished, tap the Stop icon.
Personalizing drinks
The machine allows you to adjust the settings of a drink to your own preference.
1 Select a drink by scrolling and tapping on the screen.
2 Tap the Customize icon on the screen.
3 Adjust settings according to the selected drink: volume, strength and temperature where available.
i Adjustable settings depend on the selected drink.
Creating a profile
1 On the home screen, tap "Profile +".
2 Scroll through the available profiles and select color.
3 Tap Icon to continue.
4 Scroll and select up to 8 favorite drinks.
5 Tap a preferred drink.
6 Tap to continue.
- Now your profile is made, you may edit it again every time you want.
i In case you do not select any profile, you can still personalize the settings to your own preference but the recipes you brew will not be stored.
Adjusting machine settings
Adjusting grinder setting
By adjusting the grinder, you may personalize your coffee to perfectly match your taste preferences.
- Level 1-6 (Fig. 14)
- Finer grinder setting
- The best setting if you like stronger and more bitter taste
- Ideal for short drinks or traditional milk-based recipes such as Espresso, Ristretto and Cappuccino
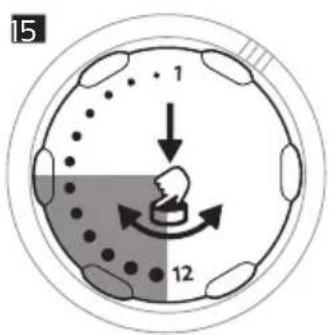
- Level 7-12 (Fig. 15)
- Coarser grinder setting
- The best setting if you like weaker and sourer taste
- Ideal for long drinks such as Coffee, Iced Coffee and Cold Brew
For more information, please visit www.home.id.
The machine has been set up to get the best taste out of your coffee beans. Therefore we advise you not to adjust the grind setting until you have brewed 100-150 cups (approx. 1 month of use).
i You can only adjust the grinder settings when the machine is grinding coffee beans. You need to brew 2 to 3 drinks before you can taste the full difference.
Do not turn the grinder setting knob more than one notch at a time to prevent damage to the grinder.
1 Place a cup under the adjustable coffee spout.
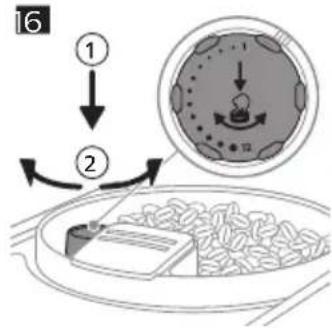
2 Open the lid of bean hopper.
3 Select a drink from the control panel and tap the Play Hall.
4 When the grinder starts grinding, press down the grinder setting knob and turn it to the left or right (Fig. 16).
Adjusting other machine settings
By tapping the Machine Settings icon, you can adjust the following machine settings:
- Water hardness: select between 5 levels according to the water hardness in your region
- Standby time: select 15, 30, 60 or 180 min
- Display brightness: select low, medium or high
- Display back light: select 'always on' or 'dim after 3 mins'
- Cup light: select 'always off', 'always on', 'always dimmed' or 'on while brewing'
- Language
- Sound: activate or deactivate the beeping sound of the machine
- Measuring units: select ml. or oz.
- Rinsing: activate or deactivate an automatic rinsing cycle when you switch on the machine
- Home screen: select 'show drinks overview' or 'show last used profile'
- Eco mode: activate or deactivate automatic adjustment of your settings to the most energy efficient option
- Factory settings: reset your machine to default settings
Restoring factory settings
The machine offers you the possibility to restore the factory settings at any moment.
1 Under the Menu, tap "Machine Settings" and "Factory Settings".
2 Tap "Reset" and confirm.
- The settings are now being restored.
i All the following machine settings will be restored except statistics: water hardness, standby time, display brightness, display back light, cup light, language, sound, measuring units, rinsing, home screen, eco mode.
In addition, stored Wi-Fi credentials and pairing with HomeID account will be lost.
Removing and inserting the brew group
Go to www.home.id/support for detailed video instructions on how to remove, insert and clean the brew group.
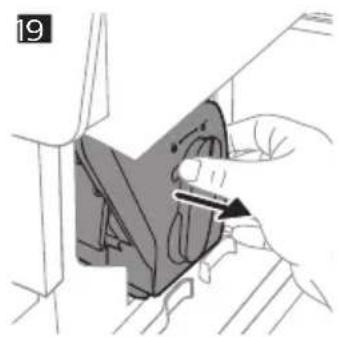
Removing the brew group from the machine
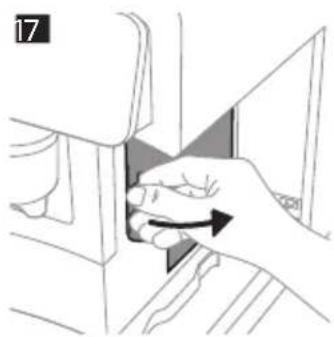
1 Remove the water tank and open the service door (Fig. 17).
2 Unlock the brew group by moving the yellow handle to the right (Fig. 18).
3 Slide the brew group from the machine (Fig. 19).
Reinserting the brew group
1 Slide the brew group back in until it clicks in the position (Fig. 20).
2 Lock the brew group by moving the yellow handle to the left (Fig. 21).
3 Close the service door and place the water tank back into the machine.
Cleaning and maintenance
Regular cleaning and maintenance keeps your machine in top condition and ensures good-tasting coffee for a long time with a steady coffee flow.
Consult the table below for a detailed description on when and how to clean all detachable parts of the machine. You can find more detailed information and video instructions on www.home.id/support. See figure B for an overview of which parts can be cleaned in the dishwasher.
Detachable parts When to clean How to clean
| Brew group Weekly Remove the brew group from the machine. Rinse it under the tap (see 'Cleaning the brew group under the tap'). | ||
| Brew group Monthly Clean the brew group with the Philips coffee oil remover tablet (see 'Cleaning the brew group with the coffee oil remover tablets'). | ||
| Pre-ground coffee compartment | Check the pre-ground coffee compartment weekly to see if it is clogged. | Unplug the machine and remove the brew group. Open the lid of the pre-ground coffee compartment and insert the spoon handle into it. Move the handle up and down until the clogged ground coffee falls down (Fig. 22). Go to www.home.id/support for detailed video instructions. |
| Coffee grounds container | Empty the coffee grounds container when prompted by the machine. Clean it weekly. | Remove the coffee grounds container while the machine is switched on. Rinse it under the tap with some washing-up liquid or clean it in the dishwasher.The front panel of the coffee grounds container (Fig. A15) is not dishwasher-safe. |
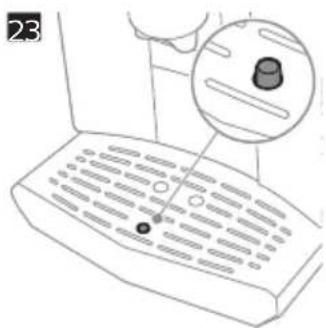
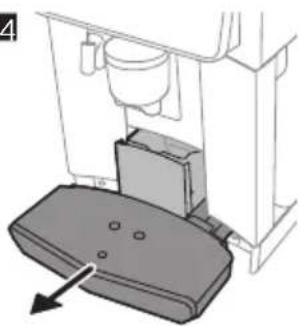
| Drip tray Empty the drip tray daily or as soon as the red 'drip tray full' indicator pops up through the drip tray (Fig. 23). Clean the drip tray weekly. | Remove the drip tray (Fig. 24) and rinse it under the tap with some washing-up liquid or clean it in the dishwasher.The front panel of the coffee grounds container (Fig. A15) is not dishwasher-safe. | |
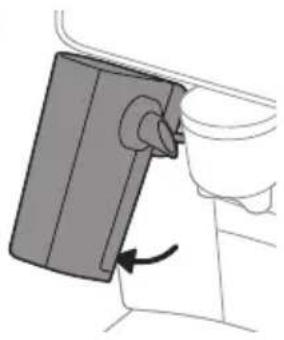
| LatteGo Pro After every use Clean LatteGo Pro attached to the machine by using the 'Clean LatteGo Pro' program (see 'Cleaning LatteGo Pro'). Remove it from the machine (Fig. 25) and rinse it under the tap or clean it in the dishwasher. | ||
Detachable parts When to clean How to clean
Water tank Before every refill Rinse the water tank under the tap before refilling with fresh water.
Machine front Weekly Clean with a non-abrasive cloth.
Cleaning the brew group
Regular cleaning of the brew group prevents coffee residues from clogging up the internal circuits. Visit www.home.id/support for support videos on how to remove, insert and clean the brew group.
Cleaning the brew group under the tap
1 Remove the brew group.
2 Rinse the brew group thoroughly with water and remove any coffee residues left on the brew group flap (Fig. 26).
3 Place the brew group back into the machine (Fig. 20).
Do not dry the brew group with a dry cloth to prevent fibers from collecting inside.
Cleaning the brew group with the coffee oil remover tablets
To clean the brew group, we recommend to use Philips coffee oil remover tablets if available in your country.
1 Under the Menu, tap "Maintenance" and "Remove Coffee Oil".
2 Follow the steps on the screen.
- Tap the Play ▶on.
Cleaning LatteGo Pro
Quickly cleaning LatteGo Pro
1 Make sure LatteGo Pro is properly attached to the machine.
2 Place a cup under the hot water spout.
3 Under the Menu, tap "Maintenance" and "Clean LatteGo Pro".
4 Tap "Start" and follow the steps on the screen.
- Small jets of hot water will be dispensed by the LatteGo Pro.
5 Store LatteGo Pro with the remaining milk in the fridge.
Thoroughly cleaning LatteGo Pro
1 Remove LatteGo Pro from the machine.
2 Pour out any remaining milk.
3 Press the release button and remove the milk container of the LatteGo Pro you want to clean (Fig. 27).
4 Clean all parts in the dishwasher or under the tap with lukewarm water and some washing-up liquid.
Descaling procedure
To clean and descale the machine, we recommend to use the Philips maintenance products if available in your country. Under no circumstances should you use a descaler based on sulfuric acid, hydrochloric acid, sulfamic or acetic acid (vinegar) as this may damage the water circuit in your machine and not dissolve the limescale properly. Failure to descale the appliance will also void your warranty. You can buy Philips descaling solution in the online shop at https://www.home-appliances.philips/parts-accessories.
When the machine needs descaling, the machine will advise you to descale.
1 Under the Menu, tap "Maintenance" and "Remove Limescale".
2 Tap "Descale" and follow the steps on the screen.
Tip: Using the AquaClean filter reduces the need for descaling!
What to do if the descaling procedure is interrupted
i You can exit the descaling procedure by long pressing the On-off button on the control panel.
If the descaling procedure is interrupted before it is complete, do the following:
1 Empty and rinse the water tank thoroughly.
2 Fill the water tank with fresh water up to the Calc / Clean level indication and switch the machine on.
3 Before brewing any drinks, perform a manual rinsing cycle.
- Dispense half a water tank of hot water by repeatedly selecting the hot water function.
- Brew several cups of pre-ground coffee without adding ground coffee.
i If the descaling procedure is not complete, the machine will require another descaling procedure as soon as possible.
Ordering accessories
To clean and descale the machine, we advise you to use the Philips maintenance products such as descaling solution, AquaClean water filter and coffee oil remover tablets if available in your country. These products can be purchased from your local retailer, from the authorized service centers or online at
https://www.home-appliances.philips/parts-accessories. To find a full list of spare parts online, enter the model number of your machine. You can find the model number on the inside of the service door (Fig. A11).
Brita-filters are not compatible with this machine.
Troubleshooting
This chapter summarizes the most common problems you could encounter with the machine. If you are unable to solve the problem, contact the Consumer Care Center in your country or go to
www.home.id/support for support videos and a complete list of frequently asked questions.
Warning icons
Warning Solution
natural_image
Black-and-white photo of a person in a lab coat, possibly a medical or laboratory setting, with no visible text or symbols.The 'Add water' screen pops up.
- The water tank is almost empty. Fill the water tank with fresh water to the maximum level indication.
- The water tank is not in place. Place back the water tank.
Warning Solution
natural_image
Close-up of a small object with a magnified view, possibly a container or tank, against a dark background (no visible text or symbols)The 'Add beans' screen pops up.
- Fill the bean hopper with coffee beans.
natural_image
Black and white photo of a person in a suit, no visible text or symbolsThe 'Empty coffee grounds container' screen pops up.
- The coffee grounds container is full. Remove and empty the coffee grounds container while the machine is switched on. Wait 5 seconds before you place it back.
natural_image
Black and white photo of a car with visible headlights and grille lines (no text or symbols)The 'Insert brew group' screen pops up.
- The brew group is not in place or not placed correctly. Remove the brew group and make sure it is locked into place. See chapter 'Removing and inserting the brew group' for step-by-step instructions.
Error codes
Below you find a list of the error codes showing problems that you can solve yourself. Video instructions are available on www.home.id/support. If another error code appears, please contact the Philips Consumer Care Center in your country. For contact details, see the warranty leaflet.
Error code Problem Possible solution
| 01 The coffee funnel is clogged. | Switch off the machine and unplug it. Remove the brew group. Then open the lid of the pre-ground coffee compartment and insert the spoon handle (Fig. 22). Move the handle up and down until the clogged ground coffee falls down. Visit www.home.id/support for detailed video instructions. |
| 03 The brew group is dirty. Rinse the brew group with tap water and let it air-dry or dry with a soft, damp cloth. Consult chapter 'Cleaning the brew group' or visit www.home.id/support for detailed video instructions. | |
| 04 The brew group is not positioned correctly. | Remove the brew group and reinsert it. Make sure that the brew group is in the correct position before you insert it. Consult chapter 'Reinserting the brew group' or visit www.home.id/support for detailed video instructions. |
| 05 There is air in the water circuit. | Restart the machine by switching it off and on again. If this works, dispense 2-3 cups of hot water. Descale the machine if you have not done so for a longer period of time. |
| 05 The AquaClean water filter is not installed properly or is clogged. | Remove the filter and try to brew a coffee again. If this works, place the filter back into the water tank properly. If this still does not work, the filter might be clogged and needs to be replaced. |
| 11 Machine needs to adjust to room temperature | Allow some time for the machine to adjust from transport/outdoor temperature to room temperature. Switch off the machine for 30 minutes and switch it on again. If this does not work, contact the Consumer Care Center in your country. |
Error code Problem Possible solution
| 14 The machine is overheated. | Switch the machine off and switch it on again after 30 minutes. |
| 19 The machine is not connected to the wall socket properly. | Make sure that the small plug of the power cord is properly connected to the socket on the back of the machine. If this does not work, contact the Consumer Care Center in your country. |
Troubleshooting table
This chapter summarizes the most common problems you could encounter with the machine. Support videos and a complete list of frequently asked questions are available on www.home.id/support. If you are unable to solve the problem, contact the Consumer Care Center in your country. For contact details, see the warranty leaflet.
Problem Cause Solution
| There are some coffee residues inside your new coffee machine. | This machine has been tested with coffee. | Although it has been carefully cleaned, there may be some coffee residues left. However, the machine is absolutely new. |
| The drip tray cover does not fit. | The machine is not placed on a flat surface and/or the drip tray is not inserted properly. | Always put the machine on a flat and stable surface and ensure that the drip tray cover (A16) fits properly on the drip tray (A17) by simply pressing it. |
| The drip tray fills up quickly or there is always some water in the drip tray. | This is normal. The machine uses water to rinse the internal circuit and brew group. Some water flows through the internal system directly into the drip tray. | Empty the drip tray daily or as soon as the red 'drip tray full' indicator pops up through the drip tray cover. Tip: place a cup under the dispensing spout to collect rinsing water that comes out of it. |
| The 'Empty coffee grounds container' screen remains on. | You emptied the coffee grounds container while you switched off the machine or you placed it back too fast. | Empty the coffee grounds container while the machine is switched on. Remove the coffee grounds container, wait at least 5 seconds and then place it back. |
| The machine prompts to empty the coffee grounds container even though the container is not full. | The machine does not reset the counter the last time you empty the coffee grounds container. | Wait about 5 seconds when you place back the coffee grounds container. In this way the coffee grounds counter will be reset to zero and the number of coffee pucks is counted correctly. |
| Empty the coffee grounds container while the machine is switched on. If you empty the coffee grounds container when the machine is switched off, the coffee grounds counter won't reset. |
Problem Cause Solution
| The coffee grounds container is too full and the 'Empty coffee grounds container' screen does not appear. | You removed the drip tray without emptying the coffee grounds container. | When you remove the drip tray, empty the coffee grounds container even if it contains only a few coffee pucks. This ensures that the coffee pucks counter is reset to zero and that the number of coffee pucks is counted correctly. |
| You cannot remove the brew group. | The brew group is not in the correct position. | Reset the machine in the following way: close the service door and place back the water tank. Switch the machine off and back on. Try again to remove the brew group. See chapter 'Removing and inserting the brew group' for step by step instructions. |
| You cannot insert the brew group. | The brew group is not in the correct position. | Leave the brew group out and reset the machine in the following way: close the service door and place back the water tank. Switch the machine off and unplug it. Wait for 30 seconds, plug the machine back in and switch it on. Then try again to reinsert the brew group into the machine. See chapter 'Removing and inserting the brew group' for step by step instructions. |
| The coffee is watery. The brew group is dirty. Remove the brew group, rinse it under the tap and leave it to dry. | ||
| The machine is performing its self-adjustment procedure. This procedure starts automatically when you use the machine for the first time, when you change to another type of coffee beans or after a long period of non-use. | Brew 5 cups of coffee initially to allow the machine to complete its self-adjustment procedure. | |
| The grinder setting is too coarse. Adjust the grinder to a finer (lower) setting (Fig. 16). Brew 2 to 3 drinks to be able to taste the full difference (see 'Adjusting grinder setting'). | ||
| The coffee is not hot enough. | The temperature is set too low. Adjust the temperature for the desired drink using Customize it on. | |
| The automatic rinsing cycle is disabled. | Activate the automatic rinsing cycle in the Settings. The machine will heat up and perform an automatic rinsing cycle when you turn on the machine. | |
| A cold cup reduces the temperature of the coffee. | Preheat the cups by rinsing them with hot water. | |
Problem Cause Solution
| Adding milk reduces the temperature of the coffee. | Regardless of whether you add hot or cold milk, adding milk always reduces the temperature of the coffee. Preheat the cups by rinsing them with hot water. | |
| Coffee does not come out or coffee comes out slowly. | The AquaClean water filter is not prepared properly for installation. | Remove the filter and dispense some hot water. If this works, the filter was not installed properly. Reinstall and activate the filter and follow all steps in chapter 'AquaClean water filter'. |
| After a long period of non-use, prepare the filter for use again and dispense 2-3 cups of hot water. | ||
| The AquaClean water filter is clogged. | Replace the filter every 3 months or when advised by your machine. | |
| The grinder setting is too fine. Adjust the grinder to a coarser (higher) setting (Fig. 16). Note that this will impact the coffee taste (see 'Adjusting grinder setting'). Brew 2 to 3 drinks to be able to taste the full difference. | ||
| The brew group is dirty. Remove the brew group and rinse it under the tap (see 'Cleaning the brew group under the tap'). | ||
| The adjustable dispensing spout is dirty. | Clean the adjustable dispensing spout and its holes with a pipe cleaner or needle. | |
| The pre-ground coffee compartment is clogged. | Remove the brew group. Open the lid of the pre-ground coffee compartment and insert the spoon handle into it (Fig. 22). Move the handle up and down until the clogged ground coffee falls down. Place the brew group back and lock in place. Restart your machine. | |
| The machine circuit is blocked by limescale. | Descale the machine with Philips descaler when the machine prompts you. | |
| The milk does not froth. LatteGo Pro is assembled incorrectly. | Make sure that the milk container is properly assembled to the frame of LatteGo Pro (you hear 'click' sound). | |
| The milk container and/or frame of LatteGo Pro are/is dirty. | Disassemble LatteGo Pro and rinse both parts under the tap or clean them in the dishwasher. | |
Problem Cause Solution
| The type of milk used is not suitable for frothing. | Different types of milk result in different amounts of froth and different froth qualities. Use Barista types of milk for best results.- For best result with cold froth, we recommend to use skimmed milk.- For best result with hot froth, we recommend to use semi-skimmed milk. | |
| Milk is leaking from the bottom of the LatteGo Pro. | The frame and the milk container are not assembled properly. | Insert the top of the milk container under the hook at the top of the frame and press home the bottom part of the milk container. You hear a click when it locks into place. |
| The milk container and/or frame of LatteGo Pro are/is dirty. | Disassemble LatteGo Pro and rinse both parts under the tap or clean them in the dishwasher. | |
| The machine seems to be leaking. | The machine uses water to rinse the internal circuit and brew group. This water flows through the internal system directly into the drip tray, which is normal. | Empty the drip tray every day or as soon as the 'drip tray full' indicator pops up through the drip tray cover.Tip: Place a cup under the adjustable coffee spout and hot water spout to collect water. |
| The drip tray is too full and has overflowed. | Empty the drip tray every day or as soon as the 'drip tray full' indicator pops up through the drip tray cover (Fig. 24). | |
| The water tank is not fully inserted. Some water is leaking out of the water tank and air is drawn into the machine. | Remove the water tank and place it back in the correct position. | |
| The brew group is dirty or clogged. | Rinse the brew group under the tap. | |
| The machine is not placed on a horizontal surface. | Place the machine on a horizontal surface so that the drip tray does not overflow and the 'drip tray full' indicator works properly. | |
| You cannot activate the AquaClean water filter and the machine asks for descaling. | You did not replace the filter in time after the screen shows the AquaClean reminder. This means your machine is not anymore completely limescale free. | Descale your machine and install the filter. |
| The new water filter does not fit. | You install another filter than the Philips AquaClean water filter. | Only use the Philips AquaClean water filter. |
| The rubber ring on the AquaClean water filter is not in place. | Place back the rubber ring on the filter. | |
Problem Cause Solution
| The machine is making a loud noise. | It is normal that your machine makes some noise during use. | If the machine starts to make a different kind of noise, clean the brew group. |
| The AquaClean water filter is not prepared properly and air is drawn into the machine. | Remove the filter from the water tank and properly prepare it for use before you place it back. See chapter 'AquaClean water filter' for step-by-step instructions. | |
| The water tank is not fully inserted and air is drawn into the machine. | Remove the water tank and place it back in the correct position. | |
| The machine cannot connect to Wi-Fi during initial setup. | The machine and Wi-Fi router are not within range of each other. | Ensure that the machine and the Wi-Fi router are within range of each other or use a Wi-Fi repeater. |
| The Wi-Fi router is not working properly. | Ensure that the Wi-Fi router is working properly and is connected to the internet. | |
| The router your machine is trying to connect to is 5 GHz band. | 5 GHz networks are not supported. Hence make your router supporting dual bands: both 5 GHz and 2.4 GHz. | |
| The machine is experiencing connection issues. | The Wi-Fi router is not working properly. | Ensure that your Wi-Fi router is functioning correctly and is connected to the internet. |
| The Wi-Fi connectivity is interrupted by electromagnetic or other interferences. | Reduce interference by moving other devices away or switching them off. | |
| Connection with Cloud Check the Wi-Fi indicator on your machine. If it is off or blinking fast, go to Machine Settings > Connected Settings > Wi-Fi, and tap "'Forget Network" to reset. Then, reconnect your machine using the HomeID App. | ||
| The machine cannot connect to Wi-Fi after changing internet provider or router. | New router settings are not compatible with the machine. | Check if it supports 2.4 GHz Wi-Fi network. |
| The machine is still paired with your previous Wi-Fi network and cannot recognize the new router. | Reset the Wi-Fi: Go to Machine Settings > Connected Settings > Wi-Fi, and tap "Forget Network". Reconnect your machine using the HomeID App. | |
| Other users are not able to control the machine via the App. | You haven't received or accepted a sharing invitation from the machine owner. | Ensure you have received and accepted a sharing invitation from the machine owner. |
Problem Cause Solution
| Other users can no longer control the machine via the App. | The machine owner has removed the machine from their HomeID App account. | Open the HomeID App and follow the pairing process under 'Add Appliance'. Once paired, the user becomes the new machine owner and can invite others again. |
| The App is not working. Temporary phone or HomeID App issue. | Close and restart the HomeID App or your phone. Ensure you install the latest version of the HomeID App (check for updates in your App Store or Google Play). Empty the cache of your phone (Settings > HomeID > Empty Cache). If needed, uninstall and reinstall the HomeID App. | |
Checking your Wi-Fi indicator status
Status Meaning
| Off Machine is not connected to Wi-Fi. |
| Blinking slowly Machine is pairing to the router. |
| On Machine is connected to Wi-Fi. |
| Blinking fast Wi-Fi connection error. |
Technical specifications
The manufacturer reserves the right to improve the technical specifications of the product. All the preset quantities are approximate.
Description Value
| Size (w x h x d) 251 x 389 x 452 mm | |
| Weight 8.5 - 9 kg | |
| Power cord length 800 - 1200 mm | |
| Water tank 1.9 litres | |
| Coffee bean hopper capacity 275 g | |
| Coffee grounds container capacity up to 12 pucks | |
| LatteGo Pro capacity 250 ml | |
| Adjustable coffee spout height 88 - 145 mm | |
| Nominal voltage - Power rating - Power supply | See data label inside the service door (Fig. A11) |
Obsah
natural_image
Blurred grayscale image with indistinct shapes and horizontal lines, no readable text or symbolsnatural_image
Two horizontal lines with a small inset image of a bowl and a small object, no visible text or symbols.natural_image
Black and white photo of a person sitting in a boat, viewed from above (no visible text or symbols)natural_image
Interior view of a vehicle with a driver and two horizontal lines, no visible text or symbolsnatural_image
Black-and-white photo of a person in a lab coat, possibly a medical or laboratory setting, with no visible text or symbols.natural_image
Interior view of a food stall with a glass bowl and side table (no visible text or symbols)natural_image
Black and white photo of a person in a suit, no visible text or symbolsSkærmen "Tøm beholdertil kaffegrums" vises.
natural_image
Black and white photo of a car interior with no visible text or symbolsnatural_image
Black-and-white photo of a person standing near a vehicle, with no visible text or symbols.natural_image
Pure graphical elements with horizontal lines and a small object, no text or symbols presentnatural_image
Black-and-white photo of a person walking on a road with horizontal lines indicating distance or distance (no visible text or symbols)natural_image
Black and white photo of a car interior with a person inside, no visible text or symbolsflowchart
graph LR
    A["Start: Seatbelt with handle"] --> B["Insert: Button to left"]
    B --> C["Click: Click button"]
    C --> D["Insert: Close button"]
    D --> E["Close button with checkmark"]
Vee kareduse seadistamine
natural_image
Black-and-white photo of a person standing near a vehicle, with no visible text or symbols.Avaneb aken "Lisa vett".
natural_image
Two horizontal lines with a small inset image showing a bowl and food item (no text or symbols)Avaneb aken "Lisa oad".
natural_image
Black-and-white photo of a person walking on a path, no visible text or symbolsnatural_image
Black and white photo of a person sitting in a car (no visible text or symbols)natural_image
Black-and-white photo of a person holding a bicycle, no visible text or symbolsnatural_image
Close-up of a glass container with a side view showing liquid, no visible text or symbolsnatural_image
Black-and-white photo of a person standing near a vehicle, with no visible text or symbols.natural_image
Two horizontal lines with a small inset image of a bowl, no text or symbols visiblenatural_image
Black-and-white photo of a person in a suit, no visible text or symbolsnatural_image
Black-and-white photo of a person inside a vehicle, no visible text or symbolshttps://www.home-appliances.philips/parts-accessories.
Kada uredaj treba očistiti od kamenca, uredaj će vas savjetovati da to učinite.
1 U izborniku dodirnite stavku Održavanje i Uklanjanje kamenca.
2 Dodirnite Čišćenje kamenca i slijedite korake na zaslonu.
Savjet: Korištenjem filtra AquaClean smanjujete potrebu za uklanjanjem kamenca.
Način postupanja u slučaju prekida postupka uklanjanja kamenca
natural_image
Black-and-white photo of a person in a lab coat, possibly a medical or laboratory setting, with no visible text or symbols.natural_image
Close-up of a glass container with a small bowl, partially obscured by horizontal lines (no text or symbols visible)https://www.home-appliances.philips/parts-accessories.
natural_image
Black-and-white photo of a person sitting on a bench with horizontal lines, no visible text or symbolsnatural_image
Interior view of a room with a large bowl and a small table, no visible text or symbolsnatural_image
Black and white photo of a person in a suit, no visible text or symbolsnatural_image
Black and white photo of a person sitting at a desk with a computer, no visible text or symbolsnatural_image
Black-and-white photo of a person standing next to a cylindrical object, with horizontal lines above (no visible text or symbols)natural_image
Close-up of a glass bottle with a small container, no visible text or symbolsnatural_image
Black and white photo of a person in a suit, no visible text or symbolsnatural_image
Black-and-white photo of a person sitting in a chair, no visible text or symbolsnatural_image
Interior view of a room with a wall-mounted fixture and horizontal lines, no visible text or symbolsEkrano lange pasirodo „lpilkite vandens”.
natural_image
Interior view of a mobile app interface with a photo of a food item and horizontal lines (no visible text or symbols)natural_image
Black and white photo of a person walking on a path, no visible text or symbolsnatural_image
Black and white photo of a person sitting in a car (no visible text or symbols)Ekrano lange pasirodo „ldėkite virimo grupę”.
flowchart
graph LR
    A["Left-hand valve"] --> B["Close-up of hand"]
    B --> C["Close-up of door switch"]
    C --> D["Click button"]
    D --> E["Close-up of door switch"]
    E --> F["Right-hand door with checkmark indicator"]
natural_image
Black-and-white photo of a vintage office building (no visible text or signage)natural_image
Close-up of a small object with a circular base and horizontal lines, no visible text or symbolsnatural_image
Black-and-white photo of a person walking on a path with horizontal lines, no visible text or symbolsnatural_image
Black-and-white photo of a person operating a machine (no visible text or symbols)natural_image
Black-and-white photo of a building with visible signage and horizontal lines, no readable text or symbolsnatural_image
Close-up of a dessert with a glass bowl and side menu bar (no visible text or symbols)natural_image
Black-and-white photo of a person standing near a vehicle (no visible text or symbols)natural_image
Black-and-white photo of a person seated in a car, viewed from above (no visible text or symbols)Sette sammen LatteGo Pro

flowchart
graph LR
    A["Start: Seatbelt with lever"] --> B["Insert: Button to left"]
    B --> C["Click: Click button"]
    C --> D["Insert: Lock with scroll"]
    D --> E["Close-up of right-hand box with checkmark"]
AquaClean-vannfilter
natural_image
Black-and-white photo of a person standing near a building with horizontal lines, no visible text or symbolsnatural_image
Two horizontal lines with a small inset image of a bowl, no text or symbols present.natural_image
Black-and-white photo of a person in a suit, no visible text or symbolsnatural_image
Black and white photo of a person inside a vehicle, no visible text or symbolsnatural_image
Black-and-white photo of a person in a lab coat, possibly a medical or laboratory setting, with no visible text or symbols.natural_image
Close-up of a glass container with a small bowl, next to a horizontal line and a button labeled '⑦' (no readable text or symbols)natural_image
Black and white photo of a person sitting in a chair, no visible text or symbolsnatural_image
Interior view of a vehicle with a large vehicle and a person sitting on the side (no visible text or symbols)Personalizar as bebidas
Encomendar acessórios
natural_image
Black-and-white photo of a person standing next to a vehicle, with no visible text or symbols.natural_image
Close-up of a small object with a magnified inset showing internal structure (no visible text or symbols)natural_image
Black and white photo of a person in a suit, no visible text or symbolsnatural_image
Black and white photo of a car with visible headlights and grille, no text or symbols presentnatural_image
Blurred grayscale image of an indistinct object with horizontal lines, no visible text or symbolsnatural_image
Close-up of a glass container with a side view showing liquid, next to a circular object (no visible text or symbols)https://www.home-appliances.philips/parts-accessories.
natural_image
Black-and-white photo of a person in a wheelchair with horizontal lines, no visible text or symbolsnatural_image
Black-and-white photo of a small object on a surface with horizontal lines, no visible text or symbolsVodni filter AquaClean
natural_image
Blurred grayscale image with indistinct shapes and horizontal lines, no readable text or symbolsnatural_image
Two horizontal lines with a small inset image of a bowl and a small object, no visible text or symbols.natural_image
Black and white photo of a person sitting in a boat, viewed from above (no visible text or symbols)natural_image
Interior view of a vehicle with a driver and two horizontal lines, no visible text or symbolshttps://www.home-appliances.philips/parts-accessories.
natural_image
Black-and-white photo of a person in a lab coat, possibly a computer or office, with no visible text or symbols.natural_image
Close-up of a small white object with a circular base, possibly a container or display, against a dark background (no visible text or symbols)Zobrazí sa obrazovka „Pridaj zrná“.
natural_image
Black-and-white photo of a person standing near a vehicle (no visible text or symbols)natural_image
Black-and-white photo of a person seated in a car, viewed from above (no visible text or symbols)natural_image
User interface with a photo frame and horizontal lines, no visible text or symbolsnatural_image
Pure graphical interface element with horizontal lines and a small circular object, no text or symbols presentPojavljuje se ekran „Dodaj zrna“.
- Sipajte zrna kafe u posudu za kafu u zrnu.
natural_image
Black and white photo of a person standing near a vehicle, with no visible text or symbols.Pojavljuje se ekran „lspraznite posudu za sakupljanje ostataka kafe“.
- Posuda za sakupljanje ostataka kafe je puna. Uklonite i ispraznite posudu za sakupljanje ostataka kafe dok je aparat uključen. Sačekajte 5 sekundi pre nego što je vratite nazad.
natural_image
Black and white photo of a car with visible seatbelt and window controls (no text or symbols)natural_image
Black-and-white photo of a person standing near a vehicle, with no visible text or symbols.natural_image
Two horizontal lines with a small inset image showing a bowl and food item (no text or symbols)natural_image
Black and white photo of a person walking, no visible text or symbolsnatural_image
Black and white photo of a person sitting at a desk with a computer monitor (no visible text or symbols)natural_image
Black-and-white photo of a person sitting on a bench with horizontal lines, no visible text or symbolsnatural_image
Close-up of a glass container with liquid, no visible text or symbolsSkärmen "Fyll bönor" visas.
natural_image
Black-and-white photo of a person walking on a road with horizontal lines indicating lanes (no text or symbols visible)natural_image
Black-and-white photo of a person sitting at a desk in front of a vehicle, with no visible text or symbols.natural_image
Two horizontal lines with a small inset image of a person in a wheelchair (no text or symbols visible)natural_image
Close-up of a glass container with a side view showing liquid, no visible text or symbolsnatural_image
Black-and-white photo of a person walking on a road with horizontal lines indicating distance or distance (no visible text or symbols)natural_image
Black-and-white photo of a person sitting at a desk with a computer, no visible text or symbolsnatural_image
Blurred grayscale image of a person standing near a vehicle, with no visible text or symbolsnatural_image
Simple grayscale interface with horizontal lines and a small inset image of a bowl (no text or symbols)natural_image
Black and white photo of a person in a suit, no visible text or symbolsnatural_image
Side view of a car with visible rear window and side stripes (no text or symbols)natural_image
Black-and-white photo of a person standing next to a vehicle, with no visible text or symbols.natural_image
Black and white photo of a glass bowl with food inside, no visible text or symbolsnatural_image
Black and white photo of a person walking on a road with horizontal lines indicating distance or path (no visible text or symbols)natural_image
Black and white photo of a car with visible wheels and side stripes (no text or symbols)natural_image
Black-and-white photo of a person holding a device, no visible text or symbolsnatural_image
Interior view of a mobile app interface with a blurred image of a food item (no visible text or symbols)natural_image
Black-and-white photo of a person walking on a road with horizontal lines, no visible text or symbolsnatural_image
Black and white photo of a car with visible window controls and a play button (no text or symbols)https://www.home-appliances.philips/parts-accessories.
natural_image
Black-and-white photo of a person standing near a vehicle, with no visible text or symbols.natural_image
Abstract graphic with horizontal lines and a small inset image of a bowl (no text or symbols)natural_image
Black and white photo of a person walking, no visible text or symbolsnatural_image
Black and white photo of a car with a visible license plate (no text or symbols)natural_image
Illustration of a plug inserted into a socket, with an arrow indicating the insertion point (no text or symbols present)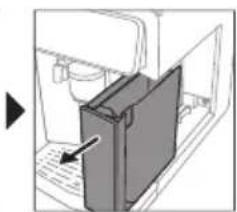
natural_image
Diagram of a computer tower with an arrow pointing to the front panel (no text or symbols present)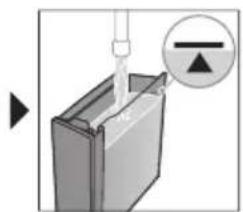
natural_image
Diagram showing a mechanical component with a tool and a magnified inset of a symbol (no text or labels)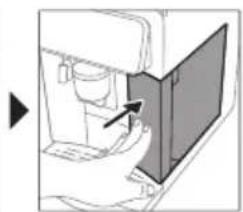
natural_image
Diagram showing a hand inserting a device into a device with an arrow indicating the component (no text or symbols present)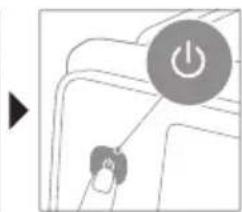
natural_image
Simple line drawing of a device with a power button and a key inserted (no text or symbols)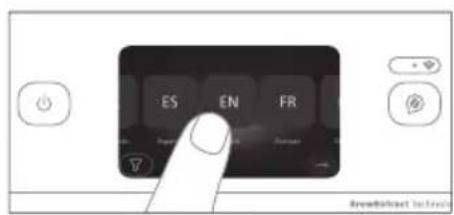
-https://www.home AquaClean
.appliances.philips/parts-accessories
.הכלהה*
| הכלההוּרָהוּרָהוּרָהוּרָהוּרָהוּרָהוּרָהוּרָהוּרָהוּרָהוּרָהוּרָהוּרָהוּרָהוּרָה�ּרָהוּרָהוּרָהוּרָהוּרָהוּרָהוּרָהוּרָהוּרָהוּרָהוּרָהוּרָהוּרָהוּרָהוֱרָהוּרָהוּרָהוּרָהוּרָהוּרָהוּרָהוּרָהוּרָהוּרָהוּרָהוּרָהוּרָהוּרָהוּר‘(A16)וּרָהוּרָהוּרָהוּרָהוּרָהוּרָהוּרָהוּרָהוּרָהוּרָהוּרָהוּרָהוּרָהוּרָהו' | .וּרָהוּרָהוּרָהוּרָהוּרָהוּרָהוּרָהוּרָהוּרָהוּרָהוּרָהוּרָהוּרָהוּרָהו-לִיַתְאֶתְאֶתְאֶתְאֶתְאֶתְאֶתְאֶתְאֶתְאֶתְאֶתְאֶתְאֶתְאֶתְאֶתְאֶתְאֶתְאֶתְעֹתְעֹתְעֹתְעֹתְעֹתְעֹתְעֹתְעֹתְעֹתְעֹתְעֹתְעֹתְעֹתְעֹתְעֹתְעֹתְעֹתְבּרָהוּרָהוּרָהוּרָהוּרָהוּרָהוּרָהוּרָהוּרָהוּרָהוּרָהוּרָהוּרָהוּרָהוֹרָהוּרָהוּרָהוּרָהוּרָהוּרָהוּרָהוּרָהוּרָהוּרָהוּרָהוּרָהוּרָהוּרָהוּר–לִיַתְאֶתְאֶתְאֶתְאֶתְאֶתְאֶתְאֶתְאֶתְאֶתְאֶתְאֶתְאֶתְאֶתְאֶתְאֶתְהוּרָהוּרָהוּרָהוּרָהוּרָהוּרָהוּרָהוּרָהוּרָהוּרָהוּרָהוּרָהוּרָהוּרָהsf:וּרָהוּרָהוּרָהוּרָהוּרָהוּרָהוּרָהוּרָהוּרָהוּרָהוּרָהוּרָהוּרָהוּרָהו:וּרָהוּרָהוּרָהוּרָהוּרָהוּרָהוּרָהוּרָהוּרָהוּרָהוּרָהוּרָהוּרָהוּרָהsf :וּרָהוּרָהוּרָהוּרָהוּרָהוּרָהוּרָהוּרָהוּרָהוּרָהוּרָהוּרָהוּרָהוּרָהו 5 | .וּרָהוּרָהוּרָהוּרָהוּרָהוּרָהוּרָהוּרָהוּרָהוּרָהוּרָהוּרָהוּרָהוּרָ病sf:וּרָהוּרָ病sf:וּרָ病sf:וּרָ病sf:וּרָ病sf:וּרָ病sf:וּרָ病sf:וּרָ病sf:וּרָ病sf:וּרָ病sf:וּרָ病sf:וּרָ病sf:וּרָ病sf: |
הכלהה
natural_image
Diagram showing a power button with an icon and a hand holding a small plug (no text or symbols)4
natural_image
Illustration of a hand pouring granular substance into a bowl on an induction cooktop (no text or symbols)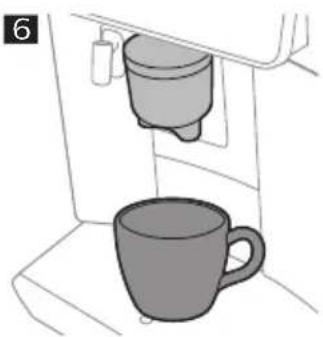
natural_image
Illustration of a coffee machine with a cup and another mug, no text or symbols present7
natural_image
Diagram of a hand holding a cylindrical object, showing the process of adding material (no text or symbols present)8
9
natural_image
Diagram of a hand holding a device with a close-up arrow indicating insertion or adjustment (no text or symbols present)10
natural_image
Diagram of a mechanical device with a curved arrow indicating rotation (no text or symbols)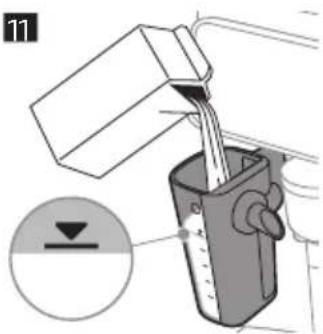
natural_image
Illustration of a hand using a hammer to press a textured object on a circular base (no text or symbols)13
natural_image
Line drawing of a coffee machine with a glass cup and spool of milk being poured into it (no text or symbols)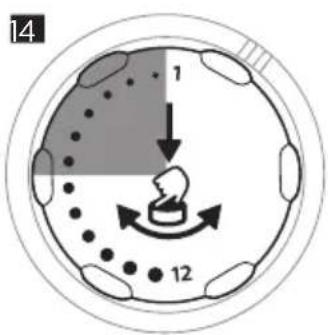
natural_image
Illustration of a hand inserting a component into a door panel (no text or symbols)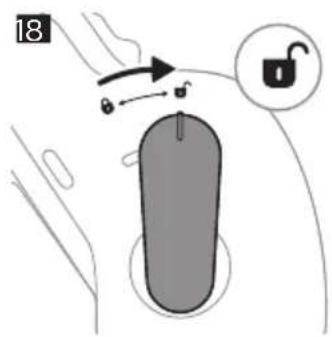
natural_image
Mechanical assembly diagram showing a hand operating a component with an arrow indicating motion (no text or symbols present)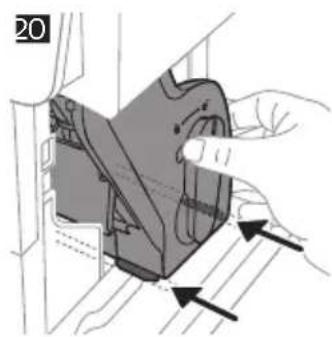
natural_image
Diagram of a hand pressing a component on a mechanical part, with arrows indicating direction (no text or symbols)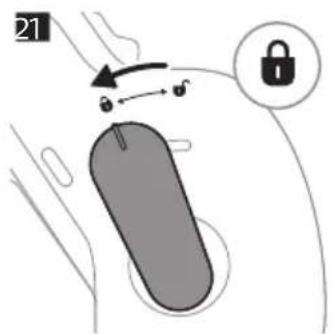

24
natural_image
Diagram of a mechanical device with a cylindrical component inserted into a housing, showing a base and arrow indicating direction (no text or symbols present)25
natural_image
Diagram of a mechanical device with a lever and directional arrow (no text or symbols)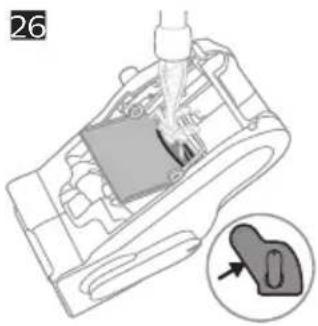
natural_image
Mechanical assembly diagram showing a component being inserted into a housing, with an inset close-up of a device (no text or symbols visible)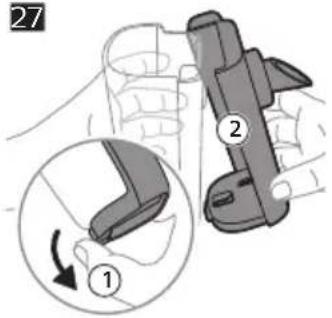
2026 © Versuni Holding B.V.
PHILIPS and the Philips Shield Emblem are registered trademarks of Koninklijke Philips N.V. and are used under license.
This product has been manufactured by and is sold under the responsibility of Versuni Holding B.V., and Versuni Holding B.V. is the warrantor in relation to this product.
642001036931 (01/2026)