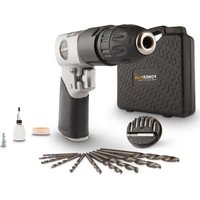
POWAIR0802 - Drill PowerPlus - Free user manual and instructions
Find the device manual for free POWAIR0802 PowerPlus in PDF.


| Product Type | Pneumatic Drill |
| Brand | PowerPlus |
| Model | POWAIR0802 |
| Air Supply | Compressed air, working pressure 6.2 bar (90 PSI) |
| No-load Speed | 1800 min⁻¹ |
| Chuck Size | 10 mm, self-tightening type |
| Average Air Consumption | 113 L/min |
| Sound Pressure (LpA) | 94 dB(A) |
| Sound Power (LwA) | 105 dB(A) |
| Vibrations (aw) | 2.1 m/s² (K=1.5 m/s²) |
| Reverse Rotation | Yes, via reverse switch |
| Variable Speed Trigger | Yes |
| Package Contents | 1 drill, 10 twist drill bits, 1 bit holder, 6 drill bits, 2 male connectors (Euro and Orion), oil, PTFE tape, plastic case, instruction manual |
| Lubrication | Pneumatic tool oil; daily lubrication recommended |
| Maintenance | Clean air filter, drain air tank daily |
| Safety | Safety goggles, hearing protection, keep children away, do not use in explosive atmosphere |
| Weight | Approx. 1.2 kg (estimate) |
| Dimensions (L×W×H) | Approx. 25×20×8 cm (estimate) |
Frequently Asked Questions - POWAIR0802 PowerPlus
User questions about POWAIR0802 PowerPlus
0 question about this device. Answer the ones you know or ask your own.
Ask a new question about this device
Download the instructions for your Drill in PDF format for free! Find your manual POWAIR0802 - PowerPlus and take your electronic device back in hand. On this page are published all the documents necessary for the use of your device. POWAIR0802 by PowerPlus.
USER MANUAL POWAIR0802 PowerPlus
natural_image
Exterior view of a power tool with black and white body (no text or symbols visible)POWAIR0802
NL NEDERLANDS VERTAALDE VERSIE VAN DE ORIGINELE HANDLEIDING
FR FRANÇAIS TRADUCTION DU MODE D'EMPLOI D'ORIGINE
EN ENGLISH ORIGINAL INSTRUCTION MANUAL
2 BESCHRIJVING (FIG. A)
- Trekker
- Koppeling
- Boorkop
- Omkeerknop
3 INHOUD VAN DE VERPAKKING
12 PROBLEEMOPLOSSING
14 DÉCLARATION DE CONFORMITÉ


VARO N.V. - Joseph Van Instraat 9 - BE2500 Lier - BELGIQUE, déclare que :
PNEUMATIC DRILL SET POWAIR0802
1 APPLIANCE
The Air drill is a compressed air powered, rotary power tool whose out put spindle is typically fitted with a chuck to hold and drive an accessory such as a drill bit or screwdriver bit.

Warning Read this manual and general safety instructions carefully before using the appliance, for your own safety.
2 DESCRIPTION (FIG. A)
- Trigger
- Coupler
- Chuck
- Reverse knob
3 PACKAGE CONTENT LIST
■ Remove all packaging materials.
- Remove remaining packaging and packing inserts (if included).
- Check that the package contents are complete.
- Check the appliance, the power cord, the power plug and all accessories for transportation damage.
- Keep the packaging materials as far as possible until the end of the warranty period. Then take it to your local waste disposal system.

WARNING Packaging materials are not toys! Children must not play with plastic bags! There is a danger of suffocation!
1 x Air drill
10 x twist drill bit
1 x drill bit holder
6 x bits
1 x plastic case
1 x male Euro coupler
1 x male Orion coupler
1 x oil bottle (empty)
1 x PTFE sealing tape
1 x BMC
1 x Manual

If any parts are missing or damaged, please contact your dealer.
4 SAFETY WARNINGS AND PRECAUTIONS
- Keep work area clean. Cluttered areas invite injuries.
- Observe work area conditions. Do not use machines or power tools in damp or wet locations. Don't expose to rain. Keep work area well lit. Do not use electrically powered tools in the presence of flammable gases or liquids.
POWAIR0802 EN
- Keep children away. Children must never be allowed in the work area. Do not let them handle machines, tools, extension cords, or air hoses.
- Store idle equipment. When not in use, tools must be stored in a dry location to inhibit rust. Always lock up tools and keep out of reach of children.
- Use the right tool for the job. Do not attempt to force a small tool or attachment to do the work of a larger industrial tool. There are certain applications for which this tool was designed. It will do the job better and more safely at the rate for which it was intended. Do not modify this tool and do not use this tool for a purpose for which it was not intended.
- Dress properly. Do not wear loose clothing or jewelry as they can be caught in moving parts. Protective, electrically non-conductive clothes and non-skid footwear are recommended when working. Wear restrictive hair covering to contain long hair.
- Use eye and ear protection. Always wear ANSI approved impact safety glasses under a full face shield while working. Wear an ANSI approved dust mask or respirator when working around metal, wood, and chemical dusts and mists.
- Do not overreach. Keep proper footing and balance at all times. Do not reach over or across running machines or air hoses.
- Maintain tools with care. Keep tools clean for better and safer performance. Follow instructions for lubricating and changing accessories. Inspect tool cords and air hoses periodically and, if damaged, have them repaired by an authorized technician. The handles must be kept clean, dry, and free from oil and grease at all times.
■ Disconnect air supply. Disconnect air hose when not in use.
- Remove adjusting keys and wrenches. Check that keys and adjusting wrenches are removed from the tool or machine work surface before connecting the tool.
- Avoid unintentional starting. Be sure the trigger is released when not in use and before connecting to the air source. Do not carry any tool with your finger on the trigger, whether it is connected or not.
- Stay alert. Watch what you are doing, use common sense. Do not operate any tool when you are tired.
- Check for damaged parts. Before using any tool, any part that appears damaged should be carefully checked to determine that it will operate properly and perform its intended function. Check for alignment and binding of moving parts; any broken parts or mounting fixtures; and any other condition that may affect proper operation. Any part that is damaged should be properly repaired or replaced by a qualified technician. Do not use the tool if the trigger does not operate properly.
- Guard against electric shock. Prevent body contact with grounded surfaces such as pipes, radiators, ranges, and refrigerator enclosures.
- Replacement parts and accessories. When servicing, use only identical replacement parts. Use of any other parts will void the warranty.
- Industrial applications must follow OSHA guidelines.
- Do not operate tool if under the influence of alcohol or drugs. Read warning labels if taking prescription medicine to determine if your judgment or reflexes are impaired while taking drugs. If there is any doubt, do not operate the tool.
- Use proper size and type extension cord. If an extension cord is required, it must be of the proper size and type to supply the correct current to the compressor without heating up. Otherwise, the extension cord could melt and catch fire, or cause electrical damage to the compressor. Check your air compressor's manual for the appropriate size cord.
POWAIR0802 EN
- Maintenance. For your safety, maintenance should be performed regularly by a qualified technician.
- Compressed air only. Never use combustible gas as a power source.
- Use both hands. The force generated from this tool can cause it to break free of your grasp, causing serious injury and damage. Always operate this tool with both hands.

Note: Performance of the compressor (if powered by line voltage) may vary depending on variations in local line voltage. Extension cord usage may also affect tool performance.
5 AIR SUPPLY
- Ensure air valve (or trigger) is in the "off" position before connecting to the air supply.
- You will require an air pressure of 91psi, and an air flow according to specification.
- WARNING! Ensure the air supply is clean and does not exceed 91 psi while operating the tool. Too high an air pressure and unclean air will shorten the product life due to excessive wear, and may be dangerous causing damage or personal injury.
- Drain the air tank daily. Water in the air line will damage the tool.
■ Clean air inlet filter weekly. - Line pressure should be increased to compensate for unusually long air hoses (over 8 meters). The minimum hose diameter should be 3/8" I.D. and fittings must have the same inside dimensions.
- Keep hose away from heat, oil and sharp edges. Check hose for wear, and make certain that all connections are secure.
6 LUBRICATION
An automatic in-line filter-regulator-lubricator is recommended (Fig 1) as it increases tool life and keeps the tool in sustained operation. The in-line lubricator should be regularly checked and filled with air tool oil.
Proper adjustment of the in-line lubricator is performed by placing a sheet of paper next to the exhaust ports and holding the throttle open approximately 30 seconds. The lubricator is properly set when a light stain of oil collects on the paper. Excessive amounts of oil should be avoided.
In the event that it becomes necessary to store the tool for an extended period of time (overnight, weekend, etc.), it should receive a generous amount of lubrication at that time. The tool should be run for approximately 30 seconds to ensure oil has been evenly distributed throughout the tool. The tool should be stored in a clean and dry environment.
- It is most important that the tool be properly lubricated by keeping the air line lubricator filled and correctly adjusted. Without proper lubrication the tool will not work properly and parts will wear prematurely.
- Use the proper lubricant in the air line lubricator. The lubricator should be of low air flow or changing air flow type, and should be kept filled to the correct level. Use only recommended lubricants, specially made for pneumatic applications. Substitutes may harm the rubber compounds in the tools, O-rings and other rubber parts.
7 IMPORTANT!!!
If no filter/ pressure regulator/ lubricator is installed in the compressed air system, then pneumatic tools must be lubricated with 2 to 6 drops of oil at least once a day or after
POWAIR0802 EN
every two hours of use. This must be done directly along the male coupler or the screw (OIL) provided for the purpose on the side of the tool's housing.
Automatic lubrication is also possible using the supplied mini oiler that you have to install between the threaded connector of the tool and the male coupler. Make sure that the oiler is always filled with suitable oil.
Fig. 1
-
Tool
-
Quick connector
-
Quick coupler
-
Air hose
-
Quick connector
-
Quick coupler
-
Lubricator
-
Regulator (0-8.5 bar)
-
Filter
-
Cut-off valve
-
Air compressor
8 LOADING AND OPERATION
8.1 Drill Bit Installation
- Select the drill bit needed for the drilling you wish to perform.
- Open up the jaws of the drill by turning the chuck.
- When the jaws are open wide enough to insert the drill bit, slide the bit into the drill chuck as far as possible.
- By hand, turn the drill chuck to tighten the jaws and make sure very tight.
8.2 Using the Air Drill

CAUTION: Do not operate the Air Drill before placing the drill bit on the material.

WARNING: Do not touch the DRILL CHUCK or the drill bit while the Air Drill is spinning.
- Mark the material on the spot for drilling the hole. Make sure your drill bit is the correct size for the hole you need to make.
- Clamp the material in a vise to make sure the material does not move or begins to spin while drilling.
- Wear eye protection to guard against flying wood or metal.
- Set the compressor's pressure regulator to 90 PSI. Do not set the compressor's outlet regulator over 90 PSI.
- Connect the air drill to the air compressor's hose. If leaking is detected, disconnect the air hose and repair before use.
- Hold the air drill firmly. Place the drill bit on the spot marked in Step 1.
■ To begin drilling, press the trigger.
- Your air drill has a variable speed for drilling. To vary the speed of the drilling action, vary the pressure on the trigger.
- Drill only as deep as necessary. Do not drill deeper than necessary into walls or other areas where you cannot identify any possible hazards behind the drilling surface.
- When you have drilled the hole, remove the drill bit from the hole while the air drill is still spinning. This is to prevent the drill getting caught in the hole and causing damage.
POWAIR0802 EN
- If the drill bit does get caught while you are drilling, immediately release the trigger.
- Flip the reverse knob to the "R" position as shown in Fig B. This will reverse the rotation of the drill, allowing you to back out your drill bit.
- Lightly press the trigger until the drill bit spins free. Remove the air drill.
- Flip the reverse knob back to the "F" position.
9 MAINTENANCE

WARNING: Disconnect wrench from air supply before changing accessories, servicing or performing maintenance. Replace or repair damaged parts. Use genuine parts only. Non-authorized parts may be dangerous
- Lubricate the air tool daily with a few drops of air tool oil dripped into the air inlet
- DO NOT use worn, or damaged tool.
- Loss of power or erratic action may be due to the following:
- Excessive drain on the air line. Moisture or restriction in the air pipe. Incorrect size or type of hose connectors. To remedy check the air supply.
- Grit or gum deposits in the tool may also reduce performance. If your model has an air strainer (located in the area of the air inlet), remove the strainer and clean it.
- When not in use, disconnect from air supply, clean tool and store in a safe, dry, childproof location.
10 TECHNICAL DATA
| Model | POWAIR0802 |
| No load speed | 1800 min-1 |
| Operating pressure | 6,2 bar |
| Diam. connection air inlet | 14 " |
| Average air consumption | 113 l/min |
| Chuck size | 10mm |
| Chuck tyê | Keyless |
11 NOISE
Noise values measured according to relevant standard. (K=3)
| Acoustic pressure level LpA | 94 dB(A) |
| Acoustic power level LwA | 105 dB(A) |

ATTENTION! The sound power level may exceed 85 dB(A), in this case individual hearing protection shall be worn.
aw (Vibration)
2.1m/s²
K = 1,5 ~m / s^2
POWAIR0802 EN
12 TROUBLE SHOOTING
The following form lists the common operating system with problem and solutions. Please read the form carefully and follow it.

WARNING: If any of the following symptoms appears during your operating, stop using the tool immediately, or serious personal injury could result. Only a qualified persons or an authorized service center can perform repairs or replacement of tool.

Disconnect tool from air supply before attempting repair or adjustment. When replacing O-rings or Cylinder, lubricate with air tool oil before assembly.
| PROBLEMS | POSSIBLE CAUSES | REMEDIES |
| Tool runs at normal speed but loses under load | Motor parts worn. | Lubricating clutch housing.Check for excess clutch oil. Clutch cases need only be half full. Overfilling can cause drag on high speed clutch parts, i.e. a typical oiled/lubricated wrench requires 1/2 ounce of oil. |
| Cam clutch worn or sticking due to lack of lubricant. | [GHG]GREASE LUBRICATED:NOTE: Heat usually indicates insufficient grease in chamber. Severe operating conditions may require more frequent lubrication. | |
| Tool runs slowly. Air flows slightly from exhaust | Motor parts jammed with dirt particles | Check air inlet filter for blockage.Pour air tool lubricating oil into air inlet as per instructions.Operate tool in short bursts quickly reversing rotation back and forth where applicable.Repeat above as needed. |
| Power regulator in closed position | ||
| Air flow blocked by dirt. |
POWAIR0802 EN
| PROBLEMS | POSSIBLE CAUSES | REMEDIES |
| Tools will not run. Air flows freely from exhaust | One or more motor vanes stuck due to material build up. | Pour air tool lubricating tool into air inlet. Operate tool in short bursts of forward and/or reverse rotation where applicable.Tap motor housing gently with plastic mallet.Disconnect supply. Free motor by rotating drive shank manually where applicable |
| Tool will not shut off | ‘O’ rings throttle valve dislodged from seat inlet valve. | Replace ‘O’ ring. |

Note: Repairs should be carried out by a qualified person.
13 ENVIRONMENT
Should your appliance need replacement after extended use, do not discard it with the household rubbish but dispose of it in an environmentally safe way.
14 DECLARATION OF CONFORMITY


VARO N.V. - Joseph Van Instraat 9 - BE2500 Lier - BELGIUM, declares that, product: Pneumatic drill set trade mark: POWERplus model: POWAIR0802
is in conformity with the essential requirements and other relevant provisions of the applicable European Directives, based on the application of European harmonized standards. Any unauthorized modification of the apparatus voids this declaration.
European Directives (including, if applicable, their amendments up to the date of signature); 2006/42/EC
European harmonized standards (including, if applicable, their amendments up to the date of signature); EN ISO 11148-3: 2012
Keeper of the Technical Documentation : Philippe Vankerkhove, VARO – Vic. Van Rompuy N.V.
The undersigned acts on behalf of the company CEO,

Hugo Cuypers Regulatory Affairs – Compliance Manager Date: 29/01/2013
POWAIR0802 DE
Modell-No: POWAIR0802
TRYKLUFTDREVET BORESÆT POWAIR0802
1 ANVENDELSE
Hugo Cuypers
Certificeringsleder
Dato: 29/01/2014
POWAIR0802 SV
1 ANVÄNDNINGSOMRÅDE....2
2 BESKRIVNING (FIG. A) 2
3 FÖRPACKNINGSINNEHÅLL 2
4 SÄKERHETSFÖRSKRIFTER OCH SÄKERHETSÅTGÄRDER ......3
5 LUFTTILLFÖRSEL....4
6 SMÖRJNING 5
7 VIKTIGT!!! 5
8 FÖRBEREDELSE OCH ANVÄNDNING....5
8.1 Isättning av en borrbit....5
8.2 Användning av tryckluftborren....6
9 UNDERHÅLL....6
10 TEKNISKA DATA....7
11 BULLER....7
12 FELSÖKNING....7
13 MILJÖHÄNSYN....8
14 KONFORMITETSDEKLARATION 9
TRYCKLUFTSBORRSET POWAIR0802
1 ANVÄNDNINGSOMRÅDE
3 FÖRPACKNINGSINNEHÅLL
14 KONFORMITETSDEKLARATION


WARNING: Disconnect wrench from air supply before changing accessories, servicing or performing maintenance. Replace or repair damaged parts. Use genuine parts only. Non-authorized parts may be dangerous
Hugo Cuypers
Manager de certificare
Data: 29/01/2014
POWAIR0802 HU
natural_image
Exterior view of a black and silver electric drill bit (no text or symbols visible)
WWW.VARO.COM
DESIGNED AND MARKETED BY VARO
©copyright by varo
VARO - VIC. VAN ROMPUY nv
JOSEPH VAN INSTRAAT 9 - 2500 LIER - BELGIUM
OFFICES:



- BESCHRIJVING (FIG. A)
- INHOUD VAN DE VERPAKKING
- PROBLEEMOPLOSSING
- DÉCLARATION DE CONFORMITÉ
- PNEUMATIC DRILL SET POWAIR0802
- APPLIANCE
- DESCRIPTION (FIG. A)
- PACKAGE CONTENT LIST
- SAFETY WARNINGS AND PRECAUTIONS
- POWAIR0802 EN
- AIR SUPPLY
- LUBRICATION
- IMPORTANT!!!
- LOADING AND OPERATION
- Drill Bit Installation
- Using the Air Drill
- MAINTENANCE
- NOISE
- TROUBLE SHOOTING
- Note: Repairs should be carried out by a qualified person.
- ENVIRONMENT
- DECLARATION OF CONFORMITY
- POWAIR0802 DE
- TRYKLUFTDREVET BORESÆT POWAIR0802
- ANVENDELSE
- POWAIR0802 SV
- TRYCKLUFTSBORRSET POWAIR0802
- ANVÄNDNINGSOMRÅDE
- FÖRPACKNINGSINNEHÅLL
- KONFORMITETSDEKLARATION
- WARNING: Disconnect wrench from air supply before changing accessories, servicing or performing maintenance. Replace or repair damaged parts. Use genuine parts only. Non-authorized parts may be dangerous
- POWAIR0802 HU
Brand : PowerPlus
Model : POWAIR0802
Category : Drill