
DEXOS 1217 M AFC - Handheld vacuum Mirka - Free user manual and instructions
Find the device manual for free DEXOS 1217 M AFC Mirka in PDF.

| Product type | Table vacuum (mobile dust extractor) |
| Brand | Mirka |
| Model | DEXOS 1217 M AFC |
| Power supply | 220-240 V AC, 50-60 Hz |
| Power consumption | 1200 W |
| Electrical protection class | Class I |
| Protection rating (moisture, dust) | IPX4 |
| Dust class | M (LEP ≥ 0.1 mg/m³) |
| Filter class | N/A (standard filter included) |
| Max. air flow | 42 l/s (151 m³/h) |
| Max. vacuum | 25 kPa (250 hPa) |
| Container capacity | 17 L |
| Weight | 13 kg |
| Filter surface | 0.5 m² |
| Sound pressure level | 77.7 dB(A) |
| Main functions | AFC (automatic filter cleaning), automatic start via tool outlet, power adjustment, Bluetooth (myMirka), liquid/solid vacuuming |
| Maintenance and cleaning | Regular filter cleaning (AFC or manual), dust bag replacement, motor cooling filter cleaning |
| Safety | Water level limiter, overheat protection, automatic shutdown in case of overflow, instructions for hazardous dust |
| Spare parts and repairability | Filter (MIX1214071), dust bag (MIX1215171), HEPA filter (MIX1216071), cooling air filter kit (MIX1212131). Repair by Mirka authorized center |
| Dimensions (approx.) | Height ~60 cm, diameter ~40 cm (not specified exactly) |
| Operating temperature | -20 °C to 40 °C |
| Compliances | CE, RCM, UKCA, EAC |
Frequently Asked Questions - DEXOS 1217 M AFC Mirka
User questions about DEXOS 1217 M AFC Mirka
0 question about this device. Answer the ones you know or ask your own.
Ask a new question about this device
Download the instructions for your Handheld vacuum in PDF format for free! Find your manual DEXOS 1217 M AFC - Mirka and take your electronic device back in hand. On this page are published all the documents necessary for the use of your device. DEXOS 1217 M AFC by Mirka.
USER MANUAL DEXOS 1217 M AFC Mirka
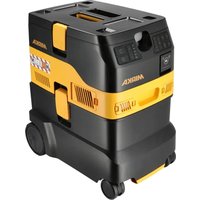
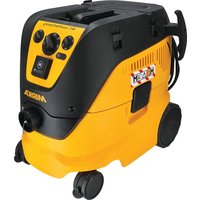
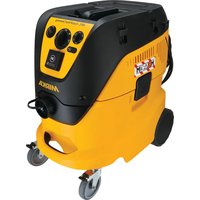
natural_image
Two Mirka industrial vacuum dampers with black and yellow branding, displayed side by side (no visible text or symbols on the devices themselves)230V
Operating instructions (original)....72en
Operating instructions....306UK|en
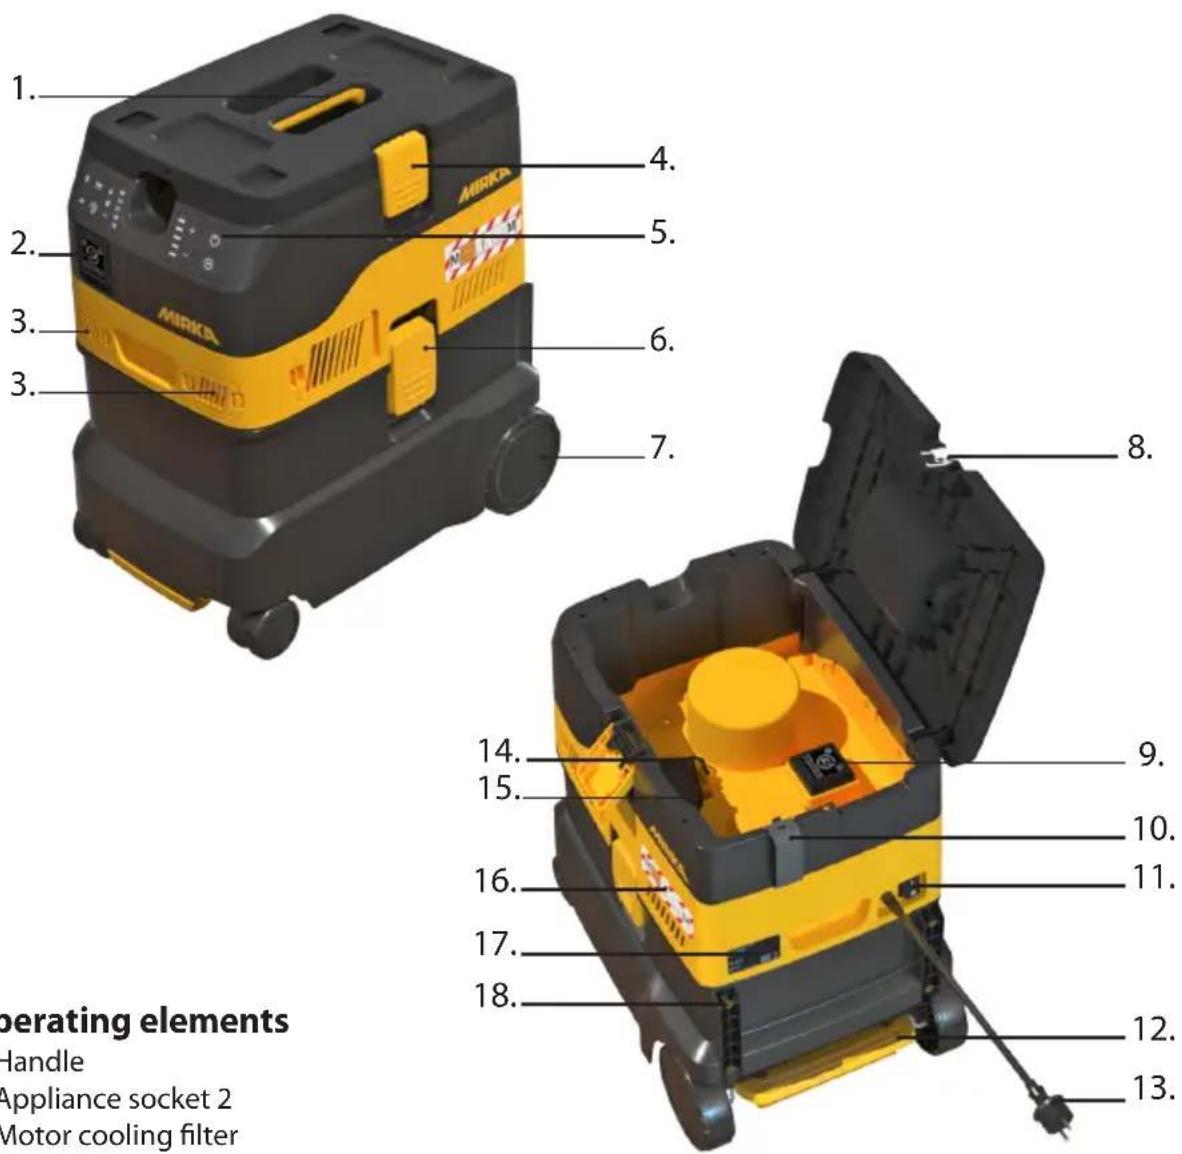
Operating elements
-
Handle
-
Appliance socket 2
-
Motor cooling filter
-
Top lid clamp
-
Control panel
-
Container clamp
-
Wheel
-
Fastening clamp for case
-
Appliance socket 1
-
Power cord strap
-
Power switch
-
Brake
-
Power cord
-
Hose inlet cap
-
Hose inlet
-
M-class sticker
-
Marking plate
-
Workstation mounting point
Pictorial quick reference guide
The pictorial quick reference guide is designed to help you when starting up, operating and storing the unit. The guide is subdivided into four sections, which are represented by symbols:
A. AFC - Auto Filter Cleaning system
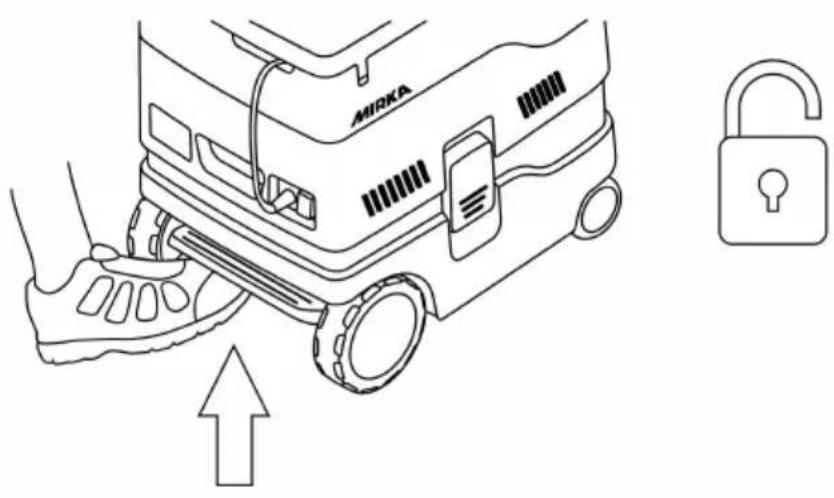
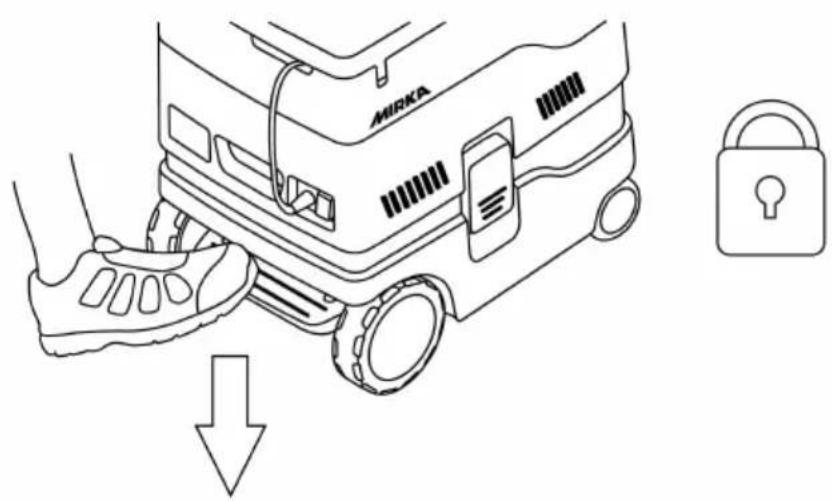
B. Brake
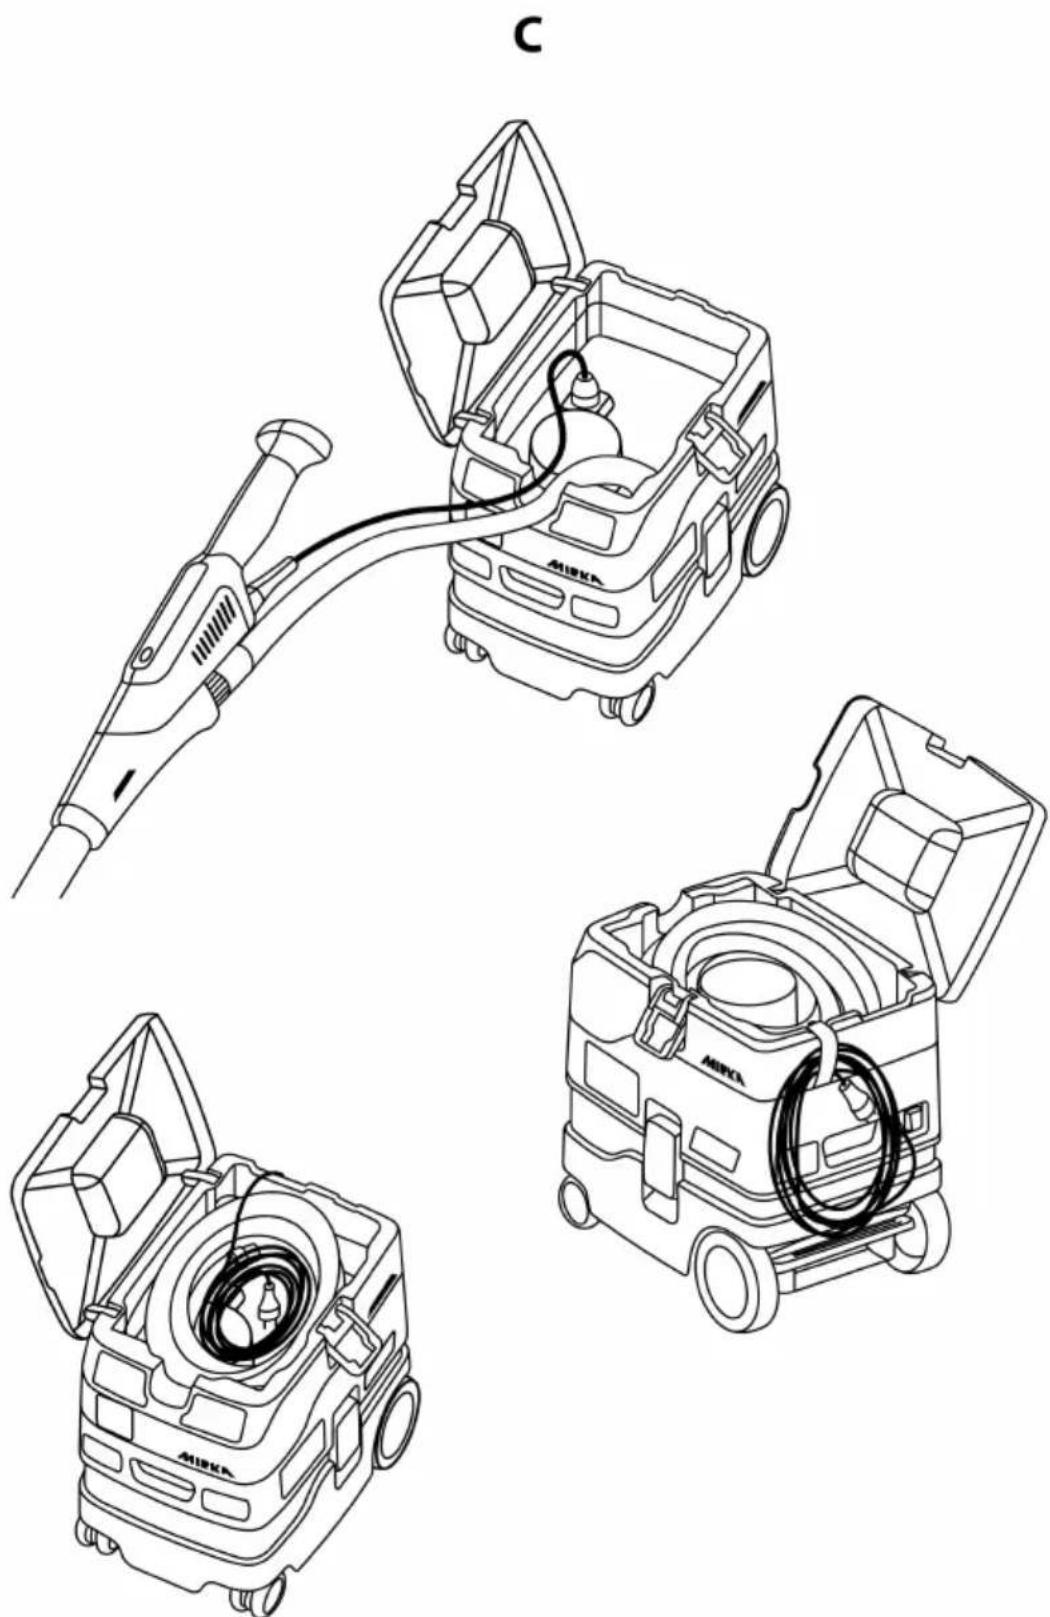
C. Power tool connection & Hose and cable storage
D. Hose setting
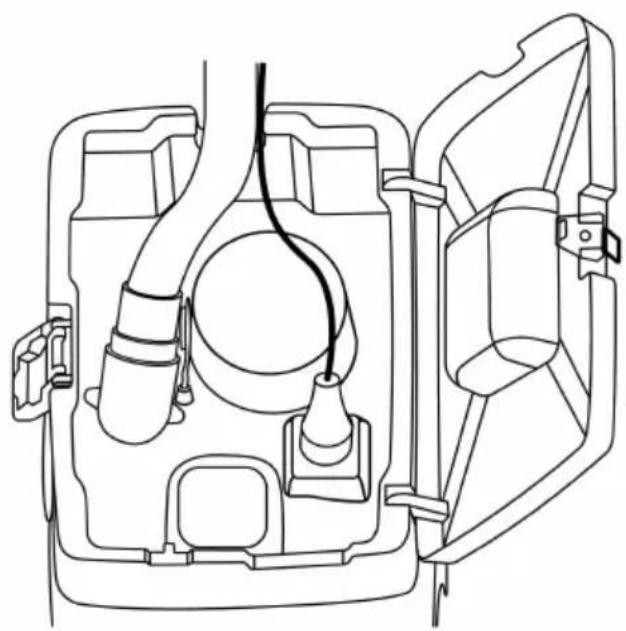
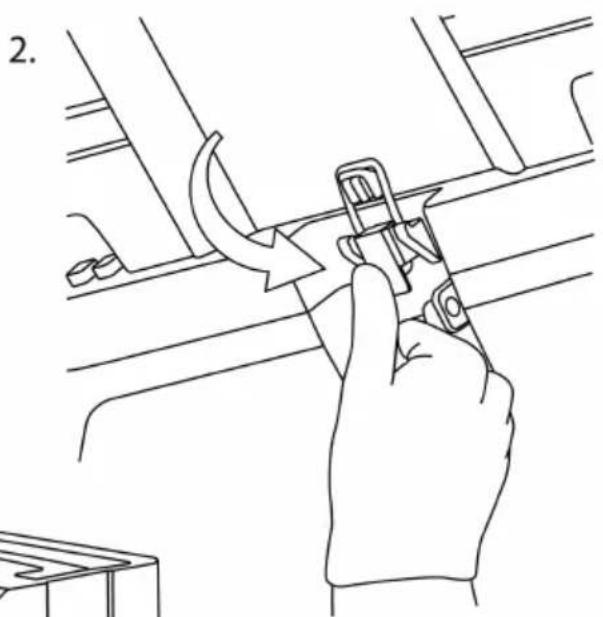
E. Case fastening accessory
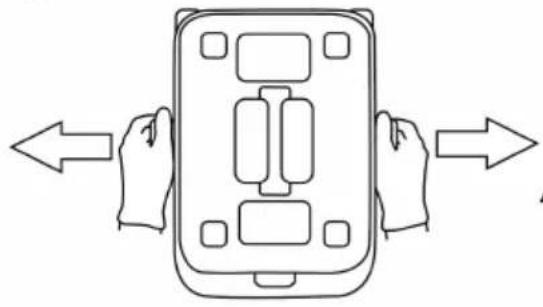
F. Dust bag replacement
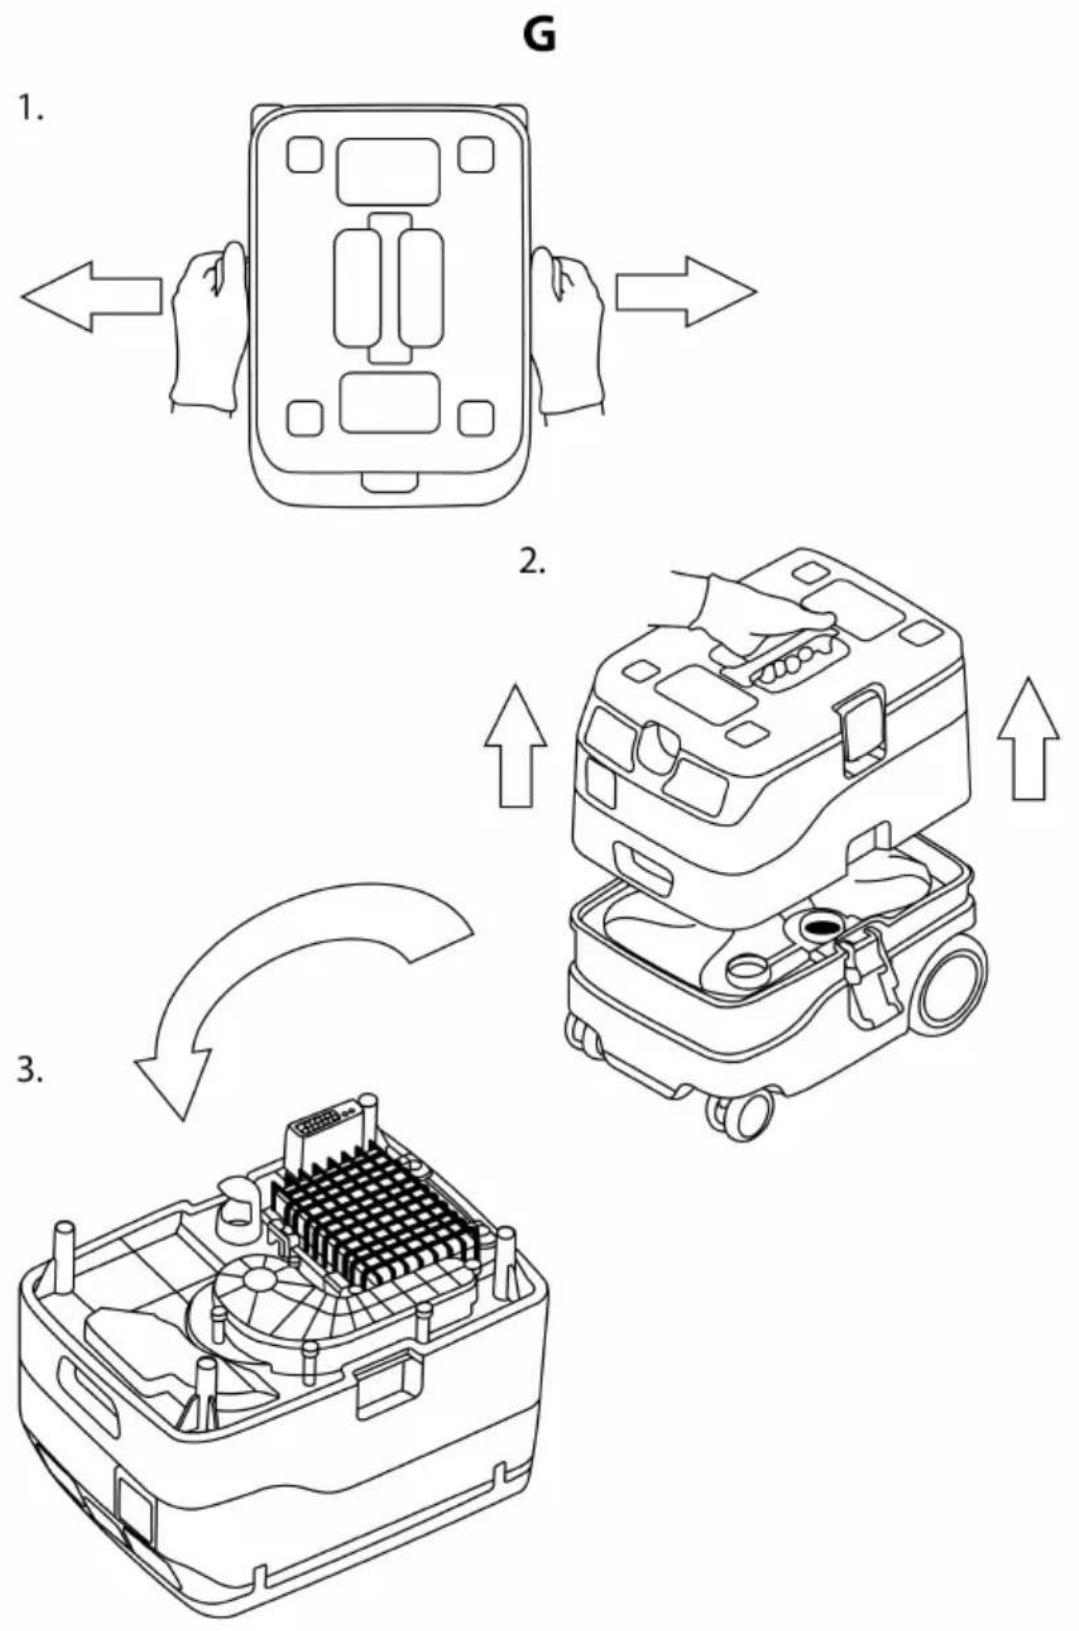
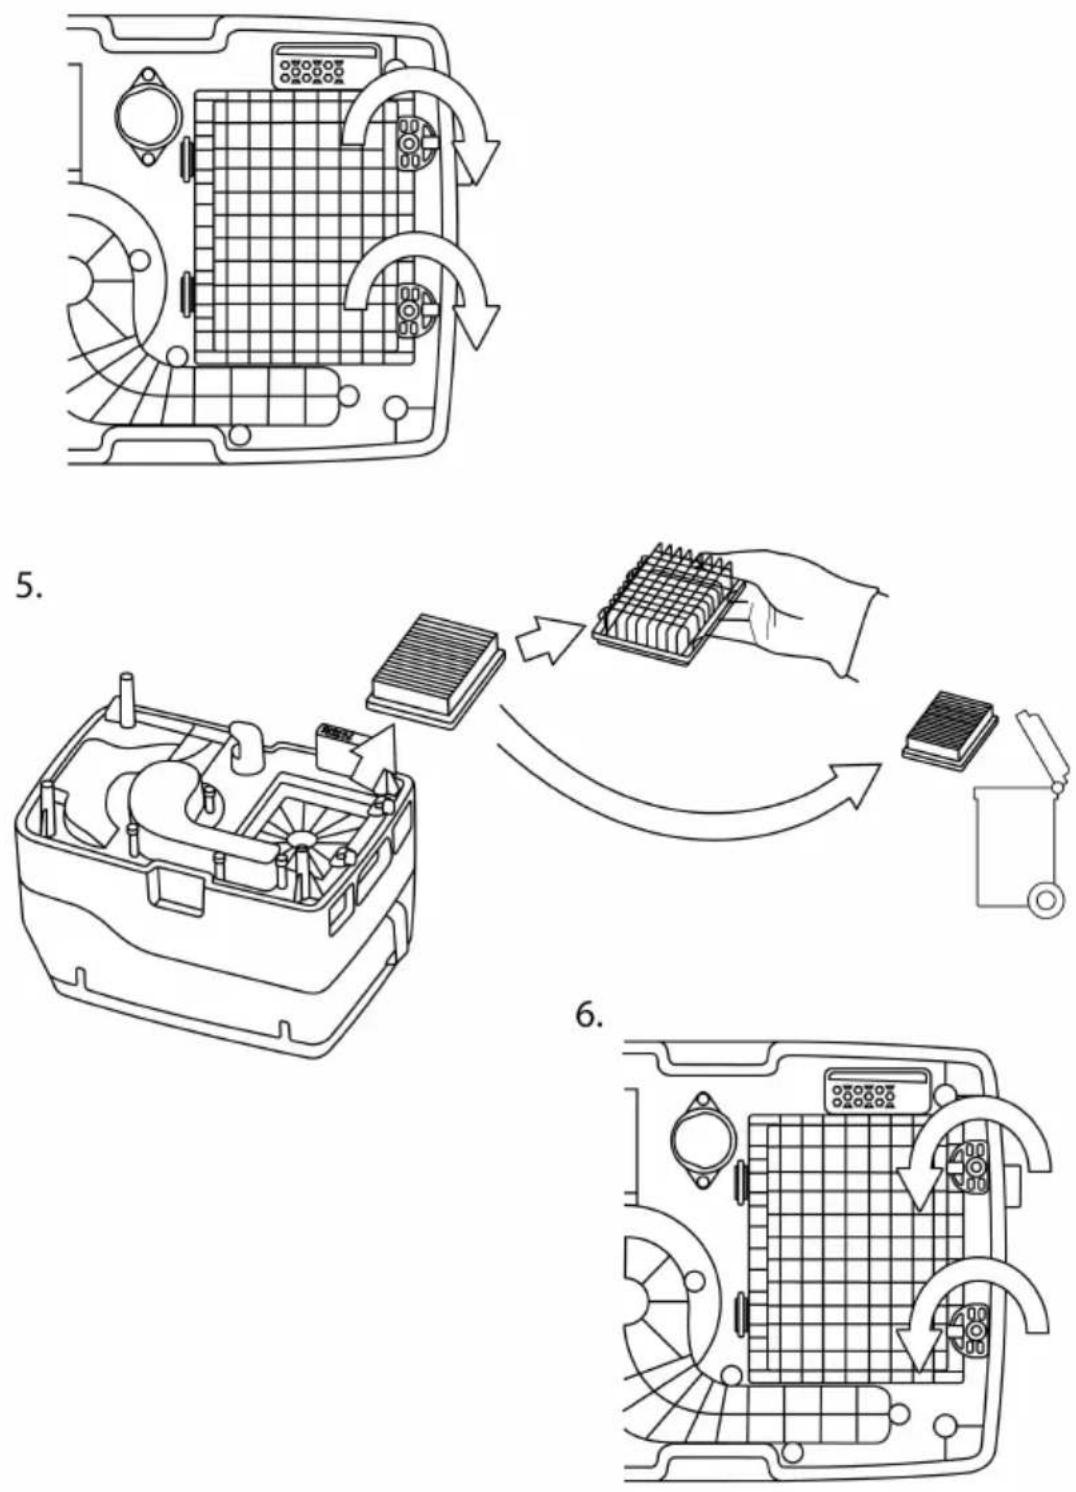
G. Filter replacement
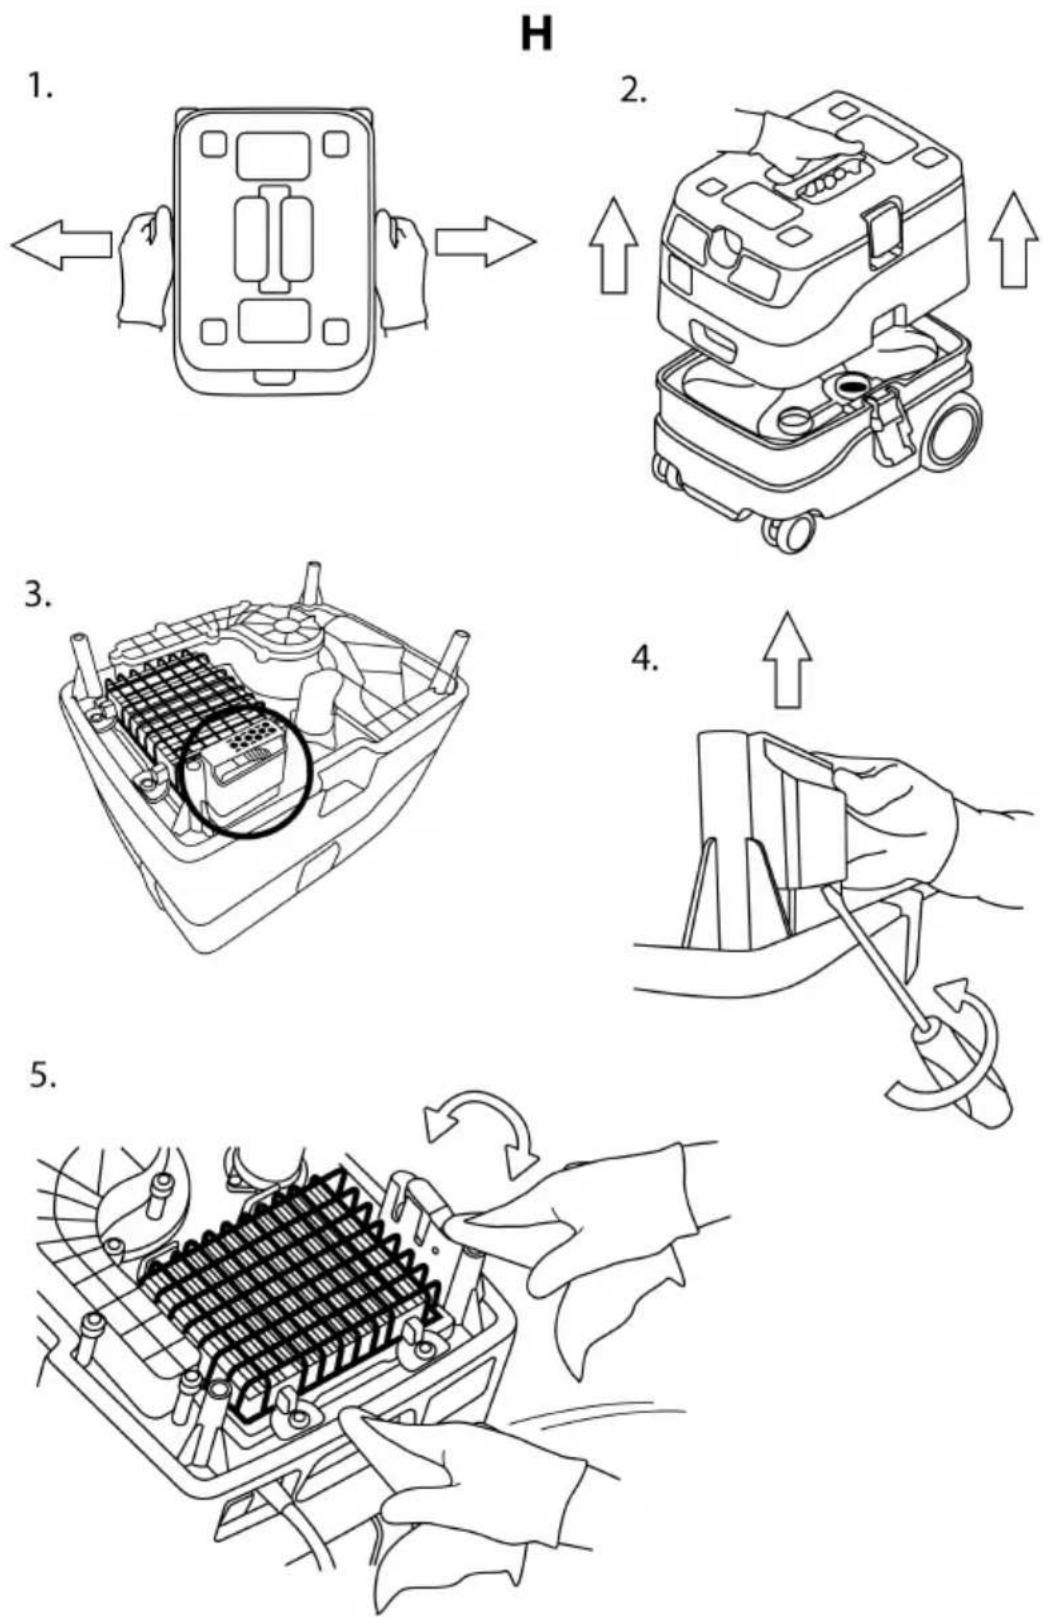
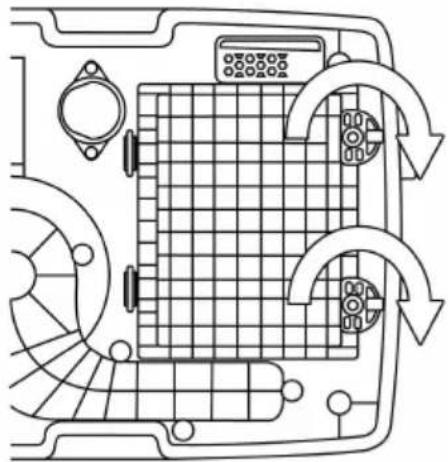
H. Gasket and float cleaning
Figure 2
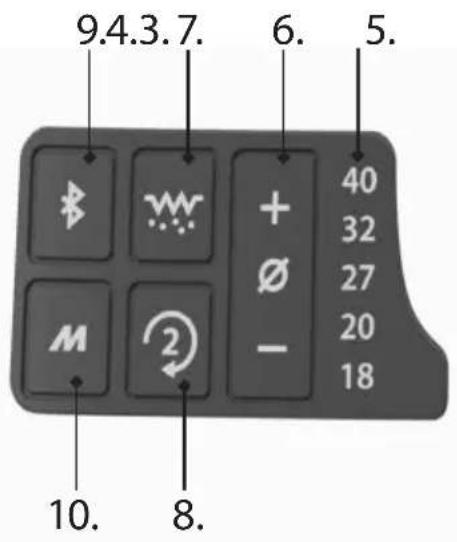
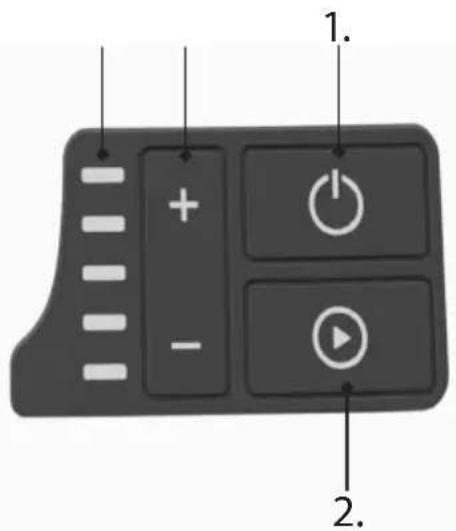
| Symbol/Button | Function(s) |
| 1. On/standby | Control panel and autostart enabled |
| 2. Start button | Manually start the dust extractor |
| 3. +/- Power | Adjust suction power |
| 4. Power level indicator | Displays current power of the dust extractor |
| 5. Hose diameter | Displays the hose diameter |
| 6. Hose setting | Select the hose diameter |
| 7. Auto filter cleaning | Enable/Disable auto filter cleaning |
| 8. Autostart from socket 2 | Dust extractor starts when power is drawn from socket 2 |
| 9. Bluetooth | Connect to device via Bluetooth |
| 10. Multifunction | Configurable via myMirka app. Default Push & Clean |
natural_image
Illustration showing a grid-patterned device and a motor with airflow arrows, no text or symbols present.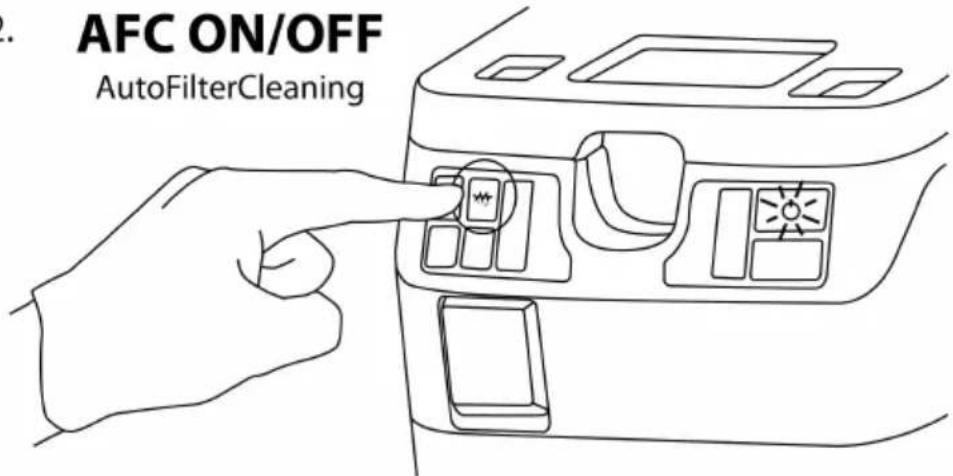

natural_image
Illustration showing a solar panel and a motor with airflow arrows (no text or symbols)B
1.
natural_image
Technical line drawings of three different MINK-branded industrial machines with internal components and wiring (no text or symbols)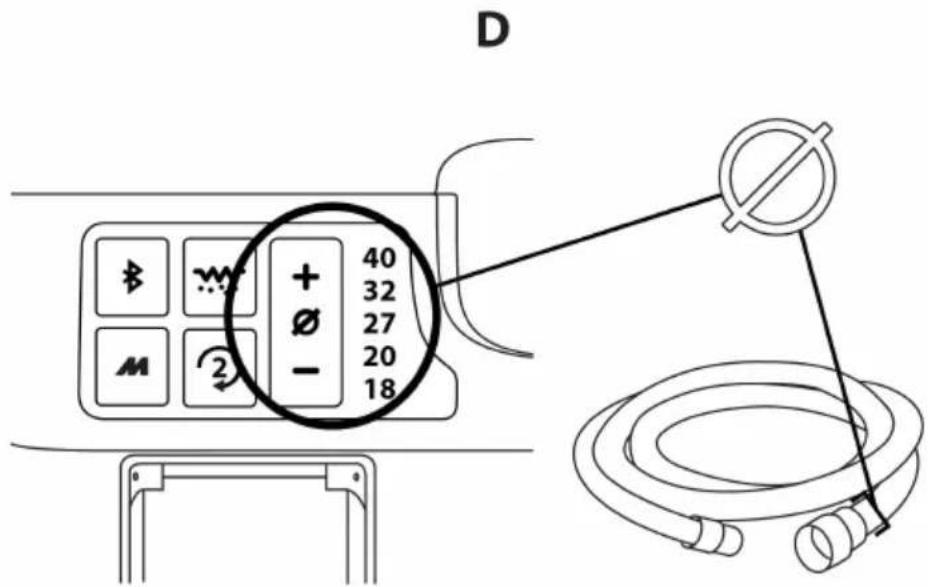
natural_image
Technical line drawing of a mechanical device with internal components and no visible text or symbols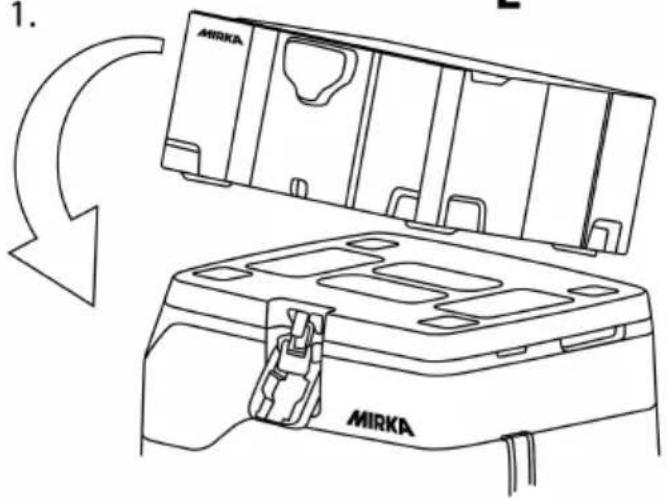
E
natural_image
Line drawing of a hand using a tool to adjust or install a component, no text or symbols present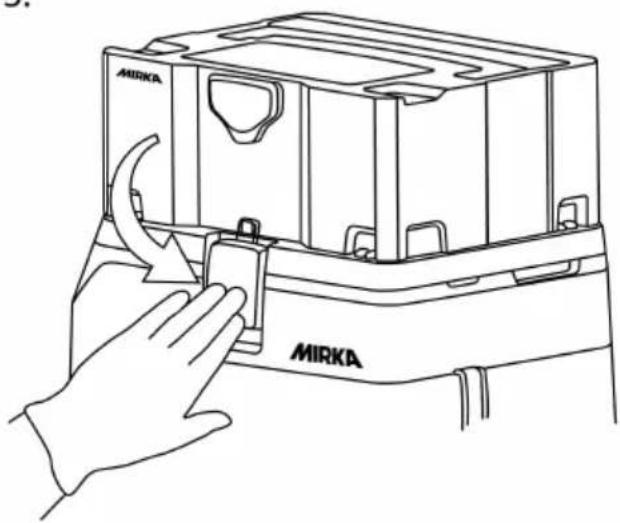
F
natural_image
Line drawing of a device with hands holding an open panel, showing directional arrows (no text or symbols)
natural_image
Line drawing of a mobile robot with hand and wheels, showing no text or symbols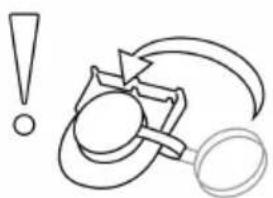
natural_image
Simple line drawing of a magnifying glass with an exclamation mark and curved arrows, no text or symbols present.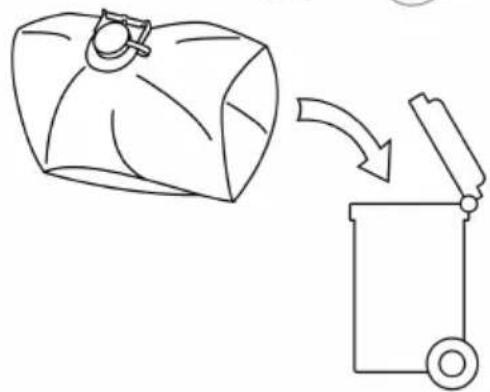
natural_image
Simple line drawing of a bag being lifted by a trash bin, no text or symbols present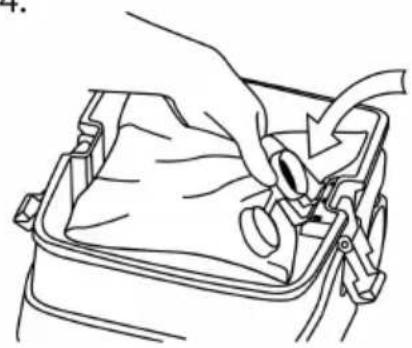
natural_image
Line drawing of a hand adjusting a device with a scroll wheel (no text or symbols)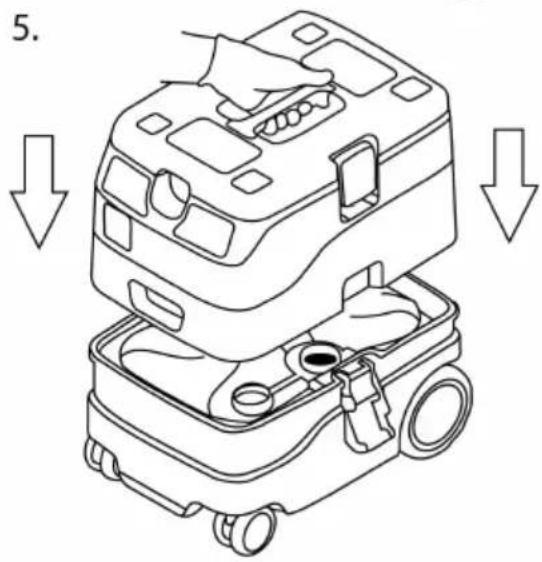
natural_image
Technical diagram of a mechanical or electrical component with grid pattern and directional arrows (no text or symbols)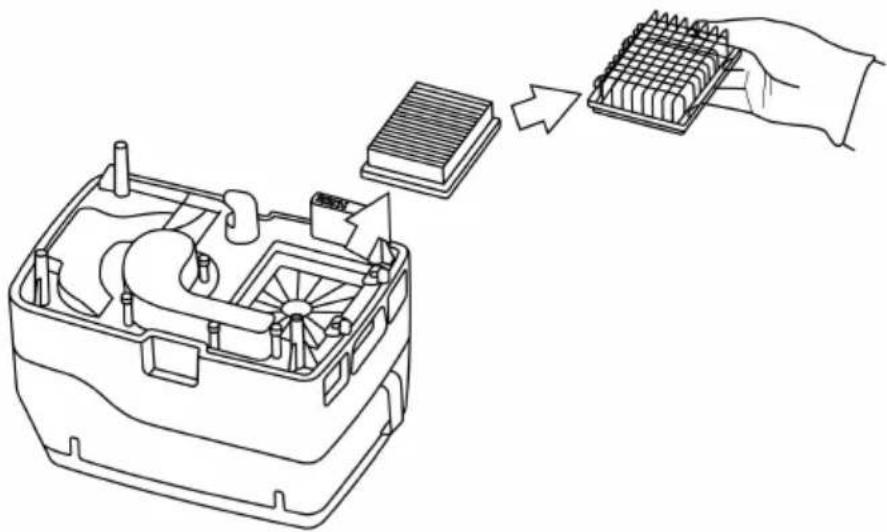
natural_image
Line drawing of a device with internal components and a hand holding a grid-like component (no text or symbols)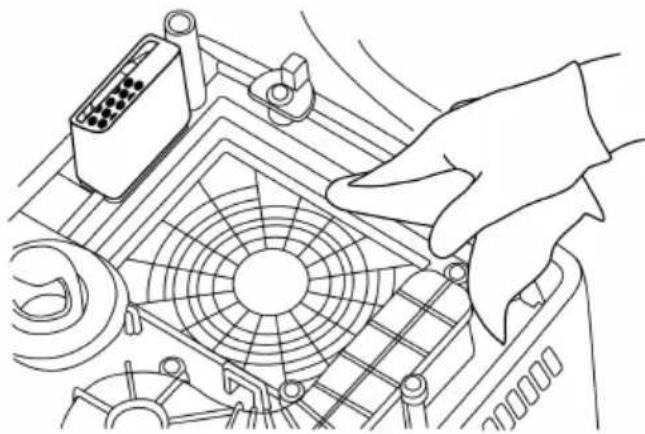
natural_image
Line drawing of a hand installing or adjusting a mechanical component with a fan and connector (no text or symbols)natural_image
Symbol of a trash bin with crossed lines indicating no waste or restriction, and a solid black rectangle below (no text or labels)natural_image
Symbol of a trash bin with crossed lines and a solid rectangle below (no text or labels)FARE
natural_image
Symbol of a trash bin with crossed lines indicating no waste or discharge (no text or labels)natural_image
Symbol of a trash bin with crossed lines indicating no waste, and a solid black rectangle below (no text or labels)Declaration of conformity
Mirka Ltd, 66850 Jeppo, Finland
declare under our sole responsibility that the Mirka® products (listed below and see "Technical data" table for particular model) to which this declaration relates are in conformity with the following standards or other normative documents: EN 60335-1:2012 + A11:2014 + A13:2017 + A1:2019 + A14:2019 + A2:2019 + A15:2021, EN 60335-2-69:2012, EN 62233:2008 + AC:2008, EN 62311:2008, EN IEC 62311:2020, EN IEC 55014-1:2021, EN IEC 55014-2:2021, EN IEC 61000-3-2:2019 + A1:2021, EN 61000-3-3:2013 + A2:2021, EN 300 328 V2.2.2, EN 301 489-1 V2.2.3, EN 301 489-17 V3.2.4 & EN IEC 63000:2018 in accordance with the regulations 2006/42/EC, 2014/53/EU, 2011/65/EU + 2015/863/EU.
Products: Mirka ^® DEXOS 1217 M AFC & 1230 M AFC
Jeppo 26.09.2025
Place and date of issue
Manufacturer/Supplier
Mirka Ltd
66850 Jeppo, Finland
Tel.+358 20 760 2111
Fax +358 20 760 2290
www.mirka.comStefan Sjöberg, CFO Company

Original instructions. We reserve the right to make changes to this manual without prior notice.
Important
Read these safety and operating instructions carefully before installing, operating or maintaining this tool. Keep these instructions in a safe and accessible place. Read and comply with state and local regulations.
Recommended personal safety equipment

Wear safety glasses

Wear
ear protection

Wear safety gloves
Wear face mask
Symbols
 | Complies with EU relevant standards |
 | Complies with Australia & New Zealand RCM requirement |
 | Complies with UK relevant regulations |
 | Read operator's manual |
 | Capacitor warning. Do NOT enter this compartment until 5 minutes after disconnecting all sources of supply |
 | Complies with Eurasian conformity requirements |

Warning: Potential hazardous situation that may result in death or serious injury and/or property damage. Caution: Potential hazardous situation that may result in minor or moderate injury and/or property damage.
General description & intended use of tool
This mobile dust extractor is designed, developed and rigorously tested to function efficiently and safely when properly maintained and used in accordance with the following instructions.
This machine is suitable for industrial use, for example at plants, construction sites and workshops. Accidents due to misuse can only be prevented by those using the machine.
READ AND FOLLOW ALL SAFETY INSTRUCTIONS.
Any other use is considered as improper use. The manufacturer accepts no liability for any damage resulting from such use. The risk for such use is borne solely by the user. Proper use also includes proper operation, servicing and repairs as specified by the manufacturer.
For Dust Class M machines the following applies:
The appliance is suitable for picking up dry, non-flammable dust and liquids, sawdust and hazardous dust with OEL (Occupational Exposure Limit) values ≥ 0,1 mg/m.
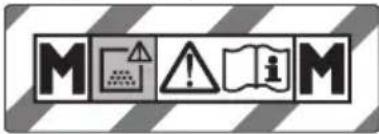
Warning label for dust class machines
Dust Class M (IEC 60335-2-69). Dust in this class includes: dust with OEL values ≥ 0.1 mg/m as well as sawdust. The machine has been tested in its entirety under vacuum for this dust class. The maximum degree of permeability is 0,1% and the exhaust air must be low in dust.
For dust extractors, ensure adequate air change rate M, when the exhaust air is returned to the room. Observe national regulations before use.
Before removing a M class machine from a hazardous area, make sure to decontaminate the dust extractor by wiping it clean or treating it with sealant.
Technical data
| DEXOS | 1217 EU | 1217 UK | 1217 CH | 1217 ANZ |
| Mains Voltage | 220 –240 VAC | 220 –240 VAC | 220 –240 VAC | 220 –240 VAC |
| Power | 1200 W | 1200 W | 1200 W | 1200 W |
| Maximum combined load for appliance sockets | 2400 W | 1750 W | 1100 W | 1100 W |
| Total mains load | 3600 W | 2950 W | 2300 W | 2300 W |
| Mains frequency | 50–60Hz | 50–60Hz | 50–60Hz | 50–60Hz |
| 10A10A13A16AFuse | ||||
| Protection grade (moist, dust) | IPX4 | IPX4 | IPX4 | IPX4 |
| Protection class (electrical) | I | I | I | I |
| Max. airflow (l/s)* | 42 l/s | 42 l/s | 42 l/s | 42 l/s |
| Max. airflow (m3/h)* | 151 m3/h | 151 m3/h | 151 m3/h | 151 m3/h |
| Max. airflow (CFM)* | 89 CFM | 89 CFM | 89 CFM | 89 CFM |
| Max. vacuum (kPa) | 25 kPa | 25 kPa | 25 kPa | 25 kPa |
| Max. vacuum (hPa) | 250 hPa | 250 hPa | 250 hPa | 250 hPa |
| Max. vacuum (in H_2O ) | 100 in H_2O | 100 in H_2O | 100 in H_2O | 100 in H_2O |
| Sound pressure level LPA (IEC 60335-2-69) | 77,7 dB(A) | 77,7 dB(A) | 77,7 dB(A) | 77,7 dB(A) |
| Vibration ISO 5349 ah | 2.5 m/s^2 | 2.5 m/s^2 | 2.5 m/s^2 | 2.5 m/s^2 |
| Weight | 13 kg (28.7 lbs) | 13 kg (28.7 lbs) | 13 kg (28.7 lbs) | 13 kg (28.7 lbs) |
| Filter surface area | 0.5 m^2 | 0.5 m^2 | 0.5 m^2 | 0.5 m^2 |
| MMMMDust class | ||||
| N/AN/AN/AN/AFilter class | ||||
| Container capacity | 17 l | 17 l | 17 l | 17 l |
| Working temperature range | -20 °C - 40 °C (-4 °F - 104 °F) | -20 °C - 40 °C (-4 °F - 104 °F) | -20 °C - 40 °C (-4 °F - 104 °F) | -20 °C - 40 °C (-4 °F - 104 °F) |
| 1230 CH1230 UK | |||
| Mains Voltage | 220-240 VAC | 220-240 VAC | 220-240 VAC |
| Power | 1200 W | 1200 W | 1200 W |
| Maximum combined load for appli-ance sockets | 2400 W | 1750 W | 1100 W |
| Total mains load | 3600 W | 2950 W | 2300 W |
| Mains frequency | 50-60Hz | 50-60Hz | 50-60Hz |
| Fuse | 16A | 13A | 10A |
| Protection grade (moist, dust) | IPX4 | IPX4 | IPX4 |
| Protection class (electrical) | I | I | I |
| Max. airflow (l/s)* | 42 l/s | 42 l/s | 42 l/s |
| Max. airflow (m3/h)* | 151 m3/h | 151 m3/h | 151 m3/h |
| Max. airflow (CFM)* | 89 CFM | 89 CFM | 89 CFM |
| Max. vacuum (kPa) | 25 kPa | 25 kPa | 25 kPa |
| Max. vacuum (hPa) | 250 hPa | 250 hPa | 250 hPa |
| Max. vacuum (in H2O) | 100 in H2O | 100 in H2O | 100 in H2O |
| Sound pressure level LPA (IEC 60335-2-69) | 77,7 dB(A) | 77,7 dB(A) | 77,7 dB(A) |
| Vibration ISO 5349 ah | 2.5 m/s2 | 2.5 m/s2 | 2.5 m/s2 |
| Weight | 14 kg (30.9 lbs) | 14 kg (30.9 lbs) | 14 kg (30.9 lbs) |
| Filter surface area | 0.5 m2 | 0.5 m2 | 0.5 m2 |
| Dust class | M | M | M |
| Filter class | N/A | N/A | N/A |
| Container capacity | 30 l | 30 l | 30 l |
| Working temperature range | -20 °C - 40 °C (-4 °F - 104 °F) | -20 °C - 40 °C (-4 °F - 104 °F) | -20 °C - 40 °C (-4 °F - 104 °F) |
* Specifications and details are subject to change without prior notice. Model range may vary between markets.

WARNINGS
- Do not use to pick up flammable or combustible liquids such as gasoline, or use in areas where they may be present.
- Operators shall be adequately instructed on the use of these machines
- The machine shall be disconnected from its power source during cleaning or maintenance and when replacing parts or converting the machine to another function by removing the plug from the socket-outlet.
- Only use the socket outlet on the machine for purposes specified in the instructions.
- To reduce the risk of fire, electric shock, or injury, please read and follow all safety instructions and caution markings before use. This machine is designed to be safe when used for cleaning functions as specified. Should damage occur to electrical or mechanical parts, the machine and/or accessory should be repaired by a competent service centre or the manufacturer before use in order to avoid further damage to the machine or physical injury to the user.
-
Do not use with damaged cord or plug. To unplug, grasp the plug, not the cord. Do not handle plug or machine with wet hands. Turn off all controls before unplugging.
-
Do not pull or carry by cord, use cord as a handle, close a door on cord, or pull cord around sharp edges or corners. Do not run machine over cord. Keep cord away from heated surfaces.
- Keep hair, loose clothing, fingers and all parts of the body away from openings and moving parts. Do not put any objects into openings or use with opening blocked. Keep openings free of dust, lint, hair, and anything else that could reduce the flow of air.
- Use extra care when cleaning on stairs.
- If the machine is not working properly or has been dropped, damaged, left outdoors, or dropped into water, return it to a service centre or the dealer.
- The machine may not be used as a water pump. The machine is intended for vacuuming air and water mixtures.
- Connect the machine to a properly earthed mains supply. The socket outlet and the extension cable must have an operative protective conductor
- Provide for good ventilation at the work place.
- Do not use the machine as a ladder or step ladder. The machine can tip over and become damaged.
- Outdoor use of the appliance must be limited to occasional use.
- Do not allow the supply cord to come into contact with the rotating brushes
- Do not allow the supply cord to come into contact with moving parts
- This machine is not intended for use by persons (including children) with reduced physical, sensory or mental capabilities, or lack of experience and knowledge.
• Children being supervised not to play with the appliance - This machine is intended for commercial use, for example in hotels, schools, hospitals, factories, shops, offices and rental businesses.
Hazardous dust
Vacuuming up hazardous materials can lead to serious or even fatal injuries. The following materials must not be picked up by the machine:
• Hot materials (burning cigarettes, hot ash, etc.)
- Flammable, explosive, corrosive liquids (e.g. petrol, solvents, acids, alkalis, etc.)
- Flammable, explosive dust (e.g. magnesium or aluminium dust, etc.)
Electrical components

Danger: The upper section of the machine contains live components. Contact with live components leads to serious or even fatal injuries. Never spray water on to the upper section of the machine.

Danger: Electric shock due to faulty mains connecting lead. Touching a faulty mains connecting lead can result in serious or even fatal injuries.
- Do not damage the mains power cord (e.g. by driving over it, pulling or crushing it).
- Regularly check whether the power cord is damaged or shows signs of ageing.
- If the power cord is damaged, it must be replaced by an authorized Mirka distributor or similar qualified person in order to avoid a hazard.
- In no circumstances should the power supply cord be wrapped around fingers or any part of the operator.
In explosive or inflammable atmosphere

Caution: This machine is not suitable for use in explosive or inflammable atmospheres or where such atmospheres are likely to be produced by the presence of volatile liquid or inflammable gas or vapour.
Additional warnings
Some dust created by power sanding, sawing, grinding, drilling, and other construction activities contains chemicals known to cause cancer, birth defects or other reproductive harm.
Some examples of these chemicals are:
- Lead from lead-based paints.
- Crystalline silica from bricks and cement and other masonry products.
- Arsenic and chromium from chemically treated lumber.
Your risk from these exposures varies, depending on how often you do this type of work. To reduce your exposure to these chemicals: work in a well ventilated area, and work with approved safety equipment, such as dust masks that are specially designed to filter out microscopic particles.
Instructions for safe use
The dust extractor must:
- Only be used by persons who have been instructed in its correct usage and explicitly commissioned with the task of operating it.
- Only be operated under supervision.
- This machine is not intended for use by persons (including children) with reduced physical, sensory or mental capabilities, or lack of experience and knowledge.
• Children must be supervised to make sure that they do not play with the dust extractor. - Do not use any unsafe working methods.
- Never use the dust extractor without a filter.
-
Switch off the dust extractor and disconnect the mains plug in the following situations:
-
Prior to cleaning and servicing
- Prior to replacing components
- Prior to changing dust bag or emptying container
- If foam develops or liquid emerges
Besides the operating instructions and the binding accident prevention regulations valid in the country of use, observe recognised regulations for safety and proper use.
Before starting work, the operating staff must be informed about and trained in:
- Use of the dust extractor.
- Risks associated with the material to be picked up.
- Safe disposal of the extracted material.
Operating instructions
The dust extractor can be damaged as a result of being connected to an unsuitable mains voltage.
- Ensure that the voltage shown on the rating plate corresponds to the voltage of the local mains power supply.
1. How to get started
Check that the power switch is switched off (in position 0). Check that suitable filters are installed in the dust extractor. Then connect the suction hose into the suction inlet on the dust extractor by pushing the hose until it fits firmly into the inlet. When used for dust extraction together with a dust-producing tool, connect the end of the suction hose using an appropriate adapter. Connect the plug into a proper electrical outlet. Put the power switch into position I in order to start the dust extractor, use control panel for further operations.
- Control panel functions (See figure 2 at the beginning of the manual)
| Function(s)Symbol/Button | |
| 1. On/standby | Control panel and autostart enabled |
| 2. Start button | Manually start the dust extractor |
| 3. +/- Power | Adjust suction power |
| 4. Power level indicator | Displays current power of the dust extractor |
| 5. Hose diameter | Displays the hose diameter |
| 6. Hose setting | Select the hose diameter |
| 7. Auto filter cleaning | Enable/Disable auto filter cleaning |
| 8. Autostart from socket 2 | Dust extractor starts when power is drawn from socket 2 |
| 9. Bluetooth | Connect to device via Bluetooth |
| 10. Multifunction | Configurable via myMirka app. Default Push & Clean |
3. Auto start from socket outlets
Earthed appliance sockets are integrated in the dust extractor. An external power tool can be connected there. The sockets features permanent power on when the power switch is set to the position I, i.e. the dust extractor can be used as an extension cord.
The dust extractor is equipped with an auto start function that detects when a tool connected to an outlet is turned on or off. For appliance socket 1, the auto start function is always enabled, while for appliance socket 2, it can be activated via control panel. When the tool is started the dust extractor detects the start. When the tool is stopped the dust extractor
is turned off after a certain delay to ensure that the dust hose is empty. The maximum power consumption of the connected electrical appliance is stated in the "Specifications" section. Before turning on the power switch, ensure that the tools connected to the appliance sockets are switched off.
3.1 Autostart sensitivity (MyMirka)
The sensitivity of the autostart function of both sockets 1 and 2 can be adjusted in the myMirka app. Connect your DEXOS via Bluetooth to the myMirka app (found on both Google Play and App store) to adjust the sensitivity. A higher level increases the sensitivity, while a lower level decreases it.
4. Filter Cleaning
The dust extractor is equipped with an automatic filter cleaning system, AFC. A frequent cleaning cycle will automatically run during operation to ensure that suction performance is always at its best. If suction performance decreases or in very dusty applications, cover the suction hose with your hand (use gloves) and hold it for about 15 seconds.
If suction power is still reduced take out the filter and clean it mechanically and make sure the filter is undamaged or replace the filter. For certain applications, such as wet pick-up, it is recommended to turn off the Auto Filter Cleaning system. For details see section "8. Wet pick-up"
5. Hose settings
Adjust the hose diameter setting with the buttons on the control panel to match the diameter of the hose at its largest end (as shown in section D).
6. Antistatic connection

Caution: The dust extractor is equipped with an antistatic system to discharge any static electricity that may develop during dust pick-up.
The hose fitting is connected to earth ground. For correct operation, the use of an electrically conductive or antistatic suction hose is recommended.
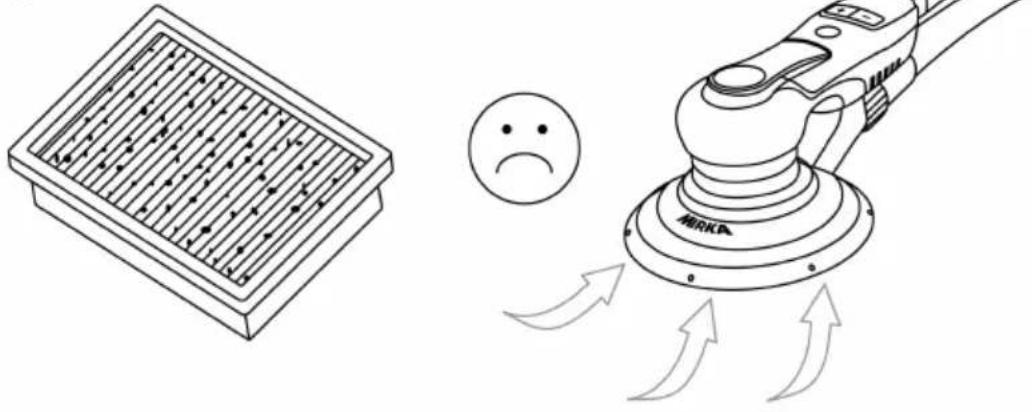
7. Motor cooling filters
To protect the electronics and motor, the machine is equipped with motor cooling filters. Clean the motor cooling filters regularly.

Caution: If the motor cooling filter is clogged by dust the over heating indication might be triggered and the motor stopped, clean the motor cooling filters and allow the dust extractor to cool for approximately 5 minutes.
8. Wet pick-up

Warning: If foam or liquid escapes from the machine, switch off immediately

Caution: The dust extractor is equipped with a water level limit system which puts the machine in standby when the maximum liquid level is reached. When this occurs, switch off the machine at the power switch. Disconnect the dust extractor from the socket and empty the container.

Caution: Never pick up liquids without the water level limit system and filter in place.

Caution: Clean the water level limiting device regularly and examine it for signs of damage.
Picking up liquids:
- Do not pick up flammable liquids.
- Before liquids are picked up, always remove the dust bag and check that the water level limit system works properly.
- Wet filters and the interior part of the liquid container shall be dried before storage
Before emptying the container, unplug the dust extractor. Disconnect the hose from the inlet by pulling out the hose. Release the container clamps by pulling them outwards so that the top unit is released. Lift the top unit off the container. Always empty and clean the container and water level limit system after picking up liquids.
Empty by tilting the container. Refit the top unit on the container. Secure the top unit with the container clamps (as shown in section F). Sudden movements can accidentally trigger the water level limiting device. Should this happen the dust extractor will be set to standby mode and a light indication will be shown on the control panel. To restart the dust extractor make sure that the float switch is not activated anymore and set the dust extractor to on/standby mode. Continue to operate the dust extractor afterwards.
9. Dry pick-up

Caution: Picking up environmentally hazardous materials. Materials picked up can present a hazard to the environment.
Dispose of the dust in accordance with legal regulations.
Unplug the dust extractor before emptying after dry pick-up. Release the container clamps by pulling them outwards so that the motor top is released. Lift the top unit off the container.
Filter: Check the filter. To clean the filter you can shake, brush or wash it. Wait until the filter is dry before re-starting dust pick-up. (See section G)
Dust bag: Please check the bag to ensure its fill factor. Replace the dust bag if necessary, and proceed to remove the old bag. The new bag should be attached using the three hooks located on the plastic part of the dust bag that fits onto the dust extractor (See section F).
After emptying: Close top unit on the container and secure the top unit with the container clamps. Never pick up dry material without having a filter fitted in the dust extractor. The suction efficiency of the dust extractor depends on the size and quality of the filter and dust bag. You should therefore only use an original filter and dust bags.
10. Volumetric flow monitoring
An acoustic warning signal sounds if the air speed in the suction hose falls below 20 m/s. The start button will flash between red and green.
| SolutionPossible causes | |
| Value set on the suction power adjuster is too low | Set the suction power adjuster to a higher value |
| Not set to the correct hose diameter. | Set to the correct hose diameter |
| Dust bag full. | Insert a new dust bag |
| Filter element clogged. | Check AFC function and clean the filter. Replace filter if necessary |
| Monitoring electronics malfunction. | Send the dust extractortoaMirka authorized service center for repair |
| Wet extraction. | Functional reliability not affected, no actions required |
Bluetooth
This tool is equipped with Bluetooth ^® low energy technology and can be connected to MyMirka app through which additional tool functionality can be accessed. For more information on the app functionality and if it is available in your country, go to www.mirka.com/mymirka
Activate Bluetooth on your Mirka® DEXOS as follows:
- Connect the power cord to mains outlet, press the power switch on.
- Switch the dust extractor on with the On/standby button, press the bluetooth button
- Bluetooth button starts blinking blue, the button lights up blue when connected
NOTE! If the app is not installed or if it is not available in your country, Bluetooth shall not be activated.
The Bluetooth ^® word mark and logos are registered trademarks owned by the Bluetooth SIG, Inc. and any use of such marks by Mirka Ltd is under license. Other trademarks and trade names are those of their respective owners.
Operations after use
Unplug the dust extractor from the socket when the dust extractor is not in use. Wind up the cord starting from the dust extractor. The power cord can be wound up inside the hose compartment, or hung from the power cord strap provided.
Transport
- Before transporting the dust extractor, close all the clamps.
- Do not tilt the dust extractor if there are liquids in the container.
- Do not use a crane hook to lift the dust extractor.
Storage

Caution: Store the machine in a dry place, protected from rain and frost. The machine must be stored indoors only.
For convenient transport the hose and cable can be stored inside the hose compartment. A flexible strap is included at the back of the dust extractor for attachment of the power cord. For instructions, see quick reference guide.
A case fastening system is located on top of the dust extractor. See quick reference guide.

Caution: Do not lift the dust extractor and case fastening accessory without ensuring that the storage case is safely installed. Note the weight and balance of the appliance in case of storage. Maximum weight of storage cases is 30 kg
Maintenance
Regular servicing and inspection
Regular servicing and inspection of your dust extractor must be carried out by suitably qualified personnel in accordance with relevant legislation and regulations. In particular, electrical tests for earth continuity, insulation resistance, and condition of the flexible cord should be carried out frequently.
In the event of any defect, the dust extractor MUST be withdrawn from service, completely checked and repaired by an authorized service technician. At least once a year, a Mirka technician or an instructed person must perform a technical inspection including filters, air tightness and control mechanisms.
Maintenance
Remove the power cord from the mains socket before performing maintenance. Before using the dust extractor make sure that the frequency and voltage shown on the rating plate correspond with the mains voltage.
The dust extractor is designed for continuous heavy work. Depending on the number of running hours – the dust filter should be renewed. Keep the dust extractor clean with a dry cloth or a damp cloth from water.
During maintenance and cleaning, handle the dust extractor in such a manner that there is no danger to maintenance staff or other persons. In the maintenance area:
• Use filtered compulsory ventilation.
- Wear protective clothing.
- Clean the maintenance area so that no harmful substances get into the surroundings.
During maintenance and repair work all contaminated parts that cannot be cleaned satisfactorily must be:
- Packed in well-sealed bags.
- Disposed of in a manner that complies with valid regulations for such waste removal.
If the power cord is damaged, it must be replaced by the manufacturer, its service agent or similarly qualified persons in order to avoid a hazard.
For details of after sales service, contact your dealer or Mirka service representative responsible for your country. See reverse of this document.
Spare parts and accessories
| Mirka codeDescription | |
| MIX1214071Filter for DEXOS | |
| HEPA Filter for DEXOS | MIX1264071 |
| Cooling air filter kit for DEXOS | MIX1212131 |
| Dust bag fleece DEXOS 1217, 5 pack | MIX1215171 |
| Dust bag fleece DEXOS 1230, 5 pack | MIX1216171 |
The use of non-genuine spare parts and accessories can impair the safety and/or function of the dust extractor. Only use original spare parts and accessories from Mirka. Spare parts that can affect the health and safety of the operator and/or function of the dust extractor, are specified above.
NOTE! Exploded view and spare parts list available at www.mirka.com
Troubleshooting guide
| SolutionPossible causeSymptom | ||
| The start button flashes between red and white | Connected to a mains outlet with wrong voltage | Connect the dust extractor to a mains outlet that correspond with the nominal voltage of the dust extractor |
| No light from control panel when switched on | Power cord not properly attached to the dust extractor or to the mains socket. | Connect it properly |
| The start button flashes between red and green and the buzzer will be activated | Insufficient airflow | See chapter 10 in Operating instructions |
| The start button flashes between red and yellow | Float switch activation | See chapter 8 in Operating instructions |
| The dust extractor has stopped and start button is solid red | The dust extractor is in safety mode due to high temperature | Wait until the dust extractor has cooled down |
Disposal information

natural_image
Symbol of a trash bin with crossed lines indicating no waste or restriction, and a solid black rectangle below (no text or labels)DANGER
Render redundant dust extractors unusable by removing the power cord.
Observe applicable country-specific regulations regarding disposal and recycling of disused machines, packaging and accessories.
EU only: Do not dispose dust extractors in house-hold waste. According to European Directives on waste electrical and electronic equipment and its implementation under national law, dust extractors that have reached the end of their life must be collected separately and taken to an environmentally compatible recycling facility.
For more information regarding REACH, RoHS and our corporate social responsibility visit www.mirka.com
natural_image
Symbol of a trash bin with crossed lines indicating no waste or discharge, and a solid black rectangle below (no text or labels)natural_image
Symbol of a trash bin with crossed lines indicating no waste or restriction, and a solid black rectangle below (no text or labels)natural_image
Symbol of a trash bin with crossed lines indicating no waste, and a solid black rectangle below (no text or labels)natural_image
Symbol of a trash bin with crossed lines indicating no waste or discharge, and a solid black rectangle below (no text or labels)natural_image
Symbol of a trash bin with crossed lines indicating no waste or restriction, and a solid black rectangle below (no text or labels)OPASNOST
Stavite nepotrebne usisivače prašine van upotrebe odspajanjem napojnog kabela.
Poštujte primjenjive nacionalne propise za odlaganje i recikliranje neupotrebljivih strojeva, ambalaže i dodatnog pribora.
Samo za EU: Nemojte odlagati usisivače prašine u otpad kućanstva. U skladu se europskim direktivama o odlaganju električne i elektroničke opreme te provedbe odlaganja u skladu s nacionalnim pravom, otpadni usisivači prašine moraju se sakupiti odvojeno i odložiti u ekološki prihvatljiv objekt za recikliranje.
natural_image
Symbol of a trash bin with crossed lines indicating no waste or restriction, and a solid black rectangle below (no text or labels)תְקַרָה בְּרָה
natural_image
Symbol of a trash bin with crossed lines indicating no waste or restriction, and a solid black rectangle below (no text or labels)natural_image
Symbol of a trash bin with crossed lines indicating no waste or restriction, and a solid black rectangle below (no text or labels)적합성 선언문
Minka Ltd
66850 Jeppo, Finland
natural_image
Symbol of a trash bin crossed with two crossed lines, no text or labels presentnatural_image
Symbol of a trash bin with crossed lines indicating no waste or discharge (no text or labels)natural_image
Symbol of a trash bin with crossed lines indicating no waste or discharge (no text or labels)natural_image
Symbol of a trash bin with crossed lines indicating no waste or discharge (no text or labels)natural_image
Symbol of a trash bin crossed with a diagonal line and a horizontal bar below (no text or labels)Stefan Sjöberg, Director ExecutivCompania
Producător/Furnizor
Mirka Ltd
66850 Jeppo, Finlanda
Tel. +358 20 760 2111
Fax +358 20 760 2290
www.mirka.com
natural_image
Symbol of a trash bin with crossed lines indicating no waste or discharge, and a solid black rectangle below (no text or labels)natural_image
Symbol of a trash bin with crossed lines indicating no waste or restriction, and a solid black rectangle below (no text or labels)ОПАСНО!
natural_image
Symbol of a trash bin with crossed lines indicating no waste or restriction, and a solid black rectangle below (no text or labels)NEVARNOST
natural_image
Symbol of a trash bin with crossed lines indicating no waste, and a solid black rectangle below (no text or labels)Nepotrebne usisivače za prašinu učinite nefunkcionalnim tako što ćete izvući utikač kabla za napajanje iz strujne utičnice.
Pridržavajte se primenljivih nacionalnih propisa o odlaganju i recikliranju rashodovanih mašina, ambalaže i dodatne opreme.
Samo za EU: Nemojte odlagati usisivače za prašinu u otpad domaćinstva. U skladu s evropskim direktivama o odlaganju električne i elektronske opreme i njihovoj primeni u skladu sa nacionalnim zakonima, usisivači za prašinu čiji je vek trajanja prošao moraju se prikupljati zasebno i odneti u ekološki kompatibilnu ustanovu za recikliranje.
natural_image
Symbol of a trash bin with crossed lines indicating no waste or restriction, and a solid black rectangle below (no text or labels)FARA
natural_image
Symbol of a trash bin with crossed lines indicating no waste or restriction, and a solid black rectangle below (no text or labels)Declaration of conformity
| Mirka Ltd, 66850 Jeppo, Finlanddeclare under our sole responsibility that the Mirka® products (listed below and see "Technical data" table for particular model) to which this declaration relates are in conformity with the following standards or other normative documents: BS EN 60335-1:2012 + A11:2014 + A13:2017 + A1:2019 + A14:2019 + A2:2019 + A15:2021, BS EN 60335-2-69:2012, BS EN 62233:2008 + AC:2008, BS EN 62311:2008, BS EN IEC 62311:2020, BS EN IEC 55014-1:2021, BS EN IEC 55014-2:2021, BS EN IEC 61000-3-2:2019 + A1:2021, BS EN 61000-3-3:2013 + A2:2021, BS EN 300 328 V2.2.2, BS EN 301 489-1 V2.2.3, BS EN 301 489-17 V3.2.4 & BS EN IEC 63000:2018 in accordance with the regulations Supply of Machinery (Safety) Regulations 2008, The Restriction of the Use of Certain Hazardous Substances in Electrical and Electronic Equipment Regulations 2012, Radio Equipment Regulations 2017. | ||
| Products: Mirka® DEXOS 1217 M AFC & 1230 M AFC | ||
| Jeppo 26.09.2025Place and date of issue |  Company Company |  Stefan Sjöberg, CEO Stefan Sjöberg, CEO |
| Manufacturer / SupplierMirka Ltd66850 Jeppo, FinlandTel. +358 20 760 2111Fax +358 20 760 2290www.mirka.com | Importer InformationMirka (UK) LtdSaxon HouseShirwell CrescentFurzton LakeMilton KeynesMK4 1GATel. +44 (0)1908 866100 |  |
This chapter is an addition to the English language chapter of the manual in order to fulfill the UKCA regulation requirements. Please refer to the English language chapter for more information about your product.
Statement of Compliance
We Mirka Ltd, hereby declare under our sole responsibility that the above-mentioned products, to which this statement relates, complies with the compliance conditions in Schedule 2 of The Product Security and Telecommunications Infrastructure (Security Requirements for Relevant Connectable Products) Regulations 2023.
The defined support period for the above-mentioned products is two years after the production date. The production date can be found on the marking plate of the products month/year.
geo
| Location | Marker | | -------- | ------ | | Mirka Ltd | 1 | | Finland | 2 |MirkaLtd
Finland
BrazilMirkaBrasilLtda.
BelgiumMirkaBelgiumLogisticsNV
CanadaMirkaCanadalnc.
ChinaMirkaTradingShanghaiCo.,Ltd
Finland&BalticsMirkaLtd
FranceMirkaFranceSarl
GermanyMirkaGmbH
IndiaMirkalndiaPvtLtd
ItalyMirkaltalias.r.l., CafroS.p.A.
MexicoMirkaMexicanaS.A.deC.V.
NetherlandsMirkaBeneluxB.V
PolandMirkaPolandSp.zo.o
SingaporeMirkaAsiaPacificPteLtd
SpainKWHMirkalbéricaS.A.U.
SwedenMirkaScandinaviaAB
TurkeyMirkaTurkeyZimparaLtdŞirketi
UnitedKingdomMirka(UK)Ltd
UnitedArabEmiratesMirkaMiddleEastFZCO
USAMirkaUSAInc.
Forcontactinformation,
pleasevisitwww.mirka.com


- Operating elements
- Pictorial quick reference guide
- F
- FARE
- Declaration of conformity
- Mirka Ltd, 66850 Jeppo, Finland
- Manufacturer/Supplier
- Important
- Recommended personal safety equipment
- Symbols
- General description & intended use of tool
- WARNINGS
- Hazardous dust
- Electrical components
- In explosive or inflammable atmosphere
- Additional warnings
- Instructions for safe use
- The dust extractor must:
- Operating instructions
- How to get started
- Auto start from socket outlets
- Autostart sensitivity (MyMirka)
- Filter Cleaning
- Hose settings
- Antistatic connection
- Motor cooling filters
- Wet pick-up
- Picking up liquids:
- Dry pick-up
- Volumetric flow monitoring
- Bluetooth
- Operations after use
- Transport
- Storage
- Maintenance
- Regular servicing and inspection
- Disposal information
- DANGER
- OPASNOST
- תְקַרָה בְּרָה
- 적합성 선언문
- Minka Ltd
- Jeppo, Finland
- Producător/Furnizor
- ОПАСНО!
- NEVARNOST
- FARA
- Statement of Compliance
Brand : Mirka
Model : DEXOS 1217 M AFC
Category : Handheld vacuum