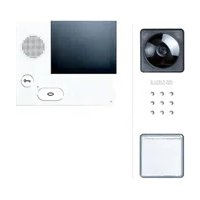
BVPC 850-0 - Intercom Siedle - Free user manual and instructions
Find the device manual for free BVPC 850-0 Siedle in PDF.


User questions about BVPC 850-0 Siedle
0 question about this device. Answer the ones you know or ask your own.
Ask a new question about this device
Download the instructions for your Intercom in PDF format for free! Find your manual BVPC 850-0 - Siedle and take your electronic device back in hand. On this page are published all the documents necessary for the use of your device. BVPC 850-0 by Siedle.
USER MANUAL BVPC 850-0 Siedle
natural_image
Line drawing of a flat-screen computer monitor with control buttons (no text or symbols)BVPC 850-0
Bedienungsanleitung
Bus-Video-Panel
Operating Instructions
Bus video panel
natural_image
Technical line drawing of a door panel with a door handle and lock, showing no text or symbolstext_image
Screenshot of a photo editing interface with a portrait image and adjustment buttons- Standard 2
natural_image
Black-and-white portrait of a smiling woman with no visible text or symbolsnatural_image
Black-and-white portrait of a smiling woman with shoulder-length hair (no text or symbols visible)Display reinigen

| Contents |
| General information 15 |
| Product description 15 |
| Product overview 16 |
| Overview of menus and symbols 17 |
| Operation 22 |
| Basic functions 22 |
| Automatic image pick-up 23 |
| Video memory 23 |
| SD card 24 |
| Ringtone and ringtone volume 24 |
| Display mode 24 |
| Cleaning 25 |
| Servicing work 25 |
Electrical voltage
Mounting, installation and servicing work on electrical devices may only be performed by a suitably qualified electrician.
Operating remarks
In order to avoid damage to the panel, please note the following: The touchscreen and the buttons can be damaged by using sharp-edged or pointed objects such as ballpoint pens or keys.
Only ever use your finger to operate the panel.
Care instructions
Dry, aggressive cleaning agents and abrasive detergents can damage the surface!
Only ever clean your indoor device using a soft damp cloth.
Please ensure that no moisture ever penetrates the housing.
Intended application
The panel is part of a door communication system and may only be used exclusively within this system. Siedle does not accept any liability for damage caused as a result of using the equipment for any other than its intended purpose.
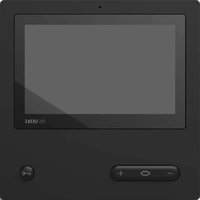
With its large touchscreen, the bus video panel sets new standards in the field of indoor video stations. Meaningful symbols and a clearly arranged menu structure permit simple, intuitive operation.
Performance features
The panel offers all the functions of a video indoor station:
- Call differentiation for a total of
- two door calls,
- four group calls
- one internal call and
- one storey call
- Selection of 11 different ringtones
- Integrated audio and video privacy
- Targeted dialling of door loudspeakers/cameras
Door and video connection possible at any time, also possible without prior door call.
- Camera scan
- Integrated video memory, can be extended with supplied SD card
- Up to 15 switching/control functions in conjunction with the bus switching module BSM/BSE..., selective dialling of door loudspeakers/cameras
- Programming of up to 15 call numbers possible; Feedback for switching/control functions and messages in conjunction with bus input module BEM...
- Intercom functions:
- Call forwarding
- Internal group call
- Collective announcement
- Automatic call pick-up with internal call
- Doormatic on/off/time controlled
- Status display in case of
- active speech connection
- active ringtone muting
Scope of supply
BVPC 850-... comprising:
- Bus video panel
- SD card
- Product information
- Operating instructions
Bus switching module/ bus input module
Together with the bus switching module BSM... and the bus switching unit BSE..., it is possible to trigger switching and control functions using the panel.
In conjunction with the bus input module BEM..., it is also possible (with the bus switching unit BSE...) to have the system display different switching statuses at the panel – for instance in the form of messages.
Overall up to 15 different actions or status enquiries can be defined.
Table-top accessory
Can be used as a table top unit using table-top accessory ZTVP 850-...
text_image
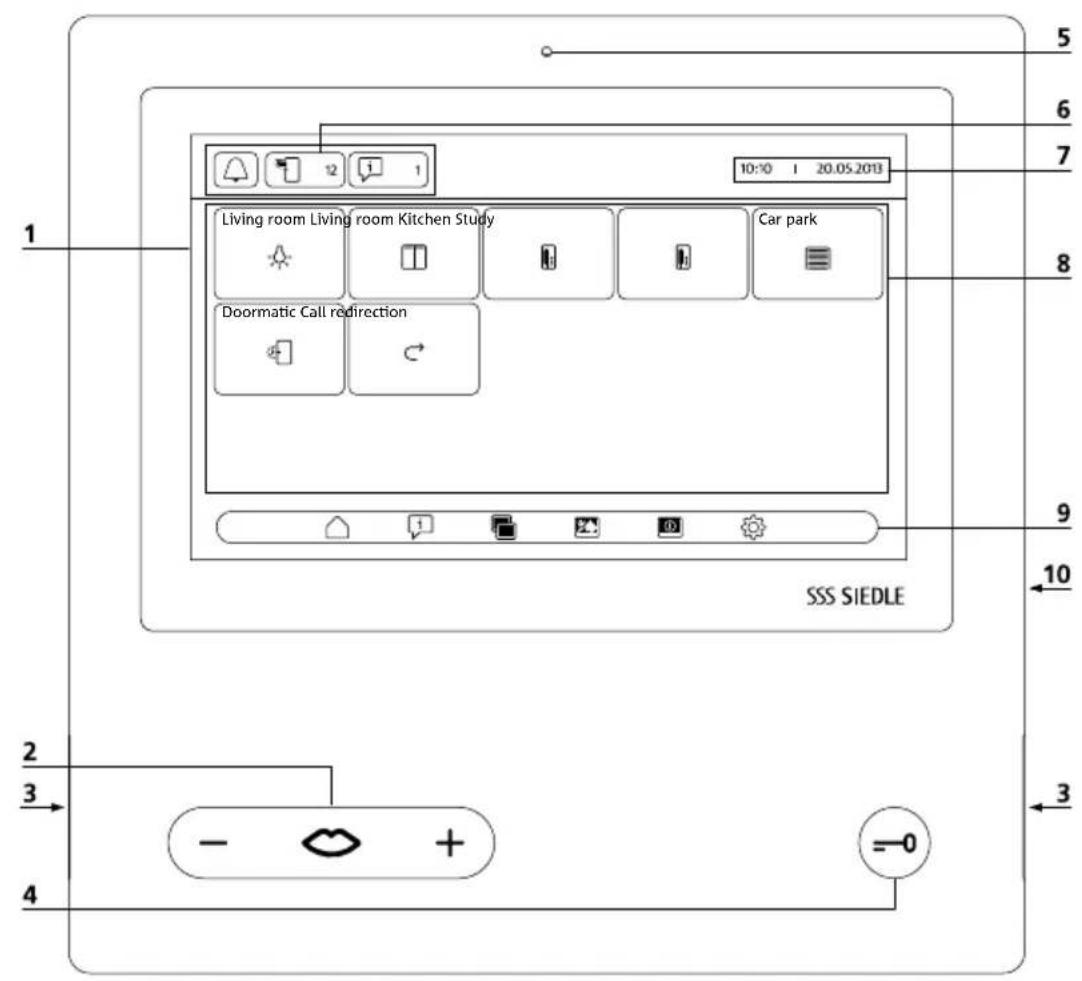
1 2 3 4 5 6 7 8 9 10 SSS SIEDLE Living room Living room Kitchen Study Car park Doormatic Call redirectionThe bus video panel is characterized by its generously dimensioned touchscreen.
Two buttons are assigned to the basic functions "Speech"/"Regulate volume" and "Door release". Other functions are actuated at the display.
1 Display with touch function (touchscreen)
2 Speech button with LED display and rocker switch for setting the speech volume
3 Loudspeaker
4 Door release button
5 Microphone
6 Status displays
7 Display of the start menu, time and date (standard configuration)
8 Content area
9 Navigation bar
10 Card slot for SD card
text_image
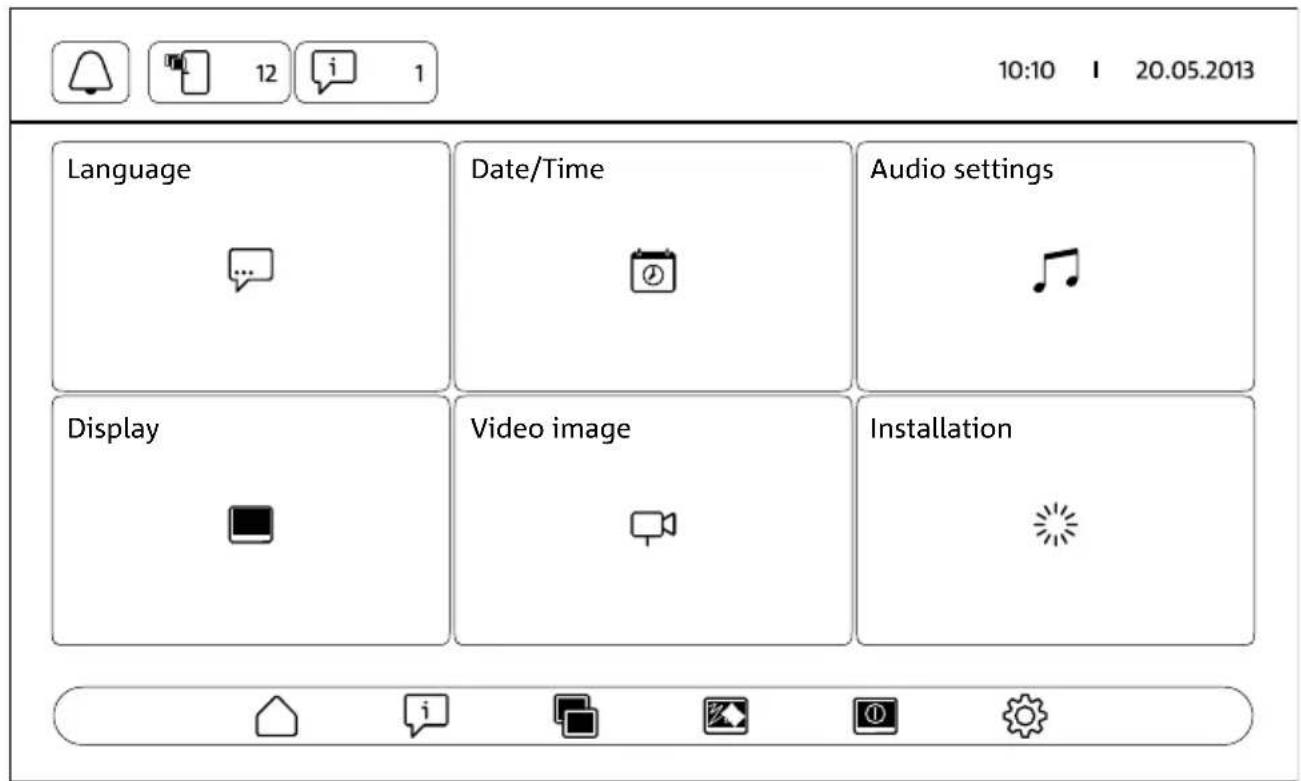
10:10 20.05.2013 Language Date/Time Audio settings Display Video image InstallationStatus displays
| Ringtone muting Accessing the Ringtone muting menuHere, it is possible tomute the ringtone.mute the ringtone for a certain time.switch the ringtone back on.The symbol indicates whether acoustic signalling of door calls and telephone calls is active or has been muted. | ||
| Missed door calls Accessing the Video memory menuRemark: The symbol only appears in the status display if new images have been taken. The number behind the symbol indicates the number of missed door calls for which new images have been stored (up to 999). | ||
| Messages Accessing the Messages menuRemark: The symbol only appears in the status display if a status change has been registered at the panel for one of the pre-defined events. The number behind the symbol indicates the number of logged status changes (up to 999). | ||
| Call redirection Status display “Call redirection active”Remark: The symbol only appears in the status display if the function is switched on. | ||
| Automatic call acceptance | Status display “Automatic call acceptance active”Remark: The symbol only appears in the status display if the function is switched on. | |
| Doormatic Status display “Doormatic active”Remark: The symbol only appears in the status display if the function is switched on. The door release button lights up in addition. | ||
Navigation bar / Content area
| [7852] | Home screen Accessing the home screen with the individually stored functionsUsing the home screen, it is possible to access the control functions and intercom functions set up by your electrical installer.Remark: Only those functions are displayed which have actually been programmed for your panel. | |
 | Call redirection Switching call redirection on and offIncoming calls are rerouted to a different indoor device.Remarks:As long as call redirection is active, the relevant symbol appears in the status display.You can continue to accept incoming calls at your panel. | |
 | Internal group call Placing an internal group callIndoor devices can be collated into a group.Using this function, all the devices of a group are called simultaneously. The speech connection is established to the user which first picks up the call. | |
 | Collective announcement | Placing a collective announcementAnnouncement to one or more hands-free telephones and/or panelsThis function can be used for instance for making an announcement in a waiting room or for searching for individual personnel in a building. |
| [2TTA] | Automatic call acceptance | Switching automatic call acceptance on and offIncoming internal calls are automatically accepted and the speech connection established. |
 | Doormatic Switching Doormatic on and offThe door release is automatically actuated after pressing the call button, either for one specific door or all doors depending on the programming.Remarks:The Doormatic function can be switched on for undetermined time periods, and also for a specific time span (up to max. 9 hours 59 minutes).As long as the Doormatic function is active, the relevant symbol appears in the status display and the door release button lights up. | |
 | Camera step Accessing the camera scan functionAll the cameras available in the system are cyclically actuated in a defined sequence (up to 8 cameras). After 30 minutes, the camera scan is automatically interrupted. During this period, the display is not switched off.In order to interrupt the camera scan beforehand, change to the home screen and press on the camera scan function again. An active camera scan is displayed in the navigation bar with and in the home screen with a yellow symbol.In order to change more quickly to the next camera image, tap twice in quick succession using your finger on the displayed video image. | |
| Navigation bar / Content area | ||||
| (Home screen continued)Additional symbols | Call door |  | Open or closegaragedoor | |
| Make internal call | [1WKK] | Open or closeshutter | ||
| Light switchinge.g. open shutter, temperature +1 °C, etc. | ||||
| On/off switche.g. close shutter, temperature -1 °C, etc. | ||||
| Messages Accessing the Messages menuThe Messages menu allows you to display predefined events, such as the arrival of mail in the letterbox.The messages must be programmed by the electrical installer.Remarks:For this function to be usable, you require a bus input module and additional accessories such as a mail notification system.Up to 15 messages can be defined.Only the information relating to switching statuses which have actually been programmed for your panel will be displayed. | ||||
sages menu
Remarks:
Navigation bar / Content area
 | Settings Accessing the Settings menu | |
 | Language Language selection | |
 | Date/Time Setting of: | The time and time formatAutomatic time changeover (summertime / normal time)Date and date formatRemark:The date and time are required in order to assign the correct time to new pictures. |
 | Audio settings | Ringtone selection for different types of call (11 different ringtones)Ringtone volume (adjustable in 5 stages)Call volume (adjustable in 5 stages)Microphone sensitivity (adjustable in 3 stages) |
 | Display Setting of: | Brightness (adjustable in 5 stages)Time after which the display switches off(can be set between 5 and 99 seconds/minutes)Signalling missed door calls (activate/deactivate) |
 | Video image Setting of: | Number of images taken automatically during an active door call and conversation (can be set between 0 and 5 images)First image recording delay (additional image recording delay from when the system is ready for recording after a call is initiated; can be set between 0 and 8 seconds)Recording delay for further images (can be set between 2 and 8 seconds)Brightness (steplessly adjustable)Colour saturation (steplessly adjustable)Image format used after tapping the transmitted door image (display mode)Save images (activate/deactivate automatic image saving) |
 | Installation • Settings for the electrical installer (programming mode, load SD card configuration)Formatting the SD cardResetting to default settings | |
Navigation bar / Content area
| Active call / activeintercom connection | Signals active call / active intercom connection or active camera scan | |
| Light Switching the light on or off | Remark:The different white and yellow colours of this symbol indicate the current status ("off" or "on").If the light can be switched using a different switch, the actual switching status is only correctly displayed in conjunction with a BEM... | |
| Microphone silencing Switching microphone silencing on or off | Using the microphone silencing function, you can mute the microphone in the panel during an active call in order to talk privately to a person in the room. Your call partner at the door or the internal user cannot hear your conversation.The active audio privacy function is indicated by the microphone symbol with a line through it. | |
| Save image Taking a picture manually | ||
Operation Basic functions
Display navigation
Navigation in the display works with the aid of buttons and symbols which you can select by tapping.
Note
The panel should only ever be operated using your fingers. Do not use any sharp-edged or pointed objects.
Switching on the display
- Tap the display to switch it on.
Switching off the display

- Tap the symbol "Switch off display".
The panel changes to the standby mode.
Remarks
- Without user activity, the panel changes after a defined period automatically to the stand-by mode. This period can be set under Settings >
Display > Switch off display.
- If the panel is in standby mode, you will still be made aware of missed door calls and new messages.
In this case, the relevant status symbols flash even if the display is switched off.
Accepting a call
As soon as a visitor actuates the call button at the door, the panel rings and the speech button flashes. The display switches on and the picture of the visitor can be seen in the display.
The call can be accepted within 45 seconds of the last ringtone.
- Press the speech button. During an active call, the speech button lights up.
Note
The panel only transmits speech in one direction and automatically switches over.
If the automatic switchover does not work due to loud incidental noises at the door station, it is possible to force switch-over of the speech direction from the apartment station to the door station by pressing and holding down the speech button in the centre. As soon as this button is released, the speech direction switches over from the door station to the panel.
Door release

To open the door from which the last door call was made:
- Press the door release button. The door is opened for 3 seconds.
Ending a call
During an active call, the speech button lights up.
- Press the speech button in order to terminate the call.
Setting the call volume
The call volume can be set in five steps – both during a call and also without an active call.
1 During a call:
The speech volume can be set by pressing + or - at the speech button.
2 If there is no active call:
Open the Settings > Audio
settings > Call volume menu.
Using the controller, adjust the call volume.
The set volume will be adopted for future calls.
Switching the light on and off

- Tap the "Light" symbol to switch the lighting on or off.
Remarks
- The lighting is only switched on if your electrical installer has connected it. - After you have tapped the symbol, the symbol changes colour (white <-> yellow) and so indicates the switching status. If the light can be switched using a different switch, the actual switching status is only correctly displayed in conjunction with a BEM 650-...
Taking a picture manually

After the visitor has actuated the call button at the door, up to 6 pictures are taken automatically.
It is possible to take additional pictures manually during a door call.
- Tap the symbol "Save image".
Automatic image pick-up
Video memory
Changing the display mode
It is possible to increase the camera image to a larger size.
- Tap the displayed camera image in order to change the display mode and show the camera image in an enlarged size.
Remarks
- The display mode is set using the
Settings > Video image > Change display modes menu. - In the full screen mode, it is not possible to take pictures.
Selecting a door station
- Press the speech button to establish a connection to the door station from where the last call came.
Note
- It is also possible to establish selective speech connections to certain doors. These must be programmed by the electrical installer. On the panel's home screen, suitable symbols are then available which can each be used to call a specific door.
- Every function can be deactivated/activated with the BPS 650-...
Every time a visitor actuates the call button at the door, up to 5 images are taken automatically.
In the Settings > Video image menu, you can set the maximum number of images which should be taken or how many seconds after ringing the first image should be taken, and also activate/deactivate the automatic saving of images. In the as-delivered status, this function is active.
If the video memory has been deactivated using BPS 650-..., this menu point is hidden at the indoor device.
If new images have been stored for door calls, the symbol "Missed door calls" will appear in the status display with the number of missed door calls.
Showing pictures for missed door calls

1 Tap the "Missed door calls" symbol to open the video memory. All door calls are displayed with time and date. The first saved image of each door call is displayed.
2 If applicable, tap < or > in order to scroll through the video memory.
3 Tap one image in order to view all the images from a door call.
4 Tap < in the navigation bar to return to the door call level.
Note
Using the navigation bar, it is possible to see on which level of the video memory you are currently located. If a "<" is displayed here, you are looking at all the images belonging to a specific door call. Otherwise, you are located on the door call level.
All visitor images are stored with time and date and the information regarding which camera was used to take them.
The images are saved in *.tif format with a resolution of 800 x 480 Pixel. One picture requires around 1.3 MB of storage space.
If the storage capacity in the device or – if you have inserted one – on the SD card is exhausted, or when you have reached the maximum number of pictures, the oldest picture is always overwritten.
Displaying the video memory

The Video memory menu can be accessed at any time using the navigation bar.
- Tap the "Video memory" symbol to open the video memory.
Deleting images

It is possible to delete individual images in the video memory:
- Tap the "Delete" symbol in the bottom right-hand corner of the picture you wish to delete.
To delete all the pictures:
1 Tap "Delete all". The question "Deleting all pictures. Are you sure?" appears.
2 Tap "Yes" to confirm the enquiry.
Ringtone and ringtone volume
Display mode
Insert the SD card
natural_image
Technical line drawing of a door panel with a lock and door, showing no text or symbols1 Open the Settings >
Installation > SD card menu.
You will be asked to insert the SD card.
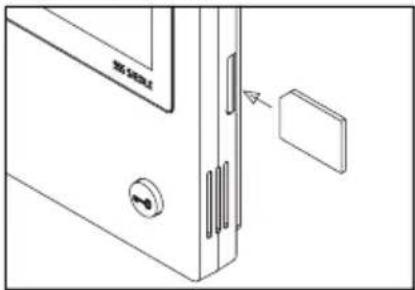
2 Insert the SD card into the provided card slot; the bevelled corner of the SD card is pointing upwards, the contacts are at the back.
3 Tap "OK".
Remarks
- Once you have inserted the SD card, the data will be written out of the video memory onto the SD card.
- Do NOT remove the SD card during the write and read process.
- If the SD card is not recognized or cannot be read, this will be indicated in the display by a symbol (in the status bar) and by a message (in the
Settings > Installation > SD card) menu.

The following error mes- es are possible for the card:
• SD card not initialized
Format the SD card.
- SD card read/write error
Remove the SD card and insert it again.
- SD card write protected
Remove the SD card, remove the write protection and insert it again.
- Unable to format the SD card Remove the SD card and use a different one.
- SD card defective / unreadable Remove the SD card and use a different one.
Switching the ringtone off and back on again

1 Tap the "Ringtone" symbol. The Ringtone menu is displayed.
2 Switch the ringtone off:
- Tap "Off" to mute the panel for an undefined time.
Or
- Select how long you wish the panel to remain muted (max. 9 hours, 59 minutes), and tap "Time controlled off".
3 Switch the ringtone back on: Tap "On".
Remarks
- The muting status is indicated by a line through the symbol "Ringtone" in the display.
- If a visitor rings the door bell or another user rings while the panel is muted, the speech button flashes.
Setting the ringtone and ring-tone volume
Set the ringtone and ringtone volume under Settings > Audio settings.
You can select between 11 ring-tones, for example using a different ringtone for the front door bell or apartment door bell than for internal or group calls.
The ringtone volume can be set in 5 steps.
1 Open the menu Settings > Audio settings and select the call type such as door call 1. You will hear the current ringtone being played.
2 Set the ringtone:
Select a different ringtone. The selected ringtone is played.
3 If applicable, set the ringtone volume.
Note
The set ringtone volume applies to all calls.
As standard, the camera image is only displayed in the work area during an active door call or speech connection.
Tap to change the display and enlarge the camera image.
The image size is set using the
Settings > Video image > Change display modes menu:
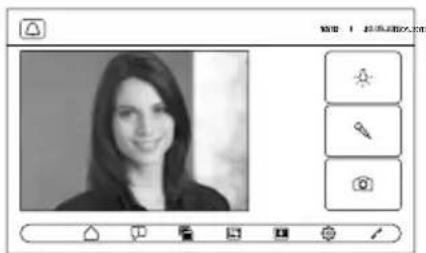
- Standard 1
The camera image appears in the work area of the display. On the right-hand side, the functions "Switch light", "Switch microphone" and "Save image" are available as standard.
text_image
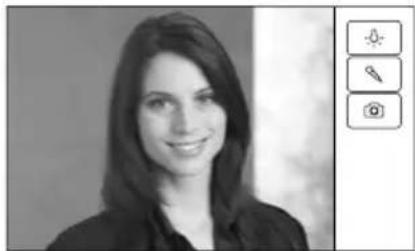
Screenshot of a photo editing interface with a portrait and tool options- Standard 2
The camera picture is enlarged to the top and bottom of the screen. On the right-hand side, the functions "Switch light", "Switch microphone" and "Save image" are available as standard.
natural_image
Portrait of a smiling woman with short hair, accompanied by three small icons in the corner (no text or symbols on the person or background)Cleaning, Servicing work
- Full screen
The camera picture is enlarged to full screen. The tab bar on the right is not available in this mode.
natural_image
Black-and-white portrait of a smiling woman with shoulder-length hair (no text or symbols visible)Cleaning the display

To ensure that you do not initiate a function by mistake or change settings when cleaning the panel, you can disable the touch function for a short period (10 seconds).
Note
Observe the care instructions in the section "General instructions".
- Tap the "Display cleaning" symbol before you clean your indoor device. If cleaning takes longer than the set period, tap the "Display cleaning" symbol again.
Factory reset
Resetting the panel to the as-delivered status will only affect settings which you can change at the panel, such as the ringtones or display settings.
Programming by the electrical installer will not be lost.
1 Open the Settings > Installation menu and touch "Factory setting".
2 Touch "Start". As soon as the process is concluded, the menu Settings > Language appears.
Configuration
The control and switching functions and the messages must be programmed by the electrical installer. The configuration is transferred to the panel using the SD card.
1 Open the Settings > Installation > SD card menu.
2 Insert the SD card with the configuration into the card slot.
3 In the "Load installation from the SD card" area, tap "Yes".
The question "Do you wish to load the configuration file?" appears.
4 Tap "Yes" to confirm. Once the transmission is complete, the confirmation "Configuration successfully loaded" appears.
5 Tap "OK".
Servicing
Statutory warranty conditions apply.
Français
Sommaire
natural_image
Technical line drawing of a door panel with a close-up view of the door (no text or symbols)text_image
Screenshot of a photo editing interface with a grayscale portrait and adjustment sliders- Standard 2
natural_image
Portrait of a smiling woman with shoulder-length hair, accompanied by three small icons in the corner (no text or symbols on the person or background)natural_image
Black-and-white portrait of a smiling woman with shoulder-length hair (no text or symbols visible)Nettoyer l'écran

natural_image
Technical line drawing of a door panel with a lock and door, showing no text or symbolstext_image
Screenshot of a photo editing interface with a portrait photo and adjustment sliders- Standard 2
natural_image
Portrait of a smiling woman with short hair, accompanied by three small icons in the corner (no text or symbols on the person or background)natural_image
Black-and-white portrait of a smiling woman with shoulder-length hair (no text or symbols visible)Pulisci display

natural_image
Technical line drawing of a door panel with a lock and door, showing no text or symbolstext_image
Screenshot of a photo editing interface with a portrait image and adjustment panels- Standaard 2
natural_image
Black-and-white portrait of a smiling woman with no visible text or symbolsReiniging,
natural_image
Black-and-white portrait of a smiling woman with shoulder-length hair (no text or symbols visible)Display reinigen

natural_image
Technical line drawing of a door panel with a lock and door, showing no text or symbols1 Åbn menuen Indstillinger > Installation > SD-kort.
text_image
Screenshot of a photo editing interface with a portrait photo and adjustment sliders- Standard 2
natural_image
Portrait of a smiling woman with no visible text or symbolsnatural_image
Black-and-white portrait of a smiling woman with shoulder-length hair (no text or symbols visible)Display rengøres

natural_image
Technical line drawing of a door panel with a lock and door, showing no text or symbolstext_image
Screenshot of a photo editing interface with a portrait photo and adjustment sliders- Standard 2
natural_image
Portrait of a smiling woman with short hair, accompanied by three small icons in the corner (no text or symbols on the person or background)Rengöring, Servicearbeten
- Helbild
natural_image
Portrait of a smiling woman with shoulder-length hair (no text or symbols visible)Rengöra displayen

natural_image
Technical line drawing of a door panel with a close button and a separate panel (no text or symbols)text_image
Screenshot of a photo editing interface with a portrait photo and adjustment sliders- Por defecto 2
natural_image
Portrait of a smiling woman with no visible text or symbolsnatural_image
Black-and-white portrait of a smiling woman with shoulder-length hair (no text or symbols visible)Limpiar display

natural_image
Technical line drawing of a door panel with a lock and door, showing no text or symbolstext_image
Screenshot of a photo editing interface with a portrait and adjustment panels- Standard 2
natural_image
Portrait of a smiling woman with shoulder-length hair, accompanied by three small icons in the corner (no text or symbols on the person or background)natural_image
Black-and-white portrait of a smiling woman with shoulder-length hair (no text or symbols visible)Czyszczenie ekranu

natural_image
Technical line drawing of a door panel with a lock and door, showing no text or symbolstext_image
Screenshot of a photo editing interface with a portrait image and adjustment buttonsnatural_image
Portrait of a smiling woman with shoulder-length hair, accompanied by three small icons in the corner (no text or symbols on the person or background)• Во весь экран
natural_image
Portrait of a smiling woman with shoulder-length hair (no text or symbols visible)Очистка дисплея