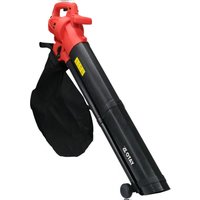
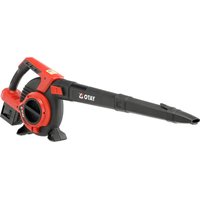
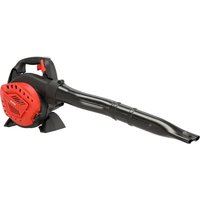
YT-85182 - Blower Yato - Free user manual and instructions
Find the device manual for free YT-85182 Yato in PDF.

| Brand | Yato |
| Model | YT-85182 |
| Product type | Garden blower / vacuum |
| Power supply | 230-240 V ~ 50 Hz, 3000 W |
| Rated speed | 11500 – 15500 min⁻¹ |
| Airflow | 10 – 16 m³/min |
| Weight | 3.8 kg |
| Insulation class | II |
| Protection degree | IPX0 (not protected against water) |
| Sound pressure level LpA | 90.8 dB(A) ± 3 dB |
| Sound power level LwA | 102.3 dB(A) ± 2.1 dB |
| Vibration level ah | 2.702 m/s² ± 1.5 m/s² |
| Main functions | Blowing, vacuuming with leaf shredding |
| Telescopic nozzle | Yes, adjustable length (multiple positions) |
| Integrated rake | Yes, foldable for collecting debris |
| Collection bag | Yes, with closure and inspection window |
| Carrying strap | Yes, to reduce fatigue |
| Thrust adjustment | Knob with +/– symbol |
| Adjustable front handle | Yes, angular adjustment |
| Anti-pull hook for extension cord | Yes |
| Maintenance and cleaning | Clean the openings with a soft brush; use the inspection window to access the rotor |
| Safety | Immediate stop when releasing the switch, double insulation, prohibited use in wet weather |
| Spare parts and repairability | Parts available online (toya24.pl); repairs at authorized center |
| General information | Manual available in 18 languages, 108 pages |
Frequently Asked Questions - YT-85182 Yato
User questions about YT-85182 Yato
0 question about this device. Answer the ones you know or ask your own.
Ask a new question about this device
Download the instructions for your Blower in PDF format for free! Find your manual YT-85182 - Yato and take your electronic device back in hand. On this page are published all the documents necessary for the use of your device. YT-85182 by Yato.
USER MANUAL YT-85182 Yato
natural_image
Close-up of a mechanical component with a serrated edge and a hole, no visible text or symbols
natural_image
Close-up of a hand using a tool to adjust or install a mechanical component (no visible text or symbols)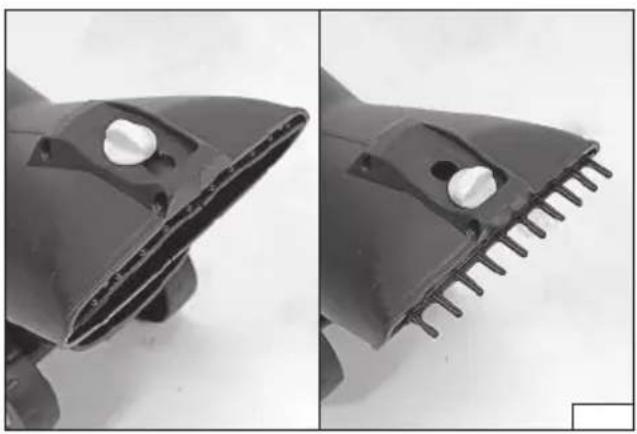
natural_image
Close-up of a black plastic tool holder with multiple grooves and a central screw (no text or symbols visible)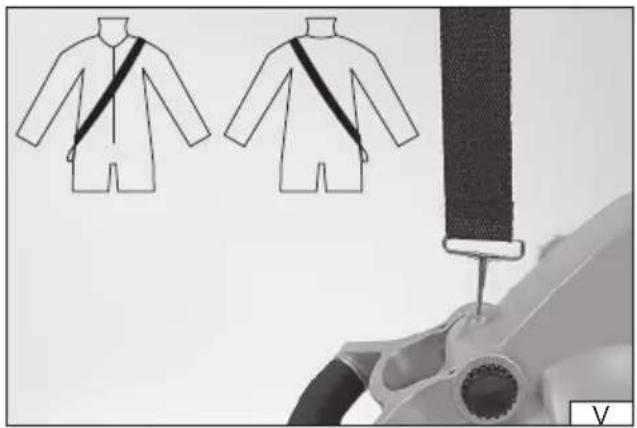
natural_image
Illustration of two men's long-sleeve suits with black straps, connected to a mechanical component (no text or symbols)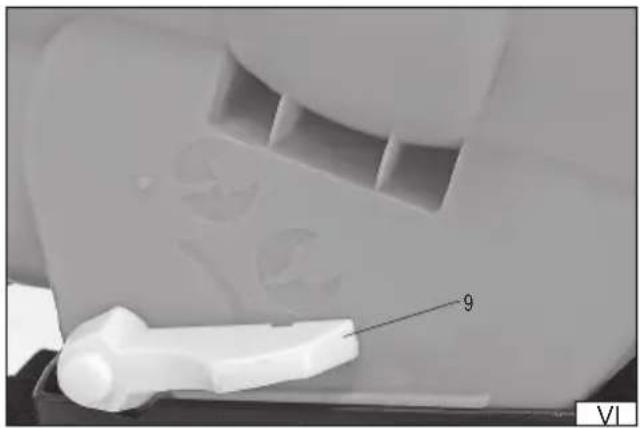
natural_image
Close-up of a mechanical component with a white plastic part and a numbered label '9' (no readable text or symbols beyond the number)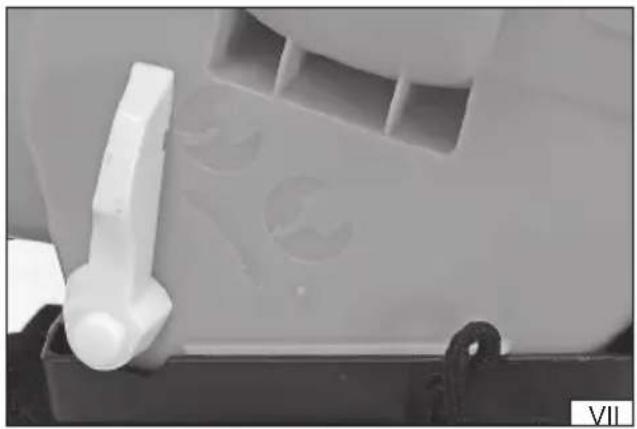
natural_image
Close-up of a white plastic mechanical component with circular features and a black base (no visible text or symbols)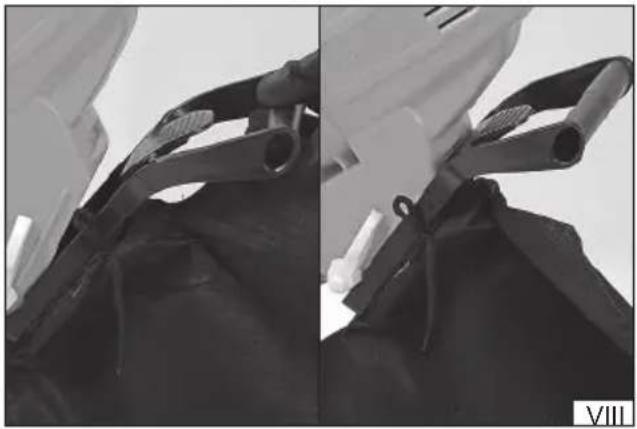
natural_image
Close-up of a person's torso with black plastic clips and a white tool, no visible text or symbolsnatural_image
Close-up of a metallic electrical plug with coiled cable and connector (no text or symbols visible)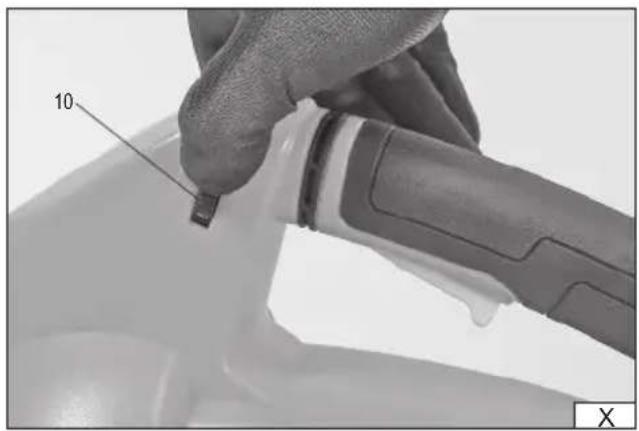
natural_image
Close-up of a hand holding a small object with a numbered label '10' (no readable text or symbols beyond the number)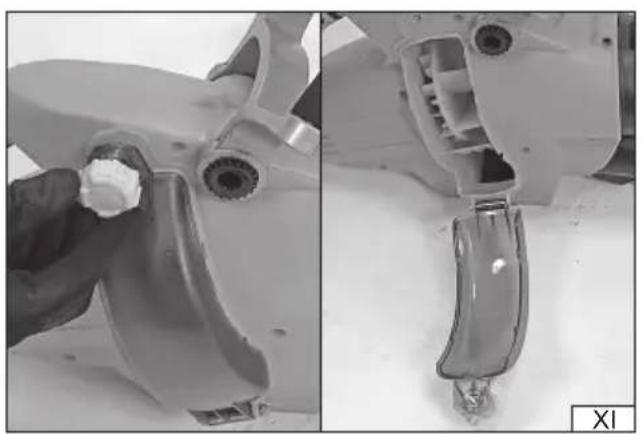
natural_image
Close-up of a mechanical component with a small white object inserted, shown from two angles (no text or symbols visible)PL
- housing
- rear handle
- front handle
- nozzle
- nozzle length adjustment button
- collection bag connector
- inspection window
- power switch
- operating mode lever
- thrust adjustment knob
- collection bag
- carrying strap
DE
Read the operating instruction
Wear protective goggles
Beware of ejected objects
Wear hearing protectors
Stay away from bystanders
Maintain a safe distance from the impeller blades
Second class of insulation
Do not expose to precipitation
Before adjusting or cleaning, in case of cable braiding or damage, switch off the device and pull the plug out of the socket.
This symbol indicates that waste electrical and electronic equipment (including batteries and storage cells) cannot be disposed of with other types of waste. Waste equipment should be collected and handed over separately to a collection point for recycling and recovery, in order to reduce the amount of waste and the use of natural resources. Uncontrolled release of hazardous components contained in electrical and electronic equipment may pose a risk to human health and have adverse effects for the environment. The household plays an important role in contributing to reuse and recovery, including recycling of waste equipment. For more information about the appropriate recycling methods, contact your local authority or retailer.
This heavy duty blower / vacuum is used for cleaning in the garden and directly in the vicinity of the house. It can be used to move fallen leaves or mowed grass with an air stream or vacuum them. Thanks to the special impeller, leaves are shredded during vacuuming, meaning that they take up less space compared to non-shredded leaves. The impeller part is equipped with an inspection window allowing easy removal of any wet leaves or other unwanted objects drawn in by the unit from the inside of the blower. The blower should not be used as a domestic vacuum cleaner. It is also forbidden to blow or vacuum ash. Proper, reliable, and safe operation of the product depends on its appropriate use; that is why you should:
Read this entire manual before the first use of the tool and keep it for future reference.
The supplier is not liable for any damage resulting from failure to observe the safety instructions and recommendations contained in this manual.
EQUIPMENT
The product is delivered complete but requires certain preliminary assembly actions described in further sections of the manual. The product is supplied with a nozzle and vacuum collection bag.
TECHNICAL DATA
| Parameter Unit Value | ||
| Part No. YT-85182 | ||
| Rated voltage [V~] 230-240 | ||
| Rated frequency [Hz] 50 | ||
| Rated power [W] 3,000 | ||
| Rated rpm [min-1] 11,500-15,500 | ||
| Airflow rate [m3/min] | 10-16 | |
| Insulation class | II | |
| Protection rating | IPX0 | |
| Noise | ||
| - sound pressure, LpA ± K | [dB(A)] | 90.8 ± 3 |
| - sound power, LwA ± K | [dB(A)] | 102.3 ± 2.1 |
| Vibration Level ah ± K | [m/s2] | 2.702 ± 1.5 |
| Weight | [kg] | 3.8 |
The declared noise emission value has been measured using the standard test method and can be used to compare one tool to another. The declared noise emission value can be used in the preliminary exposure assessment.
The declared total vibration value has been measured using the standard test method and can be used to compare one tool to another. The declared total vibration value can be used in the preliminary exposure assessment.
Caution! The vibration emission during tool operation may differ from the declared value, depending on the manner the tool is used.
Caution! Safety measures to protect the operator, which are based on an exposure assessment under actual conditions of use (including all parts of the work cycle, such as the time when the tool is turned off or idle and the activation time), must be specified.
SAFETY INSTRUCTIONS
WARNING! Read all the following instructions. Failure to do so may result in electric shock, fire, or personal injury.
OBSERVE THE INSTRUCTIONS BELOW
Do not use the machine in a potentially explosive environment containing flammable liquids, gases, or vapours. Do not place the machine near any heat or fire sources. Protect the machine from moisture. Do not expose the machine to rain or other precipitation. Never im-
EN
merse any part in water or other liquids. Do not use in an environment with relative humidity above 80%.
Avoid using the machine in bad weather, especially when there is a risk of lightning. Only connect the machine to the mains with the same parameters as shown on the machine's rating plate. Disconnect the plug of the machine's power cord from the mains after each use. Warning! Never start the machine if any persons, especially children or animals, are nearby. Use the machine as a garden blower or vacuum only. Any other use is prohibited. Do not use the blower for pumping, e.g., mattresses, firing up barbecues, or bonfires. Do not blow into hot ash, embers, or fire. Embers scattered by the blow may cause fire and lead to serious burns. When using the machine as a vacuum, it is forbidden to draw in wet or hot debris, e.g., hot ash. Do not use the machine for blowing or vacuuming snow or water. Do not direct the air outlet at yourself, other people, or animals. Before switching the blower on, check the work area and remove any objects that may pose a hazard. Please note that ejected particles can bounce off obstacles and hit the operator. When operating the machine, wear personal protective equipment such as work clothing with long legs and sleeves as well as protective gloves. Wear eye protection and a face mask. Moreover, use hearing protection. Wear solid footwear with full uppers and non-slip soles. Do not obstruct the vent holes and make sure they are clear. Obstructed or clogged vent holes may cause the machine to overheat. This can lead to damage to the machine and cause fire or electrocution. Discontinue using the machine if you notice any damage to any of its parts. In this case, hand the machine over to an authorised service centre or replace this part by yourself, provided the user's manual permits this. Switch off the tool and unplug the power cord from the mains socket before you start any work on replacing parts, cleaning, or adjusting. Switch off the tool before replacing the accessories and unplug the power cord from the mains socket.
The machine must not be used by children or persons with reduced physical, sensory or mental capabilities, or lack of experience and knowledge, as well as those who have not read this manual. Local regulations may restrict the operator's age. Children should not play with the machine. Children left unattended should not be allowed to perform the cleaning and maintenance of the machine. The machine is designed to be operated with two hands. Hold the machine by the handles. The handles should always point upwards. Make sure that air inlet and outlet are not obstructed when holding the product. The air inlet must not be too close to the ground to prevent dirt from being drawn into the machine. Keep a proper standing position during work so that you can always maintain balance. When working on a slope, move across the slope. Never run while working, always walk. Always use the machine when it is fully assembled. Never use the product without the attached nozzle. Always use a collection bag when using the machine as a vacuum. Do not touch dangerous moving parts until the machine has been unplugged from the mains by disconnecting the power cord plug, and the dangerous moving parts have come to a complete standstill. Plug the power cord into the socket only after first ensuring that the power switch is in the "off" position. Check the machine's condition each time before you start it, or after dropping it, or when it hits an object. If you notice any damage, such as cracked housing, you must not use the machine until the damage has been repaired. If, during operation, a malfunction or accident occurs, switch off the machine first, disconnect the power cord from the socket and then administer
EN
aid to injured persons. Rectify the cause of the malfunction or accident. Check the condition of the machine for damage before resuming operation. If the power cord is damaged, it must be replaced in its entirety with a new one. It is forbidden to repair the power cord. The power cord must be replaced at the manufacturer's authorised service centre. Always disconnect the power supply by disconnecting the batteries: when the user leaves the machine; before removing a jam; before inspecting, cleaning, or works on the machine; to check for damage after the machine has hit an object; to check the machine immediately if it starts vibrating abnormally. If the machine starts to vibrate excessively after start-up or during operation, this means that the machine is not operating correctly. In this case, turn the machine off immediately by pressing the power switch, disconnect the batteries and check it. Check the nozzle for any obstructions in the air inlet and outlet. Once the obstruction has been removed, reassemble the machine, connect it to the power source, and restart it. If excessive vibration persists, switch off the machine immediately, remove the power cord plug from the mains socket and send it to an authorised service centre. Although precautions have been taken during the machine's engineering and design and considering that the guidelines in this manual have been followed, there is still a residual risk in terms of exposure to vibration and noise. Therefore, use personal protective equipment, do not work too long, and take regular breaks. Make sure that the batteries have been disconnected from the machine before carrying out its maintenance. Store the machine out of reach of unauthorised persons, especially children. Make sure that the machine is out of reach of unauthorised persons, especially children, also during operation.
PRODUCT OPERATION
Preparing for operation
Unpack the product and then remove all packaging components. It is recommended not to dispose of the packaging as it may be useful for later storage of the product. Check all parts of the product for damage. Check the nozzle, the collection bag, and air inlet and outlet for any obstructions.
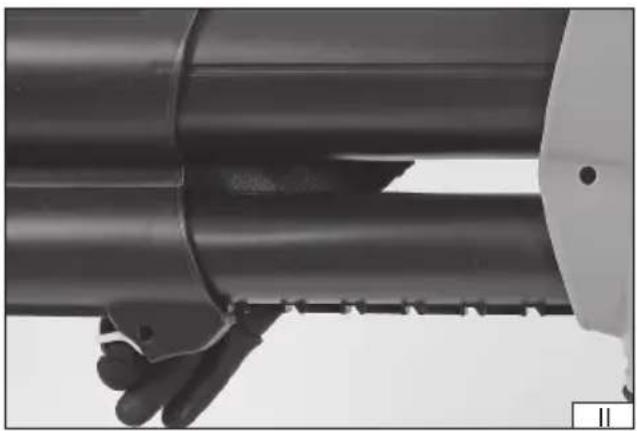
Nozzle length adjustment (II)
To adjust the nozzle length, press the nozzle adjustment button, extend the front part to the desired length, to one of several possible positions, and release the button.
Front handle adjustment (III)
To adjust the angle, simultaneously press the angle adjustment buttons located on both sides of the front handle. Set by selecting one of several possible positions and release the buttons.
Rake (IV)
The vacuum is equipped with a rake which can come in handy to help scoop up debris. To use the built-in rake, turn the rake lock knob 90° counterclockwise to automatically extend the rake. Turn the locking knob 90° clockwise to lock the extended rake. Carrying strap (V)
The vacuum is equipped with an auxiliary carrying strap. It allows reducing the load on the hands while holding the machine, especially during prolonged use. The strap latch must be passed through the opening on the top of the machine housing. The strap should be placed diagonally over the operator's body and its length adjusted so that the majority of the machine's weight rests on the strap.
Preparing for operation - blower
Move the operating mode selection lever to the bottom position so that it is next to the symbol showing the direction of air flow blowing (VI). Make sure that the collection bag is not fixed to the blower. The product is ready for use as a blower.
Preparing for operation – vacuum
Move the operating mode selection lever to the upper position so that it is next to the symbol showing the direction of air flow -
EN
suction (VII). Place the front part of the bag clamp over the front part of the air outlet (VIII) and then slide the clamp over the air outlet so that the latch engages (VIII). The bag can be removed by pressing and holding the bag latch and then sliding the bag clamp off the air outlet. The collection bag at the bottom has a closure. It allows easy emptying of the bag. Make sure that the collection bag is completely emptied and closed each time before using the tool as a vacuum.
Connecting to the power supply
The machine is equipped with only a short cord with a power plug. A separate power line equipped with a single socket should be prepared to power the machine due to its high power consumption. The system preparation should be entrusted to a qualified electrician. Use an electric extension cord to power the tool. Always use cords intended for outdoor use due to the nature of the blower operation. The power cord should have a single socket matching the machine's plug. It is forbidden to modify the plug or socket to make them fit. The electrical parameters of the power supply cord should correspond to the electrical parameters of the tool, listed on the rating plate. It should be noted that the power cord's cross-section depends on the length of the cord. Follow the instructions below regarding the power cord cross-section:
- 1.5 mm ^2 – cord length not greater than 40 m;
- 2.5 mm ^2 – cord length not greater than 60 m;
When preparing for operation and during operation, pay attention to the power cord. Protect the power cord from water, moisture, oils, heat sources and sharp objects. Lay the cord so that it is not drawn in by the blower. Cutting the cord may result in electric shock and serious injury or death. Make sure that you do not become entangled in the cord. This can lead to a fall and serious injury. Do not overload the power cord, and do not cause any of the cord's section to become tensioned. Do not pull the tool by the cord when moving. Always disconnect the power cord plug from the socket by pulling by the plug and socket housing, never pull by the cord. The blower has a special hook to which the extension cord (IX) must be attached. This connection will prevent the power cord from being torn out in the event of a sudden jerk.
Starting and stopping the blower
The machine is started by pressing and holding the power switch. Releasing the pressure on the power switch will stop the machine. It should be taken into account that after the pressure on the power switch has been released, the motor and also the impeller producing the air thrust will continue running for some time. The power switch does not have the option of locking in the "off" or "on" position. The machine is equipped with motor speed adjustment and therefore thrust adjustment. Adjustment is made using the thrust adjustment knob (X). There is a "+" and "-" symbol on the housing next to the thrust knob to indicate the direction of thrust adjustment. Turning the knob in the direction marked with the "+" symbol increases the thrust while turning the knob in the direction marked with the "-" symbol decreases the thrust. Switch off the machine after finished work using the power switch, wait for the moving parts to come to a complete standstill and then remove the power cord from the socket.
Instructions for use
Always make sure that the inlet, outlet, and nozzle are not obstructed. Increased noise and vibration will be the first sign if any of these is partly or completely obstructed. Restore the fully unobstructed condition immediately. Working with an obstructed product is inefficient and can cause its overheating and damage. Before starting work, check the work area thoroughly, removing any objects that may cause a hazard if propelled by an air blow. Also, remove any objects that may move unexpectedly under the influence of the air stream, e.g., tip over and cause danger. Provide a safety zone at least 15 m wide from the working area. The safety zone must not be accessible to any unauthorised persons, especially children. Persons who enter the safety zone must exercise caution and wear the personal protective equipment described above. Always direct the blower nozzle downwards, towards the surface to be cleaned. Do not point it at other people or animals. Do not blow air towards a surface that is too loose. The dust generated during such use impairs the ability to watch the workplace, which does not allow for appropriate response in the event of an emergency. Whenever possible, direct the air flow in the same direction as the wind. This will prevent debris from moving into the area already cleared. Before vacuuming, inspect the work area carefully and remove any hard objects such as stones, cans or glass. The suction impeller can be damaged if the vacuum draws in hard objects. Before starting the vacuum, always install the collection bag correctly. Check the fill level of the bag regularly during operation, and empty it. Collection bag overfilling will lead to blockages. There are auxiliary wheels at the nozzle outlet, which facilitate moving the nozzle across the cleaned surface. Do not use the vacuum to draw in wet, damp, or hot waste. Do not draw in construction waste and dust generated during construction works, e.g., dust generated when finishing gypsum skim coats. The product is not suitable for use with such materials. If the product features a speed adjustment, use the lowest speed possible to carry out the work. Higher speeds cause more noise and also cause faster wear of the product. Move while keeping your balance at all times, do not run, do not jump and do not overreach during work. Do not use the product to clean a surface that is out of sight.
PRODUCT MAINTENANCE AND STORAGE
Each time after finishing work, remove the power cord plug from the mains socket and begin tool maintenance. Remove the bag if it has been used. Clean the vent holes and the inlet and outlet with a soft brush or a painting brush with plastic bristles. Clean the housing, handle, and controls with a soft, slightly dampened with water cloth and then dry them. A compressed air stream with a pressure not exceeding 0.3 MPa can be used for cleaning. An inspection window (XI) located in the device housing is used to remove dirt from hard-to-reach areas. To do this, unscrew the locking screw to allow the window to be opened. Remove dirt from
EN
inside the housing and impeller blades and close the window. Secure by tightening the locking screw. Empty the bag by unzipping it and removing dust residue using a stream of compressed air of 0.3 MPa or less. Do not use sharp objects, abrasives, solvents, or alcohol for cleaning.
Spare parts
The user is not permitted to replace any other parts, apart from the nozzle and collection bag. For a detailed list of product spare parts go to the “Download” section in the Product tab on the TOYA SA website: toya24.pl.
Product storage
Store the product disassembled. The storage area should guarantee that unauthorised access to the product is prevented. The storage area must be protected from moisture, direct sunlight, and excessively low temperatures. Store the product in a temperature range 0\~+40°C with a maximum relative humidity of 80%. It is recommended to store the product in the original packaging.
PRODUKTBESCHREIBUNG
CARACTÉRISTIQUES DU PRODUIT
DEKLARACJA ZGODNOŚCI DECLARATION OF CONFORMITY DECLARATIE DE CONFORMITATE
0725/YT-85182/EC/2025
We declare and guarantee with full responsibility that the following products:
meet requirements of the following European Standards / Technical Specifications:
and fulfil requirements of the following European Directives:
Serial number: concern all serials numbers of item(s) mentioned in this declaration
The person authorized to compile the technical file:
DEKLARACJA ZGODNOŚCI DECLARATION OF CONFORMITY DECLARATIE DE CONFORMITATE
0725/YT-85182/EC/2025
We declare and guarantee with full responsibility that the following products:
meet requirements of the following European Directive: 2000/14/EC
Conformity assessment procedure:
Manufacturer quality-control system, examination of the manufacturer's technical file
Measured sound power level on an equipment representative for this type:
Guaranteed sound power level for this equipment:
conformity and references of the other Community Directives applied: