YT-82168 - Saw Yato - Free user manual and instructions
Find the device manual for free YT-82168 Yato in PDF.


User questions about YT-82168 Yato
0 question about this device. Answer the ones you know or ask your own.
Ask a new question about this device
Download the instructions for your Saw in PDF format for free! Find your manual YT-82168 - Yato and take your electronic device back in hand. On this page are published all the documents necessary for the use of your device. YT-82168 by Yato.
USER MANUAL YT-82168 Yato
natural_image
Exterior view of a YATO solar power saw with visible blade and metal casing (no text or symbols on the device itself)CE
PL DE RU UA LT LV CZ SK HU RO ES FR IT NL GR
text_image
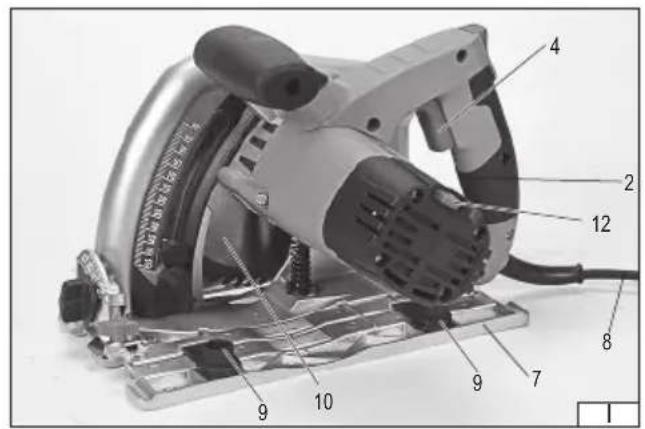
Labeled diagram of a power saw cutting machine with numbered parts for identification
text_image
Labeled diagram of a power saw cutting machine with numbered parts for identification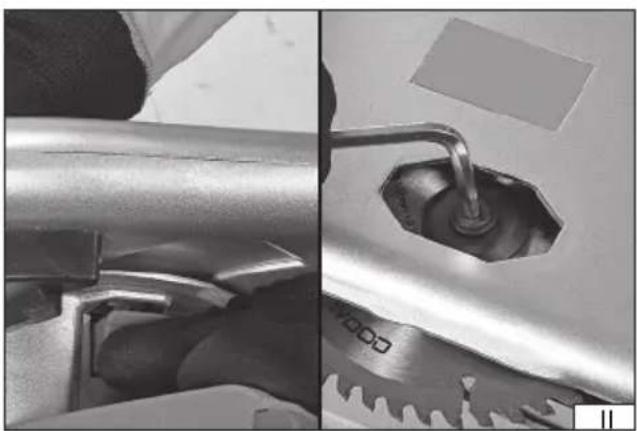
natural_image
Close-up of two metal pipe fittings with a central hole, showing mechanical details (no text or symbols visible)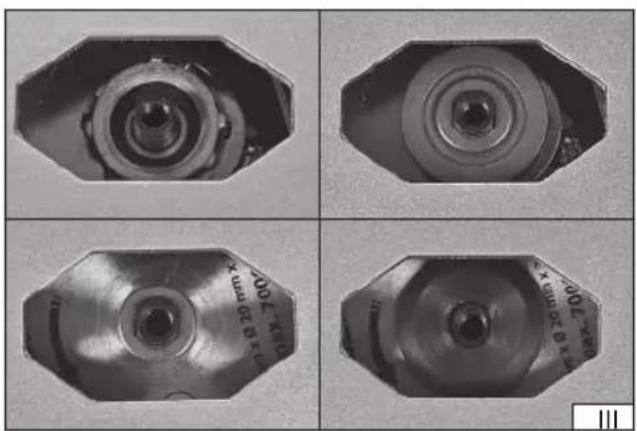
natural_image
Four views of a mechanical component with hexagonal top and circular center, shown from different angles (no text or symbols visible)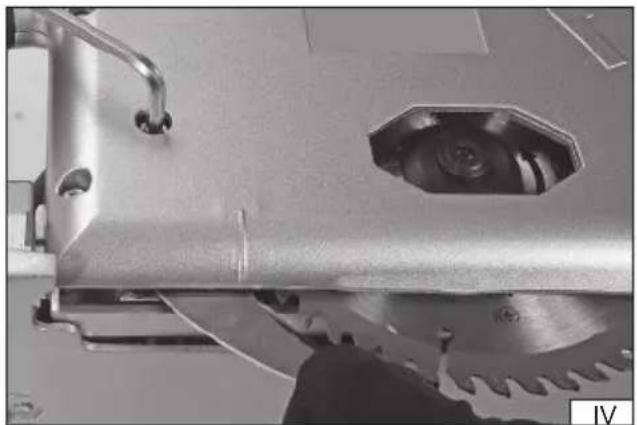
natural_image
Close-up of a metallic mechanical component with internal gear and mounting bracket (no visible text or symbols)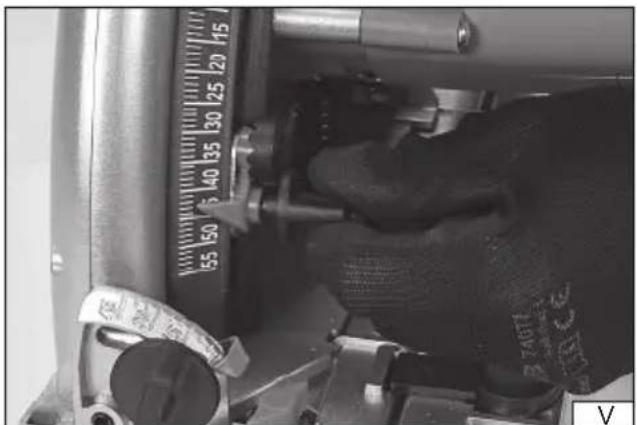
natural_image
Close-up of a mechanical device with a dial indicator and a black cylindrical component (no visible text or symbols)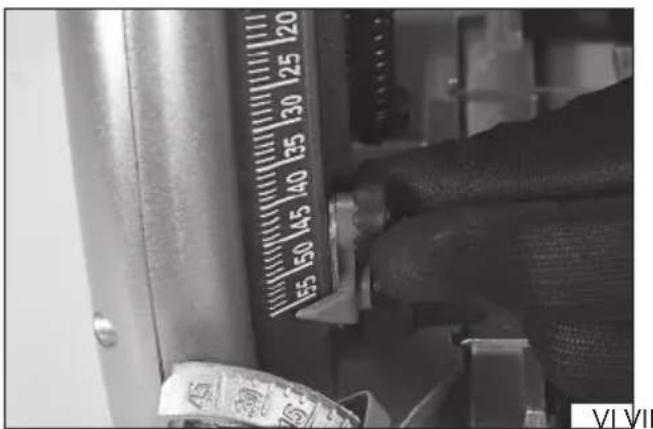
text_image
E5 150 A45 A40 135 130 125 120 VI VII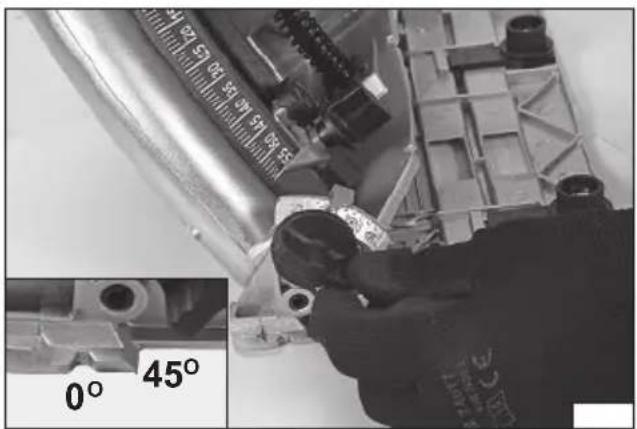
text_image
0° 45°natural_image
Close-up of hands installing or adjusting a metal bracket assembly (no visible text or symbols)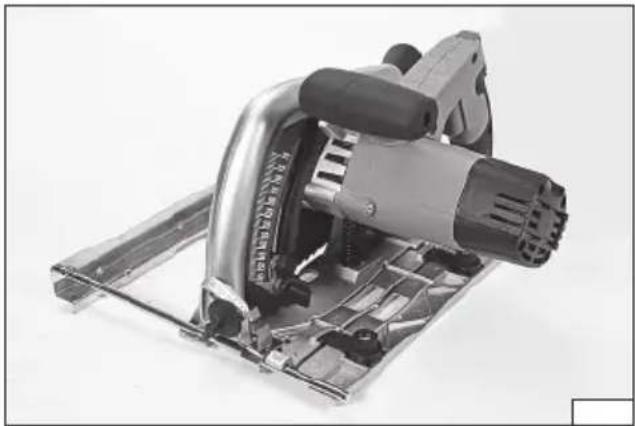
natural_image
Close-up of a metal cutting tool with visible blade and base plate (no text or symbols)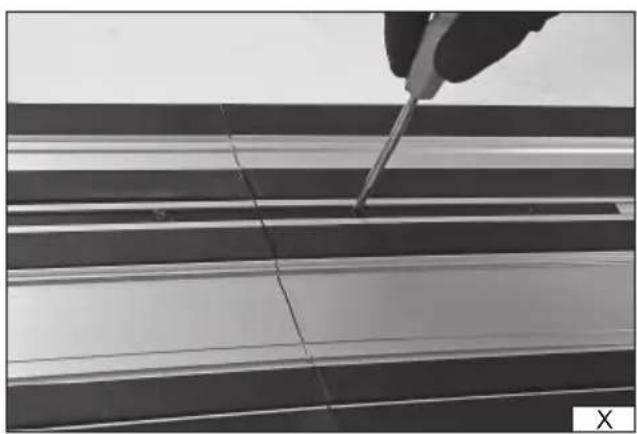
natural_image
Close-up of a hand using a tool to cut or mark a crack on a metal strip (no text or symbols visible)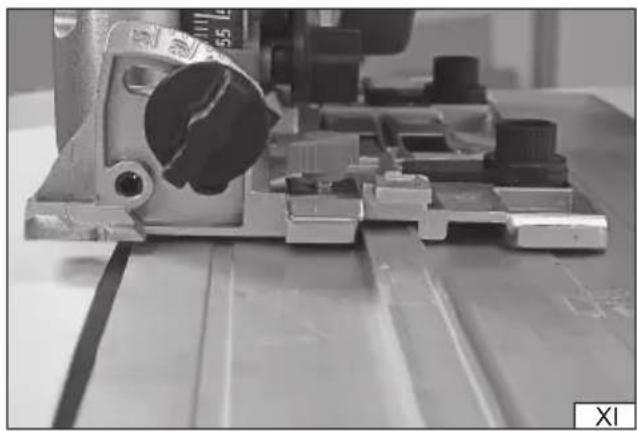
natural_image
Close-up of a mechanical assembly with metal components and a circular component, no visible text or symbols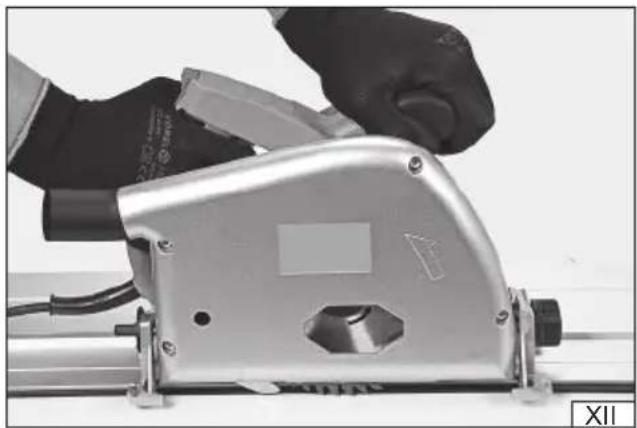
natural_image
Close-up of a hand using a silver power tool on a metal workpiece (no visible text or symbols)PL
- motor assembly
- handle assembly with power switch and lock
- additional handle
4.electric power switch - power switch lock
- saw blade guard
- base
- power cord with a plug
- travel adjustment knob
- saw blade
- dust extraction port
- rotational speed control
DE
Read the operating instruction
Wear hearing protectors
Wear protective goggles
Schutzbrille tragen
This symbol indicates that waste electrical and electronic equipment (including batteries and storage cells) cannot be disposed of with other types of waste. Waste equipment should be collected and handed over separately to a collection point for recycling and recovery, in order to reduce the amount of waste and the use of natural resources. Uncontrolled release of hazardous components contained in electrical and electronic equipment may pose a risk to human health and have adverse effects for the environment. The household plays an important role in contributing to reuse and recovery, including recycling of waste equipment. For more information about the appropriate recycling methods, contact your local authority or retailer.
The hand-held wood power saw is a power tool designed for cutting surfaces made of wood or materials of wood processing such as plywoods, particleboards, MDF panels etc., using saw blades. The power saw allows wood cutting in a vertical plane of the cut surface in the adjustable cutting depth range as well as at an angle in the adjustable range from 0^ to 45^ . The cut can only be made along a straight line. Do not cut along the curve (e.g. circle), as this could result in an accident or damage to the saw blade and power tool. The power saw can also be used for plunge cutting, which does not start with the edge of the material being cut. The correct, reliable, and safe operation of the tool depends on its proper use, therefore:
Read this entire instructions manual before the first use of the tool and keep it for future reference.
Caution! Under no circumstances the tool can be used without the saw blade guards and splitting wedge installed.
The supplier shall not be liable for any damage resulting from failure to comply with the safety instructions and recommendations specified in this instructions manual.
EQUIPMENT
The factory packaging should contain:
- power saw
- guide with rods
TECHNICAL PARAMETERS
| Parameter Unit Value | ||
| Catalogue No. YT-82168 | ||
| Mains voltage [V~] 220 - 230 | ||
| Mains frequency [Hz] 50 | ||
| Rated power [W] 1300 | ||
| Insulation class II | ||
| Rated speed [min] | ^-1 2000 - 5000 | |
| Max. cutting depth (0°/45°) | [mm] | 55/38 |
| Saw blade | ||
| Outer diameter | [mm] | 165 |
| Inner diameter | [mm] | 20 |
| Max. thickness | [mm] | 2.4 |
| Weight | [kg] | 4.7 |
| Noise level | ||
| - sound pressure L_pA ± K_pA | [dB(A)] | 89 ± 3 |
| - sound power L_wA ± K_wA | [dB(A)] | 100 ± 3 |
| Vibration level a_h ± K | [m/s] | 1.4 ± 1.5 |
| Protection rating | IPX0 |
GENERAL WARNINGS FOR THE SAFETY OF POWER TOOLS
Warning! Read all safety warnings, illustrations and specifications provided with this power tool. Failure to do so may result in electric shock, fire or serious injury.
Keep all warnings and instructions for future reference.
The term "power tool" used in warnings applies to all tools driven by power both wired and wireless.
Workplace safety
Keep the workplace well-lit and clean. Disorder and poor lighting can be causes of accidents.
Do not work with power tools in an environment with an increased risk of explosion, containing flammable liquids, gases or vapors. Power tools generate sparks that can ignite dust or fumes.
Children and third persons should not be allowed to enter the workplace. Loss of concentration can result in loss of control.
Electrical safety
The plug of the electric cable must match the power socket. You must not modify the plug in any way. Do not use any plug adapters with earthed power tools. An unmodified plug that fits the outlet reduces the risk of electric shock.
Avoid contact with earthed surfaces such as pipes, radiators and coolers. Grounding the body increases the risk of electric shock.
Do not expose power tools to contact with atmospheric precipitation or moisture. Water and moisture that gets inside the
EN
power tool increases the risk of electric shock.
Do not overload the power cable. Do not use the power cord to carry, pull or unplug the power plug from the power outlet.
Avoid contact of the power cable with heat, oils, sharp edges and moving parts. Damage or entanglement of the power cord increases the risk of electric shock.
In the case of working outside closed rooms, use extension cords intended for work outside closed rooms. The use of an extension cord adapted for outdoor use reduces the risk of electric shock.
When using a power tool in a humid environment is unavoidable as a protection against supply voltage use a residual current device (RCD). The use of RCD reduces the risk of electric shock.
Personal safety
Stay alert, pay attention to what you do and keep common sense while working with the power tool. Do not use a power tool when you are tired or under the influence of alcohol or medication. Even a moment of inattention while working can lead to serious personal injury.
Use personal protective equipment. Always wear eye protection. The use of personal protective equipment such as dust masks, anti-slip safety shoes, helmets and hearing protection reduce the risk of serious personal injury.
Prevent accidental operation. Make sure that the electric switch is in the “off” position before connecting to the power supply and / or battery, lifting or moving the power tool. Moving the power tool with the finger on the switch or powering the power tool, when the switch is in the “on” position can lead to serious injuries.
Before turning on the power tool remove any keys and other tools that were used to adjust it. The key left on the rotating parts of the power tool can lead to serious injuries.
Do not reach and do not lean too far. Keep the right attitude and balance all the time. This will allow easier control over the power tool in case of unexpected work situations.
Dress accordingly. Do not wear loose clothing or jewelry. Keep your hair and clothing away from moving parts of the power tool. Loose clothing, jewelry or long hair can be caught by moving parts.
If the devices are fitted for the connection of dust extraction or dust collection, make sure that they are connected and used properly. The use of dust extraction reduces the risk of dust hazards.
Do not let the experience acquired from frequent use of the tool resulted in carelessness and ignoring safety rules.
Carefree action can cause serious injuries in a fraction of a second.
Use and care of the power tool
Do not overload the power tool. Use the power tool appropriate for the selected application. The right power tool will provide a better and safer job if used according to the designed load.
Do not use the power tool, if the electric switch does not allow switching on and off. Power tool, which cannot be controlled by means of a power switch is dangerous and must be returned for repair.
Disconnect the plug from the power socket and / or remove the battery if it is detachable from the power tool before adjusting, changing accessories or storing the tool. Such preventive measures will allow you to avoid accidentally turning on the power tool.
Keep the tool out of the reach of children, do not let people who do not know how to operate the power tool or these instructions use a power tool. Power tools are dangerous in the hands of untrained users.
Maintain power tools and accessories. Check the tool for mismatches or jams of moving parts, damage to parts and any other conditions that may affect the operation of the power tool. Damage must be repaired before using the power tool.
Many accidents are caused by incorrectly maintained tools.
Keep cutting tools sharp and clean. Properly maintained cutting tools with sharp edges are less prone to jamming and are easier to control when working.
Use power tools, accessories and inserted tools etc. in accordance with these instructions, taking into account the type and conditions of work. The use of tools for work other than designed is likely to result in a dangerous situation.
Handles and gripping surfaces must be dry, clean and free from oil and grease. Slippery handles and gripping surfaces do not allow for safe operation and control of the tool in dangerous situations.
Repairs
Repair the power tool only in authorized facilities using only original spare parts. This ensures proper operation safety of the power tool.
ADDITIONAL SAFETY GUIDELINES
Safety instructions for all power saws
Cutting procedures
Keep your hands away from the cutting area and the power saw. Hold the other hand on the auxiliary handle or on the motor housing. If the power saw is held by both hands, they cannot be injured by the saw blade.
Do not reach under the workpiece with your hand. The guard cannot protect you from the saw blade below the workpiece.
Adjust the cutting depth according to the workpiece thickness. It is recommended that the saw blade protrudes below the
EN
cut material less than the tooth height.
Never hold the cut workpiece in hands or on leg. Attach the workpiece to a stable base. Good attachment of the workpiece is important to avoid risk of contact with the body, jamming of the saw blade or loss of cutting control.
Hold the power saw by its insulated surfaces designed for that purpose during operation during which the saw blade may have contact with live wires or the power saw power cord. Contact with “live wires” may also lead to metal parts of the tool “becoming live” leading to electrocution of the operator.
When performing longitudinal cutting, always use a guide for longitudinal cutting or an edge guide. This will improve cutting accuracy and reduce the possibility of the saw blade jamming.
Always use saw blades with correct dimensions and shapes of mounting holes (e.g. diamond or round shape). Saw blades that do not fit into the mounting bracket may work eccentrically, causing a loss of work control.
Never use damaged or improper washers or bolts to mount the saw blade. The washers and bolts mounting the saw blade have been specially designed for the power saw to ensure optimum operation and safety of use.
Further safety instructions for all power saws
Reasons for kickback and kickback prevention
A kickback is a sudden reaction to the pressed, stopped or misaligned saw blade. It causes uncontrolled lifting and movement of the power saw towards the operator.
If the saw blade is pressed or stopped during cutting, the blade is blocked and the motor reaction causes a sudden movement of the power saw towards the operator.
If the saw blade is bent or misaligned, the teeth and the rear edge can escape from the saw cut and move towards the operator. The rear kickback results from misuse of the power saw or improper procedures or operating conditions. It can be avoided by taking appropriate precautions given below.
Hold the power saw firmly with both hands, with arms positioned to withstand the force of the rear kickback. Adopt a body posture on one side of the power saw but not in the cutting line. Rear kickback can cause the power saw to move backwards abruptly, but the force of the rear kickback can be controlled by the operator if appropriate precautions are taken.
When the saw blade jams or stops cutting for some reason, release the power switch button and do not move the saw in the material until the saw blade stops completely. Never attempt to remove the power saw from the cut material or pull it backwards until the saw blade moves or can cause a rear kickback. Examine and take corrective actions to eliminate the cause of saw blade jamming.
In case of restarting the power saw in the workpiece, center the saw blade in the saw cut and check that the saw blade teeth are not caught in the material. If the saw blade jams when the power saw is restarted, it may slide-out or cause the kick-back against the workpiece.
Support large panels to minimise the risk of the blade being jammed and kicked back. Large panels tend to bend under their weight. The supports should be placed under the panel on both sides, close to the cutting line and close to the edge of the panel. Do not use blunt or damaged saw blades. Blunt or incorrectly positioned saw blade teeth make a narrow saw cut causing excessive friction, saw blade jamming and rear kickback.
Adjust the cutting depth and saw blade angle clamps securely before cutting. Changing the saw blade adjustments during cutting can cause jamming and rear kickback.
Take special care when performing “plunge cutting” towards existing walls or of other blind spaces. A protruding saw blade can cut other objects, causing a rear kickback.
Safety instructions for plunge saws
Guard function
Check the guard for proper closing before each use. Do not use the power saw if the guard does not move freely and does not close immediately. Never attach or leave the guard open. If the power saw is accidentally dropped, the guard can be bent. Lift the guard with the pull-back handle and make sure that it moves freely and does not touch the saw or other part for each angle and cutting depth adjustment.
Check the operation of the guard spring. If the guard and spring do not function properly, repair them before use. The guard may operate slowly due to damaged
parts, sticky deposits or waste build up.
Make sure that the base of the power saw will not move during the “plunge cutting”. The blade moving sideways will cause a jam and is often the cause of kickback.
Always check whether the guard covers the saw blade before placing the power saw on the workbench or floor. The unprotected edge of the saw blade will cause the power saw to retract cutting anything on its path. Be aware of the time it takes to stop the saw blade after it is switched off.
Additional safety instructions for power saws with splitting wedges
Use a suitable splitting wedge adapted to the used saw blade. The splitting wedge must be thicker than the body of the saw blade, but thinner than the spacing of the saw blade teeth.
Adjust the splitting wedge according to the description in this instructions manual. Incorrect adjustment, incorrect positioning and misalignment may render the splitting wedge ineffective in preventing rear kickback.
EN
Always use a splitting wedge except when plunge cutting. The splitting wedge must be reinstalled after the plunge cutting has been completed. The splitting wedge causes interferences during plunge cutting and may cause rear kickback.
For proper operation, the splitting wedge must be recessed into the workpiece. The splitting wedge is ineffective in preventing rear kickback during short cuts.
Do not operate the power saw if the splitting wedge is bent. Even a slight bend can slow the speed of the guard closing.
INSTALLATION OF EQUIPMENT
CAUTION! Only install the equipment when the supply voltage is disconnected. Pull the tool power cord plug out of the power socket!
The power saw is supplied complete. After opening the factory packaging, check that all equipment items have been packed. Then check the condition of the connections and possibly tighten the screw connecting the base to the fixed guard and tighten the screws fixing the splitting wedge, if included with the power saw. Before first use, assemble the saw blade.
PREPARING FOR OPERATION
Before starting work, make sure that the housing body and the connection cable with a plug are not damaged. In case of damage, do not proceed with work.
Caution! All activities related to the assembly and replacement of saw blades, adjustment and maintenance of the power tool should be carried out with the disconnected power supply to the tool. Therefore, before proceeding with these activities: Pull the power saw power cord plug out of the power socket!
Saw blades
Select a saw blade designed to cut the selected type of material. The more teeth the saw blade has, the smoother the cutting edges will be. Saw blades with several dozen teeth are better suited for cutting thinner materials with a thickness of less than 1 cm and soft wood.
Caution! Do not cut materials other than those specified in the instructions manual.
Check that the installed blade is not damaged or cracked, and that the cutting teeth are not broken, etc. If any damage is found, replace the saw blade with a new one.
Do not use deformed or cracked blades!
Do not use blades made of high speed steel.
Do not use abrasive discs. Use only blades intended for wood and similar materials compliant with EN847-1 standard.
Do not use saw blades that do not meet the specifications given in this instructions manual!
Do not use saw blades which body is thicker than the thickness of the splitting wedge! The maximum thickness of the blade teeth is specified in the technical data table.
Use only saw blades with a rotational speed greater than or equal to the power saw rotational speed.
When assembling, make sure that the saw blade rotation direction and the spindle rotation direction, indicated by an arrow on the saw blade guard, are consistent.
Saw blade installation and replacement
Caution. When replacing or assembling the saw blade, do not disassemble the saw blade guards! If the saw blade is replaced immediately after operation, wait for it to cool down.
Slide the wrench into the saw blade mounting screw socket. Press the lock button (II). The lock button has symbols in the form of arrows and padlocks showing the lock operation. Slowly turn the saw blade using a wrench until the button collapses and blocks the possibility of rotating the blade. Unscrew the screw fixing the saw blade. Remove the saw blade and all mounting elements.
Before assembling the blade, thoroughly clean the spindle, mounting elements and the guard inside. It can be done with a brush with plastic bristles, or with a compressed air stream with the pressure not exceeding 0.3 MPa. Do not use metal brushes or sharp objects for cleaning.
Assemble inner mounting plate, saw blade and outer mounting plate (III) on the spindle. Tighten the mounting screw firmly and securely, previously locking the spindle rotation by pressing the button.
After assembling the saw blade, adjust the splitting wedge located behind the saw blade. Loosen the wedge mounting screw slightly with a wrench (IV) so that the wedge can be moved freely. Do not remove the screw completely. Make sure that the splitting wedge is set so that:
- the distance between the splitting wedge and the edge of the saw blade with teeth is not more than 5 mm,
- the edge of the saw blade with teeth does not protrude more than 5 mm beyond the lower edge of the splitting wedge.
- it is in the line of the rotating saw blade,
- it is not wider than the saw blade width
Always use a splitting wedge! (in power saws factory-equipped with a splitting wedge)
Do not remove the splitting wedge that protects the saw blade and the tool from damage.
EN
After setting the splitting wedge according to the above recommendations, fix it by tightening the mounting screw.
Adjusting the cutting depth
The cutting depth can be adjusted after loosening the lock knob (V). The scale makes it easier to set the desired cutting depth. After setting, tighten the knob firmly and securely to prevent accidental change of cutting depth during operation.
To set the cutting depth up to 2 mm, turn the eccentric knob (VI).
Adjusting the cutting angle (VII)
The tool allows cutting planes at an angle between 0^ and 45^ . To adjust the angle, set the desired angle on the scale located at the front of the tool and tighten the locking screw firmly and securely.
The base has a notch at the front which is used to indicate the perpendicular cutting line ( 0^ ). In case of cutting at an angle of 45^ , the cutting line will pass at the edge of the base.
Installing the guide
The guide makes it easy to cut the surface in a straight line at the edge of the workpiece. Fix both guide rods to it using screws (VIII), then fix the rods to the tool base by tightening the set plate knobs. Make sure that the guide is parallel to the longer edge of the tool base. The power saw with the correctly installed guide is shown in figure (IX).
Cutting with optional YT-82169 guide
If the client has also purchased the YT-82169 guide, he/she can use it to cut especially long elements. The YT-82169 guide can be attached to the cut element anywhere, e.g. by means of clamps, which allows cutting in places inaccessible due to too short rods for the guide supplied with the tool.
The elements of the YT-82169 guide can be connected to each other by means of connectors on the underside of the guide. Place the connector so that it is partially in both guides and then tighten the screws by connecting the guide elements together.
The power saw base has a suitable notch for the guide lug (XI). The saw blade is then additionally secured with a rubber cover located at the edge of the guide.
By turning the knobs in the base of the power saw, set the resistance with which the base of the power saw will move on the guide. It is recommended to perform a travel test without the power saw motor running.
Dust extraction
The tool is equipped with a port to connect an external dust extraction system, e.g. an industrial vacuum cleaner. Always use dust extraction as it reduces dustiness during operation. The dust extraction system should be connected by means of a flexible hose so that it does not restrict the freedom of movement of the tool in any way.
Rotational speed control
The tool rotational speed can be smoothly adjusted within the range presented in the technical data table. The saw blade rotational speed is adjusted with the knob. The higher the number visible on the knob, the higher the rotational speed. The rotational speed of the saw blade should be selected by tests, e.g. on waste material.
Additional notes
Do not use hands to remove loose bits, splinters and similar parts of the workpiece from the surroundings of the rotating saw blade.
Do not use the power saw outdoors during rain or other precipitation.
Do not guide the power saw with hands only. Always use auxiliary tools that allow guiding the power saw securely, such as a guide.
After checking the saw blade and its secure mounting, setting the depth, angle and cutting width, it is also necessary to:
Make sure that the movable guards operate freely, without locking
Do not lock the movable guard in the open position
Make sure that all rotating mechanisms of the guard system work properly
Wear eye protection, hearing protection and work gloves. Use dust masks.
Caution! Always use hearing protection when working with hand-held power saws.
Attach the workpiece to a workstation (e.g. by means of hand-screw clamps, vices, etc.).
When cutting hard-wood surfaces (oak, beech, hornbeam), it is recommended to connect an external dust collector to the dust extraction port to collect generated dust during processing
USING THE TOOL
The power saw can only be connected to the mains after performing all the activities listed in the chapter „Preparing for operation”. Adopt a firm and stable posture.
EN
Grab the power saw in both hands by the handle and the additional handle (XII).
Use your thumb to move up and hold the power switch lock in this position. This will allow you to lower the power saw body and press the power switch. Press the power switch to switch the tool motor on. After starting the motor, release the pressure on the lock button. The power switch cannot be locked in the off position.
After switching the power saw on, keep it freely and check the uniformity of the operation with hearing. In the event of any suspicious sounds, cracks, etc., stop work immediately and repeat the steps indicated in chapter “Preparing for operation”.
Apply the power saw base to the workpiece surface in such a way that the saw blade does not touch the workpiece.
Guide the power saw along the cutting line so that the power saw base has contact with the surface of the workpiece.
After pressing the power switch, allow the saw blade to reach the rated rotational speed and only then start cutting. It is forbidden to first apply the saw blade to the workpiece and then start the tool. This can jam or damage the saw blade or cause damage to the workpiece. This can lead to injuries.
When resuming cutting, let the saw blade reach its rated rotational speed and then insert it into the cut.
When cutting, the saw blade should be guided with a smooth motion, avoiding excessive pressure. The pressure to be exerted on the cutting head should not be greater than that which is sufficient to cut the workpiece. Avoid hitting the workpiece with the saw blade.
If the saw blade blocks in the workpiece, switch the power saw off immediately by pressing the lock button and the electrical power switch and only then withdraw the power saw. During cutting, pay special attention to the possibility of slipping or kickback of the power saw and therefore the risk of accident. When working, do not exert too much pressure on the workpiece and do not make sudden movements in order not to damage the saw blade and the power saw. Take regular breaks during work.
Do not overload the tool, the temperature of the external surfaces must never exceed 60°C.
After finishing work, switch off the power saw, unplug the tool cable from the power socket and perform maintenance and inspection.
The declared total vibration value has been measured using the standard test method and can be used to compare one tool to another. The declared total vibration value can be used in the initial exposure assessment.
Caution! The vibration emission during tool operation may differ from the declared value, depending on the manner the tool is used. Caution! Safety measures to protect the operator, which are based on an assessment of exposure under actual conditions of use (including all parts of the work cycle, such as the time when the tool is switched off or idle and the activation time), must be specified.
MAINTENANCE AND OVERHAUL
ATTENTION! Before any adjustment, technical service or maintenance operations unplug the tool. Once the operations have been finished, the technical conditions of the tool must be assessed by means of external evaluation and inspection of the following elements: body and handle, conductor with a plug and deflection, functioning of the electric switch, patency of ventilation slots, sparking of brushes, noise level of functioning of bearings and gears, start-up and smoothness of operation. During the guarantee period, the user cannot dismantle the electric tools or change any sub-assemblies or elements, since it will cancel any guarantee rights. All irregularities detected at overhaul or during functioning of the tools are a signal to have the tool repaired at a service shop. Once the functioning has been concluded, the casing, ventilation slots, switches, additional handle and protections must be cleansed with a stream of air (at a pressure not exceeding 0.3 MPa), with a brush or a cloth without any chemical substances or cleaning liquids. Tools and handles must be cleansed with a clean cloth.
GERÄTEBESCHREIBUNG
DECLARATION OF CONFORMITY
0525/YT-82168/EC/2025
We declare and guarantee with full responsibility that the following products:
Plunge saw; 220 - 230 V\~; 50 Hz; 1300 W; 2000 - 5000 min ^-1 ; 55/38 mm; item no. YT-82168
meet requirements of the following European Standards / Technical Specifications:
EN 62841-1:2015 + A11:2022
EN 62841-2-5:2014
EN IEC 55014-1:2021
EN IEC 55014-2:2021
EN IEC 61000-3-2:2019 + A1:2021
EN 61000-3-3:2013 + A1:2019 + A2:2021
and fulfill requirements of the following European Directives:
2006/42/EC Machinery and safety elements
2014/30/EU Electromagnetic compatibility (EMC) Directive
2011/65/EU Restriction of the Use of Certain Hazardous Substances
Serial number: concern all serials numbers of item(s) mentioned in this declaration
The person authorized to compile the technical file:
Agnieszka Rędziak
(Place and date of issue)
V-CE PREZES ZARZADU
JAN SZMIDT
(Name and signature of authorized person)
TOYA S.A.