
67125 - Vacuum Cleaner Lund - Free user manual and instructions
Find the device manual for free 67125 Lund in PDF.

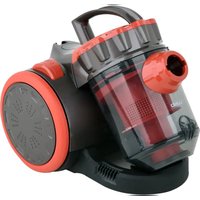
| Product type | Wet/dry vacuum cleaner (shampooer) |
| Brand | Lund |
| Model | 67125 |
| Supply voltage | 220-240 V~ |
| Frequency | 50-60 Hz |
| Rated power | 1200 W |
| Service vacuum | 17 kPa |
| Main tank capacity | 20 L |
| Detergent tank capacity | 3 L |
| Insulation class | I |
| Protection rating | IPX4 |
| Weight | 2.9 kg |
| Filter for dry work | HEPA filter (replaceable) |
| Filter for wet work | Sponge filter (replaceable) |
| Flexible hose length | Approx. 2 m (estimate) |
| Number of casters | 4 (2 small + 2 large) |
| Main functions | Dry/wet vacuuming, foam cleaning, blowing |
| Included accessories | Wash nozzle, wash brush, crevice nozzle, floor brush, extension tubes |
| Filter maintenance | Cleaning with water or compressed air (max 0.3 MPa) |
| Safety | Anti-overflow float, on/off switch, IPX4 protection |
| Repairability | Replaceable filters and seals; standard hose and accessories |
Frequently Asked Questions - 67125 Lund
User questions about 67125 Lund
0 question about this device. Answer the ones you know or ask your own.
Ask a new question about this device
Download the instructions for your Vacuum Cleaner in PDF format for free! Find your manual 67125 - Lund and take your electronic device back in hand. On this page are published all the documents necessary for the use of your device. 67125 by Lund.
USER MANUAL 67125 Lund
natural_image
Black and white photo of a vacuum cleaner with coiled tubing and a handle (no visible text or symbols)CE
PL EN DE RU UA LT LV CZ SK HU RO ES FR IT NL GR BG PT HR AR
natural_image
Close-up of a hand using a tool to adjust or install a mechanical component, showing front and side views (no text or symbols visible)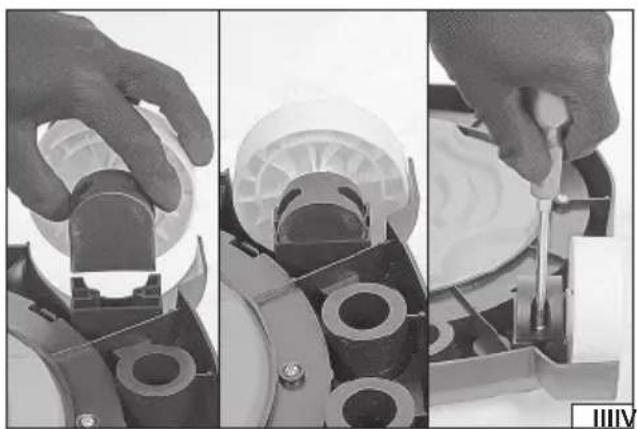
natural_image
Three-panel image showing hands assembling a mechanical component, no visible text or symbols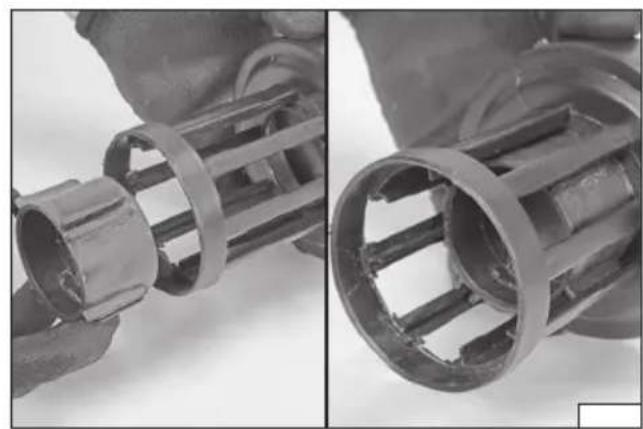
natural_image
Close-up of hands assembling a mechanical component, showing internal structure and outer ring (no text or symbols visible)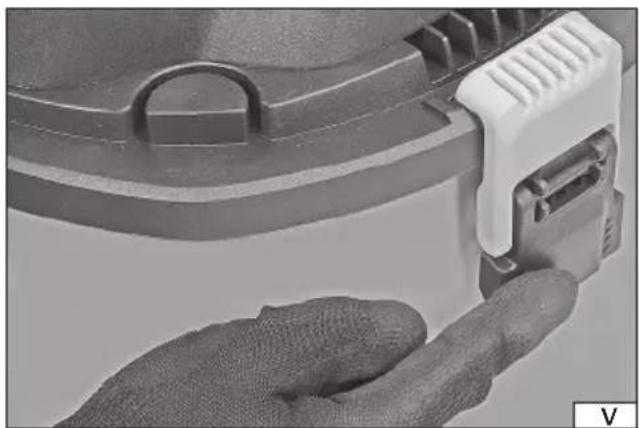
natural_image
Close-up of a hand holding a small white object with a handle, next to a mechanical component (no visible text or symbols)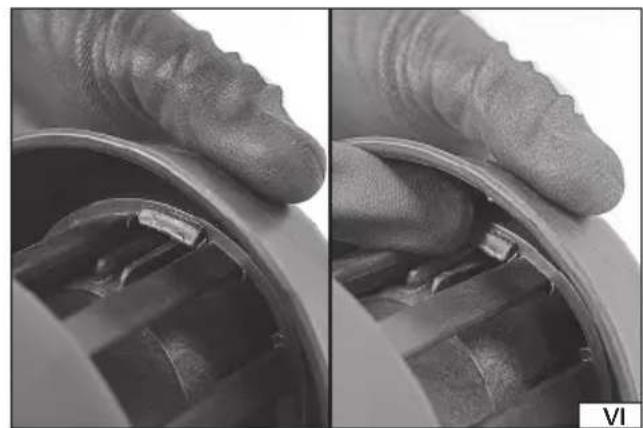
natural_image
Close-up of a hand holding a mechanical component, showing internal structure and part alignment (no text or symbols visible)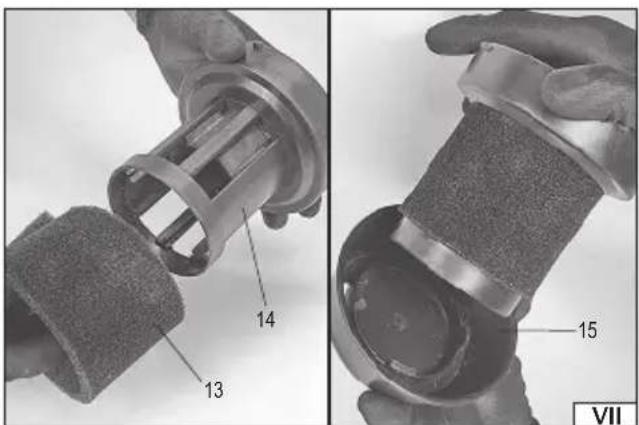
natural_image
Close-up of hands assembling a mechanical component with a labeled part (12), no visible text or symbols on the main subject.natural_image
Hand holding a circular mechanical component with radial blades (no text or symbols visible)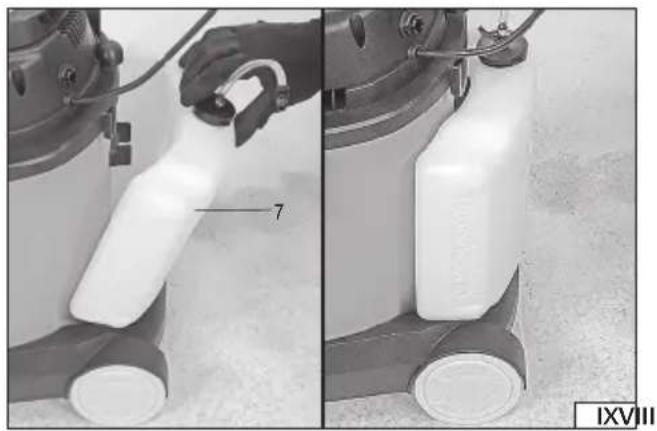
natural_image
Two-panel photo showing a hand cleaning a spray bottle from a machine, with no visible text or symbols.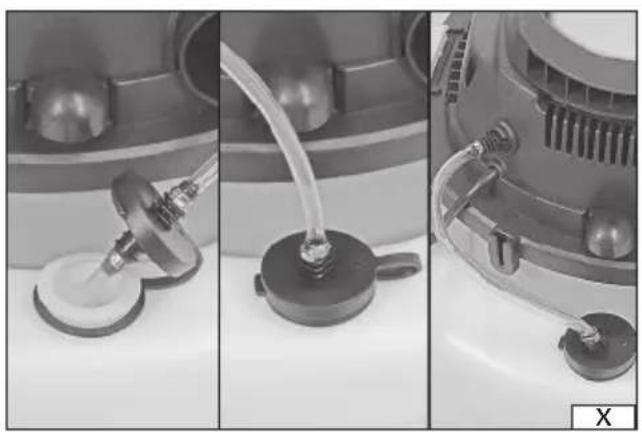
natural_image
Three-panel sequence showing a cleaning or cleaning procedure: tool, pipe, and vacuum cleaner (no text or symbols visible)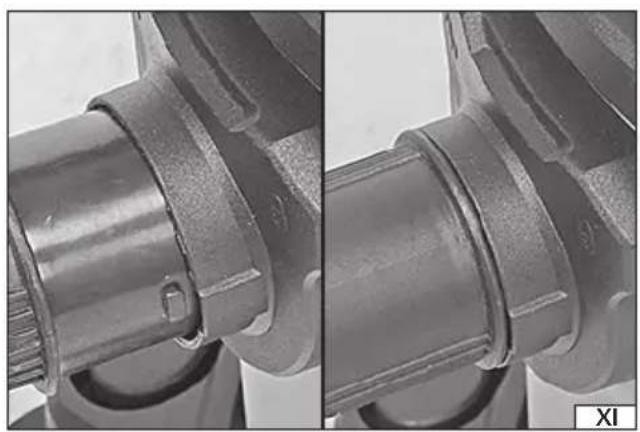
natural_image
Close-up of mechanical components with no visible text or symbols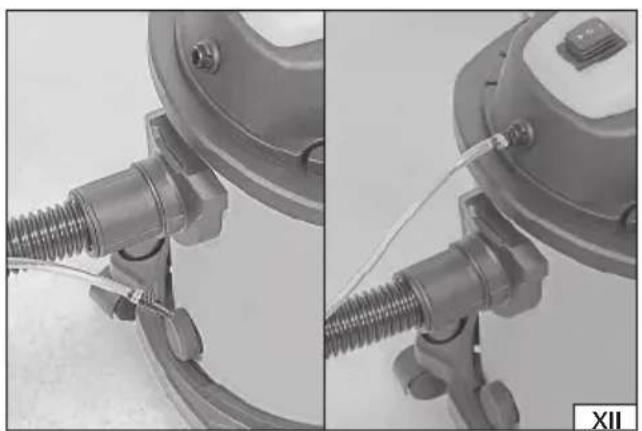
natural_image
Close-up of mechanical components with threaded connectors and wiring, no visible text or symbols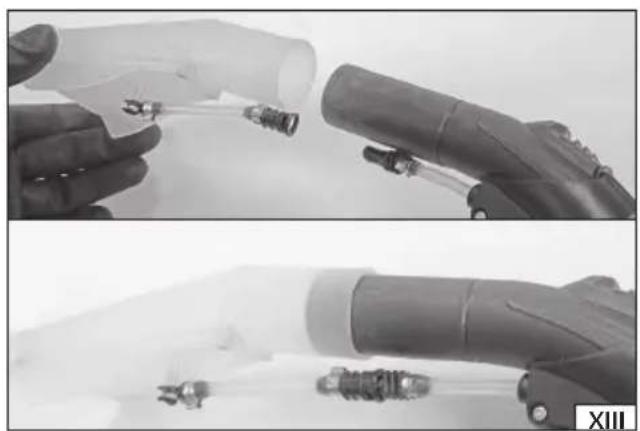
natural_image
Two-panel black-and-white photo showing hands holding a robotic arm with sensors, no visible text or symbols.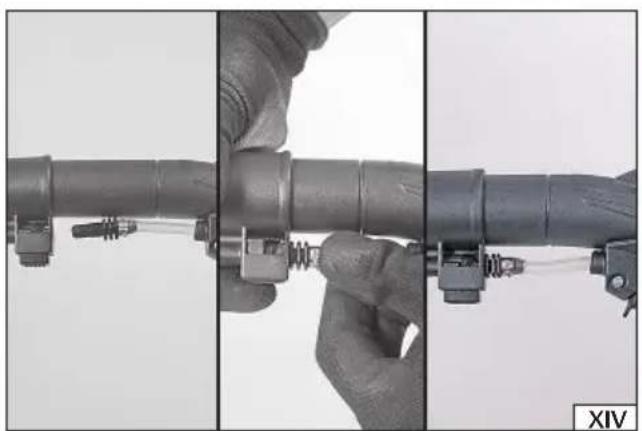
natural_image
Close-up of hands connecting a pipe with connectors, showing structural assembly (no text or symbols visible)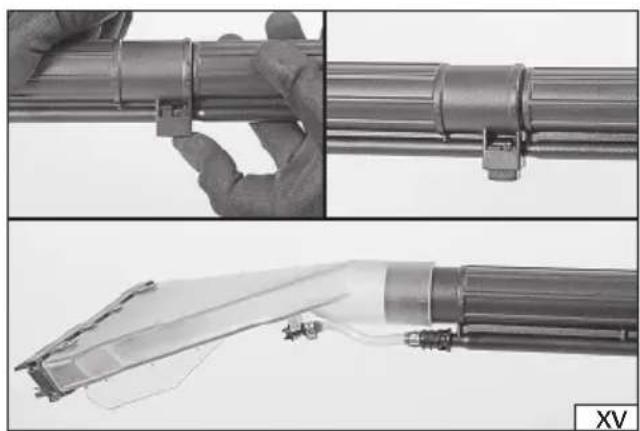
natural_image
Three-panel image showing a hand holding a cylindrical mechanical component, with close-up views of the internal structure and wiring (no text or symbols visible)PL EN DE RU UA LT LV CZ SK HU RO ES FR IT NL GR BG PT HR AR
natural_image
Close-up of a car wheel and mechanical component with a cylindrical knob (no visible text or symbols)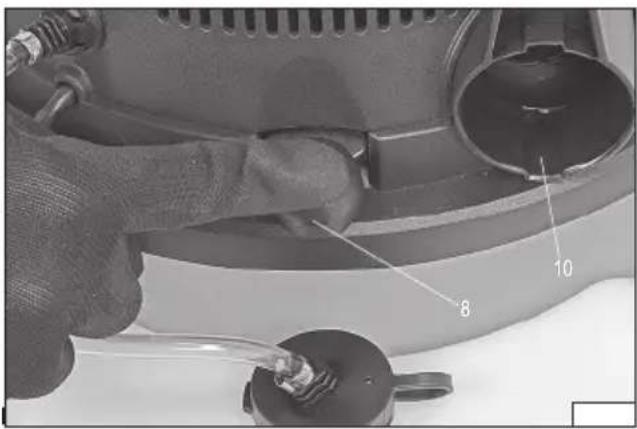
natural_image
Close-up of a hand using a tool to adjust or install a mechanical component, with no visible text or symbols.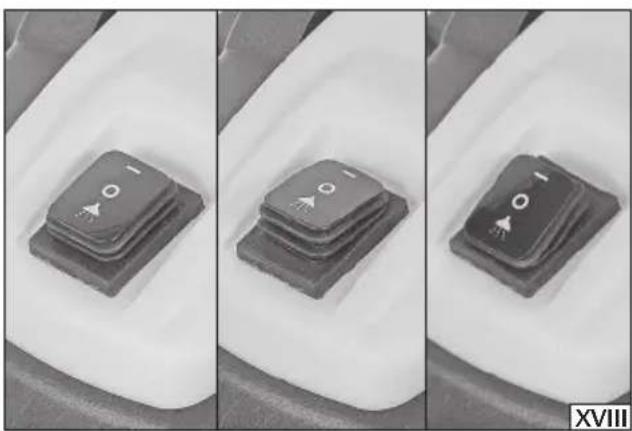
natural_image
Three-panel image showing a black square object with circular symbols, placed on a white surface (no text or labels visible)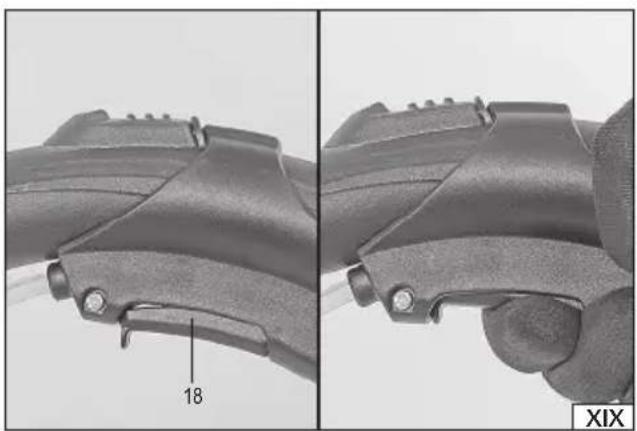
natural_image
Close-up of a mechanical component with labeled part '18' and XIX label (no readable text or symbols beyond labels)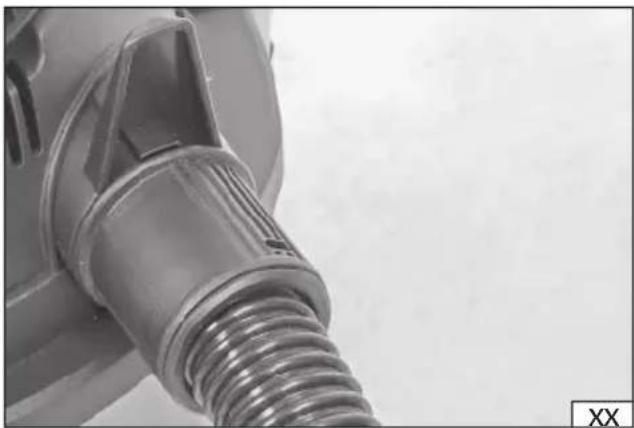
natural_image
Close-up of a mechanical component with threaded end and flange (no visible text or symbols)PL
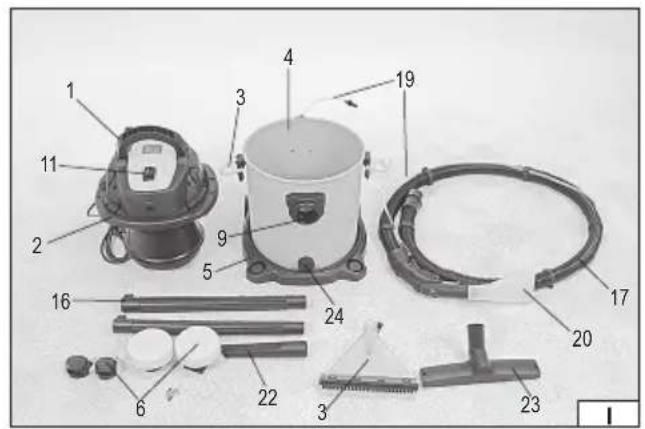
- handle
- vacuum cleaner lid
- lid latch
- vacuum cleaner container
- container base
- wheel
- detergent tank
- fi lter shaker button
- inlet
- outlet
- power switch
- dry filter
- wet fi lter
- fi Iter housing
- fi lter cover
- extension pipe
- fl exible hose
- spray butto
- detergent hose
- washing nozzle
- washing brush
- crevice nozzle
- floor brush
- container cap
DE
This symbol indicates that waste electrical and electronic equipment (including batteries and storage cells) cannot be disposed of with other types of waste. Waste equipment should be collected and handed over separately to a collection point for recycling and recovery, in order to reduce the amount of waste and the use of natural resources. Uncontrolled release of hazardous components contained in electrical and electronic equipment may pose a risk to human health and have adverse effects for the environment. The household plays an important role in contributing to reuse and recovery, including recycling of waste equipment. For more information about the appropriate recycling methods, contact your local authority or retailer.
WYPOSAŻENIE PRODUKTU
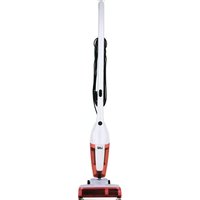
In addition to the traditional vacuuming function, the wet and dry vacuum cleaner also cleans surfaces such as carpets, flooring, and furniture and car upholstery using water and detergent. Thanks to the capacious container and flexible hose it is possible to access hard-to-reach areas and clean them thoroughly. The base equipped with wheels allows the vacuum cleaner to be easily transported. The vacuum cleaner has replaceable air filters. The correct, reliable, and safe operation of the appliance depends on its proper use, therefore:
Read the entire manual before the first use of the appliance and keep it for future reference.
The supplier shall not be liable for any damage resulting from failure to comply with the safety instructions and recommendations specified in this instructions manual.
PRODUCT ACCESSORIES
The product is supplied complete, but requires assembly before first use, as described later in this manual. The following accessories are supplied with the product: filters, flexible hose, extension tubes and suction attachments: washing nozzle, washing brush, crevice nozzle, floor brush.
TECHNICAL DATA
| Parameter Unit Value | ||
| Catalogue No. 67125 | ||
| Mains voltage [V~] 220 – 240 | ||
| Mains frequency [Hz] 50 – 60 | ||
| Rated power [W] 1200 | ||
| Operating subpressure [kPa] 17 | ||
| Detergent tank capacity | [1] | 3.0 |
| Vacuum cleaner container capacity | [1] | 20 |
| Insulation class | 1 | |
| Protection rating | IPX4 | |
| Weight | [kg] | 2.9 |
GENERAL SAFETY CONDITIONS
The appliance may be used by children aged 8 years and over, persons with reduced physical, sensory or mental capabilities, and inexperienced or untrained persons, provided they are supervised, have been given instructions for safe use and understand the risks involved. Keep children under supervision so that they do not play with the appliance. Unsupervised children must not be allowed to carry out cleaning and maintenance. The vacuum cleaner is designed for dry and wet operation. Follow the recommendations in this manual before starting work that involves drawing in water or wet waste. Failure to comply with it may result in electric shock and, as a consequence, endanger the life and health of the user and bystanders. It is prohibited to use the appliance to collect wet waste other than water. Collecting waste in the form of paints, oils, solvents, petrol and other flammable substances may lead to irreparable damage to the vacuum cleaner or its components, and may pose a risk of electric shock, fire or explosion. Always empty, clean and dry the vacuum cleaner container before changing the operation mode. Waste remaining in the container from previously performed cleaning can interfere with the operation if the mode is changed. Never draw in hot, glowing or burning objects. This can lead to fire or explosion and expose the user to serious injury or death. The maximum temperature of suctioned waste must not exceed 40^ C. The device is intended for use in closed rooms and should not be exposed to water, including precipitation.
EN
Make sure that the mains power parameters comply with the ones shown on the appliance's nameplate before connecting the appliance's power cord plug. Before each use, check the condition of the appliance, including the power cord and plug. If any faults are noticed, do not use the appliance. Damaged cords and cables must be replaced with new ones in a specialist workshop. The protection rating specified in the technical data table will be ensured if the appliance is connected to a socket with at least the same protection rating. Make sure that the power cord plug has been disconnected from the mains socket before carrying out maintenance on the unit. Keep the appliance out of reach of unauthorised persons, especially children. Make sure that the appliance is out of reach of unauthorised persons, especially children also during operation. Transport the appliance using the handle. Do not move the appliance pulling it by the power cord. When using the vacuum cleaner as a blower, it is prohibited to direct the hose outlet towards people and animals. Check the condition of the flexible hose at regular intervals. Never use the vacuum cleaner if its flexible hose is damaged.
APPLIANCE OPERATION
Preparing for operation
Check the vacuum cleaner container, empty it of waste, if necessary.
Check the condition of filters. If dirty, the dry HEPA filter can be cleaned using compressed air at a pressure of no more than 0.3 MPa and under running water. Allow to dry completely. The wet (sponge) filter can be cleaned by immersing it in lukewarm, soapy water. After cleaning, rinse in clean water and drain excess water. Do not wring. Allow to dry completely. The filters cannot be cleaned with a cleaner, pressure washer or in a dishwasher. The filter should be replaced with a new one if the contaminants cannot be removed from the filter or there is a noticeable decrease in filtration quality. The frequency of filter replacement depends on the frequency and manner of using the vacuum cleaner.
Check the condition of the float. Make sure that the float and the guides in which it moves are not damaged, are clean and ensure free movement of the float.
Check the condition of the seals. Replace the seals with new ones if damage is found.
CAUTION! It is forbidden to work with a vacuum cleaner without a properly installed air filter. This can cause damage to the vacuum cleaner as well as electric shock.
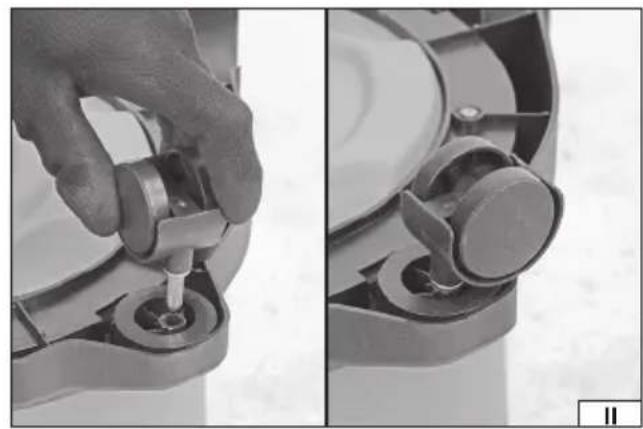
Wheels installation
The vacuum cleaner base allows for mounting wheels. Insert the pins of the small wheels into the holes in the base as shown in figure (II). Insert the large wheel mounts into the slots in the base and fix with the screws as shown in figure (III). Ensure that all wheels are fitted correctly. Wheels allow the vacuum cleaner to be moved freely.
Filter installation
CAUTION! The vacuum cleaner is equipped with two types of filters for different types of work. Do not use the wrong filter type.
Using a dry filter for wet operation will result in damage to the filter which may lead to damage to the vacuum cleaner. Using a wet filter for dry operation will not provide the correct level of filtration which may lead to damage to the vacuum cleaner. The vacuum cleaner filter is equipped with a float located inside the filter housing (IV). The float cuts off the air supply whenever the container is overfilled. During maintenance operations make sure that the float and the guides in which it moves are not damaged, are clean and ensure free movement of the float. Each instance of triggering the float is signalled by louder motor sound and a drop in suction power.
Caution! It is forbidden to use the vacuum cleaner without a functioning float.
To remove the filter from the vacuum cleaner lid, first unlock the vacuum cleaner lid latches (V), remove the lid, then remove the filter from the vacuum cleaner lid by turning it counterclockwise.
Only a sponge filter can be fitted in the filter housing for wet operation. If the dry operation HEPA filter is installed in the filter housing, it must be removed. Remove the filter cover from the filter housing to install the wet filter. Then unlock the 4 latches which hold the filter cover. The latches can be accessed from inside the filter housing (VI). Place a wet sponge filter on the filter body and attach the filter cover (VII). Ensure that all filter cover latches are correctly fastened. Install the filter in the vacuum cleaner lid so that the tabs on the filter housing fit into the notches in the opening in the vacuum cleaner lid, then turn clockwise until it locks into place. Ensure that the filter is fitted correctly and does not come loose during operation.
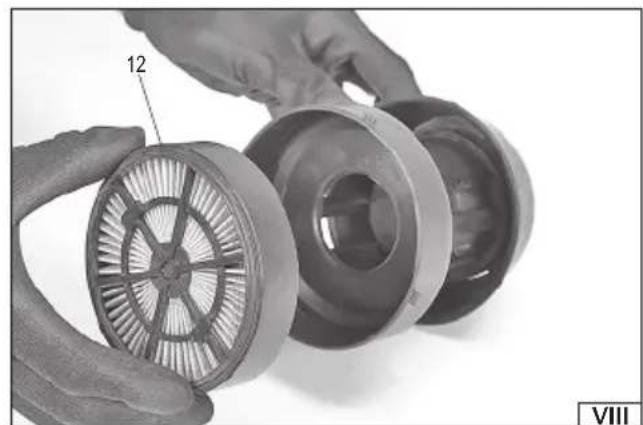
Only the HEPA filter must be fitted in the filter housing for dry operation. If the sponge filter is fitted in the filter housing, it must be removed. To do this, unlock the 4 latches which hold the filter cover. The latches can be accessed from inside the filter housing
EN
(VI), fix the filter cover. Ensure that all filter cover latches are correctly fastened. Then place the HEPA filter in the filter housing as shown in figure (VIII). Install the filter in the vacuum cleaner lid so that the tabs on the filter housing fit into the notches in the opening in the vacuum cleaner lid, then turn clockwise until it locks into place. Ensure that the filter is fitted correctly and does not come loose during operation.
Vacuum cleaner lid installation/removal
Attach the lid on the upper edge of the vacuum cleaner container so that it adheres to the entire circumference. Fix the lid to the container using the latches. Pay attention to the two marked spots on the lid to ensure proper tightness of the connection (IX). To remove the vacuum cleaner lid, unlock the latches and remove the lid.
Detergent tank installation/fi lling
Attach the detergent tank to the vacuum cleaner container as shown in figure (IX). Slide the lower fixing lugs found at the bottom of the detergent tank into the holes located in the base of the vacuum cleaner container, then slide the lugs on the back of the container into the hole located in the detergent tank until it is locked in place. Ensure that the detergent tank is firmly and securely attached and does not slip out during operation.
Depending on the type of work to be carried out, the detergent tank must be topped up with a detergent solution or clean water when preparing the vacuum cleaner for wet operation. Use only detergents designed for wet and dry vacuum cleaners, as recommended by their manufacturer. It is prohibited to use abrasive, flammable, caustic, alkaline, soapy water solutions, dishwashing liquid or floor washing liquid, and all other agents not designed for use with vacuum cleaners. The use of agents other than those intended for vacuum cleaners may damage the appliance. The temperature of solution or water used for wet operation work must not exceed 35 degrees Celsius. It is prohibited to use dense cleaning agents or pour boiling water into the detergent tank. This can lead to damage to the vacuum cleaner pump. Fill the detergent tank with suitable detergent or clean water (X). Close the detergent tank lid. The hose located on the detergent tank lid should be connected to the socket located on the back of the vacuum cleaner lid. To do this, insert the detergent hose connection into the hole so that the tabs on the hose fit into the notches in the hole and then turn clockwise. Check that the hose is properly secured and will not slip out during operation.
CAUTION! The minimum and maximum liquid levels are indicated by a scale located on the side of the detergent tank. Do not fill the tank above the maximum level. Check the detergent level during operation. Top up the detergent or water immediately if the detergent level approaches the minimum. Using the vacuum cleaner in wet operation mode with an empty detergent tank may damage the appliance's pump.
Flexible hose installation
The flexible hose attaches to the inlet. Insert the hose connection into the opening so that the tabs on it fit into the notches in the hole and then turn clockwise (XI). Make sure that the hose will not slide out of the opening during operation. The detergent hose located on the flexible hose should be connected to the socket located on the lid of the vacuum cleaner. To do this, insert the detergent hose connection into the hole so that the tabs on the hose fit into the notches in the hole and then turn clockwise (XII). Make sure that the hose will not slide out on its own during operation. The flexible hose must be disconnected in the order reverse to that of the assembly.
Installing the accessories
Select the appropriate accessory for the selected work type:
Connecting the washing nozzle
The hand-held washing suction nozzle is used for cleaning of, e.g., furniture upholstery, car upholstery or car mats, in wet operation mode. Slide the suction nozzle onto the flexible hose handle (XIII), insert the detergent hose connection located on the flexible hose holder into the hole found on the suction nozzle so that the tabs on it fit into the notches in the hole and then turn clockwise. Make sure that the hose will not slide out on its own during operation. Caution! Ensure that the vacuum cleaner's wet fi liter is assembled before beginning work using the washing nozzle.
Connecting the crevice nozzle
The dry operation crevice nozzle is used for vacuuming places unreachable with a brush. Slide the suction nozzle onto the flexible hose handle. Caution! Ensure that the vacuum cleaner's dry fi liter is assembled before beginning work using the washing nozzle.
Connecting the washing brush
The washing brush is used for cleaning, e.g. carpets and flooring, as well as for floor cleaning in wet operation mode. Slide the flexible hose handle into the first part of the extension pipe. Press and hold the button located on the pipe. Insert the detergent hose connection located on the flexible hose handle into the hole found on the extension pipe, release the button (XIV). Attach the second part of the extension pipe to the end of the first part of the pipe. To do this, press and hold the button on the second part of the extension pipe, slide the first part of the pipe into the second part, release the button (XV). Ensure that the connection is properly locked and that the pipe does not slip out during operation. Attach the washing brush to the end of the second part of the extension pipe. Slide the detergent hose coupling onto the connection at the end of the second part of the extension pipe and turn it clockwise. Caution! Ensure that the vacuum cleaner's wet filter is assembled before beginning work using the washing brush.
EN
Connecting the floor brush
The dry operation floor brush is used for cleaning large, flat surfaces. The extension pipe must be assembled and the detergent hose connected for work using the brush. In this case, the detergent hose will not be used, but it is advisable to connect it to prevent damage during operation. Insert the detergent hose connection located on the flexible hose handle into the hole found on the extension pipe, release the button (XIV). Attach the second part of the extension pipe to the end of the first part of the pipe. To do this, press and hold the button on the second part of the extension pipe, slide the first part of the pipe into the second part, release the button. Ensure that the connection is properly locked and that the pipe does not slip out during operation. Attach the floor brush to the end of the second part of the extension pipe. Caution! Ensure that the vacuum cleaner's dry filter is assembled before beginning work using the floor brush.
Extension pipes and attachments must be disconnected in order reverse to that of installation.
Emptying the vacuum cleaner container
After finishing work in dry operation mode, remove the vacuum cleaner cover and check the container filling level. Empty the container if it is full.
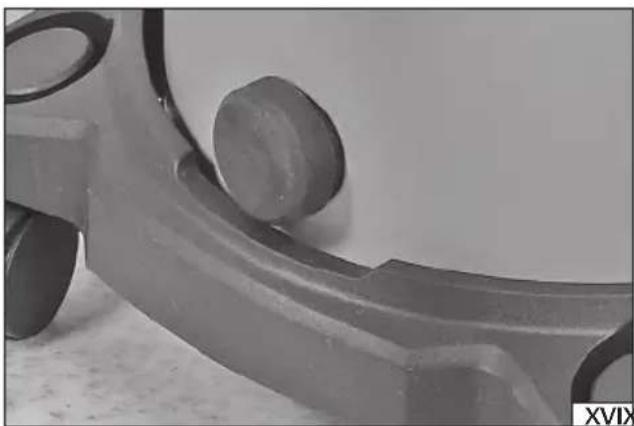
After finishing work in wet operation mode, remove the vacuum cleaner lid. The container is fitted with a cap near its base (XVI). Removing the cap from the container housing will result in emptying the container.
The dirt remaining in the container can be removed by tilting the container. After emptying, clean the container with a jet of water. Place the plug in the container housing and then dry thoroughly.
Caution! If suspicious vibrations, a drop in thrust force or noisier motor operation are observed during operation, this may mean that the container is full or that the hose, extension pipes or suction attachment is clogged. In this case, turn off the vacuum cleaner immediately with the switch and unplug the power cord from the mains socket. Then empty the container and check the permeability of the hose and attachment. Unclog if necessary. Do not use sharp objects for unclogging, as they could damage the vacuum cleaner components. If it is not possible to unclog the hose, extension pipes or the suction attachment, replace them with new ones before continuing work.
Filter shaker button
If a drop in performance is observed in dry operation mode, this may indicate a clogged filter. You can try to clean the filter using the reverse thrust function. Press and hold the reverse thrust button marked with the suction nozzle symbol for a few seconds (XVII). Repeat the procedure several times. If a drop in performance is still evident despite this, stop work, remove the vacuum cleaner's power cord plug from the socket and clean the filter manually or replace it with a new one.
VACUUM CLEANER ACTUATION
Dry operation
CAUTION! It is forbidden to use the vacuum cleaner to vacuum hot ash. The temperature of waste suctioned by the vacuum cleaner must not exceed 40 degrees Celsius.
Make sure that all preparatory activities have been carried out correctly.
Make sure that the vacuum cleaner power switch is in the "off" position - "O".
Insert the power cord plug into the mains socket, then set the power switch to the "on" position - "I" (XVIII).
After finishing work, turn off the vacuum cleaner using the power switch, and then unplug the power cord plug from the mains socket. Proceed with the vacuum cleaner maintenance.
Wet operation
CAUTION! Before beginning cleaning in wet operation mode, the colour fastness and water resistance should be tested on an inconspicuously located piece of the material to be cleaned.
Make sure that all preparatory activities have been carried out correctly.
Make sure that the vacuum cleaner power switch is in the "off" position – "O".
Insert the power cord plug into the mains socket, then set the power switch to the position marked with the suction nozzle symbol (XVIII).
The flexible hose handle is equipped with a spray button (XIX). The cleaning solution will be distributed on the surface to be cleaned and the dirty water will be collected after pressing the button. Releasing the button will deactivate the spray function. When used for the first time, it can take several dozen seconds of pumping before the liquid begins coming out of the suction nozzle or washing brush. For a proper cleaning effect, it is recommended to move the suction nozzle or washing brush evenly and slowly across the surface to be cleaned in a backwards direction. In the case of heavily soiled surfaces, wet cleaning can be repeated with clean water, thus rinsing away any residual detergent and dissolved dirt. After finishing work, turn off the vacuum cleaner using the power switch, and then unplug the power cord plug from the mains socket. Proceed with the vacuum cleaner maintenance.
EN
Blower function
The vacuum cleaner also has the option of connecting the hose to the outlet, making it suitable for use as a blower.
Caution! When using the vacuum cleaner as a blower, make sure that the container has been emptied of all waste and the filter cleaned or replaced with a new one. There is a risk of aspiration of the waste collected in the container through the outlet.
Make sure that all preparatory activities have been carried out correctly.
Make sure that the vacuum cleaner power switch is in the "off" position - "O".
The hose is connected in a similar manner to the inlet by pushing in and rotating to lock (XX). To use the blower function, the vacuum cleaner switch must be set to the "on" position – "I".
Vacuum cleaner maintenance and storage
Caution! Before carrying out any maintenance works, make sure that the power cord plug has been disconnected from the mains socket.
After each use of the vacuum cleaner, check the container, cover gasket and air filters as described in the section titled “Preparing for operation”.
Clean the external surfaces of the vacuum cleaner with a stream of compressed air with pressure of not more than 0.3 MPa. Pay special attention to the ventilation openings, both inlet and outlet – check them for blockages. Clean them with a stream of compressed air with pressure of not more than 0.3 MPa, if needed. Do not use sharp, metal objects for cleaning the ventilation openings. Do not immerse the vacuum cleaner in water to clean it. Check the vacuum cleaner hose for damage after and before each use. It is forbidden to use a damaged hose. For wet operation mode, when water or wet waste is collected, empty the container and clean the inside of the vacuum cleaner, the hose, extension pipes and nozzles immediately after finishing work. Dried debris can lead to irreparable damage to the vacuum cleaner or its components.
The inside of the hose and extension pipes should be cleaned with a jet of water, after disconnecting from the vacuum cleaner, and then left to dry completely. Remove heavy soiling from the housing with a soft cloth.
The wheel holders and the vacuum cleaner lid have been fitted with brackets to allow the attachments to be temporarily fixed while the vacuum cleaner is in use or in storage. Extension tubes and suction attachments can be fitted to the base brackets.
PRODUKTBESCHREIBUNG
CARACTÉRISTIQUES DU PRODUIT
ETF استخدام فرشaise الأرضية الجافة لënتTLIF Agricultural Agricultural Agricultural Agricultural Agricultural Agricultural Agricultural Agricultural Agricultural Agricultural Agricultural Agricultural Agricultural Agricultural Agricultural Agricultural Agricultural Agricultural Agricultural Agricultural Agricultural Agricultural Agricultural Agricultural Agricultural Agricultural Agricultural Agricultural Agricultural Agricultural Agricultural Agricultural Agricultural Agricultural Agricultural Agricultural Agricultural Agricultural Agricultural Agricultural Agricultural Agricultural Agricultural Agricultural Agricultural Agricultural Agricultural Agricultural Agricultural Agricultural Agricultural Agricultural Agricultural Agricultural Agricultural Agricultural Agricultural Agricultural Agricultural Agricultural Agricultural Agricultural Agricultural Agricultural Agricultural Agricultural Agricultural Agricultural Agricultural Agricultural Agricultural Agricultural Agricultural Agricultural Agricultural Agricultural Agricultural Agricultural Agricultural Agricultural Agricultural Agricultural Agricultural Agricultural Agricultural Agricultural Agricultural Agricultural Agricultural Agricultural Agricultural Agricultural Agricultural Agricultural Agricultural Agricultural Agricultural Agricultural Agricultural Agricultural Historical and Historical, 2015.
- PL
- DE
- WYPOSAŻENIE PRODUKTU
- PRODUCT ACCESSORIES
- GENERAL SAFETY CONDITIONS
- EN
- APPLIANCE OPERATION
- Preparing for operation
- Wheels installation
- Filter installation
- Vacuum cleaner lid installation/removal
- Detergent tank installation/fi lling
- Flexible hose installation
- Installing the accessories
- Connecting the washing nozzle
- Connecting the crevice nozzle
- Connecting the washing brush
- Connecting the floor brush
- Emptying the vacuum cleaner container
- Filter shaker button
- VACUUM CLEANER ACTUATION
- Dry operation
- Wet operation
- Blower function
- Vacuum cleaner maintenance and storage
- PRODUKTBESCHREIBUNG
- CARACTÉRISTIQUES DU PRODUIT
Brand : Lund
Model : 67125
Category : Vacuum Cleaner