
67091 - Vacuum Cleaner Lund - Free user manual and instructions
Find the device manual for free 67091 Lund in PDF.

| Product Type | Bagless Cyclonic Vacuum Cleaner |
| Brand | Lund |
| Model | 67091 |
| Rated Power | 700 W |
| Rated Voltage | 220-240 V~ |
| Rated Frequency | 50/60 Hz |
| Electric Protection Class | II |
| Dust Container Capacity | 1.5 L |
| Power Cord Length | 5 m |
| Weight | 3 kg |
| Intended Use | Domestic, cleaning of hard floors and carpets |
| Filtration Type | Cyclonic + washable filters (upper and lower) |
| Included Accessories | Flexible hose, telescopic tube, metal tube, floor/carpet brush, small brush, 2-in-1 crevice tool |
| Automatic Cord Rewind Function | Yes, rewind button |
| Suction Power Control | Manual on hose handle |
| Body Materials | Plastic |
| Filter Maintenance | Wash with lukewarm water, complete drying 24h |
| Safety | Do not vacuum liquids, hot objects, fine dust; unplug before maintenance |
| Repairability | Authorized service centers, possible filter replacement |
| Storage | Horizontal position, hook for rear brush |
Frequently Asked Questions - 67091 Lund
User questions about 67091 Lund
0 question about this device. Answer the ones you know or ask your own.
Ask a new question about this device
Download the instructions for your Vacuum Cleaner in PDF format for free! Find your manual 67091 - Lund and take your electronic device back in hand. On this page are published all the documents necessary for the use of your device. 67091 by Lund.
USER MANUAL 67091 Lund
natural_image
Black vacuum cleaner with coiled hose and plastic cover, no visible text or symbols on device bodyPL DE RU UA LT LV CZ SK HU RO ES FR IT NL GR
natural_image
Set of 14 black industrial vacuum cleaner components with numbered labels (9, 10, 11, 12, 13, 14), no visible text or symbols on the parts themselves.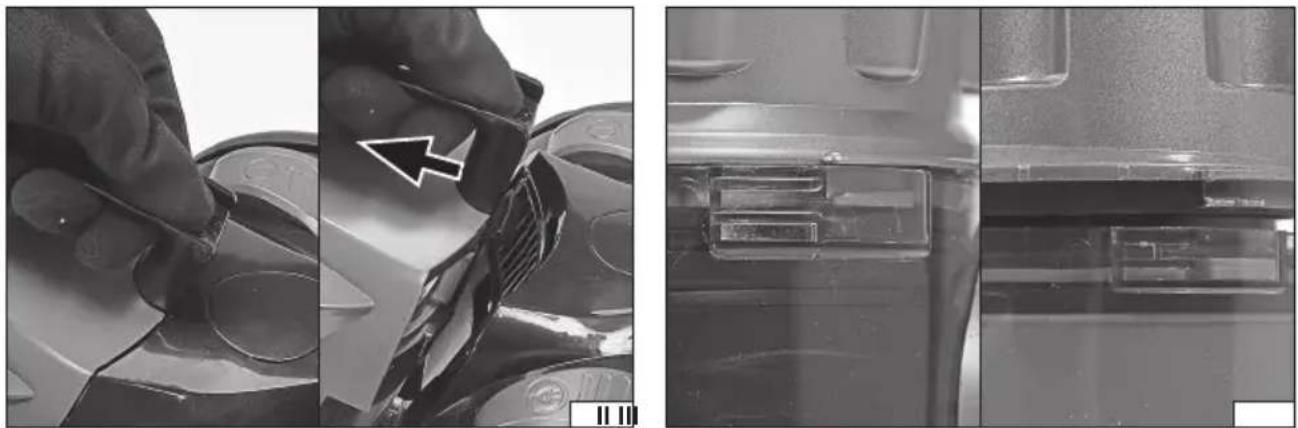
natural_image
Close-up of a hand using a tool to clean a car's seat, showing part of the door and interior details (no text or symbols visible)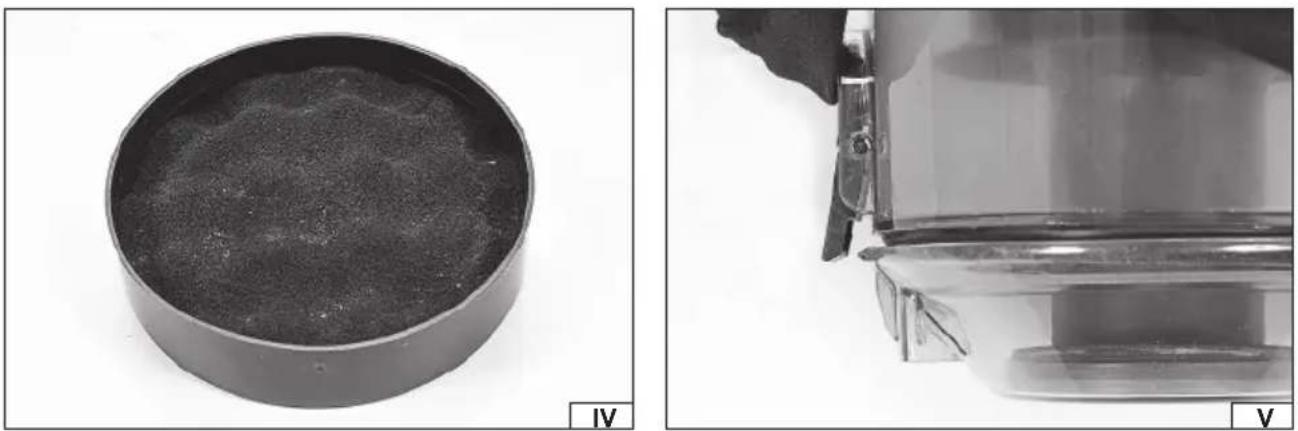
natural_image
Two black-and-white photos: left shows a circular container filled with dark granular material, right shows a close-up of a hand using scissors to clean or store the lid (no text or symbols visible)natural_image
Close-up of a mechanical component with arrows pointing to features, no visible text or symbols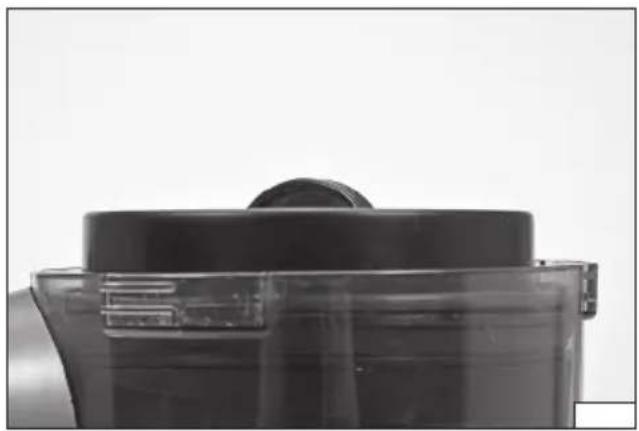
natural_image
Close-up of a black vacuum cleaner with a circular lid and transparent casing (no visible text or symbols)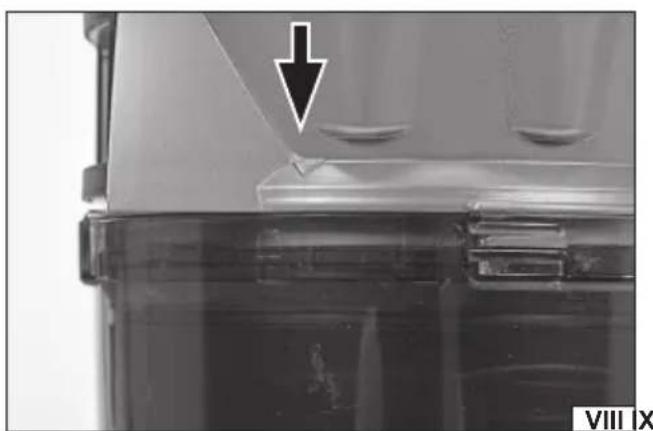
natural_image
Close-up of a mechanical component with a black arrow pointing to a feature, no visible text or symbols.
natural_image
Close-up of a mechanical component with a black arrow pointing to a detail, alongside a close-up of its parts (no visible text or symbols)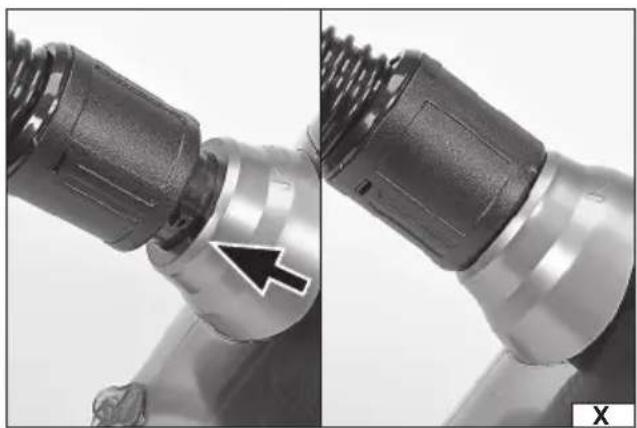
natural_image
Close-up of a mechanical component with a black arrow pointing to a specific part (no text or symbols visible)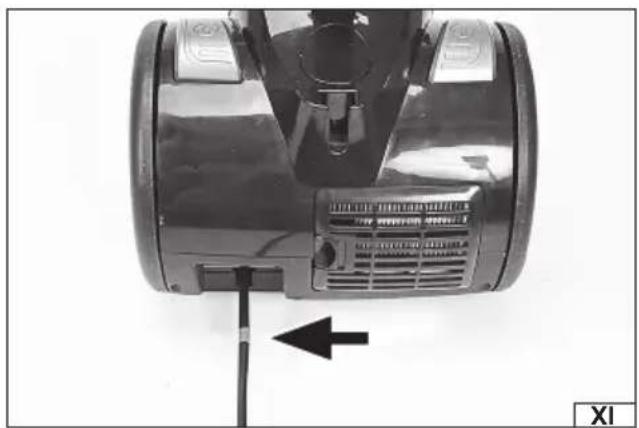
natural_image
Close-up of a black vacuum cleaner with a black arrow pointing to the component (no visible text or symbols)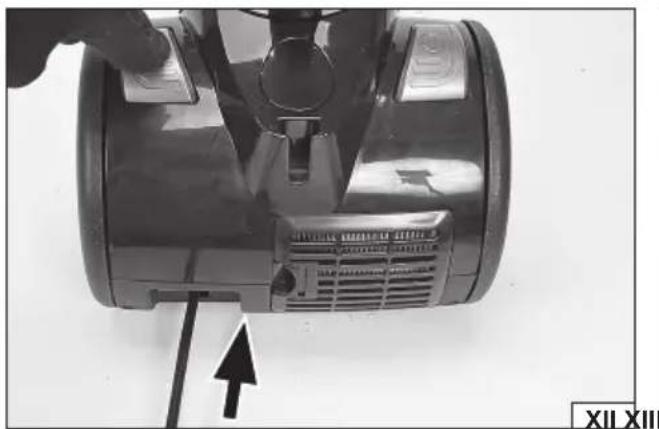
natural_image
Close-up of a hand holding a vacuum cleaner device with a black arrow pointing to the component (no visible text or symbols)
natural_image
Close-up of a hand holding a black vent grille on a car (no visible text or symbols)PL DE RU UA LT LV CZ SK HU RO ES FR IT NL GR
natural_image
Close-up of a mechanical component with a black rectangular grille and four vertical slots, labeled XIV XV (no text or symbols on the main subject)
natural_image
Close-up of a black vacuum cleaner with mechanical components (no visible text or symbols)PL
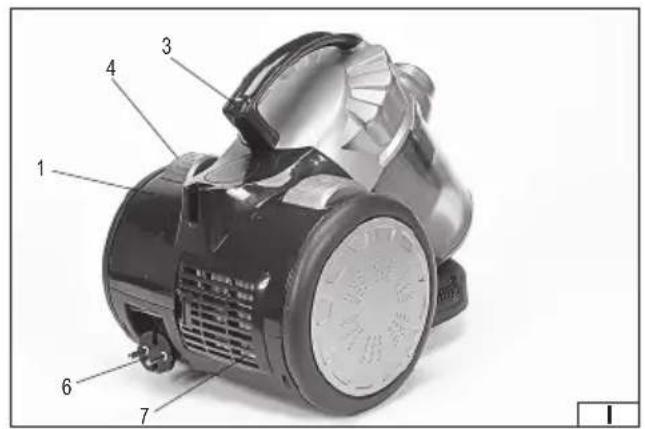
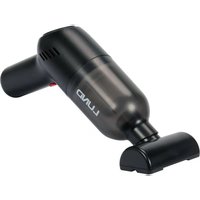
- vacuum cleaner
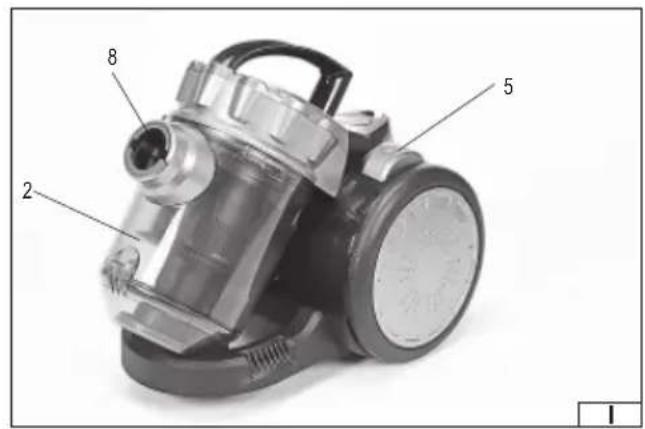
- dust container
- container lock button
- ON/OFF Switch
- cord rewind button
- Power cord and plug
- outlet fi Iter
- hose connector
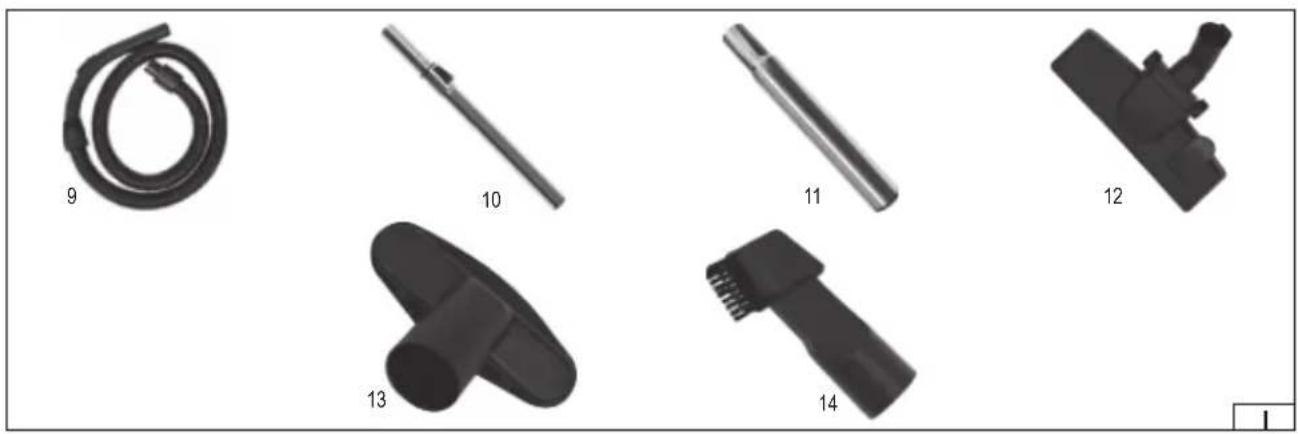
- fl exible hose
- telescopic pipe
- metal pipe
- floor and carpet brush
- small brush
- crevice brush
DE
Read the operating instruction
Second class of insulation
This symbol indicates that waste electrical and electronic equipment (including batteries and storage cells) cannot be disposed of with other types of waste. Waste equipment should be collected and handed over separately to a collection point for recycling and recovery, in order to reduce the amount of waste and the use of natural resources. Uncontrolled release of hazardous components contained in electrical and electronic equipment may pose a risk to human health and have adverse effects for the environment. The household plays an important role in contributing to reuse and recovery, including recycling of waste equipment. For more information about the appropriate recycling methods, contact your local authority or retailer.
APPLIANCE CHARACTERISTICS
The cyclone vacuum cleaner is used to clean hard floors and carpets with an air stream. The vacuum cleaner does not require dust bags. The air stream is set in a swirling motion inside the vacuum cleaner's container, which allows to separate the sucked in impurities. The product is designed for domestic use only and may not be used in commercial applications. The correct, reliable, and safe operation of the appliance depends on its proper use, so:
Reading and keeping the entire manual before the first use of the appliance.
The supplier shall not be held liable for any damage resulting from failure to observe the safety regulations and recommendations specified in this manual.
ACCESSORIES
The vacuum cleaner is supplied with additional accessories in the form of a flexible hose, a pipe and brushes for various purposes.
SAFETY INSTRUCTIONS
CAUTION! Read all of the following instructions. Failure to do so may result in electric shock, fire, or personal injury.
FOLLOW THE INSTRUCTIONS BELOW
Do not use the product in an explosive environment containing flammable liquids, gases, or vapours.
Do not place the appliance near any heat or fire sources.
Connect the appliance only to the power network with the voltage and frequency indicated on the nameplate of the appliance.
The plug of the power cord must match the power socket. Do not modify the plug. Do not use any power adapters to adapt the plug to the socket. An unmodified plug, which matches the socket, reduces the risk of an electric shock.
After each application, unplug the power cord from the power socket.
Avoid direct contact with grounded surfaces such as piping, radiators and refrigerators. Grounding of the body increases the risk of an electric shock.
The appliance is intended for indoor use only. Do not expose the appliance to any precipitation or moisture. If water and moisture enters the appliance, the risk of an electric shock is significantly increased. Do not immerse the product in water or any other liquid.
Do not obstruct the ventilation openings and make sure they are clear. Obstructed and/or clogged ventilation openings may cause the appliance to overheat. This can lead to damage to the appliance or cause fire or electric shock.
Do not overload the power cord. Do not use the power cord to carry, connect, or disconnect the plug from the power socket. Avoid any contact between the power cord and heat sources, oil, sharp edges, and moving parts. Damage to the power cord increases the risk of an electric shock. If the power cord is damaged (e.g. it is cut, its insulation is melted), immediately unplug it from the wall socket, and return it to an authorised service facility. It is not allowed to use the product with a damaged power cord. It is not allowed to have the power cord repaired. It must be changed for a new one at an authorized service centre. When using
EN
extension cords, use extension cords with power parameters such as those shown on the appliance's nameplate. The cross-section of the extension wires shall not be less than the cross-section of the wires of the power cord of the appliance. This should be checked on the insulation of the power cord and the extension cord, or contact the manufacturer of the appliance and/or the extension cord.
If you notice any damage to any part of the appliance, you must discontinue using it. In this case, the appliance must be taken to an authorised service centre or replaced by yourself, if this is permitted by the user's manual.
Turn off the appliance and unplug the power cord from the wall socket before you start any work on replacing, cleaning, or adjusting.
Switch off the appliance before replacing the accessories and unplug the power cord from the socket.
This appliance may be used by children of at least 8 years of age and by persons with reduced physical, mental abilities and persons with no experience or knowledge of the appliance, if supervised or instructed on its safe use so that the risks associated with it were understandable. Children should not play with the appliance. Children should not be allowed to clean or maintain the product without supervision.
The appliance is intended for home use only.
Do not use the vacuum cleaner on people and animals, do not put the inlet of the suction nozzles near eyes and ears.
Do not pass through the power cord with the vacuum cleaner, do not stand on the power cord. This can damage the cable and cause electrical shock.
Check the condition of the vacuum cleaner filters before each use. It is forbidden to use the vacuum cleaner without filters or with damaged filters.
Before each use, check the passability of the hose, pipes and suction nozzles. If a decrease in suction power or increased noise is noticed during operation, the passability of the above mentioned elements and the level of filling of the dust container must be checked.
Do not vacuum cigarette butts, matches, hot ashes. Avoid pulling in sharp objects such as needles, nails, pins or staples.
Do not vacuum water or other liquids. Do not vacuum wet waste.
Do not vacuum fine dust, e.g. flour, gypsum, printer toner, etc. Do not use the vacuum cleaner for cleaning industrial waste, e.g. sawdust, debris, metal filings, etc.
The vacuum cleaner must not be used in a dust extraction system where the dust is generated during operation of other tools, e.g. grinding, cutting, polishing, etc.
When vacuuming, static charges may occur on the appliance. This is normal, especially when cleaning in low humidity conditions. In order to minimise this phenomenon, it is necessary to periodically touch the grounded, metal objects around the house, e.g. radiators, with the pipe and to increase the humidity in the room to be cleaned.
OPERATING THE APPLIANCE
CAUTION! Turn off the appliance and unplug the power cord from the socket during all equipment assembly and disassembly activities.
EN
Appliance assembly and disassembly
Take the vacuum cleaner, the dust container and accessories out of the packaging and remove all packaging components. Place the vacuum cleaner on the floor and install the dust container.
Before first use, make sure that the container has all components and is correctly assembled.
If the container is mounted on a vacuum cleaner, it must be removed. Grasp the handle and press the container latch button (II) with your finger, then remove the container from the vacuum cleaner.
Turn the top cover of the dust container so that the mark on the lid indicates the open padlock (III) symbol. Then remove the cover (III).
Pull out the top filter of the dust container, check if there is an additional sponge filter under the non-woven filter. The uneven surface of the filter (IV) should be visible.
Pull out the bottom filter of the container. Check the condition of the filter to ensure that it is not damaged. Open the bottom cover of the container (V) by pressing the latch button. Check the condition of the cover seal.
Close the bottom cover. Install the bottom filter. Make sure that the tabs around the top edge of the filter hit the correct recesses in the container (VI). Tabs and recesses are of different sizes and only one mounting position is correct.
Install the top filter (VII). A correctly installed filter should have an top surface parallel to the edge of the container.
Install the dust container cover. Place it on the edge of the container so that the edge of the cover fits the edge of the container around the entire circumference, the tabs of the lid should hit the recesses of the container and the marker of the lid should indicate the symbol of an open padlock. Turn the cover so that the cover marker indicates the locked padlock symbol (VIII). Check that all the tabs on the lid have slipped between the safety tines and the edge of the cover is fits the edge of the container around the entire circumference.
Mount the assembled dust container to the vacuum cleaner.
The hitch near the latch of the bottom cover should hit the recess in the housing. Slide the top part of the container towards the vacuum cleaner housing (IX), until the latch engages. You will hear the sound of the latch mechanism. A correctly installed container cannot be removed otherwise than by pressing the container latch button.
Installation of accessories
Connect the hose to the air inlet of the dust container. Insert the hose connector into a round opening so that the tabs on the connector slip into the gaps in the opening (X) and then turn the hose connector towards the locked padlock symbol. A correctly installed hose connector fits the edge of the container opening around the entire circumference.
Disassemble the hose by turning the connector towards the padlock symbol and then slide it out of the dust container opening.
The pipe or a selected brush can be fitted to the free end of the hose. Mounting is done by sliding the end of the hose into the inside of the pipe or brush.
Using the appliance
After installing the dust container, hose and selected brush, connect the power cord plug to the socket. Grasp the plug and pull out the cord to the length required for cleaning. A coloured marker (XI) is located at the end of the cord. When you see the marker, stop pulling the cord out, otherwise the cord or the cord self-winding mechanism may be damaged.
Rolling up the excess power cord is carried out by pressing the cord winding button (XII). When winding, hold the cord in your hand to prevent entanglement and impact of the plug on the vacuum cleaner housing.
After connecting the vacuum cleaner to the socket, press the switch and start vacuuming.
The vacuum cleaner is switched off after pressing the switch.
Purpose of the accessories
Flexible hose - used to connect the pipe or brush with the vacuum cleaner. The hose handle is equipped with a mechanical suction power regulator. The more open the regulator cover, the lower the suction power.
Telescopic pipe - a pipe of adjustable length, which allows for comfortable selection of working height. The length is adjusted by pushing and holding the locking button and then changing the length. Releasing the pressure on the button and then slightly pulling the pipe will trigger the lock and set the length of the pipe, and the sound of the ratchet mechanism will be heard.
Metal pipe - allows for telescopic pipe extension.
Floor and carpet brush - universal brush for cleaning both carpets and all types of hard floors. The brush is equipped with a lever that allows the bristles to be pushed in and out. Pressing the lever in place of the bristle brush symbol pushes the bristles out.
Pressing the lever in place of the brush symbol without bristles pushes the bristles in.
Small brush - allows you to clean where a larger brush cannot fit.
2 in 1 crevice brush - allows for cleaning in narrow crevices. The brush is equipped with rotating bristles.
MAINTENANCE AND STORAGE
CAUTION! Never immerse the vacuum cleaner in water or other liquids. Doing so may result in electric shock.
After cleaning, turn off the vacuum cleaner with the switch, disconnect the power cord plug from the socket, retract the cable,
EN
disconnect the brush, pipe and hose and proceed with maintenance.
Disconnect the dust container from the vacuum cleaner. Open the lower cover of the container and discharge the waste collected in the container. Open the top cover, remove both filters. Clean the container with a damp, soft cloth, then dry with a dry cloth or allow to dry.
Remove the sponge filter from the upper filter and wash it under a stream of running, lukewarm water, squeeze out excess water and leave the sponge to dry completely. Wait at least 24 hours after placing the filter in a well-ventilated place at room temperature. Warning! It is forbidden to use the vacuum cleaner with a wet or damp filter. This can result in an electric shock.
The bottom filter can be rinsed under running, lukewarm water. Next dry with a dry cloth and allow to dry completely. Wait at least 24 hours after placing the filter in a well-ventilated place at room temperature.
Open the outlet filter cover by pressing the lock button (XIII). Remove the filter, the dirty filter can be washed under running, lukewarm water or replaced with a new one. After cleaning, dry the filter thoroughly before reassembly. Wait at least 24 hours after placing the filter in a well-ventilated place at room temperature. Check the filter seal for damage. Replace the filter with a defective seal with a new one.
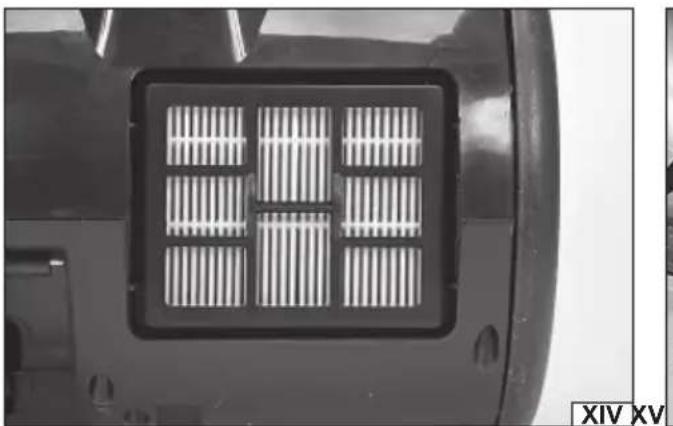
Install the filter as shown in the illustration (XIV). Secure the filter by attaching and snapping on the cover.
Do not wash filters in mechanical dishwashers and do not dry them with a stream of hot air. This can cause deformation of the plastic material used for the construction of the filter. Avoid exposing the filters to direct sunlight.
No other part of the vacuum cleaner must be exposed to water. The non-woven part of the upper filter should be gently tapped, shaking off larger impurities. In the case of excessive contamination, replace the filter with a new one.
Clean the remaining parts of the vacuum cleaner with a cloth slightly soaked in water, then dry or allow to dry.
Store the vacuum cleaner in a horizontal position. During storage, ensure that the hose is not bent, crushed or otherwise deformed. The hose can be connected or disconnected from the vacuum cleaner for storage. The vacuum cleaner has a hook at the rear for attaching the floor and carpet brush (XV) for storage. Store the vacuum cleaner with the power cord rolled up and its plug disconnected from the socket.
TECHNICAL PARAMETERS
| Parameter Units Value | ||
| Catalogue No. 67091, 67092 | ||
| Rated voltage [V~] 220 – 240 | ||
| Rated frequency [Hz] 50/60 | ||
| Rated power [W] 700 | ||
| Electrical protection class II | ||
| Dust container capacity [l] | 1.5 | |
| Power cord length | [m] | 5 |
| Weight | [kg] | 3 |
GERÄTEBESCHREIBUNG
Brand : Lund
Model : 67091
Category : Vacuum Cleaner