
YT-73138 - Digital detector Yato - Free user manual and instructions
Find the device manual for free YT-73138 Yato in PDF.

User questions about YT-73138 Yato
0 question about this device. Answer the ones you know or ask your own.
Ask a new question about this device
Download the instructions for your Digital detector in PDF format for free! Find your manual YT-73138 - Yato and take your electronic device back in hand. On this page are published all the documents necessary for the use of your device. YT-73138 by Yato.
USER MANUAL YT-73138 Yato
EN 4 IN 1 DIGITAL DETECTOR WITH MOISTURE TEST
PL
- red indicator lamp
- orange indicator lamp
- green indicator lamp
- display
- power switch
- wood detection button
- HOLD button
- metal detection button
- humidity measurement probes
- probes cover
- sensor area
- battery cover
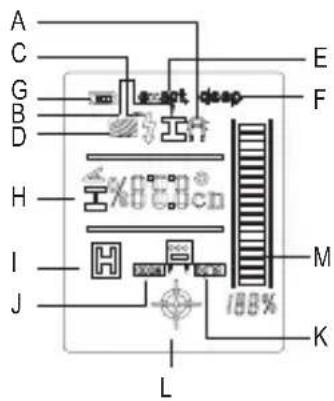
A. diamagnetic metals
B. ferromagnetic metals
C. live wire
D. wood detection
E. wood detection (accurate method)
F. wood detection (deep method)
G. battery indicator
H. metal position depth
I. holding the humidity measurement
J. humidity in wood
K. humidity in construction materials
L. cross indicator
M. signal strength scale
DE
This symbol indicates that waste electrical and electronic equipment (including batteries and storage cells) cannot be disposed of with other types of waste. Waste equipment should be collected and handed over separately to a collection point for recycling and recovery, in order to reduce the amount of waste and the use of natural resources. Uncontrolled release of hazardous components contained in electrical and electronic equipment may pose a risk that can health and have adverse effects for the environment. The household plays an important role in contributing use and recovery, including recycling of waste equipment. For more information about the appropriate recycling units, contact your local authority or retailer.
Read the operating instruction
PRODUCT CHARACTERISTICS
The detector can detect live wires, ferromagnetic and diamagnetic metal elements as well as wooden beams in walls. The two-pin probe allows the device to measure the relative humidity of soft materials such as wood, paper, and cardboard as well as hard materials like concrete, masonry mortar, and plaster. Thanks to the clear display and easy operation, it is possible to quickly and precisely perform the measurement. Small size and battery power supply ensure high mobility of the device.
CAUTION! This device is not a measuring instrument within the meaning of the Trade Metrology Act.
ACCESSORIES
The detector is supplied complete and does not require assembly. Only installing the batteries is required for the device to function properly. Batteries are not included.
TECHNICAL DATA
| Parameter Unit Value | ||
| Catalogue No. YT-73138 | ||
| Type of detected objects wood, metal, | ive wires (AC) | |
| Detection range | ||
| - ferromagnetic metals [mm] 120 | ||
| - diamagnetic metals [mm] 80 | ||
| - live wires (AC) [mm] 50 | ||
| - wood (accurate method) [mm] 20 | ||
| - wood (deep method) [mm] 38 | ||
| Wood relative humidity 5% - 50% / ±2% | ||
| Hard materials relative humidity 1.5% - | 33% / ±2% | |
| Power supply 9 V DC (6F22) | ||
| Operating temperature [ | °C] | 0 ÷ +50 |
| Storage temperature | [°C] | -10 ÷ +60 |
| Dimensions | [mm] | 200 x 77 x 20 |
| Weight (without battery) | [kg] | 0.13 |
GENERAL INSTRUCTIONS
Do not use the detector near strong electromagnetic fields or high-frequency electrical signals. Do not use the detector in an environment where the ambient temperature is outside the operating range. If the device is stored in temperature beyond the operating range, wait until the device reaches the temperature within the operating range, before using it.
Shielded wires or low-voltage signal cables (CATV, computer) will only be detected as metal elements. If the detected objects are further than the maximum range of the detector, they will not be detected.
Avoid using the detector on wet or damp surfaces. Objects in metal walls will not be detected. Some factors, such as material type and temperature can affect the humidity measurement. Do not use the product for measurements for inspection purposes.
Do not expose the detector to water, including rain. Do not place the device with other tools in the toolbox. Impacts can damage the detector.
Transport the detector in the supplied case.
Remove the battery from the device if it will not be used for a longer time. Do not store the detector at temperatures above 60^ C, as this can damage the LCD.
The product is intended only for measuring the parameters of the materials listed in the manual.
Do not use the product to measure the parameters in other materials. Do not use the product for
EN
measuring people and animals.
The product is not intended to be handled by children. Make sure that children do not treat the product as a toy.
DETECTOR OPERATION
Replacing the battery
Install a new battery before using the detector for the first time or if the display shows the used battery indicator. To do this, remove the battery cover on the bottom of the detector and remove the old battery. When replacing the battery, ensure the correct polarity.
CAUTION! Use only alkaline batteries of good quality.
If the battery indicator is visible on display, it means that the device will operate for a maximum of 1 hour. If the battery indicator flashes, it means that the device will operate for a maximum of 10 minutes. If the battery indicator flashes and the detection indicator is illuminated, it means that the device cannot operate and the battery should be replaced.
Turning the detector on and off
CAUTION! Make sure that the sensor area is not wet before turning on the detector. Otherwise, dry the sensor area with a cloth.
To turn on the detector, press the power switch. The device starts in metal detection mode.
In case when 5 minutes have elapsed since pressing any button, the device will automatically turn off. This will extend the battery replacement period.
Changing the measurement unit
By pressing the detection button and the HOLD button simultaneously, you can change the unit of detection depth between millimetres and inches.
Audible signal
The audible signal can be enabled or disabled. To do this, press the wood detection and metal detection buttons simultaneously.
Detecting metal elements
Place the detector on the tested surface so that its underside adheres to it. Turn on the device without removing it from the tested surface. To obtain the highest measurement precision, do not change the position of your fingers. The device calibrates itself initially after switching on. Removing the device from the tested surface and changing the grip negatively affect the quality of detection. The device will automatically start in metal detection mode. If a metal element is detected, the measurement indication in the form of a measuring ladder will increase its amplitude and the percentage indicator will increase its value.
In the place where the measurement indicator shows the highest value, the metal element is located exactly under the detector sensor. In this case, the display will show the distance between the detector sensor and the detected metal object. If a metal element is detected, an audible signal is emitted. The distance will not be displayed if the signal is too weak or the device cannot recognize the type of metal. The accuracy of detection depends on the shape, size, position and surroundings of the metal element.
If diamagnetic metal is detected, the appropriate indicator will appear on the display. When moving the device back and forth, a cross indicator will appear, which means that the detected metal element is located under the center of the sensor.
During the detection of metal elements, live wires may also be detected, which will be announced by the indicator on the display.
NOTE! Due to the high sensitivity of the measurement, when the wall is thin or the metal objects are thick, the metal detection area may seem much larger than the actual location. To narrow down the detection, reduce the measurement sensitivity. Press the metal detection and HOLD buttons simultaneously until a satisfactory sensitivity is obtained, visible on the display. It is possible to set one of four sensitivity levels. The sensitivity will be restored to the highest level after restarting the device.
EN
Detecting wooden elements
Place the detector on the tested surface so that its bottom side is in contact with it. Turn on the device without removing it from the tested surface. For the highest measurement precision, do not change the position of your fingers. The device will initially calibrate after starting. Lifting the device from the tested surface and changing the grip negatively affect the quality of detection. The device will automatically start in metal detection mode. With the other hand, switch the device to wood detection mode. Wait two seconds. Slowly move the detector over the tested surface. If a wooden element is detected, the measurement indication in the form of a measuring ladder will increase its amplitude and the percentage indicator will increase its value.
In the place where the measurement indicator shows the highest value, the wooden element is located exactly under the detector's sensor. If a wooden element is detected, an audible signal is emitted.
When moving the device back and forth, a cross indicator will appear, which means that the detected wooden element is located under the center of the sensor.
CAUTION! Do not lift the detector from the tested surface while moving. All the detector's feet must have contact with the tested surface.
CAUTION! If the detection symbol starts flashing while moving the detector, stop the detector until the indicator stops flashing.
CAUTION! When detecting wooden elements, it may happen that metal elements located at a depth of 25 to 50 mm will be detected. In this case, switch the detector to metal detection mode and make sure that there are no metal elements. Live wires may also be detected during the detection of wooden elements, which will be indicated by an indicator on the display.
Detecting live wires
The detector is able to indicate the location of live wires through which an alternating current of 50 or 60 Hz flows. Other wires can only be detected as metal elements.
Place the detector on the tested surface so that its underside is in contact with it. Switch on the device without removing it from the tested surface. For the highest measurement precision, do not change the position of your fingers. The device will initially calibrate after switching on. Lifting the device from the tested surface and changing the grip negatively affect the quality of detection. The device will automatically start in metal detection mode. With your other hand, switch the device to the live wire detection mode. The symbol visible on the button will appear on the display. If a live wire is detected, the measurement indication in the form of a measuring ladder will increase its amplitude and the percentage indicator will increase its value. At the point where the measurement indicator will show the highest value, the live wire is located exactly below the detector sensor.
CAUTION! Due to the high sensitivity of the measurement, when the wall is thin, or the humidity level is too high, the detection area may seem much larger than the actual location. To narrow the detection, reduce the measurement sensitivity. Simultaneously press the live wire detection and HOLD buttons, until a satisfactory sensitivity is visible on display. The device allows setting one of the four sensitivity levels. The sensitivity will be restored to the highest level when the instrument is restarted.
A live wire indicator may appear on the display when detecting both metal and wooden elements. If the indicator appears, move the device several times over the place, where a live wire may be present. Observe the indicator amplitude. The live wire is present in the place, which has the highest reading value. If a live wire is detected, the red indicator lamp will illuminate, and the audible signal will be emitted.
Live wires are the easiest to detect if the current is actually flowing through them. To do this, turn on the electricity receivers.
CAUTION! In some cases, for example, if the wires are placed behind a metal or damp surface, they cannot be detected accurately. In this case, use the metal detection mode.
CAUTION! In the case of shielded wires, detection of live wires may prove ineffective. Wires such as a computer twisted pair or braided wires will not be detected.
CAUTION! It may happen that live wires will be detected all the time, even after reducing the sensitivity. This may mean that the humidity level at the measurement site is too high or the electrostatic level is too high. The effect of the electrostatic field can be reduced by placing the
EN
other hand on the test surface.
Humidity measurement
CAUTION! The relative humidity measurement probes are very sharp. Be careful when working with uncovered probes. Always cover the measurement probes when performing measurements other than relative humidity measurement.
Remove the measurement probes cover and place them gently on the test surface. Do not use excessive force.
Press the HOLD button; a relative humidity indicator will appear on display. Press and hold the HOLD button to select the type of test material. The relative humidity indication will be visible on the display.
Press the HOLD button to save the measured value on display. It will be visible until the HOLD button is pressed again.
Detector maintenance
Use a soft, dry cloth to clean the detector. Do not use cleaning agents. Do not stick any stickers, especially those containing metal, to the detector. This will adversely affect the detector's operation.