
YT-84840 - Scarifier Yato - Free user manual and instructions
Find the device manual for free YT-84840 Yato in PDF.

| Brand | Yato |
| Model | YT-84840 |
| Product type | Electric scarifier |
| Rated voltage | 230-240 V~ |
| Rated frequency | 50 Hz |
| Rated power | 1800 W |
| Working width | 380 mm |
| Maximum working depth | 12 mm |
| Depth adjustment | 5 positions (0, 3, 6, 9, 12 mm) |
| Rated rotational speed | 3500 min⁻¹ |
| Sound pressure level | 90.2 dB(A) ± 3.0 |
| Sound power level | 105.17 dB(A) ± 3 |
| Vibration level | 1.679 m/s² ± 1.5 |
| Weight | 12.5 kg |
| Collection bag capacity | 45 L |
| Electrical insulation class | II (double insulation) |
| Protection rating | IPX4 |
| Main functions | Scarifying (aeration by blades) and dethatching (cleaning by springs/hooks) |
| Included rollers | Blade roller and spring roller |
| Adjustable handle | Yes, 3 tilt positions |
| Maintenance and cleaning | Clean after use with a brush or compressed air (max 0.3 MPa). Do not use water or chemicals. Oil metal parts after cleaning. |
| Safety | Switch with lock, spray guard, teeth stop in seconds. Use PPE (goggles, gloves, hearing protection). |
| Spare parts and repairability | Original replacement rollers available. For internal cable, contact an authorized service center. |
| General information | 120-page manual, available in multiple languages. Warranty voided if used improperly. |
Frequently Asked Questions - YT-84840 Yato
User questions about YT-84840 Yato
0 question about this device. Answer the ones you know or ask your own.
Ask a new question about this device
Download the instructions for your Scarifier in PDF format for free! Find your manual YT-84840 - Yato and take your electronic device back in hand. On this page are published all the documents necessary for the use of your device. YT-84840 by Yato.
USER MANUAL YT-84840 Yato
natural_image
Disassembled automotive component laid out on a flat surface, including steering wheel, battery pack, and clamps (no text or symbols visible)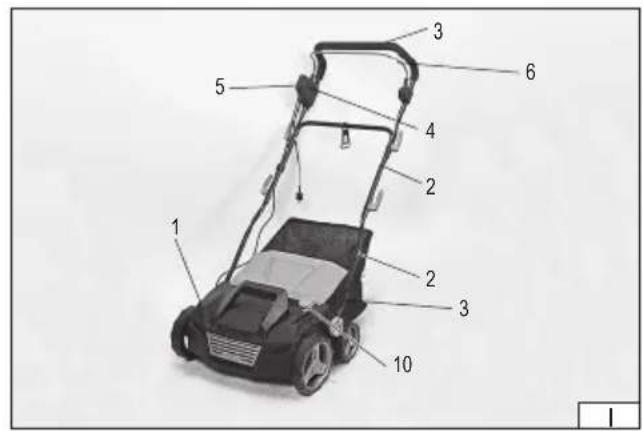
natural_image
Two types of electrical insulator components, shown from different angles (8 and 9), with no visible text or symbols.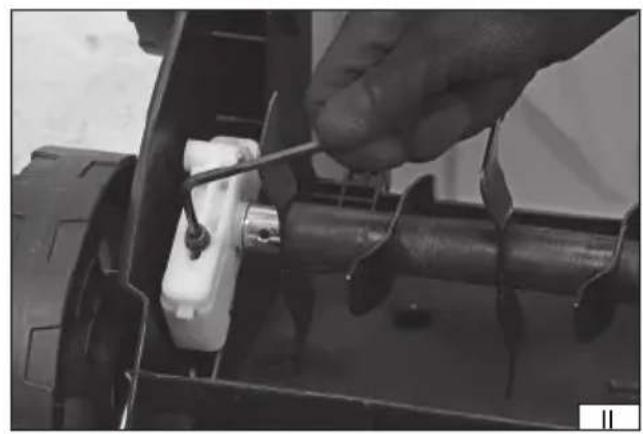
natural_image
Close-up of a hand using a tool to adjust or install a mechanical component, no visible text or symbols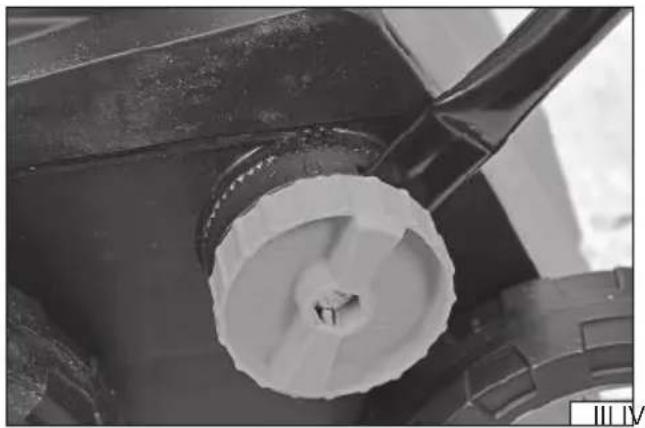
natural_image
Close-up of a mechanical component with a white circular component and a black handle (no visible text or symbols)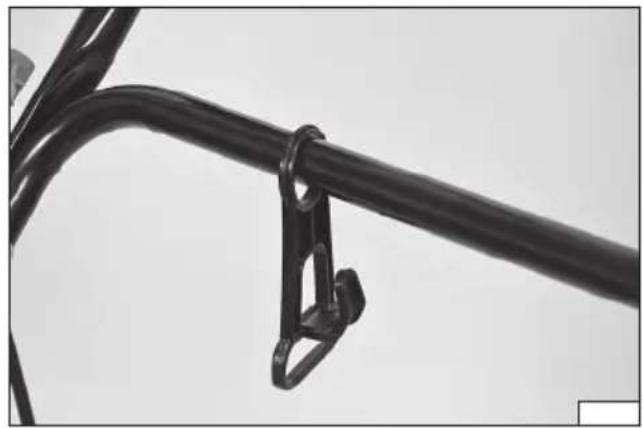
natural_image
Close-up of a black cable with a hanging clamp, no text or symbols visible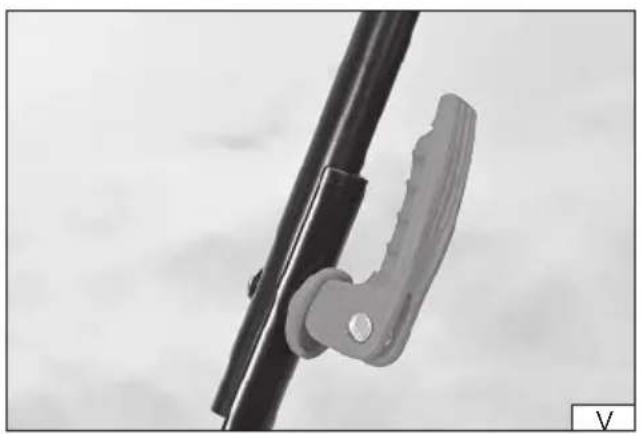
natural_image
Close-up of a mechanical clamp securing a black cable against a cloudy sky (no text or symbols visible)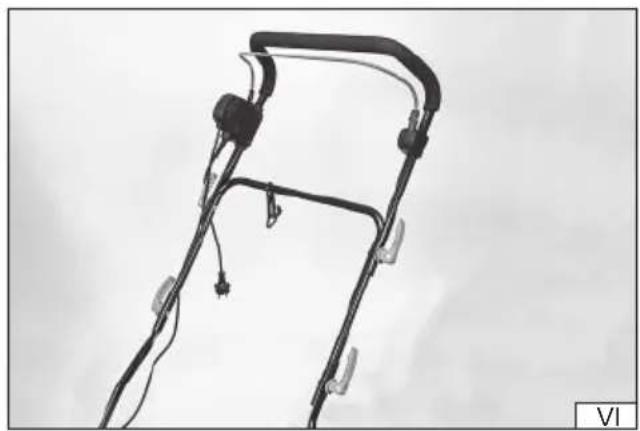
natural_image
Close-up of a black bicycle steering wheel with attached sensors and cables against a cloudy sky (no text or symbols visible)natural_image
Close-up of a black cable with a black connector and a square bracket, no visible text or symbols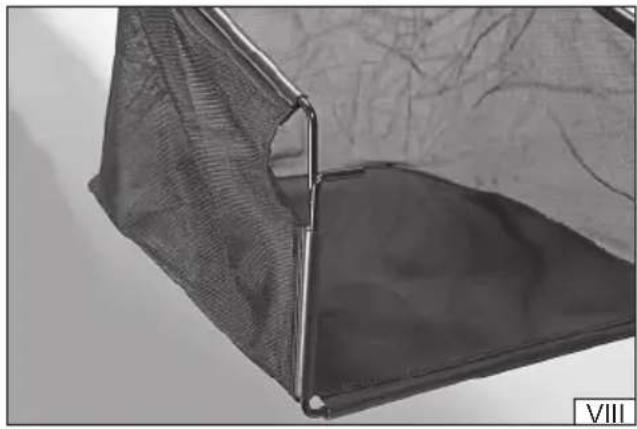
natural_image
Close-up of a mesh net with metal frame, partially covered by fabric or paper (no text or symbols visible)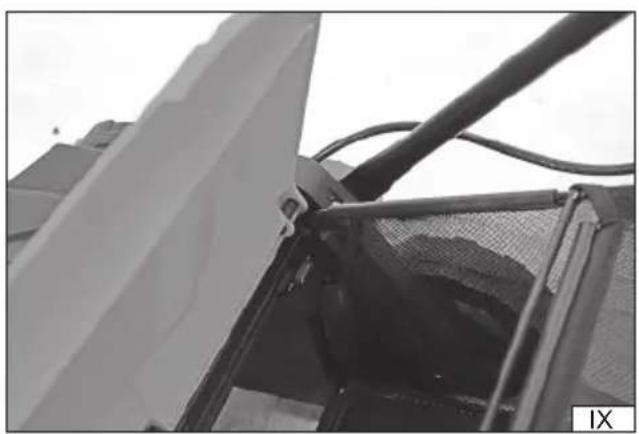
natural_image
Close-up of a metal frame structure with mesh mesh and diagonal bracing, no visible text or symbols
natural_image
Close-up of a mechanical device with a black cover and white plastic component, no visible text or symbols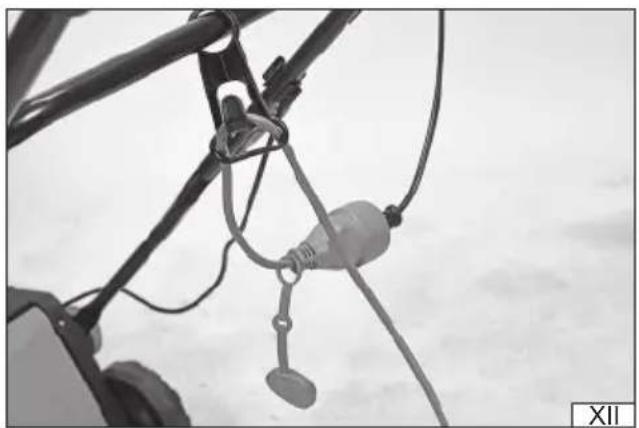
natural_image
Close-up of a bicycle suspension system with wires and a hanging connector (no visible text or symbols)
natural_image
Close-up of an electric vehicle charging plug with attached medical device (no visible text or symbols)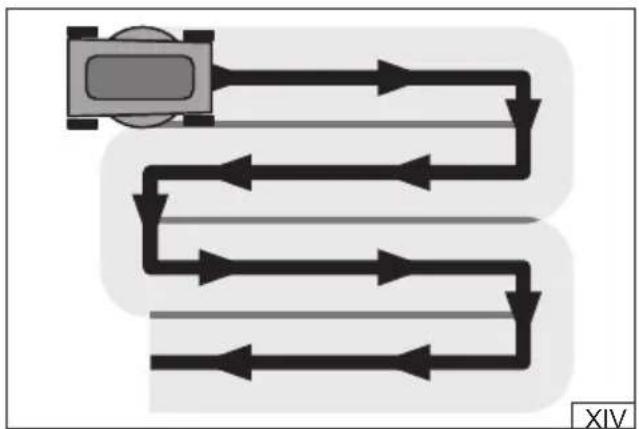
flowchart
graph TD
    A["Central Device"] --> B["Terminal Node"]
    A --> C["Intermediate Path"]
    A --> D["Final Terminal"]
    A --> E["End"]
PL
- housing
- handlebar bracket
- handlebar
- electric power switch
- power switch lock
- power switch lever
- catcher
- roller with springs
- roller with blades
- working depth adjustment
UA
Read the operating instruction
Wear protective goggles
Schutzbrille tragen
Wear hearing protectors
Second class of insulation
Keep the flexible power cord away from the cutting tools. Before adjusting or cleaning, in case of cable braiding or damage, switch off the device and pull the plug out of the socket.
Warning! Pay special attention to sharp tines; keep fingers and toes away. Pull the plug from the mains socket before maintenance, adjustment, cleaning or if the power cord becomes entangled or damaged. The tines still rotate when the motor is switched off.
Warning! Electric Shock Hazard.
Stay away from bystanders
Beware of the discarded items
Noise - L _1/2 power
Lärm – Leistung L_w
Сила шума L_WA
Сила шуму L_WA
Triukšmas - galia L
WYPOSAŻENIE PRODUKTU
The verticutter is used for maintenance and care of the lawn. It is equipped with a roller with blades that cut the ground while rotating. Cutting the soil on which the grass grows results in a better supply of air and water. The second roller has hooks that remove the excess moss and grass from the lawn surface. The electric drive allows for quiet, efficient and easy operation. Proper, reliable and safe operation of the device depends on appropriate use, that is why you should
Read this entire instructions manual before the first use and keep it for future reference.
The supplier shall not be held liable for any damage or injury resulting from improper use of the product, failure to observe the safety regulations and recommendations of this instructions manual. Use of the product for purposes other than those for which it was intended shall cause the loss of the user's rights to the warranty and statutory warranty.
PRODUCT EQUIPMENT
The product is delivered complete; however, the preparatory actions described in the further part of this instructions manual must be carried out before starting work. The product is only supplied with a short section of the power cord.
TECHNICAL DATA
| Parameter Unit Value | ||
| Catalogue No. YT-84840 | ||
| Rated voltage [VAC] 230-240 | ||
| Rated frequency [Hz] 50 | ||
| Rated power [W] 1800 | ||
| Working width [mm] 380 | ||
| Max. working depth | [mm] | 12 |
| Rated rpm | [min ^-1 ] | 3500 |
| Noise level | ||
| sound pressure L_pA ± K | [dB(A)] | 90.2 ± 3.0 |
| sound power L_mA ± K | [dB(A)] | 105.17 ± 3 |
| Vibration level a_h ± K | [m/s ^2 ] | 1.679 ± 1.5 |
| Electric insulation class | II | |
| Protection rating | IPX4 | |
| Weight | [kg] | 12.5 |
| Grass catcher capacity | [l] | 45 |
The declared total vibration emission value and declared noise emission value have been measured using the standard test method and can be used to compare one tool to another. The declared total vibration emission value and declared noise emission can be used in the initial exposure assessment.
Caution! The vibration emission during tool operation may differ from the declared value, depending on the manner the tool is used.
Caution! Safety measures to protect the operator, which are based on an assessment of emission exposure under actual conditions of use (including all parts of the work cycle, such as the time when the tool is switched off or idle and the activation time), must be specified.
INSTRUCTIONS FOR SAFE USE OF SCARIFIERS / AERATORS
IMPORTANT!
READ CAREFULLY BEFORE USE
KEEP FOR FUTURE REFERENCE
Safe operation practices for scarifiers / aerators
Training
Read the instructions manual carefully. Familiarise yourself with the controls and proper use of the equipment.
EN
Never allow children or persons not familiar with the instructions to use the product. National regulations may restrict the operator's age.
Remember that it is the operator or the user who is responsible for accidents of or hazards to other people or the properties.
Preparation
Wear ear protectors and safety glasses at all times while operating the machine.
Inspect the power cord and extension cord for damage or wear before use. If the cord is damaged during use, immediately disconnect it from the power supply. DO NOT TOUCH THE CORD BEFORE DISCONNECTING THE POWER SUPPLY. Do not use the machine if the cord is defective or damaged.
When operating the machine, wear sturdy footwear and trousers with long legs. Do not operate the tool barefoot or when wearing sandals with exposed toes. Avoid wearing clothing that is too loose or has hanging strings or other elements intended for tying.
Carefully examine the area where the equipment is to be used and remove any objects that may be ejected by the machine.
Operate the machine in the recommended position and only on a stable flat surface.
Do not operate the machine on a cobbled or gravel surface on which the material ejected could cause injury.
Before starting the machine, check that all bolts, nuts, pins and other fixing elements are properly fastened and that the guards and screens are in place. Replace damaged or illegible labels.
Never operate the machine when persons, in particular, children or pets are in the vicinity.
Operation
Operate the machine only in daylight or in good artificial lighting.
Avoid working with the machine on wet grass.
Always ensure that the balance is maintained at all times, especially on slopes.
Walk, never run.
Move across the slopes, never up or down.
Exercise particular caution when changing direction on slopes.
Do not scarify or aerate on excessive slopes.
Exercise particular caution when retracting the machine or pulling it towards you.
It is recommended to stop the tines if the machine is to be tilted for transport, when passing through surfaces other than grass and when transporting the machine to and from the area where it will be used and back.
Do not operate the machine with damaged guards or housings and without safety devices, e.g. defl ectors and/ or grass catchers in the right place.
Start the motor carefully in accordance with the instructions, keeping your feet away from the tines.
Keep the connected power cord and extension cord away from the tines.
Do not tilt the machine when starting the motor, except when it requires tilting during starting.
In this case, do not tilt more than necessary and lift only the part which is away from the oper-
EN
ator. Always ensure that both hands are in the working position (work position) before turning the machine back onto the ground.
Do not transport the machine when its supplied with power.
Keep hands and feet away from rotating parts. Stay clear of the ejection opening at all times.
Stop the machine and pull the plug from the socket. Make sure that all moving parts have come to a complete stop:
- every time you step away from the machine;
- before removing a blockage or unlocking the steering element,
- before checking, cleaning the machine or working with the machine,
- after hitting a foreign object. Visually inspect the machine for damage and repair it before restarting and operating the machine;
if the machine starts to vibrate excessively (check immediately): - perform a visual inspection for damage,
- replace or repair all damaged parts,
- check for loose parts; if there are some, tighten them.
Maintenance and storage
Make sure that all nuts, bolts and screws are tightened to make sure that the equipment is in a safe working condition.
Check the catcher frequently for wear or damage.
Replace worn or damaged parts to ensure safety.
In the case of machines with multiple tile assemblies, note that rotation of one tile assembly may cause rotation of another tile assembly.
Be careful when adjusting the machine to prevent finger entrapment between the moving tile assemblies and the fixed parts of the machine.
Always allow the machine to cool down before storage.
When maintaining the tine assembly, be aware that while the power source is disconnected, the tile assemblies may still move.
Replace worn or damaged parts to ensure safety. Use only original spare parts and equipment.
When the machine is stopped for maintenance, visual inspection or storage, or accessory replacement, turn off the power source, disconnect the machine from the power supply, and make sure that all moving parts have come to a complete stop. Allow the machine to cool down before carrying out any visual inspection, adjustments, etc. Maintain the machine carefully and keep it clean.
Store the machine in a place inaccessible for children.
Recommendations
It is recommended that the machine be power-supplied by a residual current device (RCO) with a trip current of 30 mA or less.
Risks related to noise and vibrations
The tool is designed to reduce the risk of exposing the user to noise and vibration as much
EN
as possible. However, it is not possible to completely eliminate these hazards. Additionally, people in the vicinity of the operating tool are also exposed to noise hazards.
However, the risks associated with the above-mentioned hazards can be reduced by observing the following guidelines:
- the product should be used in accordance with its intended use, described in the instructions manual;
- make sure that the tool is in good condition and is regularly maintained;
- use proper and well-sharpened cutting tools;
- use a fi rm grip on the product handle;
- plan work so that frequent breaks can be incorporated.
Residual risks
Even if all safety precautions are followed during operation, the potential risk of injury remains. The following risks remain in relation to the design of the product.
Vibration-related injuries caused by prolonged operation of the tool, incorrect manner of work, or work with an improperly maintained tool.
Injuries caused by an unexpected impact from hidden, ejected objects.
PRODUCT OPERATION
Preparing for operation
Unpack the product by removing all packaging components. It is recommended to retain the packaging, which can be of use when transporting or storing the product.
Check that no part of the product has been damaged during transport. In case of damage detection, such as cracks or deformations, it will disqualify the product from further use until it is repaired or damaged components are replaced.
It is recommended to place all the components on a flat, hard, and clean surface.
Use personal protective equipment such as protective gloves, eye protection, and protective clothing during assembly.
Caution! Before performing the product assembly, make sure that it is disconnected from the power supply. The device power cord plug must be disconnected from the mains socket.
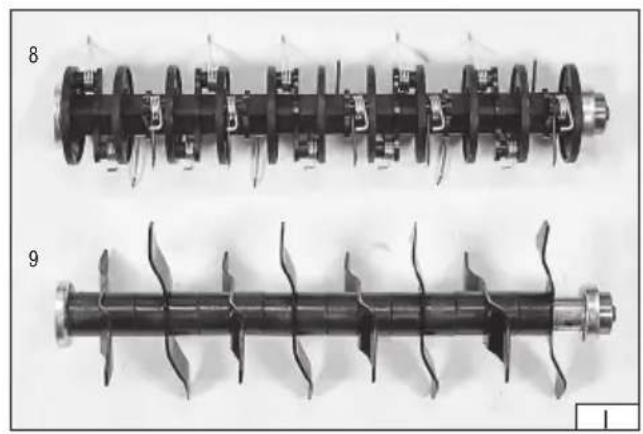
When first assembling the product, it is recommended to start by assembling the correct roller with the scarifying blades or with the cleaning hooks. It will be easier to manoeuvre the device without the handlebar installed.
Caution! Due to the sharp edges of the rollers, there is a risk of injury. Take special care. Wear protective gloves for assembly.
If one of the rollers is already installed in the device, loosen the bolts of the clamp, open the clamp, dismantle the roller and close the clamp. Secure the closed clamp by tightening the fixing bolts (II). The roller is not symmetrical and on one side has a protruding element with a square cross-section; the protruding element should go to the drive socket of the same shape.
Place the device on the wheels and proceed to the installation of the handlebar. Fasten the straight bracket elements on both sides to the machine housing. The bracket is equipped with a gear that should match the sprocket wheel on the machine housing. Secure the connection with a knob (III). The sprocket wheel allows for selecting one of the three positions of the handlebar inclination. During installation, it is recommended to select the middle position and the correct height, adjusted to the operator's height, should be selected after assembling the handlebar.
Before installing the U-shaped bracket, place a holder on it for holding the power cord (IV). Then install the U-shaped bracket using the eccentric levers. Pass the lever bolt through the holes in the brackets and tighten the lever itself until its closure secures the connection of the brackets (V). Mount the handlebar with the power switch on the bracket so that the bent part of the handlebar faces upwards (VI). The handlebar with the power switch must be mounted using the lever as described when connecting the two parts of the handlebar bracket together.
Fasten the cable connecting the power switch to the verticutter housing to the handlebar bracket using the flexible clamp (VII). Install the external cover (VIII) onto the catcher frame. Then lift and hold the cover at the back of the housing in the upper position and insert the frame rods into the holes in the housing (IX). Lower the cover so that it covers the hole in the catcher (X).
EN
When assembled in this manner, the product is ready for use.
Setting the working depth (XI)
To set the working depth, use the lever, which should be moved and then introduced into the gap. The gaps are described by numbers, which indicate the working depth: 0 – transport position, 1 – 3 mm, 2 – 6 mm, 3 – 9 mm, 4 – 12 mm.
Setting the excessive working depth can lead to damage to the lawn and faster wear of the rollers, as well as to damage to their elements.
Warning! In case there is a need to change the depth during operation, always turn off the verticutter first, wait for the roller to stop, disconnect the verticutter from the power cord and then change the working depth. Accidental starting of the roller during a depth adjustment may result in serious injury.
Connecting the verticutter to the power supply
The verticutter is only equipped with a short section of power cord with a plug, that is why it must be connected with an external cable. Always use cords intended for outdoor use due to the nature of the machine work. The cable should have a single socket matching the verticutter power cord plug. It is forbidden to modify the plug or socket to make them fit. The electrical parameters of the power cord should correspond to the electrical parameters of the device, listed on the rating plate. It should be noted that the power cord's cross-section depends on the length of the cord. Follow the instructions below regarding the power cord cross-section:
- 1.0 mm ^2 – cord length not greater than 40 m;
- 1.5 mm ^2 – cord length not greater than 60 m;
- 2.5 mm ^4 – cord length not greater than 100 m.
When preparing for the operation and during operation, pay attention to the power cord. Protect the power cord from water, moisture, oils, heat sources and sharp objects. Lay the cord so that it does not come within the reach of the roller's blades. Cutting the cord may result in electric shock and serious injury or death. Make sure that you do not become entangled in the cord. This can lead to a fall and serious injury.
Do not overload the power cord, and do not cause any of the cord's section to become tensioned. Do not pull the cord when moving the device. Always disconnect the power cord plug from the socket by pulling on the plug and socket housing, never pull on the cord.
The external power supply cable near the socket to which its plug will be connected must be passed through the eyelet of the holder and then through the hook (XIII). Only then connect the power cord of the device to the external cable.
Make sure that the cable does not kink or become tensioned. Disconnect the cable from the plug as required, lengthen the loop and reconnect. Only after the external cable is properly connected to the power cord, the external cable can be connected to the mains socket.
Starting and stopping the verticutter
Place the verticutter on a flat and level place on the lawn. Set the transport working depth position. Press and hold the power switch lock button, then pull the power switch lever to the handlebar and hold it in this position. If the device starts, release the pressure on the power switch lock and grasp the handlebar with both hands.
The operation will be stopped when the power switch lever is released. The roller may still rotate for a while.
Working with the verticutter
Depending on the type of work to be done, one of the two rollers should be selected and installed correctly. A roller with blades is used to cut (scarify) the soil on which the lawn grows. The roller with springs and hooks is used to clean (verticut) the surface of the lawn, e.g. from moss or leaves. This roller with the set working depth too deep can cause damage to the lawn. It is recommended to use this roller for surface work with the minimum working depth set.
Before the proper operation, it is recommended to check the operation of the rollers at different working depth settings in less exposed places.
Before starting work, prepare the lawn. Check that there are no obstacles on the lawn that could be caught by the blades and damage the verticutter, or be ejected and pose a risk to an operator or bystanders.
The soil on which the lawn grows should not be too hard. Too hard soil will lead to faster wear of the elements that go into the ground during operation, and can also lead to a decrease in the performance of the machine and its overheating.
Check that there are no electrical cables in the work area that could be cut by the blade. Damage to an electrical cable presents a risk of electric shock, which can lead to serious injury or death.
Make sure that there are no bystanders or pets in the work area. If such persons appear during operation, stop the machine immediately and only then warn people of the danger.
Check all machine components before starting work. In case the damage is detected, do not start work before removing the damage or replacing the damaged components with new ones. Make sure that the ventilation openings are clear. If necessary, clean them with a soft cleaning tool or brush. Do not use sharp or metal objects for cleaning the product ventilation openings.
EN
Check the tightness of the screw connections. Tighten if necessary.
Check that the handlebars are clean, free of grease and other contamination. If necessary, clean them with a soft cloth.
Take regular breaks during work to avoid fatigue and overwork. This will allow better product control and reduce the risk of accidents.
Caution! Always push the verticutter while working; never pull it towards you. Pulling the verticutter causes the operator to move backwards, which means no control over the area behind the operator's back. In addition, when pulling the verticutter backwards, the blades can catch the power cord.
Push the verticutter slowly; always walk, never run. This will give you better control of the machine and reduce the response time to unexpected events.
During operation, move along the rows (XIV). Rows should be kept equal in width, slightly overlapping so as not to leave any space. Take special care when changing the direction.
Make sure to begin work from the electrical connection side. This will reduce the risk of driving over the power cord.
When working near the flower beds, move around them.
Empty the catcher regularly during operation. It is also possible to work without the catcher, but make sure that the cover completely covers the outlet opening at the back of the housing. Objects caught by the rotating roller may be ejected through the uncovered or partially covered outlet opening, which may be dangerous for the operator and/or bystanders.
Warning! Never open the outlet opening cover while the machine motor is running and the rollers are rotating.
When work is finished, turn off the verticutter, wait for the roller to stop, then disconnect the power cord and wait for the machine to cool down, then start maintenance works.
Caution! If a foreign object hits the verticutter during operation, immediately turn the product off, wait for the roller to stop, then disconnect the power cord, and allow the verticutter to cool down. Then check the verticutter for damage. If the damage is detected, it is forbidden to continue working before removing the damage. Excessive vibration during operation can be caused by damage to the machine. In that case, stop working, disconnect the power cord, and check the product.
PRODUCT MAINTENANCE
Caution! Make sure that the product is disconnected from the power supply before starting any maintenance works. The power cord must be disconnected from the machine.
Always wear protective gloves during all maintenance works.
If the maintenance procedure is not contained in the instructions manual, it means that it should be performed at an authorised service centre.
Clean the product after each use. Remove any residual grass and soil with a soft cleaning tool, brush or cloth. Clean the ventilation openings to ensure that they are clear.
Dirt that is difficult to remove can be cleaned with an air jet with a pressure of up to 0.3 MPa.
Never use chemicals, alkaloids, abrasives, or aggressive detergents to clean the product. The product cannot be cleaned with a water jet or by immersion in water.
Check for wear and damage to the roller blades. If excessive wear or damage is observed, replace the roller with a new one.
Always replace the roller with the original one, identical to the one delivered with the product. Only the use of original spare parts can maintain product safety.
After each use and cleaning of the metal roller elements, they should be covered with a thin layer of light general purpose lubricating oil. This will reduce corrosion and increase metal elements service life.
The roller should be replaced when a significant deterioration in the performance of the device is observed.
After each operation, the grass catcher must be removed and emptied of the grass. The catcher can be cleaned with lukewarm water with suds. After cleaning, leave the catcher in the working position until completely dry.
If the internal cable connecting the product power switch to the motor is damaged, it must be replaced by an authorised service centre of the manufacturer. The cable cannot be repaired and must be replaced entirely. It is forbidden to operate the product with a damaged cable.
STORAGE AND TRANSPORT
Caution! Always disconnect the product from the power supply before storing or transporting it. Clean according to the instructions.
Store in the dark, dry, frost-free, and well-ventilated areas. The place of storage should protect the tool from access by children.
The product should be stored at a temperature between 10^ C and 30^ C. It is recommended that the product is stored in its original packaging or another packaging that protects it from dust.
Before transporting the product, set the working depth lever to the transport position. Transport the product by carrying it by the handles. Protect the product from impacts and strong vibrations during transport. Secure the product against slipping or tipping over during transport.
GERÄTEBESCHREIBUNG
CARACTÉRISTIQUES DU PRODUIT
DECLARATION OF CONFORMITY
0425/YT-84840/EC/2025
We declare and guarantee with full responsibility that the following products:
Electric scarifier; 230-240 V\~; 50 Hz; 1800 W; 3500 min ^-1 ; 320 mm; item no. YT-84840
meet requirements of the following European Standards / Technical Specifications:
EN 60335-1:2012 + A11:2014 + A13:2017 + A1:2019 + A14:2019 + A2:2019 + A15:2021
EN 50636-2-92:2014
EN ISO 12100:2010
EN 62233:2008
EN IEC 55014-1:2021
EN IEC 55014-2:2021
EN IEC 61000-3-2:2019 + A1:2021
EN IEC 61000-3-11:2019
and fulfill requirements of the following European Directives:
2006/42/EC Machinery and safety elements
2014/30/EU Electromagnetic compatibility (EMC) Directive
2011/65/EU Restriction of the Use of Certain Hazardous Substances
Serial number: concern all serials numbers of item(s) mentioned in this declaration
The person authorized to compile the technical file:
Agnieszka Rędziak
(Place and date of issue)
V-CE PREZES ZARZADU
JAN SZMIDT
(Name and signature of authorized person)
TOYA S.A.
DECLARATION OF CONFORMITY
0425/YT-84840/EC/2025
We declare and guarantee with full responsibility that the following products:
Electric scarifier; 230-240 V\~; 50 Hz; 1800 W; 3500 min ^-1 ; 320 mm; item no. YT-84840
fulfil requirements of the following European Directive: 2000/14/WE
Conformity assessment procedure:
Manufacturer quality-control system
Measured sound power level on an equipment representative for this type: 105,17 dB(A)
Guaranteed sound power level for this equipment: 108 dB(A)
conformity and references of the other Community Directives applied:
2006/42/EC Machinery and safety elements
2014/30/EU Electromagnetic compatibility (EMC) Directive
2011/65/EU Restriction of the Use of Certain Hazardous Substances
Wrocław, 2025.04.09
(Place and date of issue)
V-CE PREZES ZARZADU
JAN SZMIDT
(Name and signature of authorized person)
TOYA S.A.