KD2010 - Baby monitors Concept - Free user manual and instructions
Find the device manual for free KD2010 Concept in PDF.

| Brand | Concept |
| Model | KD2010 |
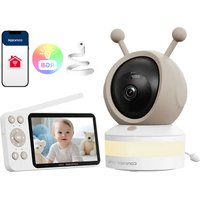
| Product type | Baby monitor (camera + monitor) |
| Camera power supply | 5 V, 1 A, USB-C (power adapter included) |
| Monitor power supply | Built-in rechargeable battery via USB-C |
| Standby consumption | Max 0.18 W |
| Transmission frequency | 2.4 GHz |
| Range | Not specified (estimated: up to 300 m in open field) |
| Main functions | Infrared night vision, two-way communication, cry detection, VOX mode, lullabies, LED nightlight, motion tracking, digital zoom (2x/4x), temperature alarm, feeding reminder, temperature display |
| Monitor screen | Color screen, adjustable brightness |
| Camera | Lens, microphone, speaker, infrared sensor, temperature sensor |
| Monitor | Microphone, speaker, touch controls, LED indicators |
| Installation | On flat surface, flexible bed attachment, wall mounting (kit included) |
| Maintenance | Clean with a soft, dry cloth. Do not use abrasive or chemical products. Do not immerse. |
| Safety | Do not use outdoors, keep out of reach of children under 8 years, do not use if damaged, unplug during storms, etc. |
| Package contents | Camera, monitor, adapters, USB-C cable, mounting kit, flexible stand, instruction manual |
| Warranty | Not specified (generally 2 years) |
| Country of origin | Not specified |
Frequently Asked Questions - KD2010 Concept
User questions about KD2010 Concept
0 question about this device. Answer the ones you know or ask your own.
Ask a new question about this device
Download the instructions for your Baby monitors in PDF format for free! Find your manual KD2010 - Concept and take your electronic device back in hand. On this page are published all the documents necessary for the use of your device. KD2010 by Concept.
USER MANUAL KD2010 Concept
natural_image
Digital camera setup with a white remote device and a digital display showing a sleeping baby (no visible text or symbols)KD2010
CZ HULVDEFRNSKPL ITES RO
POPIS VÝROBKU
POPIS VÝROBKU
OPIS PRODUKTU
A TERMÉK LEÍRÁSA
IERICES APRAKSTS
PRODUCT DESCRIPTION
PRODUKTBESCHREIBUNG
DESCRIPTION DU PRODUIT
DESCRIZIONE DEL
PRODOTTO
DESCRIPCIÓN DEL
PRODUCTO
DESCRIEREA PRODUSULUI

natural_image
Three technical illustrations showing different mechanical or electrical setups: a dial indicator, a bed with a rope, and a pulley system (no text or symbols present)Metoda 2 / Method 2 Metoda 3 / Method 3 Metoda 1 / M
PODĚKOVÁNÍ
natural_image
Close-up of a sleeping baby next to a digital control interface with buttons (no readable text or symbols)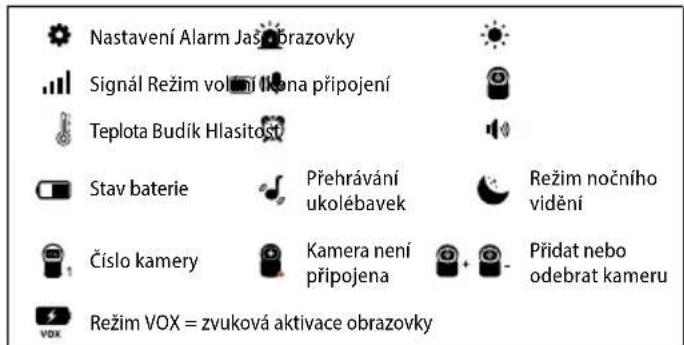
natural_image
Digital phone icon showing a sleeping child next to a circular control panel with 'OK' and musical notes (no readable text or symbols)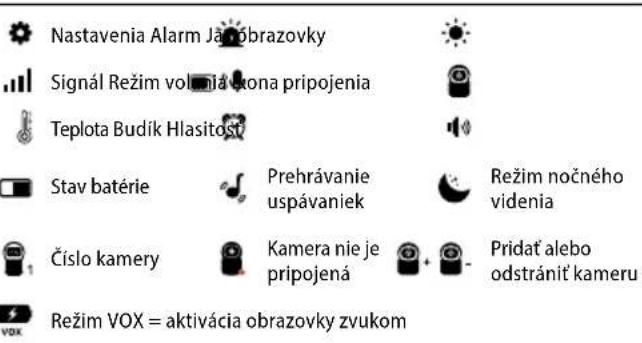
Nastavenia Alarm Jabobrazovky
Signál Režim volonia xona pripojenia
Teplota Budík Hlasitost

Stav batérie
natural_image
Close-up of a sleeping baby next to a mobile phone interface with control buttons (no readable text or symbols)
natural_image
Close-up of a baby gently resting on her hand, wearing a light blue shirt (no text or symbols visible)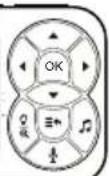

natural_image
Close-up of a sleeping baby next to a digital control interface with four rotary buttons (OK, OK, Cancel, Play, Play) and musical notes (no readable text or symbols)
Iestatijumi Trauksme krāna spilgtums


Signāls

Zvanīšanas režims

Savienojuma ikona

Temperatura Modinatajs Apjoms


Akumulatora
statuss

Šūpuldziesmu
spēlēšana

Nakts redzamības
režims

Kameras
numurs

Kamera nav
pievienota


Kameras
pievienošana vai
nonemšana

Thank you for purchasing a Concept product. We wish you much joy with your new appliance every day you use it.
Please read the instruction manual carefully before initial use. To refer to this manual any time you need to, we recommend you to keep it in a safe place. And please pass it to any future owner of the appliance.
| Technical parameters | |||
| Power supply 5 V | 1 A typ C | Power consumption when switched off | max. 0,18 W |
| Transmission frequency | 2,4 GHz | ||
Camera: If it is not playing music and has no signal, it will switch to off mode.
Monitor: Once the built-in battery is fully charged, the product will switch to off mode.
IMPORTANT SAFETY PRECAUTIONS
- Do not use the appliance in any other way than as described in this manual.
- Remove all the covering and marketing materials from the appliance before the first use.
• Make sure the mains voltage corresponds to the values on the rating plate of the appliance. - When disconnecting the appliance from the wall outlet, never pull the power cord, grasp the plug end and disconnect it by removing it from the receptacle.
- Do not allow children or unauthorized people to handle the appliance, use it out of their reach.
-
Persons with reduced mobility, reduced sensory perception, mental disadvantage or persons not familiar with the operation must use the appliance only under the supervision of responsible person, who is familiar with the instructions.
-
Care should be taken when using the appliance near children.
- Do not let the power cord touch hot surfaces.
- Keep the power cord out of the reach of children.
- Protect the appliance from direct sunlight, high temperatures and humidity.
- Do not allow the appliance to hang on the power cord.
- Do not use the appliance in an environment where there are explosive gases and flammable substances (solvents, varnishes, adhesives, etc.).
- Do not use coarse and chemically aggressive substances to clean the appliance.
- Do not use the appliance if it is not working properly, has been dropped, damaged or immersed in liquid. Have it checked and repaired by an authorized service centre.
- Do not use the appliance with a damaged cord or plug and have it repaired immediately by an authorized service centre.
- Do not wrap the power cord around the appliance body.
- Do not use the appliance outdoors.
- The appliance is only suitable for home use and is not intended for commercial use.
- Do not immerse the power cord, plug or appliance in water or any other liquid.
- Do not use any accessories other than those recommended by the manufacturer. Do not use an extension cord.
- Do not repair the appliance yourself. Contact an authorized service centre.
- This appliance can be used by children aged from 8 years and above and persons with reduced physical, sensory or mental capabilities or lack of experience and knowledge if they have been given supervision or instruction concerning the use of the appliance in a safe way and understand the hazards involved. Cleaning and maintenance performed by the user must not be carried out by children unless they
EN
concept
concept
EN
are 8 years old and under supervision. Children aged under 8 years of age must be kept away from the appliance and its power cord. Do not let children play with the appliance.
Damages from failure to follow the manufacturer's instructions are not covered by the warranty.
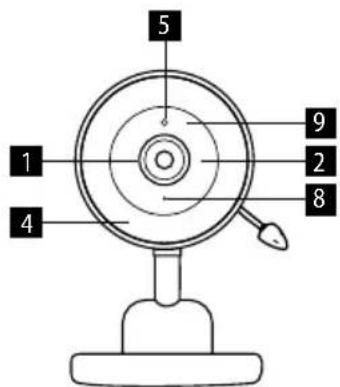
PRODUCT DESCRIPTION
Baby Camera Description
1 Camera Lens
2 Microphone
3 Pairing button/LED light
4 LED Light
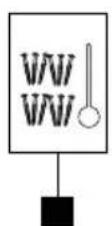
5 Infrared sensor for night vision
6 Speaker
7 USB-C Power Connector
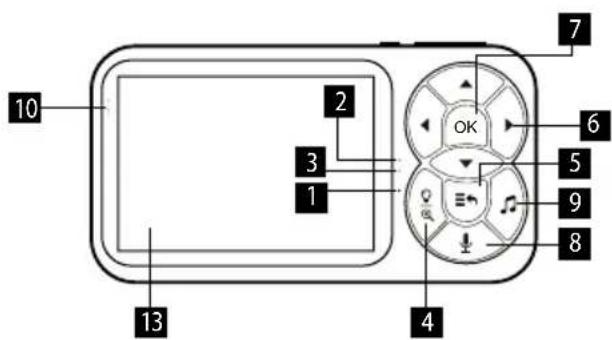
Monitor Description
1 Microphone
2 Charging Indicator Light
3 In-Use Indicator Light
4 LED light and zoom button
5 Menu/Back button
6 Direction
7 Confirm
8 Call
8 Status indicator
9 Night Vision LEDs
10 Temperature Sensor
11 Fixed stand
12 Flexible holder
13 Adapter
14 Mounting kit
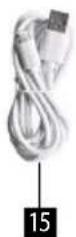
15 USB-C charging cable
9 Lullaby play button
10 Camera sound indicator
11 Power Button
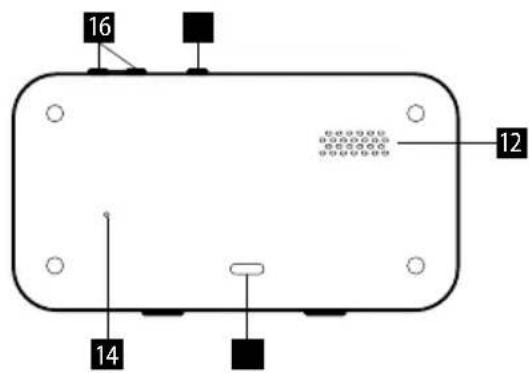
12 Speaker
13 Display
14 Restart
15 USB-C Connector
16 Volume control button
Note: The in-use indicator light (3) is blue.
Monitor Display Description
Press Menu/Back button to enter multi-function settings - icons will appear in the bottom row, use ◀▶ to switch between icons. Use the ▲▼ arrows to toggle between the options for a given icon. After 30 seconds

natural_image
Close-up of a sleeping baby next to a mobile phone interface with control buttons (no readable text or symbols)of inactivity, the bottom row of icons will disappear from the display.

Settings Alarm


Screen brightness

Signal Call mode connection icon


Temperature Alarm clock Volume


Battery status

Playing lullabies

Night vision mode

Camera number

Camera is not connected


Add or remove a camera

VOX mode = voice activation of the screen
OPERATING INSTRUCTIONS
Note: The camera is designed to be powered from the mains. When the camera is connected to the power supply, the indicator lights up green.
Connecting the camera to the monitor
- Connect the camera to a power source using the USB-C charging cable and adapter.
- Turn on the monitor by pressing the power button, and the monitor will automatically connect to the camera.
- If the connection fails, perform the pairing according to the following steps:
- Press and hold the pairing/LED light button on the camera. The status indicator will flash green during pairing. When the indicator stays green, pairing is successful.
- On the monitor screen, press the Menu/Back button and select Camera -> Add Camera -> select Camera No. 1, confirm with the Confirm button.
- If you need to pair more cameras, repeat the previous step.
Viewing multiple cameras
Press the Menu/Back button -> Camera icon and select automatic camera switching after 15s / 30s / 60s / off.
EN
concept
concept
EN
Camera disconnection alert
If the camera is not online or the camera and monitor are out of range, the corresponding icon will appear on the monitor and an alarm will sound. Connect the camera to a power source using the USB-C charging cable and adapter. Leave the monitor near the camera until it reconnects.
Disconnecting the camera and monitor
- On the monitor screen, press the Menu/Back button -> Camera icon -> Remove Camera.
- Select the camera you want to disconnect.
- Press the Confirm button.
Camera & monitor functions
Sound/cry detection – The camera can detect sound and crying. The LEDs on the left side of the monitor display indicate the camera's sound volume:
- green: low and medium
- orange: high
- red: highest
VOX mode = sound activation of the screen – When the camera detects sound or crying and the set sound level is exceeded, the display lights up and an audible alarm sounds. Press the Confirm button to cancel the audible alarm. Menu/Back button -> VOX icon and select high / medium / low / off. The corresponding icon will appear on the display.
Note: Press the power button briefly to turn the screen on/off, press and hold the button to turn the monitor off/on.
Monitoring your child's movements – The image is updated in real time, so you can see what is happening thanks to the camera.
LED light – When your child cries, you can turn on the night light. There are different modes to choose from. The LED light can be turned off/on on the camera by briefly pressing button (3) or on the monitor by briefly pressing button (4) -> off/on/auto.
Lullaby - When your child cries, you can play a lullaby. There are various lullaby modes to choose from -> Menu/Back -> Lullaby icon (loop playback, switching between lullabies, setting the playback time to 15 min / 30 min / 60 min, setting the lullaby volume). The corresponding icon will be displayed on the screen during playback.
Night light - When less light is detected, the night light is activated and the image switches to black and white mode. The corresponding icon will appear on the display.
Temperature detection and alarm - The alarm will sound whenever the upper or lower temperature limit is exceeded, and the temperature will flash red on the display. Menu/Back button -> Settings -> Min/Max -> Confirm -> set with the ▲▼ arrows -> Confirm.
Two-way communication - If you see your child crying on the monitor, you can talk to them and calm them down with your voice even from a distance. Hold down the Call button, and the corresponding icon will appear in the upper right corner of the display.
Alarm clock = Feeding time reminder - Set the alarm clock as a reminder for regular feeding times. Menu/Back button -> Alarm clock -> select: 30 min / 1H / 2H / Off. The corresponding icon will appear on the display, and after the selected time has elapsed, an audible alarm will sound and the icon will flash red.
Alarm - You can set the alarm sensitivity: high / medium / low / off. Menu/Back button -> Settings -> Alarm.
Zoom – Press and hold button (4) – the image will zoom in twice; press and hold the button again to zoom in four times. The corresponding icon will appear on the display. Press the button again to return to the previous image.
Volume adjustment - Press the + or - button on the top of the monitor to adjust the volume to the desired level.
Screen brightness adjustment - Use the ◀▶ arrows to adjust the brightness level.
Charging the monitor
- The charging indicator light (2) on the monitor lights up red during charging and green when fully charged.
- A low battery will be indicated by repeated beeps and the battery status icon will flash red. Connect the monitor to a power source using the USB-C charging cable and adapter. The battery status icon in the upper right corner of the screen will display the charging status.
Setting the color LED backlight of the camera
- Manual color temperature adjustment: Briefly press button (4), then use the ◀▶ arrows to select On mode -> Confirm, then use the ▲▼ arrows to select the color and then use the ◀▶ arrows to adjust the color temperature and confirm by pressing the Confirm button. The corresponding icon will appear on the display.
EN
concept
- Automatic lighting mode: Briefly press button (4) and then use the arrows to select the lighting mode -> Automatic and confirm by pressing the Confirm button. The corresponding icon will appear on the display.
- Switching off the LED backlight: Briefly press button (4), then use the arrows to select the Off mode and confirm by pressing the Confirm button.


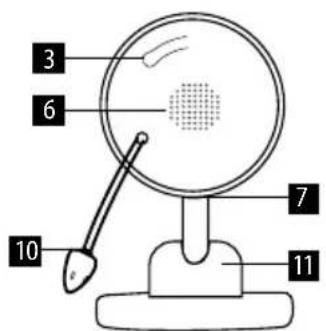
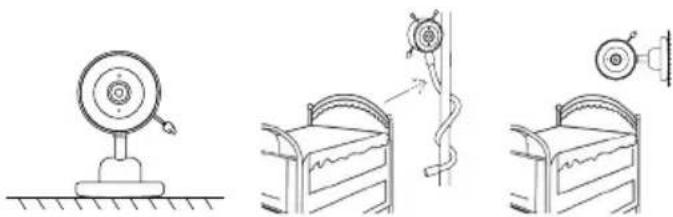
Camera installation options
You can place the camera on a flat surface (Fig. Method 1), attach it to the frame of a crib or the headboard of a double bed using a flexible mount (Fig. Method 2), or attach it to a wall using the included mounting kit (Fig. Method 3).
Note: When using Method 2, attach the flexible mount to the camera instead of the fixed stand. Alternatively, the flexible mount can also be attached to the fixed stand. Adjust the desired viewing angle by manually rotating the camera: up/down/left/right.
TROUBLESHOOTING
- Audio interference: The camera and monitor are too close to each other. Separate them by at least 1.5 m to prevent audio interference. Make sure there are no other electronic devices such as TVs, PCs, or mobile phones near the device.
- Product interference: The use of other 2.4 GHz products, such as wireless networks (Wi-Fi routers), may cause interference with this product, so keep the baby monitor at a minimum distance 1.5 m from these types of products.
- The monitor display cannot be turned on: Charge the monitor. If the display still cannot be turned on, reset the monitor using the reset pin from the mounting kit, disconnect both devices, and reconnect them to pair them.
concept
EN
SERVICE
Extensive maintenance or repair, which requires access to internal parts of the product, has to be performed by a qualified service centre.
ENVIRONMENTAL CONCERNS
- Packaging materials and old appliances should be recycled.
- Packaging materials may be disposed of as sorted waste.
- Dispose the plastic bags made of polyethylene (PE) of as sorted waste.
Recycling of the appliance at the end of its lifespan
This appliance is labelled in accordance with European Directive 2012/19/EU concerning used electrical and electronic appliances (Waste Electrical and Electronic Equipment - WEEE). The symbol on the product or on its packaging indicates that this product may not be treated as household waste. Instead, it should be taken to the appropriate collection point for the recycling of electrical and electronic equipment. By ensuring this product is disposed of correctly, you will help prevent potential negative consequences for the environment and human health, which could otherwise be caused by inappropriate waste handling of this product. The disposal of such material has to be done according to the recycling regulations. For more detailed information about recycling of this appliance see the authorized local office or service for household waste disposal or the shop, where you purchased the appliance.

The product meets all the necessary requirements of the EU directives applicable to the specific product.
Changes in text, design, and technical specifications are subject to change without notice and we reserve the right to change them.
DE
concept
concept
DE
DANKSAGUNG
natural_image
Close-up of a sleeping baby next to a mobile phone interface with control buttons (no readable text or symbols)
natural_image
Illustration of a sleeping child next to a rotary control panel with playback buttons (no text or symbols on the main image)
natural_image
Close-up of a sleeping baby next to a mobile phone interface with control buttons (no readable text or symbols)
Impostazioni Allarn


natural_image
Close-up of a sleeping baby next to a circular app interface with icons (no readable text or symbols)
Ajustes Alarma


natural_image
Close-up of a sleeping baby next to a mobile phone interface (no visible text or symbols on the device)
Setări Alarma