
Multipic 5.2 - Projector Overmax - Free user manual and instructions
Find the device manual for free Multipic 5.2 Overmax in PDF.

| Product Type | Smart LED Projector |
| Brand | Overmax |
| Model | Multipic 5.2 |
| Power Supply | 100-240V ~ 50/60 Hz, 2.5A, 120W |
| Connectors | USB-A, HDMI, 3.5mm Jack, IR Receiver |
| Supported Video Formats | MP4, VOB, 3GP, TS, F4V, DAT, MOV, FLV, TRP |
| Supported Audio Formats | MP3, WMA, M4A, MP2, OGG, WAV, FLAX |
| Supported Image Formats | JPG, BMP, PNG |
| Operating System | Google TV (GTV) |
| Wireless Connectivity | WiFi, Bluetooth, Miracast (Android), iOS Cast |
| Image Functions | Auto Focus, Zoom, Automatic and Manual Keystone Correction |
| Remote Control | AAA 1.5V batteries (not included), functions: focus, Google Assistant, sources |
| Safety | Do not look into the lens, turn off after 6 hours, do not block ventilation, avoid humidity |
| Maintenance and Cleaning | Unplug before cleaning, soft cloth for lens, soft brush for grilles |
| Operating Temperature | 5°C to 35°C |
| Power Consumption | 120W |
| Audio Compatibility | Does not support Dolby sound |
| Included Accessories | Power cable, remote control (batteries not included) |
| Repairability | Do not disassemble yourself (risk of electric shock), contact a professional |
| Warranty | EU/CE compliance, contact: pomoctechniczna@overmax.pl |
Frequently Asked Questions - Multipic 5.2 Overmax
User questions about Multipic 5.2 Overmax
0 question about this device. Answer the ones you know or ask your own.
Ask a new question about this device
Download the instructions for your Projector in PDF format for free! Find your manual Multipic 5.2 - Overmax and take your electronic device back in hand. On this page are published all the documents necessary for the use of your device. Multipic 5.2 by Overmax.
USER MANUAL Multipic 5.2 Overmax
PL | EN | DE | IT | FR | ES | NL | LT | HR | CS | SK
Multipic 5.2
Instrukcja obsługi | User Manual | Bedienungsanleitung | Manuale d'uso | Manuel de l'Utilisateur | Manual de usuario | Handleiding | Vartotojo vadovas | Korisnički priručnik | Uživatelská příručka | Návod na použitie
natural_image
Exterior view of a black CVERMAX projector with visible lens and ventilation slots (no text or symbols on body)OVERMAX
A
B
1
flowchart
graph TD
    A["Top Left Side"] --> B["Top Right Side"]
    B --> C["Bottom Left Side"]
    C --> D["Bottom Right Side"]
    style A fill:#f9f,stroke:#333
    style B fill:#f9f,stroke:#333
    style C fill:#f9f,stroke:#333
    style D fill:#f9f,stroke:#333
2
3
4
natural_image
Simple line drawing of a meeting setup with three seated figures and a ceiling-mounted device (no text or symbols)3

natural_image
Diagram showing a pulley system with three seated figures, no text or symbols present1
natural_image
Simple line drawing of a meeting setup with three seated figures and a camera, no text or symbols present.4
natural_image
Diagram showing a vehicle approaching a vertical pole with three seated figures, no text or symbols present5
6
7
8
![Zoom Screen 100% Press [up and down] to adjust the screen size [ ] to reset](/content/2026/05/751172/images/1c2a22b3abf917235778cdeee265a67a20965db5fe6463b0a8118fb380430a25.jpg)
9

![The image ratio is best when the center circle is a perfect circle Press [OK] to select the vertex position and press [Arrow Keys] to fine tune to a square shape Press [ ] to reset](/content/2026/05/751172/images/700c7ed06c9746076e24fa1496093b8ac692e5bf06a559b7b1c94ff0f553b2f4.jpg)
10
11
12
Rotacast
Miracast
To connect an Android Mobile/Pad with a Projector Based on WiFi-Display Technology
natural_image
Icon showing a presentation screen with wireless signal and two smartphone devices (no text or symbols)- On your Android Mobile/Pad, open the setting menu
2.Access your display settings or screen-mirroring - Select your Miracast receiver MULTIPIC5.2-6190
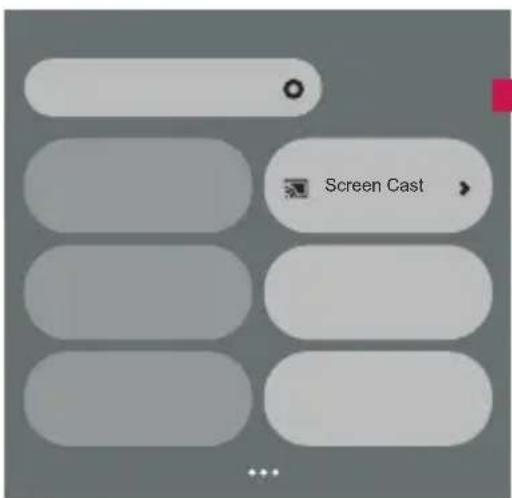

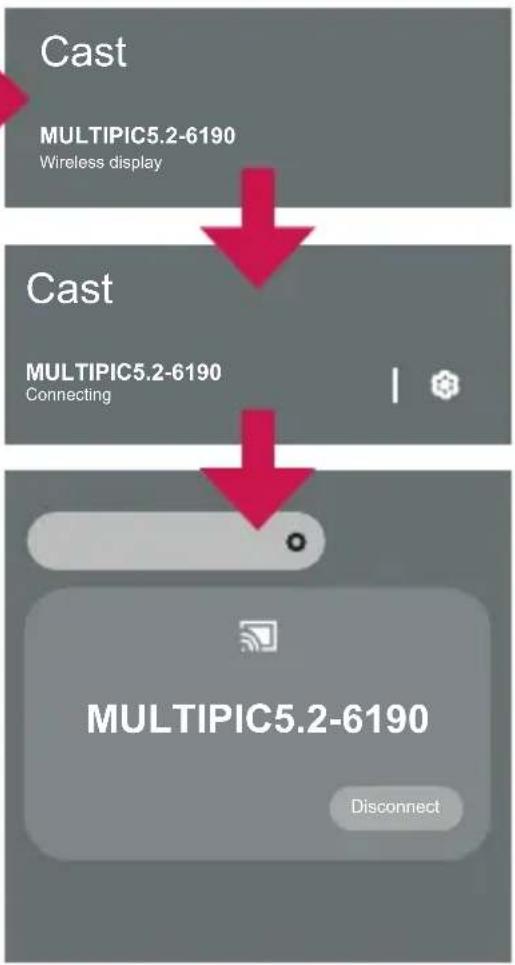
flowchart
graph TD
    A["Cast"] --> B["MULTIPIC5.2-6190\nWireless display"]
    B --> C["Cast"]
    C --> D["MULTIPIC5.2-6190\nConnecting"]
    D --> E["MULTIPIC5.2-6190\nDisconnect"]
13
Rotacast
Make sure that your iOS device is connected to the same network as your projector.
- On your iOS device, open Control Center and tap Screen Mirroring.
- Looking for devices that can be mirrored on.
- Select MULTIPIC5.2-6190 from the list


MULTIPIC5.2-6190Net
Wprowadzenie
PL
Drogi Kliencie!
WYBÓR JĘZYKA (RYS. 3)
WYBÓR SIECI WI-FI (RYS. 10)
Thank you for placing trust in us and choosing Overmax.
Thanks to the use of high-quality materials and modern solutions, we provide you with a product perfect for everyday use. We are convinced that the product will satisfy your requirements as it has been manufactured with utmost care. Before you use the product, please read this operating manual carefully.
Should you have any remarks or questions concerning the product, please do not hesitate to contact us: pomoctechniczna@overmax.pl
WARNINGS
Before using the projector, read and then follow the instructions in this manual. Incorrect handling of the device can lead to electric shock and increase the risk of fire. Please follow the instructions below when using and maintaining the projector.
- For better image quality, use the projector in rooms with drawn curtains or in dark rooms.
- Use the projector with care. Dropping or malfunctioning can damage parts or cause blurred images and incorrect display.
- Do not dismantle the device yourself – risk of electric shock.
- Protect the device from moisture and keep it away from water or other liquids.
- When the projector is on, ensure that the ventilation openings of the device are not obstructed. Do not place the projector on soft surfaces or cover it with any fabrics.
- Only the provided power cord can be connected directly to the projector.
- Be careful when using the power cord, avoid excessive bending of the cord; damage to the power cord can cause electric shock or fire.
- Do not look into the lens while the device is operating.
- It is recommended to switch off the device after 6 hours of continuous operation.
- Unplug the power cord after switching off the power supply.
- It is advisable to use the original packaging to transport the device.
- Do not place any objects on the projector.
- Do not expose the projector to sunlight.
-
Do not use the projector in a humid environment.
-
Store the projector only in a dry environment with moderate temperatures.
- The device is intended for domestic use only. Do not use it for any other purpose incompatible with its intended use.
EN
WARNINGS FOR REMOTE CONTROL BATTERIES
- Disposable, non-rechargeable batteries should not be charged.
- Do not insert different types of batteries or batteries with varying levels of wear into the remote control.
- Ensure batteries are inserted with the correct polarity.
- Remove used batteries from the remote control.
- Do not short-circuit the battery terminals.
- If the product is not in use for an extended period, remove the batteries from the remote control compartment.
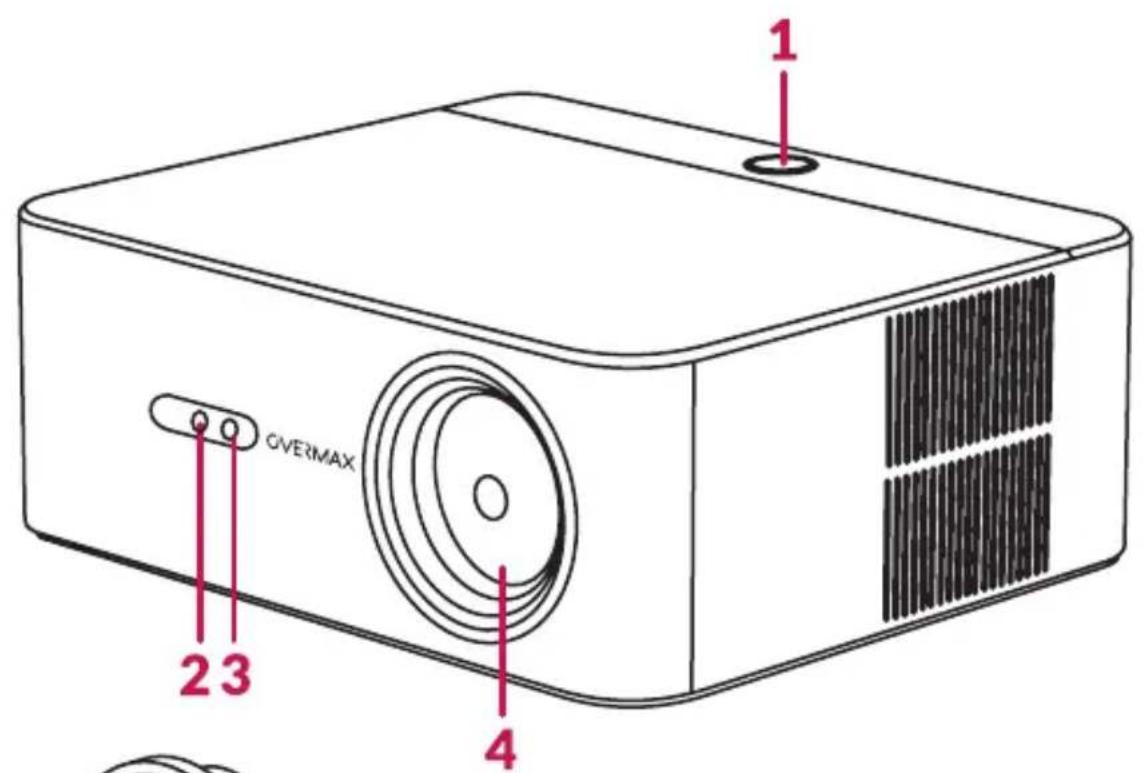
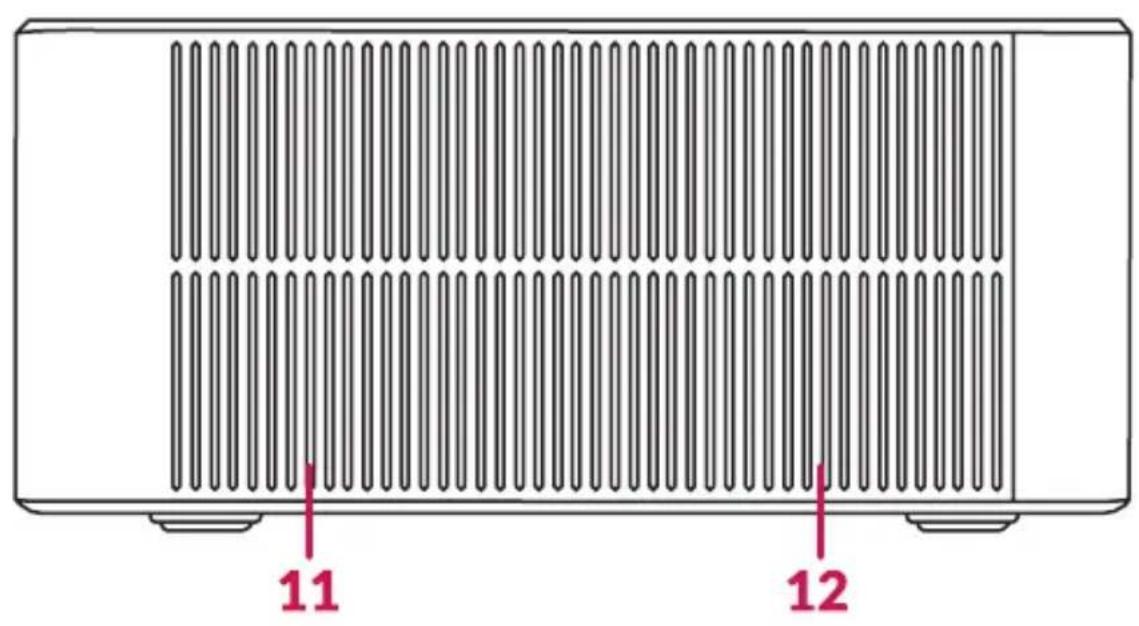
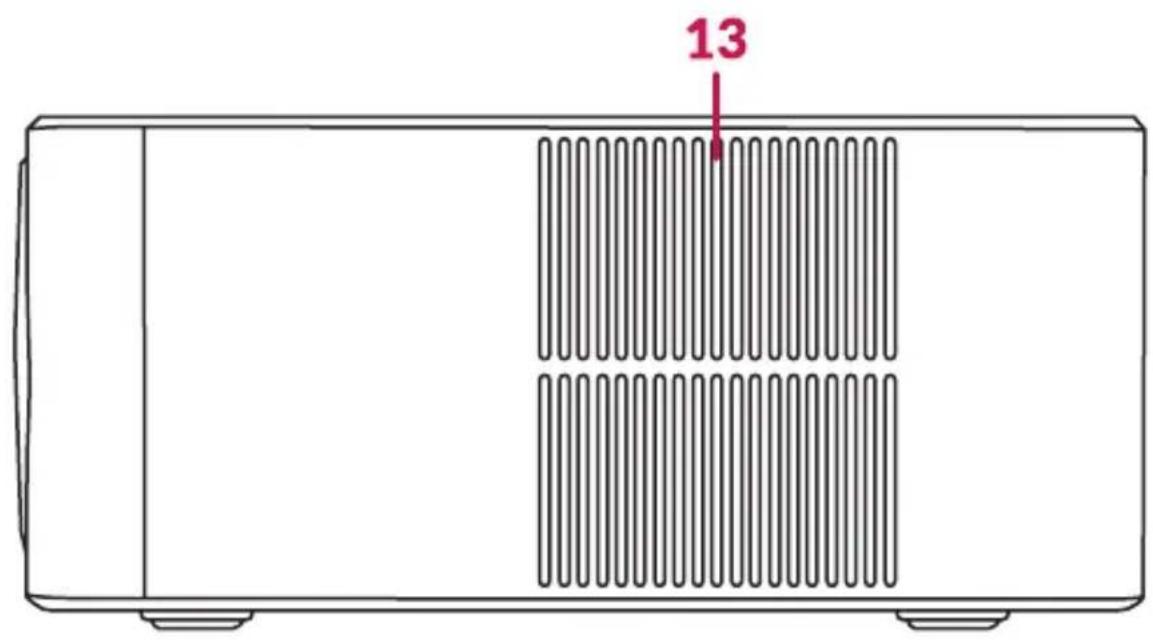
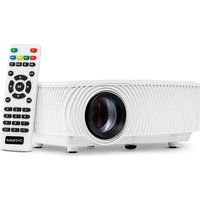
DESCRIPTION OF PARTS (FIG. A)
- ON/OFF switch
- Camera
- Infrared receiver
- Lens
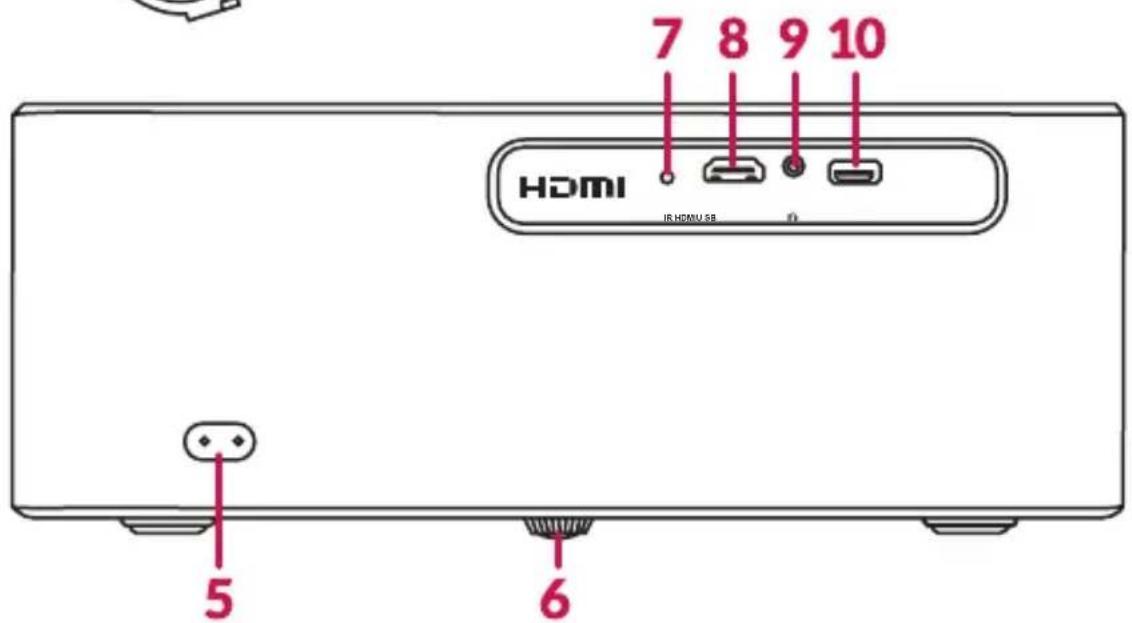
- Power socket
- Tilt adjustment foot
-
Rear infrared receiver
-
HDMI port
- Audio input 3.5 mm
- USB port
- Speaker
- Ventilation grille
- Air inlet
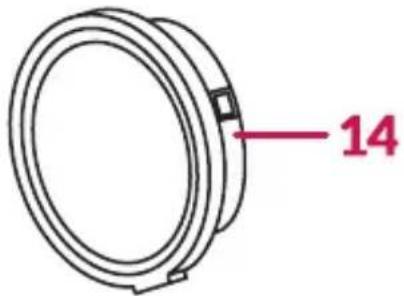
- Lens cover
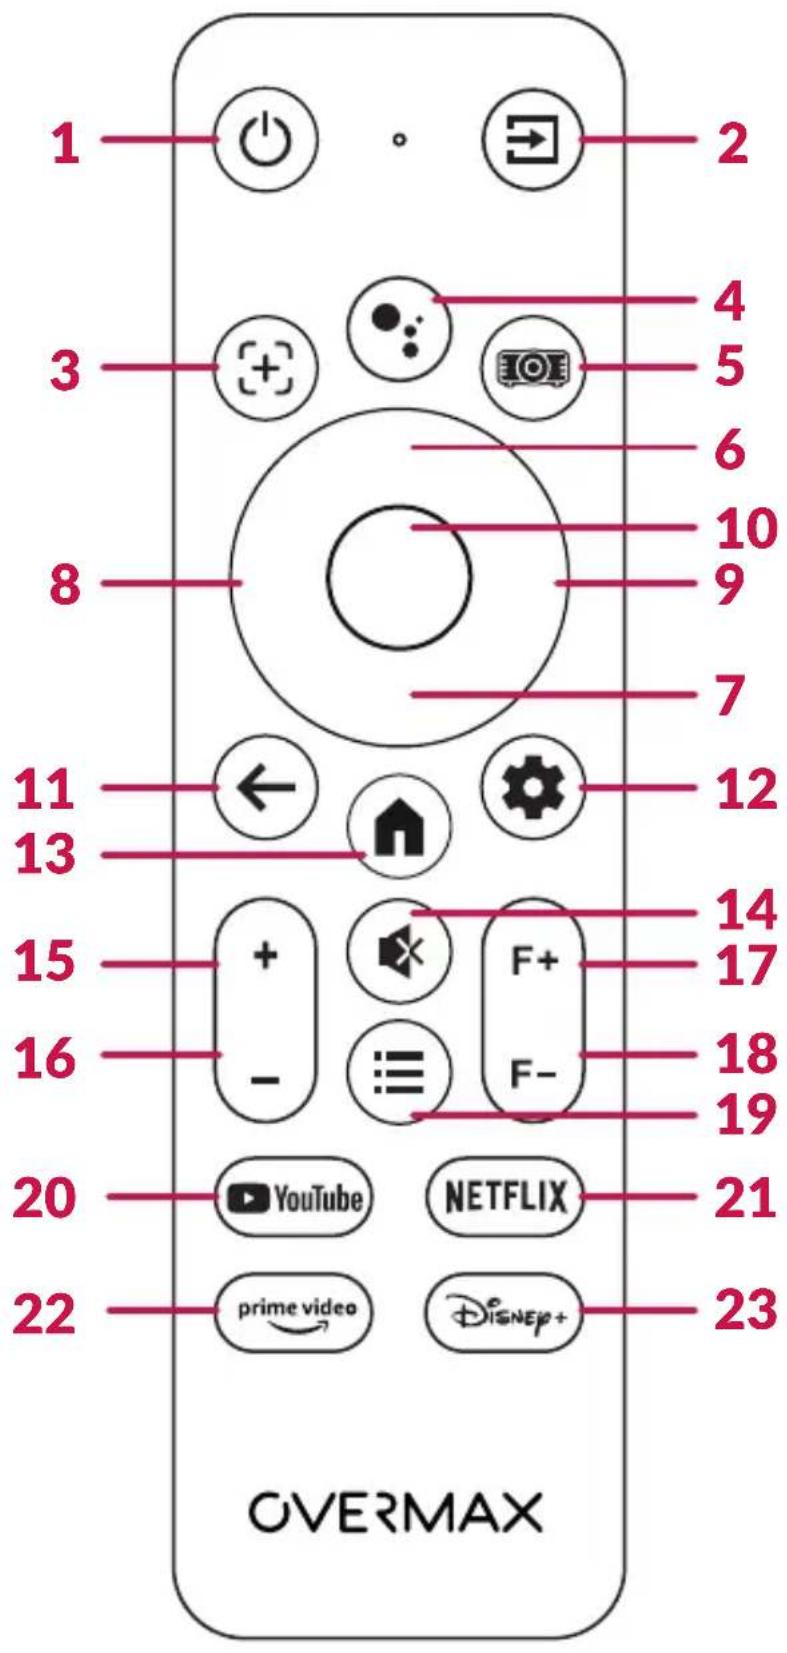
DESCRIPTION OF THE REMOTE CONTROL (FIG. B)
- ON/OFF switch
- Source selection
- Focus adjustment button
- Google Assistant
- Projector settings
- Up arrow
- Down arrow
- Left arrow
- Right arrow
- OK - confirmation
- Return to the previous screen
-
Google TV settings
-
Return to the Google TV home screen
- Mute
- Louder
- Quieter
- Focus adjustment +
- Focus adjustment -
- Image options
- Launch YouTube app
- Launch Netflix app
- Launch Prime Video app
- Launch Disney+ app
DEVICE SPECIFICATIONS
Voltage: 100-240V \~ 50/60Hz 2.5A
Power output: 120W
Connectors: USB-A, HDMI, Jack 3.5 mm, IR
Supported video formats: MP4/VOB/3GP/TS/F4V/DAT/MOV/FLV/TRP
Supported audio formats: MP3/WMA/M4A/MP2/OGG/WAV/FLAX
Supported image formats: JPG/BMP/PNG
Important! This device does not support audio encoded in the Dolby system due to copyright protection.
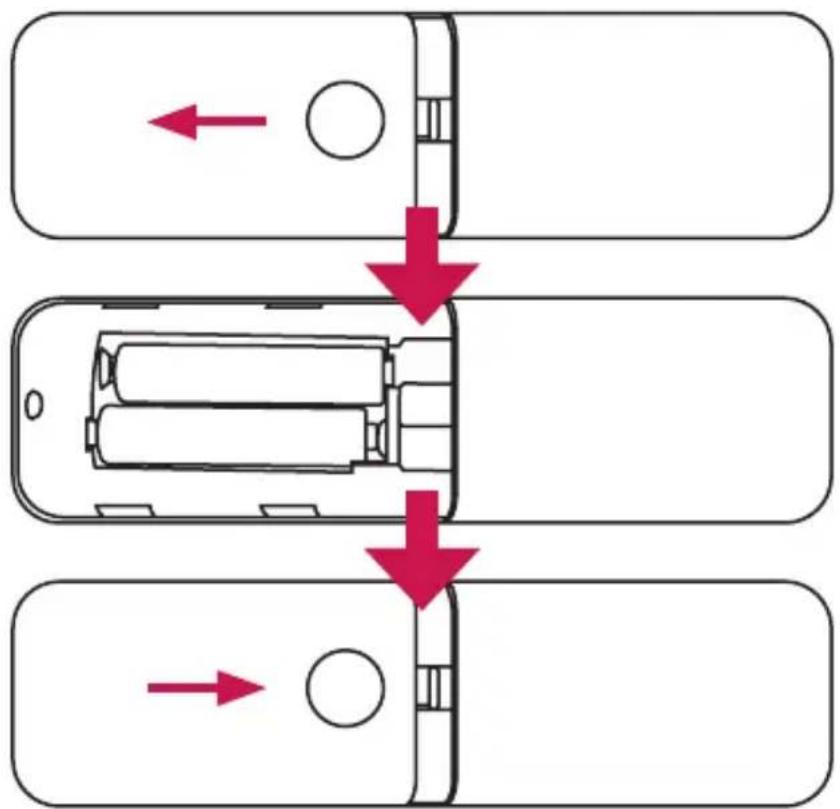
Important! Batteries are not included in the package.
-
Slide off the battery compartment cover.
-
Insert two AAA 1.5V batteries. Pay special attention to the battery polarity.
-
Put the cover back on.
SWITCHING ON AND OFF
When the projector is connected to a power source, the ON/OFF switch (1, fig. A) will illuminate red. To turn on the projector, press the on/off switch on the top of the housing (1, fig. A) or use the on/off button on the remote control (1, fig. B). Once the projector is on and ready for use, the on/off switch will turn blue. To turn off the projector, press the ON/OFF switch (1, fig. A) or the ON/OFF button on the remote control (1, fig. B). Confirm your desire to switch off the device by pressing the confirmation button (10, fig. B) or by pressing the off button on the remote control again. After turning it off, the switch on top of the casing will illuminate red again.
CONTROL USING MOUSE/KEYBOARD
The projector can be controlled using a mouse and/or keyboard:
• Control in the projector system is enabled by connecting the device to the USB port (10, fig. A).
• Control in GTV is done by pairing the device via BT, depending on the multimedia source being used (see: CONNECTING VIA BT or PAIRING DEVICES THROUGH GTV).
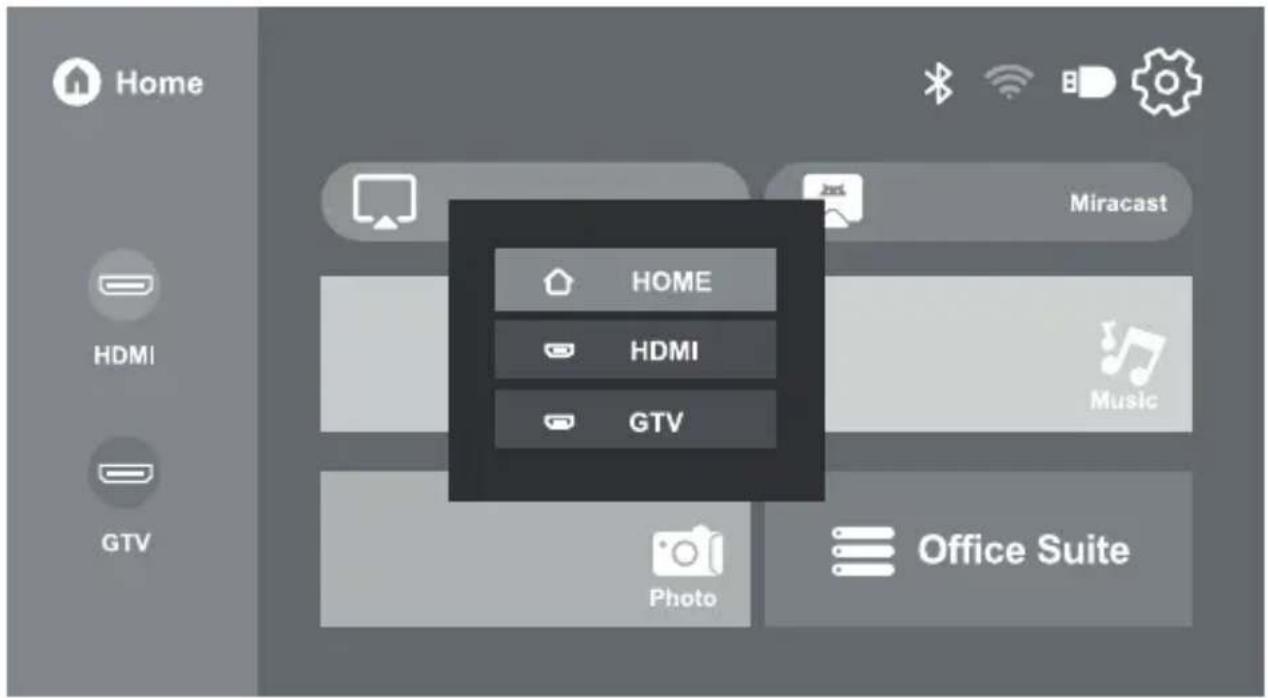
MEDIA SOURCE SELECTION (FIG. 2)
To select a media source, press the “Source Selection” button on the remote control (2, fig. B), or:
- Enter the projector settings using the dedicated button (5, fig. B) or, alternatively, select the gear icon in the top right corner of the main menu.
- Select "Signal Source". The side menu will expand on the right side. The selected setting will be highlighted in blue.
- Press the right arrow button (9, fig. B) on the remote control, select the signal source using the directional buttons (6, 7, fig. B), and press the confirmation button (10, fig. B). To exit the settings and return to the side menu, press the back button on the remote (11, fig. B).
- The projector supports image projection from various devices. Depending on your device, use the corresponding input at the rear of the housing (fig. A):
- HDMI (8, fig. A) – for devices such as computers, laptops, consoles, satellite receivers, and phones (supporting MHL technology and only via the appropriate MHL cable).
• USB (10, fig. A) – for devices such as USB flash drives and external hard drives.
GTV CONFIGURATION
GTV is a separate device installed in the projector. It has its own settings that are independent of the projector's settings.
CAUTION! To use the GTV feature, it is necessary to log in to an existing Google account.
- Follow the on-screen instructions to pair the remote with the projector. Use the directional buttons (6–9, fig. B) to select the language and region.
- Connect to the chosen Wi-Fi network. Important! Connecting to WiFi via the GTV panel is done independently of the projector's configuration (see: SELECTION OF WI-FI NETWORK).
- Log in to an existing Google account and follow the on-screen instructions to modify the GTV service settings.
- Confirm your subscription choice. Wait for the device to finish installing the application. The download speed depends on your Internet connection speed.
PAIRING DEVICES THROUGH GTV
To connect a device via BT:
- Click on your profile picture, then select Settings in the top corner of the main GTV menu.
- Select Remote control and accessories and then Pair the remote control or compatible device. Choose the device you want to connect to and then Pair.
To obtain more information about the available GTV features:
-
visit Google Help: https://support.google.com/googletv
-
From the available options, select Google TV.
- Enter the name of the feature in the search bar or select an article of interest from the available help topics.
PROJECTOR CONFIGURATION
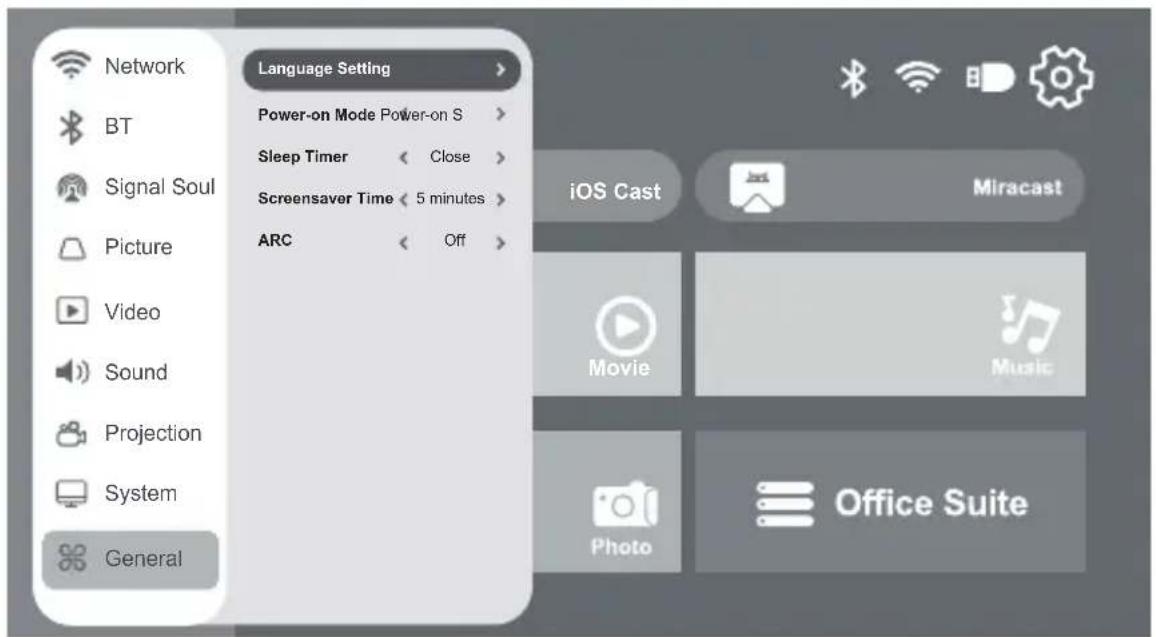
LANGUAGE SELECTION (FIG. 3)
- Enter the projector settings using the dedicated button (5, fig. B) or, alternatively, select the gear icon in the top right corner of the main menu.
- Select the option "General". The side menu will expand on the right side. The selected setting will be highlighted in blue.
- Press the right direction button on the remote control (9, fig. B), select the "Language Settings" option, choose your preferred language, and press the confirmation button (10, fig. B).
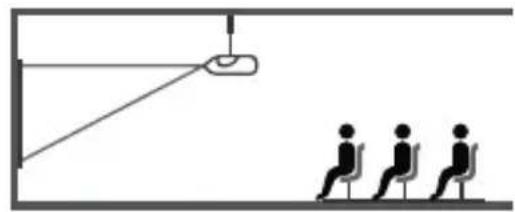
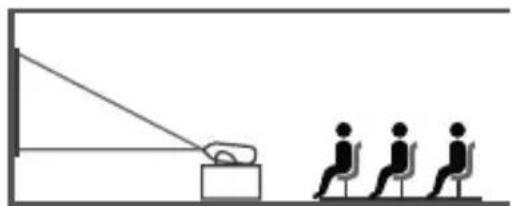
PROJECTOR INSTALLATION METHODS (FIG. 4)
Contact a professional installer to mount the projector on the ceiling. Correct projector positions:
- Ceiling mount for front projection.
- Placing the projector on an elevated surface for front projection.
- Ceiling mount for rear projection.
- Placing the projector on an elevated surface for rear projection.
Warning: The projector may become irreparably damaged if it is improperly mounted on the ceiling or on another surface.
- The projector should only be used in an environment where the temperature does not exceed the range of 5°C to 35°C. Failure to adhere to this may result in projector failure.
- Failure may occur if the projector is placed in a dusty, wet, humid, or smoky environment.
- Poor ventilation in the room may cause overheating, which could damage the projector and also create life-threatening situations.
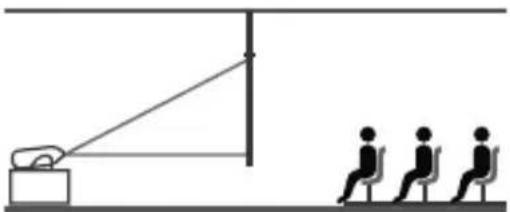
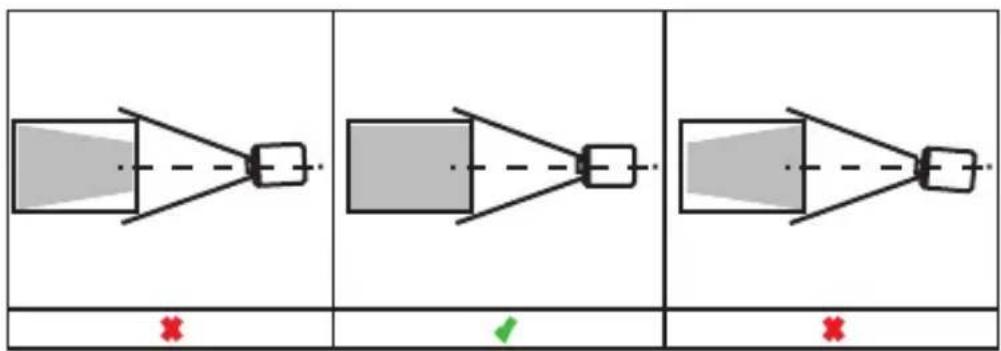
IMAGE ADJUSTMENT (FIG. 5)
Check the adjustment diagram:
X - incorrect installation
√ - recommended installation
For optimal image quality, it is recommended to position the projector perpendicular to the screen surface.
Refer to the table below to adjust the image size and projector distance.
| Aspect ratio 16:9 | |
| Image diagonal (metres / inches) | Projection distance (metres/ inches) |
| 1.70 / 50 1.45 / 57.09 | |
| 1.77 / 70 2.00 / 78.74 | |
| 2.54 / 100 2.90 / 114.17 | |
| 3.04 / 120 3.50 / 137.8 | |
| 3.81 / 150 4.30 / 169.29 | |
| 5.08 / 200 5.80 / 228.35 | |
Important! If the distance between the projector and the screen is less than the minimum distance or much greater, the image may be blurred.
To change the projector's display settings:
- Enter the projector settings using the dedicated button (5, fig. B) or, alternatively, select the gear icon in the top right corner of the main menu.
- Enter the "Projection Image Setting" option. The side menu will expand on the right side.
- Press the right arrow button on the remote control (9, fig. B) and select the projection method using the direction arrows (fig. 6). The selected setting will be highlighted in blue. The device offers 4 display options: front projection, rear projection, front ceiling projection, and rear ceiling projection.
- To confirm, press the confirmation button (10, fig. B). To return to the main menu, press the left direction button (8, fig. B).
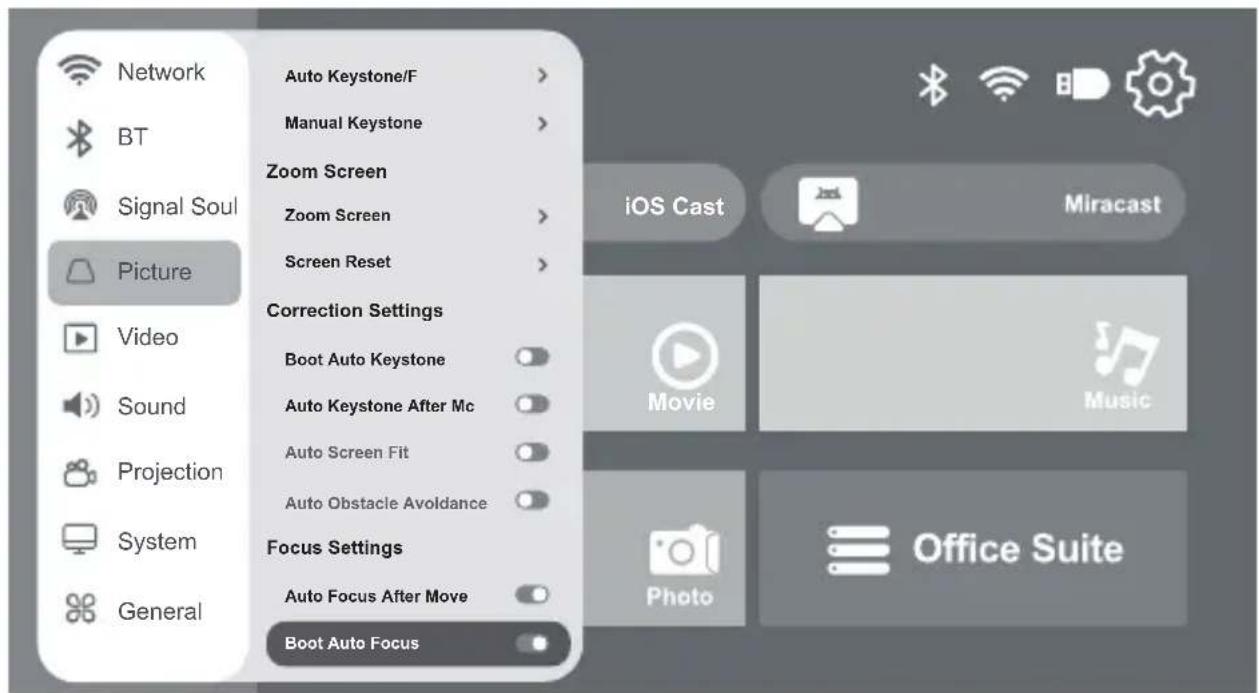
FOCUS ADJUSTMENT
The device features an Auto Focus function. Do not block the image to allow proper focus adjustment.
AUTO FOCUS (FIG. 7)
- Enter the projector settings using the dedicated button (5, fig. B) or, alternatively, select the gear icon in the top right corner of the main menu.
- Select "Picture". The side menu will expand on the right side. The selected setting will be highlighted in blue. Press the right arrow button on the remote control (9, fig. B).
- Select the "Boot Auto Focus" option. Press the confirmation button (10, fig. B) to turn the auto focus adjustment on or off. To return to the selec-
ted option from the main menu, press the left direction button (8, fig. B).
- You can also turn on Auto Focus using the focus adjustment button (3, fig. A). To manually adjust the focus of the displayed image, use the focus adjustment buttons on the remote control (17, 18, fig. B).
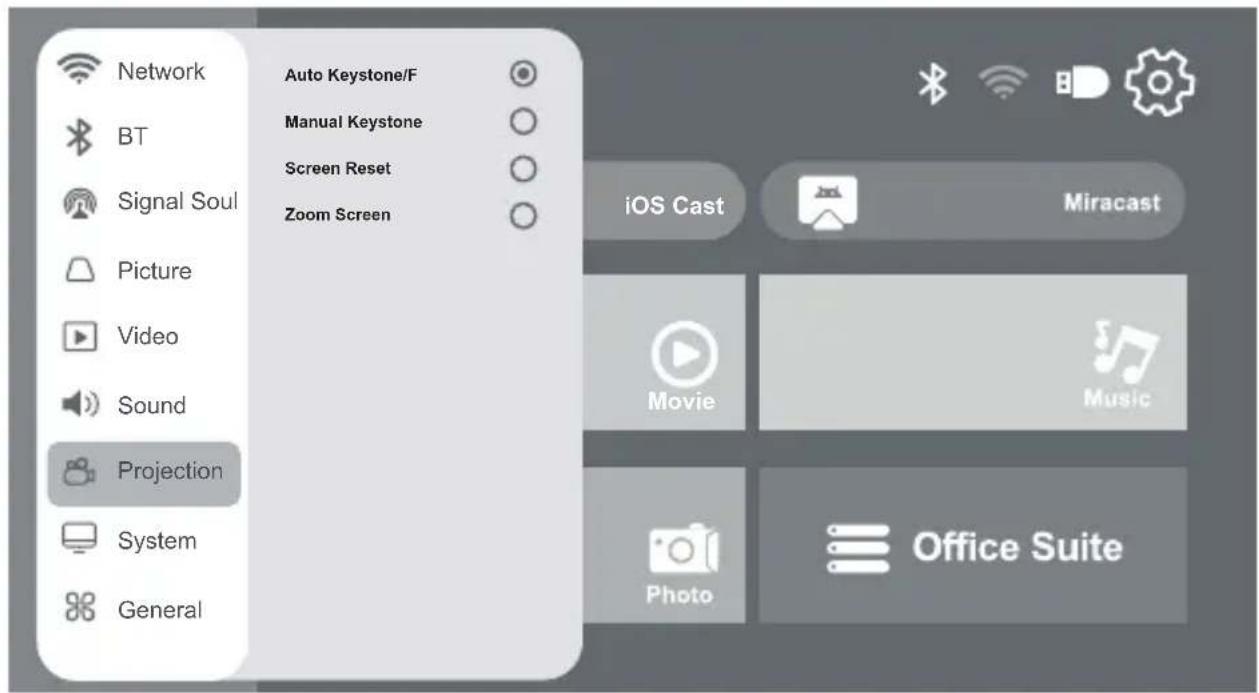
ZOOM SETTINGS (FIG. 8)
- To zoom in on the projector image, press the device settings button (5, fig. B) or select the gear icon in the top right corner of the main menu.
- Select "Picture" and choose the "Zoom Screen" option.
- Follow the on-screen instructions to adjust the screen according to your preferences. To exit the setting, press the back button on the remote (11, fig. B).
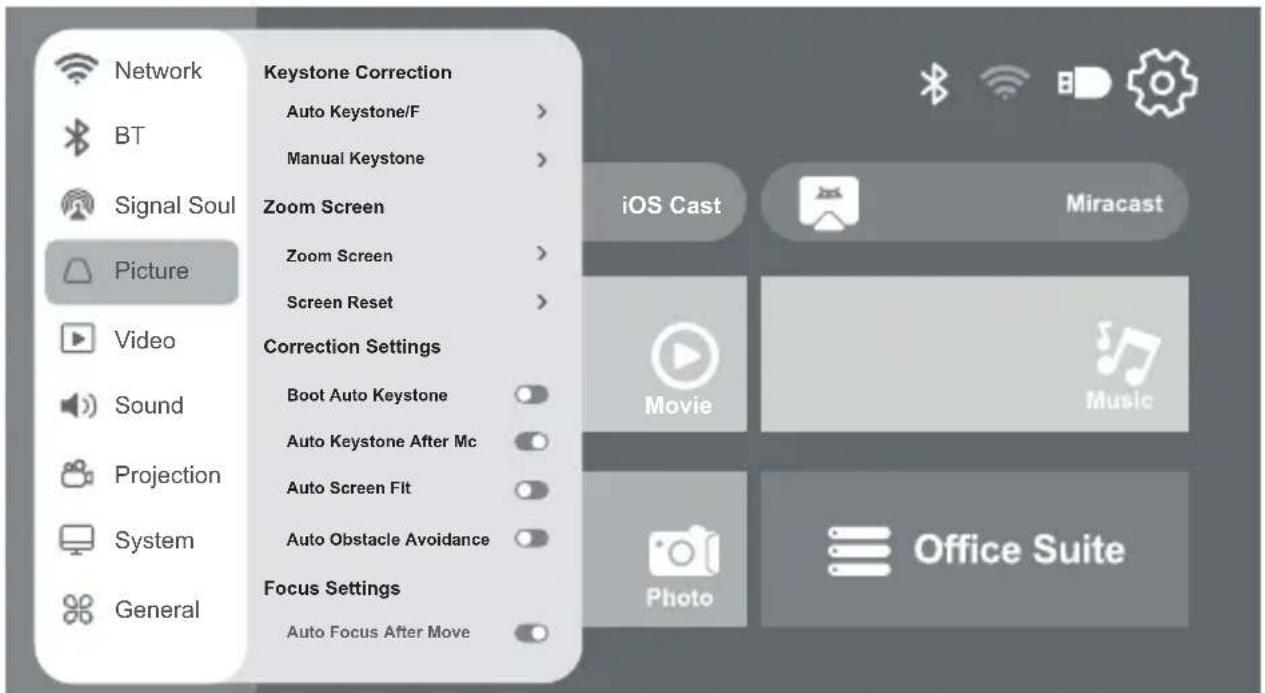
KEYSTONE SETTINGS (FIG. 9)
If the projector is positioned non-parallel to the projection screen, the image will be displayed in a trapezoidal shape. To correct the image shape:
- Enter the projector settings using the dedicated button (5, fig. B) or, alternatively, select the gear icon in the top right corner of the main menu.
- Select "Picture". The side menu will expand on the right side. The selected setting will be highlighted in blue.
- Press the right direction button on the remote control, find the option "Boot Auto Keystone", and then press the confirmation button (10, fig. B) to enable/disable the Keystone effect. To return to the selected option from the main menu, press the left direction button (8, fig. B).
The image can be manually adjusted both vertically and horizontally by shortening and stretching the sides and corners. For configuration:
- Enter the projector settings using the dedicated button (5, fig. B) or, alternatively, select the gear icon in the top right corner of the main menu.
- Select "Picture". The side menu will expand on the right side. The selected setting will be highlighted in blue.
- Press the right direction button (9, fig. B) on the remote control, find the "Manual Keystone Setting" option, and follow the on-screen instructions.
- To exit the setting, press the back button on the remote (11, fig. B).
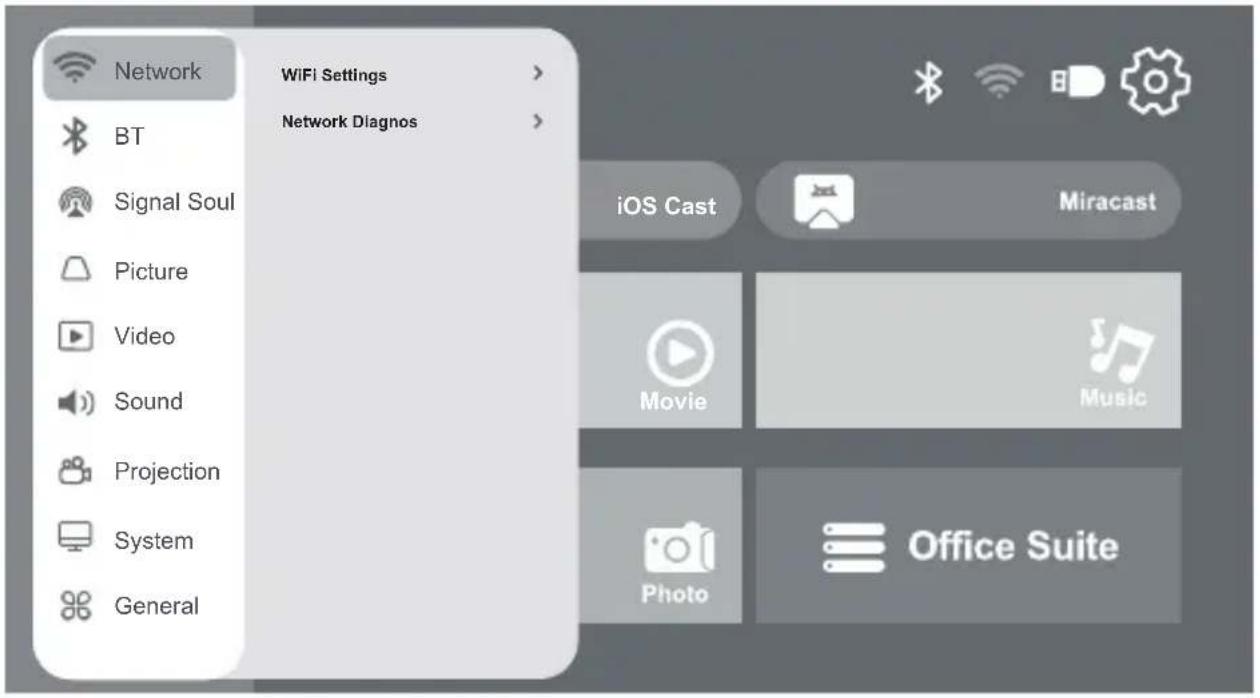
SELECTION OF WI-FI NETWORK (FIG. 10)
- Enter the projector settings using the dedicated button (5, fig. B) or, alternatively, select the gear icon in the top right corner of the main menu.
- Select "Network". The side menu will expand on the right side. The se-
lected setting will be highlighted in blue.
- Press the right arrow button on the remote control (9, fig. B) and select the setting using the confirmation button (10, fig. B).
- To turn the WiFi network on/off, go to "WiFi Settings" and then select the "WiFi Switch" option.
- From the list of available devices, choose the network you want to connect to and enter the password using the on-screen keyboard.
- To add a new WiFi network, go to the "WiFi Settings" option, then select "Add WiFi". Enter the name and password of the network you want to connect to using the on-screen keyboard.
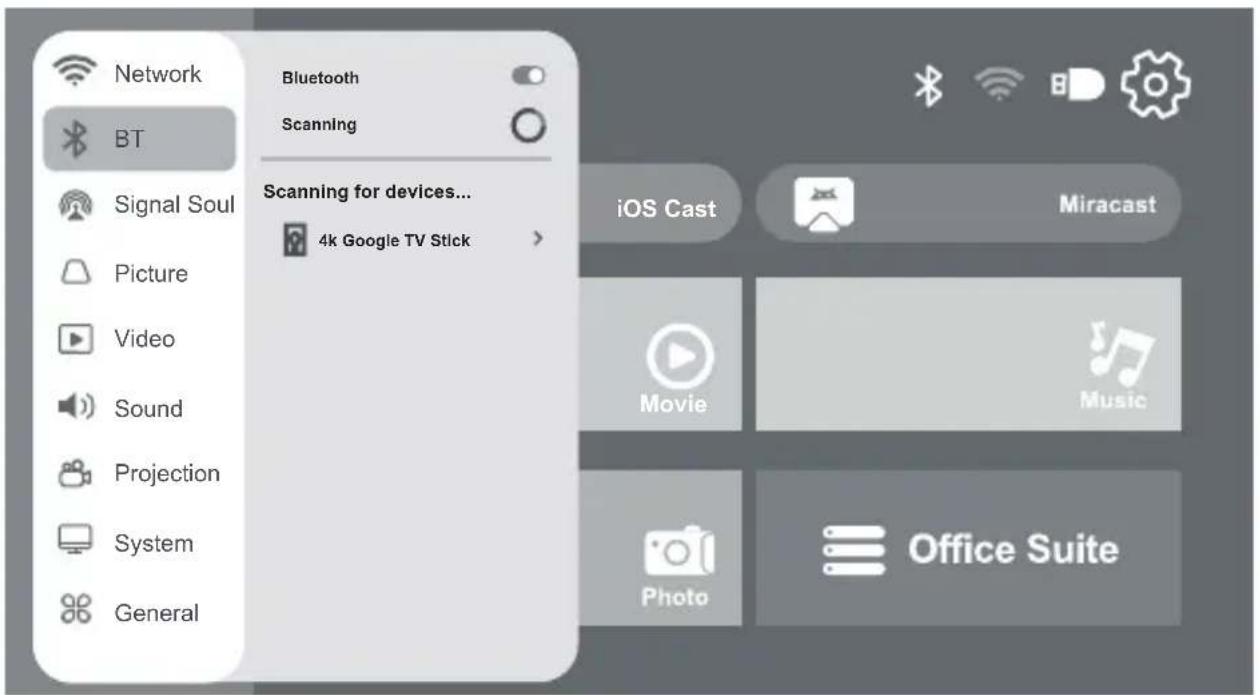
CONNECTING VIA BT (FIG. 11)
To connect to the device via BT, select the BT icon in the top right corner of the main menu, and then follow the steps from section 4 or:
- Enter the projector settings using the dedicated button (5, fig. B) or, alternatively, select the gear icon in the top right corner of the main menu. Then select "BT". The side menu will expand on the right side. The selected setting will be highlighted in blue.
- Press the right direction button on the remote control (9, fig. B), select BT and then press the confirmation button (10, fig. B) to enable or disable the BT feature. To return to the selected option from the main menu, press the left direction button (8, fig. B).
- Select the "Scanning for devices" option from the side menu and press the confirmation button (10, fig. B). Detected devices will be listed below. Select the device you wish to connect to.
- To exit the settings and return to the main menu, press the back button on the remote (11, fig. B).
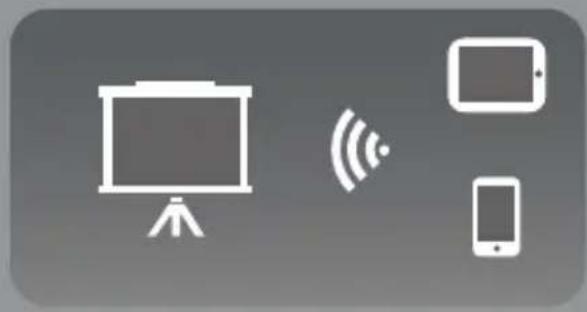
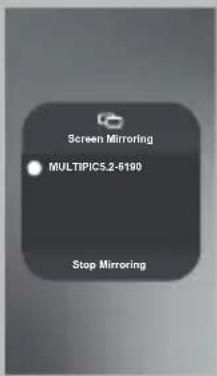
MIRACAST (FIG. 12)
Important! This feature is specifically designed for Android devices.
- Connect the projector and your mobile phone to the same Wi-Fi network.
- In the main menu, select the Miracast button and press the confirmation button (10, fig. B).
- Open the screen mirroring app or select this feature on your phone and connect to the device by selecting the device name. To exit, disconnect the screen mirroring app using the appropriate button.
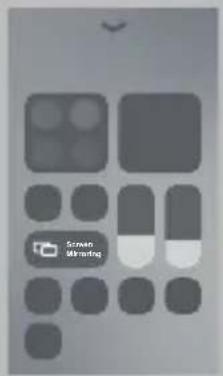
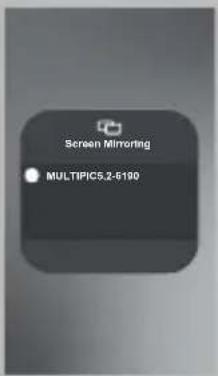
IOS CAST (FIG. 13)
- Connect the projector to the Wi-Fi network (see: SELECTION OF WI-FI NETWORK).
- In the main menu, select the IOS Cast button and press the confirma-
tion button (10, fig. B). Then, follow the on-screen instructions.
- Open your chosen screen mirroring app, or select this feature on your phone, and connect to your device by selecting "MULTIPIC5.2-6190".
SOFTWARE UPDATES
- Enter the projector settings using the dedicated button (5, fig. B) or, alternatively, select the gear icon in the top right corner of the main menu.
- Select System. The side menu will expand on the right side. The selected setting will be highlighted in blue.
- Press the right direction button on the remote control (9, fig. B), select the "System Upgrade" option, then choose "Online Upgrade" from the side menu, and press the confirmation button (10, fig. B).
RESTORATION OF FACTORY SETTINGS
- Enter the projector settings using the dedicated button (5, fig. B) or, alternatively, select the gear icon in the top right corner of the main menu.
- Select System. The side menu will expand on the right side. The selected setting will be highlighted in blue.
- Press the right direction button on the remote control (9, fig. B), select "System Upgrade" and then the "Factory Reset" option from the side menu.
- Press the confirmation button (10, fig. B) and follow the on-screen instructions.
CLEANING AND MAINTENANCE
- Always unplug the power cord before cleaning the device.
- Clean the housing regularly with a damp cloth.
- Use an eyeglass tissue or soft cloth to clean the projector lens to avoid scratches.
Regularly clean the projector's ventilation grille and speaker with a soft brush to prevent blockage and ensure proper ventilation.
TROUBLESHOOTING
| Problem Possible causes | |
| The projector does not turn on after pressing the ON/OFF switch (1, fig. A). | The power cord is not properly connected. |
| The ON/OFF switch (1, fig. A) is faulty. | |
| The projector does not respond when using the remote control. | The remote control has no batteries or the batteries are depleted. To install or replace the batteries, see: INSTALLATION OF BATTERIES IN THE REMOTE CONTROL. |
| The remote control is not aimed at the infrared receiver. | |
| The infrared receiver is exposed to intense lighting. | |
| No image. Incorrect input source. | |
| The input cable is not connected. | |
| When using a laptop, check if the output signal is HDMI. | |
| The projector's ventilation is blocked. | |
| Automatic shut-off. The voltage is not stable. | |
The photos are for reference only; the actual appearance of products may differ from the photos.
Einführung
X - installation non recommandée
CHOIX D'UN RÉSEAU WI-FI (FIG. 10)
PROJECTOR INSTALLATIE METHODEN (FIG. 4)
ODABIR WI-FI MREŽE (SL. 10)
-
Udite u postavke projektora pomoću gumba (5, sl. B) ili odaberite zupčanik u gornjem desnom kutu glavnog izbornika.
-
Odaberite Mrežu („Network“). Proširit će se bočni izbornik s desne strane. Odabrana postavka bit će označena plavom bojom.
- Pritisnite desnu tipku sa smjerom na daljinskom upravljaču (9, sl. B) i odaberite postavku pomoću tipke za potvrdu (10, sl. B).
- Da biste uključili/isključili WiFi, idite na WiFi postavke ("WiFi Settings") i zatim odaberite WiFi prekidač ("WiFi Switch").
- S popisa dostupnih uređaja odaberite mrežu na koju se želite povezati i unesite lozinku pomoću zaslonske tipkovnice.
- Kako biste dodali novu WiFi mrežu, idite na WiFi postavke, ("WiFi Settings") zatim odaberite Dodaj mrežu ("Add WiFi") i unesite naziv i lozinku mreže na koju se želite spojiti pomoću tipkovnice na zaslonu.
POVEZIVANJE PUTEM BT-a (SL. 11)
Za povezivanje sa svojim uređajem putem BT-a odaberiteikonu BT u gornjem kutu glavnog izbornika, zatim slijedite korake 4 ili:
EN: The product complies with the requirements of European Union directives. Pursuant to Directive 2012/19/EU, this product is subject to separate waste collection. The product should not be disposed of with municipal waste, as it may pose a risk to the environment and human health. Return the used product to a recycling centre for electrical and electronic equipment.
EN: Simplified EU/EC declaration of conformity:
BrandLine Group Sp. z o. o. hereby declares that the “MULTIPIC 5.2” projector complies with the following directives: 2014/53/EU (RED directive) and 2011/65/EU (RoHS directive).
The complete EU declaration of conformity can be accessed online at:
https://overmax.pl/multipic-5-2-smart-projektor-led

- Multipic 5.2
- 8
- 9
- 10
- 11
- 12
- Miracast
- 13
- Rotacast
- Wprowadzenie
- Drogi Kliencie!
- WYBÓR JĘZYKA (RYS. 3)
- WYBÓR SIECI WI-FI (RYS. 10)
- WARNINGS
- EN
- WARNINGS FOR REMOTE CONTROL BATTERIES
- DESCRIPTION OF PARTS (FIG. A)
- DESCRIPTION OF THE REMOTE CONTROL (FIG. B)
- DEVICE SPECIFICATIONS
- SWITCHING ON AND OFF
- CONTROL USING MOUSE/KEYBOARD
- MEDIA SOURCE SELECTION (FIG. 2)
- GTV CONFIGURATION
- CAUTION! To use the GTV feature, it is necessary to log in to an existing Google account.
- PAIRING DEVICES THROUGH GTV
- PROJECTOR CONFIGURATION
- LANGUAGE SELECTION (FIG. 3)
- PROJECTOR INSTALLATION METHODS (FIG. 4)
- IMAGE ADJUSTMENT (FIG. 5)
- FOCUS ADJUSTMENT
- AUTO FOCUS (FIG. 7)
- ZOOM SETTINGS (FIG. 8)
- KEYSTONE SETTINGS (FIG. 9)
- SELECTION OF WI-FI NETWORK (FIG. 10)
- CONNECTING VIA BT (FIG. 11)
- MIRACAST (FIG. 12)
- IOS CAST (FIG. 13)
- SOFTWARE UPDATES
- RESTORATION OF FACTORY SETTINGS
- CLEANING AND MAINTENANCE
- Einführung
- CHOIX D'UN RÉSEAU WI-FI (FIG. 10)
- PROJECTOR INSTALLATIE METHODEN (FIG. 4)
- ODABIR WI-FI MREŽE (SL. 10)
- POVEZIVANJE PUTEM BT-a (SL. 11)
Brand : Overmax
Model : Multipic 5.2
Category : Projector