Multipic 4.2 - Projector Overmax - Free user manual and instructions
Find the device manual for free Multipic 4.2 Overmax in PDF.

| Product type | Multimedia projector |
| Brand | Overmax |
| Model | Multipic 4.2 |
| Native resolution | 800 x 480 pixels |
| Display technology | LCD |
| Power supply | Mains (power cable included) |
| Connectivity | 2 x HDMI, 2 x USB, 1 x AV, 1 x audio output |
| Wireless | Wi-Fi (Miracast, iOS Cast), Bluetooth |
| Keystone correction | Manual (vertical) |
| Focus | Manual (focus ring) |
| Projected image size | 40 to 200 inches (diagonal, 16:9 format) |
| Projection distance | 1.20 m (40") to 6.15 m (200") |
| Supported video formats | MP4, MKV, AVI, WMV, RMVB, RM, FLV, TRP, VOB, 3GP, DIVX, TP, TS, MPG, M2TS, F4V, DAT |
| Supported audio formats | MP3, AAC, FLAC, WAV, WMA, M4A |
| Supported image formats | BMP, JPG, PNG, JPEG |
| Mounting | On table, on ceiling (mount not included, professional installation recommended) |
| Wireless functions | Miracast, iOS Cast, iOS Cable |
| Built-in speaker | Yes (speaker) |
| Cleaning | Soft cloth for the lens, compressed air for ventilation openings |
| Safety | Do not disassemble, do not look at the lens while operating, unplug before cleaning |
| Certifications | CE, RED, LVD, EMC |
Frequently Asked Questions - Multipic 4.2 Overmax
User questions about Multipic 4.2 Overmax
0 question about this device. Answer the ones you know or ask your own.
Ask a new question about this device
Download the instructions for your Projector in PDF format for free! Find your manual Multipic 4.2 - Overmax and take your electronic device back in hand. On this page are published all the documents necessary for the use of your device. Multipic 4.2 by Overmax.
USER MANUAL Multipic 4.2 Overmax
Please press ok to enter
Software Version
Thank you for placing trust in us and choosing Overmax.
Thanks to the use of high-quality materials and modern solutions, we provide you with a product perfect for everyday use. We are convinced that the product will satisfy your requirements as it has been manufactured with utmost care. Before you use the product, please read this operating manual carefully.
Should you have any remarks or questions concerning the product, please do not hesitate to contact us: pomoctechniczna@overmax.pl
Important notice
Before operating the projector read and then follow the instructions in this operating manual. Improper use of the device may cause an electric shock and increased risk of fire. During the use and maintenance of the projector, observe the following instructions.
Installation and use
- For higher picture quality, use the projector in rooms with curtains or dark rooms.
- Use the projector carefully. A drop or failure may damage the parts or cause picture blur and improper projection.
- Do not disassemble the device on your own - electric shock risk.
- Protect the device from moisture and keep away from water or other liquids.
- When the projector is disabled, be careful not to cover ventilation slots. Do not place it on soft surfaces or cover it with fabrics.
- Only use the wires included with the device.
- During the use of the power cord, avoid bending the cable excessively. Damage to the power cord may cause an electric shock or fire.
- Do not look into the lens during the operation of the device.
- It is recommended to disable the device after 6 hours of uninterrupted operation.
- Disable the device and disconnect the power cord.
It is recommended to use the original packaging to transport the device. - Do not place heavy objects on the projector.
To ensure free heat dissipation, before operating the projector, adjust the height using the knob (8, fig. B).

The product meets the requirements of the directives of the European Union.
Under the Directive 2012/19/EU, this product is subject
to separate collection. The product must not be disposed of with municipal waste, because it may be dangerous to the environment and human health. The used product must be delivered to the waste electrical and electronic equipment recycling point.
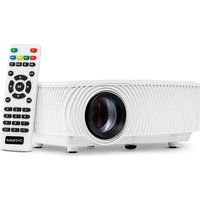
Description of the projector (fig. A)
- Lens
- Speaker
- IR module for the remote control of the device
- Power outlet
- Dust guard
-
Fan
-
Audio output
- AV port
- USB1 port
- USB2 port
11.HDMI1 port - HDMI2 port
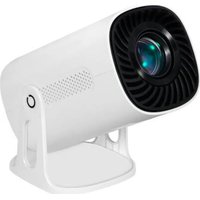
Description of the projector (fig. B)
- Picture focus adjustment
- Picture keystone correction
- Control
- OK button
- On/off button
- Return
-
Input selection
-
Height adjustment
- Feet and screw openings (remove the feet before suspending the projector)
- Dust cover (open the cover to clean the dust from the projector)
Remote controller (fig. C)
- On/off key
- Select source
- Direction keys
- Menu
- Homepage
- Volume up
-
Volume down
-
Mute
- Rotate projection screen
- Confirm key (Play/pause)
11.Exit - Previous slide
- Next slide
EN
Supported formats
Picture formats: BMP/JPG/PNG/JPEG
Video formats: MP4/MKV/WMV/RMVB/RM/AVI/FLV/TRP/VOB/3GP/DIVX/
TP/TS/MPG/M2TS/F4V/DAT
Audio formats: MP3/AAC/FLAC/WAV/WMA/M4A
File formats: TXT
Note: this device does not support Dolby-encoded audio for copyright protection reasons.
Use of the device
Start and turn off the device
- Plug the power cord into the device and then connect the device to the power supply.
- Push the on/off button on the remote controller or projector (A, fig. 1). The indicator light will be lit solid blue.
- After about 2 seconds, the device will be enabled and the picture will appear on the screen. The device will switch into standby mode.
- The picture may be blurred or distorted, when the device is turned on for the first time (adjust it, see: "Picture focus adjustment and keystone correction").
- To turn off the device, push the on/off button on the remote controller or projector. The device will switch into sleep mode.
- After switching into sleep mode, the device will start the automatic heat dissipation process. The indicator light will turn red.
Picture focus adjustment and keystone correction
- Place the projector so that the lens remains perpendicular to the wall or screen, on which the picture will be displayed.
- To correct the focus of the displayed picture, turn the focus knob (A, fig. 2) until the image is focused. During picture focus adjustment, you can continue to use the product.
- Use the keystone correction knob (B, fig. 2) to adjust the shape of the picture (fig. 3). Note! Only vertical mechanical keystone correction is available. Make sure the projector is at the same level as the displayed picture.
Projector installation methods (fig. 16)
For projector installation under the ceiling, contact a professional installer.
- Ceiling mount for front projection.
-
Placing the projector on a front projection stand.
-
Ceiling mount for rear projection.
- Placing the projector on a rear projection stand.
Warning: The projector may be damaged if improperly mounted to the ceiling or another surface.
- Only use the projector in a room, in which the temperature is in the range of 5^ to 35^ . Otherwise, projector failure may occur.
- In a dusty, wet, damp or smoky room, projector failure may occur.
- Poor ventilation may cause overheating, which may cause damage to the projector, as well as the risk of fire.
Standard setting
Place the projector on a solid and stable surface. Ventilation slots should not be covered or blocked. Do not place any objects within about 30~cm of ventilation openings.
To adjust the picture size and projector distance, refer to the following table (fig. 4):
| Aspect ratio 16:9 | |
| Picture size (in) Distance (m) | |
| 40 1.20 | |
| 50 1.54 | |
| 70 2.15 | |
| 100 3.08 | |
Set the input
Turn on the projector and then select the preferred input on the main interface (fig. 5).
Multimedia
Connect the external drive to the USB port of the projector. In the menu, select Multimedia, select the drive and then the file to display (fig. 6).
Connection to multimedia input using the wire
The projector may display the picture from many devices. Depending on your device, use a suitable input in the rear of the enclosure.
- USB input - memory sticks, portable drives.
Note! The product does not support USB 3.0.
- HDMI input - PC, laptop, console, satellite signal receiver, telephone (with MHL support and the MHL wire only).
- Video-In input (AV) - console, satellite signal receiver.
EN
Menu settings
Push the menu button on the remote controller (4, fig. C) to move to the menu settings. Set the selected display (fig. 7) and sound (fig. 8) parameters, as preferred.
Miracast
- In the main interface, select Miracast.
- Connect the projector and mobile phone to the same Wi-Fi network.
- Open the selected screen mirroring app and connect it to the device by selecting "NETLINK-XXXX". The final four digits of the device name are generated at random.
iOS Cast
- In the main interface, select iOS Cast.
- Connect the projector and mobile phone to the same Wi-Fi network or connect the iOS device to the wireless access point (AP) of the projector.
- On the iOS device, open the telephone and then select the "Screen mirroring" function (A, fig. 9). When the device is scanning for the projector (B, fig. 9), select NETLINK-XXXX-(icast) from the list of available devices (C, fig. 9). The final four digits of the device name are generated at random.
iOS Cable
- In the main interface, select iOS Cable.
- Connect the iOS device to the USB port on the projector using the data transmission wire (A, fig. 10).
- Select "Trust" in the window that appears on the iOS device screen (B, fig. 10).
- Enter the iOS device password (C, fig. 10).
Connection to the Wi-Fi network
- In the main interface, select Settings and then Wi-Fi settings (A, fig. 11).
- Scan for the Wi-Fi network to connect to, enter the password and confirm it (fig. 12).
System settings
- In the main interface, select Settings and then System settings (B, fig. 11).
- In System settings, you can change the language and software version, connect via Bluetooth, restore factory defaults and complete local or online update (fig. 13).
- Local update: If you have the installation file to update the software to the newer version, you can save it to the USB drive and complete the update. Connect the external drive to the USB port and then follow the instructions.
- Online update: If you do not have the installation file, connect the projector to the Wi-Fi network and then follow the instructions.
Projection settings
- In the main interface, select Settings and then Projection settings (C, fig. 11).
- Depending on the installation method and projector setting (see: Projector installation methods), select one of the available picture settings (fig. 14).
Connection via Bluetooth
- In the main interface, select Settings and then System settings (B, fig. 11).
- In System settings, select Bluetooth, scan for the available devices and select the device to connect to (fig. 15).
Cleaning
- Before cleaning the device, disconnect the power cord.
- Clean the enclosure on a regular basis, with a moist cloth and natural cleaning products.
- To clean the projector lens, use the glasses cleaning cloth or soft fabric to avoid scratches.
- Clean the ventilation slots and projector speakers using a brush on a regular basis. Otherwise, ventilation may be blocked.
- Clean the slot under the dust cover (10, fig. B) on a regular basis (for example with compressed air) to maintain good picture quality.
These pictures are for reference only, the actual appearance of the products may differ from the pictures.
Einführung
IpoDyKT BiIDNoBidae BnMOram DnpeKtnB EbponeNcbKoro Co103y.
BiiinobiDIO Do DnpeKtNBn 2012/19 / EC uei npodykT niDnrae Bn6ipkoBOMy BiDxOy. Bnpi6 He MoXHa BnKnIdaTn
pa3OM i3 N6yTOBmN BiXoJaMn, OckIbKn Ce MoKe cTaHOBnTn 3aRpo3y IJn HABKOJIuHbOro cepeIOBua Ta 3dOpOB' JIoJe. BnKOpNCtAHn IpOdyKT CIId 3dATn Ha NyHK Tnepeo6Kn eEeKTPnuHnx Ta eEeKTPoHHNX pIncTpoIB.
Cnocobn BcTaHOBJIeHH npoeKTopa (MaJ. 16)
Uo6 BCTaHOBtN npoeKTop Ha cTei, 3BepHITbcr Do npopeciHoro MOHTaXHHka.
- CTeIbOBe KpinJIeHHnДЯ ФpoNTaIbHOI npoeKciI.
- Po3miueHH npoeKtopa Ha Bucoti Ila fpoHTaIbHOI npoeKciI.
- CTeIbOBe KpInJIeHHa IJra 3aHbOi npoeKciI.
- Po3TaUyBaHnHa npoeKtopa Ha niDHeCen 3aHni npoeKcii.
PonepeJxehn: npoeKTop MoKe 6yTu N0uKOJxHn, kUo NOrO He npabNbHo 3akpInTu Ha cTeI qn iHsiNOBepxHi.
UA
BnKOpncToBynte npoeKTop TiIbKn B npimiueHHi, De TempepaTpa He 3haxoDntbcra y diana3oHi 5^ - 35^. JaKuo cboRo He 3pO6HTn, npoeKTop MoKe BnHTn 3 naHy.
HecnpabHicTb MoKe BUNKHyTu, KaIIO npoeKTop 3HaXoNtbcraB 3aIIeHomy, BOIOromy a60 3aIIMLeHomy cepeOboNsi.
- Ioraha BeHTnlaizj MoKe np3BecTu Do nepeRpiBy, 0o MoKe NowkoDTu npoeKToP, a TaKoJ CTBOpTu pN3NK NoXeKi.
CtanhapThe hanaWtyBaHHa
Po3micitb npoeKTop Ha TBepdi i cTiKi nobepxHi. BeHTnlaui Hi OTBOpH He NobHHi 6yTu 3akpnti a6o 3a6Jokobahi. He po3miuTe ppeMeTu B Mekax np6I. 30 cm BiD BeHTnlauiHnx OTBopiB.
EU DECLARATION OF CONFORMITY
- BLACK: 5903771703109
- Name and address of the manufacturer or his authorized representative:
BrandLine Group Sp. zo.o. ul.A.Kreglewskiego 1, 61-248 Poznań, POLAND
OVERMAX
- This declaration of conformity is issued under the sole responsibility of the manufacturer: BrandLine Group Sp. z o. o.
- Subject of declaration: Multipic 4.2
- The subject of this declaration mentioned above is in conformity with the relevant requirements of the EU harmonization legislation:
2014/53/EU - RED Directive
2014/35/EU - LVD Directive
2014/30/EU - EMC Directive
2011/65/EU - RoHS Directive
- References to the relevant harmonized standards used, or references to other technical specifications, for which compliance is declared:
ETSI EN 301489-1V2.2.3:2019
IEC 62321-3-1:2013
ETSI EN 301489-17 V3.2.4:2020
IEC 62321-4:2013+A1:2017
ETSI EN 300 328 V2.2.2:2019
IEC 62321-5:2013
ETSI EN 300 440 V2.2.1:2018
IEC 62321-6:2015
ETSI EN 301 893 V2.1.1:2017
IEC 62321-7-1:2015
EN 62311:2008
IEC 62321-7-2:2017
EN IEC 62368-1:2020+A11:2020
IEC 62321-8:2017
- Additional information:
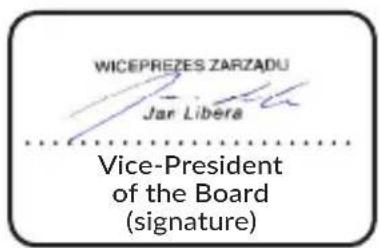
Signed on behalf of: BrandLine Group Sp. z o. o.
Poznan, 02.09.2022
(place and date of issue)
2011/65/EU - RoHS Directive
ETSI EN 301489-17 V3.2.4:2020
IEC 62321-4:2013+A1:2017
ETSI EN 300 328 V2.2.2:2019
IEC 62321-5:2013
ETSI EN 300 440 V2.2.1:2018
IEC 62321-6:2015
ETSI EN 301 893 V2.1.1:2017
IEC 62321-7-1:2015
EN 62311:2008
IEC 62321-7-2:2017
EN IEC 62368-1:2020+A11:2020
IEC 62321-8:2017
2011/65/EU - RoHS Directive
ETSI EN 301489-17 V3.2.4:2020
IEC 62321-4:2013+A1:2017
ETSI EN 300 328 V2.2.2:2019
IEC 62321-5:2013
ETSI EN 300 440 V2.2.1:2018
IEC 62321-6:2015
ETSI EN 301 893 V2.1.1:2017
IEC 62321-7-1:2015
EN 62311:2008
IEC 62321-7-2:2017
EN IEC 62368-1:2020+A11:2020
IEC 62321-8:2017
2011/65/EU - RoHS Directive
ETSI EN 301489-17 V3.2.4:2020
IEC 62321-4:2013+A1:2017
ETSI EN 300 328 V2.2.2:2019
IEC 62321-5:2013
ETSI EN 300 440 V2.2.1:2018
IEC 62321-6:2015
ETSI EN 301 893 V2.1.1:2017
IEC 62321-7-1:2015
EN 62311:2008
IEC 62321-7-2:2017
EN IEC 62368-1:2020+A11:2020
IEC 62321-8:2017
2011/65/EU - RoHS Directive
ETSI EN 301489-17 V3.2.4:2020
IEC 62321-4:2013+A1:2017
ETSI EN 300 328 V2.2.2:2019
IEC 62321-5:2013
ETSI EN 300 440 V2.2.1:2018
IEC 62321-6:2015
ETSI EN 301 893 V2.1.1:2017
IEC 62321-7-1:2015
EN 62311:2008
IEC 62321-7-2:2017
EN IEC 62368-1:2020+A11:2020
IEC 62321-8:2017
2011/65/EU - RoHS Directive
ETSI EN 301489-17 V3.2.4:2020
IEC 62321-4:2013+A1:2017
ETSI EN 300 328 V2.2.2:2019
IEC 62321-5:2013
ETSI EN 300 440 V2.2.1:2018
IEC 62321-6:2015
ETSI EN 301 893 V2.1.1:2017
IEC 62321-7-1:2015
EN 62311:2008
IEC 62321-7-2:2017
EN IEC 62368-1:2020+A11:2020
IEC 62321-8:2017
2011/65/EU - RoHS Directive
ETSI EN 301489-17 V3.2.4:2020
IEC 62321-4:2013+A1:2017
ETSI EN 300 328 V2.2.2:2019
IEC 62321-5:2013
ETSI EN 300 440 V2.2.1:2018
IEC 62321-6:2015
ETSI EN 301 893 V2.1.1:2017
IEC 62321-7-1:2015
EN 62311:2008
IEC 62321-7-2:2017
EN IEC 62368-1:2020+A11:2020
IEC 62321-8:2017
2011/65/EU - RoHS Directive
- Upucivanja na odgovarajuće primijenjene uskladene norme, ili upucivanja na druge tehnicke specifikacije, u odnosu na koje se izjavljuje sukladnost:
ETSI EN 301489-1 V2.2.3:2019
IEC 62321-3-1:2013
ETSI EN 301489-17 V3.2.4:2020
IEC 62321-4:2013+A1:2017
ETSI EN 300 328 V2.2.2:2019
IEC 62321-5:2013
ETSI EN 300 440 V2.2.1:2018
IEC 62321-6:2015
ETSI EN 301 893 V2.1.1:2017
IEC 62321-7-1:2015
EN 62311:2008
IEC 62321-7-2:2017
EN IEC 62368-1:2020+A11:2020
IEC 62321-8:2017