
TPS 500W A1 - Power bank TRONIC - Free user manual and instructions
Find the device manual for free TPS 500W A1 TRONIC in PDF.

| Product type | Power station (Portable battery) |
| Brand | TRONIC |
| Model | TPS 500W A1 |
| Battery capacity | 518 Wh (19.2 V, 27 Ah) |
| Battery type | Lithium-iron-phosphate (LiFePO4) |
| Weight | approx. 7.4 kg |
| Dimensions (with handle) | approx. 335 x 180 x 230 cm |
| AC Input | 220-240 V~50/60 Hz, 10 A Max. |
| AC Output (inverter mode) | 230 V~50 Hz, 2.2 A, 500 W / Peak 1000 W |
| USB-C Output (PD) | 5V/3A, 9V/3A, 12V/3A, 15V/3A, 20V/5A (100W max) |
| USB-A Output | 5V/2.4A max per port (total 4.8A) |
| DC5525 / Cigarette lighter output | 12-14.6V = 10A, 120W max |
| Total DC+AC output power | 650 W |
| Operating temperature | 10 - 35 °C |
| Storage temperature | 0 - 45 °C |
| Humidity (non-condensing) | 10 - 70 % |
| EPS function | Emergency power supply (switchover < 20 ms) |
| Display | LCD screen with status and warning indicators |
| Maintenance and cleaning | Slightly damp cloth and mild dish soap |
| Safety | Do not open, avoid water, do not use near flammable gases |
| Warranty | 3 years |
| Spare parts | Available during the warranty period |
| After-sales service France | Tel. 0800904879, Email: owim@lidl.fr |
| Package contents | Power station, AC cable, cigarette lighter cable, quick start guide |
Frequently Asked Questions - TPS 500W A1 TRONIC
User questions about TPS 500W A1 TRONIC
0 question about this device. Answer the ones you know or ask your own.
Ask a new question about this device
Download the instructions for your Power bank in PDF format for free! Find your manual TPS 500W A1 - TRONIC and take your electronic device back in hand. On this page are published all the documents necessary for the use of your device. TPS 500W A1 by TRONIC.
USER MANUAL TPS 500W A1 TRONIC
Operation and safety notes
FR BE
STATION D'ALIMENTATION
** AC socket type may vary in different EU countries
B
natural_image
Diagram of a digital testing device with connected cables and a power plug (no text or symbols)Warnings and symbols used.... Page 17
Introduction Page 18
Intended use.... Page 18
Trademark notice.... Page 18
Scope of delivery.... Page 18
Parts of description.... Page 18
LCD display Page 18
Technical specifications Page 19
Safety notices Page 19
Operation and use ...... Page 21
Charging the power station....Page 21
AC charging (Grid Charging) Page 21
Solar Panel Charging the power station Page 22
Car charging Page 22
USB-C charging....Page 22
Charging mobile devices with the power station.... Page 23
Checking the battery status (see fig. B) Page 23
Input and Output status (see fig. B) Page 23
EPS Page 23
Troubleshooting Page 23
Cleaning and care Page 24
Storage during non-use.... Page 24
Disposal Page 24
Warranty Page 25
Warranty claim procedure.... Page 25
Service Page 25
| Warnings and symbols usedThe following symbols and warnings are used in the operating instructions, on the packaging and on the product: | |||
 | DANGER! This symbol with the signal word "DANGER" indicates a hazard with a high level of risk which, if not avoided, will result in serious injury or death. |  | WARNING! EXPLOSION HAZARD! A warning with this symbol and word "WARNING! EXPLOSION HAZARD" indicates the potential threat of explosion. Failure to observe this warning may result in serious or fatal injuries and potential property damage. Follow the instructions in this warning to prevent serious injuries, a danger to life or property damage! |
| WARNING! This symbol with the signal word "WARNING" indicates a hazard with a medium level of risk which, if not avoided, could result in serious injury or death. |  | This symbol means that the operating instructions must be observed before using the product. | |
| CAUTION! This symbol with the signal word "CAUTION" indicates a hazard with a low level of risk which, if not avoided, could result in minor or moderate injury. |  | Direct current/voltage | |
| ATTENTION! This symbol with the signal word "ATTENTION" indicates a possible property damage. | Alternating current / voltage | ||
| NOTE: This symbol with the signal word "NOTE" provides additional useful information. | [W67] | Fragile! Handle with Care | |
| Safety informationInstructions for use |  | Power Delivery (PD), introduced by the USB Implementers Forum, Inc., is a specification for handling higher power and allows quick charging over a USB connection. | |
| Polarity of barrel connector |  | CE mark indicates conformity with relevant EU directives applicable for this product. | |
POWER STATION
● Introduction
We congratulate you on the purchase of your new product. You have chosen a high quality product. The instructions for use are part of the product. They contain important information concerning safety, use and disposal. Before using the product, please familiarise yourself with all of the safety information and instructions for use. Only use the product as described and for the specified applications. If you pass the product on to anyone else, please ensure that you also pass on all the documentation with it.
Intended use
This POWER STATION (hereinafter referred to as "product") is an Information Technology device which is intended to be used to charge mobile devices or provide power to operate electronic products that do not exceed a 500W max. power.
This product is not intended for commercial use. Manufacturer is not liable for damages, which result from non-intended use.
Trademark notice
- USB ^ is a registered trademark of USB Implementers Forum, Inc.
- The TRONIC trademark and trade name is the property of their respective owners.
- Apple, iPad, iPad Air, iPad Pro, iPhone, and Lightning are trademarks of Apple Inc., registered in the U.S. and other countries.
- Galaxy, Samsung, Samsung Galaxy are registered trademarks by Samsung Electronics Co., Ltd. in the E.U. and other countries.
- Any other names and products may be trademarks or registered trademarks of their respective owners.
- Scope of delivery
1 Power station
1 AC charging cable
1 Car charging cable
1 Short Manual
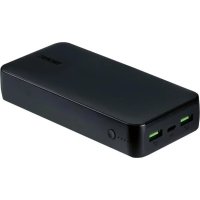
Parts of description
1 Handle
2 LCD ON/OFF button
3 LCD display panel
4 AC output socket
5 AC power ON/OFF button
6 USB-C input/ output port
7 USB-A output port
8 DC5525 output port
9 Car charger/12V DC output port (behind silicon protection cover)
10 AC input port (behind silicon protection cover)
11 XT60 input port for solar IN or Car charging IN
12 Overload protection reset button
13 AC charging cable
14 Car charging cable
15 Short Manual
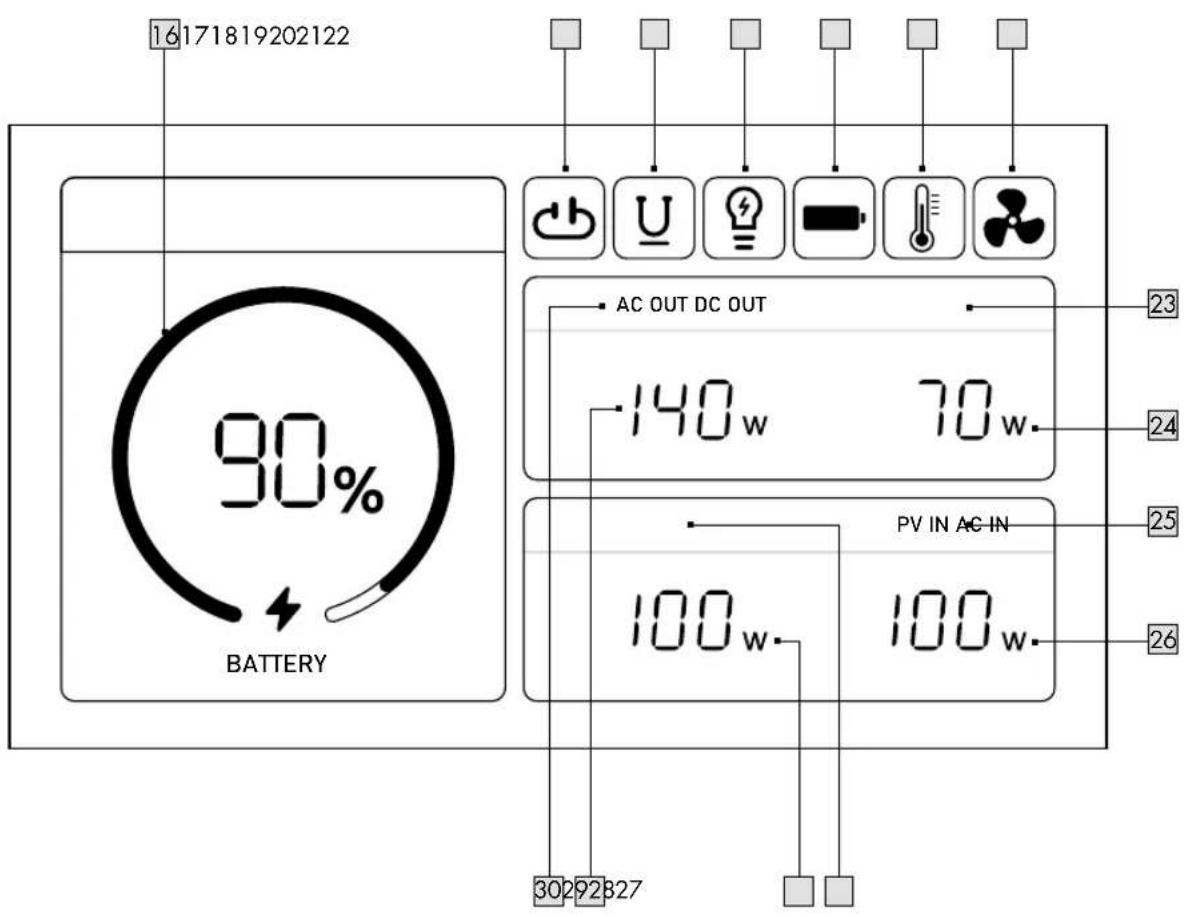
LCD display
16 Remaining battery capacity
17 Short circuit warning indicator
18 Undervoltage warning indicator
19 Overload warning indicator
20 Overcharge warning indicator
21 High/ Low temp. warning indicator
22 Fan indicator
23 DC output indicator (DC Out)
24 Total DC output power (Watt)
25 Solar/ Car charging input indicator (PV IN/ Car IN)
26 Total Solar/ Car Charging input power (Watt)
27 AC input power
28 AC input indicator
29 AC output power
30 AC output indicator
NOTE: Refer to "Troubleshooting" section for details about LCD indicators 17-22.
● Technical specifications
Battery:
Battery type: Li-ion phosphate battery (LiFePO4)
Capacity: 518 Wh (19.2 V, 27 Ah)
Inputs:
AC input
(Charging mode): 220-240 V\~50/60 Hz, 10 A Max.
(Bypass mode): 220-240 V\~50/60 Hz, 650 W Max.
USB-C (PD) Input : 5 V = 3 A; 9 V = 3 A;
$$ 1 2 \mathrm{V} = - 3 \mathrm{A}; 1 5 \mathrm{V} = 3 \mathrm{A}; $$
$$ 2 0 \mathrm{V} = - 5 \mathrm{A} 1 0 0 \mathrm{W} \text { Max }. $$
Solar/
Car Charging input: 11-30 V = , 8 A,
200 W Max. via XT60
Outputs:
AC Output
(inverter mode): 230 V\~50 Hz, 2.2 A,
Total 500 W/Peak 1000 W
(Bypass mode): 220-240 V\~50/60 Hz,
650 W Max
Type C (PD) Output: 5 V = 3 A; 9 V = 3 A;
$$ 1 2 \mathrm{V} = - 3 \mathrm{A}; 1 5 \mathrm{V} = 3 \mathrm{A}; $$
$$ 2 0 \mathrm{V} = 5 \mathrm{A} 1 0 0 \mathrm{W} \text { Max }. $$
Type A Output: 5 V ——2.4 A Max. per port
(Total: 4.8 A Max.)
DC5525 /
Car Charger total
output: 12-14.6 V
$$ = 1 0 \mathrm{A}, 1 2 0 \mathrm{W} \text { Max }. $$
Total DC+AC output
power: 650 W
Operating
temperature: 10 - 35 °C
Storage temperature: 0 - 45 °C
Humidity
(no condensation): 10 - 70 %
Dimension
(include handle): approx. 335 x 180 x 230 mm
Weight: approx. 7.4 kg
Safety notices
Please familiarise yourself with all instructions for use and safety notices before using the product for the first time. When passing this product on to third parties, please be sure to include all documentation.
- Check the product for visible external damage before use. Do not use the product if damaged or dropped.
This product may be used by children age 8 years and up, as well as by persons with physical, sensory or mental impairments or lacking experience and/or knowledge, provided they are supervised or instructed in the safe use of the product and understand the associated risks. Do not allow children to play with the product. Never allow children to clean or maintain this product unsupervised.
⚠️ DANGER! Packaging materials are not toys. Keep all packaging materials out of the reach of children. Suffocation hazard!
■ Always use the product on flat and smooth surface. The product could be damaged if it falls.
Do not expose the product to direct sunlight or high temperatures. It may otherwise overheat and be damaged beyond repair.
- Do not operate the product near heat sources such as radiators or other devices producing heat.
- Do not operate the product near open flames.
The product is not designed for use in rooms with high temperatures or humidity (i.e bathrooms) or those in which a great amount of dust is generated.
- Do not touch this product or connector plug when your hands are wet. It may cause electric shock hazard.
Do not expose the product to extremely high temperatures. This applies in particular if you are thinking about storing the product in your car. Over a prolonged period of time, the car and the glove compartment could become extremely hot. Remove electric and electronic devices from the car.
Do not use the product immediately after it has brought from a cold room to a warm room. Allow the product to acclimatise before you switch it on.
⚠ WARNING! Never open the product casing. This product has no internal parts requiring maintenance.
Do not use metal to contact AC input or output interface. It may cause electric shock, fever, fire and other dangers.
- Do not use AC connections other than those specified. It may cause electric shock, fever, fire and so on.
⚠ WARNING! Do not use if a connector cannot be fully inserted due to a loose or deformed interface. Otherwise, electric shocks, heating up and fire can be caused.
To reduce risk of damage to the electric plug and cord, pull the plug rather than the cord when disconnecting the power pack.
- Do not independently convert or modify the product.
- Repairs to the product must be performed by authorised specialised companies or customer service. Improper repairs may place the user in considerable danger. They will also void the warranty.
Do not expose the product to dripping water or splashing water and do not place containers filled with liquids such as vases or open drinks on top of or beside the product.
Immediately switch the product off and remove the charging cable from the product if you smell burning or see smoke. Have the product examined by a qualified technician before using it again.
Please check the rated power specifications of the connection interface or the connection product and do not exceed the specifications. It may cause electric shock, fever, fire and so on.
Please do not have a strong impact on the product such as a drop or a hammer strike. This can result in an electric shock, heating up, fire or damage to the product.
Do not move the product, while it is charging or in use. Heating up, fire, electric shock or damage can be caused to the product due to vibrations or impacts while moving.
- Do not block the air ventilation fan forcibly during use.
Please make sure when storage, transport or operating the device with the ventilation slots not facing upwards.
- Not permitted on aircrafts because the battery capacity exceeds 100 Wh.
When charging this power station via AC power. Connect the power station to an electrical outlet that is always easily reachable so that in case of an emergency the plug can be unplugged immediately.
Pull the AC plug out of the power supply to completely disconnect the product from the mains network after charging completed.
The power station will continue to draw a small amount of electricity, even without operated, as long as the AC power cable is connected to the power supply. It must be disconnected from the mains network after complete charging the power station.
⚠ WARNING! EXPLOSION HAZARD! Improper handling of lithium-ion batteries can result in fire, explosions, hazardous substances leaking, or other dangerous situations! Do not throw the product into the fire, as this could lead to the built-in battery exploding.
- Observe the usage restrictions and prohibitions of use for battery operated products in situations which may be hazardous such as at petrol stations, airports, hospitals, etc.
⚠ WARNING! During charging process, please be noticed that the product must not be covered. Otherwise the product can be heated. The product should never be charged at a PC or notebook, because due to the high power consumption, the PC or notebook could be damaged.
⚠ WARNING! Please do not place the product upside down or on its side when using and storing it, otherwise it may cause leakage, heat, fire and other hazards.
This product is not for powering medical emergency equipment related to personal safety, including but not limited to medical grade ventilators (hospital version CPAP: Continuous Positive Airway Pressure), artificial lungs (ECMO: Extracorporeal Membrane Oxygenation). It can normally work with a home ventilator (home version CPAP), and does not have to be continuously monitored by professionals.
Please follow your doctor's instructions and consult with the manufacturer for restrictions on the use of the equipment. If it is used for general medical equipment, please be sure to monitor the power status to ensure that the power does not run out.
⚠ WARNING! RADIO INTERFERENCE!
- Switch the product off on airplanes, in hospitals, service rooms (e.g. boiler room, electric supply room), or near medical electronic systems.
The wireless signals transmitted could impact the functionality of sensitive electronics. - Keep the product at least 20 cm from pacemakers or implantable cardioverter defibrillators, as the electromagnetic radiation may impair the functionality of pacemakers.
The radio waves transmitted could cause interference in hearing aids.
Do not place the product near flammable gases or potentially explosives areas (e.g. paint shops) with the wireless components on, as the radio waves emitted can cause explosions and fire.
The range of the radio waves varies by environmental conditions.
In the event of wireless data transmission, unauthorised third parties receiving the data cannot be excluded.
The OWIM GmbH & Co. KG is not responsible for interference with radios or televisions due to unauthorised modification of the product.
The OWIM GmbH & Co. KG further assumes no liability for using or replacing cables and products not distributed by OWIM.
The user of the product is fully responsible for correcting interference caused by unauthorised modification of the product (refer to above 2 points).
● Operation and use
Press the LCD ON/OFF button 2 to activate this product and the main power indicator show the approx. battery capacity status. Press this button again to turn OFF the LCD display panel 3.
Remarks: the product will automatically turn into standby mode under different situation refer to below table.
This device will automatically turn into standby mode under following different conditions.
| Scenario | LCD display status | Output status | Time to enter into standby mode |
| 1 LCD display OFF AC output OFF Enter into standby mode in 10 seconds. | |||
| 2 LCD display OFF AC output ON without load | After 2 hours AC will be auto switch OFF, and then enter into standby mode in 10 seconds. | ||
| 3 LCD display ON AC output OFF | After 12 hours LCD display will auto switch OFF, and then enter into standby mode in 10 seconds. | ||
| 4 LCD display ON AC output ON without load | After 2 hours AC will be auto switch OFF, and then after 12 hours LCD display will auto switch OFF, enter into standby mode in 10 seconds. | ||
| 5 NA | with AC or DC output | Discharge until battery capacity to 0% then enter into standby mode. | |
i NOTE:
When this power station is under charging, it can't be turned off unless the charging cable is unplugged first.
● Charging the power station
The built-in rechargeable battery must be fully charged before using the product.
☐ To charge the power station only use power supplies with an output voltage and current matching the rated input voltage and current as stated in "Technical specifications" of this user manual.
⚠️ ATTENTION! The power station should not be charged from a PC or notebook.
☐ In order to get the fastest charging speed, charge the power station via the AC input port using AC cable included. Connect the AC cable plug to the nearby AC socket.
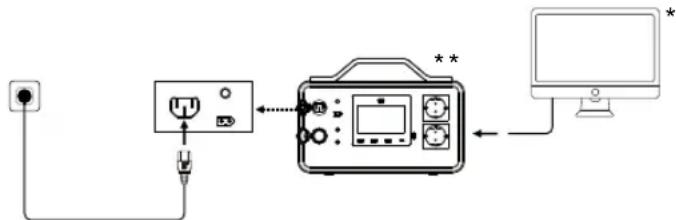
● AC charging (Grid Charging)
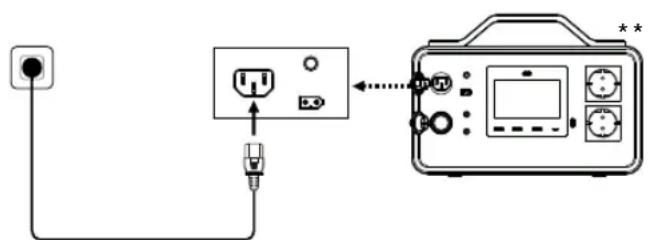
AC charging cable 13
* Using AC charging (Grid Charging) approx. 1 hour can charge above 80% battery capacity.
** AC socket type may vary in different EU countries.
△For AC charging, we recommend that you use a power socket with a capacity of more than 10A and ensure that the working current of the socket is constantly greater than 10A. Please use the AC charging cable 13 included in the package and plug the cable directly into a wall outlet instead of an extension socket.
☐ Ensure that the AC cable is properly inserted, otherwise the AC contact terminals could melt or catch fire at high temperatures.
Alternatively, you could charge the power station via other ports like XT60 input port for Solar/Car charging, or USB-C input port (XT60 cable and USB-C cable not included).
As soon as the power station is fully charged, disconnect connection cable from the power station.
● Solar Panel Charging the power station
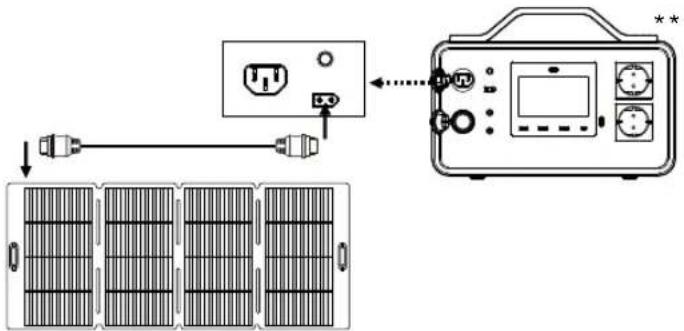
* Using Solar charging cable (not included), 100W max fully charged in approximate 7 hours.
** AC socket type may vary in different EU countries.
i IMPORTANT NOTE:
-
Solar charging cable and solar panel are not included.
-
Before connecting solar panel to this power station, please make sure you have read user manual of solar panel and follow its instruction for installation.
-
Ensure that the output voltage of solar panel is within this power station solar input parameters (11-30V, 8A, 200W max via XT60) to avoid product damage.
Car charging
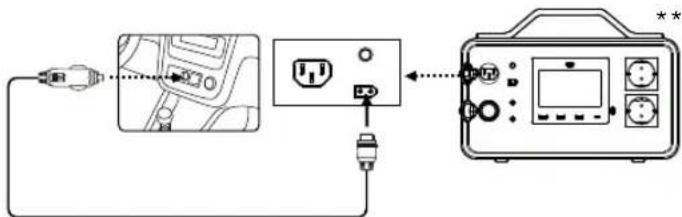
* Using car charging cable 14, 120W max fully charged in approximate 6 hours.
☐ You can recharge this power station through the car power outlet. The product supports 12V/24V car chargers and a maximum charging current of 8A.
Please charge using the car charger after the car is started to avoid failure to start due to insufficient car battery. In addition, please make sure that the car power outlet is securely connected to the cigarette lighter of the car charging cable 14.
i IMPORTANT NOTE:
We take no responsibilities for any loss or damage caused by failure to follow instructions.
** AC socket type may vary in different EU countries.
USB-C charging
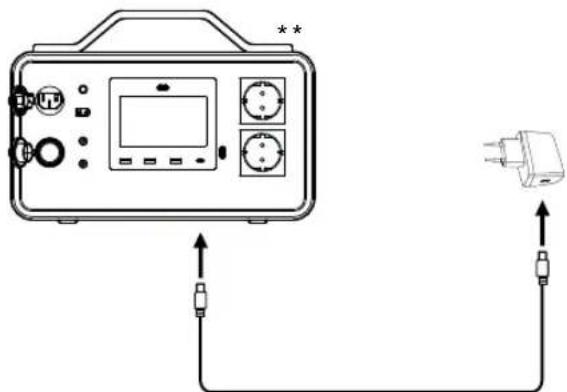
NOTE: Please use USB-C charging cable (Type C plug) and AC_DC adapter for charging this power station (both not included).
The LCD display panel 3 will show the dynamic charging status of battery and its capacity in percentage*.
* This is approx. percentage of power station capacity but not actual measurement.
⚠️ ATTENTION! Do not connect any device to be charged to power station as long as the power station is charging. Remove the charging cable from the power station when it is fully charged.
** AC socket type may vary in different EU countries.
● Charging mobile devices with the power station
☐ You can charge devices at the same time using the power station. If all outputs (AC+DC) are used at the same time, the sum of the output power may not exceed 650W. (We recommend that you confirm the power of your devices before use, and ensure that the sum power of all loaded devices is less than the rated power.)
Please read through mobile device's user manual electrical parameters before charging your device to avoid damage. Please also charge your mobile devices with an input voltage and current matching the power station rated output voltage and current as stated in "Technical specifications" of this user manual.
☐ The USB-A and USB-C output ports are automatically turned ON once the product is turned ON. Short press AC power ON/OFF button 5 once to turn on their corresponding AC output sockets; Short press again to turn them off.
When using the AC output socket, make sure that the sum power of all loaded devices is less than the rated power.
- Checking the battery status (see fig. B)
☐ You can check the battery status via the LCD display panel
☐ 3 of the power station at anytime.
Briefly press the LCD ON/OFF button 2. The LCD display panel 3 will show the approximate status of the internal battery capacity 16 level for approx. 30 seconds.
● Input and Output status (see fig. B)
☐ You can also check with the PowerStation input and output usage status via LCD display panel 3 by pressing LCD ON/OFF button 2 to activate the screen anytime to light it up.
- AC output power status30
- Total AC output power usage 29
-
DC output power status 23
-
Total DC output power usage 24
- AC input power status 28
- Total input power usage 27
- PV/ Car charge input power 25
- Total PV/ Car charge input power 26
EPS
The product supports emergency power supply (EPS). When you connect the grid power to the AC input port of the product through an AC charging cable 13, you can power electrical devices through the AC output port (AC power will come from the grid instead of the power station in this situation). In case of a sudden blackout, the product can automatically switch to the battery-powered supply mode within 20ms.
flowchart
graph LR
    A["Power Source"] --> B["Switch"]
    B --> C["Device 1"]
    C --> D["Computer Interface"]
    D --> E["Output Signal"]
    style A fill:#f9f,stroke:#333
    style E fill:#ccf,stroke:#333
This item provides only basic UPS feature, this EPS function does not support professional Oms switching time. Please do not connect product to any device that requires Oms UPS (such as data servers and workstations...etc.). Please test and confirm the compatibility before using this product.
⚠️We recommend that you charge only one device with max. AC power < 500W at a time and do not use multiple ones at the same time to avoid overload protection and triggering. We take no responsibilities for any device failure or data loss caused by this failure to follow instructions.
* Monitor is not included
** AC socket type may vary in different EU countries.
● Troubleshooting
● = Problem
● = Cause
= Solution
● The power station is not being charged.
It may be that the power station is not connected properly.
○ Check that it is connected.
In order to charge the power station, use a power supply with an output voltage and current matching the rated input voltage and current as stated in "Technical specifications" of this user manual.
● A connected device is not being charged.
The battery is drained.
○ Charge the battery.
The device is not connected.
○ The device is not connected. Check that it is connected.
USB-C PD port reverse charging
● Some devices will reverse charging to this power station.
- USB-C PD port is a bi-direction charging port and under sometime situation reverse charging may happen.
○ User need to turn ON power station LCD display panel and then connect your device to be charged to this power station again few times to solve this.
Indicator Problem Solution
| 17 | Light up AC load short circuit. | Normal operation will resume automatically after the AC load is removed. | ||
| 18 | Light up | battery voltage is low, the battery will automatically turn off all outputs. | Normal operation will resume automatically after the battery is charged. | |
| 19 | Light up | AC output overload, the battery will automatically turn off all outputs. | Remove overpower devices and restart the product to resume normal operation. The sum power of load electrical appliances must not exceed the rated total power. | |
| 20 | Light up Charging overload. | Remove the charging cable and normal operation will resume automatically after restart. | ||
| 21 | Light up Low temp. or high temp. protection. | Normal operation will resume automatically after the battery warms up or cools down. | ||
| 22 | Light up Fan is working. | Normal phenomenon the fan will turn on automatically for cooling when internal temp. reach setting value. | ||
● Cleaning and care
This product has no internal parts requiring maintenance.
Moisture entering the product may result in damage.
☐ Ensure no moisture enters the product during cleaning to prevent damaging the product beyond repair.
☐ Do not use abrasive, solvent-based or aggressive cleaners. These can damage the surface of the product.
☐ Only clean the product with a slightly damp cloth and mild washing-up liquid.
● Storage during non-use
Store the product in a dry dust-free location, protected from direct sunlight.
☐ If the product is not used for a long time, the built-in battery should be fully charged to prolong its operating life. Regularly charge the built-in battery if you do not use the product for a long period of time. This is necessary to preserve the battery.
● Disposal
Packaging:
The packaging is made of environmentally friendly materials, which you be disposed through your local recycling facilities.

Observe the marking of the packaging materials for waste separation, which are marked with abbreviations (a) and numbers (b) with following meaning: 1–7: plastics/20–22: paper and fibreboard/80–98: composite materials.
Product:

Contact your local refuse disposal authority for more details of how to dispose of your worn-out product.

The adjacent symbol of a crossed out dustbin on wheels indicates this product is subject to directive 2012/19/EU. This directive states at the end of the life this product must not be disposed of through regular household refuse but must be returned to special collection sites, recycling depots or waste management companies.
This disposal is free of charge to you.
Protect the environment and dispose of properly.
The built-in rechargeable battery cannot be removed for disposal. Return the product completely to a collection site for used electronics.

The product incl. accessories, manual and packaging materials are recyclable and are subject to extended producer responsibility. Dispose them separately, following the illustrated Info-tri (sorting information), for better waste treatment. The Triman logo is valid in France only.
Batteries/accumulators:

Environmental damage through incorrect disposal of the batteries/accumulators!
Never dispose of batteries in your household waste. They may contain toxic heavy metals and are subject to hazardous waste regulations. The chemical symbols of the heavy metals are: Cd = cadmium, Hg = mercury, Pb = lead. Therefore dispose of used batteries through your local collection site.
● Warranty
The product has been manufactured to strict quality guidelines and meticulously examined before delivery. In the event of material or manufacturing defects you have legal rights against the retailer of this product. Your legal rights are not limited in any way by our warranty detailed below.
The warranty for this product is 3 years from the date of purchase. The warranty period begins on the date of purchase. Keep the original sales receipt in a safe location as this document is required as proof of purchase.
Any damage or defects already present at the time of purchase must be reported without delay after unpacking the product.
Should the product show any fault in materials or manufacture within 3 years from the date of purchase, we will repair or replace it - at our choice - free of charge to you. The warranty period is not extended as a result of a claim being granted. This also applies to replaced and repaired parts.
This warranty becomes void if the product has been damaged, or used or maintained improperly.
The warranty covers material or manufacturing defects. This warranty does not cover product parts subject to normal wear and tear, thus considered consumables (e.g. batteries, rechargeable batteries, tubes, cartridges), nor damage to fragile parts, e.g. switches or glass parts.
● Warranty claim procedure
To ensure quick processing of your claim, observe the following instructions:
Make sure to have the original sales receipt and the item number (IAN 462657_2307) available as proof of purchase.
You can find the item number on the rating plate, an engraving on the product, on the front page of the instruction manual (bottom left), or as a sticker on the rear or bottom of the product.
If functional or other defects occur, contact the service department listed below either by telephone or by e-mail.
Once the product has been recorded as defective you can return it free of charge to the service address that will be provided to you. Ensure to enclose the proof of purchase (sales receipt) and a short, written description outlining the details of the defect and when it occurred.
Service
GB Service Great Britain
Tel.:08000569216
E-Mail:owim@lidl.co.uk
IE Service Ireland
Tel.:1800200736
E-Mail:owim@lidl.ie
CE
(Mode bypass): 220-240 V\~50/60 Hz, 650 W Max.
Entrée USB-C (PD) : 5 V ——— 3 A; 9 V = 3 A; 12 V ——— 3 A; 15 V = 3 A; 20 V ——— 5 A 100 W Max.
Entrée de charge
solaire/allume-cigare : 11-30 V = , 8 A, 200 W Max. via XT60
Sorties :
Sortie AC
Piles/accumulateurs:

⚠ WAARSCHUWING! RADIOSTORING!
* Pomocou nabíjacieho kábla do auta 14, max. 120 W sa plne nabije za približne 6 hodín.
Túto napájaciu stanicu môžete dobíjať prostredníctvom elektrickej zásuvky v aute. Výrobok podporuje autonabíjačky 12 V/24 V a maximálny nabíjací prúd 8 A.
Po naštartovaní vozidla nabíjajte pomocou autonabíjačky, aby ste predišli neúspešnému štartu z dôvodu nedostatočnej kapacity akumulátoru auta. Okrem toho sa uistite, že je elektrická zásuvka automobilu bezpečne pripojená k cigaretovému zapal'ovaču nabíjacieho kábla ^14 .
i DÔLEŽITÁ POZNÁMKA:
Total 500 W/Pico 1000 W
(modo Bypass): 220-240 V\~50/60 Hz,
650 W Máx.
Salida Tipo C (PD): 5 V = 3 A; 9 V = 3 A;
$$ 1 2 \mathrm{V} = - 3 \mathrm{A}; 1 5 \mathrm{V} = 3 \mathrm{A}; $$
$$ 2 0 \mathrm{V} = 5 \mathrm{A} 1 0 0 \mathrm{W} \text { M a x }. $$
natural_image
Line drawing of a portable electronic device with connected cables and terminal blocks (no text or symbols)| indgang: | 5 V --- 3 A; 9 V = 3 A;12 V --- 3 A; 15 V = 3 A;20 V --- 5 A 100 W maks. |
Batterier/akkumulatorer:

20 V = 5 A 100 W max.
Napelemes/ autós
AC töltókábel 13
- STATION D'ALIMENTATION
- Warnings and symbols used.... Page 17
- Introduction Page 18
- Safety notices Page 19
- Operation and use ...... Page 21
- Troubleshooting Page 23
- Cleaning and care Page 24
- Storage during non-use.... Page 24
- Disposal Page 24
- Warranty Page 25
- POWER STATION
- ● Introduction
- Intended use
- Trademark notice
- - Scope of delivery
- Parts of description
- LCD display
- ● Technical specifications
- Battery:
- Inputs:
- Outputs:
- Safety notices
- ⚠ WARNING! RADIO INTERFERENCE!
- ● Operation and use
- i NOTE:
- ● Charging the power station
- ● Solar Panel Charging the power station
- i IMPORTANT NOTE:
- Car charging
- USB-C charging
- ● Charging mobile devices with the power station
- - Checking the battery status (see fig. B)
- ● Input and Output status (see fig. B)
- EPS
- ● Troubleshooting
- ● = Problem
- ● The power station is not being charged.
- ● A connected device is not being charged.
- USB-C PD port reverse charging
- ● Cleaning and care
- ● Storage during non-use
- ● Disposal
- Packaging:
- Product:
- This disposal is free of charge to you.
- Batteries/accumulators:
- Environmental damage through incorrect disposal of the batteries/accumulators!
- ● Warranty
- ● Warranty claim procedure
- Service
- Sorties :
- Piles/accumulateurs:
- ⚠ WAARSCHUWING! RADIOSTORING!
- i DÔLEŽITÁ POZNÁMKA:
- Batterier/akkumulatorer:
Brand : TRONIC
Model : TPS 500W A1
Category : Power bank