PALS 50 B1 - Lamp PARKSIDE - Free user manual and instructions
Find the device manual for free PALS 50 B1 PARKSIDE in PDF.

User questions about PALS 50 B1 PARKSIDE
0 question about this device. Answer the ones you know or ask your own.
Ask a new question about this device
Download the instructions for your Lamp in PDF format for free! Find your manual PALS 50 B1 - PARKSIDE and take your electronic device back in hand. On this page are published all the documents necessary for the use of your device. PALS 50 B1 by PARKSIDE.
USER MANUAL PALS 50 B1 PARKSIDE
LED PRACOVNÉ SVIETIDLO 360°
Krátky návod
ES
LÁMPARA LED 360° DE TRABAJO
Guía rápida
DK
LED ARBEJDSLAMPE 360°
Kort vejledning
IT
LAMPADA DA LAVORO LED 360°
Guida rapida
HU
LED-MUNKALÁMPA 360°
Rövid útmutató
| DE/AT/BE/CH | Kurzanleitung | Seite | 5 | |
| GB/IE | Short manual | Page 14 | ||
| FR/BE | Guide de démarrage rapide | Page 22 | ||
| NL/BE | Beknopte handleiding | Pagina 31 | ||
| PL | Krótka instrukcja | Strona 39 | ||
| CZ | Krátký návod | Strana 48 | ||
| SK | Krátky návod | Strana 56 | ||
| ES | Guía rápida | Página 64 | ||
| DK | Kort vejledning | Side 72 | ||
| IT | Guida rapida | Pagina 80 | ||
| HU | Rövid útmutató | Oldal 88 | ||
A
HG12247
HG12247-FR
B

natural_image
Technical line drawing of a tripod-mounted device with a circular cross symbol and a labeled 'E' (no text or symbols on the device itself)Intended use.... Page 16
Scope of delivery ...... Page 16
Parts list Page 16
Technical data.... Page 16
General safety instructions.... Page 17
First use.... Page 18
Unpacking the product.... Page 18
Setting up the product ...... Page 18
Use Page 18
Switching the product on/off Page 18
Connecting an external appliance to the socket-outlet . . . . . . . . . . . . . . . . . . . . . . . . . . . . . . . . . . . . . . . . . . . . . . . . . . . . . . . . . . . . . . . . . . . . 19
Cleaning Page 19
Disposal Page 19
Warranty Page 20
Warranty claim procedure.... Page 20
Service Page 21
| List of pictograms used | |||
 | DANGER! - Designating a hazard with high risk, which will result in death or severe injury if not avoided (e.g. risk of suff ocation) |  | Alternating current/voltage |
 | WARNING! - Designating a hazard with moderate risk, which can result in death or severe injury if not avoided (e.g. risk of electric shock) |  | Dust-protected + splash-proof (IP54) for LED work light (except socket-outlet) |
 | CAUTION! - Designating a hazard with low risk, which could result in minor or moderate injury if not avoided (e.g. risk of scalding) |  | Splash-proof (only socket-outlet) |
 | NOTICE! - Warns of possible damage to property/the product if not avoided (e.g. risk of short circuit) |  | CAUTION. Hot surface! |
 | INFO: This symbol with the “Info” signal word off ers additional useful information. |  | Product designed to withstand severe mechanical handling |
| 1.0 m | Minimum distance to illuminated material | [2967] | Safety information Instructions for use |
| [048E] | Not suitable for household room illumination |  | CE mark indicates conformity with relevant EU directives applicable for this product. |
LED 360° WORK LIGHT
● Short manual
This document is a shorter printed version of the complete operating instructions. Scanning the QR code takes you directly to parkside-diy.com. Choose your country and use the search screen to search for the operating instructions. Entering the item number (IAN) 500147_2504 takes you to the operating instructions for your item. The short guide is an integral part of this product. Prior to using the product, familiarize yourself with all operation and safety notes. Store the short guide in a safe place and if you hand the product on to third parties, all documentation should be passed on as well.
Intended use
This product is intended to illuminate outdoor areas.
This product is intended for use in rough conditions.
This product is only intended for private use, e.g. in work-shops or garages.
This product is not intended for commercial use or for use in other applications.
This product is not suitable for household room illumination.
- Scope of delivery
1 LED 360° Work light
1 User manual
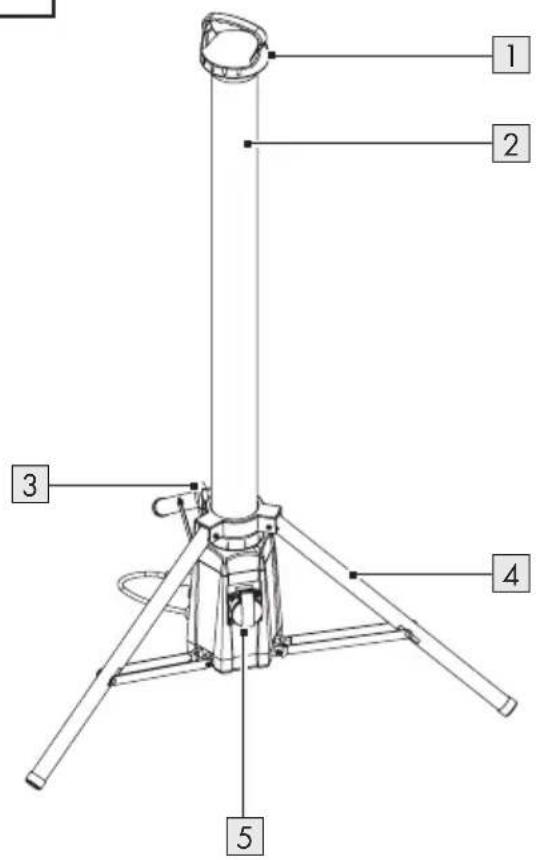
Parts list
Before reading, unfold the page containing the illustrations and familiarise yourself with all functions of the product.
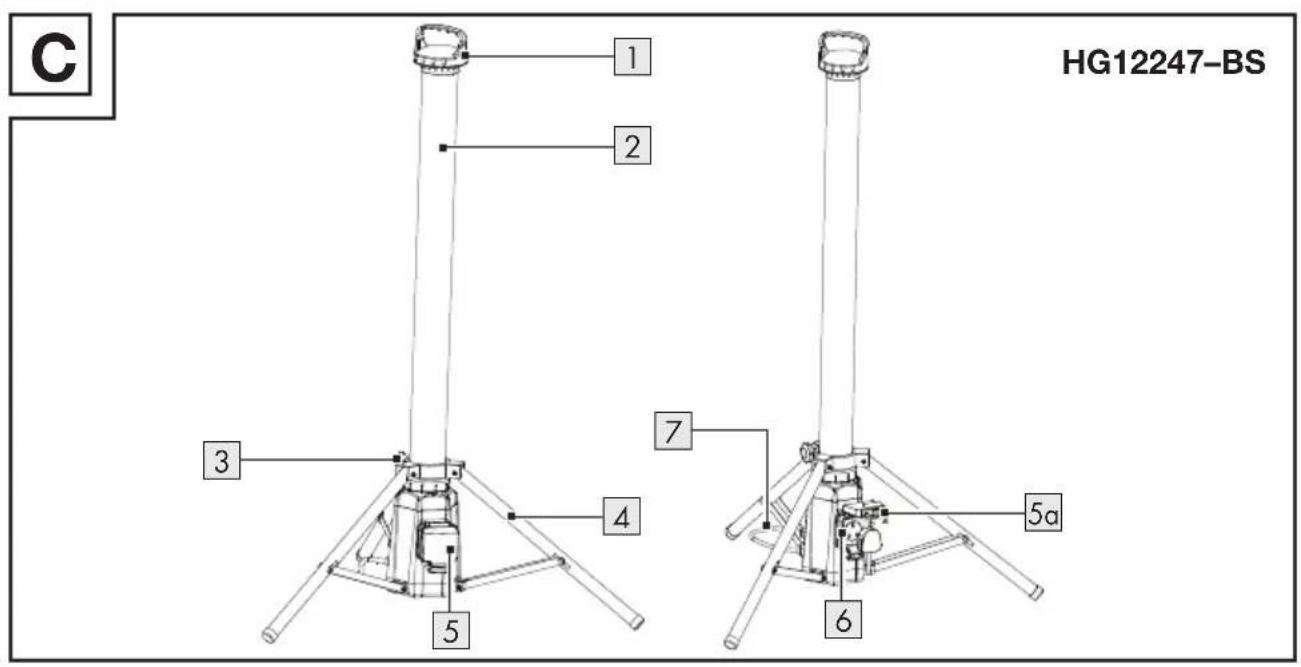
(Fig. A, B, C)
1 Handle
2 Strip light
3 Locking screw
4 Tripod
5 Socket-outlet cover
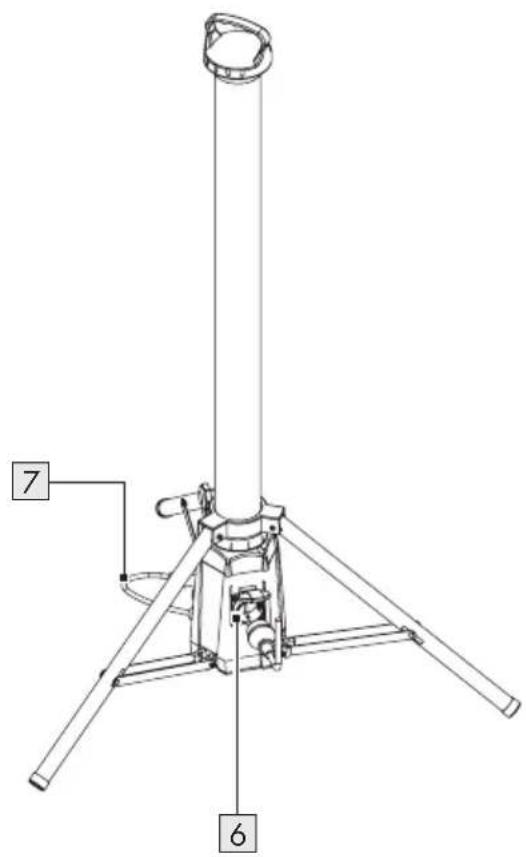
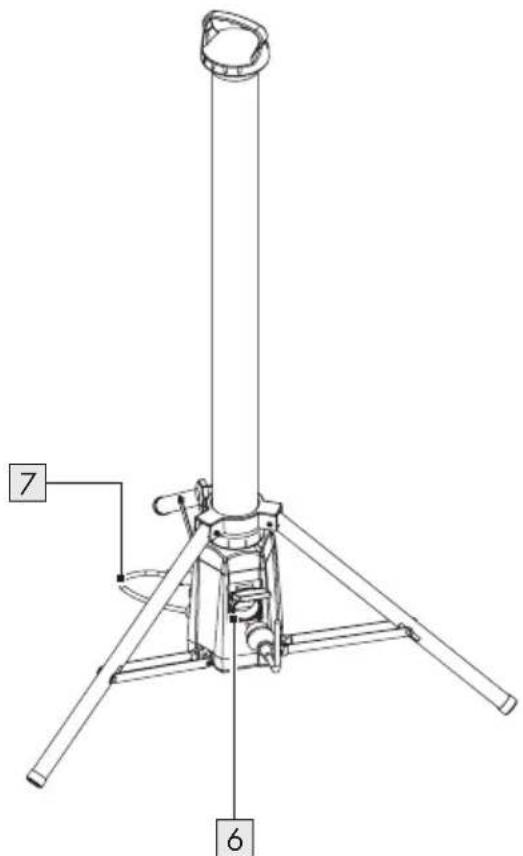
6 Socket-outlet (for connecting external appliances)
7 Mains cord with mains plug
(Fig. C)
5a Interlock
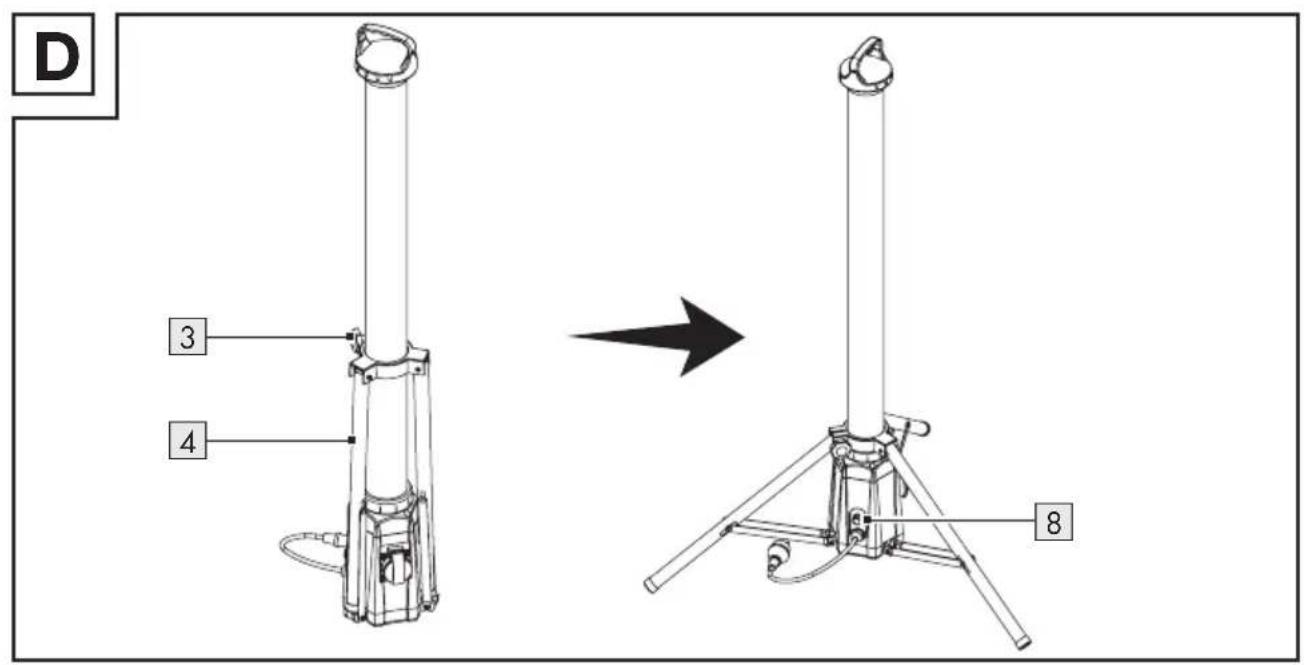
(Fig. D)
8 Rotary knob (switching on/off, brightness control)
- Technical data
| Model: HG12247 HG12247-FR HG12247-BS | ||
| Input voltage: 230 V~, 50 Hz | ||
| Total power consumption: 50 W | ||
| Protection class: I | ||
| Power output via socket: | max. 2,500 W | |
| Dimensions (∅ × H): | approx. 75 cm × 120 cm | |
| Model: HG12247 HG12247-FR HG12247-BS | ||||
| Weight: approx. 3,000 g approx. 3 | 100 g | |||
| Projected area: approx. 1,200 cm | 2 | |||
| Certification: GS - | ||||
| Degree of protection | Product (except socket-outlet): IP54 | 1 | IP541,2 | |
| Socket-outlet: IPX4 | 3 | IPX43,4 | IPX43,5 | |
| This product contains a light source of energy efficiency class “D”. | ||||

General safety instructions
BEFORE USING THE PRODUCT, FAMILIARISE YOURSELF WITH ALL OF THE SAFETY INFORMATION AND INSTRUCTIONS FOR USE! WHEN PASSING THIS PRODUCT ON TO OTHERS, ALSO INCLUDE ALL THE DOCUMENTS!

⚠ WARNING! DANGER TO LIFE AND RISK OF ACCIDENTS FOR INFANTS AND CHILDREN!
Never leave children unattended with the packaging material. The packaging material represents a danger of suffocation. Children frequently underestimate the dangers. Keep the product out of the reach of children at all times.
This product may be used by children age 8 years and up, as well as by persons with reduced physical, sensory or mental capacities, or lacking experience and/or knowledge, so long as they are supervised or instructed in the safe use of the product and understand the associated risks. Children should not be allowed to play
with the product. Cleaning and user maintenance should not be performed by children without supervision.
⚠️ DANGER! Risk of suffocation!
Children could swallow and choke on small included parts (e.g. screws). Keep children away from the work area during assembly.
- Do not carry out any modifications or repairs to the product yourself. The built-in LED module and built-in LED driver cannot be replaced.
If the LEDs fail at the end of their lives, the entire product must be replaced.
- The external flexible cable or cord of this product cannot be replaced; if the cord is damaged, the product shall be destroyed.

Danger to life by electric shock
■ Always check the product for damage before connecting it to the mains. Never use the product if it shows any signs of damage.
- Protect the mains cable against sharp edges, mechanical stresses and hot surfaces.
■ Always unplug the mains plug from the socket before installation, dismantling or cleaning.
■ Disconnect the product from the mains supply if it is not going to be used for some time (e.g. holiday).
Prior to installation, verify that the mains voltage on site corresponds with the operating voltage required for the product (230 V\~, 50 Hz). Otherwise do not install the product.
⚠️ CAUTION! Risk of burn injuries! To prevent burns, verify the product is switched off and has cooled down for at least 15 minutes before touching it. The product can become very hot.
The accessible surface, especially the heat shrink, is very hot when the lamp is operating.
FIRE HAZARD! Fit the product so that it is at least 1.0 metre away from the material to be illuminated. Excessive heat can result in a fire.
The product is only suited for use with the built-in LED control gear.
The product continues to draw a small amount of power even if the product is off as long as the product is connected to the supply mains. To switch the product off completely, disconnect the mains plug 7 from the socket-outlet.
- The mains plug 7 can only be connected with a corresponding socket-outlet with the same IP degree in order to keep the protective degree against dust/water.
■ Only for HG12247-BS: The mains plug 7 is suitable for indoor use only.
■ Luminaires shall not be connected after each other.
- First use
● Unpacking the product
- Take the product out of the packaging and remove all packaging materials and plastic wrappings.
- Check to make sure that all listed parts are included (see "Scope of delivery").
- Check whether the product and all parts are in good condition. If any damage or defect is detected, do not use the product, but follow the procedure described in chapter "Warranty".
- Setting up the product
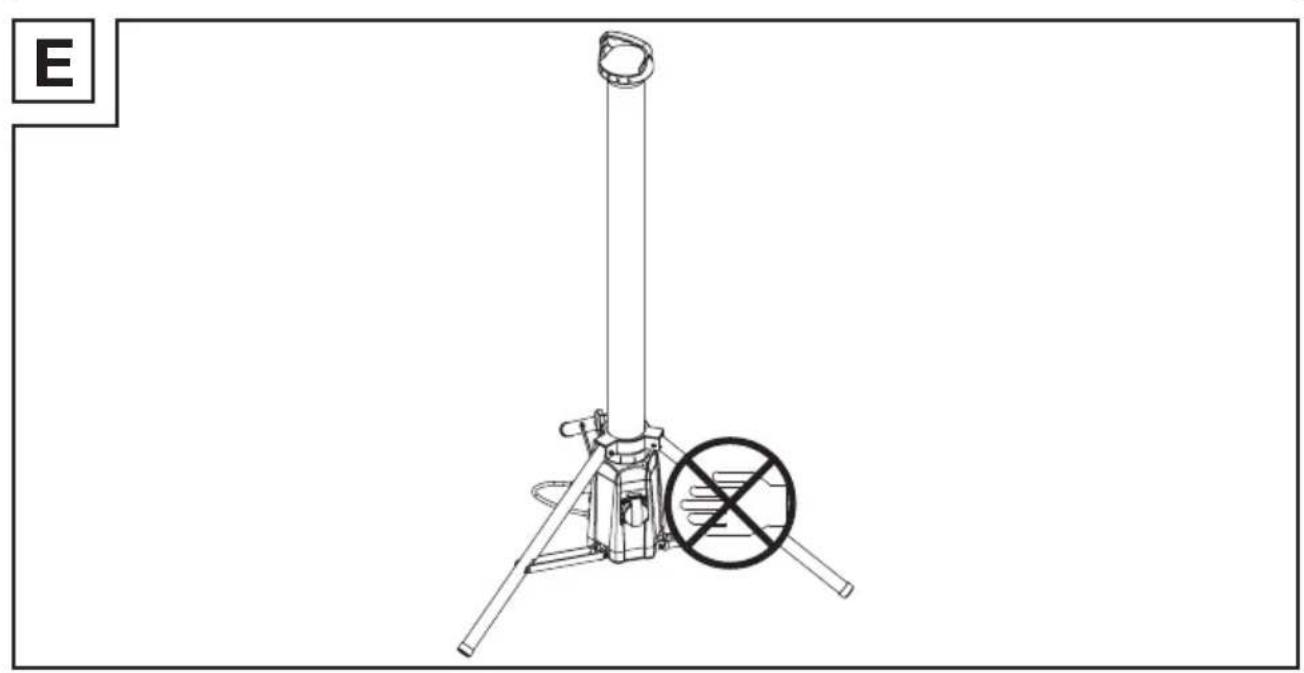
(Fig. D, E)
⚠️ CAUTION! Risk of injury! Note the position of your hands whilst opening or closing the tripod 4. There is a risk of pinching your fingers.
i INFO:
The product may be placed on the provided tripod 4 and then be positioned in the desired location.
□ Use and operate the product on a stable surface without any angle.
- Rotate the locking screw 3 anti-clockwise to loosen the tripod 4.
- Adjust the tripod 4 to the desired position. Rotate the locking screw 3 clockwise to fix the tripod in its position.
- Fully extend the tripod 4. Check the stability of the product.
Use
- Switching the product on/off
⚠ NOTICE! Risk of property damage!
Do not move the mains cord 7 after connecting the mains plug to a socket-outlet. There is a risk that the product will slip or tip over.
i INFO:
☐ Using the product outdoors: Connect the mains plug 7 with an IPX4 socket-outlet only.
If an IPX4 socket-outlet should not be available, the mains plug 7 must be connected indoors only.
- Connect the mains plug 7 to a suitable socket-outlet.
- Switching on: Rotate the rotary knob 8 in clockwise direction. When the strip light 2 is switched on, you will hear a click sound.
- Brightness control: Once the strip light 2 is switched on, rotate the rotary knob 8 to control the brightness.
| Direction Function | |
| Clockwise Increase brightness | |
| Counter-clockwise Reduce brightness | |
- Switching off: Rotate the rotary knob 8 in counter-clockwise direction. When the strip light 2 is switched off, you will hear a click sound.
- Connecting an external appliance to the socket-outlet
⚠ WARNING! Risk of fire! Do not connect any appliance with a total power consumption of more than 2,500 W.
⚠ WARNING! Risk of electric shock!
Water may enter the product if you connect an appliance featuring a non-waterproof mains plug. When using the product outdoors, make sure that the appliance to be connected to the socket-outlet 6 features a waterproof mains plug.
■ The socket-outlet 6 is only IPX4 protected.
■ Only insert a corresponding IPX4 mains plug for outdoor use.
HG12247 and HG12247-FR
- Open the socket-outlet cover 5.
- Connect the mains plug of your appliance to the socket-outlet 6.
- After use, disconnect the mains plug of your appliance from the socket-outlet 6. Close the socket-outlet cover 5.
HG12247-BS
- Open the socket-outlet cover 5.
- Connect the mains plug of your appliance to the socket-outlet 6.
- Close the socket-outlet cover 5.
- Lock the socket-outlet cover 5 with the interlock 5a.
- Cleaning
■ Never immerse the product in water or other liquids. Otherwise the product can be damaged.
□ Before cleaning:
- Remove the mains plug 7 from the socket-outlet.
-Allow the product to cool down.
- Close the socket-outlet cover 5.
□ Clean the product with a lint-free, slightly moist cloth and mild cleaning agent.
- Disposal
The packaging is made entirely of recyclable materials, which you may dispose of at local recycling facilities.
Observe the marking of the

packaging materials for waste separation, which are marked with abbreviations (a) and numbers (b) with following meaning: 1–7: plastics/20–22: paper and fibreboard/80–98: composite materials.
Product:
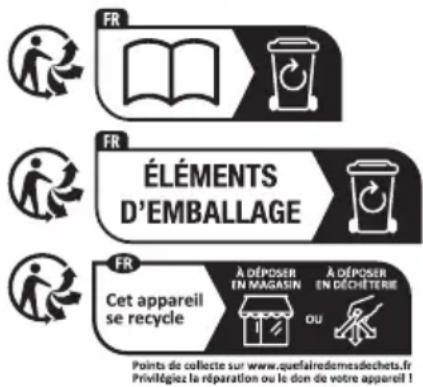
The product incl. accessories and packaging materials are recyclable and are subject to extended producer responsibility. Dispose them separately, following the illustrated Info-tri (sorting information), for better waste treatment.
The Triman logo is valid in France only.
Contact your local refuse disposal authority for more details of how to dispose of your worn-out product.
To help protect the environment, please dispose of the product properly when it has reached the end of its useful life and not in the household waste. Information on collection points and their opening hours can be obtained from your local authority.
Warranty
The product has been manufactured to strict quality guidelines and meticulously examined before delivery. In the event of material or manufacturing defects you have legal rights against the retailer of this product. Your legal rights are not limited in any way by our warranty detailed below.
The warranty for this product is 3 years from the date of purchase. The warranty period begins on the date of purchase. Keep the original sales receipt in a safe location as this document is required as proof of purchase.
Any damage or defects already present at the time of purchase must be reported without delay after unpacking the product.
Should the product show any fault in materials or manufacture within 3 years from the date of purchase, we will repair or replace it – at our choice – free of charge to you. The warranty period is not extended as a result of a claim being granted. This also applies to replaced and repaired parts.
This warranty becomes void if the product has been damaged, or used or maintained improperly.
The warranty covers material or manufacturing defects. This warranty does not cover product parts subject to normal wear and tear, thus considered consumables (e.g. batteries, rechargeable batteries, tubes, cartridges), nor damage to fragile parts, e.g. switches or glass parts.
● Warranty claim procedure
So that your request can be processed quickly, please observe the following instructions:
For all inquiries, please have the receipt and item number (IAN 500147_2504) ready as proof of purchase.
The article number can be taken from the identification label on the product, engraving on the product, the front cover of your manual (at the bottom left), or the sticker on the back or bottom of the product.
If malfunctions or other defects arise, first contact the service department indicated below by phone or email.
You can then send a product recorded as defective to the communicated service address postage-free, making sure to enclose proof of purchase (receipt) and information on the details of the defect and when it occurred.

You can download and view this and numerous other manuals at parkside-diy.com. This QR code takes you directly to parkside-diy.com. Choose your country and use the search screen to search for the operating instructions. Entering the item number (IAN) 500147_2504 takes you to the operating instructions for your item.
Service
GB Service Great Britain
Tel.:08000518970
Contact form on parkside-diy.com
IAN 500147_2504
IE Service Ireland
Tel.:1800851251
Contact form on parkside-diy.com
IAN 500147_2504

PDF ONLINE
parkside-diy.com