USER MANUAL PAS 4000 A1 PARKSIDE
natural_image
Black cylindrical device with a white top and mounting base (no visible text or symbols)
CORDLESS WORK LIGHT PAS 4000 A1/AKKU-ARBEITSLEUCHTE PAS 4000 A1/BALADEUSE RECHARGEABLE PAS 4000 A1
CZ
AKU PRACOVNÍ LED SVÍTILNA
Operating and safety information
IT MT CH
LAMPADA DA LAVORO RICARICABILE
GB IE NI CY MT Before you start reading, please fold out the illustrations page and familiarise yourself with all of the item's functions.
natural_image
Technical line drawing of a vertical mechanical device with mounting flanges and a cylindrical component (no text or symbols)
natural_image
Three technical line drawings of a device with no visible text, numbers, or symbols.
CZ
Úvod 8
Explanation of symbols....41
Intended use....42
Included in package 42
Description of parts 42
Technical data 42
Safety instructions 42
Risk of leakage from batteries.....43
Assembly and installation....43
Switching the cordless work lamp on/off....44
Charging the battery 44
Cleaning and storage.... 45
Troubleshooting 45
Disposal......45
Warranty 46
Service 47
IT MT CH
Introduzione 54
Žárovka LED (nelze 2 x 5 W COB LED
EXPLOSIONSGEFAHR! Laden
● = Fehler
● = Ursache
○ = Lösung
Cd = Kadmium, Hg = Quecksilber, Pb = Blei
Bombilla LED (no 2 x 5 W COB LED
sustituible): Flujo luminoso: 2 x 600 lm
$$
2 \times 3, 7 \vee = - - -,
$$
RISQUE D'ECRASEMENT ET DE COINCEMENT !
● = Erreur
● = Cause
○ = Solution
Hg = mercure, Pb = plomb.
Garantie
Chère cliente,
Congratulations on the purchase of your new product. You have chosen a high-quality product. Please read these operating instructions thoroughly and carefully. These instructions are an essential part of the product and contain important information on first-time use and handling. Always observe all safety instructions. If you have any questions or are unsure how to operate the product, please contact your retailer or service centre. Please keep this manual in a safe place and pass it on to third parties where necessary.
- Explanation of symbols


Read the operating instructions!
Issue date of instruction manual (month/year)
Date of manufacture (month/year)
Direct current
Risk of fatal injury and accidents for infants and children!
Observe warning notices and safety instructions!
Explosion hazard!
Wear protective gloves!
This symbol indicates that the product operates with safety extra-low voltage (SELV/PELV, protection class III).
Not suitable for indoor lighting
Light duration and charging time
Luminous flux


Batteries: Lithium-ion
Dispose of packaging and product in an environmentally friendly manner!
Risk of environmental damage from incorrect disposal of batteries/rechargeable batteries!

Packaging made of FSC certified wood mix

With the CE label, the manufacturer confirms that this product complies with the applicable European directives.
- Intended use
This product is intended exclusively for indoor use in dry and enclosed spaces. This product is intended for use in private households only. Any type of use other than that described above or any modification of the product is prohibited and likely to cause damage or even personal injury. The manufacturer or retailer accepts no liability for loss or damage that occurs as a result of use other than intended or incorrect use. The lamp is suitable for normal use.
- Included in package
1 cordless work lamp
1x USB-C charging cable
1x instruction manual
• Description of parts
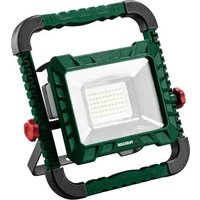
1 Battery-powered work light
2 Unlock button
3 LED light strip
4 Charge indicator
5 ON/OFF button
6 Magnetic mount
7 USB-C charging cable
8 Handle
9 Charging socket
10 Control knob
- Technical data
Model number: 1266-B
LED illuminant (non-replaceable): 2 x 5 W COB LED Luminous power: 2 x 600 lm
$$
2 \times 3. 7 \vee = - - - ,
$$
Li-ion battery: 2000 mAh (only to be replaced by professionals)
Power supply voltage: 5V = max. 2.5A
Dimensions: approx. 47.8 x 6.3 x 5.6 cm
Colour temperature: 6500 K (cold white)
Protection class: III
- Safety instructions

Safety instructions

WARNING! RISK OF FATAL INJURY AND ACCIDENTS TO INFANTS AND
CHILDREN! Never leave children unsupervised with the packaging material. The packaging material may pose a risk of suffocation. Children often underestimate the dangers. Always keep children away from the product.
This product can be used by children aged 8 years and over, as well as by persons with limited physical, sensory or mental
abilities or lacking in experience and knowledge if they have been supervised and instructed as to the safe use of the product and understand the resulting hazards. Do not let children play with the product. Cleaning and maintenance may not be carried out by children without proper supervision.
- Keep the product out of the reach of children.
- Do not use the product if you notice any damage.
■ The LEDs are not replaceable. Once the light source reaches the end of its service life, the product must be replaced.

RISK OF ELECTRIC SHOCK!
Always unplug the mains plug from the socket before cleaning the
product

AVOID THE RISK OF FIRE AND INJURY!

TRIPPING HAZARD! Ensure that the mains power cable is positioned in such a way that nobody can
tread on or trip over it.

Safety instructions for batteries
RISK OF DEATH! Keep batteries out of the reach of children. If swallowed, seek medical advice immediately!

EXPLOSION HAZARD! Never recharge non-rechargeable batteries. Do not short-circuit and/ or open up batteries. They could overheat, cause a fire or explode.
- Never throw batteries into fire or water.
- Do not expose the batteries to mechanical stress.
■ Never combine different types of battery with different charge levels.
- Charge the battery at normal room
temperature (approx. 20 °C).
■ The battery must only be replaced by professionals.
● Risk of leakage from batteries
- Avoid exposing batteries to extreme conditions and temperatures, e.g. radiators or direct sunlight.
- Avoid contact with skin, eyes and mucous membrane! In the event of skin contact with battery acid, immediately rinse the affected area with plenty of clean water and seek urgent medical advice!

WEAR PROTECTIVE GLOVES!
Leaking or damaged batteries can cause chemical burns if they come
into contact with skin. Make sure to wear suitable protective gloves in such cases.
In the event of battery leaks, have the batteries removed from the product immediately to avoid damage.
- Assembly and installation
Instructions: Remove the product from its packaging and remove all packaging material.
- Check that all package contents are present.
- Check if the product or individual parts are damaged. If that is the case, do not use the product. Please contact the retailer via the service address indicated.
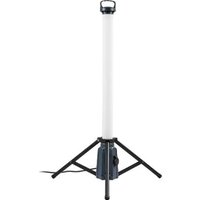
You can operate the work lamp as described below:
Separating the lamp into two parts
Pick up the work lamp 1.
Press the unlock button 2 and pull half of the lamp downwards (see fig. D).

DANGER OF CRUSHING AND ENTRAPMENT!
The product has two retractable handles. If
you do not exercise proper caution, your fingers may get crushed or injured in the opening of the handle.
Be careful with your fingers when using the handles.
Using the product in two halves
You have the option of using both halves of the lamp separately.
The part of the lamp with the two magnets [11] can be mounted on magnetic surfaces.
Instructions! The magnets are only on one half of the lamp (see fig. B).
Ensure that both magnets are in contact with the magnetic surface. Otherwise, a secure hold is not guaranteed.
Set up your product
Connect both halves of the work lamp 1 together.
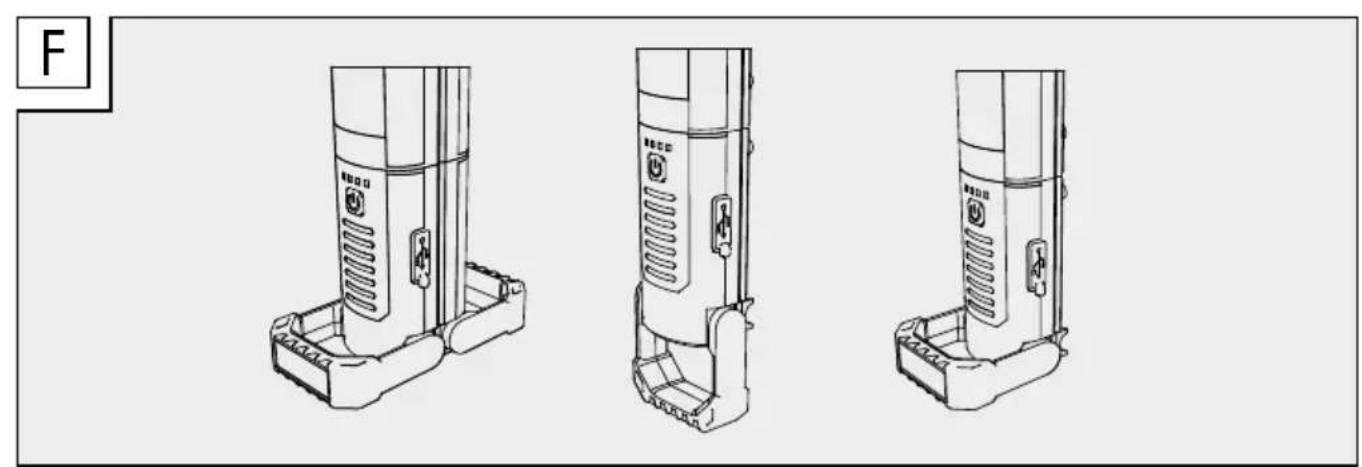
Retract the handles 8 at a 90° or 180° angle from the base (see fig. F).
This ensures it will stand securely.
Mounting the product magnetically
There are magnets 6 at the end of the handle 8.
You can mount the product 1 to magnetic surfaces with the magnetic mount 6 on this side.
Ensure the product is held securely in place before letting go of it. Depending on the surface, the mounting angle and the configuration of the lamp, there may be a risk that the product cannot be held securely and falls.
Make sure you protect the surface if it is of a type that marks easily. Make sure that the surface is flat and level to ensure the lamp is firmly attached.
Illumination area
You can choose between the following options for optimal illumination of your work area.
- Check if the control knob is tightened. If it is, loosen it so that you can take the two halves of the work lamp apart.
Turn the control knob 10 to loosen the locking mechanism. You should now be
able to move both halves of the lamp so that the illumination area can be adjusted in any direction (see fig. B).
Please note!
The two halves of the lamp are connected by magnets, so separating them requires extra force.
Once you have set your desired illumination area, retighten the knob (see fig. B)
Loosen the knob and pull the two halves apart until the lamp reaches its full length (see fig. E).
The illumination angle can also be adjusted by turning the LED light strips 3.
- Switching the cordless work lamp on/off
The ON/OFF button 5 switches the cordless work lamp on/off and also controls its brightness. The battery charge level is indicated by the charge indicator 4 (see Fig. B).
Press the ON/OFF button 5 once (see fig. A) to set the product 1 to maximum brightness (100%).
Press it a second time to set the product to reduced brightness (50%).
Press it a third time to set the product to minimum brightness (25%).
Press the ON/OFF button 5 again to switch the product off. The product's illumination time is 2–6 hours with a fully charged battery.
If you set the two halves of the lamp at two different brightness levels, they will remain lit at different brightness levels – even if the two halves are connected.
If you wish to set the two halves at the same brightness level, press the ON/OFF button 5 on one half until both of them have the same brightness.
- Charging the battery
If the lamp is on, switch it off by pressing
the ON/OFF button 5 (see Fig. A).
Connect the USB charging cable 7 to the USB-C port 9 (see Fig. B) and a standard SELV USB interface.
Instructions: The product cannot be switched on during the charging process, so it is not suitable for continuous operation. When the product is charging, the charge indicator 4 flashes red. The charge status is displayed in 4 levels:
Level one 25%
Level two 50%
Level three 75%
Level four 100%
If all 4 LEDs of the charge indicator 4 are lit up, the work lamp is fully charged.
- Cleaning and storage
If you wish to stop using the product and store it away, turn it off by pushing the ON/OFF/button 5.
Regularly inspect the product for soiling. Remove any dirt to ensure proper function of the product.
Use only a dry, lint-free cloth for cleaning. If the product is very dirty, dampen the cloth slightly.
When the product is not in use, store it inside the packaging in a dry place.
- Troubleshooting
● = Fault
● = Cause
○ = Solution
● = The product is not switching on.
● = The product is switched off.
○ = Press the ON/OFF button 5 to switch the product on.
● = The light is flickering.
● = The battery is almost fully discharged.
○ = Charge the battery (see section "Charging the battery").
- Disposal

Note the labels on the packaging materials when sorting the waste; they are marked with abbreviations (a) and numbers (b) with the following meanings:
1-7: Plastics
20-22: Paper and cardboard
80-98: Composite materials

You can find out how to dispose of the used product by contacting your local district or city council.

The product and packaging materials are recyclable. Please dispose of them separately for better treatment of waste. The Triman logo is only applicable to France.

In the interest of environmental protection, when the product has reached the end of its useful life, do not dispose of it as general household waste but have it properly recycled. For information on recycling centres and their opening times, please contact your local council.
Faulty or used batteries must be recycled in accordance with Regulation EU 2023/1542 and its amendments. Return batteries and/or the product to the local recycling facilities provided.

Risk of environmental damage from incorrect disposal of rechargeable batteries!
Batteries must not be disposed of as general household waste. They may contain toxic heavy metals* and are subject to special waste treatment. Batteries and rechargeable batteries that are not permanently fixed inside the product must be removed before disposal of the product and disposed of separately. Please ensure batteries/rechargeable batteries are fully discharged when disposed of! Wherever possible, use
rechargeable batteries rather than single-use batteries.
*) Marked as followed: Cd = cadmium, Hg = mercury, Pb = lead
- Warranty
Dear customer, This product comes with a 3-year warranty from the date of purchase. In the event that this product is faulty, you have legal rights against the seller of the product. These statutory rights are not restricted by our warranty as set out below.
Warranty terms
The warranty period begins with the date of purchase. Please keep the original receipt in a safe place. It is required as proof of purchase. If a material or manufacturing defect occurs within three years of the date of purchase, we will repair or replace the product for you free of charge, or refund the purchase price, at our discretion. This warranty service is granted provided that the faulty device and the proof of purchase (receipt) are presented within three years, along with a brief written description of the fault and of when it occurred. If the fault is covered by our warranty, we will return the fixed product or send you a new one. No new warranty period shall begin upon repair or replacement of the product.
Warranty period and statutory warranty claims
The warranty period is not renewed after a warranty service has been granted. This rule shall also apply for any replaced or repaired parts. Any damage or faults that already existed when buying the product must be reported immediately upon unpacking the product. A fee is charged for any repairs that are carried out after the end of the warranty period.
Warranty scope
The device was carefully manufactured according to the strictest quality guidelines and thoroughly tested before delivery. The warranty covers material and manufacturing defects as well as the battery. This warranty does not apply to product parts that are subject to normal wear and tear and can thus be regarded as wearing parts; nor does it cover damage to fragile parts, such as switches or parts made of glass.
This warranty is void if the product has been damaged, improperly used or serviced. To ensure proper use, all instructions included in the manual must be followed carefully. All uses and actions that users are discouraged from or warned of in the manual must be avoided under all circumstances. The product is intended for private household use only, and not for commercial activities. The warranty is void, if the product is treated inappropriately, if force is applied, and in the case of any manipulation that is not carried out by our authorised service branch.
Warranty processing
To ensure your request is handled swiftly, please observe the following Notes:
Please have the receipt and the article number (e.g. IAN 123456) ready as proof of purchase for all enquiries.
Please refer to the type plate on the product, an engraving on the product, the cover of the manual (bottom left) or the sticker on the back or base of the product to find out the product number.
In the case of any malfunctions or other defects, please call or email the service department indicated below as a first step.
After your product has been registered as faulty, you can send it to the specified service address, free of charge. Please include the proof of purchase (receipt) and information about the defect and about when it occurred.
- Service
GB
Service Great Britain
Tel.: 00800 80040044
E-Mail: administration@mynetsend.de
IE NI
Service Ireland
Tel.: 00800 80040044
E-Mail: administration@mynetsend.de
CY
Σέρβις Κύπρος
Tel.: 00800 80040044
E-Mail: administration@mynetsend.de
MT
Service Malta
Tel.: 00800 80040044
E-Mail: administration@mynetsend.de
IAN 459050\_2401
Please have the receipt and the article number (e.g. IAN 123456) ready as proof of purchase for all enquiries.
You can find an up-to-date version of the operating instructions at: www.citygate24.de
You can download this and many other manuals, product videos and installation software at www.lidl-service.com.
Scanning the QR code on the front page will take you directly to the Lidl Service web page (www.lidl-service.com) where you can access the user instructions by entering the item number (IAN) 123456_7890.