IC 3.5 - Indoor bike trainer Schwinn - Free user manual and instructions
Find the device manual for free IC 3.5 Schwinn in PDF.

User questions about IC 3.5 Schwinn
0 question about this device. Answer the ones you know or ask your own.
Ask a new question about this device
Download the instructions for your Indoor bike trainer in PDF format for free! Find your manual IC 3.5 - Schwinn and take your electronic device back in hand. On this page are published all the documents necessary for the use of your device. IC 3.5 by Schwinn.
USER MANUAL IC 3.5 Schwinn
Important Safety Instructions
Thanks for choosing SCHWINN IC3.5 as your fitness equipment. We are sincerely encourage you to read through this Owner's manual carefully before the assembling of your equipment started, especially of below WARNINGS! WARNINGS WILL REDUCE THE RISK OF BURNS, FIRE, ELECTRICAL SHOCK OR INJURY TO PERSONS.
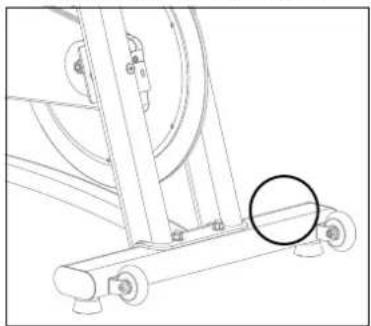
Before proceeding, find your equipment's serial number located on a white barcode sticker on stabilizer tube and enter it in the space provided below.
ENTER YOUR SERIAL NUMBER AND MODEL NAME IN THE BOXES BELOW:
SERIAL NUMBER:
MODEL NAME: SCHWINN IC3.5
» Refer to the SERIAL NUMBER and MODEL NAME when calling for service.
SERIAL NUMBER LOCATION
natural_image
Technical line drawing of a mechanical exercise machine with wheels and a highlighted circular component (no text or symbols)
WARNING
- FAILURE TO FOLLOW THESE INSTRUCTIONS COULD RESULT IN INJURY!
- Use this equipment only for its intended use as described in this equipment's Owner's Manual.
- Heart rate monitoring systems may be inaccurate. Over exercising may result in serious injury or death. If you feel paint stop exercising immediately.
- If you experience any kind of pain, including but not limited to chest pains, nausea, dizziness, or shortness of breath, stop exercising immediately and consult your physician before continuing. Incorrect or excessive exercise may damage your health.
- Do not wear any clothing or jewelry that might catch on any moving parts of this equipment.
- Always wear rubber soled athletic shoes or cycling shoes with cleats when you use this machine. Do not use the machine with bare feet or only wearing socks.
- Prior to use, make sure you understand the operation of the engagement / release mechanism for the pedals and cleats (shoes).
- Do not jump on the equipment.
- Never rotate the foot pedals by hand. Spinning pedals can cause injury.
- Do not put fingers or other objects into moving parts of the exercise equipment.
- Ensure that adjustment levers (seat and handlebar fore-and-aft) are properly secured and do not interfere with range of motion during exercise.
- To avoid injury, do not expose any body parts (for example, fingers, hands, arms or feet) to the drive mechanism or other potentially moving parts of the equipment.
- Do not attempt to ride the exercise bike in a standing position at high RPMs until you have practiced at slower speeds.
- Do not adjust the levelers to such a height that they detach or unscrew from the machine. Injury to you or damage to the machine can occur.
- Do not lift the Seat post above the "STOP" mark on the Seat Post.
- Make the Pedals stable before you step on them. Use caution when you step on and off the machine.
- Make sure handlebars are secure before each use.
- Make sure your shoes are fixed into the toe cage (if available).
- Step off the machine before you adjust the seat.
- At no time should more than one person be on the equipment.
- This equipment should not be used by persons weighing more than the weight showing in TECH SPEC section. Failure to comply will void the warranty.
- At NO time should pets or children under the age of 13 be closer to the equipment than 3 meter.
- At NO time should children under the age of 13 use the equipment.
- Children over the age of 13 or the persons with reduced physical, sensory or mental capabilities, or lack of experience and knowledge should not use the equipment, unless supervised or unless they have been given instruction concerning use of the equipment by a person responsible for their safety.
- Use handlebars to maintain balance when mounting and dismounting, and for additional stability while exercising.
- Set up and operate this equipment on a solid, level, horizontal surface.
- Connect this exercise product to a properly grounded outlet only.
- To disconnect, turn all controls to the off position, then remove plug from outlet.
- To remove power from the bike, the power cord must be disconnected from the wall outlet.
- Disconnect all power before moving the equipment.
- Never operate equipment if it has been dropped, with a damaged cord or plug even if it is working properly. Never operate the equipment if it is not working properly or if it has been damaged, or has been immersed in water. Contact Customer Tech Support for replacement or repair in order to avoid a hazard.
- This equipment should never be left unattended when plugged in. When not in use, and prior to servicing, cleaning, or moving equipment, turn off power, then unplug from outlet.
- Check the cleats periodically for wear. When the cleats are worn, replace them. Replace the cleat when it becomes difficult to release, or starts
to release with much less effort than when it was in new condition.
- Keep cleats and bindings clear of dirt and debris to ensure engagement and release.
- Since this machine operates with a fixed gear, do not back, or reverse, pedal. Doing so may loosen the Pedals, which could result in damage to the machine and/or injury to the user. Never operate this machine with loose Pedals.
- Exercise on this machine requires coordination and balance. Be sure to anticipate that changes in speed and resistance level can occur during workouts, and be attentive in order to avoid loss of balance and possible injury.
• Service should only be done by and authorized service technician. - Do not remove the protected covers unless instructed by professional and your local dealer.
- Do not remove the console covers unless instructed by Customer Tech Support.
- Do not use other attachments that are not recommended by the manufacturer. Attachments may cause injury.
- Return the unit to a service center for examination and repair.
- To prevent electrical shock, never drop or insert any object into any opening.
- Do not operate where aerosol (spray) products are being used or when oxygen is being administered.
- This equipment is intended for in-home use only. Failure to comply will void the warranty.
- Do not use equipment in any location that is not temperature controlled, such as but not limited to garages, porches, pool rooms, bathrooms, car ports or outdoors. If your equipment has been exposed to colder temperatures or high moisture climates, it is strongly recommended that the equipment is warmed up to room temperature before first time use. Failure to comply will void the warranty.
- Tighten the Brake/ Resistance Adjustment Knob as described until the Flywheel is locked before moving/safe storage, remove the power supply when storage and place in a secure location. Place the machine in a secure location away from children and pets.
- Equipment is heavy; use care and additional help if necessary when moving.
- Have 2 people available for assembly, this will make the assembly process easier. Do not do steps that involve heavy lifting or awkward movements on your own.
- Do not assemble this machine outdoors or in a wet or moist location. Make sure assembly is done in an appropriate work space away from foot traffic and exposure to bystanders.
- Do all assembly steps in the sequence given. Incorrect assembly can lead to injury or incorrect function.
- Do not try to change the design or functionality of this machine. This could compromise the safety of this machine and will void the warranty.
- Do not use or put the machine into service until the machine has been fully assembled and inspected for correct performance in accordance with the Manual.
- Do not move or lift equipment from packaging until specified to do so in the assembly instructions.
- Unpack and assemble the unit where it will be used. Never open box when it is positioned upside-down or on its side.
- Silicone lubricant is not intended for human consumption. Keep out of reach of children. Store in a safe place.
-
Keep AC Adapter, power cord away from heated surfaces. Do not carry this unit by its supply cord or use the cord as a handle. Do not pull on this power cord or apply any mechanical loads to this cord.
-
To reduce the risk of electrical shock or unattended/unsupervised usage, always unplug the AC Adapter from the wall outlet and the machine and wait 5 minutes before cleaning, maintaining or repairing the machine. Place the AC Adapter in a secure location.
- Care should be taken in mounting and dismounting the stationary exercise equipment. Before dismounting, bring the machine to a complete stop.
- Apply full resistance load when the Indoor Cycle is not in use to prevent injuries due to moving drive gear components.
- The Indoor Cycle does not have a free moving flywheel; the pedals will continue to move together with the flywheel until the flywheel stops. Reducing speed in a controlled manner is required. To stop the flywheel immediately, push down hard the emergency brake. Always pedal in a controlled manner and adjust your desired cadence according to your own abilities. Push the emergency brake down = emergency stop.
- The Indoor Cycle uses a fixed flywheel that builds momentum and will keep the pedals turning even after the user stops pedaling or if the user's feet slip off. DO NOT ATTEMPT TO REMOVE YOUR FEET FROM THE PEDALS OR DISMOUNT THE MACHINE UNTIL BOTH THE PEDALS AND THE FLYWHEEL HAVE COMPLETELY STOPPED. Failure to follow these instructions may lead to loss of control and the potential for serious injury.
text_image
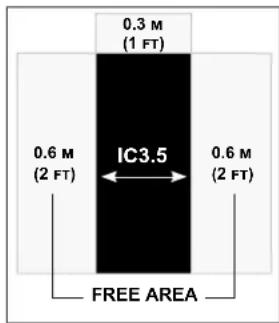
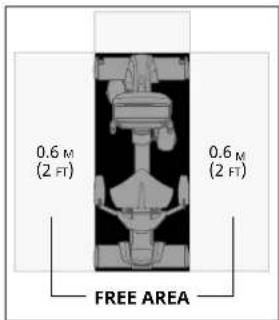
0.3 M (1 FT) 0.6 M (2 FT) IC3.5 0.6 M (2 FT) FREE AREAPlace the exercise bike on a level surface. There should be 30~cm in front of the exercise bike for the power cord. For ease of access, there should be an accessible space preferentially on both sides of the exercise bike equal to 2 ft (0.6 meters) to allow a user access to the machine from either side. Do not place the exercise bike in any area that will block any vent or air openings.
The exercise bike should not be located in a garage, covered patio, near water or outdoors.
DANGER!
- Improper connection of the equipment-grounding conductor can result in a risk of electric shock. Check with a qualified electrician or service provider if you are in doubt as to whether the product is properly grounded. Do not modify the plug provided with the product. If it does not fit the outlet, have a proper outlet installed by a qualified electrician.
- This product is for use on a nominal local voltage circuit and has a grounding plug. No adapter should be used with this product.
- This product must be used on a dedicated circuit. To determine if you are on a dedicated circuit, shut off the power to that circuit and observe if any other devices lose power. If so, move devices to a different circuit.
Note: There are usually multiple outlets on one circuit.
TECH SPECS
| Assembled Dimensions (L x W x H) | 120 x 53 x 115 cm / 47" x 21" x 45" |
| Product Weight 38 kg / 85 lbs. | |
| Max User Weight 113 kg / 250 lbs. | |

From now on, you can assemble your equipment at your convenience. For detailed instructions on assembly, operation, programs, troubleshooting, and maintenance, please scan the QR code on the left side to access the complete manual.
If scanning the QR code fails, you can visit the website provided here: https://global.schwinnfitness.com/en/manuals.html
WARRANTY
If your equipment requires warranty service, please contact local Customer Tech Support.

NEED HELP?
If you have any questions, need assistance with missing parts, or require technical support or maintenance for your equipment, please contact Customer Tech Support.
Manufacturer: Johnson Health Industry (Vietnam) Co., Ltd. | Manufacturer address: Lot CN-24, Thuan Thanh II Industrial Park, Mao Dien Ward, Bac Ninh Province, Vietnam
MODEL INFORMATION
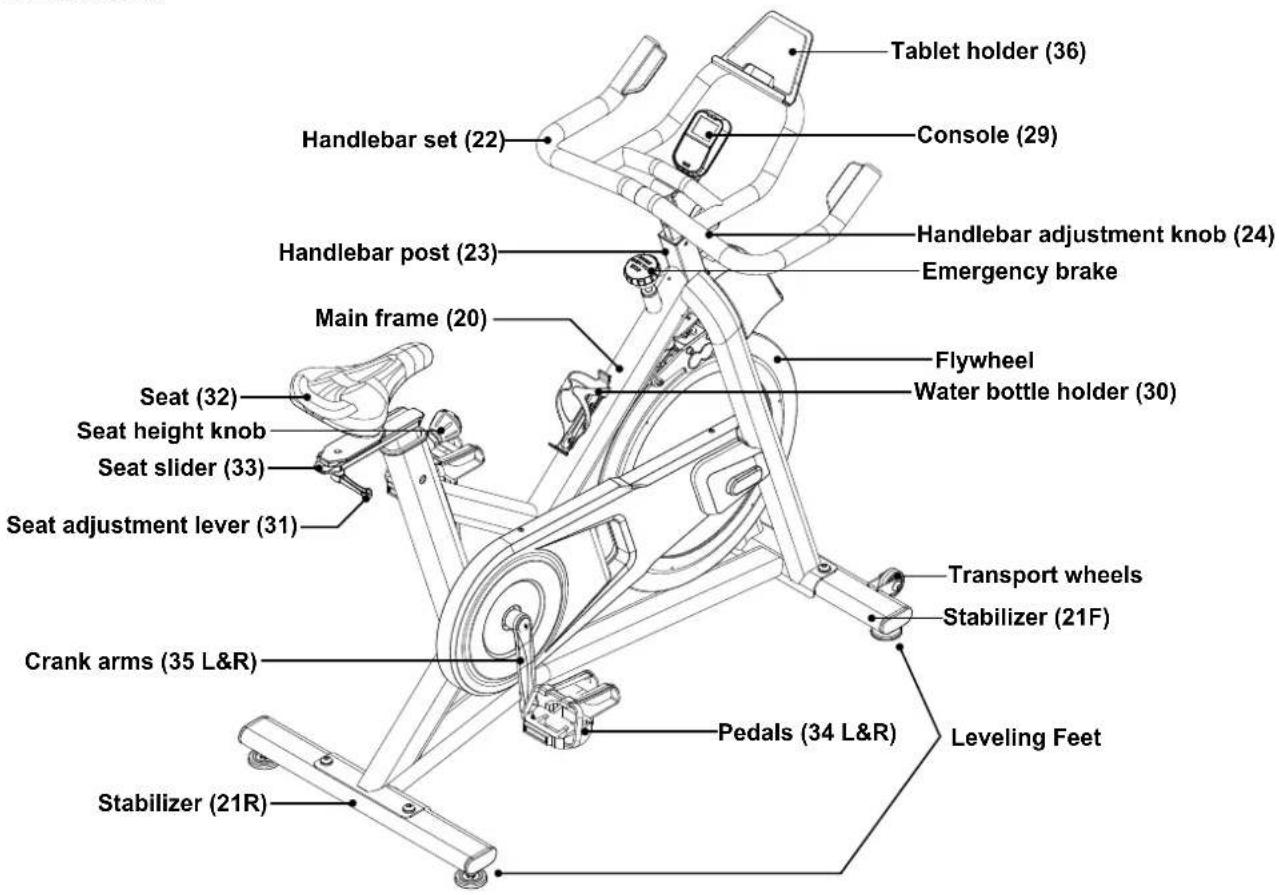
text_image
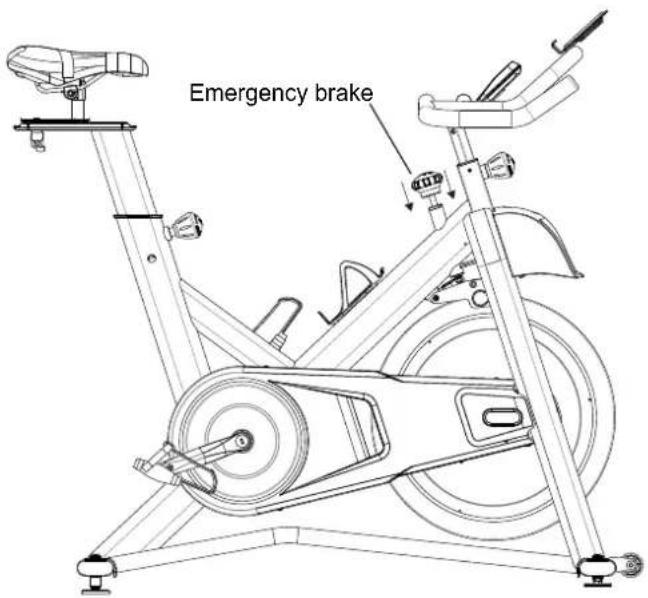
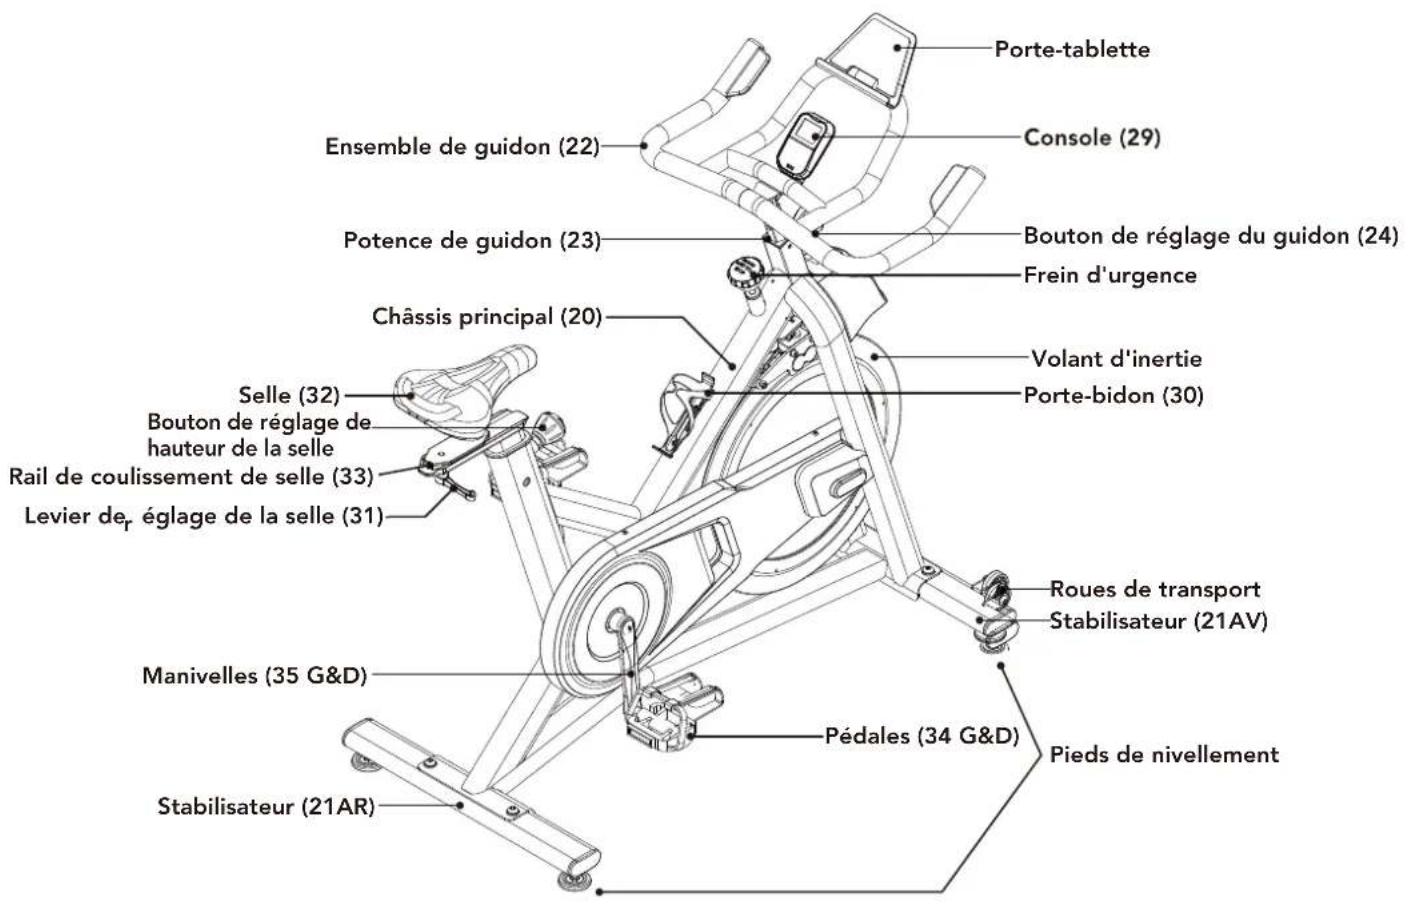
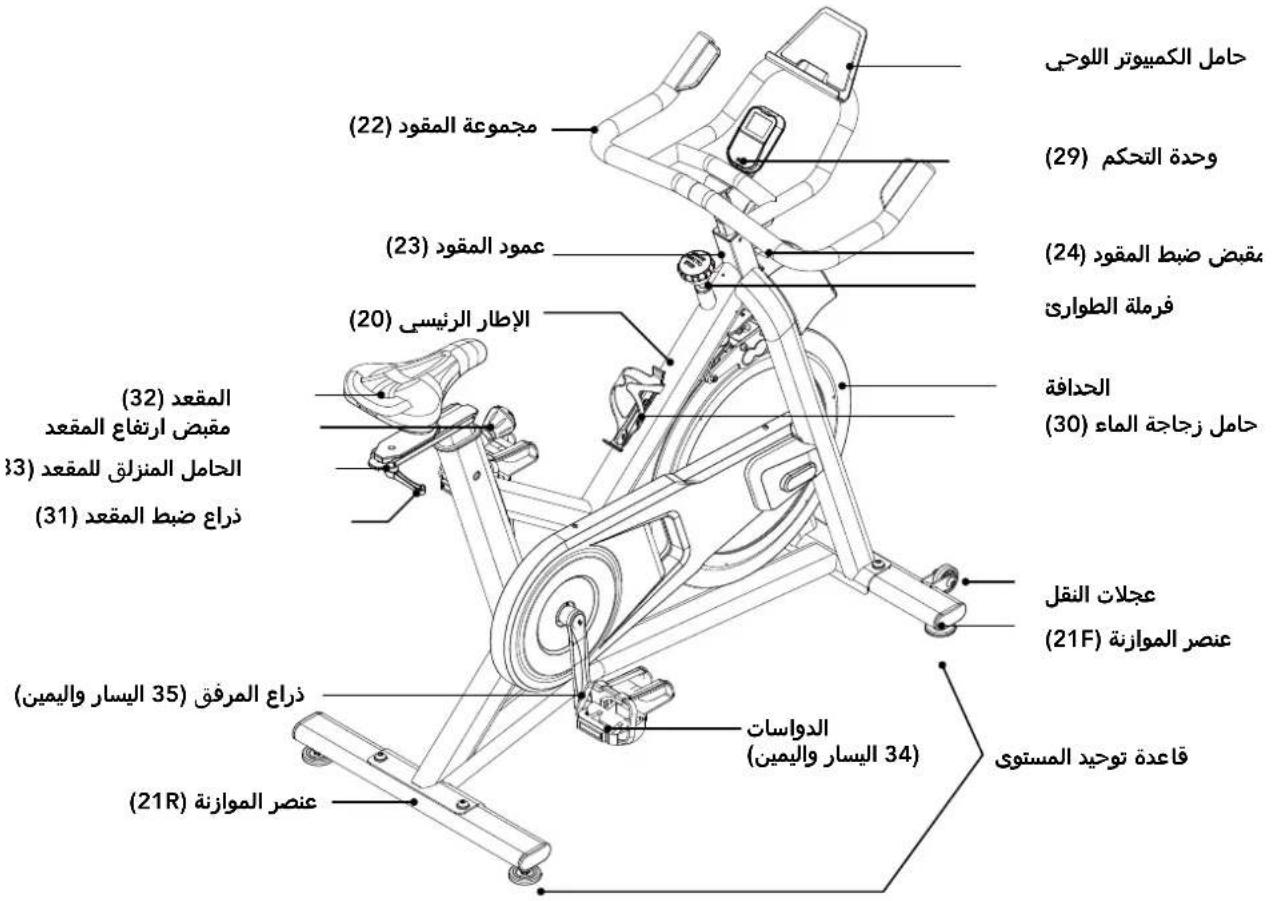
Tablet holder (36) Console (29) Handlebar set (22) Handlebar post (23) Emergency brake Main frame (20) Flywheel Water bottle holder (30) Seat (32) Seat height knob Seat slider (33) Seat adjustment lever (31) Crank arms (35 L&R) Stabilizer (21R) Pedals (34 L&R) Transport wheels Stabilizer (21F) Leveling FeetMAIN PARTS INCLUDED:
□ Main Frame (20)
Front Stabilizer (21F)
Rear Stabilizer (21R)
Handlebar Set (22)
Handlebar Post (23)
Console (29)
□ Pedal Set (34 L&R)
Seat Post Set (31, 32 & 33)
PARTS PACKING
INCLUDED:
□1 Hardware Kit
PRE ASSEMBLY
UNPACKING
Due to the weight of the indoor cycle, it is recommended that two people perform the assembly. Unpack the product where you will be using it. It is recommended that you place a protective covering on your floor. Place the carton on a level flat surface and remove all packing materials; do not dispose of the packing materials until assembly is completed.
NOTE: During each assembly step, ensure that ALL nuts and bolts are in place and partially threaded in before completely tightening any ONE bolt.
NOTE: A light application of grease may aid in the installation of hardware. Any grease, such as lithium bike grease is recommended.

NEED HELP?
If you have questions or if there are any missing parts, contact Customer Tech Support.
HARDWARE KIT:
1
Bolt
M8
Qty: 7

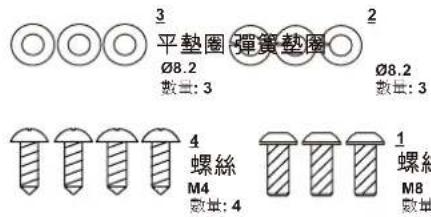
2
Spring Washer
∅8.2
Qty: 7

3
Flat Washer
∅8.2
Qty: 7

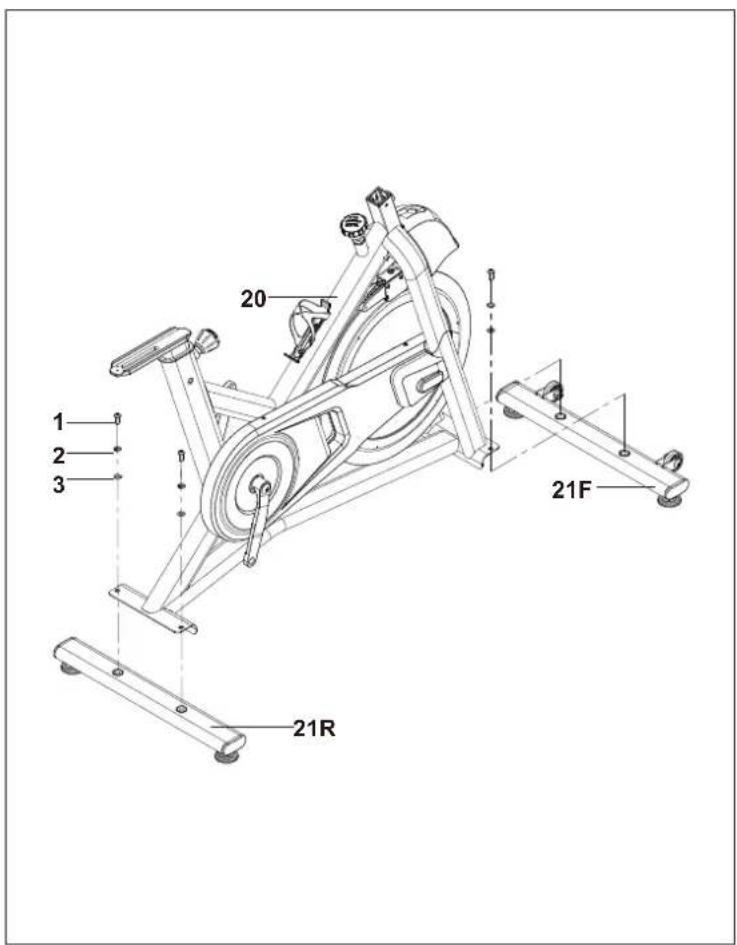
4
Bolt
M4
Qty: 3

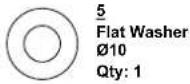
5
Flat Washer
∅10
Qty: 1
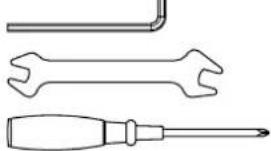
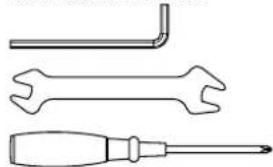
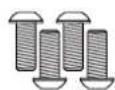
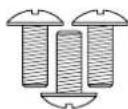
Tool Kit
5mm Wrench
13/15mm Wrench
Screwdriver
natural_image
Line drawing of three different wrenches and screwdriver tools (no text or symbols)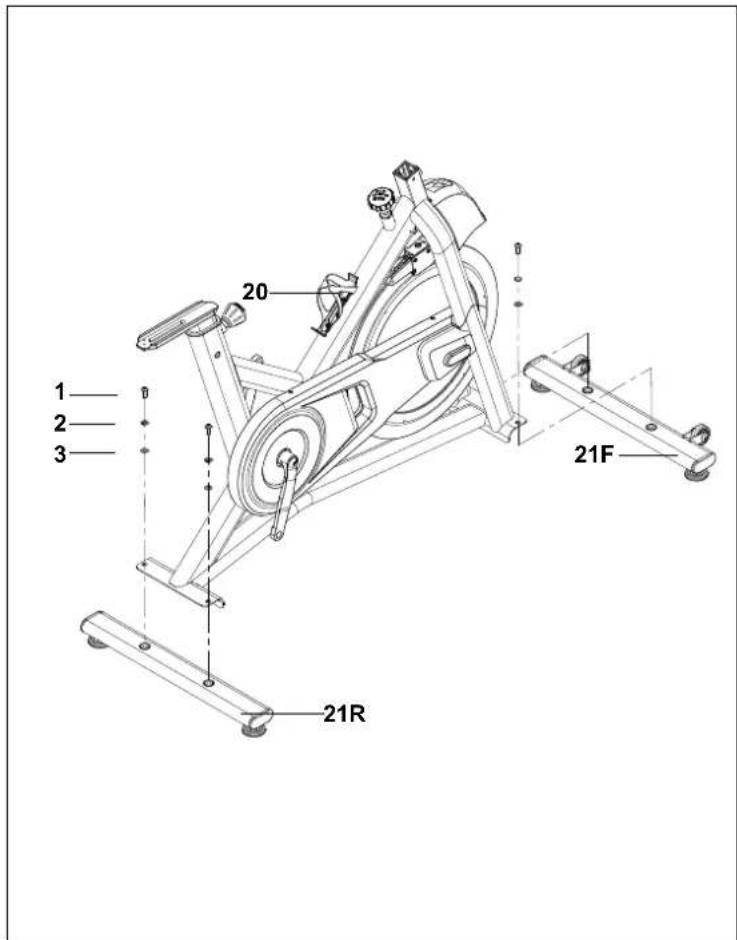
text_image
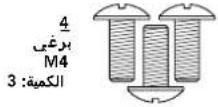
1 2 3 20 21F 21RASSEMBLY STEP 1
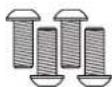
STEP 1 HARDWARE :

1
Bolt
Qty: 4

2
Spring Washer
Qty: 4

3
Flat Washer
Qty: 4
1.1 Open hardware for Step 1.
1.2 Attach the Front Stabilizer (21F) and Rear Stabilizer (21R) to the Main Frame (20) using 4 Bolts (1), 4 Spring Washers (2) and 4 Flat Washers (3), and tighten firmly.
text_image
Technical diagram of a vehicle seat assembly with numbered components and labeled partsASSEMBLY STEP 2
STEP 2 HARDWARE :

text_image
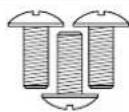
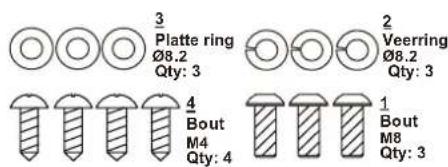
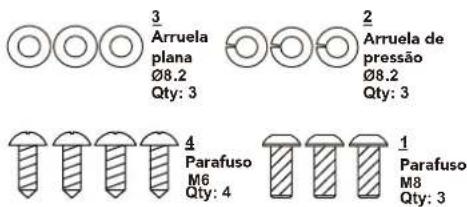
3 Flat Washer Ø8.2 Qty: 3 2 Spring Washer Ø8.2 Qty: 3 1 Bolt M8 Qty: 3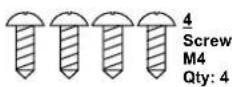
2.0 Open hardware for Step 2.
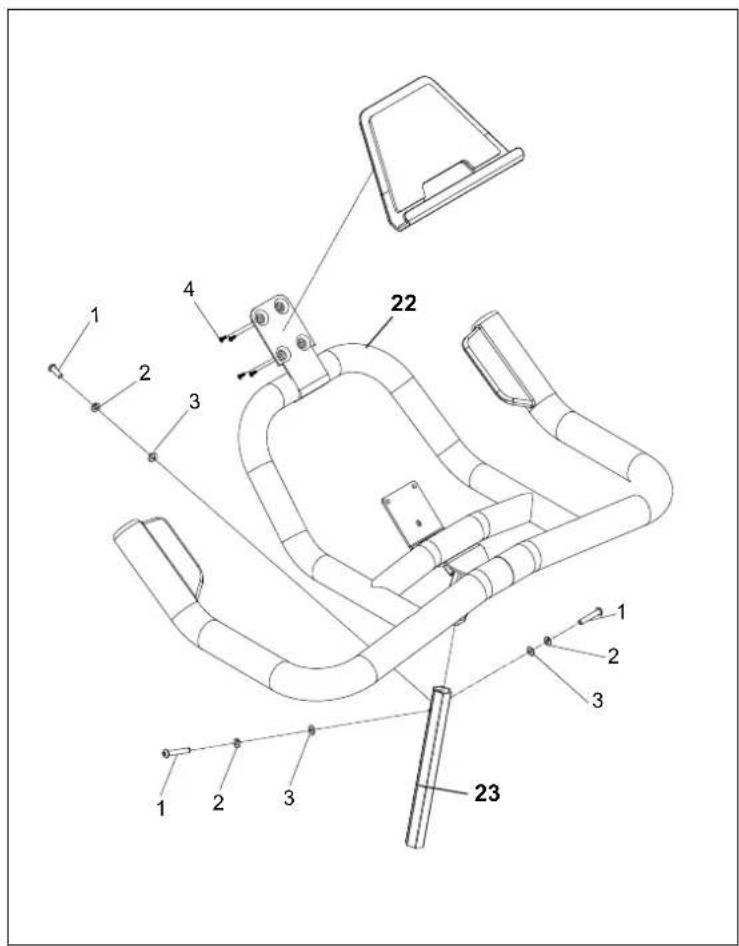
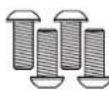
2.1 Attach tablet holder (36) to Handlebars (22) using 4 Bolts (4).
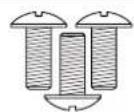
2.2 Insert Handlebars (22) into Handlebar Post (23) and secure the front with 1 Bolt (1), 1 Spring Washer (2) and 1 Flat Washer (3). Do not fully tighten hardware until end of Step 2.
2.3 Secure the side with 2 Bolt (1), 2 Spring Washer (2), 2 Flat Washer(3), Screw (4).
2.4 Fully tighten bolts from Steps 2.2 & 2.3.
text_image
Technical diagram of an exercise bike with numbered components and a detailed inset view showing internal structure.ASSEMBLY STEP 3
3.1 Turn Adjustment Knob (24) counter-clockwise to fully loosen.
3.2 Attach Lead Wire (26) to Console Cable (25) and pull Console Cable (25) from Head Tube (28) through Handlebar Post (23) and out hole in front of Handlebar Post (23).
3.3 Pull Console Cable (25) through hole in Console Bracket (27).
3.4 Insert Handlebar Post (23) into Head Tube (28) and turn Adjustment Knob (24) to secure.
3.5 Detach and discard Lead Wire (26).
NOTE: Be careful not to pinch any wires while assembling handlebars.
text_image
Technical diagram of an exercise bike with labeled components and a magnified inset showing internal components.ASSEMBLY STEP 4
STEP 4 HARDWARE :

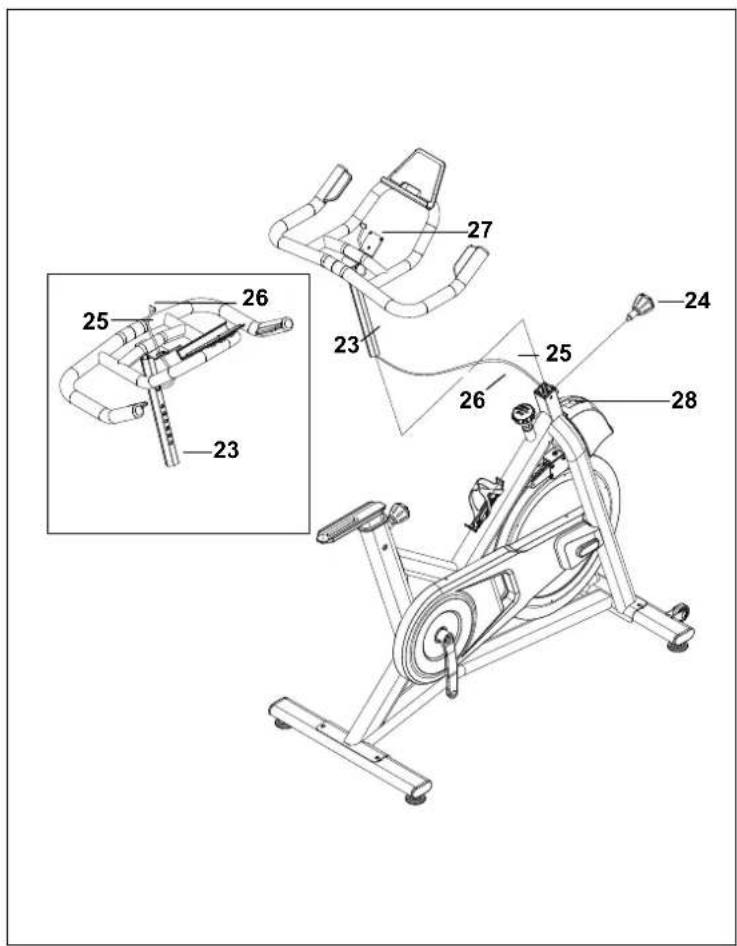
4.1 Open hardware for Step 4.
4.2 Attach Console Cable (25) to Console (29).
4.3 Carefully tuck Console Cable (25) into Handlebar Post (23).
4.4 Route Console Cable (25) through channel on back of Console (29) to avoid pinching cable. Attach Console (29) to Console Bracket (27) using 3 Bolts (4).
NOTE: Be careful not to pinch any wires while assembling console.
text_image
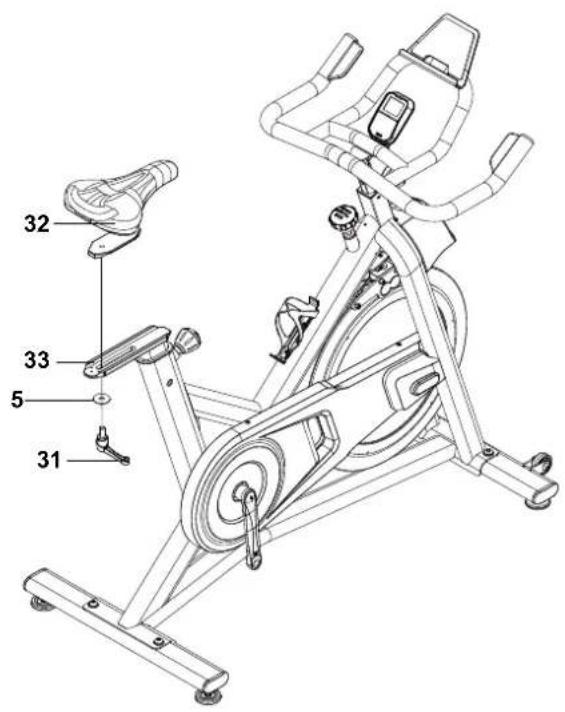
32 33 5 31ASSEMBLY STEP 5
STEP 5 HARDWARE :
5.1 Open hardware for Step 5.
5.2 Unscrew Adjustment Lever (31) from Seat (31).
5.3 Place Seat (32) onto Seat Slider (33).
5.4 Secure Seat (32) with 1 Flat Washer (5) and Adjustment Lever (31).
text_image
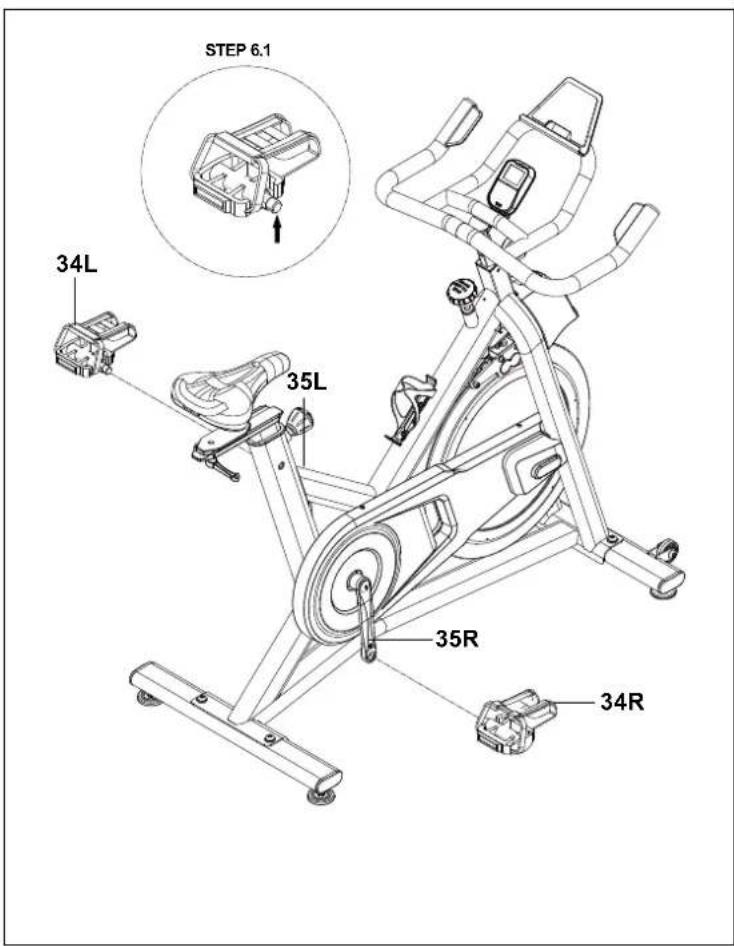
STEP 6.1 34L 35L 35R 34RASSEMBLY STEP 6
6.1 Identify Left Pedal (34L) which is labeled L on spindle and Right Pedal (34R) labeled R.
6.2 Insert Left Pedal (34L) into Left Crank Arm (35L) and tighten Counter Clockwise.
6.3 Insert Right Pedal (34R) into Right Crank Arm (35R) and tighten Clockwise.
6.4 Use Combination Wrench to fully tighten pedals.
Product Weight: 38 kg / 85 lbs.
User Weight Capacity: 113 kg / 250 lbs.
Dimensions (L×W×H): 120 x 53 x 117 cm /
47" x 21" x 46"
CONGRATULATIONS!
You have successfully assembled your indoor cycle.
Indoor Cycle Setup and Use
SAVE THESE INSTRUCTIONS
Read the OWNER'S GUIDE before use. When using an electrical product, basic precautions should always be followed, including the following: Read all instructions before using this equipment. It is the responsibility of the owner to ensure that all users of this equipment are adequately informed of all warnings and precautions. If you have any questions after reading this guide, contact Customer Tech Support.
It is essential that this equipment is used only indoors, in a climate-controlled room. If your exercise equipment has been exposed to colder temperatures or high moisture climates, it is strongly recommended that this equipment is warmed up to room temperature prior to use.
This equipment is intended for in-home use only. Do not use this equipment in any commercial, rental, school or institutional setting. Failure to comply will void the warranty.

WARNING
TO REDUCE THE RISK OF BURNS, FIRE, ELECTRICAL SHOCK OR INJURY TO PERSONS:
- Use this equipment only for its intended use as described in this guide and in the equipment's Owner's Manual.
- At NO time should children under the age of 14 use the equipment.
- At NO time should pets or children under the age of 14 be closer to the equipment than 10 feet / 3 meters.
- This equipment is not intended for use by persons with reduced physical, sensory or mental capabilities, or lack of experience and knowledge, unless they are supervised or have been given instruction concerning use of the equipment by a person responsible for their safety.
- Always wear athletic shoes while using this equipment. NEVER operate the exercise equipment with bare feet.
- Do not wear any clothing that might catch on any moving parts of this equipment.
• Heart rate monitoring systems may be inaccurate. Over exercising may result in serious injury or death. - If you experience any kind of pain, including but not limited to chest pains, nausea, dizziness, or shortness of breath, stop exercising immediately and consult your physician before continuing.
- Do not jump on the equipment.
• At no time should more than one person be on the equipment. - Set up and operate this equipment on a solid level surface.
- Never operate the equipment if it is not working properly or if it has been damaged.
- Use handlebars to maintain balance when mounting and dismounting, and for additional stability while exercising.
- To avoid injury, do not expose any body parts (for example, fingers, hands, arms or feet) to the drive mechanism or other potentially moving parts of the equipment.
- Connect this exercise product to a properly grounded outlet only.
- This equipment should never be left unattended when plugged in. When not in use, and prior to servicing, cleaning, or moving equipment, turn off power, then unplug from outlet.
- Do not use any equipment that is damaged or has worn or broken parts. Use only replacement parts supplied by Customer Tech Support or an authorized dealer.
- Never operate this equipment if it has been dropped, damaged, or is not working properly, has a damaged cord or plug, is located in a damp or wet environment, or has been immersed in water.
- Keep power cord away from heated surfaces. Do not pull on this power cord or apply any mechanical loads to this cord.
• Do not remove any protective covers unless instructed by Customer Tech Support. Service
should only be done by an authorized service a technician.
• To prevent electrical shock, never drop or insert any object into any opening.
- Do not operate where aerosol (spray) products are being used or when oxygen is being administered.
- This equipment should not be used by persons weighing more than the specified maximum weight capacity as listed in the equipment Owner's Manual. Failure to comply will void the warranty.
- Do not use this equipment in any location that is not temperature controlled, such as, but not limited to: garages, porches, pool rooms, bathrooms, car ports or outdoors. Failure to comply will void the warranty.
- Contact Customer Tech Support or an authorized dealer for examination, repair and/or service.
• Make sure handlebars are secure before each use.
• Never rotate the foot pedals by hand.
- Never dismount the equipment until the pedals come to a complete STOP.
- Ensure that adjustment levers (seat and handlebar fore-and-aft) are properly secured and do not interfere with range of motion during exercise.
- Do not attempt to ride the exercise bike in a standing position at high RPMs until you have practiced at slower speeds.
• Make sure your shoes are fixed into the toe cage (if available).
- Apply full resistance load when the Indoor Cycle is not in use to prevent injuries due to moving drive gear components.
- The Indoor Cycle does not have a free moving flywheel; the pedals will continue to move together with the flywheel until the flywheel stops. Reducing speed in a controlled manner is required. To stop the flywheel immediately, push down hard the emergency brake. Always pedal in a controlled manner and adjust your desired cadence according to your own abilities. Push the emergency brake down = emergency stop.
- The Indoor Cycle uses a fixed flywheel that builds momentum and will keep the pedals turning even after the user stops pedaling or if the user's feet slip off. DO NOT ATTEMPT TO REMOVE YOUR FEET FROM THE PEDALS OR DISMOUNT THE MACHINE UNTIL BOTH THE PEDALS AND THE FLYWHEEL HAVE COMPLETELY STOPPED. Failure to follow these instructions may lead to loss of control and the potential for serious injury.
BASIC OPERATION
text_image
0.6 M (2 FT) 0.6 M (2 FT) FREE AREAPlace the exercise bike on a level surface. There should be one foot in front of the exercise bike for the power cord. For ease of access, there should be an accessible space preferentially on both sides of the exercise bike equal to 2 ft (0.6 meters) to allow a user access to the machine from either side. Do not place the exercise bike in any area that will block any vent or air openings. The exercise bike should not be located in a garage, covered patio, near water or outdoors.
MOVING THE EXERCISE BIKE
Your exercise bike has a pair of transport wheels built into the front stabilizer tube. Remove the power supply before attempting to move the bike.
WARNING!
Our exercise bikes are heavy, use care and additional help if necessary when moving. Failure to follow these instructions could result in injury.
text_image
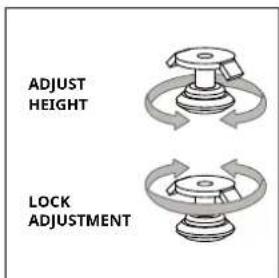
ADJUST HEIGHT LOCK ADJUSTMENTYour exercise bike should be level for optimum use. Once you have placed your exercise bike where you intend to use it, raise or lower one or both of the adjustable levelers located on the bottom of the frame. A carpenter's level is recommended. Once you have leveled your exercise bike, lock the levelers in place by tightening the nuts against the frame. Actual levelers may differ from image and may not include the lock.
POWER
Your exercise bike is powered by a power supply. The power must be plugged into the power jack, which is located in the front of the machine near the stabilizer tube. Unplug cord when not in use.
WARNING!
Never operate product if it has a damaged cord or plug, if it is not working properly, if it has been damaged, or immersed in water. Please reference contact information on the INFORMATION CARD for assistance.
text_image
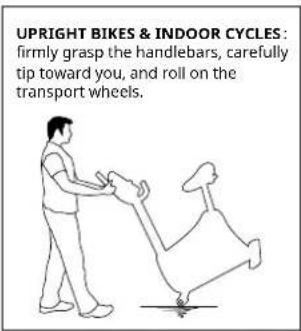
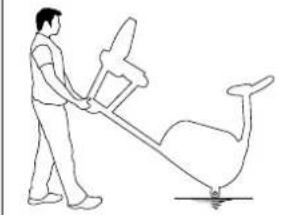
UPRIGHT BIKES & INDOOR CYCLES: firmly grasp the handlebars, carefully tip toward you, and roll on the transport wheels.RECUMBENT BIKES: firmly grasp the steel portion of the rear stabilizer tube, carefully lift and roll on the transport wheels.
natural_image
Line drawing of a person using a manual tool to lift a bird, with no text or symbols present.PROPER USAGE
To determine proper seat position, sit on the seat and position the ball of your foot on the center of the pedal. Your knee should bend slightly at the furthest pedal position. You should be able to pedal without locking your knees or shifting your weight from side to side. Adjust pedal straps to desired tightness.
UPRIGHT SEAT ADJUSTMENT
For upright bikes with an adjustment lever: To raise the seat height, pull the seat upward. To lower the seat, locate the adjustment lever under the seat and pull the lever up to slide the seat down. Release lever and allow to lock into place. Please check to be sure seat post is locked in place before each use.
For upright bikes with a locking seat adjustment knob: To adjust, get off the bike seat and loosen the adjustment knob by turning it two half turns counter-clockwise. Pull out the knob to unlock the post, and adjust the post up or down to the desired setting. Release the knob to lock in place. Turn the knob clockwise until tightened. Please check to be sure seat post is locked in place before each use.
INDOOR CYCLE SEAT & HANDELBAR ADJUSTMENT (IF AVAILABLE)
Rotate the adjustment lever or knob counterclockwise to slide the seat or handlebars forward or backward for horizontal adjustment; raising or lowering the seat or handlebar with the other hand for height adjustment. Rotate the lever or knob clockwise to lock the position.
Do not adjust seat or handlebar height past MAX mark or adjustment points on post.
RECUMBENT SEAT ADJUSTMENT
For recumbent bikes with an adjustment lever: To adjust the seat position, locate the lever under the seat before you mount the bike. Place your right hand on the adjustment handle under the seat. Place feet on the ground while seated and slide forward if needed. Place feet on pedals, gently lift lever under the seat. Using legs, slowly push and slide the seat up or down to a position that puts you in a comfortable pedaling range (one that keeps a slight bend in your knee while your legs are in the extended position). Release lever and allow to lock into place.
For recumbent bikes with a locking seat adjustment handle: Turn the handle up into its middle position making the handle feel loose. Then, slide the seat to a position that puts you in a comfortable pedaling range (one that keeps a slight bend in your knee while your legs are in the extended position). Lock the mechanism by rotating it down until handle tightens.
RECUMBENT MESH SEAT BACK ADJUSTMENT
Some recumbent bikes are equipped with a tilting mesh seat back. Tilt adjustments are made with a rotating lever on the user's right side, located slightly behind the handlebar. Not all mesh seat backs have an adjustment lever so check the ASSEMBLY GUIDE.
To adjust the tilt angle of the seat back, rotate the lever down (counter-clock wise) and lean back on the mesh seat back until the desired position is achieved. When the position is set, rotate the lever upward (clock wise) until it is snug. The seat back comes equipped with a spring return system to return the seat back to its original position when the adjustment lever is released and the user is not leaning against the seat back.
The preferred level of difficulty in pedaling (resistance) can be regulated in increments by use of the resistance buttons on the console. To increase the resistance, push the up arrow. To decrease the resistance, push the down arrow.
FOR INDOOR CYCLE:

WARNING
- Make sure your shoes are fixed into the toe cage (if available).
- Apply full resistance load when the Indoor Cycle is not in use to prevent injuries due to moving drive gear components.
- The Indoor Cycle does not have a free moving flywheel; the pedals will continue to move together with the flywheel until the flywheel stops. Reducing speed in a controlled manner is required. To stop the flywheel immediately, push down hard the emergency brake. Always pedal in a controlled manner and adjust your desired cadence according to your own abilities. Push the emergency brake down = emergency stop.
- The Indoor Cycle uses a fixed flywheel that builds momentum and will keep the pedals turning even after the user stops pedaling or if the user's feet slip off. DO NOT ATTEMPT TO REMOVE YOUR FEET FROM THE PEDALS OR DISMOUNT THE MACHINE UNTIL BOTH THE PEDALS AND THE FLYWHEEL HAVE COMPLETELY STOPPED. Failure to follow these instructions may lead to loss of control and the potential for serious injury.
text_image
Emergency brakeINDOOR CYCLE SEAT & HANDELBAR ADJUSTMENT (IF AVAILABLE)
Rotate the adjustment lever or knob counterclockwise to slide the seat or handlebars forward or backward for horizontal adjustment; raising or lowering the seat or handlebar with the other hand for height adjustment. Rotate the lever or knob clockwise to lock the position. Do not adjust seat or handlebar height past MAX mark or adjustment points on post.
CONSOLE

text_image
LCD Display CADENCE RESISTANCE 188 188 TIME WATTS CAL HR DIST SPEED 8:8:8:8 HR MODE Bluetooth Button Up/Down KeysCONSOLE DISPLAY
LCD Display:
In the exercise mode, the upper LCD window will always display Cadence and Resistance.
The lower portion of the display can show: Time, Calories (Cal), Heart Rate (HR), Distance (Dist) and Speed. There is also a default cycle function which will display each of the data types for 5 seconds before cycling to the next.
To lock the lower portion to one specific data display, press the Enter √ / Display □ button until the label for the data you desire is shown. To return to cycling data, press the Enter √/Display button until the two arrows are shown.
Up & Down (√) Keys:
Press the Up and Down (A) keys to increase and decrease the settings: Resistance or Time.
In the exercise mode, the Up and Down arrows will adjust the resistance by 1. If you hold down the arrow keys for more than 1/2 of a second, the resistance range will go up/down by 5 until released.
CONSOLE OPERATION
Manual Setting:
Press Start/Stop ▶|| button to start a quick manual workout. In this mode, the resistance will start at 0 and the timer will count up from 0 seconds.
Customize Your Workout:
Press Enter √ / Display 🔒 button until Time flashes. Use the Up/Down ∧∨ keys to adjust your desired workout time and then press the Enter √ / Display 🔒 button to confirm your desired time. Once confirmed, the starting resistance range will begin flashing. Adjust the desired starting resistance with the Up/Down ∧∨ keys and confirm with the Enter √ / Display 🔒 button.
Press Start ▶ begin the workout with your desired time and resistance.
Once your custom program has been started, the timer will count down from your desired time and the resistance will begin at the resistance you selected. You may still adjust the resistance to different values during the workout.
Energy Saver:
To minimize energy consumption, your machine will enter energy saver mode (ERP) automatically when not in use and the console will be woken up quickly with a touch of a button.
HOW TO SWITCH BETWEEN APP MODE & BT HEART RATE MODE
Home- P1
Connecting to an App (default mode)
If using a 3rd party App, please turn on your device's Bluetooth (BT) and follow the App pairing instructions. Ensure the bike console is not connected to any other BT devices by checking that the BT symbol ✗is not lit on the console.
If you wish to use the BT HR Strap with a 3rd party App that is capable, then connect to the HR strap from within the App interface (please follow the App instructions to find and connect to the HR Strap).
Follow the 3rd party App instructions to start the program. Some require you to start from inside the App, others require you to press the console Start button first.
To stop the workout, End Ride in the App and press Stop button on console for 3 seconds.
Connecting to HR Strap (off by default)
In order to access to HR Strap mode, make sure the console is not currently connected to any Bluetooth (BT) devices by checking that no BT Symbol ➕ is displayed on the console.
Wear the HR strap, make sure to read the strap instruction. Note: Some chest contact HR straps need to be moist to read the HR precisely.
Press and hold the Bluetooth button for a few seconds until "HR MODE" symbol displays on the right LCD corner. Once the console detects the BT HR strap, the BT symbol will display on the LED screen.
Hit Start to begin a workout and console should show the heart rate.
To exit HR Strap mode, disconnect the BT HR device and ensure the BT symbol disappears from the display. Then press and hold Bluetooth button for a few seconds until "HR MODE" disappears on LED screen. NOTE: it should take a few seconds for the Bluetooth to disconnect from the console.
CONNECT YOUR DEVICE WITH THE JRNY APP FOR MORE DYNAMIC WORKOUTS
If you have a JRNY membership*, it can be accessed through your device when synced to the console of this machine.
With that JRNY membership, you receive guided workouts adapted.

text_image
QR code image containing encoded data, no visible human-readable text* A JRNY membership is required for the JRNY experience – see global.schwinnfitness.com/en/schwinn-jrny.html for details. Where available (including the United States), you can obtain a JRNY membership by downloading the JRNY app onto your phone or tablet and signing up within the downloaded app. JRNY memberships may not be available in all countries.
MAINTENANCE & TROUBLESHOOTING
TROUBLESHOOTING
COMMON PRODUCT QUESTIONS
ARE THE SOUNDS MY EXERCISE BIKE MAKES NORMAL?
Our exercise bikes are some of the quietest available because they use belt drives and friction free magnetic resistance. We use the highest grade bearings and belts to minimize noise. However, because the resistance system itself is so quiet, you will occasionally hear other slight mechanical noises. Unlike older, louder technologies, there are no fans, friction belts, or alternator noises to mask these sounds on our exercise bikes. These mechanical noises, which may or may not be intermittent, are normal and are caused by the transfer of significant amounts of energy to a rapidly spinning flywheel. All bearings, belts and other rotating parts will generate some noise which will transmit through the casing and frame. It is also normal for these sounds to change slightly during a workout and over time because of thermal expansion of the parts.
WHY IS THE EXERCISE BIKE I HAD DELIVERED LOUDER THAN THE ONE AT THE STORE?
All fitness products seem quieter in a large store showroom because there is generally more background noise than in your home. Also, there will be less reverberation on a carpeted concrete floor than on a wood overlay floor. Sometimes a heavy rubber mat will help reduce reverberation through the floor. If a fitness product is placed close to a wall, there will be more reflected noise.
HOW LONG WILL THE DRIVE BELT LAST?
The computer modeling we have done indicated virtually thousands of maintenance free hours. You should not have to replace the belt as long as you have the exercise bike.
CAN I MOVE THE EXERCISE BIKE EASILY ONCE IT IS ASSEMBLED?
Your exercise bike has a pair of transport wheels built into the front stabilizer tube. Please follow the MOVING THE EXERCISE BIKE section to transport your exercise bike. It is important that you place your exercise bike in a comfortable and inviting room. Your exercise bike is designed to use minimal floor space. Many people will place their exercise bikes facing the TV or a picture window. If at all possible, avoid putting your exercise bike in an unfinished basement. To make exercise a desirable daily activity for you, the exercise bike should be in a comfortable setting.
BASIC TROUBLESHOOTING
PROBLEM: The console does not light up.
SOLUTION: Verify the following:
- The outlet the machine is plugged into is functional. Double check that the breaker has not tripped.
- The correct power cord is being used. Only use the power cord provided. Test the voltage on the power cord to verify it provides the specified output voltage from the label.
- The power cord is not pinched or damaged and is properly plugged into the outlet AND the machine.
- Unplug power cord, remove the console and check that all connections to the console are secure and not damaged or pinched. Unplug then reconnect the console cable.
PROBLEM: The console lights up but the Distance/Watts/RPMs do not count.
SOLUTION: Verify the following:
- Unplug power cord, remove the console and check that all connections to the console are secure and not damaged or pinched. Unplug then reconnect the console cable.
- If doing the above does not fix the problem, the speed sensor and/or magnet may have become dislodged or damaged.
PROBLEM: The resistance levels seem to be incorrect, seeming too hard or too easy.
SOLUTION: Verify the following:
- The correct power cord is being used. Only use the power cord provided.
- Reset the console and allow the resistance to reset to the default position. Restart and retry the resistance levels.
PROBLEM: The exercise makes a clicking noise or feeling from the pedals.
SOLUTION: Verify the following:
- Verify the bike is on a level surface.
- Remove the pedals, apply blue thread-locker to the threads and re-tighten the pedals using an open wrench.
PROBLEM: The exercise bike makes a squeaking or chirping noise.
SOLUTION: Verify the following:
• The exercise bike is on a level surface.
- Loosen all bolts attached during the assembly process, grease the threads, and tighten again.
FOR CYCLES WITH SPEAKERS:
PROBLEM: When MP3 player is connected there is no sound coming from the speakers or the speakers sound fuzzy.
SOLUTION: Make sure audio cable is plugged in securely to both the console and MP3 Player jacks.
TROUBLESHOOTING
HEART RATE (GRIP-PULSE ONLY)
Check your exercise environment for sources of interference such as fluorescent lights, computers, underground fencing, home security systems or appliances containing large motors. These items may cause erratic heart rate readouts.
You may experience an erratic readout under the following conditions:
- Gripping the heart rate handlebars too tight. Try to maintain moderate pressure while holding onto the heart rate handlebars.
- Constant movement and vibration due to constantly holding the heart rate handlebars while exercising. If you are receiving erratic heart rate readouts, try to only hold the grips long enough to monitor your heart rate.
- When you are breathing heavily during a workout.
- When your hands are constricted by wearing a ring.
- When your hands are dry or cold. Try to moisten your palms by rubbing them together to warm.
- Anyone with heavy arrhythmia.
- Anyone with arteriosclerosis or peripheral circulation disorder.
- Anyone whose skin on the measuring palm is especially thick.
NEED ASSISTANCE?
If this troubleshooting section does not remedy the problem, discontinue use and turn the power off.

Please reference contact information on the INFORMATION CARD for assistance.
The following information may be asked of you when you call. Please have these items readily available:
- Model Name
- Serial Number
• Proof of Purchase (receipt or credit card statement)
Some common troubleshooting questions that may be asked are:
• How long has this problem been occurring?
- Does this problem occur with every use? With every user?
- If you are hearing a noise, does it come from the front or the back? What kind of noise is it (thumping, grinding, squeaking, chirping etc.)?
- Has the machine been maintained per the MAINTENANCE schedule?
Answering these and other questions will give the technicians the ability to send proper replacement parts and the service necessary to get you and your cycle running again!
You may find more troubleshooting suggestions on the customer support section of our website.
MAINTENANCE
WHAT KIND OF ROUTINE MAINTENANCE IS REQUIRED?
Minimal maintenance and cleaning is required. Adhering to this schedule will extend the life of your machine.
We use sealed bearings throughout our bikes so lubrication is not needed. The most important maintenance step is to simply wipe your perspiration off the bike after each use.
HOW DO I CLEAN MY BIKE?
Clean with soap and water cleaners only. Never use solvents on plastic parts. Cleanliness of your bike and its operating environment will keep maintenance problems and service calls to a minimum. For this reason, we recommend that the following preventive maintenance schedule be followed.
WARNING
To remove power from the bike, the power cord must be disconnected from the wall outlet.
MAINTENANCE SCHEDULE
| ACTION FREQUENCY | |
| After each use:Turn off the bike by unplugging the power cord from the wall outletWipe down the bike with a damp cloth. Never use solvents, as they can cause damage to the bike.Inspect the power cord. If the power cord is damaged, reference contact information on the back cover of the INFORMATION CARD for a replacement.Make sure the power cord is not underneath the bike or in any other area where it can become pinched or cut. | DAILY |
| Clean underneath the bike, following these steps:Turn off the bike.Unplug the power adapter from the bike.Move the bike to a different location.Wipe or vacuum any dust particles or other objects that may have accumulated underneath the bike.Return the bike to its previous location. | WEEKLY |
| Inspect and tighten all assembly bolts and pedals on the machine.Clean any debris off of the seat guide rail. | MONTHLY |
Waste Disposal
Products are recyclable.
At the end if its useful life please dispose of this article correctly and safely (local refuse sites).
THE FOLLOWING INFORMATION ONLY CONCERNS CUSTOMERSIN GERMANY
1. Disposal of electrical and electronic equipment
The symbol of the “crossed-out dustbin” means that you are required by law to dispose of this equipment separately from unsorted municipal waste. Disposal via household waste, such as the residual waste garbage can or the yellow garbage can, is prohibited. Avoid misdirected waste by disposing of it correctly at special collection and return points.
2. Removal of batteries and lamps
If the products contain batteries and accumulators or lamps that can be removed from the old device without destroying it, these must be removed before disposal and disposed of separately as batteries or lamps. The following batteries or accumulators are contained in this electrical device: Lithium-ion accumulator.
3. Possibilities of the return of old devices
Owners of old appliances can return them free of charge within the framework of the possibilities for the return or collection of old appliances set up and available by public waste management authorities, so that the proper disposal of the old appliances is ensured. In addition, the return is also possible with distributors under certain conditions. The following link provides an online directory of collection and take-back points: https://www.ear-system.de/ear-verzeichnis/sammel-und-ruecknahmestellen
For distributors: The return has to be free of charge with the purchase of a similar new device (1:1 return). Independently of this, there is the possibility to return the old equipment to the distributor free of charge. The prerequisite for this is that the external dimensions do not exceed 25 centimeters and the return is limited to three old devices per type of device (0:1 take-back).
Retail: Distributors with a sales area for electrical and electronic equipment of at least 400 square meters are obligated to take back WEEE. Also obliged to take back are food retailers who have a total sales area of at least 800 square meters and who also offer and make available on the market electrical and electronic equipment several times a calendar year or on a permanent basis.
Distance selling market: distributors who sell their products using distance communication means (e.g. online store) are obliged to take back WEEE if the storage and shipping areas for electrical and electronic equipment are at least 400 square meters.
4. Data protection
We would like to point out to all end users of WEEE that you are responsible for deleting personal data on the WEEE to be disposed of.
5. WEEE registration number
Under the registration number DE-49229072 we are registered with the stiftung elektro-altgeräte register, Nordostpark 72, 90411 Nuremberg, Germany, as a producer of electrical and/or electronic equipment.
Manufacturer/EU-importer: Johnson Health Tech. GmbH | Europaallee 51, 50226 Frechen, Germany
DEUTSCH
natural_image
Technical line drawing of a mechanical device with wheels and a highlighted circular feature (no text or symbols)WARNING
5 mm Schraubenschlüssel
13/15 mm Schraubenschlüssel
Schraubenzieher
natural_image
Line drawings of three wrenches and a screwdriver (no text or symbols)
text_image
1 2 3 20 21F 21RAUFBAUSCHRITT 1
HARDWARE FÜR SCHRITT 1:
1Sraube
M8
Menge: 4

2Federsc
∅8.2
Menge: 4

3 Unterleg-
scheibe
∅8.2
Menge: 4
text_image
Technical diagram of a vehicle seat assembly with numbered components for identificationAUFBAUSCHRITT 2
text_image
Technical diagram of an exercise bike with numbered components and a detailed inset view showing internal structure.AUFBAUSCHRITT 3
text_image
Technical diagram of an exercise bike with labeled components and a close-up inset showing internal components.AUFBAUSCHRITT 4
HARDWARE FÜR SCHRITT 4:
4
Sraube
M4
Menge: 3
natural_image
Line drawing of a person pushing a large object with a curved leg, standing on ground (no text or symbols)natural_image
Line drawing of a person using a tool to lift a large object, with no text or symbols present.text_image
QR code image containing encoded data, no visible human-readable textManufacturer/EU-importer: Johnson Health Tech. GmbH | Europaallee 51, 50226 Frechen, Germany
MODELNAAM: SCHWINN IC3.5
natural_image
Technical line drawing of a mechanical device with wheels and a circular annotation (no text or symbols)
WAARSCHUWING
natural_image
Line drawings of three different wrenches and a screwdriver (no text or symbols)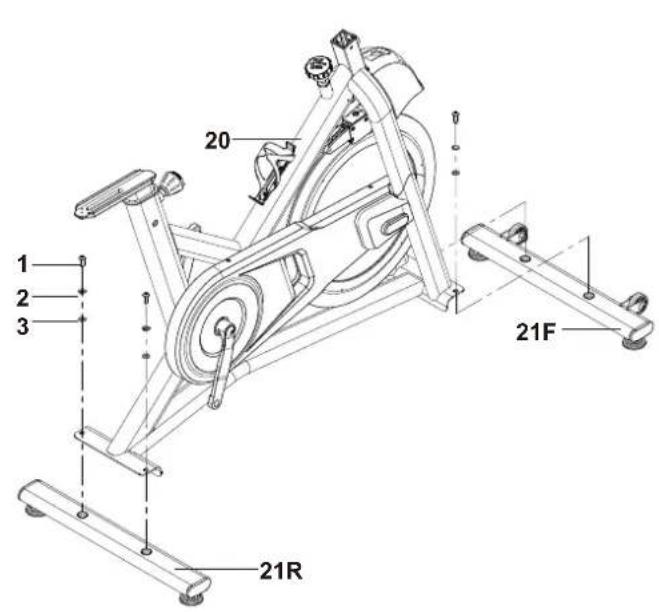
text_image
1 2 3 20 21F 21RMONTAGE STAP 1
STAP 1 MONTAGEMATERIAAL:
1
Bou
M8
Aan-
tal: 4

2
Veerring
∅8,2
Aantal: 4

3
Platte ring
∅8,2
Aantal: 4
text_image
Technical diagram of a vehicle seat assembly with numbered components and labeled partsMONTAGE STAP 2
STAP 2 MONTAGEMATERIAAL:
text_image
3 Platte ring Ø8.2 Qty: 3 2 Veerring Ø8.2 Qty: 3 4 Bout M4 Qty: 4 1 Bout M8 Qty: 3text_image
Technical diagram of an exercise bike with numbered components and a magnified inset showing internal structure details.MONTAGE STAP 3
text_image
Technical diagram of an exercise bike with labeled components and a close-up inset showing internal components.MONTAGE STAP 4
STAP 4 MONTAGEMATERIAAL:
4
Bout
M4
Aantal: 3
VERBIND JE APPARAAT MET DE JRNY-APP VOOR DYNAMISCHERE WORKOUTS
text_image
QR code image containing encoded data, no visible human-readable textnatural_image
Technical line drawing of a mechanical device with wheels and a highlighted circular component (no text or symbols)
AVERTISSEMENT
Fabricant: Johnson Health Industry (Vietnam) Co., Ltd. | Adresse du fabricant: Lot CN-24, Thuan Thanh II Industrial Park, Mao Dien Ward, Bac Ninh Province, Vietnam
INFORMATIONS SUR LE MODÈLE
natural_image
Line drawing of three different wrenches and screwdriver tools (no text or symbols)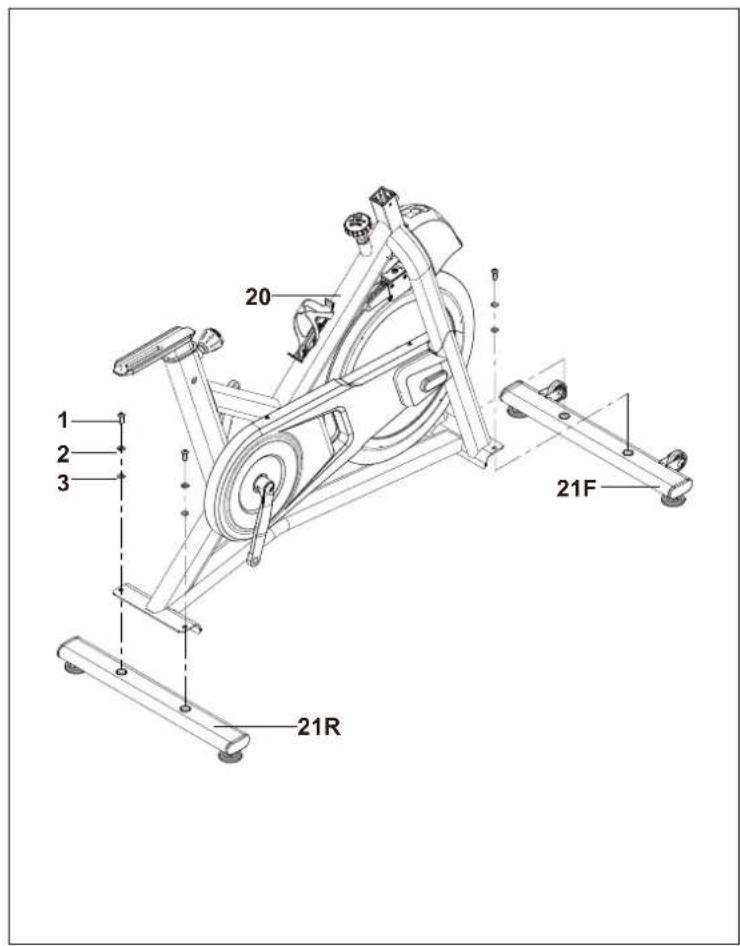
text_image
1 2 3 20 21F 21RASSEMBLAGE ÉTAPE 1
ÉTAPE 1 MATÉRIEL :

text_image
Technical diagram of a vehicle seat assembly with numbered components and labeled partsASSEMBLAGE ÉTAPE 2
ÉTAPE 2 MATÉRIEL :
text_image
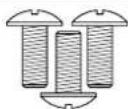
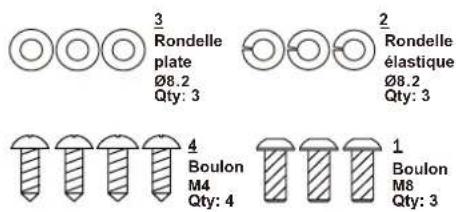
3 Rondelle plate Ø8.2 Qty: 3 2 Rondelle élastique Ø8.2 Qty: 3 4 Boulon M4 Qty: 4 1 Boulon M8 Qty: 3text_image
Technical diagram of an exercise bike with numbered components and a detailed inset view showing internal structure.ASSEMBLAGE ÉTAPE 3
text_image
Technical diagram of an exercise bike with labeled components and a close-up inset showing internal components.ASSEMBLAGE ÉTAPE 4
ÉTAPE 4 MATÉRIEL :

natural_image
Line drawing of a person pushing a large dog on ground (no text or symbols)natural_image
Line drawing of a person using a manual lever to lift a vehicle (no text or symbols)RÈGLES D'UTILISATION
text_image
QR code image containing encoded data, no visible human-readable textQUESTIONS FRÉQUENTES RELATIVES AU PRODUIT
LES SONS QUE FAIT MON VÉLO D'EXERCICE SONT-ILS NORMAUX ?
natural_image
Technical line drawing of a mechanical device with wheels and a circular annotation (no text or symbols)
ATTENZIONE
natural_image
Line drawing of three different wrenches and screwdriver tools (no text or symbols)
text_image
1 2 3 20 21F 21RASSEMBLAGGIO PASSAGGIO 1
COMPONENTI PASSAGGIO 1:
1 Bullone M8 Qtà: 4
text_image
Technical diagram of a vehicle seat assembly with numbered components and labeled partsASSEMBLAGGIO PASSAGGIO 2
COMPONENTI PASSAGGIO 2:

text_image
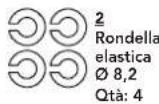
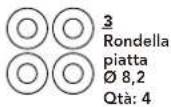
3 Rondella piatta Ø8.2 Qty: 3 2 Rondella elastica Ø8.2 Qty: 3
text_image
Technical diagram of an exercise bike with numbered components and a detailed inset view showing internal structure details.ASSEMBLAGGIO PASSAGGIO 3
text_image
Technical diagram of an exercise bike with labeled components and a close-up inset showing internal components.ASSEMBLAGGIO PASSAGGIO 4
COMPONENTI PASSAGGIO 4:

natural_image
Line drawing of a person pulling a dog on ground (no text or symbols)natural_image
Line drawing of a person using a manual lever to lift a large object (no text or symbols)UTILIZZO CORRETTO
text_image
QR code image containing encoded data, no visible human-readable textnatural_image
Technical line drawing of a mechanical device with wheels and a circular annotation (no text or symbols)ADVERTENCIA
natural_image
Line drawings of three wrenches and a screwdriver (no text or symbols)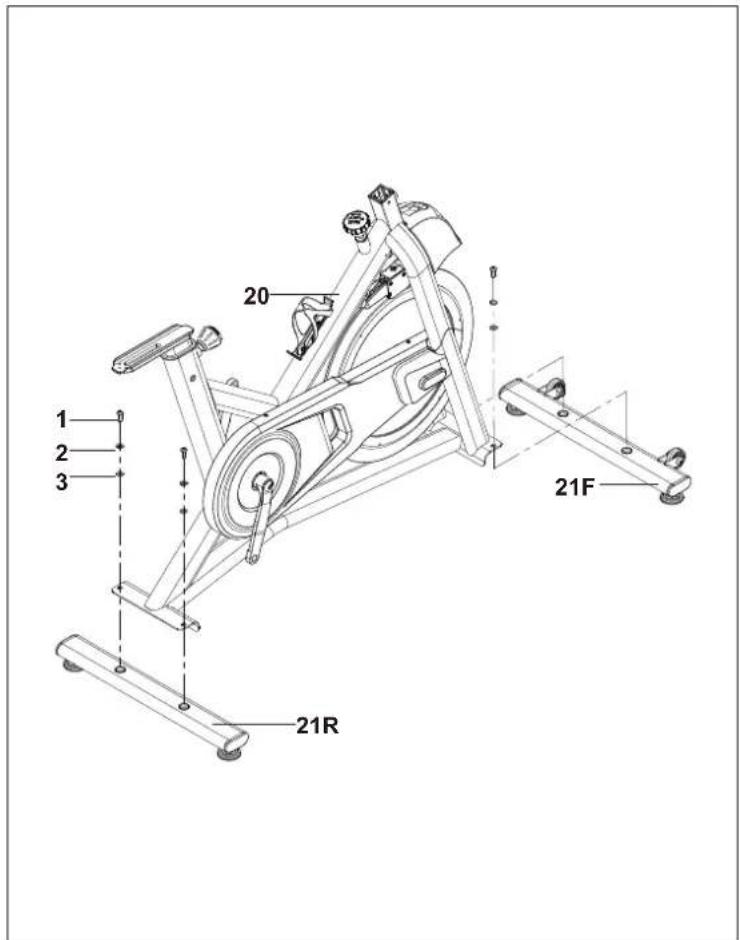
text_image
1 2 3 20 21F 21RPASO DE MONTAJE 1
text_image
Technical diagram of a vehicle seat assembly with numbered components and labeled partsPASO DE MONTAJE 2
text_image
Technical diagram of an exercise bike with numbered components and a detailed inset view showing internal structure.PASO DE MONTAJE 3
text_image
Technical diagram of an exercise bike with labeled components and a close-up inset showing internal wiring details.PASO DE MONTAJE 4
PASO 4 TORNILLERÍA :
4 Perno
M4
Cant.: 3
natural_image
Line drawing of a person pulling a large object with a foot, no text or symbols presentnatural_image
Line drawing of a person using a lever to lift a large object, with no text or symbols present.USO CORRECTO
text_image
QR code image containing encoded data, no visible human-readable textnatural_image
Technical line drawing of a mechanical exercise frame with wheels and a highlighted circular component (no text or symbols)AVISO
natural_image
Line drawings of three wrenches and a screwdriver (no text or symbols)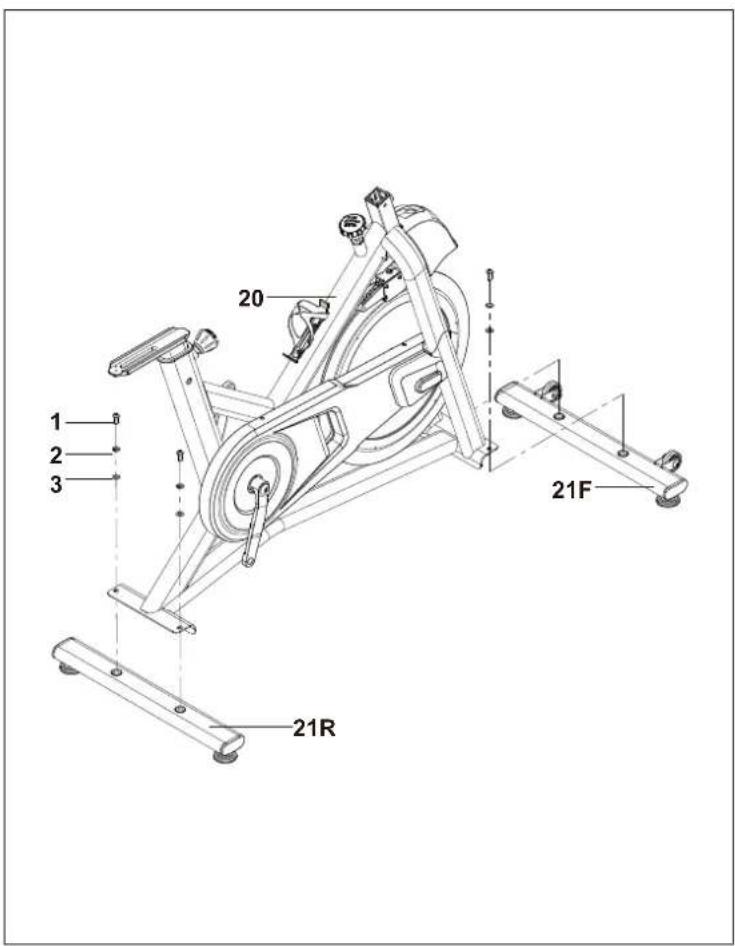
text_image
1 2 3 20 21F 21RMONTAGEM PASSO 1
PASSO 1 FERRAGENS :
1 Parafuso M8 Otd. 4

text_image
Technical diagram of a vehicle seat assembly with numbered components and labeled partsMONTAGEM PASSO 2
PASSO 2 FERRAGENS :
text_image
3 Arruela plana Ø8.2 Qty: 3 2 Arruela de pressão Ø8.2 Qty: 3 4 Parafuso M6 Qty: 4 1 Parafuso M8 Qty: 3text_image
Technical diagram of an exercise bike with numbered components and a detailed inset view showing internal structure.MONTAGEM PASSO 3
text_image
Technical diagram of an exercise bike with labeled components and a close-up inset showing internal components.MONTAGEM PASSO 4
PASSO 4 FERRAGENS :

natural_image
Line drawing of a person pushing a large object with a small ground symbol (no text or symbols present)
text_image
AJUSTAR A ALTURA TRAVAR AJUSTECOMO NIVELAR A BICICLETA ERGOMÉTRICA
natural_image
Line drawing of a person using a seesaw to lift a large object (no text or symbols)USO ADEQUADO
text_image
QR code image containing encoded data, no visible human-readable textnatural_image
Technical line drawing of a mechanical device with wheels and a highlighted circular component (no text or symbols)m = 311
• عن
Lot CN-24, Thuan Thanh II Industrial Park, Mao Dien Ward, | Johnson Health Industry (Vietnam) Co., Ltd Bac Ninh Province, Vietnam
معلومات الموديل
text_image
Technical diagram of an exercise bike with numbered components and a detailed inset view showing internal structure.الجميع الخطوة 4
الخطوة 4 الجهار :
text_image
Technical diagram of an exercise bike with labeled components and a close-up inset showing internal components.التجمع الخطوة 5
الخطوة 5 الجهاز:


natural_image
Line drawing of a person pushing a dog on a ground (no text or symbols)
natural_image
Line drawing of a person using a manual lever to lift a large object, with no text or symbols present.موقع دراجة التمرين
text_image
QR code image containing encoded data, no visible human-readable textnatural_image
Technical line drawing of a mechanical device with wheels and a highlighted circular component (no text or symbols)
警告
natural_image
Line drawing of a wrench, screwdriver, and flat tool (no text or symbols)
4
螺絲
M4
數量:3

5
平垫圈
∅10
數量:1
text_image
1 2 3 20 21F 21R組裝第 1 步
步骤1,五金包:

text_image
Technical diagram of a vehicle seat assembly with numbered components and labeled parts組裝第2步
步骤2,五金包:
text_image
Technical diagram of an exercise bike with numbered components and a magnified inset showing internal structure details.組裝第 3 步
text_image
Technical diagram of a stationary exercise bike with labeled components and an inset showing internal wiring or sensor placement.組裝第4步
natural_image
Line drawing of a person pulling a dog on a platform (no text or symbols)natural_image
Line drawing of a person using a plow to lift a bird, no text or symbols present正確的使用方式
text_image
QR code image containing encoded data, no visible human-readable textnatural_image
Technical line drawing of a mechanical device with wheels and a highlighted circular component (no text or symbols)
警告
natural_image
Line drawing of three wrenches and screwdriver tools (no text or symbols)
4
螺栓
M4
数量:3

5
平垫圈
∅10
数量:1

text_image
1 2 3 20 21F 21R 抗 倍组装步骤 1
步骤1所需五金件
1 螺栓 M8 数量:4

2 弹簧垫圈 ∅8.2 数量:4

3 平垫圈 ∅8.2 数量:4
拆开用于步骤
1的五金件。
text_image
Technical diagram of a vehicle seat assembly with numbered components and labeled parts组装步骤 2
步骤2所需五金件:

text_image
Technical diagram of an exercise bike with numbered components and a detailed inset view showing internal structure.组装步骤 3
逆时针转动调节钮 (24)以完全松开。
text_image
Technical diagram of an exercise bike with labeled components and a close-up inset showing internal components.组装步骤 4
步骤4所需五金件:
4螺栓
M4数量
广力云智慧零售收银系统
拆拜用于步骤
4 的五金件。
natural_image
Line drawing of a person pulling a dog on water (no text or symbols)natural_image
Line drawing of a person using a manual lever to lift a large object, with no text or symbols present.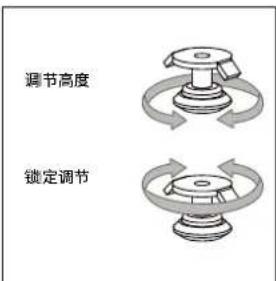
RF Module Model RF Module Type Frequency Transmitter H-field requirements
WLT5283M BT 5.0 & BLE 2.4G -0.42 dBm
DE/UK REPRESENTATIVE CONTACT INFO

EU Web Contact UK Web Contact

Simplified Declaration of Conformity
Johnson Health Tech (including Johnson Health Tech Co. Ltd., Johnson Industries Shanghai, and Johnson Industries Viet Nam), having an Authorized Representative located in the below locations, declares under our sole responsibility that the product accompanied by this Simplified Declaration meets the essential requirements of the EU and UK directives, including the requirements of the RED Directive (2014/53/EU) and the Radio Equipment Regulations 2017 (UK).
The Authorised Representative for the EU is: Johnson Health Tech. GmbH Europaallee 51, D-50226 Frechen, Germany Telephone: +49 (0) 2234/9997-100
The Authorised Representative for the UK is: Johnson Health Tech. Digital UK Limited
Unit 2, 40.40 Link, Mill End Road,
High Wycombe, HP12 4AX,
United Kingdom