SFT 3.1 - Electric bike Schwinn - Free user manual and instructions
Find the device manual for free SFT 3.1 Schwinn in PDF.

User questions about SFT 3.1 Schwinn
0 question about this device. Answer the ones you know or ask your own.
Ask a new question about this device
Download the instructions for your Electric bike in PDF format for free! Find your manual SFT 3.1 - Schwinn and take your electronic device back in hand. On this page are published all the documents necessary for the use of your device. SFT 3.1 by Schwinn.
USER MANUAL SFT 3.1 Schwinn
Important Safety Instructions
Thanks for choosing SCHWINN SFT3.1 Treadmill as your fitness equipment. We are sincerely encourage you to read through this Owner's manual carefully before the assembling of your equipment started, especially of below WARNINGS! WARNINGS WILL REDUCE THE RISK OF BURNS, FIRE, ELECTRICAL SHOCK OR INJURY TO PERSONS.
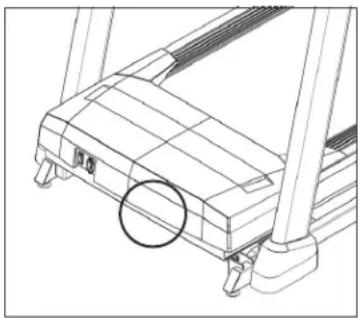
Before proceeding, find your treadmill's serial number located on a white barcode sticker near the on/off power switch and power cord and enter it in the space provided below.
ENTER YOUR SERIAL NUMBER AND MODEL NAME IN THE BOXES BELOW:
SERIAL NUMBER:
MODEL NAME: SCHWI NN SFT3.1
» Refer to the SERIAL NUMBER and MODEL NAME when calling for service.
SERIAL NUMBER LOCATION
natural_image
Technical line drawing of a treadmill base with no visible text or symbols
WARNING
- FAILURE TO FOLLOW THESE INSTRUCTIONS COULD RESULT IN INJURY!
- Heart rate monitoring systems may be inaccurate. Over exercising may result in serious injury or death. If you feel paint stop exercising immediately.
- When exercising, always maintain a comfortable pace.
- If you experience any kind of pain, including but not limited to chest pains, nausea, dizziness, or shortness of breath, stop exercising immediately and consult your physician before continuing. Incorrect or excessive exercise may damage your health.
- Do not wear clothes that might catch on any part of the treadmill
• Always wear athletic shoes while using this equipment. - Do not jump on the treadmill.
- While exercising, do not run near the edge of the belt to avoid the risk of injury.
- At no time should more than one person be on treadmill while in operation.
- This treadmill should not be used by persons weighing more than the weight showing in TECH SPEC section. Failure to comply will void the warranty.
- When lowering the treadmill deck, wait until rear feet are firmly on the floor before stepping on the deck.
- Do not operate under blanket or pillow. Excessive heating can occur and cause fire, electric shock, or injury to persons.
- Connect this exercise product to a properly grounded outlet only.
- To disconnect, turn all controls to the off position, then remove plug from outlet.
- Disconnect all power before moving the equipment.
- Never operate product with a damaged cord or plug even if it is working properly. Never operate any product if it appears damaged, or has been immersed in water. Contact Customer Tech Support for replacement or repair in order to avoid a hazard.
• The treadmill should never be left unattended when plugged in. Unplug from outlet when not in use, and before putting on or taking off parts.
- At NO time should pets or children under the age of 13 be closer to the treadmill than 3 meter.
- At NO time should children under the age of 13 use the treadmill.
- Children over the age of 13 or the persons with reduced physical, sensory or mental capabilities, or lack of experience and knowledge should not use the treadmill, unless supervised or unless they have been given instruction concerning use of the treadmill by a person responsible for their safety.
- Do not remove the protected covers unless instructed by professional and your local dealer. Service should only be done by and authorized service technician.
- Disconnect the safety key to prevent uncontrolled usage of third parties.
- Treadmill equipped with side handrails and front handlebar for user support and emergency dismount, press emergency button to stop the machine for emergency dismount.
- The noise level of the treadmill is less than 70 dB when there is no user on it and more than 70 dB when it is in use. If the noise of treadmill bothers you, stop exercising and take a break. Noise emission under load is higher than without load.
• Make sure the treadmill comes to complete stop before folding. Do not operate the treadmill when it is folded.
- Please note that the plastic parts, such as end caps, are susceptible to wear.
- The treadmill's safety level can only be maintained if it is checked regularly for damage and wear.
- Make sure the edge of the belt is parallel with the lateral position of the side rail and does not move under the side rail. If the belt is not centered it must be adjusted before use.
- Use the treadmill only for its intended use as described in the treadmill guide and owner's manual.
- Do not use other attachments that are not recommended by the manufacturer. Attachments may cause injury.
- Return the unit to a service center for examination and repair.
- Keep power cord away from heated surfaces. Do not carry this unit by its supply cord or use the cord as a handle.
- Never operate the treadmill with the air opening blocked. Keep the air opening clean, free of lint, hair, and the like.
- To prevent electrical shock, never drop or insert any object into any opening.
- Do not operate where aerosol (spray) products are being used or when oxygen is being administered.
- This treadmill is intended for in-home use only. Failure to comply will void the warranty.
- Do not use treadmill in any location that is not temperature controlled, such as but not limited to garages, porches, pool rooms, bathrooms, car ports or outdoors. If your treadmill has been exposed to colder temperatures or high moisture climates, it is strongly recommended that the treadmill is warmed up to room temperature before first time use. Failure to comply will void the warranty.
- Treadmill is heavy; use care and additional help if necessary when moving. Do not attempt to move or transport treadmill unless it is in the upright, folded position with the lock latch secured. Failure to follow these instructions could result in injury.
-
Do not move or lift treadmill from packaging until specified to do so in the assembly instructions. You may remove the plastic wrap from console masts.
-
Never open box when it is positioned upside-down or on its side.
- Unpack and assemble the unit where it will be used.
- The enclosed treadmill is equipped with high-pressure springs which can cause the lower base frame to spring open if mishandled.
- Do not remove the console covers unless instructed by Customer Tech Support. Service should only be done by an authorized service a technician.
- Have 2 people available for assembly, this will make the assembly process easier.
TECH SPECS
| Assembled Dimensions (L x W x H) | 162.5 x 77 x 139.5 cm / 64" x 30.3" x 54.9" |
| Product Weight | 52.4 kg / 115 lbs. |
| Max User Weight | 113 kg / 250 lbs. |

From now on, you can assemble your equipment at your convenience. For detailed instructions on assembly, operation, programs, troubleshooting, and maintenance, please scan the QR code on the left side to access the complete manual.
If scanning the QR code fails, you can visit the website provided here: https://global.schwinnfitness.com/en/manuals.html
WARRANTY
If your equipment requires warranty service, please contact local Customer Tech Support.

NEED HELP?
If you have any questions, need assistance with missing parts, or require technical support or maintenance for your equipment, please contact Customer Tech Support.
Manufacturer: Johnson Health Industry (Vietnam) Co., Ltd. | Manufacturer address: Lot CN-24, Thuan Thanh II Industrial Park, Mao Dien Ward, Bac Ninh Province, Vietnam
text_image
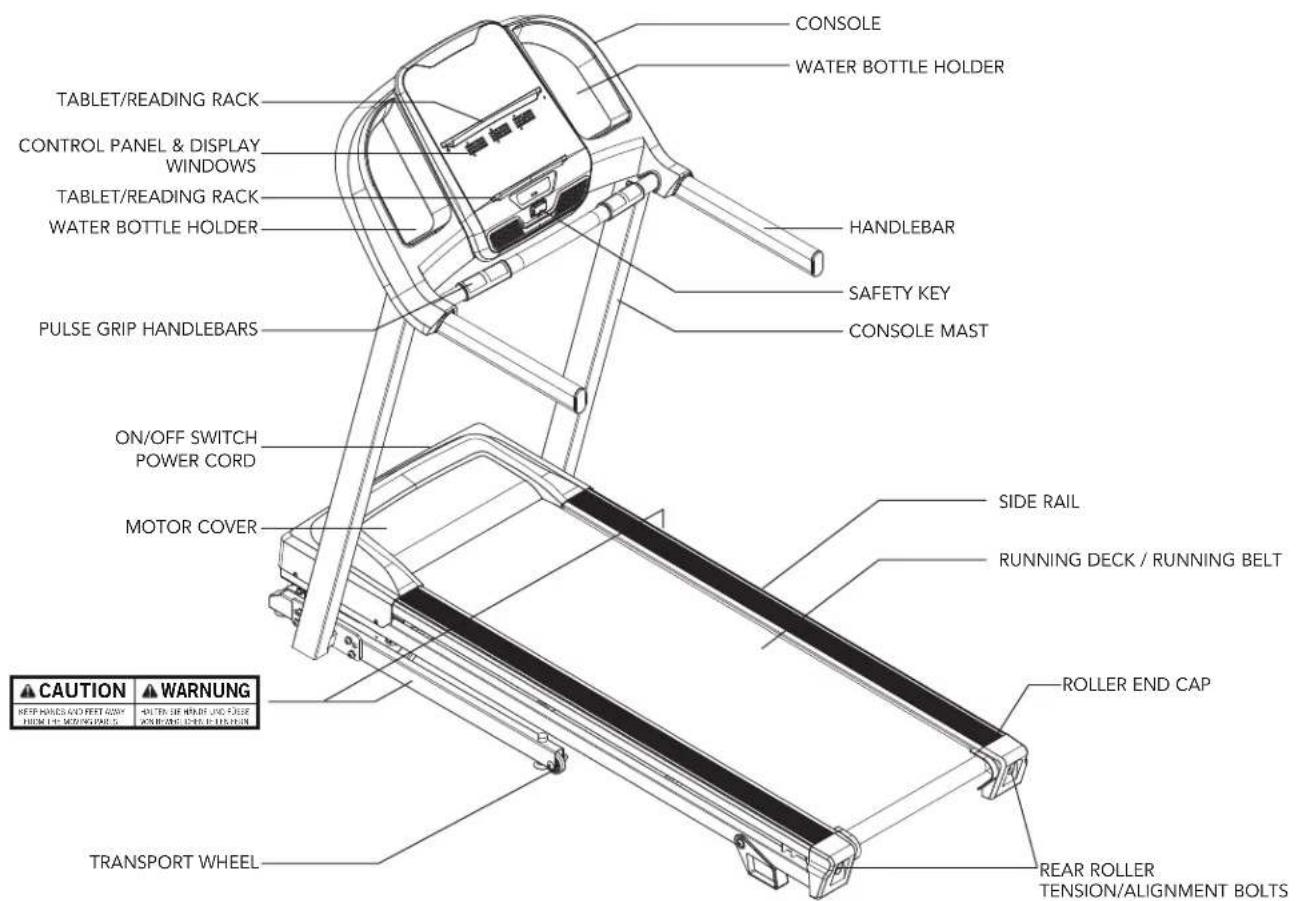
CONSOLE WATER BOTTLE HOLDER TABLET/READING RACK CONTROL PANEL & DISPLAY WINDOWS TABLET/READING RACK WATER BOTTLE HOLDER HANDLEBAR SAFETY KEY PULSE GRIP HANDLEBARS CONSOLE MAST ON/OFF SWITCH POWER CORD MOTOR COVER SIDE RAIL RUNNING DECK / RUNNING BELT CAUTION WARNING KEEP HOURS & FEET NOW ITEM 1#-MOZZONE 5 DOWN 2#-MOZZONE 5 ROLLER END CAP TRANSPORT WHEEL REAR ROLLER TENSION/ALIGNMENT BOLTSTOOLS INCLUDED:

6 mm L-Wrench
6 mm T-Wrench
PARTS INCLUDED:
1 Console Assembly
2 Console Masts
1 Hardware Kit
1 Safety Key
1 Bottle of Silicone Lubricant
(for 2 applications)
1 Power Cord
2 Handlebars

NEED HELP?
If you have questions or if there are any missing parts, contact Customer Tech Support.
PRE ASSEMBLY

WARNING
DO NOT ATTEMPT TO LIFT THE TREADMILL! Do not move or lift treadmill from packaging until specified to do so in the assembly instructions. You may remove the plastic wrap from console masts.
UNPACKING
Place the treadmill carton on a level flat surface. It is recommended that you place a protective covering on your floor. Take CAUTION when handling and transporting this unit. Never open box when it is on its side. Once the banding straps have been removed, do not lift or transport this unit unless it is fully assembled and in the upright folded position, with the lock latch secure. Unpack and assemble the unit where it will be used. The enclosed treadmill is equipped with high-pressure shocks and may spring open if mishandled. Never grab hold of any portion of the incline frame and attempt to lift or move the treadmill.

WARNING
FAILURE TO FOLLOW THESE INSTRUCTIONS COULD RESULT IN INJURY!
NOTE: During each assembly step, ensure that ALL nuts and bolts are in place and partially threaded in before completely tightening any ONE bolt.
NOTE: A light application of grease may aid in the installation of hardware. Any grease, such as lithium bike grease is recommended.
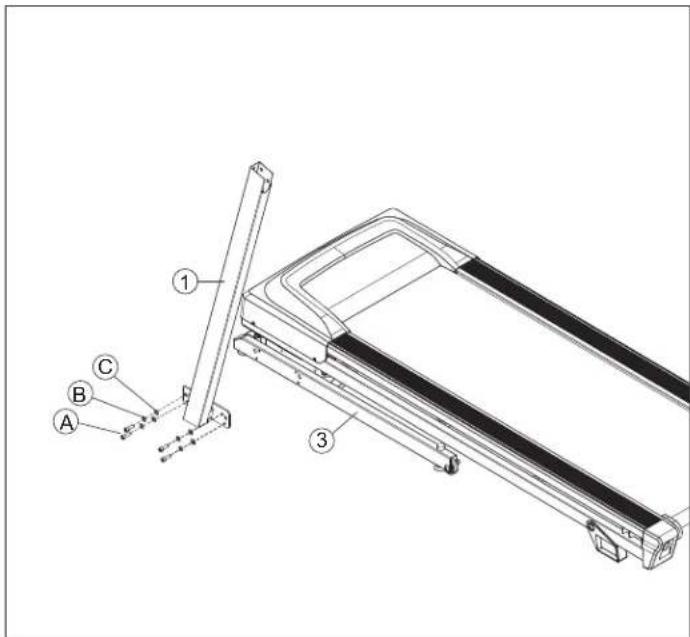
ASSEMBLY STEP 1
| HARDWARE FOR STEP 1 | |||
| PART TYPE DESCRIPTION QTY | |||
| A BOLT M8X1.25PX15L 4 | |||
| B SPRING WASHER 8.0X13.0X1.5T 4 | |||
| C FLAT WASHER | 8.2X13.0X1.4T | 4 | |
text_image
Technical diagram of a treadmill with labeled parts A, B, C and numbered components 1, 2, 3A Open HARDWARE FOR STEP 1.
B Attach the LEFT CONSOLE MAST (1) to the BASE FRAME (3) using 4 BOLTS (A), 4 SPRING WASHERS (B) and 4 FLAT WASHERS (C).
NOTE: Do not fully tighten bolts until STEP 4.
A

B
C
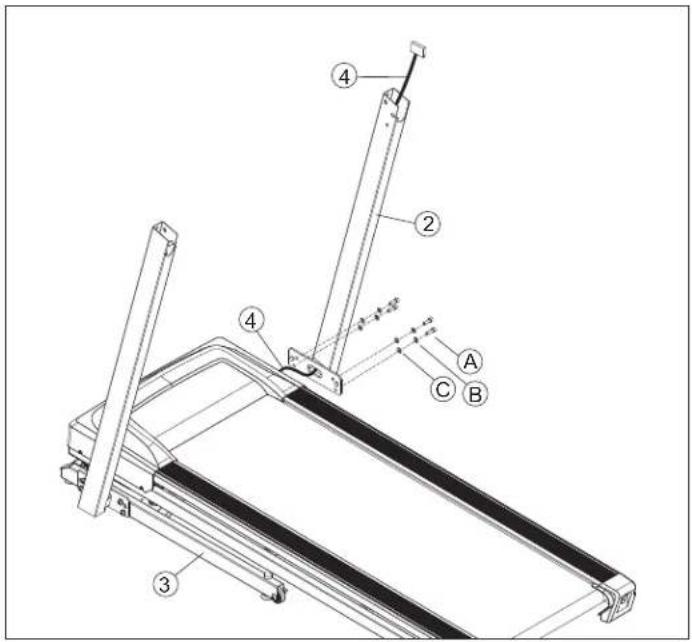
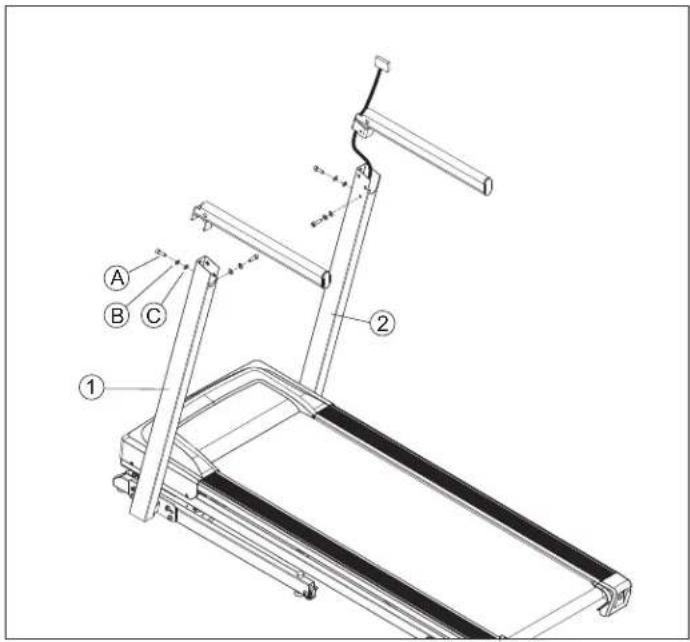
ASSEMBLY STEP 2
| HARDWARE FOR STEP 2 | |||
| PART TYPE DESCRIPTION QTY | |||
| A BOLT M8X1.25PX15L 4 | |||
| B SPRING WASHER 8.0X13.0X1.5T 4 | |||
| C | FLAT WASHER | 8.2X13.0X1.4T | 4 |
text_image
Technical diagram of a treadmill with labeled parts including legs, arms, and support structuresA Open HARDWARE FOR STEP 2.
B Attach LEAD WIRE to bottom end of CONSOLE CABLE (4). Pull LEAD WIRE through RIGHT CONSOLE MAST (2). After pulling the lead wire through the mast, the top of the CONSOLE CABLE (4) should be located at the top of the mast.
C Attach the RIGHT CONSOLE MAST (2) to the BASE FRAME (3) using 4 BOLTS (A), 4 SPRING WASHERS (B) and 4 FLAT WASHERS (C).
NOTE: Do not fully tighten bolts until STEP 4.

A

B

C
ASSEMBLY STEP 3
| HARDWARE FOR STEP 3 | |||
| PART TYPE DESCRIPTION QTY | |||
| A BOLT M8X1.25PX15L 4 | |||
| B | SPRING WASHER | 8.0X13.0X1.5T | 4 |
| C | FLAT WASHER | 8.2X13.0X1.4T | 4 |
text_image
Technical diagram of a treadmill with labeled parts A, B, C and numbered components 1, 2NOTE: Be careful not to pinch any wires while assembling the console.
A Pull the LEAD WIRE through the bottom end of the HANDLEBAR.
B Open HARDWARE FOR STEP 3.
C Attach the HANDLEBAR to the LEFT CONSOLE MAST (2) using 2 BOLTS (A), 2 SPRING WASHERS(B) and 2 FLAT WASHERS (C).
D Do the same above for the another HANDLEBAR. NOTE: Do not fully tighten bolts until STEP 5.
A

B

C
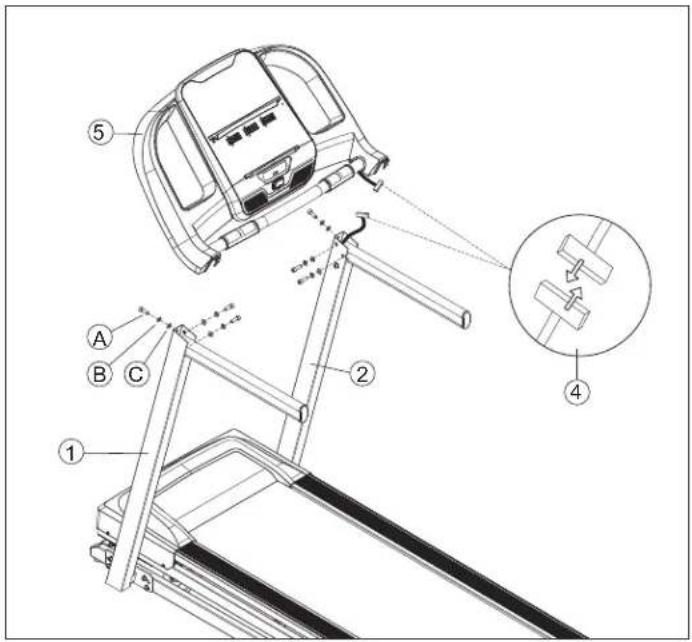
ASSEMBLY STEP 4
| HARDWARE FOR STEP 4 | |||
| PART TYPE DESCRIPTION QTY | |||
| A BOLT M8X1.25PX15L 6 | |||
| B | SPRING WASHER | 8.0X13.0X1.5T | 6 |
| C | FLAT WASHER | 8.2X13.0X1.4T | 6 |
text_image
Technical diagram of a treadmill assembly with labeled parts and an inset showing a mechanical component detail.A Open HARDWARE FOR STEP 4.
B Gently place the CONSOLE (5) on top of the CONSOLE MASTS (1&2). Attach the LEFT SIDE first using 3 BOLTS (A), 3 SPRING WASHERS (B) and 3 FLAT WASHERS (C).
C The CONSOLE CABLES (4) are tucked into the CONSOLE MAST (2). Using the lead wire carefully pull the CONSOLE CABLE (4) out of the CONSOLE MAST (2). Detach and discard the LEAD WIRE. Connect the CONSOLE CABLES (4) and carefully tuck wires in the mast to avoid damage.
D Attach the RIGHT SIDE of the CONSOLE (5) using 3 BOLTS (A), 3 SPRING WASHERS (B) and 3 FLAT WASHERS (C).

A

B
C
ASSEMBLY STEP 5

natural_image
Line drawing of a treadmill with adjustable arms and legs (no text or symbols)ASSEMBLY COMPLETE!
Treadmill Setup and Use
text_image
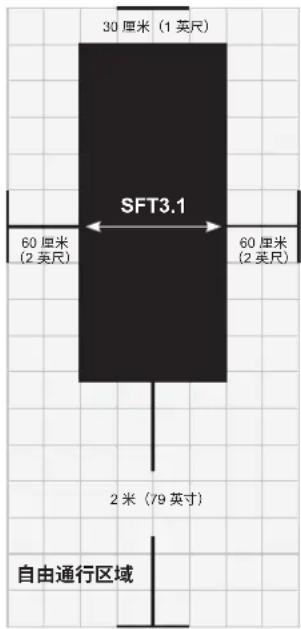
30 cm (1 FT) SFT3.1 60 cm (2 FT) 60 cm (2 FT) 2 M (79") FREE AREAPlace the treadmill on a level and stable surface. There should be 30cm of clearance in front of the treadmill for the power cord. Please leave a clear zone behind the treadmill that is at least the width of the treadmill and at least 2 meters long. This zone must be clear of any obstruction and provide the user a clear exit path from the machine. In case of an emergency, place both hands on the side arm rests to hold yourself up and place your feet onto the side rails.
For ease of access, there should be an accessible space preferentially on both sides of the treadmill equal to 0.6 meter to allow a user access to the treadmill from either side.
Do not place the treadmill in any area that will block any vent or air openings. The treadmill should not be located in a garage, covered patio, near water or outdoors.
GROUNDING INSTRUCTIONS
This product must be grounded. If a treadmill should malfunction or breakdown, grounding provides a path of least resistance for electrical current to reduce the risk of electrical shock. This product is equipped with a cord having an equipment-grounding conductor and a grounding plug. The plug must be plugged into an appropriate outlet that is properly installed and grounded in accordance with local codes and ordinances.
DANGER!
- Improper connection of the equipment-grounding conductor can result in a risk of electric shock. Check with a qualified electrician or service provider if you are in doubt as to whether the product is properly grounded. Do not modify the plug provided with the product. If it does not fit the outlet, have a proper outlet installed by a qualified electrician.
- This product is for use on a nominal local voltage circuit and has a grounding plug. No adapter should be used with this product.
- This product must be used on a dedicated circuit. To determine if you are on a dedicated circuit, shut off the power to that circuit and observe if any other devices lose power. If so, move devices to a different circuit. Note: There are usually multiple outlets on one circuit.
FOLDING TREADMILLS
To fold, firmly grasp the back end of the treadmill. Carefully lift the end of the treadmill deck into the upright position until the lock latch engages and securely locks the deck into position. Make sure the deck is securely latched before letting go.
UNFOLDING
Firmly grasp the back end of the treadmill. To unfold, gently press down on the foot lock latch with your foot until the lock latch disengages. Carefully lower the deck to the ground.
natural_image
Diagram of a balance scale mechanism with an inset showing foot movement (no text or symbols)USING THE SAFETY KEY
Your treadmill will not start unless the safety key is placed in position. Attach the clip end securely to your clothing. This safety key is designed to cut the power to the treadmill if you should fall. Check the operation of the safety key every 2 weeks.
WARNING: Never use the treadmill without securing the safety key clip to your clothing. Pull on the safety key clip first to make sure it will not come off your clothing.
POWER
Your treadmill is powered by a power supply. The power must be plugged into the power jack, which is located in the front of the machine near the stabilizer tube. Some treadmills have a power switch, located next to the power jack. Make sure it is in the on position. Unplug cord when not in use. NOTE: Some treadmills have an on/off switch located behind the console.
WARNING: Never operate product if it has a damaged cord or plug, if it is not working properly, if it has been damaged, or immersed in water.
LEVELING THE TREADMILL
Your treadmill should be level for optimum use. Once you have placed your treadmill where you intend to use it, raise or lower one or both of the adjustable levelers located on the bottom of the treadmill frame. A carpenter's level is recommended. If your treadmill is not level, the running belt may not track properly. Once you have leveled your treadmill, lock the levelers in place by tightening the nuts against the frame.
ADJUST HEIGHT LOCK ADJUSTMENT
text_image
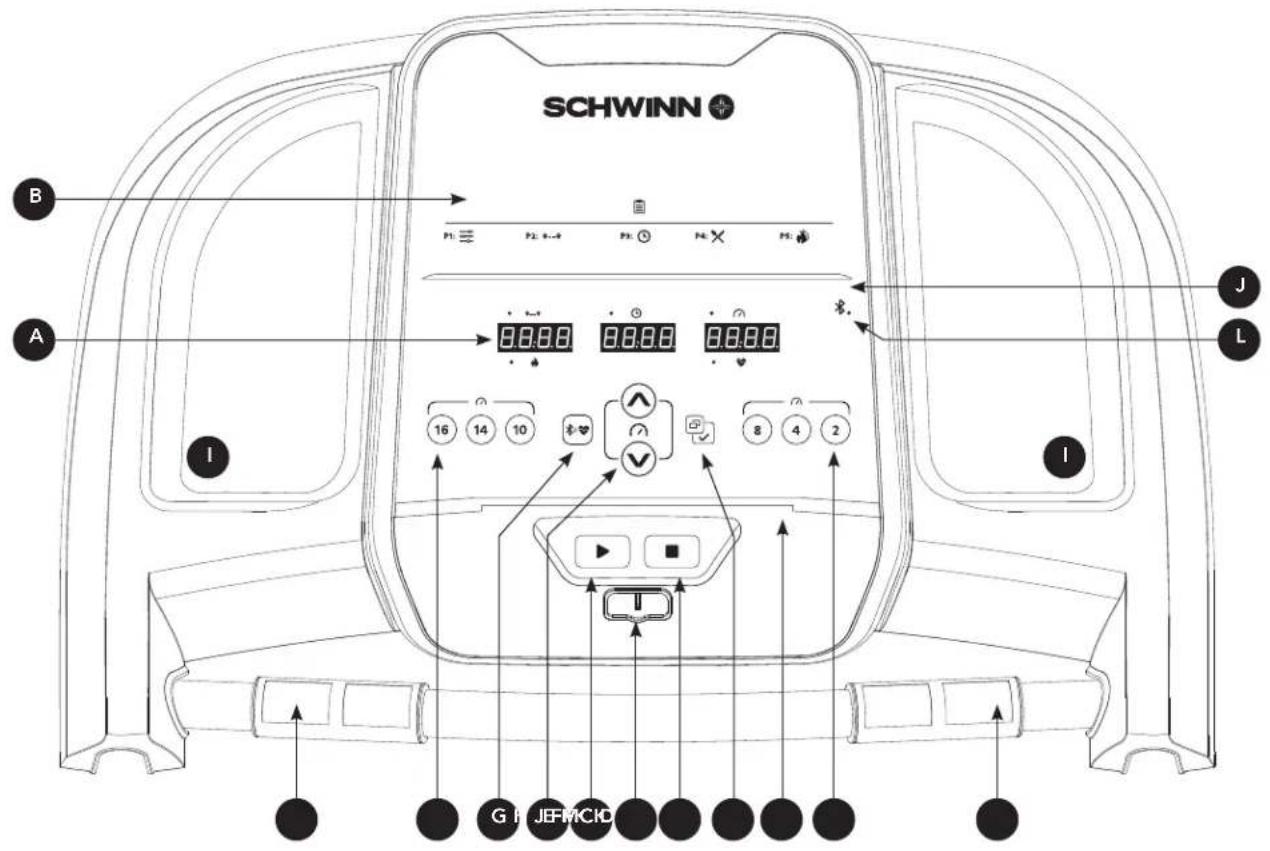
SCHWINN B P1: 3 P2: 6-4 P3: 0 P4: X P5: A 00.00 00.00 00.00 16 14 10 √♥ 8 4 2 I G H JEFMCKD I J LCONSOLE OPERATION
Note: There is a thin protective sheet of clear plastic on the overlay of the console that should be removed before use.
A) LED DISPLAY: Calories, Time, Distance, Speed, Heart Rate.
B) WORKOUT PROGRAMS: used to reference program code shown on LED display.
C) START: press to begin exercising, start your workout, or resume exercising after pause.
D) STOP: press to pause/end your workout. Hold for 3 seconds to reset the console.
E) SPEED +/- KEYS: used to adjust speed in small increments (0.1 mph increments).
F) SPEED QUICK KEYS: used to reach desired speed more quickly.
G) BLUETOOTH HEART RATE: press and hold 3 sec to connect to the Bluetooth heart rate strap. (APP & BT heart rate strap could only connect one at a time)
H) ENTER/CHANGE DISPLAY: press to select item/press to change display feedback during workout.
I) WATER BOTTLE POCKETS: holds personal workout equipment.
J) TABLET/READING RACK: holds tablet or reading material.
K) HEART RATE PULSE GRIPS: used to measure heart rate.
L) BLUETOOTH: the light will be consistently on once the Bluetooth was connected.
M) SAFETY KEY: the safety key need to plug in to turn on the treadmill.
text_image
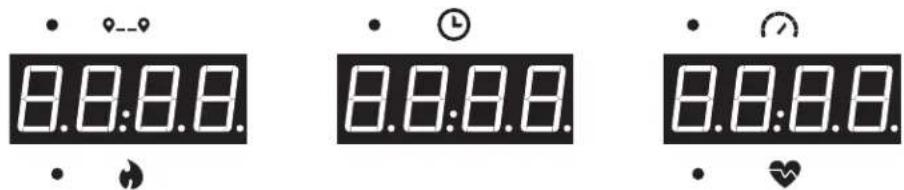
8.8:8.0 • ⏰—9 8.8:8.0 • ⏰ 8.8:8.0 • ⏰DISPLAY WINDOWS
CALORIES: Total calories burned or calories remaining left to burn during your workout.
• TIME: Set up your workout time and speed. Then start your work out.
- 9__9 DISTANCE: Shown as kilometer. Indicates distance traveled or distance remaining during your workout.
- SPEED: Shown as KPH. Indicates how fast your walking or running surface is moving.
• HEART RATE: Shown as BPM (beats per minute). Used to monitor your heart rate (displayed when contact is made with both pulse grips).
GETTING STARTED
1) Check to make sure no objects are placed on the belt that will hinder the movement of the treadmill.
2) Plug in the power cord and turn the treadmill ON. (The ON/OFF switch is next to the power cord.)
3) Stand on the side rails of the treadmill.
4) Attach the safety key clip to part of your clothing making sure that it is secure and will not become detached during operation.
5) Insert the safety key into the safety keyhole in the console.
6) You have two options to start your workout:
A) QUICK START UP
Simply press the START key to begin working out.
Time, distance, and calories will all count up from zero. OR...
B) SELECT A WORKOUT OR TARGET
1) Select your PROGRAM with the +/- buttons and press ENTER when your desired PROGRAM is displayed.
2) Adjust the SETTING with the +/- buttons and press ENTER when your desired SETTING is displayed.
3) Press START to begin.
WORKOUT PROFILES

P1) MANUAL: Adjust your speed manually during your workout.

P2) DISTANCE: Push yourself and go further during your workout with 13 distance workouts. Choose from L1: 1.6 km, L2: 3.2 km, L3: 5 km, L4: 8 km, L5: 10 km, L6: 12.8 km, L7: 15 km, L8: 16 km, L9: 20 km, L10: half marathon, L11: 24 km, L12: 32 km and L13: marathon goals. User sets starting speed levels.

P3) TIME: Set goals for Time. User could set up the speed and Incline to start.

P4) CALORIES: Set goals for burning calories. Calories burned are calculated using distance and speed.

P5) FAT BURN: A workout designed specifically to target fat. Promotes weight loss by increasing and decreasing the speed, while keeping you in your fat burning zone. Includes 10 levels.
| Segment Warm Up 1 2 3 4 5 6 7 8 | |||||||||||
| Time 4:00 Mins 30 Sec 30 Sec 30 Sec 30 Sec 30 Sec 30 Sec 30 Sec 30 Sec 30 Sec 30 Sec 30 Sec 30 Sec 30 Sec 30 Sec 30 Sec 30 Sec 30 Sec 30 Sec 30 Sec 30 Sec 30 Sec 30 Sec 30 Sec 30 Sec 30 Sec 30Sec | |||||||||||
| Level 1 Speed(kph) 0.8 2.4 3.2 4 4.8 5.6 6.4 5.6 4.8 4 | |||||||||||
| Level 2 Speed(kph) 0.8 3 4 4.8 5.6 6.4 7.2 6.4 5.6 4.8 | |||||||||||
| Level 3 Speed(kph) 0.8 3.7 4.8 5.6 6.4 7.2 8 7.2 6.4 5.6 | |||||||||||
| Level 4 Speed(kph) 1.6 4.1 5.6 6.4 7.2 8 8.8 7.2 6.4 | |||||||||||
| Level 5 Speed(kph) 1.6 4.8 6.4 7.2 8 8.8 9.6 8.8 8 7.2 | |||||||||||
| Level 6 Speed(kph) 1.6 5.1 7.2 8 8.8 9.6 | 10.4 | 9.6 8.8 8 | |||||||||
| Level 7 | Speed(kph) | 2.2 | 6.1 | 8 | 8.8 | 9.6 | 10.4 | 11.2 | 10.4 | 9.6 | 8.8 |
| Level 8 | Speed(kph) | 2.2 | 6.6 | 8.8 | 9.6 | 10.4 | 11.2 | 12 | 11.2 | 10.4 | 9.6 |
| Level 9 | Speed(kph) | 2.2 | 7.2 | 9.6 | 10.4 | 11.2 | 12 | 12.8 | 12 | 11.2 | 10.4 |
| Level 10 | Speed(kph) | 2.2 | 7.8 | 10.4 | 11.2 | 12 | 12.8 | 13.6 | 12.8 | 12 | 11.2 |
TO RESET THE CONSOLE
Hold STOP key for 3 seconds.
When your workout is complete, the unit will beep. Your workout information will stay displayed on the console for 30 seconds and then reset.
CONNECT YOUR DEVICE WITH THE JRNY APP FOR MORE DYNAMIC WORKOUTS
If you have a JRNY membership*, it can be accessed through your device when synced to the console of this machine. With that JRNY membership, you receive guided workouts adapted.

text_image
QR code image containing encoded data, no visible human-readable text* A JRNY membership is required for the JRNY experience – see global.schwinnfitness.com/en/schwinn-jrny.html for details. Where available (including the United States), you can obtain a JRNY membership by downloading the JRNY app onto your phone or tablet and signing up within the downloaded app. JRNY memberships may not be available in all countries.
Maintenance & Troubleshooting
MAINTENANCE
Preventative maintenance is the key to smooth operating equipment, as well as keeping the users' liability to a minimum. Equipment needs to be inspected at regular intervals. Defective components must be replaced immediately. Improperly working equipment must be kept out of use until it is repaired. Ensure that any person(s) making adjustments or performing maintenance or repair of any kind is qualified to do so.

WARNING
To remove power from the treadmill, the power cord must be disconnected from the wall outlet.
MAINTENANCE SCHEDULE
| ACTION FREQUENCY | |
| Clean and inspect the treadmill:Turn off the treadmill with the ON/OFF switch, then unplug the power cord at the wall outlet.Wipe down the running belt, deck, motor cover and console casing with a damp cloth. Never use solvents, as they can cause damage to the treadmill.Inspect the power cord. If the power cord is damaged, please reference contact information on the back cover of the INFORMATION CARD for assistance.Make sure the power cord is not underneath the treadmill or in any other area where it can become pinched or cut during storage or use.Check the tension and alignment of the running belt. Make sure that the treadmill belt will not damage any other components on the treadmill by being misaligned.If any labels are damaged or illegible, please reference contact information on the back cover of the INFORMATION CARD for assistance. | DAILY |
| Clean underneath the treadmill:Turn off the treadmill with the ON/OFF switch, then unplug the power cord at the wall outlet.Fold the treadmill into the upright position, making sure that the lock latch is secure.Move the treadmill.Wipe or vacuum any dust particles or other objects that may have accumulated underneath the treadmill.Return the treadmill to its previous position. | WEEKLY |
| IMPORTANT!Turn off the treadmill with the ON/OFF switch, then unplug the power cord at the wall outlet. Wait 60 seconds.Inspect all assembly bolts of the machine for proper tightness.Remove the motor cover. Wait until ALL display screens turn off.Clean the motor and lower board area to eliminate any lint or dust particles that may have accumulated. Failure to do so may result in premature failure of key electrical components.Wipe down the belt with a damp cloth. Vacuum any black/white particles that may accumulate around the unit. These particles may accumulate from normal treadmill use.If your treadmill has air shocks under the deck for lift assistance, lubricate the silver air shock tube with Teflon-based spray found at your local hardware or bike store. | MONTHLY |
MAINTENANCE SCHEDULE
LUBRICATING THE RUNNING BELT
EVERY 3 MONTHS OR 480 KM
It is necessary to lubricate your treadmill running deck every three months or 480 km to maintain optimal performance. Once the treadmill records 480 km it will display the message "LUBE" or "LUBE BELT." The treadmill will not operate while the message is showing. Your treadmill came with a bottle of 100% silicone lubricant, which can be used for two applications.
To purchase additional Silicone Lubricant: Please contact Customer Tech Support.
Tools Needed:
• T-wrench or Allen wrench
• 100% silicone oil
text_image
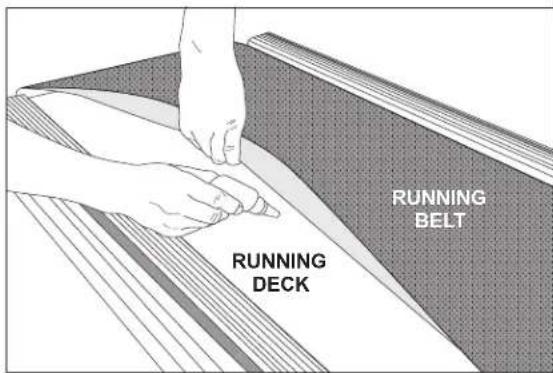
RUNNING BELT RUNNING DECKPROCEDURE:
- Turn off the treadmill with the on/off switch and unplug the power cord at the wall outlet.
- Using the T-wrench or Allen wrench, loosen the rear roller bolts 10-15 counter-clockwise turns. This should give the belt enough slack for you to lift it.
- Lift the belt as far as you can and squirt the silicone oil in a zigzag pattern across the entire running deck surface. Use 1/2 bottle of silicone lubricant. Do not apply the silicone oil on top of the running belt. Lay the running belt down and then tighten both rear roller bolts clockwise the same number of turns loosened.
- After you have applied lubricant, plug in the power cord, and insert the safety key. Reset the Lube Belt message by first pressing and holding the SPEED UP button, then STOP button and hold BOTH buttons for 5-7 seconds.
- Stay off of the machine and press START. Allow the belt to run at 3 mph for 3 minutes to begin spreading the silicone. Then walk on the machine at a comfortable speed for 3 minutes to complete spreading the silicone and to check the running belt for proper tension and alignment.
- Once the belt is centered and tensioned, stop the belt. Wipe any excess oil from the sides with a damp cloth.
Press any key to suspend the lubrication warning message until after your next workout.
Note: Some older models may require you to hold stop for 5 seconds to suspend message for 8 km of use.
If your treadmill has air shocks under the deck for lift assistance, lubricate the silver air shock tube with Teflon-based spray found at your local hardware or bike store.
Visit the Customer Support section of our website to view “how-to” maintenance videos. Please contact Customer Tech Support with questions about applying lubricant to your treadmill.
natural_image
Line drawing of a hand using a tool to adjust or install a mechanical component (no text or symbols present)natural_image
Line drawing of a hand using a hammer to adjust or install a mechanical component (no text or symbols)TENSIONING THE RUNNING BELT
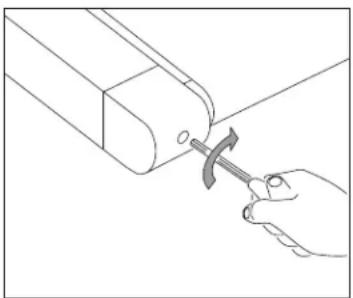
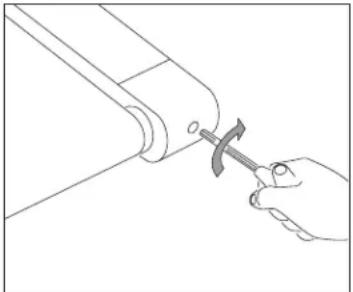
If you can feel a slipping sensation when running on the treadmill, the running belt must be tightened. In most cases, the belt has stretched from use, causing the belt to slip. This is a normal and common adjustment. To eliminate this slipping, turn the treadmill off and tension both the rear roller bolts using the supplied Allen wrench, turning them 14 turn to the right (clockwise) as shown. Turn the treadmill on and check for slipping. Repeat if necessary, but never turn the roller bolts more than 14 turn at a time. Belt is properly tensioned when the slipping sensation is gone.
WARNING
Running belt should NOT be moving during tensioning. Over-tightening the running belt can cause excessive wear on the treadmill as well as its components. Never over-tighten the belt.

natural_image
Line drawing of a hand using a hammer to adjust or install a mechanical component (no text or symbols present)BELT IS TOO FAR TO THE RIGHT SIDE

natural_image
Line drawing of a hand using a hammer to adjust a mechanical component (no text or symbols)BELT IS TOO FAR TO THE LEFT SIDE
CENTERING THE RUNNING BELT
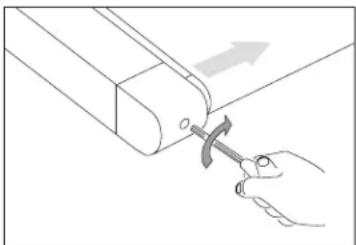
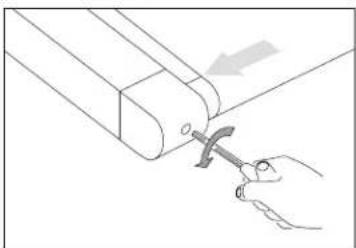
If the running belt is too far to the right side: Using the supplied Allen wrench and with the treadmill running at 1 km/h turn the LEFT adjustment bolt counter-clockwise a 14 turn and wait for the belt to adjust itself. Use the motor cover marking or part line as a reference for alignment. Repeat if necessary, until the belt remains centered during use.
If the running belt is too far to the left side: Using the supplied Allen wrench and with the treadmill running at 1 km/h turn the LEFT adjustment bolt clockwise a 14 turn and wait for the belt to adjust itself. Use the motor cover marking or part line as a reference for alignment. Repeat if necessary, until the belt remains centered during use.
- If you find the belt is slipping because it is too loose, center it then tension as needed.
- For easier adjustment bolt access, remove the end caps.

CAUTION
Do not run belt faster than 1 km/h while centering. Keep fingers, hair and clothing away from belt at all times.
TROUBLESHOOTING
COMMON PRODUCT QUESTIONS
ARE THE SOUNDS MY TREADMILL MAKES NORMAL?
All treadmills make a certain type of thumping noise due to the belt riding over the rollers, especially new treadmills. This noise will diminish over time, although it may not totally go away. Over time, the belt will stretch, causing the belt to ride smoother over the rollers.
WHY IS THE TREADMILL I PURCHASED LOUDER THAN THE ONE AT THE STORE?
All fitness products seem quieter in a large store showroom because there is generally more background noise than in your home. Also, there will be less reverberation on a carpeted concrete floor than on a wood overlay floor. Sometimes a heavy rubber mat will help reduce reverberation through the floor. If a fitness product is placed close to a wall, there will be more reflected noise.
WHEN SHOULD I BE WORRIED ABOUT A NOISE?
As long as the sounds your treadmill makes are no louder than a normal conversational tone of voice, it is considered normal noise.
BASIC TROUBLESHOOTING
PROBLEM: The console does not light up.
SOLUTION: Verify the following:
Does the red light on the ON/OFF switch light up?
NOTE: Some treadmill models do not have a switch that lights up. If this is the case, please proceed with the yes and no solutions below.
If yes:
- Turn the power off, unplug the power cable and wait 60 seconds. Remove motor cover. Wait until all red LED lights have gone off on the motor control board before proceeding. Next verify that none of the wires connecting to the lower board are loose or disconnected.
- Double-check that all connections are secure, especially the console cable. Unplug and reconnect the console cable to verify.
- Make sure the console cable is not pinched or damaged in any way.
- Plug the treadmill in, turn the power switch on and look for any lit LEDs on the motor control board.
If no:
- Verify that the outlet the machine is plugged into is functional. Double-check that the breaker has not tripped, it is on a dedicated 15-amp circuit, it is not on a GFCI-equipped outlet, and it is not plugged into a power strip/surge protector or extension cord.
- Verify that the power cord is not pinched or damaged and is properly plugged into the outlet AND the machine.
- Verify that the power switch is turned to the ON position.
PROBLEM: The console reads SAFETY KEY OFF or only displays dashes.
SOLUTION: Verify the following:
- Verify the safety key is securely in place.
- If using a magnetic key, make sure the key is magnetized.
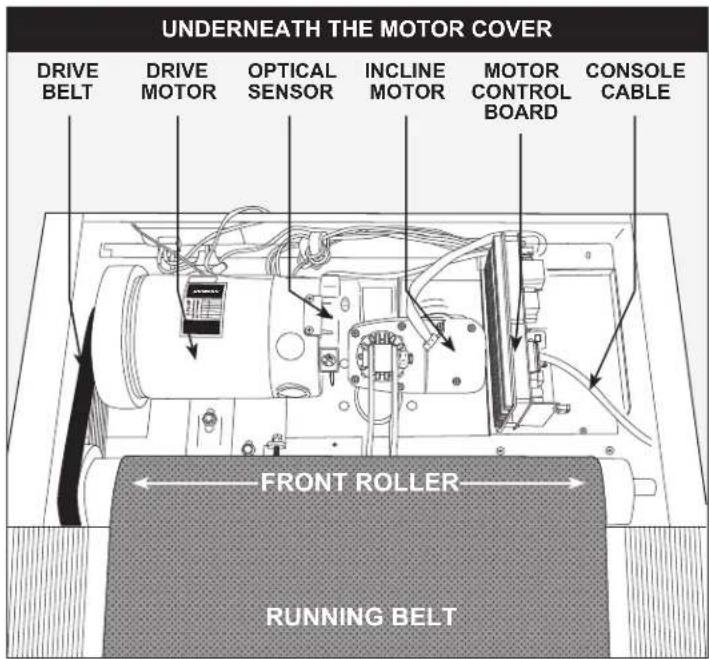
UNDERNEATH THE MOTOR COVER

text_image
DRIVE BELT DRIVE MOTOR OPTICAL SENSOR INCLINE MOTOR MOTOR CONTROL BOARD CONSOLE CABLE FRONT ROLLER RUNNING BELTTROUBLESHOOTING
BASIC TROUBLESHOOTING
PROBLEM: The belt does not move or moves briefly, but the console works.
SOLUTION: Verify the following:
- Make sure you are following the recommendations and power guidelines of GROUNDING INSTRUCTIONS & BASIC OPERATION in this owner's manual. The unit should be on a dedicated 15-amp circuit and not on a GFCI-equipped outlet. Do not plug the machine into a power strip/surge protector or extension cord.
- Check for any belt movement. If so, make note of how far or how long it moves before stopping.
- Try to move the belt by hand. If not, the drive belt may have come off or the motor bearings may have seized.
- Turn the treadmill off and unplug it from the outlet. Remove the plastic motor cover located in front of the machine by taking out the Phillips screws. Check the drive belt for proper alignment.
- With the cover still off, check over the wire and cable connections, as they may have become loose or disconnected during shipping or assembly. Make sure connections are secure and no wires are crimped, damaged, disconnected or burnt.
PROBLEM: The incline does not move, won't go down or does not seem to be at the right level.
text_image
UNDERNEATH THE MOTOR COVER DRIVE BELT DRIVE MOTOR OPTICAL SENSOR INCLINE MOTOR MOTOR CONTROL BOARD CONSOLE CABLE FRONT ROLLER RUNNING BELTSOLUTION: Verify the following:
- Make sure you are following the recommendations and power guidelines on pages 4 and 5 of this TREADMILL GUIDE. The unit should be on a dedicated 15-amp circuit and not on a GFCI-equipped outlet. Do not plug the machine into a power strip/surge protector or extension cord.
-
Make sure the console shows a change on the display when the elevation buttons are pressed.
-
Turn the treadmill off and unplug it from the outlet. Verify the console cable connections at the top of the mast are connected securely. Make sure all of the multicolored wires are fully inserted into the cable harness.
- Remove the plastic motor cover located in front of the machine by taking out the Phillips screws. Check over the wire and cable connections, as they may have become loose or disconnected during shipping or assembly. Make sure connections are secure and no wires are crimped, damaged, disconnected or burnt.
PROBLEM: No audio comes out of the speakers, but the headphones work.
SOLUTION: Verify the following:
- Turn the treadmill off and unplug it from the outlet. Remove the plastic motor cover located in front of the machine by taking out the Phillips screws.
- Check the wire and cable connections to the speaker board, near the motor control board.
PROBLEM: The treadmill circuit breaker trips during a workout.
SOLUTION: Verify the following:
- Make sure the treadmill is plugged into a dedicated 15-amp circuit.
- Verify that you do not have the machine on an extension cord or surge protector.
- Confirm that the machine is not plugged into a GFCI-equipped outlet or on a circuit that has a GFCI-equipped outlet on it.
PROBLEM: The running belt does not stay centered during a workout.
SOLUTION: Verify the following:
- Make sure the treadmill is on a level surface.
- Verify that the belt is properly tightened and centered (Refer to the TENSIONING and CENTERING THE RUNNING BELT sections for detailed directions).
PROBLEM: Operating speed appears inaccurate.
SOLUTION:
- Turn the treadmill off and unplug it from the wall.
- Remove the screws from the motor cover screws using a Phillips screwdriver.
- Verify that the optical sensor is plugged into the motor control board.
- Inspect the speed sensor cable/connection for any visible damage.
BASIC TROUBLESHOOTING
PROBLEM: At higher incline levels, a message reading "Speed Range Error – Ending Workout" appears.
SOLUTION:
- This is a safety feature that automatically cuts power to the drive motor when the speed is out of range due to the combination of the load on the belt and high degree of incline
- To prevent an automatic end to your workout, reduce the incline level percentage.
TROUBLESHOOTING HEART RATE (GRIP-PULSE ONLY)
Check your exercise environment for sources of interference such as fluorescent lights, computers, underground fencing, home security systems or appliances containing large motors. These items may cause erratic heart rate readouts.
You may experience an erratic readout under the following conditions:
- Gripping the heart rate handlebars too tight. Try to maintain moderate pressure while holding onto the heart rate handlebars.
- Constant movement and vibration due to constantly holding the heart rate handlebars while exercising. If you are receiving erratic heart rate readouts, try to only hold the grips long enough to monitor your heart rate.
- When you are breathing heavily during a workout.
- When your hands are constricted by wearing a ring.
- When your hands are dry or cold. Try to moisten your palms by rubbing them together to warm.
- Anyone with heavy arrhythmia.
- Anyone with arteriosclerosis or peripheral circulation disorder.
- Anyone whose skin on the measuring palm is especially thick.
NEED ASSISTANCE?
If this troubleshooting section does not remedy the problem, discontinue use and turn the power off.

Please contact Customer Tech Support.
The following information may be asked of you when you call. Please have these items readily available:
- Model Name
- Serial Number
• Proof of Purchase
Some common troubleshooting questions that may be asked are:
• How long has this problem been occurring?
- Does this problem occur with every use? With every user?
• If you are hearing a noise, does it come from the front or the back? What kind of noise is it (thumping, grinding, squeaking, chirping etc.)?
- Has the machine been maintained per the MAINTENANCE schedule?
Answering these and other questions will give the technicians the ability to send proper replacement parts and the service necessary to get you and your treadmill running again!
THE FOLLOWING INFORMATION ONLY CONCERNS CUSTOMERSIN GERMANY
1. Disposal of electrical and electronic equipment
The symbol of the “crossed-out dustbin” means that you are required by law to dispose of this equipment separately from unsorted municipal waste. Disposal via household waste, such as the residual waste garbage can or the yellow garbage can, is prohibited. Avoid misdirected waste by disposing of it correctly at special collection and return points.
2. Removal of batteries and lamps
If the products contain batteries and accumulators or lamps that can be removed from the old device without destroying it, these must be removed before disposal and disposed of separately as batteries or lamps. The following batteries or accumulators are contained in this electrical device: Lithium-ion accumulator.
3. Possibilities of the return of old devices
Owners of old appliances can return them free of charge within the framework of the possibilities for the return or collection of old appliances set up and available by public waste management authorities, so that the proper disposal of the old appliances is ensured. In addition, the return is also possible with distributors under certain conditions. The following link provides an online directory of collection and take-back points: https://www.ear-system.de/ear-verzeichnis/sammel-und-ruecknahmestellen
For distributors: The return has to be free of charge with the purchase of a similar new device (1:1 return). Independently of this, there is the possibility to return the old equipment to the distributor free of charge. The prerequisite for this is that the external dimensions do not exceed 25 centimeters and the return is limited to three old devices per type of device (0:1 take-back).
Retail: Distributors with a sales area for electrical and electronic equipment of at least 400 square meters are obligated to take back WEEE. Also obliged to take back are food retailers who have a total sales area of at least 800 square meters and who also offer and make available on the market electrical and electronic equipment several times a calendar year or on a permanent basis.
Distance selling market: distributors who sell their products using distance communication means (e.g. online store) are obliged to take back WEEE if the storage and shipping areas for electrical and electronic equipment are at least 400 square meters.
4. Data protection
We would like to point out to all end users of WEEE that you are responsible for deleting personal data on the WEEE to be disposed of.
5. WEEE registration number
Under the registration number DE-49229072 we are registered with the stiftung elektro-altgeräte register, Nordostpark 72, 90411 Nuremberg, Germany, as a producer of electrical and/or electronic equipment.
Manufacturer/EU-importer: Johnson Health Tech. GmbH| Europaallee 51, 50226 Frechen, Germany
DEUTSCH
natural_image
Line drawing of a treadmill base with a circular highlight on the front wheel (no text or symbols)
WARNUNG
text_image
Technical diagram of a treadmill with labeled parts A, B, C and numbered components 1, 2, 3text_image
Technical diagram of a treadmill with labeled parts including legs, arms, and support structurestext_image
Technical diagram of a treadmill with labeled parts A, B, C and numbered components 1, 2text_image
Technical diagram of a treadmill assembly with labeled parts and an inset showing a close-up view of the component.natural_image
Line drawing of a treadmill with adjustable arms and legs (no text or symbols)natural_image
Diagram showing a foot stepping on a bicycle seat frame with an inset close-up of the foot (no text or symbols)text_image
SCHWINN B A I J L G H JEFMCICBEDIENUNG DER KONSOLE
text_image
QR code image containing encoded data, no visible human-readable textnatural_image
Line drawing of a hand using a tool to adjust or install a mechanical component (no text or symbols present)natural_image
Line drawing of a hand using a tool to adjust or install a mechanical component (no text or symbols present)natural_image
Line drawing of a hand using a hammer to adjust or install a cylindrical component (no text or symbols)BAND ZU WEIT RECHTS

natural_image
Line drawing of a hand using a hammer to adjust a mechanical component (no text or symbols)BAND ZU WEIT LINKS
ZENTRIEREN DES LAUFBANDS
Manufacturer/EU-importer: Johnson Health Tech. GmbH|Europaallee 51, 50226 Frechen, Germany
MODELNAAM: SCHWINN S F T3.1
natural_image
Technical line drawing of a treadmill base with a highlighted circular component (no text or symbols)
WAARSCHUWING
text_image
Technical diagram of a treadmill with labeled parts A, B, C and numbered components 1, 2, 3text_image
Technical diagram of a treadmill with labeled parts including legs, arms, and support structuresA Open HARDWARE (MONTAGEMATERIAAL) VOOR STAP 2.
text_image
Technical diagram of a treadmill with labeled parts A, B, C and numbered components 1, 2text_image
Technical diagram of a treadmill assembly with labeled parts and an inset view showing mechanical components.natural_image
Line drawing of a standard treadmill with adjustable arms and legs (no text or symbols)MONTAGE VOLTOOID!
INKLAPBARE LOOPBANDEN
natural_image
Diagram showing a foot stepping on a leg using a horizontal barbell, with an inset close-up of the foot's leg movement (no text or symbols present)text_image
SCHWINN B P1: ≡ P2: 0...0 P3: Ⓤ P4: ✕ P5: ♦ A I J L 16 14 10 √ ↑ ↓ ✓ 8 4 2 ▶ ▼ G H JEFMCKDBEDIENING CONSOLE
VERBIND JE APPARAAT MET DE JRNY-APP VOOR DYNAMISCHERE WORKOUTS
text_image
QR code image containing encoded data, no visible human-readable texttext_image
LOOPBAND LOOPDEKPROCEDURE:
natural_image
Line drawing of a hand using a tool to adjust or install a mechanical component (no text or symbols present)SPANT DE LINKERKANT
VAN DE ROLLER AAN

natural_image
Line drawing of a hand using a hammer to adjust or install a mechanical component (no text or symbols)SPANT DE RECHTERKANT VAN DE ROLLER AAN
DE LOOPBAND AANSPANNEN
natural_image
Line drawing of a hand using a hammer to adjust or install a mechanical component (no text or symbols)BAND LIGT TE VER NAAR RECHTS

natural_image
Line drawing of a hand using a hammer to adjust a mechanical component (no text or symbols)BAND LIGT TE VER NAAR LINKS
DE LOOPBAND CENTREREN
natural_image
Technical line drawing of a treadmill base with a highlighted circular component (no text or symbols)
AVERTISSEMENT
Fabricant: Johnson Health Industry (Vietnam) Co., Ltd. | Adresse du fabricant: Lot CN-24, Thuan Thanh II Industrial Park, Mao Dien Ward, Bac Ninh Province, Vietnam
text_image
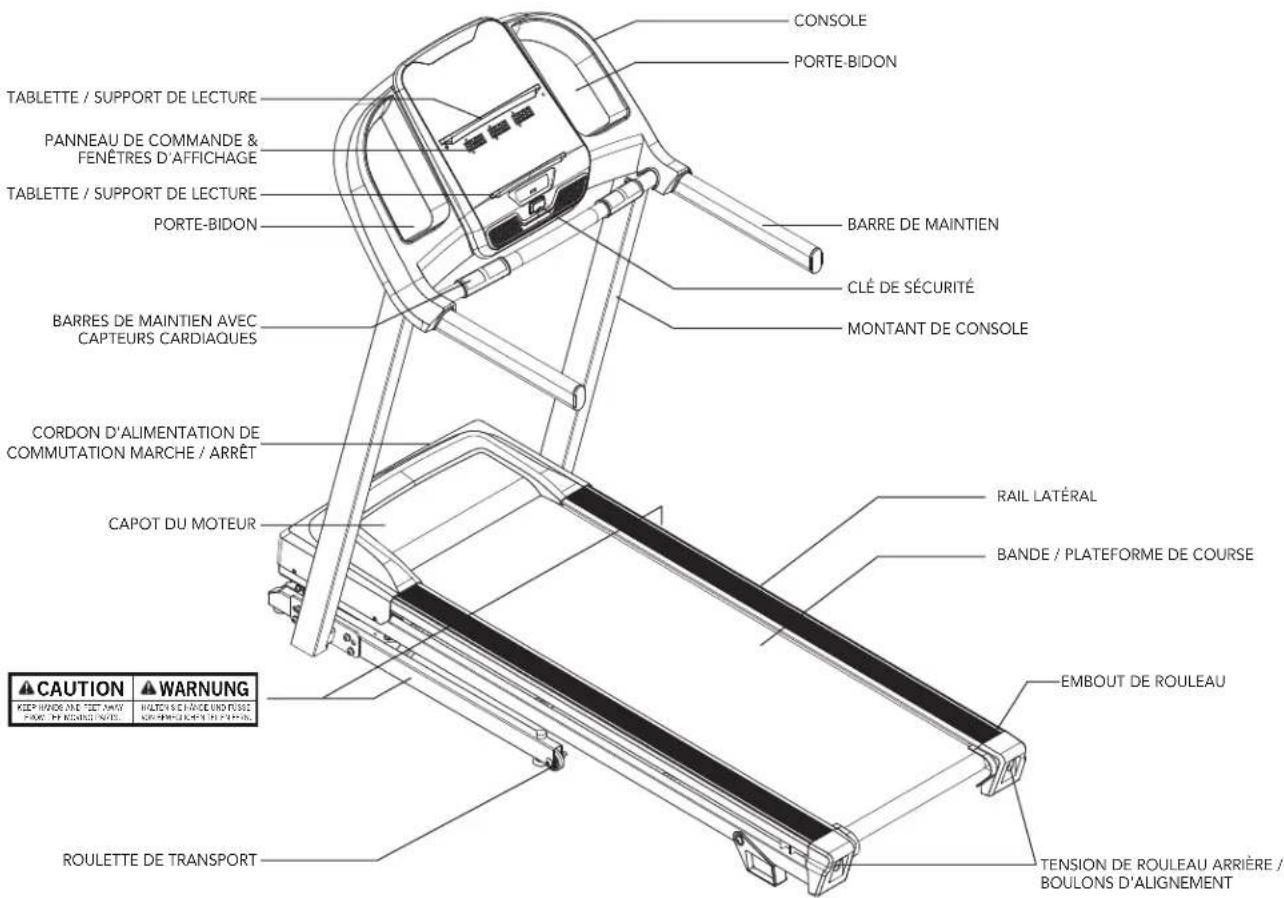
CONSOLE PORTE-BIDON TABLETTE / SUPPORT DE LECTURE PANNEAU DE COMMANDE & FENÊTRES D'AFFICHAGE TABLETTE / SUPPORT DE LECTURE PORTE-BIDON BARRE DE MAINTIEN CLÉ DE SÉCURITÉ MONTANT DE CONSOLE BARRES DE MAINTIEN AVEC CAPTEURS CARDIAQUES CORDON D'ALIMENTATION DE COMMUTATION MARCHE / ARRÊT CAPOT DU MOTEUR RAIL LATÉRAL BANDE / PLATEFORME DE COURSE EMBOUT DE ROULEAU CAUTION ⚠️ WARNING KEEP WANDS AND THE CEEV AVAY POCKET FOR RECARDED ITEMS ROULETTE DE TRANSPORT TENSION DE ROULEAU ARRIÈRE / BOULONS D'ALIGNEMENTOUTILS INCLUS :
text_image
Technical diagram of a treadmill with labeled parts A, B, C and numbered components 1, 2, 3text_image
Technical diagram of a treadmill with labeled parts including legs, arms, and support structurestext_image
Technical diagram of a treadmill with labeled parts A, B, C and numbered components 1, 2text_image
Technical diagram of a treadmill assembly with labeled parts and an inset showing a mechanical component detail.natural_image
Line drawing of a standard treadmill with adjustable arms and legs (no text or symbols)LE MONTAGE EST TERMINÉ !
natural_image
Diagram of a treadmill with foot positioning and foot movement arrows, showing a close-up of the foot (no text or symbols present)UTILISATION DE LA CLÉ DE SÛRETÉ
text_image
SCHWINN B A I J L G H JEFMCIDFONCTIONNEMENT DE LA CONSOLE
text_image
QR code image containing encoded data, no visible human-readable textnatural_image
Line drawing of a hand using a tool to adjust or install a mechanical component (no text or symbols present)RESSERRAGE DU CÔTÉ
GAUCHE DU ROULEAU

natural_image
Line drawing of a hand using a hammer to adjust or install a mechanical component (no text or symbols)RESSERRAGE DU CÔTÉ DROIT DU ROULEAU
RÉGLAGE DE LA TENSION DE LA BANDE DE COURSE
natural_image
Line drawing of a hand using a hammer to adjust or install a mechanical component (no text or symbols present)LA BANDE DE COURSE EST
TROP DÉCALÉE À DROITE

natural_image
Line drawing of a hand using a tool to adjust or install a mechanical component (no text or symbols present)LA BANDE DE COURSE EST TROP DÉCALÉE À GAUCHE
CENTRAGE DE LA BANDE DE COURSE
QUESTIONS FRÉQUENTES RELATIVES AU PRODUIT
LES SONS QU'ÉMET MON TAPIS DE COURSE SONT-ILS NORMAUX ?
natural_image
Technical line drawing of a treadmill base with a highlighted circular component (no text or symbols)
ATTENZIONE
text_image
Technical diagram of a treadmill with labeled parts A, B, C and numbered components 1, 2, 3A Aprire I COMPONENTI PER IL PASSAGGIO 1.
B Collega l'ASTA SINISTRA DELLA CONSOLE (1) al TELAIO DI BASE (3) usando 4 BULLONI (A), 4 RONDELLE ELASTICHE (B) e 4 RONDELLE PIATTE (C).
text_image
Technical diagram of a treadmill with labeled parts including legs, arms, and support structurestext_image
Technical diagram of a treadmill with labeled parts A, B, C and numbered components 1, 2text_image
Technical diagram of a treadmill assembly with labeled parts and a magnified inset showing internal components.natural_image
Line drawing of a standard treadmill with adjustable arms and legs (no text or symbols)ASSEMBLAGGIO COMPLETO!
natural_image
Diagram showing a foot stepping on a leg using a horizontal barbell, with an inset close-up of the foot's leg movement (no text or symbols present)UTILIZZO DELLA CHIAVE DI SICUREZZA
text_image
QR code image containing encoded data, no visible human-readable textnatural_image
Line drawing of a hand using a tool to adjust or install a mechanical component (no text or symbols present)natural_image
Line drawing of a hand using a tool to adjust or install a mechanical component (no text or symbols present)SERRAGGIO DEL LATO DESTRO DEL RULLO
TARATURA DEL NASTRO DA CORSA
natural_image
Line drawing of a hand using a hammer to adjust a cylindrical component (no text or symbols)natural_image
Line drawing of a hand using a hammer to adjust a mechanical component (no text or symbols)natural_image
Technical line drawing of a treadmill base with a highlighted circular component (no text or symbols)text_image
Technical diagram of a treadmill with labeled parts A, B, C and numbered components 1, 2, 3text_image
Technical diagram of a treadmill with labeled parts and motion indicatorstext_image
Technical diagram of a treadmill with labeled parts A, B, C and numbered components 1, 2text_image
Technical diagram of a treadmill assembly with labeled parts and an inset showing a mechanical component.natural_image
Line drawing of a standard treadmill with control panel and side-mounted legs (no text or symbols)MONTAJE FINALIZADO
natural_image
Diagram of a treadmill with foot positioning and foot movement arrows, showing a close-up of the foot (no text or symbols present)text_image
SCHWINN B E P2 9.4 P3 0 P4 X P5 A 8:00:00 8:00:00 8:00:00 16 14 10 G F JEYMCKD I J L Itext_image
QR code image containing encoded data, no visible human-readable textCÓMO LUBRICAR LA BANDA
CADA 3 MESES O 480 KM
natural_image
Line drawing of a hand using a tool to adjust or install a mechanical component (no text or symbols present)TENSADO DE LA PARTE
IZQUIERDA DEL RODILLO

natural_image
Line drawing of a hand using a hammer to adjust or install a mechanical component (no text or symbols)TENSADO DE LA PARTE DERECHA DEL RODILLO
TENSADO DE LA CINTA
natural_image
Line drawing of a hand using a hammer to adjust a mechanical part (no text or symbols)LA BANDA ESTÁ DEMASIADO
HACIA LA DERECHA
natural_image
Line drawing of a hand using a hammer to adjust a mechanical component (no text or symbols)natural_image
Technical line drawing of a treadmill base with a highlighted circular component (no text or symbols)
AVISO
text_image
Technical diagram of a treadmill with labeled parts A, B, C and numbered components 1, 2, 3A Abra as FERRAGENS PARA ETAPA 1.
B Fixe a HASTE ESQUERDA DO CONSOLE (1) à ESTRUTURA DE BASE (3) usando 4 PARAFUSOS (A), 4 ARRUELAS DE PRESSÃO (B) e 4 ARRUELAS PLANAS (C).
text_image
Technical diagram of a treadmill with labeled parts including legs, arms, and support structuresA Abra as FERRAGENS PARA ETAPA 2.
text_image
Technical diagram of a treadmill with labeled parts A, B, C and numbered components 1, 2text_image
Technical diagram of a treadmill assembly with labeled parts and an inset showing a mechanical component detail.natural_image
Line drawing of a standard treadmill with control panel and side-mounted legs (no text or symbols)MONTAGEM CONCLUÍDA!
natural_image
Diagram of a treadmill with foot positioning and foot movement arrows, showing a close-up of the foot (no text or symbols)COMO USAR A CHAVE DE SEGURANÇA
text_image
SCHWINN B E P2 9.4 P3 0 P4 X P5 A 8:00:00 8:00:00 8:00:00 16 14 10 G F JEYMCKD I J L IOPERAÇÃO DO CONSOLE
text_image
QR code image containing encoded data, no visible human-readable textnatural_image
Line drawing of a hand using a tool to adjust or install a mechanical component (no text or symbols present)APERTANDO O LADO ESQUERDO DO ROLETE
natural_image
Line drawing of a hand using a tool to adjust or install a mechanical component (no text or symbols present)APERTANDO O LADO DIREITO DO ROLETE
COMO TENSIONAR A CORREIA DE CORRIDA
natural_image
Line drawing of a hand using a hammer to adjust a mechanical part (no text or symbols)natural_image
Line drawing of a hand using a hammer to adjust a mechanical component (no text or symbols)natural_image
Technical line drawing of a treadmill base with a highlighted circular component (no text or symbols)
警告
text_image
Technical diagram of a treadmill with labeled parts A, B, C and numbered components 1, 2, 3text_image
Technical diagram of a treadmill with labeled parts including legs, arms, and support structurestext_image
Technical diagram of a treadmill with labeled parts A, B, C and numbered components 1, 2請注意:組裝儀表時,切勿擠壓任何電線。
text_image
Technical diagram of a treadmill assembly with labeled parts and an inset showing a mechanical component.natural_image
Line drawing of a standard treadmill with adjustable arms and legs (no text or symbols)組裝完成!
跑步機的 安裝與使用

text_image
Diagram illustrating a mechanical device with an inset showing a foot and a curved arrow indicating rotation or movement.使用安全開關
text_image
QR code image containing encoded data, no visible human-readable textnatural_image
Line drawing of a hand using a tool to adjust or install a mechanical component (no text or symbols present)調緊滾軸左側
調整跑帶
natural_image
Line drawing of a hand using a hammer to press or install a mechanical component (no text or symbols)調緊滾軸右側
natural_image
Line drawing of a hand using a hammer to adjust or install a mechanical component (no text or symbols present)跑带太偏右

natural_image
Line drawing of a hand using a tool to adjust or install a mechanical component (no text or symbols present)跑带太偏左
跑带居中
natural_image
Technical line drawing of a treadmill base with a highlighted circular component (no text or symbols)
警告
text_image
Technical diagram of a treadmill with labeled parts A, B, C and numbered components 1, 2, 3text_image
Technical diagram of a treadmill with labeled parts including legs, arms, and support structurestext_image
Technical diagram of a treadmill with labeled parts A, B, C and numbered components 1, 2text_image
Technical diagram of a treadmill assembly with labeled parts and an inset view showing mechanical components.natural_image
Line drawing of a standard treadmill with adjustable arms and legs (no text or symbols)组装完成!
跑步机的 安装与使用
text_image
Diagram illustrating a mechanical device with an inset showing a foot and a curved arrow indicating rotation or movement.使用安全钥匙
natural_image
Line drawing of a hand using a tool to adjust or install a mechanical component (no text or symbols present)张紧滚轴左侧
跑步带张紧
natural_image
Line drawing of a hand using a hammer to press or adjust a mechanical component (no text or symbols)张紧滚轴右侧
警告
natural_image
Line drawing of a hand using a hammer to adjust or install a mechanical component (no text or symbols present)跑步带离右侧过远

natural_image
Line drawing of a hand using a tool to adjust or install a mechanical component (no text or symbols present)跑步带离左侧过远
跑步带居中
RF Module Model RF Module Type Frequency Transmitter H-field requirements
JCP-3B-1001A001 WiFi2.4 + BT & BLE WiFi 2.4G, BT & BLE 2.4G 5.0dBm
DE/UK REPRESENTATIVE CONTACT INFO

EU Web Contact

Webcontact
Simplified Declaration of Conformity
Johnson Health Tech (including Johnson Health Tech Co. Ltd., Johnson Industries Shanghai, and Johnson Industries Viet Nam), having an Authorized Representative located in the below locations, declares under our sole responsibility that the product accompanied by this Simplified Declaration meets the essential requirements of the EU and UK directives, including the requirements of the RED Directive (2014/53/EU) and the Radio Equipment Regulations 2017 (UK).
The Authorised Representative for the EU is: Johnson Health Tech. GmbH Europaallee 51, D-50226 Frechen, Germany Telephone: +49 (0) 2234/9997-100
The Authorised Representative for the UK is: Johnson Health Tech. Digital UK Limited Unit 2, 40.40 Link, Mill End Road, High Wycombe, HP12 4AX, United Kingdom
The Authorised Representative for the UK is:
Johnson Health Tech. Digital UK Limited
Unit 2, 40.40 Link, Mill End Road, High Wycombe, HP12 4AX, United Kingdom
SFT3.1-21 Rev. 1.1 B | 1000534149 © 2025 Schwinn Fitness