
AD6 - Exercise bike Schwinn - Free user manual and instructions
Find the device manual for free AD6 Schwinn in PDF.
| Product Type | Air Resistance Exercise Bike |
| Brand | Schwinn |
| Model | AD6 |
| Dimensions (L x W x H) | 126.3 x 65.2 x 129.2 cm |
| Product Weight | 52.5 kg |
| Max User Weight | 136 kg (300 lbs) |
| Power Supply | 2 AA (LR6) batteries – included |
| Resistance Type | Air fan (progressive resistance) |
| Console Functions | RPM, time, speed, distance, watts, calories, telemetric heart rate |
| Display | LCD – workout data display |
| Heart Rate Monitor Compatibility | Polar™ uncoded chest strap (4.5 – 5.5 kHz) |
| Workout Programs | Quick Start, custom duration |
| Adjustments | Height-adjustable seat, pedals with straps, moving handlebar |
| Transport and Storage | Transport wheels, fan locking strap |
| Routine Maintenance | Wipe after use, weekly cleaning, hardware check |
| Spare Parts and Repairability | Full list in manual; contact customer service for original parts |
| Warranty | Manufacturer warranty – contact local technical service |
| General Information | Indoor use only; do not use outdoors or in a garage |
Frequently Asked Questions - AD6 Schwinn
User questions about AD6 Schwinn
0 question about this device. Answer the ones you know or ask your own.
Ask a new question about this device
Download the instructions for your Exercise bike in PDF format for free! Find your manual AD6 - Schwinn and take your electronic device back in hand. On this page are published all the documents necessary for the use of your device. AD6 by Schwinn.
USER MANUAL AD6 Schwinn
Thanks for choosing SCHWINN Airdyne AD6i as your fitness equipment. We are sincerely encourage you to read through this Owner's manual carefully before the assembling of your equipment started, especially of below WARNINGS! WARNINGS WILL REDUCE THE RISK OF BURNS, FIRE, ELECTRICAL SHOCK OR INJURY TO PERSONS.
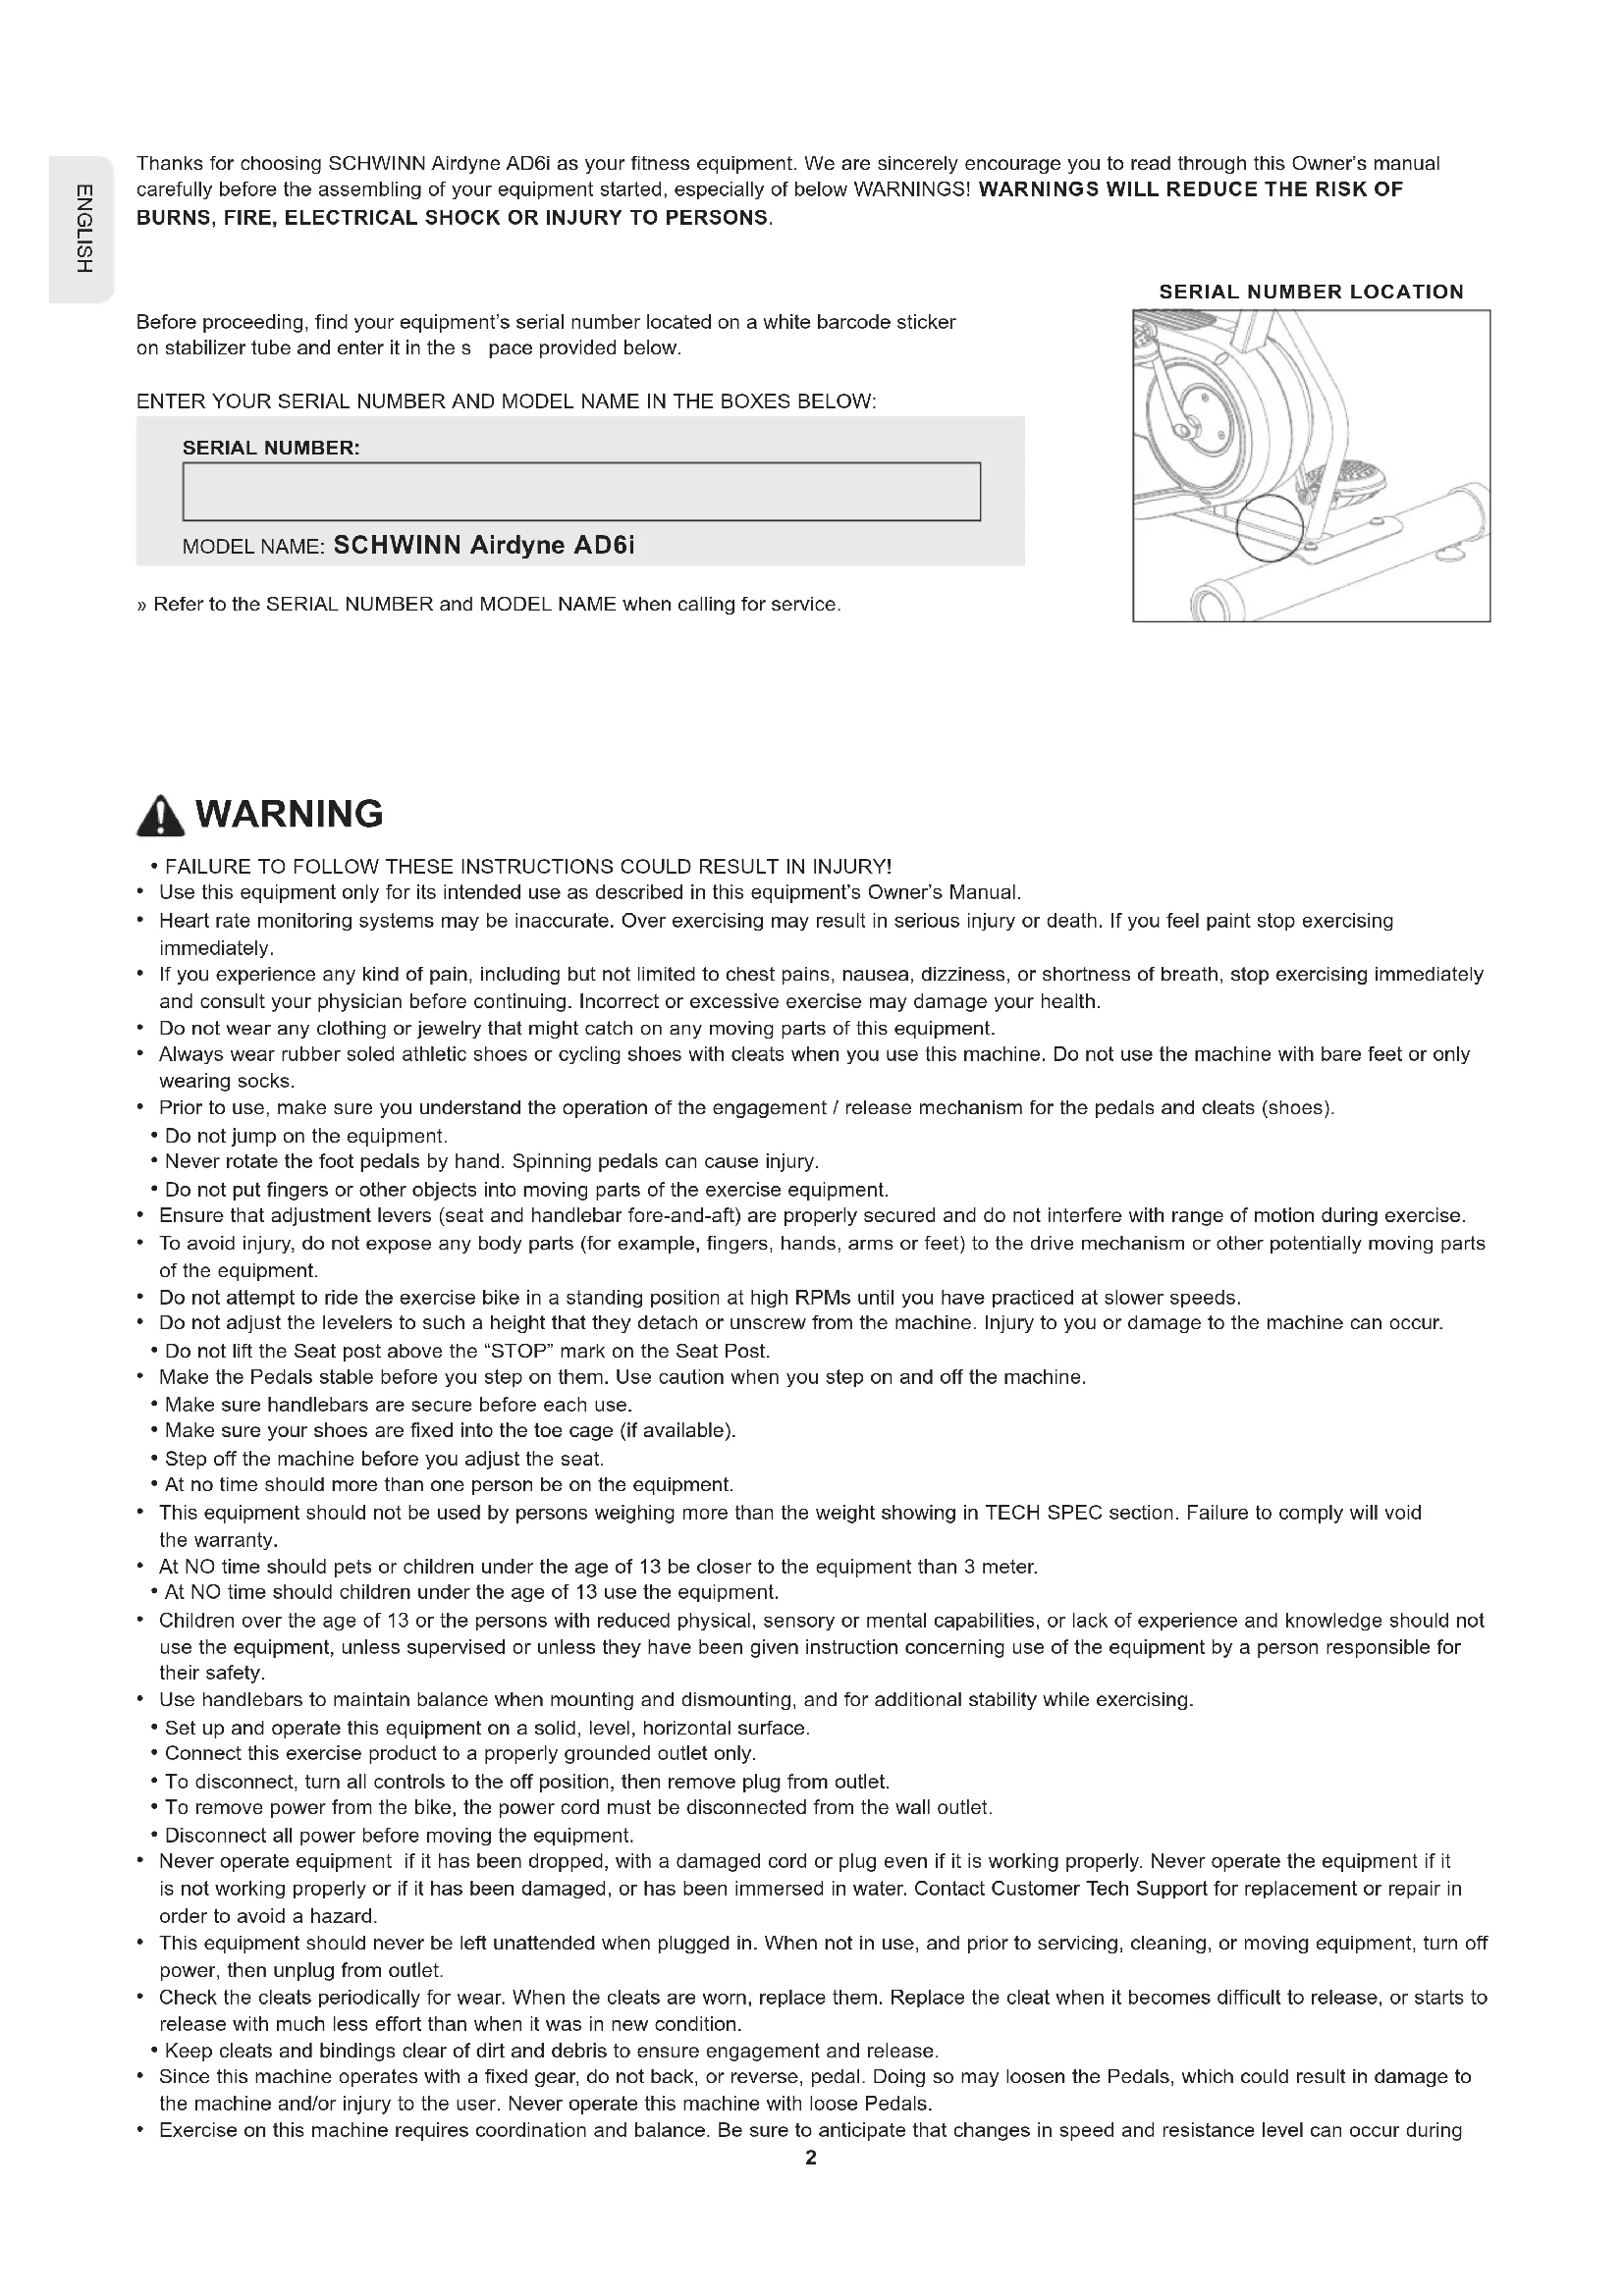
Before proceeding, find your equipment's serial number located on a white barcode sticker on stabilizer tube and enter it in the s pace provided below.
ENTER YOUR SERIAL NUMBER AND MODEL NAME IN THE BOXES BELOW:
SERIAL NUMBER:
MODEL NAME: SCHWINN Airdyne AD6i
» Refer to the SERIAL NUMBER and MODEL NAME when calling for service.
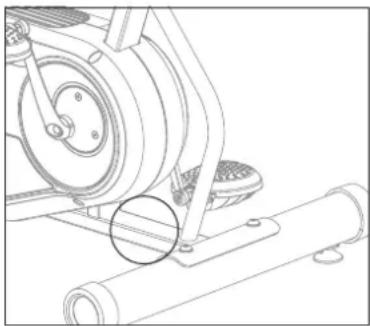
SERIAL NUMBER LOCATION

WARNING
-
FAILURE TO FOLLOW THESE INSTRUCTIONS COULD RESULT IN INJURY!
-
Use this equipment only for its intended use as described in this equipment's Owner's Manual.
Heart rate monitoring systems may be inaccurate. Over exercising may result in serious injury or death. If you feel paint stop exercising immediately.
If you experience any kind of pain, including but not limited to chest pains, nausea, dizziness, or shortness of breath, stop exercising immediately and consult your physician before continuing. Incorrect or excessive exercise may damage your health. -
Do not wear any clothing or jewelry that might catch on any moving parts of this equipment.
Always wear rubber soled athletic shoes or cycling shoes with cleats when you use this machine. Do not use the machine with bare feet or only wearing socks.
Prior to use, make sure you understand the operation of the engagement / release mechanism for the pedals and cleats (shoes). -
Do not jump on the equipment.
- Never rotate the foot pedals by hand. Spinning pedals can cause injury.
- Do not put fingers or other objects into moving parts of the exercise equipment.
Ensure that adjustment levers (seat and handlebar fore-and-aft) are properly secured and do not interfere with range of motion during exercise.
-
To avoid injury, do not expose any body parts (for example, fingers, hands, arms or feet) to the drive mechanism or other potentially moving parts of the equipment.
-
Do not attempt to ride the exercise bike in a standing position at high RPMs until you have practiced at slower speeds.
-
Do not adjust the levelers to such a height that they detach or unscrew from the machine. Injury to you or damage to the machine can occur.
-
Do not lift the Seat post above the "STOP" mark on the Seat Post.
- Make the Pedals stable before you step on them. Use caution when you step on and off the machine.
- Make sure handlebars are secure before each use.
- Make sure your shoes are fixed into the toe cage (if available).
- Step off the machine before you adjust the seat.
- At no time should more than one person be on the equipment.
This equipment should not be used by persons weighing more than the weight showing in TECH SPEC section. Failure to comply will void the warranty.
- At NO time should pets or children under the age of 13 be closer to the equipment than 3 meter.
- At NO time should children under the age of 13 use the equipment.
Children over the age of 13 or the persons with reduced physical, sensory or mental capabilities, or lack of experience and knowledge should not use the equipment, unless supervised or unless they have been given instruction concerning use of the equipment by a person responsible for their safety.
- Use handlebars to maintain balance when mounting and dismounting, and for additional stability while exercising.
- Set up and operate this equipment on a solid, level, horizontal surface.
- Connect this exercise product to a properly grounded outlet only.
- To disconnect, turn all controls to the off position, then remove plug from outlet.
- To remove power from the bike, the power cord must be disconnected from the wall outlet.
-
Disconnect all power before moving the equipment.
-
Never operate equipment if it has been dropped, with a damaged cord or plug even if it is working properly. Never operate the equipment if it is not working properly or if it has been damaged, or has been immersed in water. Contact Customer Tech Support for replacement or repair in order to avoid a hazard.
This equipment should never be left unattended when plugged in. When not in use, and prior to servicing, cleaning, or moving equipment, turn off power, then unplug from outlet.
- Check the cleats periodically for wear. When the cleats are worn, replace them. Replace the cleat when it becomes difficult to release, or starts to release with much less effort than when it was in new condition.
-
Keep cleats and bindings clear of dirt and debris to ensure engagement and release.
-
Since this machine operates with a fixed gear, do not back, or reverse, pedal. Doing so may loosen the Pedals, which could result in damage to the machine and/or injury to the user. Never operate this machine with loose Pedals.
Exercise on this machine requires coordination and balance. Be sure to anticipate that changes in speed and resistance level can occur during
workouts, and be attentive in order to avoid loss of balance and possible injury.
Service should only be done by and authorized service technician.
- Do not remove the protected covers unless instructed by professional and your local dealer.
- Do not remove the console covers unless instructed by Customer Tech Support.
- Do not use other attachments that are not recommended by the manufacturer. Attachments may cause injury.
- Return the unit to a service center for examination and repair.
- To prevent electrical shock, never drop or insert any object into any opening.
- Do not operate where aerosol (spray) products are being used or when oxygen is being administered.
This equipment is intended for in-home use only. Failure to comply will void the warranty. - Do not use equipment in any location that is not temperature controlled, such as but not limited to garages, porches, pool rooms, bathrooms, car ports or outdoors. If your equipment has been exposed to colder temperatures or high moisture climates, it is strongly recommended that the equipment is warmed up to room temperature before first time use. Failure to comply will void the warranty.
- Tighten the Brake/ Resistance Adjustment Knob as described until the Flywheel is locked before moving/safe storage, remove the power supply when storage and place in a secure location. Place the machine in a secure location away from children and pets.
- Equipment is heavy; use care and additional help if necessary when moving.
- Have 2 people available for assembly, this will make the assembly process easier. Do not do steps that involve heavy lifting or awkward movements on your own.
- Do not assemble this machine outdoors or in a wet or moist location. Make sure assembly is done in an appropriate work space away from foot traffic and exposure to bystanders.
- Do all assembly steps in the sequence given. Incorrect assembly can lead to injury or incorrect function.
Do not try to change the design or functionality of this machine. This could compromise the safety of this machine and will void the warranty. - Do not use or put the machine into service until the machine has been fully assembled and inspected for correct performance in accordance with the Manual.
- Do not move or lift equipment from packaging until specified to do so in the assembly instructions.
- Unpack and assemble the unit where it will be used. Never open box when it is positioned upside-down or on its side.
Silicone lubricant is not intended for human consumption. Keep out of reach of children. Store in a safe place. - Care should be taken in mounting and dismounting the stationary exercise equipment. Do not dismount the bike until the Pedals have come to a complete stop. Be aware that the moving Pedals can strike the backs of the legs.
- This bike cannot stop the Pedals independently of the Resistance Fan. Reduce the pace to slow the Resistance Fan and Pedals to a stop. Do not dismount the bike until the Pedals have come to a complete stop. Be aware that the moving Pedals can strike the backs of the legs emergency brake down = emergency stop.
This bike cannot stop the Pedals independently of the Resistance Fan. Reduce the pace to slow the Resistance Fan and Pedals to a stop.
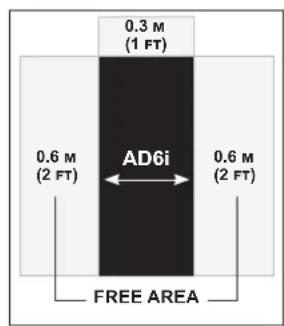
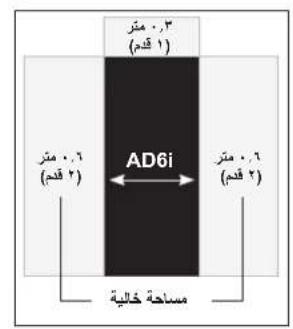
Place the exercise bike on a level surface. There should be 30~cm in front of the exercise bike. For ease of access, there should be an accessible space preferentially on both sides of the exercise bike equal to 2 ft (0.6 meters) to allow a user access to the machine from either side. Do not place the exercise bike in any area that will block any vent or air openings. The exercise bike should not be located in a garage, covered patio, near water or outdoors.
DANGER!
- Improper connection of the equipment-grounding conductor can result in a risk of electric shock. Check with a qualified electrician or service provider if you are in doubt as to whether the product is properly grounded. Do not modify the plug provided with the product. If it does not fit the outlet, have a proper outlet installed by a qualified electrician.
- This product is for use on a nominal local voltage circuit and has a grounding plug. No adapter should be used with this product.
- This product must be used on a dedicated circuit. To determine if you are on a dedicated circuit, shut off the power to that circuit and observe if any other devices lose power. If so, move devices to a different circuit.
Note: There are usually multiple outlets on one circuit.
TECH SPECS
| Assembled Dimensions (L x W x H) | 126.3 x 65.2 x 129.2 cm / 49.7" x 25.7" x 50.9" |
| Product Weight | 52.5 kg / 115 lbs. |
| Max User Weight | 136 kg / 300 lbs. |

From now on, you can assemble your equipment at your convenience. For detailed instructions on assembly, operation, programs, troubleshooting, and maintenance, please scan the QR code on the left side to access the complete manual.
If scanning the QR code fails, you can visit the website provided here: https://global.schwinnfitness.com/en/manuals.html
WARRANTY
If your equipment requires warranty service, please contact local Customer Tech Support.

NEED HELP?
If you have any questions, need assistance with missing parts, or require technical support or maintenance for your equipment, please contact Customer Tech Support.
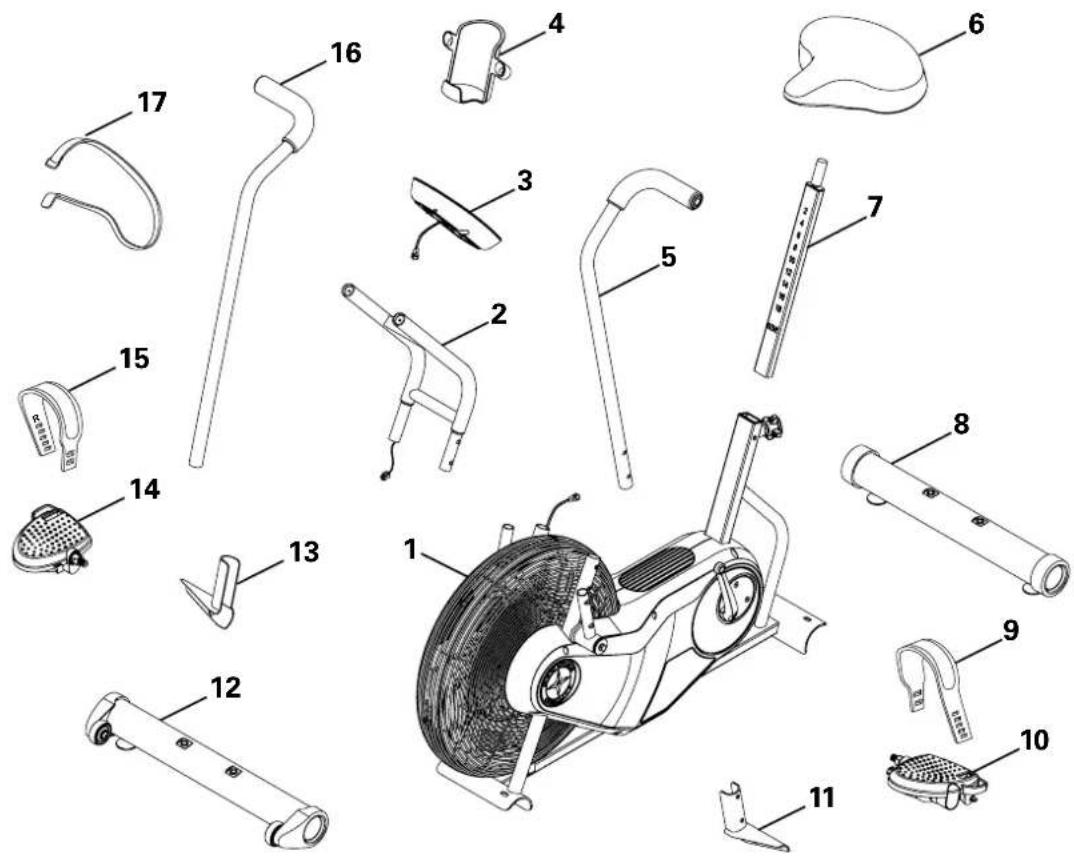
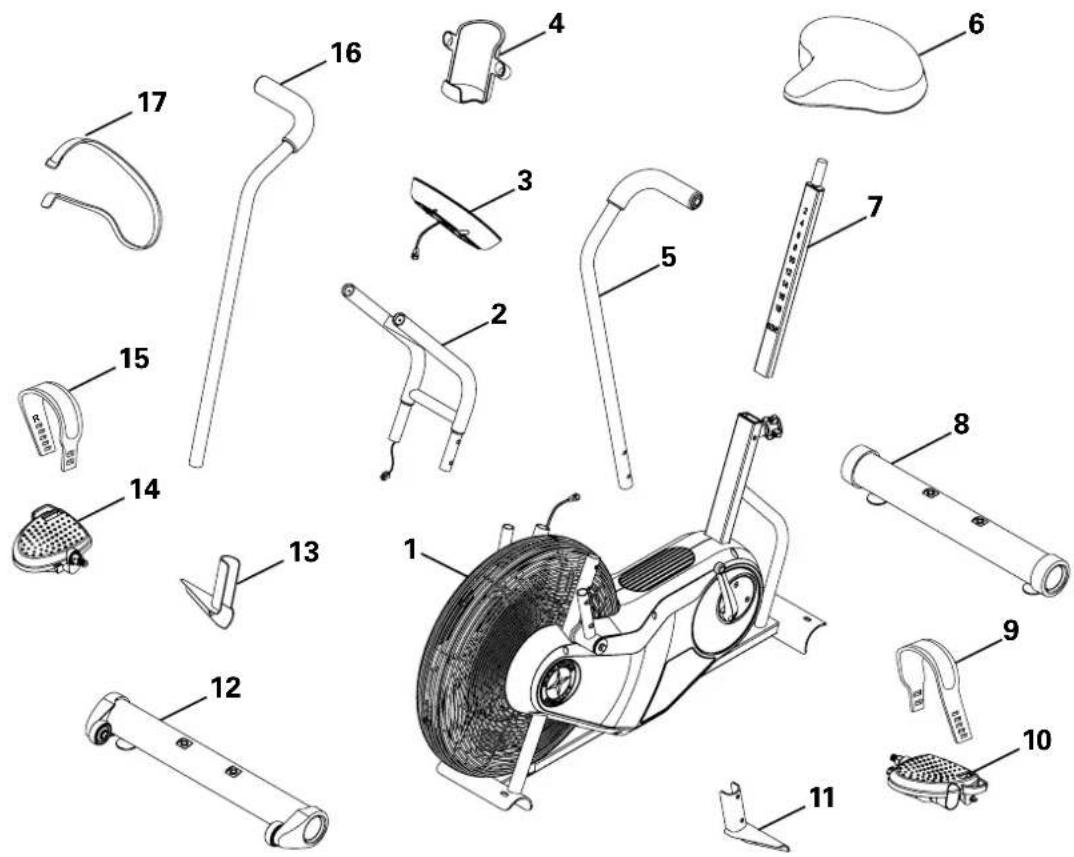
MAIN PARTS INCLUDEED
A decal has been applied to all right ("R") and left ("L") parts to assist with assembly.
| Item Qty Description | Item Qty Description | ||||
| 1 1 Frame 10 1 | Pedal, Left | ||||
| 2 | 1 | Console Support Bar | 11 | 1 | Foot Peg, Left |
| 3 1 Console | 12 1 Stabilizer, Front | ||||
| 4 1 Water Bottle | Holder | 13 1 Foot Peg, Right | |||
| 5 1 Handlebar, Left | 14 1 Pedal, Right | ||||
| 6 1 Seat | 15 1 Pedal Strap, Right | ||||
| 7 1 Seat Post | 16 1 Handlebar, Right | ||||
| 8 1 Stabilizer, Rear | 17 1 Strap, Transport and Immobilization | ||||
| 9 1 Pedal Strap, Left | |||||
HARDWARE KIT TOOL KIT

ABCDE


| Item | Qty | Description |
| A 4 | Button Head Hex Screw, M8x1.25x20 | |
| B 4 | Washer, M8 Lock | |
| C 4 | Washer, M8 | |
| D 4 | Washer, M8 Black | |
| E 4 | Button Head Hex Screw, M8x1.25x12 Black | |
6mm

2
13 mm
15mm
17 mm
2 AA size batteries (LR6)
PRE ASSEMBLY
UNPACKING
Due to the weight of the equipment, it is recommended that two people perform the assembly. Unpack the product where you will be using it. It is recommended that you place a protective covering on your floor. Place the carton on a level flat surface and remove all packing materials; do not dispose of the packing materials until assembly is completed.
NOTE: During each assembly step, ensure that ALL nuts and bolts are in place and partially threaded in before completely tightening any ONE bolt.
NOTE: A light application of grease may aid in the installation of hardware. Any grease, such as lithium bike grease is recommended.

NEED HELP?
If you have any questions or if there are any missing parts, please contact Customer Tech Support.
ASSEMBLY
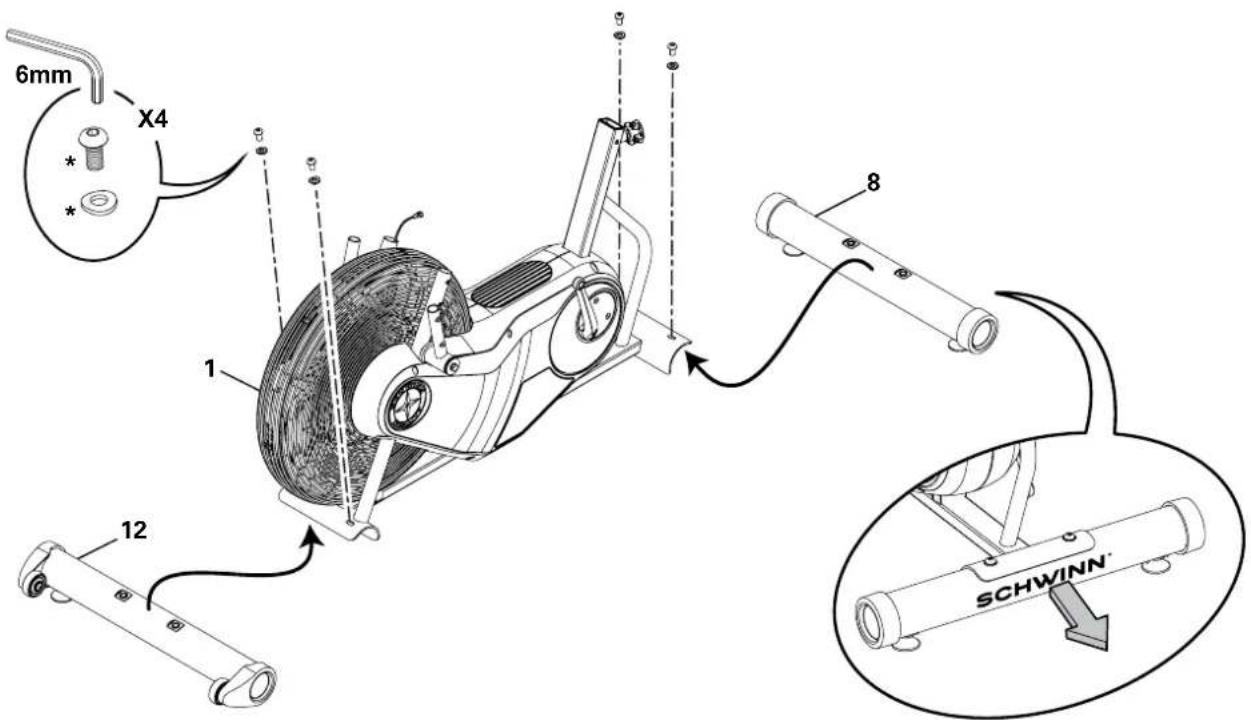
1. Attach Stabilizers to Frame
Note: Hardware is pre-installed and not on the Hardware Card (*).
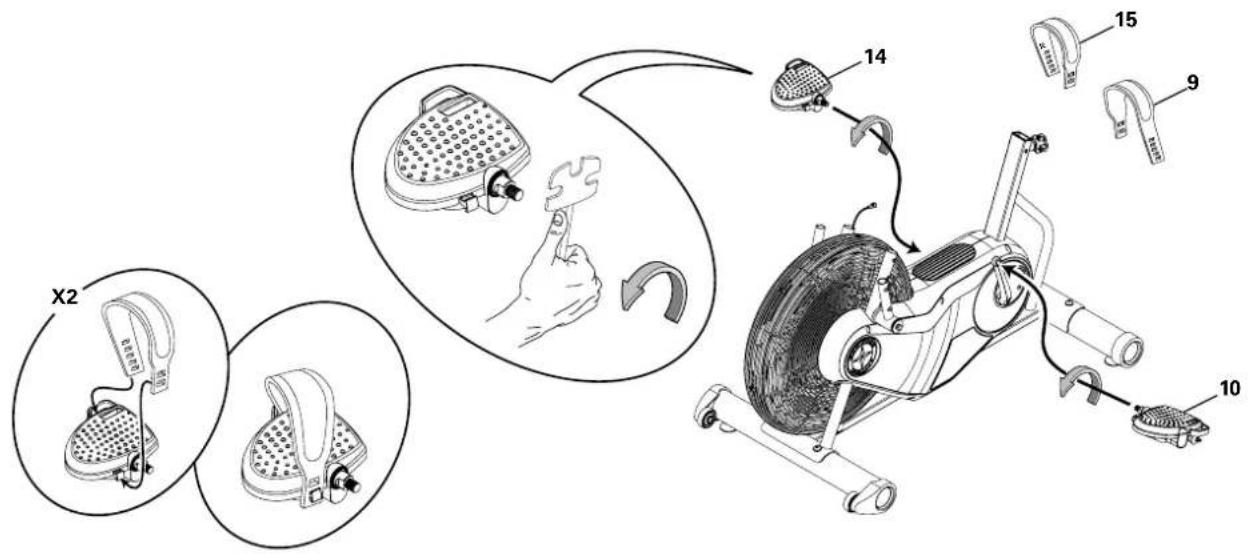
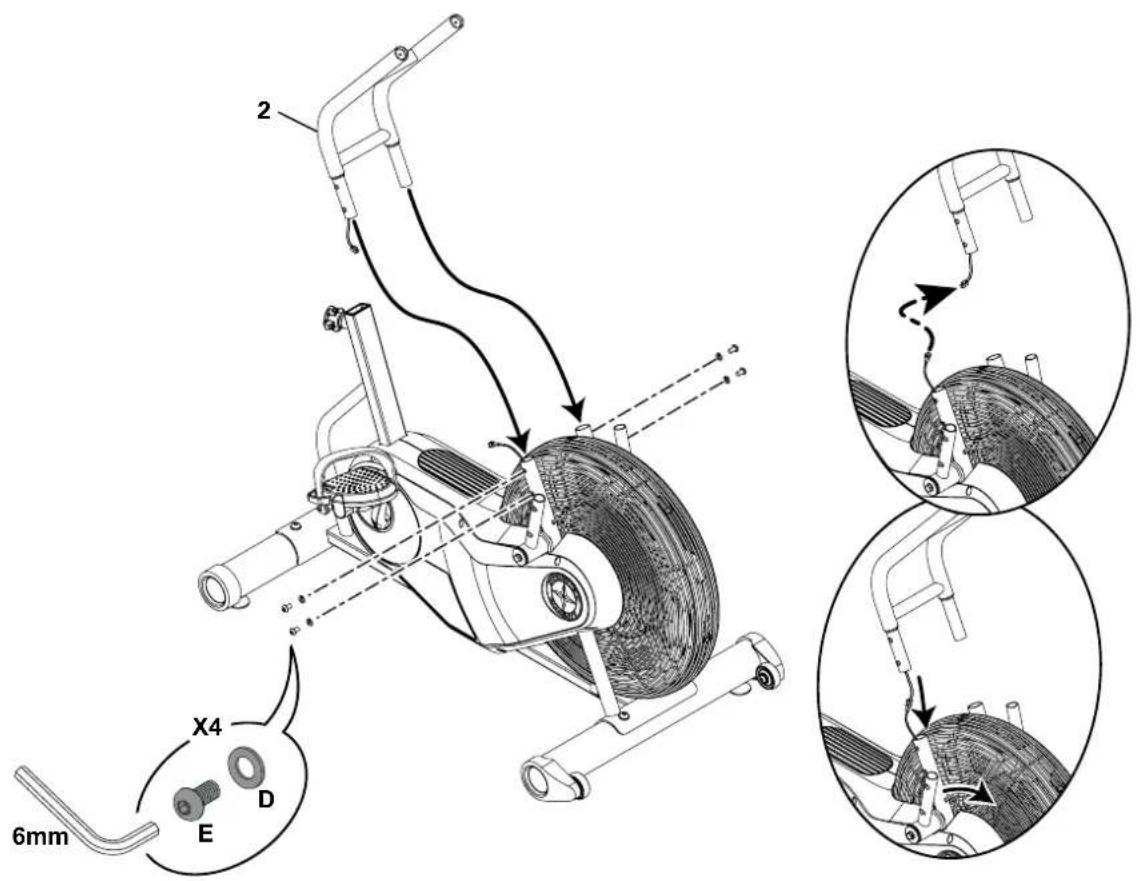
2. Attach Pedals and then Pedal Straps to Frame Assembly
Note: The Left Pedal is reverse-threaded. Be sure to attach Pedals on the proper side of the Bike. Orientation is based from a seated position on the bike. The Left Pedal has an "L", the Right Pedal an "R".
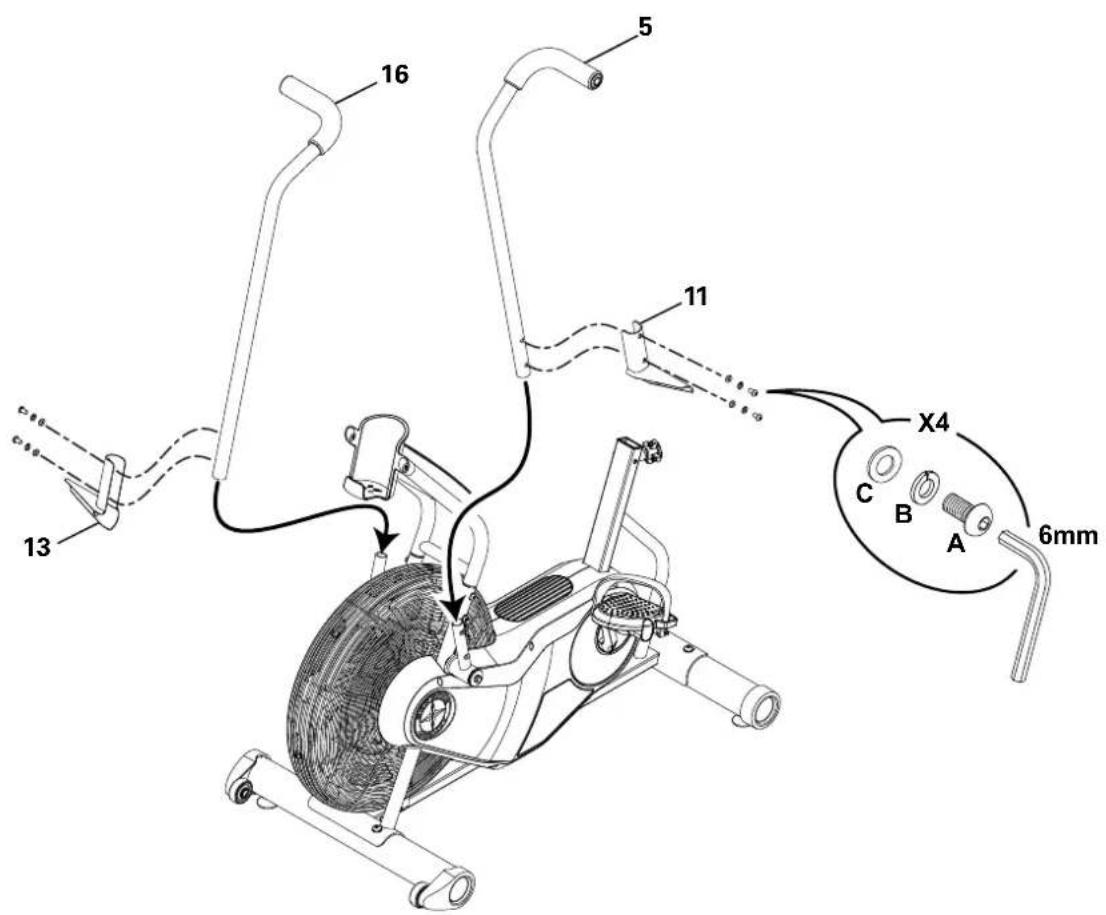
3. Connect Cables and Attach the Console Support Bar to Frame Assembly
Note: Do not crimp the cables. Pull the lower cable to remove any slack as you insert the Console Support Bar.
In order to avoid possible serious injury, when inserting the tube ends into the Frame Assembly be careful to avoid fingers or hands being caught or pinched.
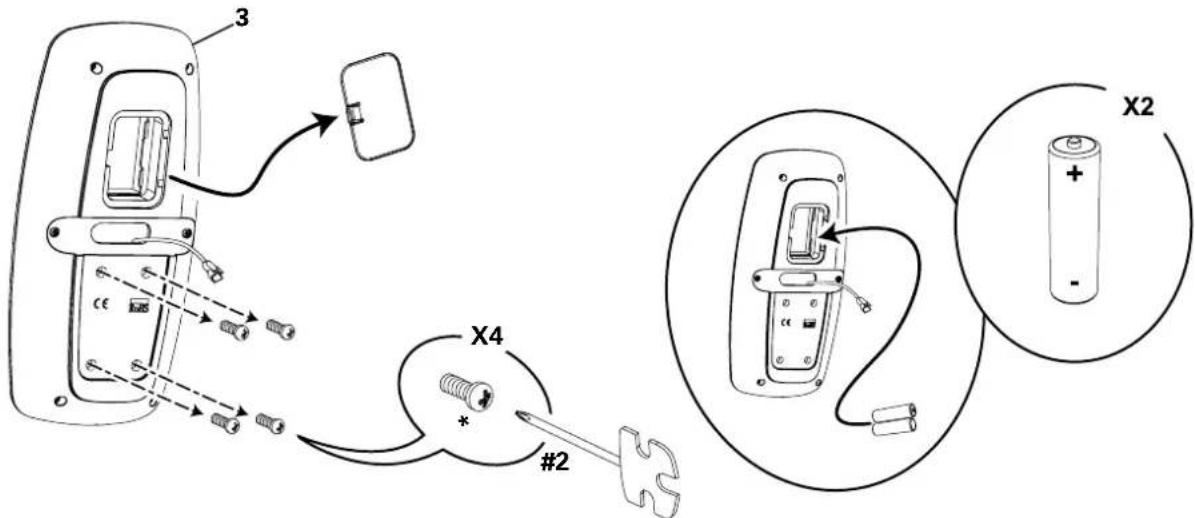
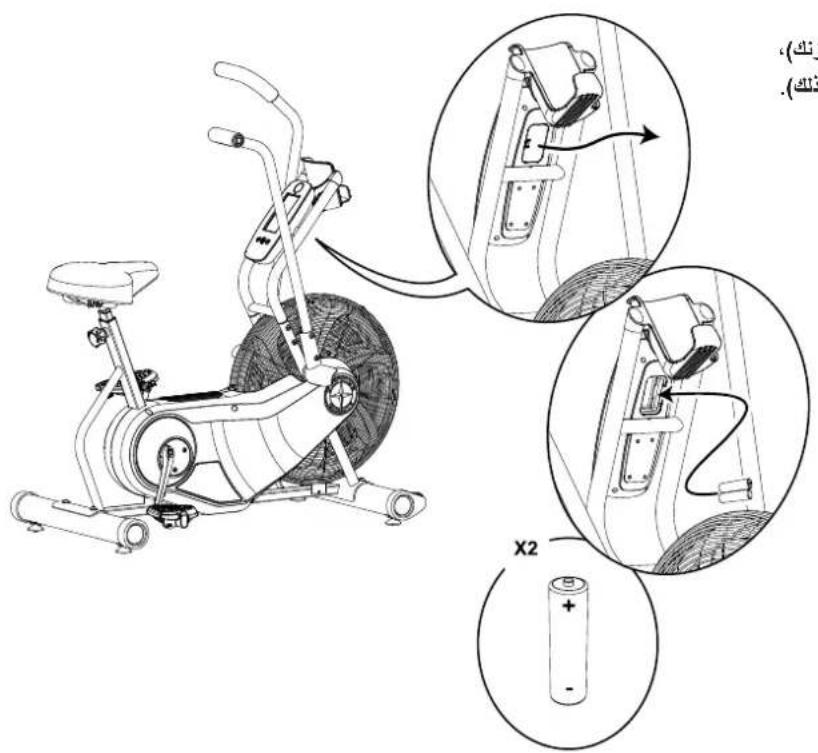
4. Remove Hardware and Install Batteries into Console
Note: Make sure that the batteries point in the direction of the +/- indicators in the battery bay. Hardware is pre-installed and not on the Hardware Card (*).

Do not mix alkaline, standard (carbon-zinc), or rechargeable (Ni-Cd, Ni-MH, etc) batteries.
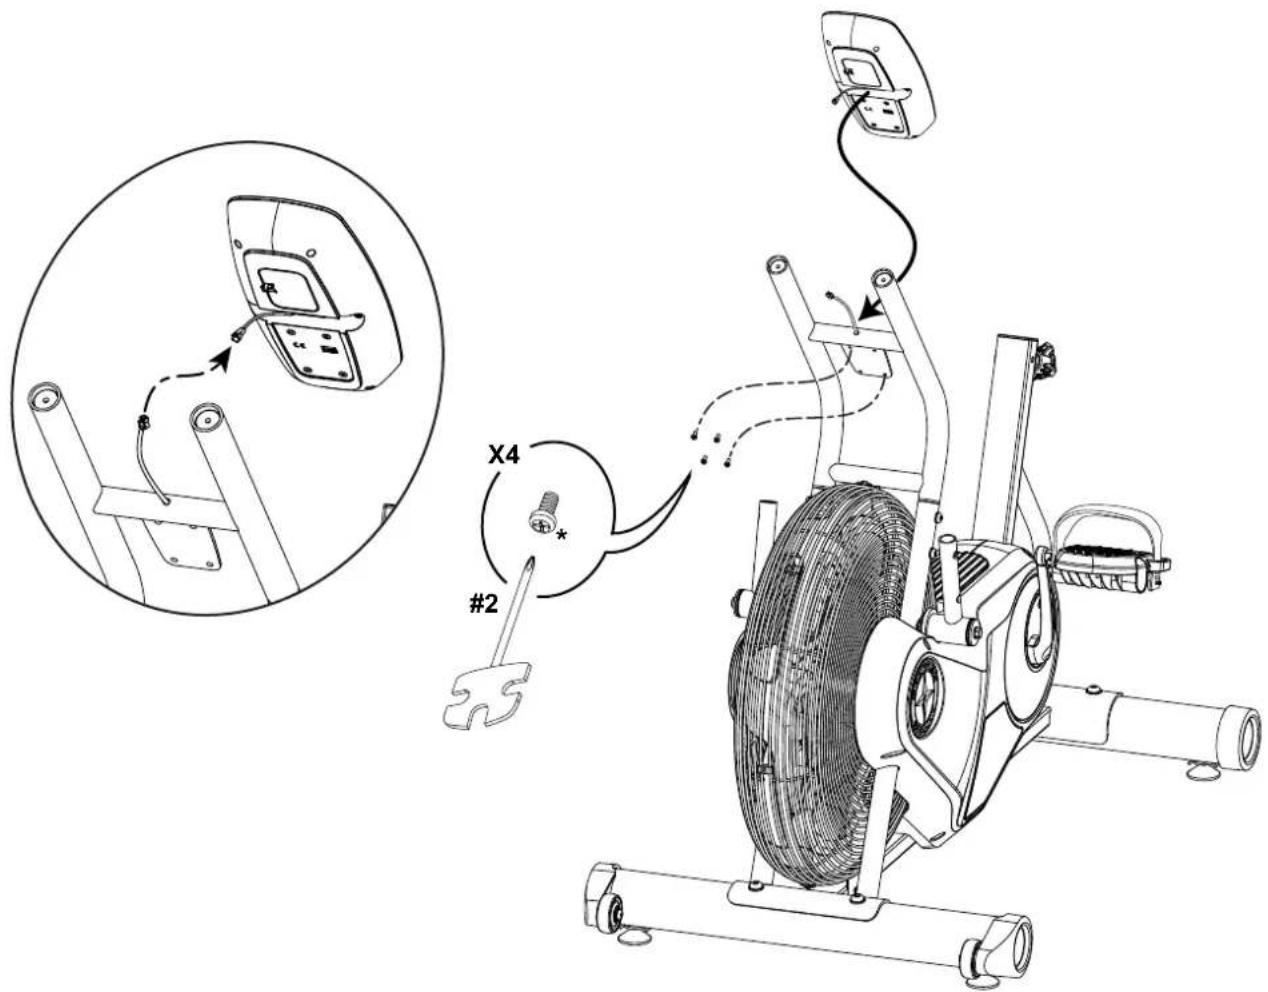
5. Connect Cable and Attach the Console Note: Do not crimp Console Cable.
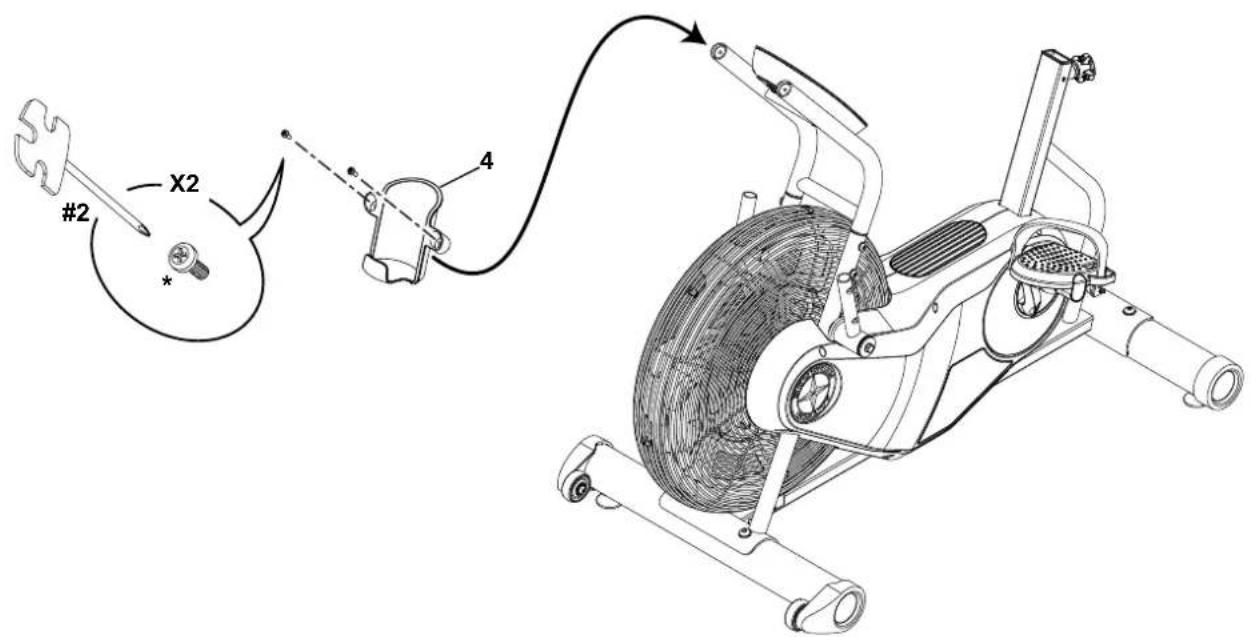
6. Attach Water Bottle Holder to Frame Assembly
Note: Hardware is pre-installed and not on the Hardware Card (*).
7. Attach Foot Pegs and Handlebar Arms to Frame Assembly
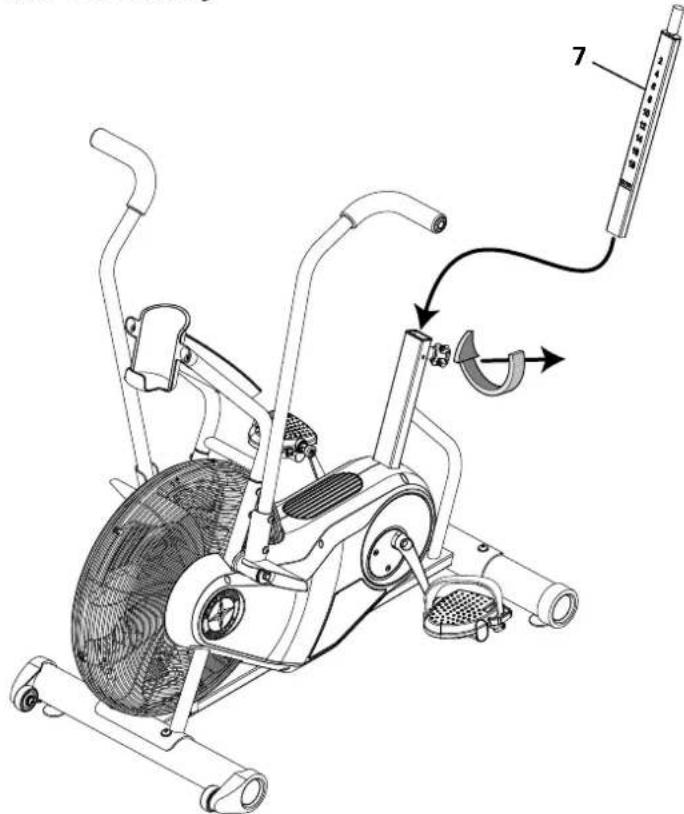
8. Loosen and Pull the Seat Post Adjustment Knob to Attach Seat Post to Frame Assembly
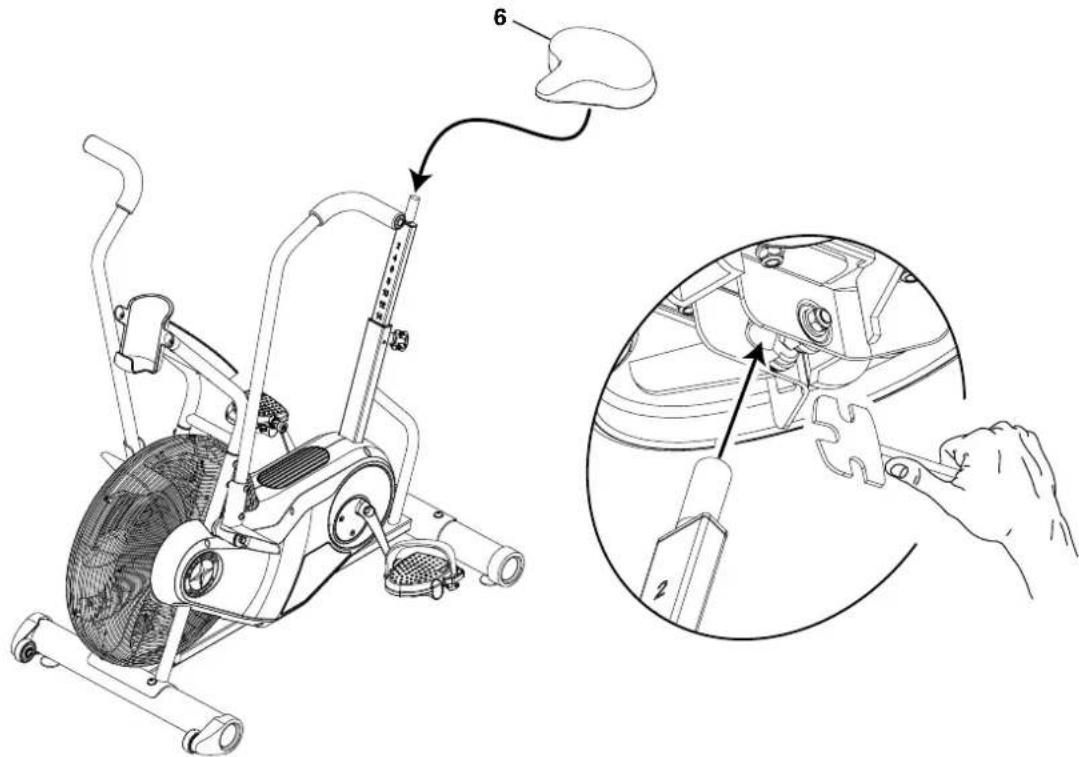
9. Attach Seat to Seat Post
NOTICE: Be sure the Seat is straight and then tighten the hardware.
10. Final Inspection
Inspect your machine to ensure that all hardware is tight and components are properly assembled.

Do not use or put the machine into service until the machine has been fully assembled and inspected for correct performance in accordance with the Owner's Manual.
BEFORE YOU START
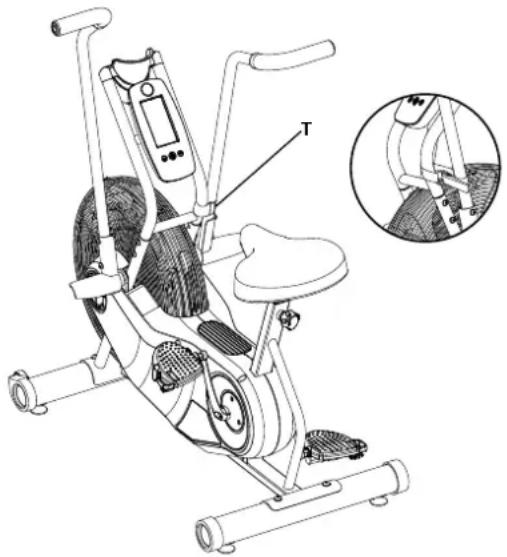
Moving the Machine

The machine may be moved by one or more persons depending on their physical abilities and capacities. Make sure that you and others are all physically fit and able to move the machine safely. Use proper safety precautions and lifting techniques.
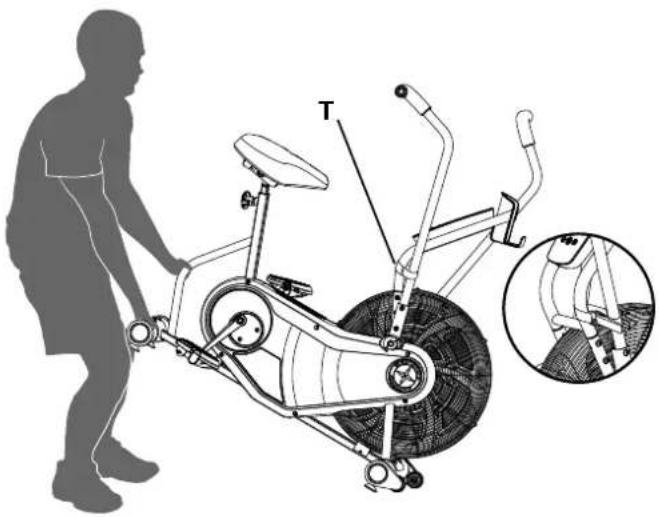
- Secure the Handlebar to the Console Support Bar with the Transport and Immobilization Strap (T).
- Use the Rear Stabilizer to carefully lift the machine onto the transport rollers.
Note: Be sure to keep the fan assembly clear of the floor.
- Push the machine into position.
- Carefully lower the machine into position.
NOTICE: Be careful when you move the machine. All abrupt motions can affect the computer operation.
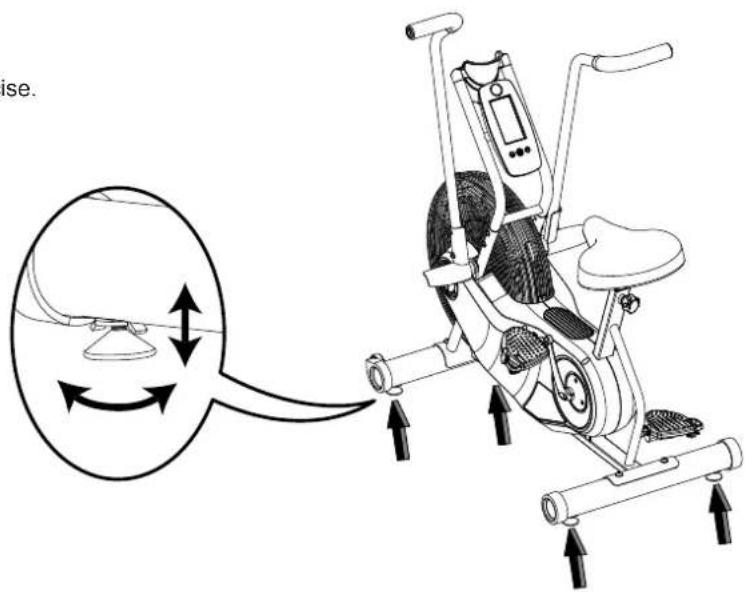
Leveling the Machine
The machine needs to be leveled if your workout area is uneven. To adjust:
- Place the machine in your workout area.
- Loosen the locking nuts and adjust the levelers until they are evenly balanced and in contact with the floor.

Do not adjust the levelers to such a height that they detach or unscrew from the machine. Injury to you or damage to the machine can occur.
- Tighten the locking nuts.
Make sure the machine is level and stable before you exercise.
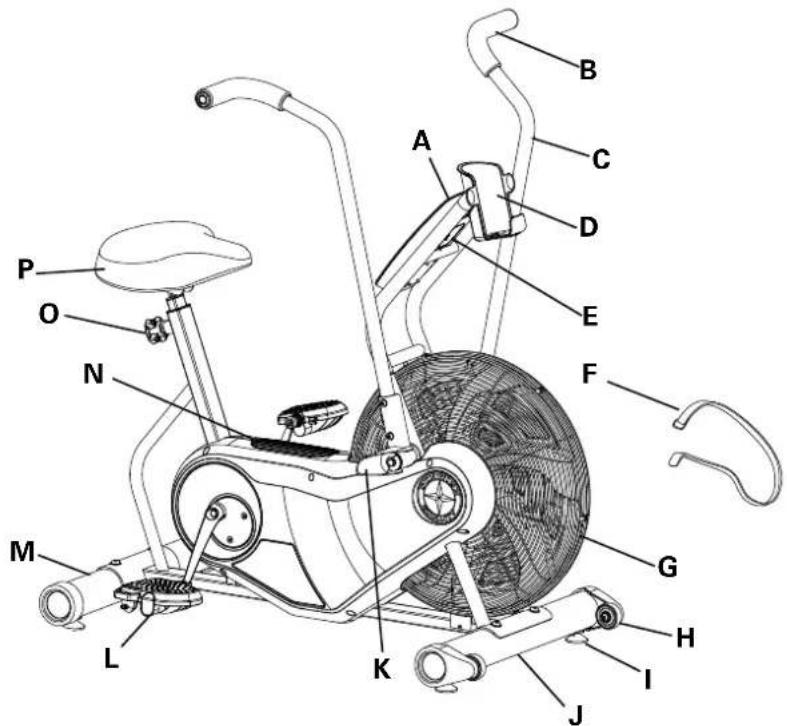
MAIN PARTS INCLUDEED
| A | Console | G | Air Resistance Fan | M | Stabilizer, Rear |
| B | Hand Grip | H | Transport Roller | N | Foot Step Pad |
| C | Handlebar | I | Leveler | O | Seat Post Adjustment Knob |
| D | Water Bottle Holder | J | Stabilizer, Front | P | Seat |
| E | Battery Compartment | K | Foot Peg | ||
| F | Transport and Immobilization Strap | L | Pedal |
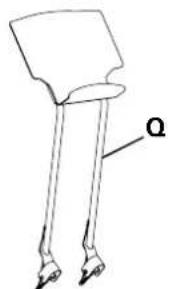
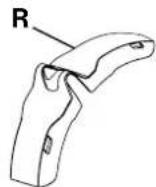
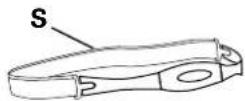
ACCESSORIES
| Q | AirDyne™ Reading Rack | R | AirDyne™ Wind Screen | S | Remote Heart Rate Chest Strap |
To order:
If purchased in US/Canada, go to www.schwinnfitness.com or call 1 (800) 605-3369.
If purchased outside US/Canada, contact your local distributor.
WARNING! Use the values calculated or measured by the machine's computer for reference purposes only. The heart rate displayed is an approximation and should be used for reference only. Over exercising may result in serious injury or death. If you feel faint stop exercising immediately.
Console Features
The Console provides information about your workout on the display screen.
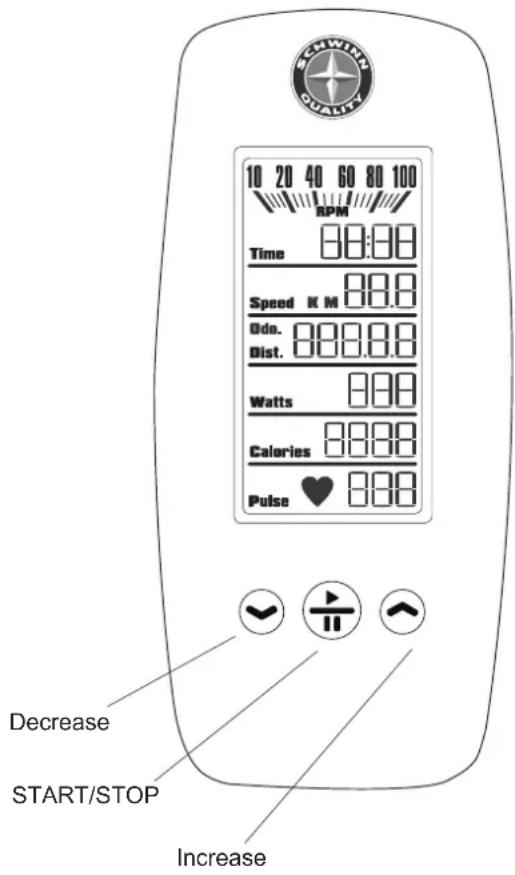
LCD Display Data
The console display shows each workout value.
RPM
The RPM display field shows the machine revolutions per minute (RPM). The maximum display is 100.
Time
The TIME display field shows the time count of the workout. The maximum display is 99:59. If the time count is more, the display starts again at 0:00.
During the initial power-up, this display will show altitude ("Alt"). The altitude where the machine will be in operation must be entered.
Speed
The SPEED display field shows the machine speed in kilometers per hour ( "KM") or miles per hour ("M"), to one decimal place—for example, 3.4 or 10.5. The maximum display is 99.9.
Dist.
The DISTANCE display field shows the distance count (miles or km) in the workout, to two decimal places—for example, 2.07. The maximum display is 99.99. If the distance exceeds 99.99, the display starts again at 0.00.
Note: To change the measurement units to English Imperial or metric, refer to the "Console Service Mode" section in this manual.
The Odometer ("Odo.") shows the sum of all workout distances. It is displayed when a workout is paused, or as an option in the "Console Service Mode".
During the initial power-up, this display will show the Altitude value until accepted.
Watts
The WATTS display field shows the power that you are producing at the current resistance level (1 horsepower = 746 watts).
Calories
The CALORIES display field shows the estimated calories that you have burned during the exercise. The maximum display is 9999. If the calorie count is more, the display flashes 9999.
Pulse
The PULSE display shows the heart rate in beats per minute (BPM) from a telemetric heart rate sensor. The icon will flash when it has a signal from a telemetric heart rate strap. This display value will be blank if a heart rate signal is not detected.

Consult a physician before you start an exercise program. Stop exercising if you feel pain or tightness in your chest, become short of breath, or feel faint. Contact your doctor before you use the machine again. The heart rate displayed is an approximation and should be used for reference purposes only.
Keypad Functions
Decrease () button- Decreases a value (time or altitude) or moves through options.
START/STOP button- Starts a Program workout, confirms a selection, and ends a paused workout if held down for 3 seconds.
Increase (▲) button- Increases a value (time or altitude) or moves through options.
Remote Heart Rate Monitor
Monitoring your Heart Rate is one of the best procedures to control the intensity of your exercise. The Console can read telemetry HR signals from a Heart Rate Chest Strip Transmitter that operates in the 4.5kHz - 5.5kHz range.
Note: The heart rate chest strap must be an uncoded heart rate strap from Polar Electro or an uncoded POLAR compatible model. (Coded POLAR heart rate straps such as POLAR OwnCode chest straps will not work with this equipment.)

If you have a pacemaker or other implanted electronic device, consult your doctor before using a wireless chest strap or other telemetric heart rate monitor.
Heart Rate Calculations
Your maximum heart rate usually decreases from 220 Beats Per Minute (BPM) in childhood to approximately 160 BPM by age 60. This fall in heart rate is usually linear, decreasing by approximately one BPM for each year. There is no indication that training influences the decrease in maximum heart rate. Individuals of the same age could have different maximum heart rates. It is more accurate to find this value by completing a stress test than by using an age related formula.
Your at-rest heart rate is influenced by endurance training. The typical adult has an at-rest heart rate of approximately 72 BPM, where as highly trained runners may have readings of 40 BPM or lower.
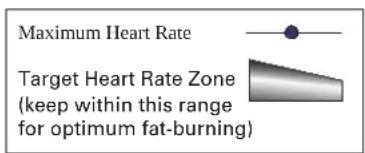
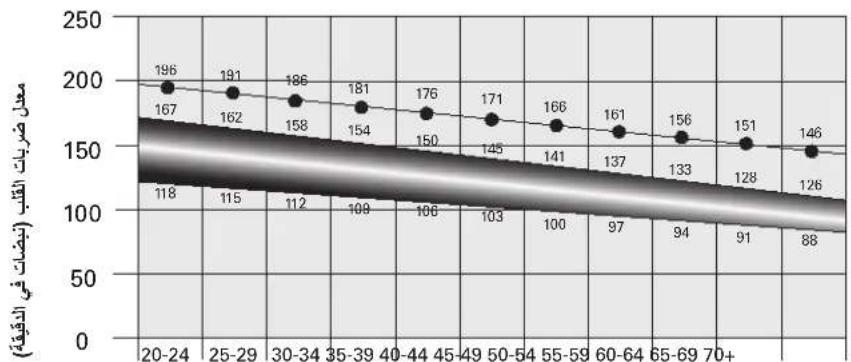
The Heart Rate table is an estimate of what Heart Rate Zone (HRZ) is effective to burn fat and improve your cardiovascular system. Physical conditions vary, therefore your individual HRZ could be several beats higher or lower than what is shown.
The most efficient procedure to burn fat during exercise is to start at a slow pace and gradually increase your intensity until your heart rate reaches between 60 - 85% of your maximum heart rate. Continue at that pace, keeping your heart rate in that target zone for over 20 minutes. The longer you maintain your target heart rate, the more fat your body will burn.
The graph is a brief guideline, describing the generally suggested target heart rates based on age. As noted above, your optimal target rate may be higher or lower. Consult your physician for your individual target heart rate zone.
Note: As with all exercises and fitness regimens, always use your best judgment when you increase your exercise time or intensity.
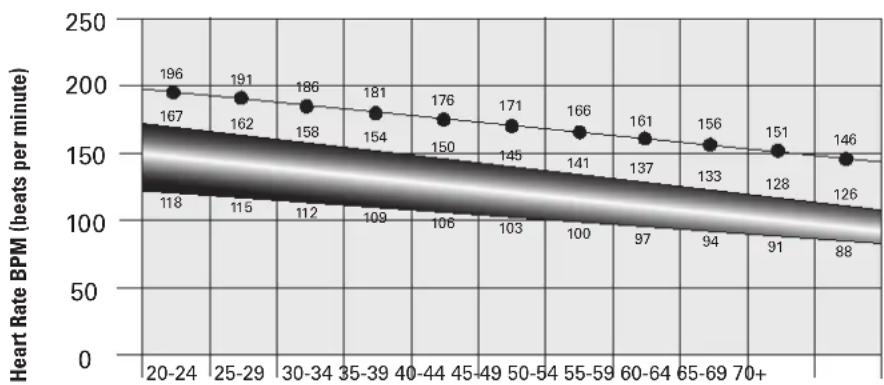
FAT-BURNING TARGET HEART RATE
Age
OPERATION
What to Wear
Wear rubber-soled athletic shoes. You will need the appropriate clothes for exercise that allow you to move freely.
How Often Should You Exercise

Consult a physician before you start an exercise program. Stop exercising if you feel pain or tightness in your chest, become short of breath, or feel faint. Contact your doctor before you use the machine again. Use the values calculated or measured by the machine's computer for reference purposes only. The heart rate displayed is an approximation and should be used for reference purposes only.
- 3 times a week for 20 minutes each day.
- Schedule workouts in advance and try to follow the schedule.
Seat Adjustment
Correct seat placement encourages exercise efficiency and comfort, while reducing the risk of injury.
- With a Pedal in the forward position, place the heel of your foot to the lowest part of it. Your leg should be bent slightly at the knee.
- If your leg is too straight or your foot cannot touch the Pedal, you need to move the seat downward. If your leg is bent too much, you need to move the seat upward.

Step off the machine before you adjust the seat.
- Loosen and pull the Seat Post Adjustment Knob on the Seat Post. Adjust the seat to the desired height.

Do not lift the Seat post above the "STOP" mark on the Seat Post.
- Release the Seat Post Adjustment Knob to engage the locking pin. Be sure that the pin is fully engaged and fully tighten the adjustment knob.
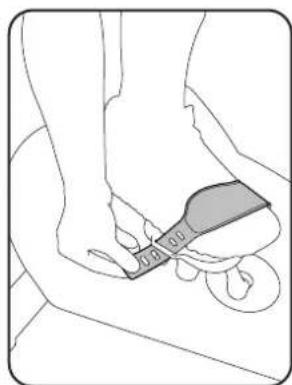
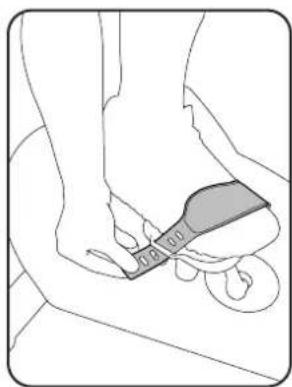
Foot Position / Pedal Strap Adjustment
Foot pedals with straps provide secure footing to the exercise bike.
- Rotate the Pedals until one can be reached.

Be aware that the Pedals, Handlebars and Resistance Fan are connected and when any of these parts move the others do as well.
- Put the ball of each foot on the Pedals.
- Fasten the strap over the shoe.
- Repeat for the other foot.
Be sure toes and knees point directly forward to ensure maximum Pedal efficiency. Pedal straps can be left in position for subsequent workouts.
Using the Machine

Be aware that the Pedals, Handlebars and Resistance Fan are connected and when any of these parts move the others do as well.
Carefully mount the machine using the Foot Step Pad if necessary. Adjust the Seat and Pedals before starting a workout.
Lower Body Workout: Slowly pedal with your arms relaxed at your sides or with your hands resting on the Hand Grips as the Handlebars move.
Full Body Workout: Grasp the Hand Grips with your palms down. Push and pull the Handlebars as you pedal, keeping your elbows low and next to your body.
Upper Body Workout: Grasp the Hand Grips firmly with palms down and place your feet on the Foot Pegs. Lean slightly forward at the hips with your back straight and shoulders down. Now push and pull the Handlebars
Note: You may need to safely push a Pedal to assist with starting the workout.
To increase the air resistance and workload, increase your level of activity. To exercise all the muscle groups in your arms, alter your grasp to palms up for part of the workout.
When done with your workout, reduce the Resistance Fan speed until the machine fully stops.

This bike cannot stop the Pedals independently of the Resistance Fan. Reduce the pace to slow the Resistance Fan and Pedals to a stop. Do not dismount the bike until the Pedals have come to a complete stop.
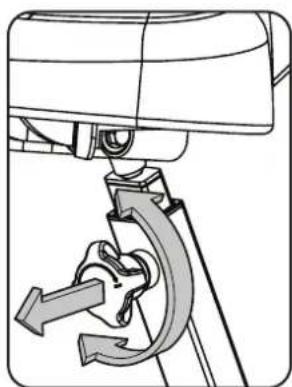
Locking the Fan Assembly / Storage
When the machine is not in use, be sure to lock the Fan Assembly with the Transport and Immobilization Strap. The fan assembly should be locked for storage of the machine.

For safe storage of the machine, remove the batteries and install the Transport and Immobilization Strap to secure the Resistance Fan. Place the machine in a secure location from children and pets. Be aware that the Pedals, Handlebars and Resistance Fan are connected and when any of these parts move the others do as well.
To lock the Fan Assembly:
- Move the Handlebars so that one Handlebar is as close as possible to the Console Support Bar.
- Wrap the Transport and Immobilization Strap (T) around the Handlebar and the Console Support Bar and put the end of the strap through the metal ring. Tighten the strap to prevent movement of the handlebars and secure the strap.
Power-Up/Idle Mode
The Console will enter Power-Up / Idle Mode if any button is pushed, or if it receives a signal from the RPM sensor as a result of pedaling the machine.
Note: The Console will display "Lbatt" if the batteries are around 10% of their rated power during power up.
Auto Shut-Off (Sleep Mode)
If the Console does not receive any input in approximately 5 minutes, it will automatically shut off. The LCD display is off while in Sleep Mode.
Note: The Console does not have an On/Off switch.
Initial Setup
During the initial power-up, the Console will display "Alt" and must be setup with the current workout altitude.
- Push the Increase/Decrease buttons to change the value for the altitude. Entering the correct value will make the calorie count more accurate.
- Push the START/STOP button to set.
Note: The altitude value can be adjusted at a future time. To adjust the value, consult the "Console Set-Up Mode" section.
Quick Start Workout
The Quick Start program lets you start a workout without entering any information.
- Sit on the machine.
- With the Console in Idle Mode, push the START/STOP button to start the workout program.
- When done with your workout, stop pedaling. Then push and hold down the START/STOP button for 3 seconds to end the workout.
Custom Time Workout
The Console allows you to select a Custom Time Workout and enter your own time value. The Console will remember this value until changed.
-
Sit on the machine.
-
With the Console in Idle Mode, push and hold down for 3 seconds the START/STOP button.
- The Console will show the default value or the last custom time value.
Note: The default time value is 20 minutes.
- Push the Increase and Decrease buttons to adjust the custom time value.
- Push START/STOP to accept the custom time workout. Your Custom Goal Workout will now begin.
Pausing or Stopping
To Pause a workout:
- Stop pedaling to pause your workout.
Note: The Console will automatically pause if there is no RPM signal for 5 seconds.
- To continue your workout, push START/STOP or start pedaling.
To stop the workout, push and hold down the START/STOP button for 3 seconds. The Console will go into Results mode.
When paused, the Console display will flash the current workout values of TIME, AVERAGE SPEED, DISTANCE, TOTAL MACHINE DISTANCE ("Odo.), WATTS, CALORIES, and AVERAGE HEART RATE (if activated).
Results Mode
When you complete or end a workout, the Console will display your workout values three times in the order of TIME, AVERAGE, SPEED, DISTANCE, WATTS, CALORIES, and AVERAGE HEART RATE (if activated).
Push START/STOP to stop the Results display and go back to Idle Mode.
CONSOLE SERVICE MODE
The Console Service Mode lets you set the units of measurement to either English or Metric, see the total time and distance the machine has been used, adjust the altitude value for a more accurate calorie count, or find out which version of Firmware is installed.
- Hold down the Increase button and Decrease button together for 3 seconds while in the Idle Mode to go into the Console Service Mode.
- The Console display shows the Units prompt ("Unit"). Push START/STOP to start Units option. Push the Increase/Decrease buttons to change between "M" (Imperial English units) and "KM" (metric units).
- Push START/STOP to set. For the next option, push the Increase button.
- The Console display shows the Breakfast Statistics prompt ("StAt"). Push START/STOP to start the Breakfast Statistics option. The Console will display the Total Distance ("Odo") and Total Time.
Note: The upper displayed value is total hours followed by the remaining minutes.
- Push START/STOP to exit. For the next option, push the Increase button.
- The Console display shows the Firmware Version prompt ("Fir"). The Console will display which Firmware Version is installed in the Speed display field.
- For the next option, push the Increase button.
- The Console display shows Altitude ("Alt") with the previously entered value in the Speed display field. Push START/STOP to adjust the Altitude value. Use the Increase/Decrease buttons to change the value.
- Push START/STOP to exit. For the next option, push the Increase button.
- The Console display shows the exit prompt ("dOnE").
- Push START/STOP to exit.
To fully exit the Console Service Mode push and hold down the START/STOP button for 3 seconds. In Service Mode if the Console does not receive any input in approximately 5 minutes, it goes into Sleep Mode.
| Condition/Problem Things | to Check Solution | |
| Console will not power up/turn on/start | Batteries Make sure batteries are installed correctly. If batteries are correctly installed, replace with a set of new batteries. | |
| Check data cable integrity All wires in cable should be intact. If any are visibly crimped or cut, replace cable. | ||
| Check data cable connections/ orientation | Make sure cable is connected securely and oriented properly. Small latch on connector should line up and snap into place. | |
| Check console display for damage | Check for visual sign that console display is cracked or otherwise damaged. Replace Console if damaged. | |
| If the above steps do not resolve the problem, contact Customer Service (if inside US/Canada) or your local distributor (if outside US/Canada). | ||
| Speed displayed is not accurate D | Display set to wrong unit of measure. (English/Metric) | Change display units (consult "Console Service Mode") |
| Speed displayed is always "0"/stuck in Pause mode | Data cable Make sure the data cable is connected to the back of the Console and the main frame assembly. | |
| Speed Sensor (under Shrouds) Make sure the Speed Sensor Magnet and the Speed Sensor are in place. | ||
| No speed/RPM reading | Check data cable integrity | All wires in cable should be intact. If any are cut or crimped, replace cable. |
| Check data cable connections/orientation | Be sure cable is connected securely and oriented properly. Small latch on connector should line up and snap into place. | |
| Check Speed Sensor Magnet position (requires shroud removal) | Magnet should be in place on pulley. | |
| Check Speed Sensor Assembly (requires shroud removal) | Speed Sensor Assembly should be aligned with magnet and connected to data cable. Realign sensor if necessary. Replace if there is any damage to the sensor or the connecting wire. | |
| Console displays "Lbatt" error code | Batteries Replace batteries | |
| Unit operates but Telemetric Heart Rate not displayed | Chest Strap (optional) Strap should be "POLAR compatible and uncoded. Make sure strap is directly against skin and contact area is wet. | |
| Chest Strap Batteries If strap has replaceable batteries, install new batteries. | ||
| Interference Try moving unit away from sources of interference (TV, Microwave, etc). | ||
| Replace Chest Strap If interference is eliminated and HR does not function, replace strap. | ||
| Replace Console If HR still does not function, replace Console. | ||
| Console shuts off (enters sleep mode) while in use | Check data cable integrity All wires in the cable should be intact. If any are cut or crimped, replace cable. | |
| Check data cable connections/orientation | Be sure cable is connected securely and oriented properly. Small latch on connector should line up and snap into place. | |
| Check Battery Indicator on console or check batteries. | Make sure batteries are installed correctly. If batteries are correctly installed, replace with a set of new batteries. | |
| Check Speed Sensor Magnet position (requires shroud removal) | Speed Sensor Magnet should be in place on pulley. | |
| Check Speed Sensor Assembly | Contact Customer Service (if inside US/Canada) or your local distributor (if outside US/Canada). | |
| Unit rocks/does not sit level | Check leveler adjustment | Leveling feet may be turned in or out to level bike. |
| Check surface under unit | Adjustment may not be able to compensate for extremely uneven surfaces. Move bike to level area. | |
| Pedals loose/unit difficult to pedal | Check pedal to crank connection | Pedal should be tightened securely to crank. Be sure connection is not cross-threaded. |
| Check crank to axle connection | Crank should be tightened securely to axle. | |
| Clicking sound when pedaling | Check pedal to crank connection | Remove pedals and reattach fully. |
| Seat post movement | Check locking pin | Be sure adjustment pin is locked into one of the seat post adjustment holes. |
| Check locking knob | Be sure knob is securely tightened. | |
MAINTENANCE
Read all maintenance instructions fully before you start any repair work. In some conditions, an assistant is required to do the necessary tasks.

Equipment must be regularly examined for damage and repairs. The owner is responsible to make sure that regular maintenance is done. Worn or damaged components must be repaired or replaced immediately. Only manufacturer supplied components can be used to maintain and repair the equipment.
If at any time the Warning labels become loose, unreadable or dislodged, replace the labels. If purchased in US/ Canada, contact Customer Service for replacement labels. If purchased outside US/Canada, contact your local distributor for them.
Disconnect all power to the machine before you service it.
Daily:
Before each use, examine the exercise machine for loose, broken, damaged, or worn parts. Do not use if found in this condition. Repair or replace all parts at the first sign of wear or damage. After each workout, use a damp cloth to wipe your machine and Console free of moisture.
Note: Avoid excessive moisture on the Console.
NOTICE: If necessary, only use a mild dish soap with a soft cloth to clean the Console. Do not clean with a petroleum based solvent, automotive cleaner, or any product that contains ammonia. Do not clean the Console in direct sunlight or at high temperatures. Be sure to keep the Console free of moisture.
Weekly: Clean the machine to remove any dust, dirt, or grime from the surfaces.
Check for smooth seat operation. If needed, sparingly apply a thin coating of 100% silicone lube to ease operation.

Silicone lubricant is not intended for human consumption. Keep out of reach of children. Store in a safe place.
Note: Do not use petroleum based products.
Monthly
Make sure all bolts and screws are tight. Tighten as necessary.
or after 20 hours:
Replacing the Console Batteries
The Console will display "Lbatt" for ten seconds when the batteries are around 10% of their rated power during power up. When replacing the batteries, make sure the batteries point in the +/- direction shown in the battery bay.
Note: The console uses AA size batteries (LR6)

Do not mix old and new batteries.
Do not mix alkaline, standard (carbon-zinc), or rechargeable (Ni-Cd, Ni-MH, etc) batteries.

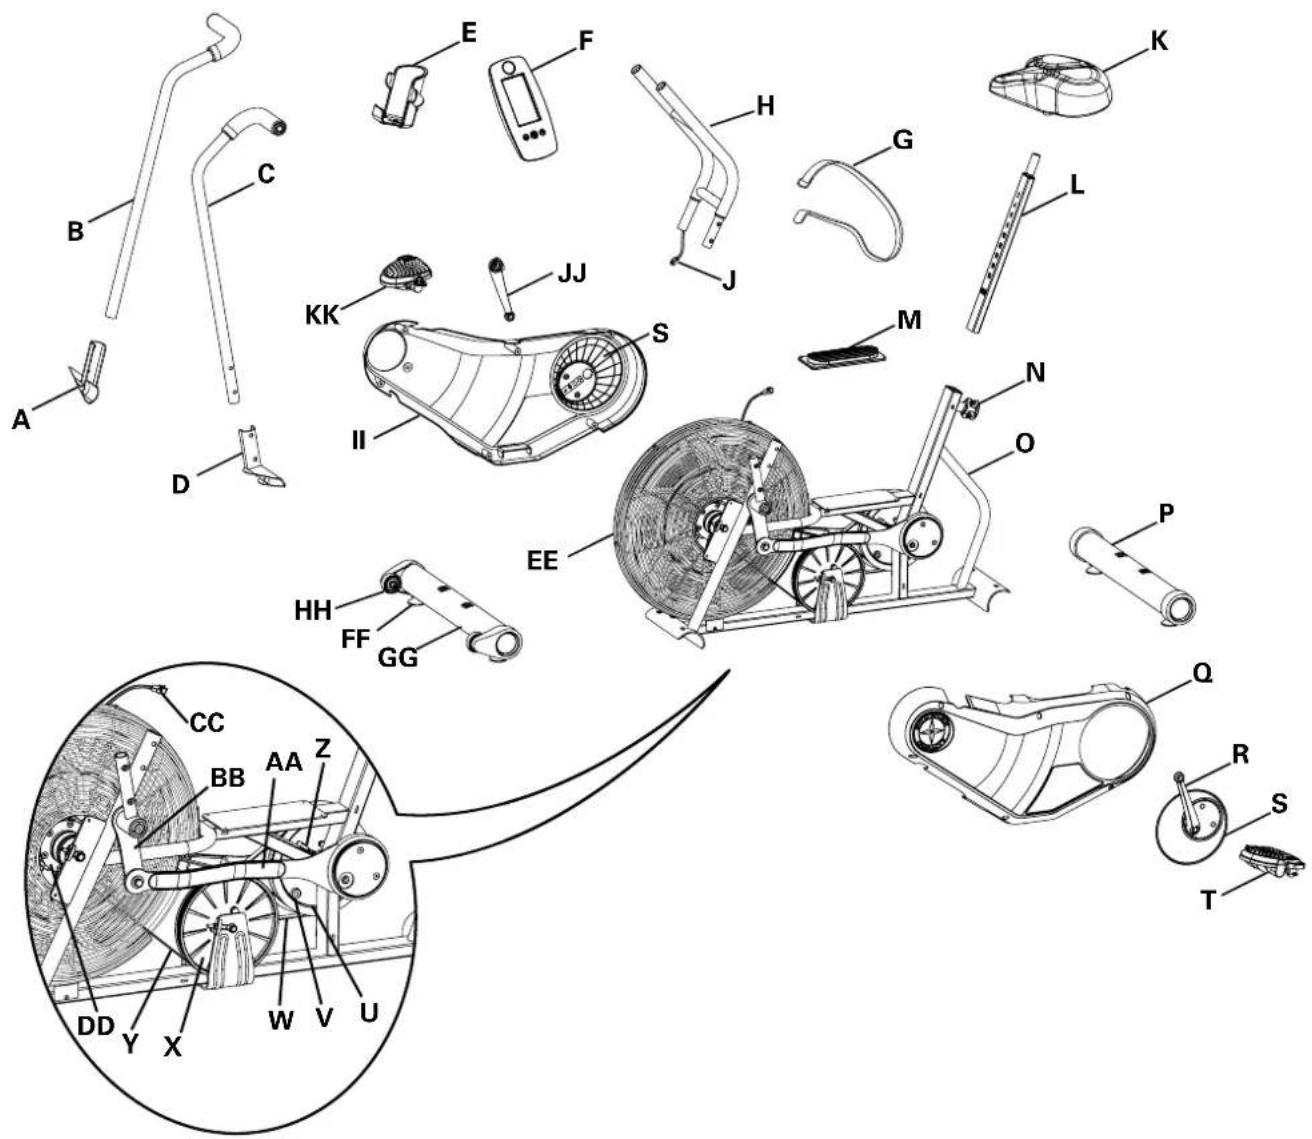
| A | Foot Peg, Right | N | Seat Adjustment Knob | AA | Connector Arm |
| B | Handlebar, Right | O | Frame | BB | Arm Pivot |
| C | Handlebar, Left | P | Stabilizer, Rear | CC | Console Cable, Lower |
| D | Foot Peg, Left | Q | Shroud, Left | DD | Resistance Fan Assembly |
| E | Water Bottle Holder | R | Crank Arm, Left | EE | Fan Cover |
| F | Console | S | Center Plate | FF | Leveler |
| G | Strap, Transport/Immobilization | T | Pedal, Left | GG | Stabilizer, Front |
| H | Console Support Bar | U | Pulley, Crank | HH | Transport Wheel |
| I | not used | V | Speed Sensor Magnet | II | Shroud, Right |
| J | Console Cable, Upper | W | Crank Belt | JJ | Crank Arm, Right |
| K | Seat | X | Pulley, Drive | KK | Pedal, Right |
| L | Seat Post | Y | Drive Belt | ||
| M | Foot Step Pad | Z | Speed Sensor Assembly |
KONSOLE-SERVICE-MODUS
MODELNAAM: SCHWINN Airdyne AD6i
https://global.schwinnfitness.com/en/manuals.html
GARANTIE
NOM DU MODELE: SCHWINN Airdyne AD6i
Mode Demarrage/Repos
https://global.schwinnfitness.com/it/manuals.html
GARANZIE
https://global.schwinnfitness.com/en/manuals.html
GARANTÍA
4. Remover as ferragens e instalar as pilhas na consola
SCHWINN Airdyne AD6i
1


1
j 1 j 1 1 1 1 1 1 1 1 1 1 1 1 1 1 1 1 1 1 1 1
1
1
.128
.
12
()
j4 = j1 + 5
.
AIRDYNE
a 1 1 1 1 1 1 1 1 1 1 1 1 1 1 1 1 1 1 1 1 1 1 1 1 1 1 1 1 1 1 1 1 1 1 1 1 1 1
1.
y 1234567890123456789012345678901234567890123456789012345678901234567890123456789012345678901234567890123456789
Aie aie 1jssll jai jiae i kai jai jai jai jai jai jai jai jai jai jai jai jai jai jai jai jai jai jai jai jai jai jai jai jai jai jai jai jai jai jai jai jai jai jai jai jai jai jai jai jai jai jai jai jai jai jai jai jai jai jai
:la aal gaiy juy dkiy ay yaiy jay jiai https://global.schwinnfitness.com/en/manuals.html

aill cullol
No.2217, Hechen Rd., JiaDing District, Shanghai, China | Johnson Industries (Shanghai) Co., Ltd.
a1gaii 1j
gaiyai (L) (R)
POLAR Polar Electro 1
POLARTM POLORTM 1
gslalll alj aaii jia yuuiy iie ggygiigil jgsgl lall cayn jy
a 1

Llal Ljia Jua Ljua
1 11
y 1
y 1
y 1
Jg a a t. 1
J 1 (HRZ) 11111111111111111111
a aaa aaa aa aaa aaa aaa aaa aaa
A 10
saii iie iie
jglal jz jzall daa zjlaLs. jzhl
e 1
y
A 1
j 1

Ae aee eae ee eae eae eae eae eae eae eae eae eae eae eae eae eae eae eae eae eae eae eae eae eae eae eae eae eae eae eae eae eae eae eae eae eae eae eae eae eae eae eae eae eae eae eae eae eae eae eae eae
a a
a a a a a a a a a a a a a a a a a a a a a a a a a a a a a a a a a a a a a

aal (STOP) "g" aale yaaal

JalSlybajlall jaiybjaiyjaiy jaiy jaiy jaiy jaiy jaiy jaiy jaiy jaiy jaiy jaiy jaiy jaiy jaiy jaiy jaiy jaiy jaiy jaiy jaiy jaiy jaiy jaiy jaiy
aai gali jia /aii iiaiaea a
Aajllge aaiy jy jaii Jaaie iiaaall lal yjay sajg jao
a aal 1
a

Cullgill
1
.
gulal aai jai jay Aulil Jaceolk no jad gail plalll y
Aa aaiy
jglz11 a1234567890
a a a a a a a a a a a a a a a a a a a a a a a a a a a a a a
aiee eae aee ae aee aee aee aee aee aee aee aee aee
j 1
a aal
a a a a a a a a a a a a a a a a a a a a a a a a a a a a a a a a
iie 1
"JllLCD 10000000000000000000000000000000000000000000
Jy/1y
1321 132
y 1
A 1
jll jy/ jg jge bai
"Saill 120g 120g! gao" pao qao jao jao jao jao jao jao jao jao jao jao jao jao jao jao jao jao jao jao jao
y
Lgaa Jia 2022
jie 1
y
a a a a a a a a a a a a a a a a a a a a a a a a
julal
J 1
a a a a a a a a a a a a a a a a a a
Aa 1
a aal 1
a 0
aegill gag aegall aegill
i#
i
a 0 a 0
y
"gilllll 100000000000000000000000000000000000000000000000000
(Odo)jlllallll,laalll,laalll,laalll
(ajglljus
1
y j 1
()
"Uyul, yu, yu, yu, yu, yu, yu, yu, yu, yu, yu, yu, yu, yu, yu, yu, yu, yu, yu, yu, yu, yu, yu
psaill 8g a
1 1
aaii iiaaii jai aai iai aiai iai
"ssii 11i i "Jiaaiie jaii jaii jaii jaii jaii jaii jaii jaii jaii jaii
Jilll lal/sal jll g jzj 1a (Jil) /
"KM",(j)
"si jil" 2jie lai, jlll lill lill (jlll lill) START/STOP jle lai
aalaaal aalaaal aalaaal aalaaal aalaaal aalaaal aalaaal aalaaal aalaaal aalaaal aalaaal aalaaal aalaaal aalaaal aalaaal aalaaal aalaaal aalaaal aalaaal aalaaal aalaaal aalaaal aalaaal aalaaal aalaaal aalaaal
("Odo")
a a a a a a a a a a a a a a a a a a a
"ssj" r j 15 11 11 11 11 11 11 11 11 11 11 11 11 11 11 11 11 11 11 1
"ae 1
"ssjlljjie biai jilll jill
aal (aill) /jaii) START/STOP . "ae jai" jae jai aai aiai (Ait) eaiy aiai saa
aaiil "jlll/syl" jz jzss.
"zjll" jzj 1000000000000000000000000000000000000000000000000000000000
.("dOnE")gjzall gao sall gao jzai
()START/STOP
sJ 151
"ssllg"lll 10000000000000000000000000000
y j 1
Cai gai 1

eal 1i jai iis/6dai ci y g jai ai i i dai ay g jai gai iai ai iai ai
Aaiue Jg jie 10 Laiu aal
A 1
:
aill 12g lgl jll aajll q
y 1
a 1
AaBbJn aALLs pssll sEe! n 5
1
Jaa Jaa Jaa 11 11 a a a a a a a a a a a a a a a a a a a a a a a a a a a a aa
1 1
1

aLw.
aill 0000
A
yagai gaii
