
TP2010 - Vacuum Cleaner Concept - Free user manual and instructions
Find the device manual for free TP2010 Concept in PDF.

| Product Type | Steam mop vacuum cleaner (wet) |
| Brand | Concept |
| Model | TP2010 |
| Supply Voltage | 230 V ~ 50 Hz |
| Power Consumption | 450 W |
| Sound Power Level | ≤ 84 dB(A) |
| Clean Water Tank Capacity | 1.5 L |
| Dirty Water Tank Capacity | 0.8 L |
| Maximum Water Temperature | 50 °C |
| Included Accessories | Upholstery nozzle, shoe nozzle, carpet nozzle, flat crevice tool, cleaning product |
| Suitable Surface Types | Sofas, carpets, shoes, soft indoor surfaces |
| Intended Use | Domestic only |
| Hose Length | Wrap-around storage on the appliance |
| Filter Type | Water filter (washable) |
| Main Material | Plastic |
| Color | Black/White (depending on model) |
| Weight | Approximately 3.5 kg (estimation) |
| Dimensions (L x W x H) | Approximately 30 x 25 x 40 cm (estimation) |
| Safety | Stop and unplug before maintenance |
| Warranty | Standard manufacturer's warranty (2 years) |
Frequently Asked Questions - TP2010 Concept
User questions about TP2010 Concept
0 question about this device. Answer the ones you know or ask your own.
Ask a new question about this device
Download the instructions for your Vacuum Cleaner in PDF format for free! Find your manual TP2010 - Concept and take your electronic device back in hand. On this page are published all the documents necessary for the use of your device. TP2010 by Concept.
USER MANUAL TP2010 Concept
natural_image
Concept vacuum cleaner with coiled hose and black casing (no visible text or symbols on device body)TP2010
CZ
The image contains no text or characters. Therefore, the correct OCR output is an empty string.
The image contains no text or characters.
HULVDEFR
ENSKPL
The Ground Truth image displays a single, solid horizontal line. According to Rule 2 (UNDERSCORE & LINE RULES), this is a stylistic or background line, not a placeholder underscore. Therefore, the OCR result must ignore it and output nothing or only meaningful text. The provided OCR content is "____", which consists of four underscores. This is an incorrect interpretation of the line as a placeholder, violating the rule that stylistic lines must be ignored. The OCR has hallucinated underscores where none should exist based on the GT's visual context. Hence, the OCR result is inconsistent with the Ground Truth.
ITES
RO
PODĚKOVÁNÍ
Příslušenstvi
natural_image
Illustration of two mechanical devices with arrows indicating motion or force direction (no text or symbols)Prislušenstvo
A Hubica na čalùnenie
B Hubica na obuy
C. Hubica na koberce
D. Štrbinová hubica
E Čistiaci prostriedok
SK
concept
concept
SK
NÁVOD NA OBSLUHU
natural_image
Two diagrams showing a mechanical device with arrows indicating motion or force direction (no text or symbols present)Akcesoria
natural_image
Two diagrams showing a hand holding a device with arrows indicating motion or force direction (no text or symbols present)Tartozékok
natural_image
Two diagrams showing a hand holding a tool with arrows indicating movement or force direction (no text or symbols present)Piederumi
natural_image
Illustration of a medical or surgical tool with two different angles (no text or symbols)Thank you for purchasing a Concept product. We wish you much joy with your new appliance every day you use it. Please read the instruction manual carefully before initial use. To refer to this manual any time you need to, we recommend you to keep it in a safe place. And please pass it to any future owner of the appliance.
| TECHNICAL SPECIFICATIONS | |
| Voltage 230 V ~ 50 Hz | |
| Input 450 W | |
| Sound performance level ≤ 84 dB(A) | |
IMPORTANT SAFETY PRECAUTIONS
- Do not use the appliance in any other way than as described in this manual.
- Remove all the covering and marketing materials from the appliance before the first use.
- Make sure the mains voltage corresponds to the values on the rating plate of the appliance.
- Do not leave the appliance unattended when it is switched on or connected to the mains.
- Disconnect the appliance from the electrical outlet if it is not being used.
- When disconnecting the appliance from the wall outlet, never pull the power cord, grasp the plug end and disconnect it by removing it from the receptacle.
- Do not allow children or unauthorized people to handle the appliance, use it out of their reach.
- Persons with reduced mobility, reduced sensory perception, mental disadvantage or persons not familiar with the operation must use the appliance only under the supervision of responsible person, who is familiar with the instructions.
- Pay extra attention if the appliance is used near children.
- Do not use the appliance as a toy.
- Do not allow the power cord to hang freely over the edge of the worktop, or touching hot surfaces and sharp objects.
- CAUTION! When cleaning, you must first spray the cleaning mixture on the surface and then suck up the water. Do not suck the dirt dry! The appliance does not serve as a vacuum cleaner for hard and dried dirt.
- Do not use any accessories other than those recommended by the manufacturer.
EN
concept
concept
EN
- Do not use the appliance with a damaged cord or plug and have it repaired immediately by an authorized service centre.
- Do not use the power cord to move or handle the appliance.
- Keep the appliance away from heat sources such as radiators, ovens, etc. Protect it from direct sunlight and humidity.
- Do not touch the appliance with wet hands.
- When installing accessories, cleaning and maintenance or in the event of a malfunction, switch off the appliance and disconnect the plug from the electrical outlet.
- The appliance is only suitable for home use and is not intended for commercial use.
- Do not immerse the power cord, plug or appliance in water or any other liquid.
- Check the device, the hose and the supply cable regularly for possible damage.
- Do not switch on a damaged device.
- Do not use the device if it is not working properly, if it has been dropped, damaged or immersed in liquid. Have it tested and repaired by an authorized service center.
- Do not sit or step on the device.
- Place the device on a stable flat surface and make sure that nothing obstructs the air outlet at the bottom of the device.
- Never block the air outlet of the device, it could overheat!
- Do not place the device on places from which it can easily fall (tables, chairs).
- Do not switch on the device before inserting clean and dirty water containers.
- Vacuum the surface (sofa, carpet...) of coarse dirt with a normal vacuum cleaner before using the device!
- Do not use the device if the dirty water container is full, empty it first.
- Do not tilt the device when it is full of water, it could spill into the motor!
- Do not pull the device by the hose, it may be damaged.
-
Do not use the device to vacuum dust, plaster, cement, shards, flammable liquids (petrol), cigarettes, matches, hot ash, toner used inside laser printers and copiers, etc. Do not use the device in areas where flammable and explosive substances may be present. Only use the device for its intended purpose!
-
The device is suitable for cleaning soft surfaces indoors (e.g. sofas, carpets, shoes).
- Make sure that the cleaning agent used is suitable for the surface to be cleaned and cannot damage it.
- Use only special non-foaming products suitable for machine cleaning! Do not use foaming cleaning products!
- If you hear an unusual sound or smell a strange odour, stop using the device and contact an authorised service centre.
- Do not insert any objects into the suction opening!
- Keep loose clothing, hair and fingers out of reach of the cleaning nozzles during use! It is not permitted to bring the suction tips close to the eyes and ears.
- It is not allowed to clean people and animals!
- If the suction opening of the device becomes blocked, switch off the device and remove the dirt before switching it on again.
- Do not repair the appliance yourself. Contact an authorized service centre.
- This appliance can be used by children aged from 8 years and above and persons with reduced physical, sensory or mental capabilities or lack of experience and knowledge if they have been given supervision or instruction concerning the use of the appliance in a safe way and understand the hazards involved. Cleaning and maintenance performed by the user must not be carried out by children unless they are at least 8 years old and under supervision. Children aged under 8 years of age must be kept away from the appliance and its power cord. Do not let children play with the appliance.
Damages from failure to follow the manufacturer's instructions are not covered by the warranty.
EN
concept
concept
EN
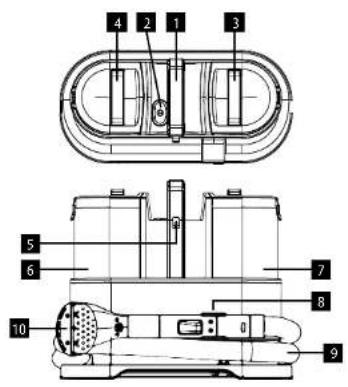
PRODUCT DESCRIPTION
1 Transport holder
2. Switch
3 Clean water container handle
4 Dirty water container handle
5 Supply cord holder
6 Dirty water container
7 Clean water container
8 Nozzle handle holder
9 Hose
10 Replacement nozzle
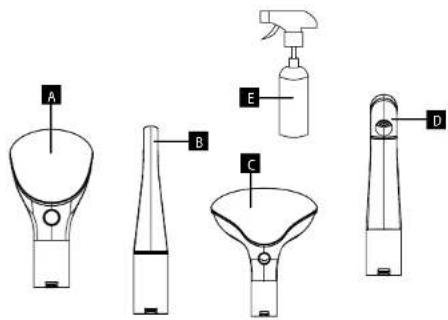
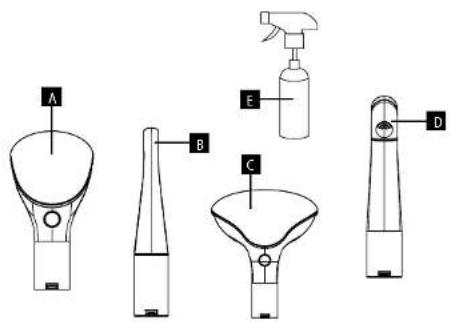
Accessories
A Upholstery nozzle
B Shoe nozzle
C Carpet nozzle
D Crevice nozzle
E Cleaning agent
INSTRUCTION MANUAL
- Before using the device for the first time, wipe it with a soft damp cloth.
- Remove the clean water container by pulling it upwards.
- Open the lid of the clean water container, pour in water (warm water up to 50 °C is recommended) and add the cleaning agent (recommended ratio according to the information on the cleaning agent).
- Put the lid back on and insert the container into the device, you will hear a click.
- Select the accessories according to the type of surface to be cleaned. Place the brush nozzle on the hose, you will hear a click. To remove the nozzle, press the release button and pull the nozzle out.
natural_image
Illustration of two mechanical components with arrows indicating motion direction (no text or symbols)- Connect the device to the power supply.
- Press the switch on the top of the device to start the device, press again to switch it off.
- Grasp the hose handle, press and hold the water spray button in a smooth motion to spray water and detergent onto the surface to be cleaned. Release the button to stop the water spray.
- Clean normal stains with the brush nozzle. Brush the stain repeatedly.
Note: Depending on the type of surface being cleaned, a custom brush can be used to clean tough stains more effectively. - Use smooth, slow moves towards you to suck the dirty water from the surface. Move the nozzle over the surface to be cleaned in strips that partially overlap each other.
- Switch off the device by pressing the power switch and disconnect the device from the power supply.
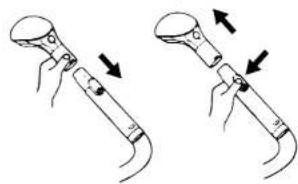
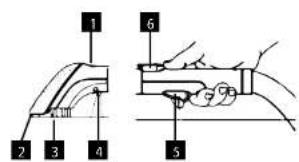
DESCRIPTION OF NOZZLE WITH HANDLE
1 Button for removing the transparent cover
2 Suction section for vacuuming dirt
3 Brush
4 Water spray
5 Button for water spray
6 Nozzle release button
- If the clean water runs out, switch off the device, remove the container, open the lid and refill the water with detergent, switch the device back on and continue cleaning.
- Monitor the amount of dirty water in the container, if the water level is close to the maximum, the suction power will be reduced. Empty the dirty water container in time!
• Clean water container capacity: 1.5 l.
• Dirty water container capacity: 0.8 L
Note: Do not tilt the device too much during operation to prevent water leakage.
EN
concept
concept
EN
CLEANING AND MAINTENANCE
The device is to be cleaned properly after each use!
To maintain the high performance of the device, the dirty water container must be cleaned and emptied regularly and the accessories must be cleaned.
CLEANING THE WATER CONTAINERS
- Remove the water containers and empty the containers.
- After emptying and rinsing the clean water container, we also recommend rinsing the spray path by filling the clean water container with clean water only (no detergent), starting the device and dipping the handle slightly into the clean water container. This step causes the clean water to flow through the entire spray path, thus washing the detergent out of the device. If necessary, repeat the process with another container of clean water.
- Switch off the device and disconnect it from the power supply before proceeding with cleaning!
- Remove the water containers and empty the containers. Remove the inner covers from the dirty water container and wash them under running water. Wash the container under running water, clean the inner walls and allow to dry completely. Put the dry parts back in and insert the complete container into the device, you will hear a click.
- Remove the water filter with the clean water container cap, rinse with water and put it back on.
- Wipe the area under the containers with a cloth and allow to dry.
- Wipe the body of the device with a damp cloth.
CLEANING THE BRUSH NOZZLE
- Remove the brush nozzle after use.
- Press the button to release the transparent lid, wash with water, allow to dry and put the lid back on.
- If there are tangled hairs in the brush nozzle, remove them.
- If the nozzle is clogged, remove the transparent cover and clean the suction openings.
- Wrap the hose around the device and place the handle in the storage holder.
- Store the device, cleaned and dried, in a dry place where there is no risk of tripping over it.
TROUBLESHOOTING
| Problem Cause | Solution | |
| The device is not working. | Wrong or poorly inserted plug into the socket. | Check the plug connection. |
| Poor water suction. | Too much water in dirty water container. Empty the dirty water container. | |
| Dirt in the nozzle or hose handle. Remove dirt for proper suction. | ||
| The device makes an unusual noise. | The suction part of the nozzle is clogged. Remove dirt. | |
| Too much water in the dirty water container. | Empty the dirty water container. | |
| There is no water coming out of the nozzle. | Lack of water in the clean water container. Refill water and detergent in the clean water container. | |
| Nozzle clogged. Remove the obstruction in the nozzle with a thin needle. | ||
| Internal pipework is blocked or damaged. Contact an authorised service centre. | ||
| Water leak. | Missing or poorly fitted inner cap in dirty water container. | Check the position of the caps. If they have not been reinserted after previous maintenance of the device, reinsert them. |
| Poorly fitted clean or dirty water container. | Check the position of the containers. |
SERVICE
Extensive maintenance or repair, which requires access to internal parts of the product, has to be performed by a qualified specialist or the service centre.
ENVIRONMENTAL CONCERNS
- Packaging materials and old appliances should be recycled.
- Packaging materials may be disposed of as sorted waste.
- Dispose the plastic bags made of polyethylene (PE) of as sorted waste.
Recycling of the appliance at the end of its lifespan:

This appliance is labelled in accordance with European Directive 2012/19/EU concerning used electrical and electronic appliances (Waste Electrical and Electronic Equipment - WEEE). The symbol on the product or on its packaging indicates that this product may not be treated as household waste. Instead, it should be taken to the appropriate collection point for the recycling of electrical and electronic equipment. By ensuring this product is disposed of correctly, you will help prevent potential negative consequences for the environment and human health, which could otherwise be caused by inappropriate waste handling of this product. The disposal of such material has to be done according to the recycling regulations. For more detailed information about recycling of this appliance see the authorized local office or service for household waste disposal or the shop, where you purchased the appliance.

The product meets all the necessary requirements of the EU directives applicable to the specific product.
Changes in text, design, and technical specifications are subject to change without prior notice and we reserve the right to change them.
DE
concept
concept
DE
DANKSAGUNG
Zubehör
natural_image
Two diagrams showing a device with arrows indicating movement or force, no text or symbols present.Accessoires
natural_image
Illustration of two mechanical components with arrows indicating motion direction (no text or symbols)Accessori
natural_image
Illustration of two mechanical components with arrows indicating motion direction (no text or symbols)Accesorios
natural_image
Illustration of two mechanical devices with arrows indicating motion or assembly (no text or symbols)Accesorii
natural_image
Two diagrams showing a device with arrows indicating motion or force direction (no text or symbols present)
- PODĚKOVÁNÍ
- Příslušenstvi
- Prislušenstvo
- concept
- NÁVOD NA OBSLUHU
- Akcesoria
- Tartozékok
- Piederumi
- IMPORTANT SAFETY PRECAUTIONS
- EN
- PRODUCT DESCRIPTION
- Accessories
- INSTRUCTION MANUAL
- DESCRIPTION OF NOZZLE WITH HANDLE
- CLEANING AND MAINTENANCE
- CLEANING THE WATER CONTAINERS
- CLEANING THE BRUSH NOZZLE
- SERVICE
- ENVIRONMENTAL CONCERNS
- Recycling of the appliance at the end of its lifespan:
- DANKSAGUNG
- Zubehör
- Accessoires
- Accessori
- Accesorios
- Accesorii
Brand : Concept
Model : TP2010
Category : Vacuum Cleaner