
VP8251 - Vacuum Cleaner Concept - Free user manual and instructions
Find the device manual for free VP8251 Concept in PDF.


| Brand | Concept |
| Model | VP8251 |
| Category | Vacuum cleaner |
| Type | Canister vacuum cleaner with bag |
| Voltage | 220–240 V ~ 50/60 Hz |
| Power | 700 W |
| Sound power level | 52 dB |
| Filter type | Motor filter and exhaust air filter |
| Bag level indicator | Yes (red indicator) |
| Automatic cord rewind | Yes |
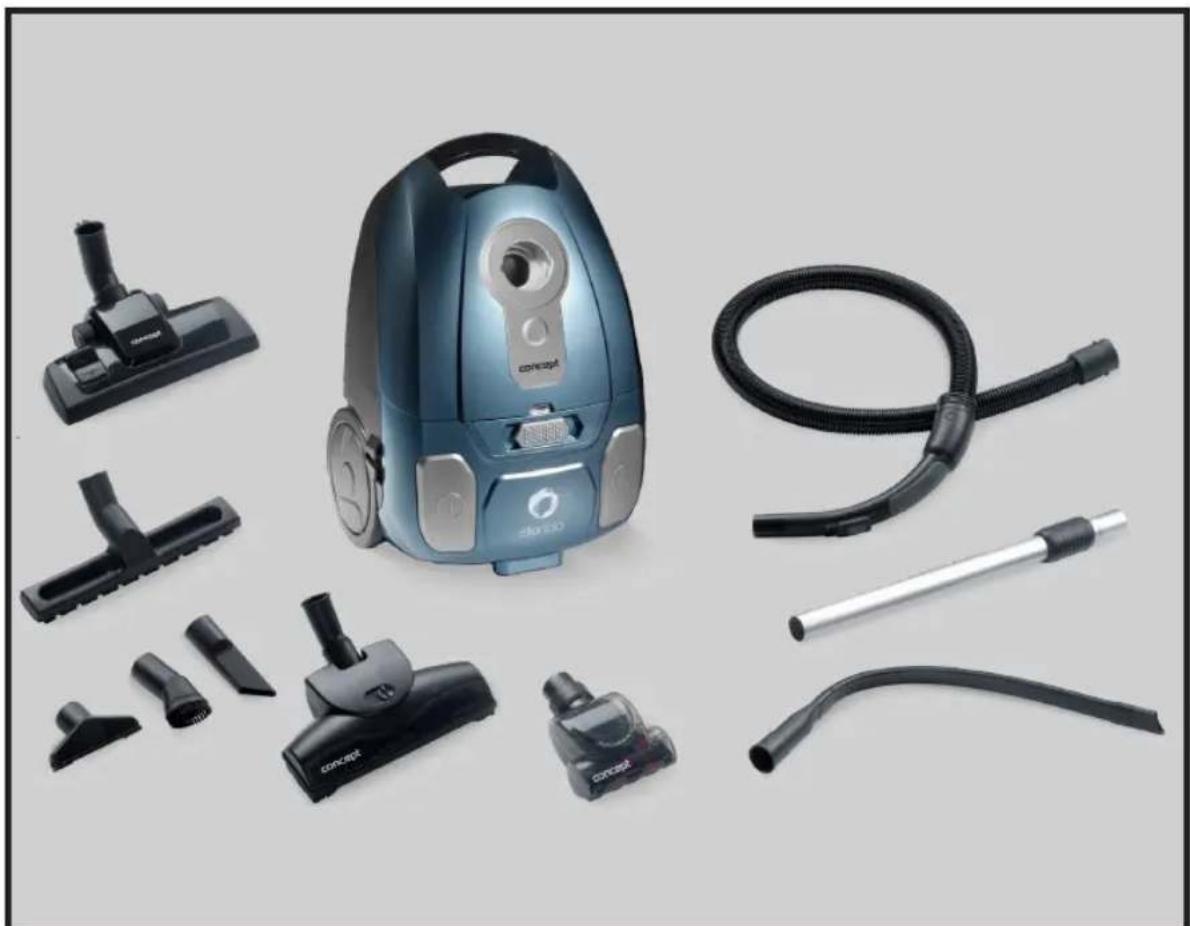
| Included accessories | Crevice tool, upholstery tool, extension nozzle, large turbo brush, small turbo brush, parquet brush, dusting brush |
| Functions | Suction, brushing (position change pedal) |
| Use | Household |
| Maintenance | Regular filter cleaning, dust bag replacement |
| Safety | Overheating protection, thermal cut-out |
| Warranty | 24 months |
| Spare parts available | Dust bags (ref. SMS9000), filters |
| After-sales service | Authorized service center |
| Manufacturer | Jindřich Valenta – Concept, Czech Republic |
Frequently Asked Questions - VP8251 Concept
User questions about VP8251 Concept
0 question about this device. Answer the ones you know or ask your own.
Ask a new question about this device
Download the instructions for your Vacuum Cleaner in PDF format for free! Find your manual VP8251 - Concept and take your electronic device back in hand. On this page are published all the documents necessary for the use of your device. VP8251 by Concept.
USER MANUAL VP8251 Concept
Floor vacuum cleaner
Fußbodenstaubsauger
Aspirateur de sols
Aspirapolvere pavimento
Aspiradora de piso
natural_image
Product photo of a concept vacuum cleaner with various accessories and tubing (no visible text or symbols)VP 8250
CZ
ESBGLVSKPI
concept
PODĚKOVÁNÍ
NÁVOD K OBSLUZE – SESTAVOVÁNÍ VYSAVAČE
UPOZORNĚNÍ
natural_image
Close-up of a car's air vent with a coiled hose inserted into the air gap (no visible text or symbols)Obr. 1
natural_image
Close-up of a hand pressing a black plastic component on a black tray (no text or symbols visible)Obr.2
PŘÍSLUŠENSTVÍ
- Štěrbinová hubice
natural_image
Close-up of a black plastic device with a circular component on its side (no visible text or symbols)Obr. 3
VÝMĚNA FILTRŮ
natural_image
Close-up of a hand inserting a keyboard into a device (no visible text or symbols)Obr. 4
ČIŠTĚNÍ A VÝMĚNA FILTRU MOTORU
natural_image
Close-up of a hand inserting a plastic component into a black industrial machine (no visible text or symbols)Obr. 5
ČIŠTĚNÍ A VÝMĚNA FILTRU VÝSTUPU VZDUCHU
NÁVOD K OBSLUZE – SESTAVOVÁNÍ VYSAVAČE
UPOZORNENIE
natural_image
Close-up of a car's air vent with a coiled hose inserted into the air gap (no visible text or symbols)Obr. 1

natural_image
Close-up of a hand pressing a black button on a black electronic device (no visible text or symbols)Obr. 2
PRÍSLUŠENSTVO
natural_image
Close-up of a black plastic device with a circular component on top (no visible text or symbols)Obr. 3
VÝMENA FILTROV
natural_image
Close-up of a hand inserting a keyboard into a device (no visible text or symbols)Obr. 4
ČISTENIE A VÝMENA FILTRA MOTORA
natural_image
Close-up of a hand inserting a filter into a black industrial machine cover (no visible text or symbols)Obr. 5
ČISTENIE A VÝMENA FILTRA VÝSTUPU VZDUCHU
natural_image
Close-up of a car's air vent with a coiled hose inserted into the air gap (no visible text or symbols)Rys. 1

natural_image
Close-up of a hand pressing down on a black electronic device component (no visible text or symbols)Rys. 2
WYPOSAŻENIE
natural_image
Close-up of a black plastic device with a central circular component and handle (no visible text or symbols)Rys. 3

natural_image
Close-up of a hand inserting a black plastic component into a device (no visible text or symbols)Rys. 4

natural_image
Close-up of a hand inserting a component into a black industrial machine (no visible text or symbols)Rys. 5
CZYSZCZENIE I WYMIANA FILTRA SILNIKA
natural_image
Close-up of a mechanical component with a threaded tube inserted, showing no visible text or symbols.- ábra

natural_image
Close-up of a hand pressing down on a black electronic device component (no visible text or symbols)- ábra
TARTOZÉKOK
natural_image
Close-up of a black plastic device with a circular component on top, showing no visible text or symbols.- ábra

natural_image
Close-up of a hand pressing down on a black keyboard (no visible text or symbols)- ábra

natural_image
Close-up of a hand inserting a plastic into a black industrial machine cover (no visible text or symbols)natural_image
Close-up of a car's air vent with a coiled hose inserted into the air gap (no visible text or symbols)Att. 1

natural_image
Close-up of a hand pressing a black button on a black electronic device (no text or symbols visible)Att. 2
PIEDERUMI
natural_image
Close-up of a black electronic device with a circular component and handle (no visible text or symbols)Att. 3

natural_image
Close-up of a hand inserting a black plastic component into a device (no visible text or symbols)Att 4

natural_image
Close-up of a hand inserting a filter into a black air conditioner cover (no text or symbols visible)Att 5
MOTORA FILTRA TİRİŞANA UN MAINA
natural_image
Close-up of a car's air vent with a coiled hose inserted into the air gap (no visible text or symbols)Φu2.1

natural_image
Close-up of a hand pressing a button on a black electronic device (no visible text or symbols)Φu2.2
Принадлежности
natural_image
Close-up of a black plastic electronic device with a central circular component (no visible text or symbols)Φu2.3

natural_image
Close-up of a hand inserting a black plastic component into a black housing (no visible text or symbols)Φu24
СМЯНА НА ФИЛТРИТЕ
natural_image
Close-up of a hand inserting a filter into a black industrial machine (no visible text or symbols)Φu25
Thank you for purchasing a Concept product. We hope you will be satisfied with our product throughout its service life.
Please study the entire Operating Manual carefully before you start using the product. Keep the manual in a safe place for future reference. Make sure that any persons handling the vacuum cleaner are also familiar with this Operating Manual.
| Technical parameters | |
| VP 8250 | |
| Voltage 220–240 V ~ 50/60 Hz | |
| Power input | 700W |
| Noise level | 52 dB |
 | Double or reinforced insulation |
IMPORTANT SAFETY PRECAUTIONS
- Do not use this appliance in a way that is different from the instructions this manual.
- Remove all packaging and marketing materials from the appliance before you use it for the first time.
- Make sure that the connecting voltage corresponds to the values on the appliance type label.
- Do not leave the appliance unattended when turned on or plugged into the electrical socket.
- Disconnect the appliance from the electrical socket when you are not using it.
- Never pull the supply cable when disconnecting the appliance from the electrical socket; pull the plug instead.
- Do not allow children or irresponsible people to handle the appliance. Use the appliance out of the reach of these people.
- Handicapped people, people with impaired faculties or mental capabilities or people unfamiliar with the appliance operation are only allowed to use it when supervised by responsible, knowledgeable people.
- Be especially careful when there are children near the appliance.
- Do not allow the appliance to be used as a toy.
- Do not use the appliance outdoors or on wet surfaces as there is a threat of electric shock in these places.
- Do not use any other accessories except those recommended by the manufacturer.
- Never use the appliance if the supply cable or plug has been damaged; have the defect repaired immediately by an authorised service centre.
- Never run over the supply cable with the floor attachment or the appliance itself.
- Provided the rotary brush is used, it may be dangerous to run the appliance over the supply cable.
- Never pull the supply power cord or use it to carry the appliance.
- Keep the appliance away from any sources of heat, such as radiators, ovens, etc. Do not expose the appliance to direct sunlight or moisture.
- Do not touch the appliance with damp or wet hands.
- Do not insert any items into the openings. Do not use the appliance if any of these openings is obstructed.
- Unplugging the appliance from the wall socket, first turn off the main switch, then pull the plug out of the electric voltage socket.
• Take extra care when using the appliance on stairs.
EN
concept
- If the appliance's suction inlet becomes obstructed, turn the appliance off and remove any obstructing dirt before turning the appliance on again.
- Hold the supply cable while winding it in order to avoid uncontrolled movement.
- Before fixing any accessories, cleaning, or in the case of a defect turn off the appliance and pull the plug out of the electrical socket.
- Unwind the necessary length of power supply cord before using the appliance. The ideal length of the power supply cord is marked by a yellow dot on the cord. Do not unwind the power supply cord past the red mark.
• The appliance is intended for household use only (not for commercial use). - Do not vacuum any burning items such as cigarettes, matches, or hot ash.
- Do not use the appliance in wet rooms; do not vacuum any wet items or liquids, flammable liquids (such as petrol) and do not use the appliance in places where these substances may be present.
- Never vacuum without using the dust collection bag or the appliance's filters. Before each using the appliance, make sure the dust collection bag and the appliance's filters are properly installed.
- Do not immerse the supply cable, the plug, or the appliance itself into water or any other liquid.
- Check the appliance and the supply cable regularly for any damage. Never turn the appliance on if it is damaged.
- Prior to cleaning and after using the appliance, turn it off, disconnect it from the electric voltage outlet and let it cool.
- Before using the appliance, remove any large or sharp items from the surface you want to vacuum as these items may damage the dust collection bag or the appliance's filters.
- Do not use the appliance if the filters are dirty.
- Never repair the appliance by yourself. Instead, contact an authorised service centre for repair.
- This appliance may be used by children 8 years of age and older and by persons with physical or mental impairments or by inexperienced persons if they are properly supervised or have been informed about how to use of the product in a safe manner and understand the potential dangers. Children must not play with the appliance. This appliance may be cleaned by children 8 years of age and older if they are properly supervised. Keep this appliance and the power cord out of reach of children younger than 8 years of age.
Failure to follow the manufacturer's instructions may invalidate the warranty.
concept
EN
PRODUCT DESCRIPTION
1 Telescopic tube
2 Air discharge filter HEPA
3 Floor attachment
4 Flexible hose
5 Power cord winding button
6 Dust collection bag fill indicator
7 ON/OFF button
8 Carrying handle
9 Front cowl clap
ACCESSORIES
A Slotted nozzle
B Nozzle for upholstery
C Long slotted nozzle
D Large turbo brush
E Small turbo brush
F Parquet nozzle
G Nozzle with brush

OPERATING MANUAL – ASSEMBLY OF THE VACUUM CLEANER
NOTE
Before fixing or removing accessories, always pull the plug out of the electrical socket!
-
Connecting the flexible hose to the appliance Insert the flexible hose into the appliance's air suction inlet. Continue pushing until you hear a clicking sound, which indicates that the correct position has been reached. For removing the flexible hose, press both stopper buttons and remove the hose (Fig. 1). When the slide throttle is closed, the air flow is stronger. Slide throttle in open position – weaker air flow.
-
Attaching the telescopic tube to the hose adapter Put the telescopic tube on the hose adapter and turn it slightly.
-
Extending the telescopic tube Press the plastic latch and pull the smaller tube outwards.
-
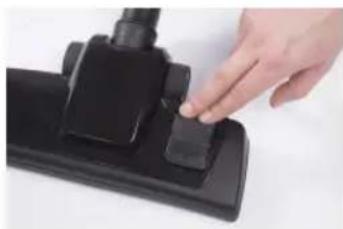
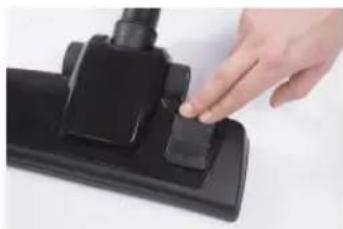
Fixing the floor attachment to the telescopic tube Insert the telescopic tube into the floor attachment and turn it slightly. The flap (Fig. 2) is used for setting the floor attachment to brushing (for smooth floors), or to smooth vacuuming (for carpets).

natural_image
Close-up of a car's air vent with a coiled hose inserted into the air gap (no visible text or symbols)Fig. 1

natural_image
Close-up of a hand pressing a black plastic clip onto a black base (no text or symbols visible)Fig. 2
ACCESSORIES
- Slot nozzle The slot nozzle adapter is used for vacuuming places that are difficult to access, such as radiators, slots, corners, pedestals, spaces between upholstery, and others.
- Upholstery nozzle This upholstery nozzle attachment may be used for smaller upholstered areas.
USING THE APLIANCE
Before using the appliance, make sure that filters and the dust collection bag are properly positioned and mounted. Unwind the supply cable length you need. The yellow mark on the supply cable indicates the optimum cable length. Do not unwind the supply cable beyond the red mark!
- Insert the plug into the electric voltage socket.
- Press the ON/OFF switch on the appliance.
- After you have stopped vacuuming, switch the appliance off and disconnect it from the electric voltage outlet.
- For winding up the supply cable, press the winding button with one hand and hold the supply cable with the other hand to avoid uncontrolled movement.
CHECKING THE DUST COLLECTION BAG FILL
When the dust collection bag fill indicator turns red during operation, replace the full dust collection bag immediately.
concept
EN
If the dust collection bag fill indicator is still red after the bag has been replaced, this may be due to several causes:
- some of the air passages (hoses, telescopic tube, suction inlet, brush adapter, or other adapters) are obstructed;
- the motor filter is dirty;
- the air outlet filter is dirty.
Check for each of the possible causes above and eliminate the problem before you start vacuuming. If the cause of the problem cannot be identified, hand over the product to the nearest service centre. Never use the vacuum cleaner if the bag level indicator is completely red during operation. The motor could be damaged irreparably
CLEANING AND MAINTENANCE
You may clean the accessories and the appliance with a wet cloth. Never immerse the appliance in water! Do not use any aggressive substances for cleaning, such as solvents or abrasives!
REPLACING THE DUST COLLECTION BAG
-
Unplug the product from the mains. Disconnect the hose from the suction inlet and open the appliance cover.
-
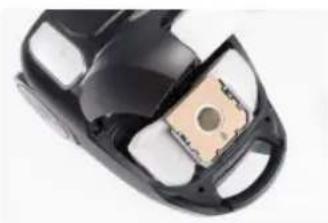
Push the flap on the dust retention bag holder; remove the used dust retention bag (Fig. 3). Dispose of a paper or SMS dust collection bag. Be careful not to tear the bag when handling. If the bag is made of fabric, empty it and close it carefully – it can be used repeatedly.
-
Insert a new or empty dust retention bag by fitting the plate in the bag holder. The bag opening must be aligned with the hose hole in the appliance cover.
-
Never use the vacuum cleaner without the dust bag installed! If you forget to insert the dust retention bag or you insert it incorrectly, the appliance's motor may become damaged.
-
Close the cover. Press until you hear a click.
natural_image
Close-up of a black plastic device with a circular component on top, showing internal structure (no text or symbols visible)Fig. 3
REPLACING FILTERS
- The filters should be cleaned or replaced when they are visibly dirty, or if the appliance's suction power is reduced. Always check the filters after using the appliance.
- In order to avoid damage to the appliance, do not use it with incorrectly installed filters.
- Before replacing the filters, disconnect the appliance from the electrical socket
- You can buy suitable types of filters from your dealer, or you can order them from the manufacturer.
natural_image
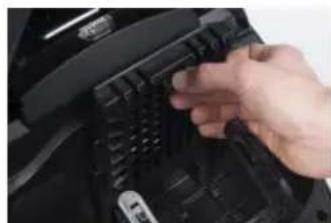
Close-up of a hand inserting a keyboard into a device (no visible text or symbols)Fig 4
CLEANING AND REPLACEMENT OF THE MOTOR FILTER
-
Disconnect the flexible hose and open the appliance cover.
-
Pull the dust collection bag out of its holder so that you can access the motor filter more easily.
natural_image
Close-up of a hand inserting a filter into a device (no visible text or symbols)Fig 5
EN
concept
- Remove the motor filter (Fig. 4). You can clean the filter by tapping it. If the filter is heavily soiled, you may wash it in lukewarm water and let it dry properly.
- Insert the cleaned or new motor filter into the appliance and close the cover.
CLEANING AND REPLACING THE AIR OUTLET FILTER
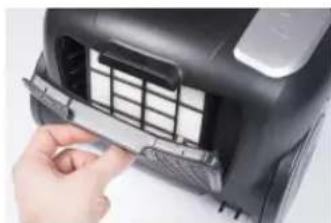
- Open the air outlet grid in the appliance's rear section (Fig. 5).
- Remove the air outlet filter. You can clean this filter by tapping it, then brushing it with a soft brush. After this operation is complete, you may clean a very dirty filter by washing and brushing with a soft brush in lukewarm water with no cleaning agents added. It is important to let the wet parts dry thoroughly. A wet filter will be damaged by vacuuming! Do not use a hair dryer to dry it!
Note: Wet cleaning may cause more wear and tear of the filter and, consequently, may shorten its service life. - Insert the cleaned or new air outlet filter into the appliance and close the air outlet grid.
TROUBLESHOOTING
| Problem Cause Solution | ||
| Motor does not run. | Plug inserted into the mains outlet incorrectly or insufficiently. | Check the plug connection. |
| The mains outlet is not live. | Check for voltage, e.g. by connecting another appliance. | |
| Motor has stopped operating. | Improper or insufficient air flow. Motor overheating fuse activated. | Disconnect the cable from the socket.Check and release the air suction and discharge holes; check the filter's cleanliness and/or replace the dust bag.Let the vacuum cleaner cool down. |
| Front cover cannot be closed | Dust bag inserted incorrectly. | Check the dust filter installation. |
| Reduced suction power | Dust bag full or clogged. Replace the dust bag. | |
| Obstructed filter. Clean or replace the filter. | ||
| Clogged nozzle, tube, or hose. | Check and clear the air passage on the suction and discharge sides. | |
| Vacuum cleaner heats up | Slight heating of the vacuum cleaner is normal and cannot be considered a failure. | |
OPTIONAL ACCESSORIES
The following appliance accessories can be purchased additionally:
Dust bags (5 units + 2 units of motor filters)
Order code SMS9000
Price according to the valid price list
concept
EN
SERVICE
Any larger maintenance or repairs requiring intervention into the internal parts of the product shall only be performed by an authorized service
ENVIRONMENTAL PROTECTION
- Packaging materials and obsolete appliances should be recycled.
• The transport box may be disposed of as sorted waste.
• Polyethylene bags shall be handed over for recycling.
Appliance recycling at the end of its service life:

A symbol on the product or its packaging indicates that this product should not go into household waste. It must be taken to the collection point of an electric and electronic equipment recycling facility. By making sure this product is disposed of properly, you will help prevent the negative effects on the environment and human health that would otherwise result from inappropriate disposal of this product. You can learn more about recycling this product from your local authorities, a household waste disposal service or in the shop where you bought this product.

This product meets all the basic EU regulation requirements that relate to it.
Changes to the text, design and technical specifications may occur without prior notice and we reserve the right to make these changes.
concept
DANKSAGUNG
natural_image
Close-up of a car's air vent with a coiled hose inserted into the air gap (no visible text or symbols)Abb. 1

natural_image
Close-up of a hand pressing down on a black electronic device component (no visible text or symbols)Abb. 2
ZUBEHÖR
natural_image
Close-up of a black plastic electronic component with a circular sensor or chip on its surface (no visible text or symbols)Abb. 3

natural_image
Close-up of a hand inserting a black plastic component into a device (no visible text or symbols)Abb 4

natural_image
Close-up of a hand inserting a filter into a black air conditioner cover (no text or symbols visible)Abb 5
natural_image
Close-up of a car's air vent with a coiled hose inserted into the air gap (no visible text or symbols)Fig. 1

natural_image
Close-up of a hand pressing down on a black electronic device (no visible text or symbols)Fig. 2
ACCESSOIRES
natural_image
Close-up of a black plastic device with a circular component on top (no visible text or symbols)Fig. 3
REPLACEMENT DES FILTRES
natural_image
Close-up of a hand inserting a black plastic component into a black plastic housing (no visible text or symbols)Fig. 4
NETTOYAGE ET REMPLACEMENT DU FILTRE POUR MOTEUR
natural_image
Close-up of a hand inserting a filter into a black industrial machine cover (no visible text or symbols)Fig. 5
NETTOYAGE ET REMPLACEMENT DU FILTRE DE SORTIE D'AIR
natural_image
Close-up of a car's air vent with a coiled hose inserted into the air gap (no visible text or symbols)Fig. 1
natural_image
Close-up of a hand pressing a black plastic component on a black tray (no text or symbols visible)Fig. 2
ACCESSORI
natural_image
Close-up of a black plastic device with a circular component on top, no visible text or symbolsFig. 3
natural_image
Close-up of a hand inserting a keyboard into a device (no visible text or symbols)Fig. 4
PULIZIA E SOSTITUZIONE DEL FILTRO MOTORE
natural_image
Close-up of a hand inserting a filter into a black industrial air conditioner unit (no text or symbols visible)Fig. 5
IT
concept
PULIZIA E SOSTITUZIONE DEL FILTRO ALL'USCITA ARIA
natural_image
Close-up of a car's air vent with a coiled hose inserted into the air gap (no visible text or symbols)Fig. 1

natural_image
Close-up of a hand pressing a black plastic component on a black tray (no text or symbols visible)Fig. 2
ACCESORIOS
natural_image
Close-up of a black plastic device with a circular component on top, no visible text or symbolsFig. 3
natural_image
Close-up of a hand inserting a black keyboard into a device (no visible text or symbols)Fig. 4
LIMPIEZA Y CAMBIO DEL FILTRO DEL MOTOR
natural_image
Close-up of a hand inserting a plastic component into a black industrial machine (no visible text or symbols)Fig. 5
ES
concept
The manufacturer (or importer) is responsible for ensuring the product complies with the requirements of applicable legal regulations as well as those of the relevant technical standards. Moreover, they are responsible for ensuring the product has the properties the manufacturer described in documents related to the goods or those reasonably expected by the customer with regard to the nature of the goods or based on advertising produced by the manufacturer, and further they are responsible for ensuring the product is fit for the purpose proposed by the manufacturer or that a product of the same type is normally used for.
The quality warranty term is 24 months from product takeover by the customer.
The warranty does not apply to wear and tear caused by regular use. The customer shall not be entitled to any warranty claims if, prior to taking the product over, they knew the product contained a defect or if the defect is attributable to the customer.
The warranty specifically does not apply:
- if the product installation, operation and service conditions stipulated in the product operating manual have not been adhered to,
- to malfunctions caused due to mechanical, heat or chemical damage, short circuit, over voltage or incorrect installation,
• to malfunctions caused by an inexpert third-party intervention,
• to malfunctions caused by natural disaster, - to malfunctions caused by insufficient or inappropriate maintenance in violation of the operating manual, including malfunctions caused by water and other sediments,
- to changes in colour of the heating surface or to scratching of the surface caused as a result of using the products in an unusual manner,
• to appearance and functional changes caused by exposure to sunlight, thermal radiation of water and other sediments, - if the service life of certain product parts expires, e.g. for accumulators, bulbs, etc.
The warranty does not apply to any products and services provided along with the product (gifts, promotional articles, etc.).
Filing a complaint
A complaint against a product defect must be filed as soon as identified, yet no later than before the end of the warranty term.
The customer must file a product complaint with the dealer from which they have purchased the product, or with any authorised service centre, a list of which is included in the product package, or available at www.my-concept.com.
While filing a product complaint, the product must be duly cleaned and securely packed so as to prevent any damage during its transport to an authorised service centre, where relevant, unless the product is delivered in person.
The customer must submit proof of having concluded a purchase contract for the product by producing the receipt.
While filing their complaint, the customer must indicate the noted defect and identify the preferred complaint application method.
Complaints processing
As long as the noted defect may be removed, the user has the right to have the defect duly removed free of charge on a timely basis.
Where such a procedure is not reasonable with regard to the nature of the defect, the user may require to be supplied a new defect-free product (replacement), or, where the defect applies to a part of the product only, replacement of the part concerned. However, if replacement of the product or any part thereof is not proportionate with regard to the nature of the defect, especially if the defect can be removed without undue delay, the customer has the right to have the defect removed free of charge.
concept
If the noted defect is not removable, or if the customer becomes entitled to replacement of the product or a part thereof, yet the replacement is not possible, for example due to the product having been sold out, the customer has the right to return the product (withdrawal from the contract).
The customer shall have the right to a new product (replacement) or to replacement of a part of the product even if the defect can be removed, provided they cannot properly use the product due to repeated occurrence of the defect or due to a high number of such defects. In such a case, the customer also has the right to return the product (by withdrawing from the contract).
If the product is not returned (the customer does not withdraw from the contract), or if the customer does not apply the right to a new defect-free product (replacement), to replacement of a part thereof or to repair of the product, they may request a reasonable discount. The customer also has a right to a reasonable discount if a new defect-free product cannot be supplied to them, or if a product part cannot be replaced or the product repaired unless the situation is remedied within a reasonable time limit, or if remedying the situation would create major discomfort on the part of the customer.
The seller, authorised service centre or a staff member authorised by them must decide about each complaint immediately or within three business days in complicated cases. This term does not include areasonable period of time, depending on the type of product concerned, required for the defect to be assessed by an expert. A complaint, including defect removal, must be dealt with without any undue delay, yet no later than within 30 calendar days of the complaint filing date, unless the seller and the customer agree on a later deadline.
On returning the product (withdrawing from the contract) the customer must return any accessories and documents supplied along with the product.
The customer does not have the right to keep the defective parts and components of the product replaced as part of a repair of the product.
This shall be without prejudice to any other rights the customer may have in relation to the purchase of the product.
Remark: Complaints against products damaged in transport are governed by the carrier's complaints procedure.
Manufacturer
Jindřich Valenta - Concept
Vysokomýtská 1800, 565 01 Choceň
Czech Republic
tel.: +420 465 471 400
fax +420 465 473 304
Company ID No. 13216660
email: servis@my-concept.cz
www: www.my-concept.com
Product data
| Model: | |
| Production number: | |
| Date of purchase: Seal and signature of vendor: | |
DE
GARANTIEBEDINGUNGEN
Garantie
CONDITIONS DE GARANTIE
Garantie
- concept
- PODĚKOVÁNÍ
- NÁVOD K OBSLUZE – SESTAVOVÁNÍ VYSAVAČE
- UPOZORNĚNÍ
- PŘÍSLUŠENSTVÍ
- VÝMĚNA FILTRŮ
- ČIŠTĚNÍ A VÝMĚNA FILTRU MOTORU
- ČIŠTĚNÍ A VÝMĚNA FILTRU VÝSTUPU VZDUCHU
- UPOZORNENIE
- PRÍSLUŠENSTVO
- VÝMENA FILTROV
- ČISTENIE A VÝMENA FILTRA MOTORA
- ČISTENIE A VÝMENA FILTRA VÝSTUPU VZDUCHU
- WYPOSAŻENIE
- CZYSZCZENIE I WYMIANA FILTRA SILNIKA
- TARTOZÉKOK
- PIEDERUMI
- MOTORA FILTRA TİRİŞANA UN MAINA
- Принадлежности
- СМЯНА НА ФИЛТРИТЕ
- IMPORTANT SAFETY PRECAUTIONS
- EN
- PRODUCT DESCRIPTION
- ACCESSORIES
- OPERATING MANUAL – ASSEMBLY OF THE VACUUM CLEANER
- NOTE
- USING THE APLIANCE
- CHECKING THE DUST COLLECTION BAG FILL
- CLEANING AND MAINTENANCE
- REPLACING THE DUST COLLECTION BAG
- REPLACING FILTERS
- CLEANING AND REPLACEMENT OF THE MOTOR FILTER
- CLEANING AND REPLACING THE AIR OUTLET FILTER
- OPTIONAL ACCESSORIES
- SERVICE
- ENVIRONMENTAL PROTECTION
- Appliance recycling at the end of its service life:
- DANKSAGUNG
- ZUBEHÖR
- ACCESSOIRES
- REPLACEMENT DES FILTRES
- NETTOYAGE ET REMPLACEMENT DU FILTRE POUR MOTEUR
- NETTOYAGE ET REMPLACEMENT DU FILTRE DE SORTIE D'AIR
- ACCESSORI
- PULIZIA E SOSTITUZIONE DEL FILTRO MOTORE
- PULIZIA E SOSTITUZIONE DEL FILTRO ALL'USCITA ARIA
- ACCESORIOS
- LIMPIEZA Y CAMBIO DEL FILTRO DEL MOTOR
- Filing a complaint
- Complaints processing
- Manufacturer
- DE
- GARANTIEBEDINGUNGEN
- Garantie
- CONDITIONS DE GARANTIE
Brand : Concept
Model : VP8251
Category : Vacuum Cleaner