
AT-60 - Tape dispenser Vevor - Free user manual and instructions
Find the device manual for free AT-60 Vevor in PDF.

User questions about AT-60 Vevor
0 question about this device. Answer the ones you know or ask your own.
Ask a new question about this device
Download the instructions for your Tape dispenser in PDF format for free! Find your manual AT-60 - Vevor and take your electronic device back in hand. On this page are published all the documents necessary for the use of your device. AT-60 by Vevor.
USER MANUAL AT-60 Vevor
Technical Support and E-Warranty Certificate
www.vevor.com/support
TAPE DISPENSER USER MANUAL
MODEL: AT-60
We continue to be committed to provide you tools with competitive price. "Save Half", "Half Price" or any other similar expressions used by us only represent estimate of savings you might benefit from buying certain tools with us compared to top brands and does not necessarily mean to cover all categories of tools offered are kindly reminded to verify carefully when you are placing an order with us actually saving half in comparison with the top major brands.
MODEL: AT-60

natural_image
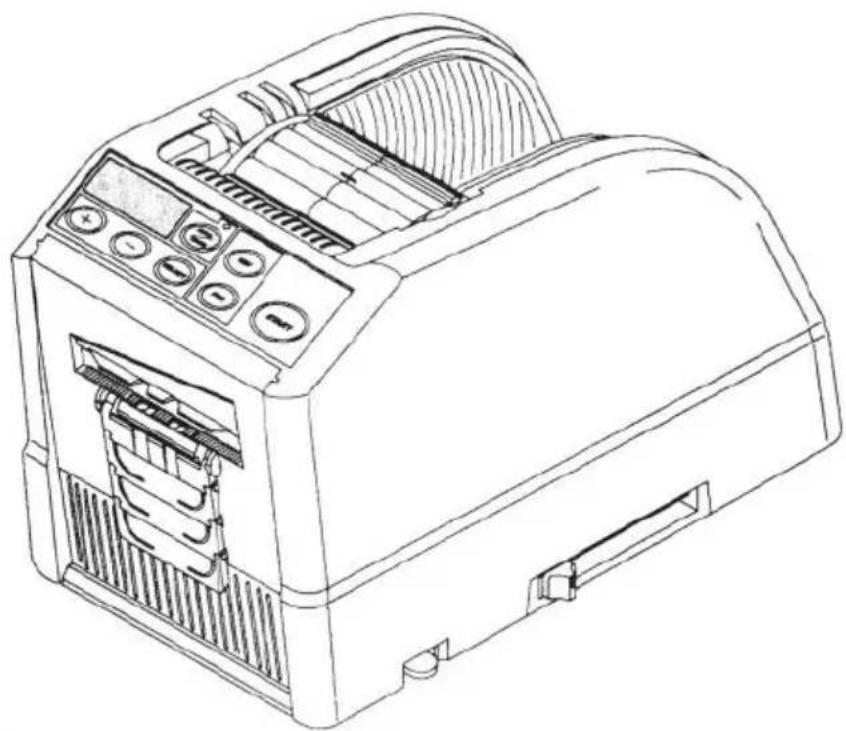
Line drawing of a toaster device with control panel and ventilation slots (no text or symbols)NEED HELP? CONTACT US!
Have product questions? Need technical support? Please feel fr contact us:
Technical Support and E-Warranty Certificate www.vevor.com/support
This is the original instruction, please read all manual instruction carefully before operating. VEVOR reserves a clear interpretation user manual. The appearance of the product shall be subject to product you received. Please forgive us that we won't inform you there are any technology or software updates on our product.
WARNING
-
Read carefully and understand all ASSEMBLY AND OPERATION INSTRUCTIONS before operating.
-
Failure to follow the safety rules and other basic safety precautions result in serious personal injury.
GENERAL SAFETY RULES
The safety guidelines in this instruction Manual must be observed in order to prevent damage to the machine or injury to the operator or other persons. The safety guidelines prescribed "Warning" and "Caution" describe possible in or damage that may be suffered from operating or maintaining the machine in manner other than as described in this instruction Manual.
Read and follow the safety precautions carefully before reading the Instruction Manual.
Warning
Indicates a potentially hazardous situation that, if not avoided, could result in or serious injury.
Caution
Indicate that mishandling may result in danger and that the operator is at risk injury, or the machine is at risk of damage.

Indicates Caution
A symbol within the triangle, or the description, will indicate a specific hazard

A Prohibited Action
A symbol within the circle, or the description, will indicate prohibited action.

A Required Action
A symbol within the circle, or the description, will indicate the required action

Do not plug in, unplug the cord, or operate the machine with wet
hands.Failure to observe this may result in injury due to electric shock.

Never insert your finger, any other body part, or any foreign object into the ne.Failure to observe this may result in injury.

Keep hair or loose clothing away from the machine while it is operating.
Failure to observe this may result in injury

This machine is intended for industrial use only. Do not allow untrained operators or children to operate the machine. Failure to observe this may result in injury.

Turn off the power switch and unplug the machine prior to replacing the blade unit or performing any maintenance on the machine. Failure to observe this may result in serious injury

Do not use this machine for anything other than its specified applications Use of the machine for any unintended applications can cause injury to the operator or failure of the machine.
SAVE THESE INSTRUCTIONS
MODEL AND PARAMETERS
| Model | AT-60 |
| Tape Width | 6-60mm |
| Tape length | 5-999mm |
| Outside Dia. of Roll | 20~300mm |
| Body Material | Anti-Static ABS |
| Rating(s) | AC100V-240V 50-60Hz |
| Power(Max.) | 24.6W |
STRUCTURE DIAGRAM
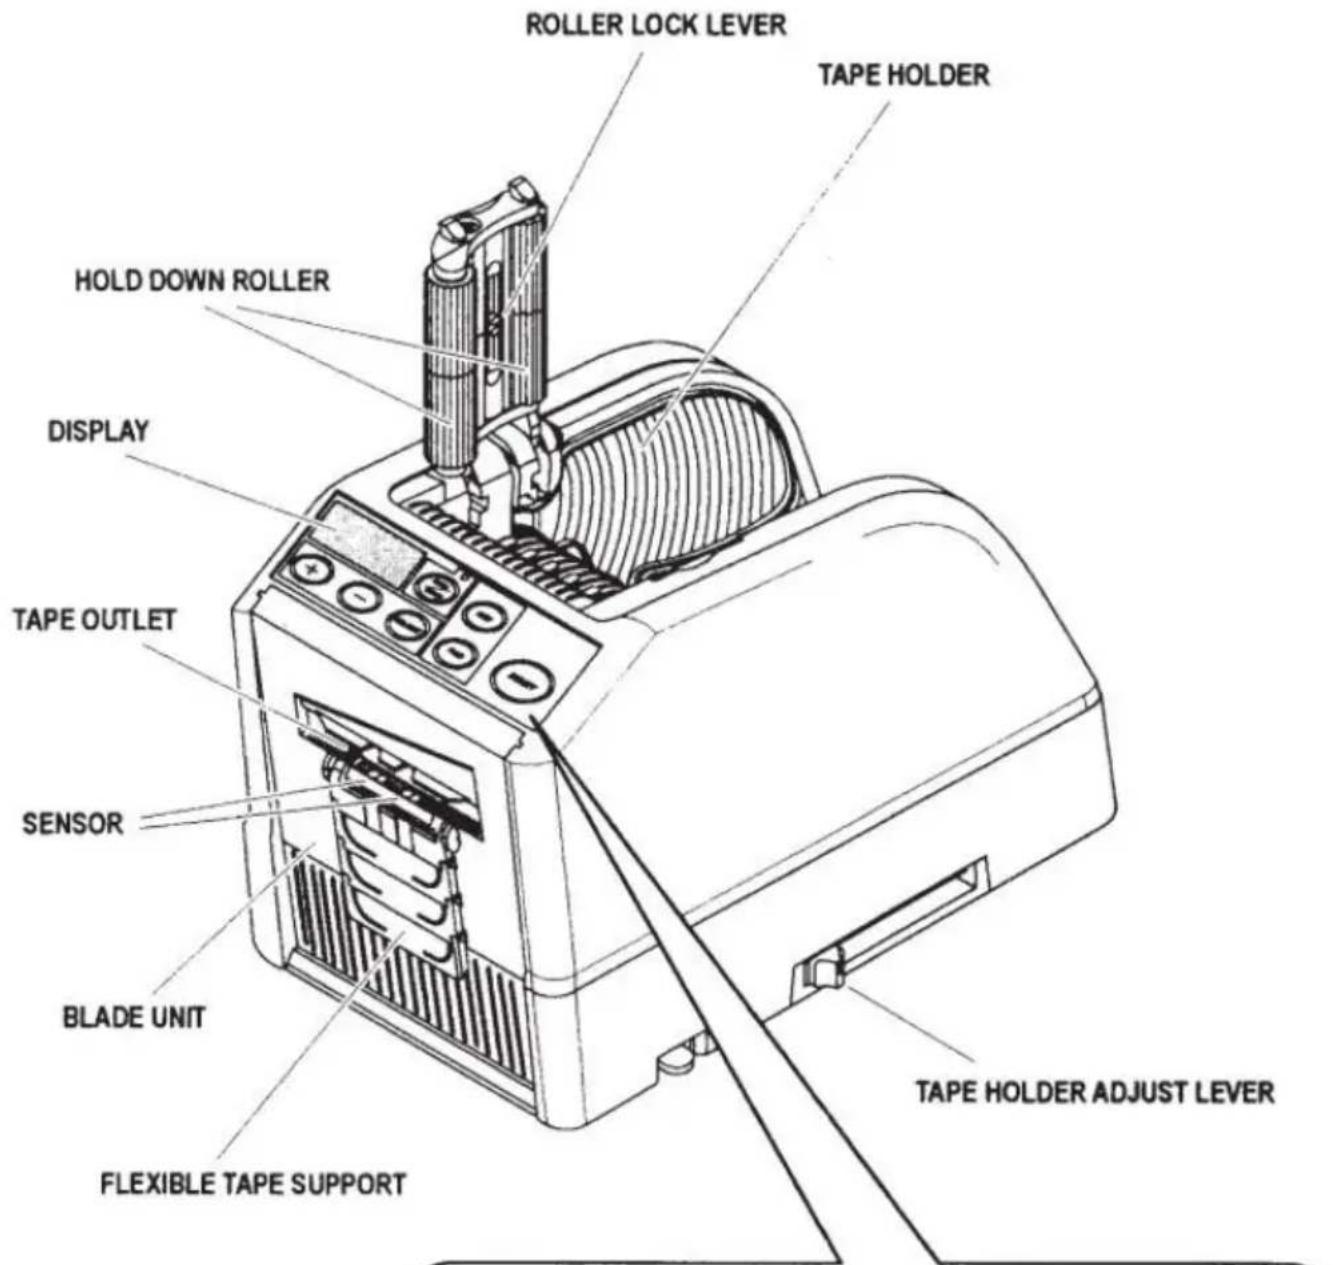
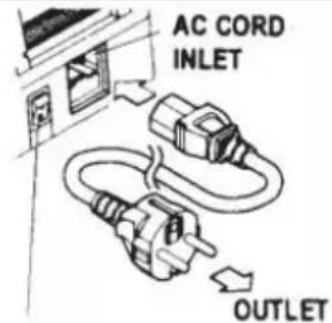
◆Plug in the AC CORD to the AC CORD INLET.
◆Make sure the POWER SWITCH is off, then plug it into appropriately grounded AC outlet.
◆Turn the POWER SWITCH on.
When the POWER SWITCH is turned on, a buzzer will have sound.
At this moment, the mode is set to MANUAL
◆Press the HOLD DOWN ROLLER RELEASE BUTTON
◆Place a roll of tape in the machine
◆Hold the tape by adjusting the TAPE HOLDERS
Adjust the TAPE HOLDERS to a proper width, slide the TA HOLDERADJUST LEVER from the front to the rear of the then close it.
The TAPE HOLDERS should hold the roll lightly in the cen cavity of the machine
This is very important because it keeps the tape in the ce The tape passes over the SENSOR in front of the BLADE To support a larger roll of tape, pull the LOWER HOLDER
◆Put the tape on the TAPE FEED ROLLER
◆Press the FWD BUTTON until the tape comes out from OUTLET!
When using a strong sticky adhesive tape, pull a little bit in positioning into the TAPE INLET.
Press the FWD BUTTON continuously for a few seconds, a the tape position in the TAPE INLET.
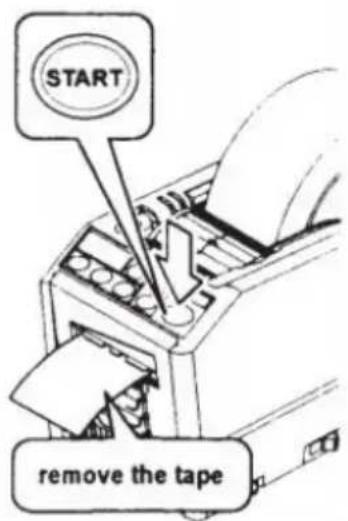
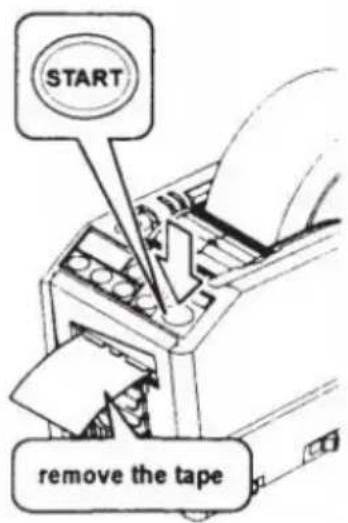
◆After the tape is loaded and the TAPE HOLDERS are ad close the HOLD DOWN ROLLER UNIT.
◆Press the START BUTTON.
Remove the first piece of tape and discard it
◆When you take the roll of tape out from the machine, press backward and press REV BUTTON.
POWER SWITCH

natural_image
Technical line drawing of a mechanical device with internal components (no text or symbols)

| NOTE:Always use Tweezers to remove tape.Whenever you set the tape, make sure that adhesive side always faced down. | |
| Set the Tape Length◆Make sure that DISPLAY indicatingThe cutting length is always indicated in some alphabets A,b,C,d,E,F◆Set the cutting length.Set your needed length by using +/- BUTTON.The cutting length is adjustable between 5 mm to 999 mYou can set six different lengths by using SELECT BUTTIf you press +/- BUTTON for a short while, the length in to 1 mm.And if you press +/- BUTTON longer, it shows fast forwaCautionThe actual length differs from the displayed length depend the type of the tape and its condition.When cutting short length of tape, the length may not cu consistently or tape is jammed.Try several test cuts to ensure proper operation. | INDICATE CUTTING LENGTH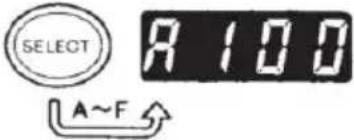 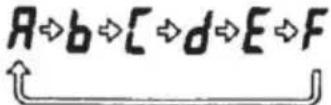 SET THE CUTTING LENGTH SET THE CUTTING LENGTH  |
| Mode Setting1.Manual Mode◆Make sure that blue LED LAMP is off.When the LED LAMP is flashing or turned on, press AUTO/MANUAL MODE and turn off the LED LAMP◆Press the START BUTTON once, the machine will feed-in of tape then cut it out based on your set length.◆To cut another piece, press START BUTTON again.2.Auto Mode◆Make sure that the LED LAMP is flashing.When the LED Lamp's lights are off, press AUTO/MANU BUTTON and let the LED LAMP flash. | 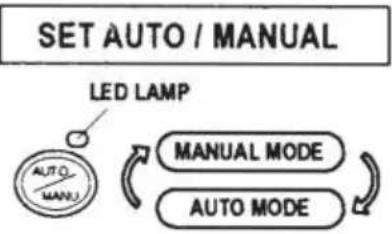 MANUAL MODE MANUAL MODE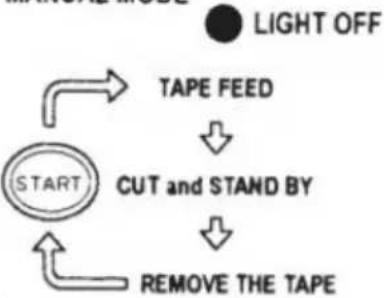 |
| ◆Press the START BUTTON once, the machine will feed-in of tape then cut it out based on your set length.When that piece of tape is removed, the machine will fee another piece then cut it out.The machine will feed-in and cut a new piece of tape o piece of tape is removed. | 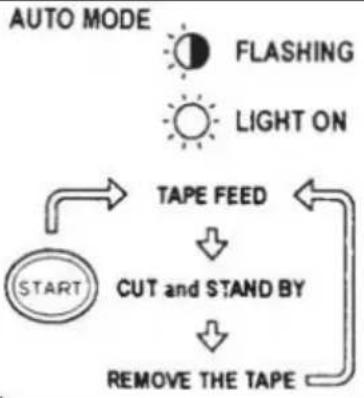 |
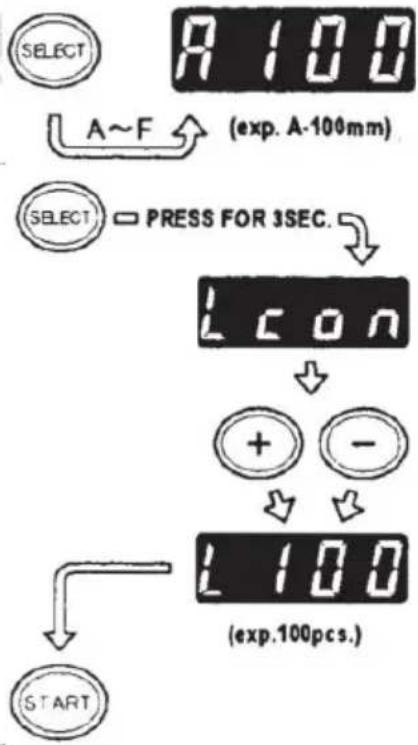
| P-Mode (Preset Mode)The machine is able to be programmed.A signal will be sh based on your selected quantity of pieces and it will all cu out.(Maximum 999 pieces.)A buzzer will have a sound when the program is finished.You can use the mode either MANUAL or AUTO◆Press SELECT BUTTON to choose your needed length.◆Press SELECT BUTTON for three seconds then it will ind "Lcon"◆Press SELECT BUTTON again then it will indicate "p".◆Use +/- BUTTON and set the needed quantity.◆Choose AUTO or MANUAL by USING AUTO/MANUAL BU◆When you press the START BUTTON, the machine will f and cut out a piece of tape for testing purposeTo operate the machine by using MANUAL MODE,press t STARTBUTTON and feed-in a piece of tape after taking itTo operate the machine by using AUTO MODE, the mac feed-in a piece of tape automatically.◆The signal shows numbers backwards when feeding-in and piece of tape◆When the DISPLAY indicates "0", the buzzer will have a The DISPLAY indicates the number of pieces that are pre Please wait until the buzzer stops.If you take the tape out before the buzzer stops, the LE will flash so you need to press the START SWITCH again.◆If you try to change the mode (AUTO/MANUAL) when ma operating just press AUTO/MANUAL BUTTON. | INDICATE CUTTING LENGTH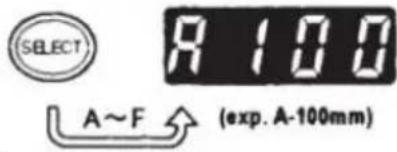 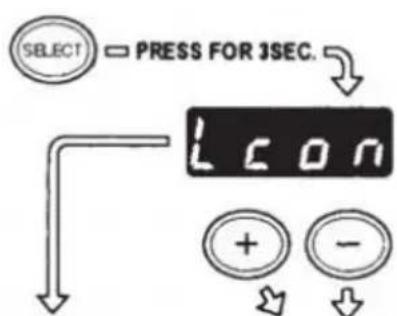 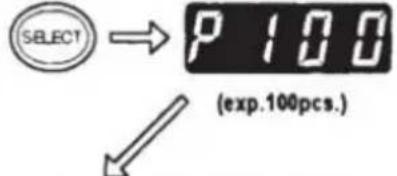 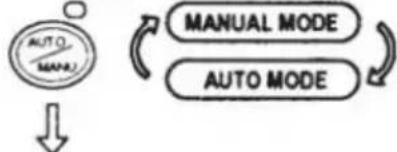  |
L-Mode (Loop Mode)
You can preset the quantity of pieces which will be cut out (Maximum 999 pieces)The machine will cut out the pieces by your selected quantities then it will stop.
◆Press the SELECT BUTTON and decide the length of tap
◆Press and hold SELECT BUTTON so that DISPLAY will i "Lcon"
◆Set the number of pieces to be cut out by using +/- BU
◆When you press the START BUTTON,DISPLAY indicates a that shows numbers backwards and cutting continuously
When the DISPLAY indicates "0", the buzzer will make a then the machine is stopped.
To stop the machine while running under L-MODE, press STARTBUTTON.
How to Manage a Curling Tape
◆Press the HOLD DOWN ROLLER RELEASE BUTTON in open the HOLD DOWN ROLLER UNIT
◆ Extend the ROLLER LOCK LEVER so that the roller will
◆Close the HOLD DOWN ROLLER UNIT
With the rollers locked, the tension may cause the length. Cut several test pieces in order to adjust the length if no
Use Narrow Tape /Use Two Rolls in a Same Time
If the tape is less than 15 mm in width or you want to rolls at the same time, use the SEPARATOR.
Cut less than 10 mm width of tape, put the GUIDE PLATE SEPARATOR
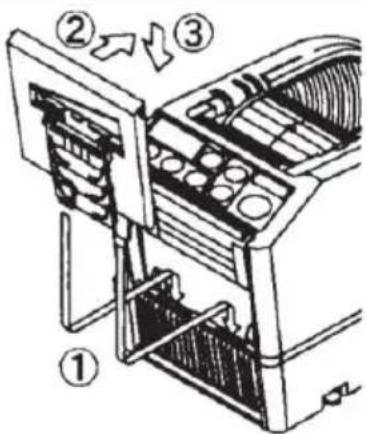
◆Remove the SEPARATOR from the bottom of body
◆Open the HOLD DOWN ROLLER UNIT
◆Insert the SEPARATOR into the body by slotting into the cavity
◆When you cut the tape less than 10 mm, put the GUIDI onto the Separator.
◆Place one roll of the tape on either side by inserting a SEPARATOR for loading tape
INDICATE CUTTING LENGTH
flowchart
graph TD
    A["SELECT"] --> B["A~F"]
    B --> C["(exp. A-100mm)"]
    D["SELECT"] --> E["PRESS FOR 3SEC."]
    E --> F["L CON"]
    F --> G["+"]
    F --> H["-"]
    G --> I["L 100"]
    H --> I
    I --> J["(exp.100pcs.)"]
    K["START"] --> L["Start"]
natural_image
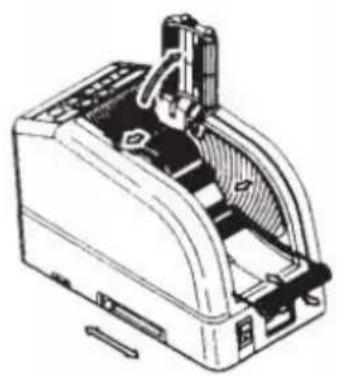
Diagram of a cylindrical device with internal flow arrows indicating movement or process (no text or symbols present)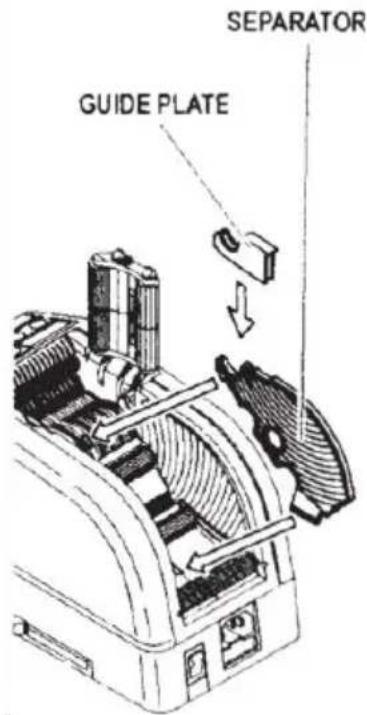
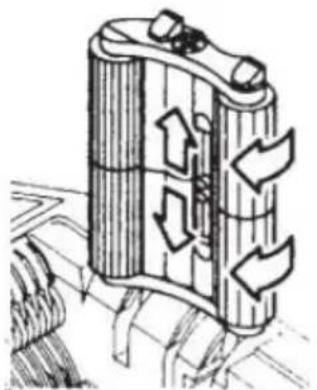
| ◆To hold the tape by adjusting TAPE HOLDERS, it is unneto push the SEPARATOR out of positionWhen dispensing two rolls of tapes at the same time, itto feed-in both of its lengths at the same time◆Remove the first piece of tape◆When the second piece of the tape is removed, both sidtape are also dispensed. | |
| Other FunctionsFLEXIBLE TAPE SUPPORTWhen you cut the tape longer or cut non-adhesive tape /FLEXIBLE TAPE SUPPORT in order to avoid the tape fallin | 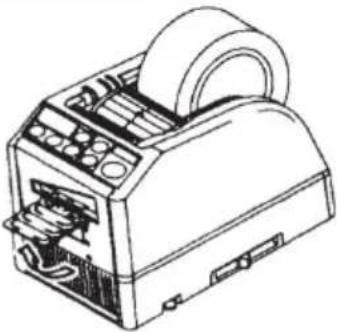 |
| ASSIST STANDBased on the tape material or work-piece purpose, use theSTAND to move the body of machine towards a lower leve |  |
| Replace the Blade UnitOnly Blade is not accepted to be replaced.It needs to change with the whole Blade Unit.Turn the POWER SWITCH off.Remove the BLADE UNIT by releasing the 8LADE UNIT RLEVERInstall the new BLADE UNIT into the body.Push down on the housing firmly until it is locked.Make sure that the lower blade is positioned properly, turBLADEUNIT over and take a look at the bottom edge of tblade. | 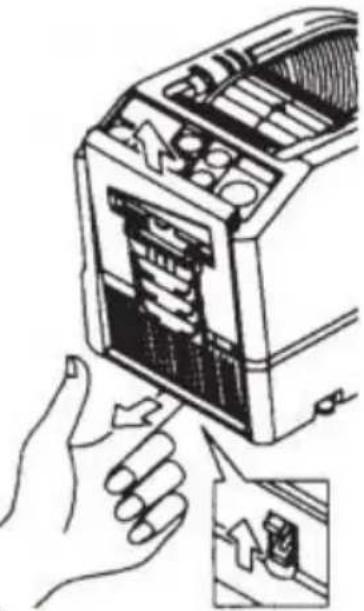 |
MAINTENANCE

Whenever you clean or replace the BLADE UNITd touch the sharp edge of the blade.
Clean the Blade Unit
When cutting tapes with heavy adhesive, the residue will on the blade gradually.
It is necessary to remove the BLADE UNIT for cleaning
◆Turn the POWER SWITCH off.
◆Remove the BLADE UNIT by releasing BLADE UNIT REL LEVER.
◆Put some alcohol on a clean dry cloth, or use a swab the residue
◆Replace the BLADE UNIT.
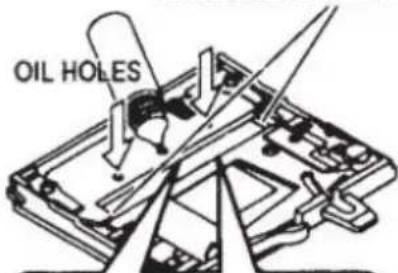
Lubricate the Blade
Lubricate the blade in order to prevent residue from sti the blade.
◆Turn the POWER SWITCH off
◆Remove the BLADE UNIT from the body.
◆Locate three oil holes on the back side of the top blade
◆Drip one drop of BLADE OIL into each hole.
◆Also lubricate LOWER BLADE GUIDE.
◆Do not lubricate over and over again.
◆Wipe the spare oil away by using cotton cloth.
LOWER BLADE GUIDE
natural_image
Technical line drawing of a mechanical component with arrows indicating motion or force direction (no text or symbols)◆Replace the BLADE UNIT into the body. ◆Turn the POWER SWITCH on. Make several test cuts in order to make sure the tape down from the TAPE OUTLET.
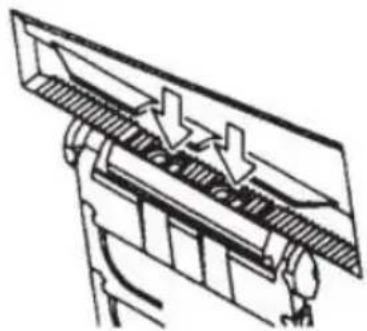
Clean the Sensors
There are two pairs of SENSORS below the TAPE OUTLE opening is covered by tape residue or debris, the SENSOR not detect the presence of tape.
Always keep clean around the SENSORS.
To protect the SENSOR, clean the openings after removing BLADE UNIT carefully.
Clean the Body
Put neutral detergent on a damp cloth to clean the body. alcohol or solvent to clean the plastic parts.
Error Messages
The buzzer will have a sound then a message will flash a on the DISPLAY.
E-02 Blade is Out of Position
A signal shows that the blade is not installed well or mach because of the thickness or hardness of the tape.
◆Turn the POWER SWITCH off.
◆Remove the BLADE UNIT by releasing the BLADE UNIT RELEASINGLEVER then lift the assembly out of the b
◆Turn the POWER SWITCH on.
◆Press the FWD BUTTON and feed -in the tape once, cu in between the TAPEOUTLET and the BLADE UNIT w scissors.
◆Press the REV BUTTON to remove the tape
◆Clean the BLADE UNIT and lubricate the LOWER BLADE GUIDE.
◆Check the lower blade position and replace the BLADE U

POWER SWITCH IS OFF

REMOVE BLADE UNIT

POWER SWITCH IS ON


CLEAR THE ERROR

FEED THE TAPE

REMOVE THE TAPE

CLEAR THE BLADE

SET THE TAPE
| E-03 Motor is StoppedIndicates that the motor is stopped because of overload.◆Press the START BUTTON to clear the error message.◆Press the REV BUTTON to remove the tape.◆Turn the POWER SWITCH off.◆Check the BLADE UNIT and TAPE OUTLET carefully.◆Clear and take away the spare tape waste or sticky resid using TWEEZERS |   CLEAR THE ERROR[0CHX] CLEAR THE ERROR[0CHX] REMOVE THE TAPE REMOVE THE TAPE SET THE TAPE SET THE TAPE |
 | Do not touch the Blade when you are correcting an error under POWER SWIT |
 | Turn off the POWER SWITCH and stop using the machine.If the machine cannot work normally after correcting the error.It seems that nothing is wrong without any error messages. |
 | Do not use the tape if static electricity generates over 1000V.It may cause failure to the machine. |
TROUBLESHOOTING
| Problem | Possible Cause | Possible Solution |
| The POWER SMTCH is on but the machit cannot run. | The AC CORD is loosened.The FUSE has been blown. | Check the AC CORD then plug in the of firmly.Replace the FUSE.Stop using the machine immediately even though the FUSE is blown again after be replaced. |
| After removing a piece of tape, the n piece doesn't feed under AUTO mode. | The mode is set to MANUAL.Some debris is covering the SENSORS.The tape can not go through the SENSORS.The tape has extremely low reflectance. | Set the mode to AUTO.Remove the debris.Use SEPARATOR to narrow the tape les than 15mm.Do not bring strong illuminants close around the SENSORS.Some types of tape may not be used up AUTO mode. |
| The BLADE can not move smoothly. | The BLADE UNIT is not a proper position. | Check the BLADE UNIT and push down the housing firmly. |
| The length of the ta is different from the set length. | The adhesive of tape is strong.The elasticity of tape is strong. | Correct the setting after cutting several te pieces |
| Tape curls excessively. | The machine is not grounded.The ROLLER LOCK is disengaged | Check ground on cord.Engage the ROLLER LOCK to apply tens |
 | This product is subject to the provision of European Directive 2012.The symbol showing a wheelie bin crossed through indicates that t product requires separate refuse collection in the European Union. T applies to the product and all accessories marked with this symbol. marked as such may not be discarded with normal domestic waste be taken to a collection point for recycling electrical and electronic | |

If the machine still can not operate properly, stop using the machine immediately contact vendor for repair authorization.
Warranty
We warrant to the original purchaser of the product that it will be free from defects in material workmanship for as long as the original purchaser owns the product, when given normal wear proper usage.
The spare parts such as Cutting Blades, Rollers, are not covered under the warranty period as considered as "wear parts" This warranty is only valid if the product:
Was not damaged while being installed.
Was operated in accordance with product's specifications, instructions and any technical support directions.
Was not modified or damaged by tempering, user error, accident.disaster, abuse, misuse, power support, power application, alternation, repair, modification, a fix or replacement by someone other than the original product.
Manufacturer: Shanghaimuxinmuyeyouxiangongsi
Address: Baoshanqu Shuangchenglu 803long 11hao 1602A-1609shi Shanghai
EC REP: SHUNSHUN GmbH.
Römeräcker 9 Z2021,76351 Linkenheim-Hochstetten, Germany
Tel: +49 1727041930 euvertreter@gmail.com
UK REP: Pooledas Group Ltd.
Unit 5 Albert Edward House, The Pavilions Preston, United Kingdom
Tel: 01772418127 pooledas123@gmail.com
Imported to AUS: SIHAO PTY LTD.
1 ROKEVA STREETEASTWOOD NSW 2122 Australia
Imported to USA: Sanven Technology Ltd.
Suite 250, 9166 Anaheim Place, Rancho Cucamonga, CA 91730
Made In China
VEVOR®
TOUGH TOOLS, HALF PRICE
Technical Support and E-Warranty Certificate
www.vevor.com/support
VEVOR®
TOUGH TOOLS, HALF PRICE
We continue to be committed to provide you tools with competitive price. "Save Half", "Half Price" or any other similar expressions used by us only represent of savings you might benefit from buying certain tools with us compared to top brands and does not necessarily mean to cover all categories of tools offered are kindly reminded to verify carefully when you are placing an order with us actually saving half in comparison with the top major brands.
VEVOR®
TOUGH TOOLS, HALF PRICE
Tape Dispenser
MODÈLE : AT-60
natural_image
Line drawing of a toaster device with control panel and ventilation slots (no text or symbols)NEED HELP? CONTACT US!
Have product questions? Need technical support? Please feel fr contact us:
Technical Support and E-Warranty Certificate www.vevor.com/support
This is the original instruction, please read all manual instruction carefully before operating. VEVOR reserves a clear interpretation user manual. The appearance of the product shall be subject to product you received. Please forgive us that we won't inform you there are any technology or software updates on our product.
WARNING
POWER SWITCH

natural_image
Technical line drawing of a mechanical device with internal components (no text or symbols)

natural_image
Illustration of hands assembling a device into a rack, showing internal components and a close-up view (no text or symbols)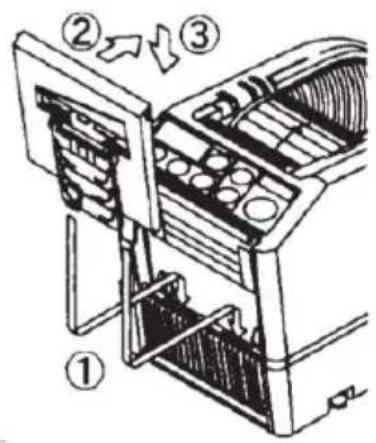
MAINTENANCE

natural_image
Technical line drawing of a mechanical assembly with arrows indicating motion or force direction (no text or symbols)Error Messages
Bureau 250, 9166 Anaheim Place, Rancho Cucamonga, CA 91730
Fabriqué en Chine
VEVOR®
TOUGH TOOLS, HALF PRICE
www.vevor.com/support
VEVOR®
TOUGH TOOLS, HALF PRICE
www.vevor.com/support
BENUTZERHANDBUCH FÜR DEN
KLEBEBANDABROLLER
MODELL: AT-60
We continue to be committed to provide you tools with competitive price. "Save Half", "Half Price" or any other similar expressions used by us only represent of savings you might benefit from buying certain tools with us compared to top brands and does not necessarily mean to cover all categories of tools offered are kindly reminded to verify carefully when you are placing an order with us actually saving half in comparison with the top major brands.
MODELL: AT-60

natural_image
Line drawing of a toaster device with control panel and ventilation slots (no text or symbols)NEED HELP? CONTACT US!
Have product questions? Need technical support? Please feel fr contact us:
Technical Support and E-Warranty Certificate www.vevor.com/support
This is the original instruction, please read all manual instruction carefully before operating. VEVOR reserves a clear interpretation user manual. The appearance of the product shall be subject to product you received. Please forgive us that we won't inform you there are any technology or software updates on our product.
WARNING
POWER SWITCH

natural_image
Technical line drawing of a mechanical device with internal components (no text or symbols)

natural_image
Illustration of hands assembling a device into a rack, showing internal components and a close-up view (no text or symbols)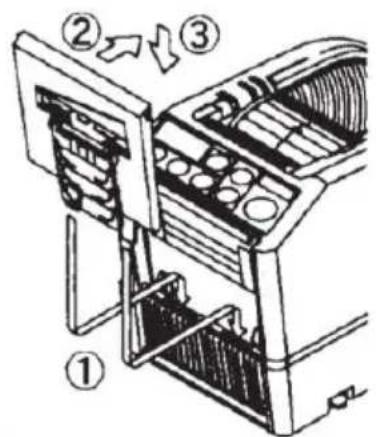
MAINTENANCE


natural_image
Technical line drawing of a mechanical assembly with arrows indicating motion or force direction (no text or symbols)Error Messages
Suite 250, 9166 Anaheim Place, Rancho Cucamonga, CA 91730
www.vevor.com/support
VEVOR®
TOUGH TOOLS, HALF PRICE
www.vevor.com/support
MANUALE UTENTE DEL DISTRIBUTORE DI NASTRO
MODELLO: AT-60
We continue to be committed to provide you tools with competitive price. "Save Half", "Half Price" or any other similar expressions used by us only represent of savings you might benefit from buying certain tools with us compared to top brands and does not necessarily mean to cover all categories of tools offered are kindly reminded to verify carefully when you are placing an order with us actually saving half in comparison with the top major brands.
VEVOR®
TOUGH TOOLS, HALF PRICE
Tape Dispenser
MODELLO: AT-60

natural_image
Line drawing of a toaster device with control panel and ventilation slots (no text or symbols)NEED HELP? CONTACT US!
Have product questions? Need technical support? Please feel fr contact us:
Technical Support and E-Warranty Certificate www.vevor.com/support
This is the original instruction, please read all manual instruction carefully before operating. VEVOR reserves a clear interpretation user manual. The appearance of the product shall be subject to product you received. Please forgive us that we won't inform you there are any technology or software updates on our product.
WARNING
POWER SWITCH
natural_image
Technical line drawing of a mechanical device with internal components (no text or symbols)

natural_image
Technical line drawing of a mechanical component with arrows indicating motion or force direction (no text or symbols)Importato in AUS: SIHAO PTY LTD.
1 ROKEVA STREETEASTWOOD NSW 2122 Australia
Suite 250, 9166 Anaheim Place, Rancho Cucamonga, CA 91730
Made in China
VEVOR®
TOUGH TOOLS, HALF PRICE
www.vevor.com/support
VEVOR®
TOUGH TOOLS, HALF PRICE
We continue to be committed to provide you tools with competitive price. "Save Half", "Half Price" or any other similar expressions used by us only represent of savings you might benefit from buying certain tools with us compared to top brands and does not necessarily mean to cover all categories of tools offered are kindly reminded to verify carefully when you are placing an order with us actually saving half in comparison with the top major brands.
VEVOR®
TOUGH TOOLS, HALF PRICE
Tape Dispenser
MODELO: AT-60

natural_image
Line drawing of a toaster device with control panel and ventilation slots (no text or symbols)NEED HELP? CONTACT US!
Have product questions? Need technical support? Please feel fr contact us:
Technical Support and E-Warranty Certificate www.vevor.com/support
This is the original instruction, please read all manual instruction carefully before operating. VEVOR reserves a clear interpretation user manual. The appearance of the product shall be subject to product you received. Please forgive us that we won't inform you there are any technology or software updates on our product.
WARNING
POWER SWITCH

natural_image
Technical line drawing of a mechanical device with internal components (no text or symbols)

BE CAREFUL TO HANDLE
THE SENSORS
natural_image
Technical line drawing of a mechanical component with arrows indicating motion or force direction (no text or symbols)1 ROKEVA STREET ASTWOOD NSW 2122 Australia
Suite 250, 9166 Anaheim Place, Rancho Cucamonga, CA 91730
Hecho en china
VEVOR®
TOUGH TOOLS, HALF PRICE
www.vevor.com/support
VEVOR®
TOUGH TOOLS, HALF PRICE
www.vevor.com/support
INSTRUKCJA OBSŁUGI DOZOWNIKA TAŚMY
MODEL: AT-60
We continue to be committed to provide you tools with competitive price. "Save Half", "Half Price" or any other similar expressions used by us only represent of savings you might benefit from buying certain tools with us compared to top brands and does not necessarily mean to cover all categories of tools offered are kindly reminded to verify carefully when you are placing an order with us actually saving half in comparison with the top major brands.
MODEL: AT-60

natural_image
Line drawing of a toaster device with control panel and ventilation slots (no text or symbols)NEED HELP? CONTACT US!
Have product questions? Need technical support? Please feel fr contact us:
Technical Support and E-Warranty Certificate www.vevor.com/support
This is the original instruction, please read all manual instruction carefully before operating. VEVOR reserves a clear interpretation user manual. The appearance of the product shall be subject to product you received. Please forgive us that we won't inform you there are any technology or software updates on our product.
WARNING
POWER SWITCH

natural_image
Technical line drawing of a mechanical device with internal components (no text or symbols)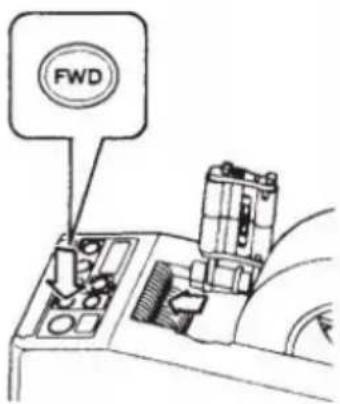

natural_image
Illustration of hands assembling a device into a rack, showing internal components and a close-up view (no text or symbols)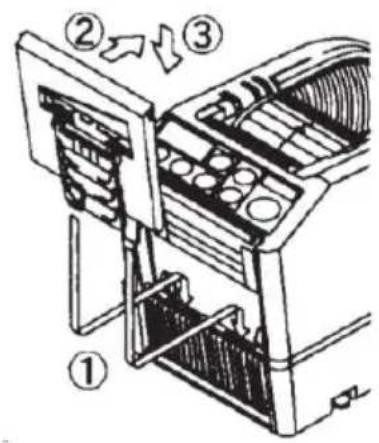
MAINTENANCE

natural_image
Technical line drawing of a mechanical assembly with arrows indicating motion or force direction (no text or symbols)Error Messages
1 ROKEVA STREETEASTWOOD NSW 2122 Australia
Import do USA: Sanven Technology Ltd.
Apartament 250, 9166 Anaheim Place, Rancho Cucamonga, Kalifornia 91730
www.vevor.com/support
VEVOR®
TOUGH TOOLS, HALF PRICE
www.vevor.com/support
GEBRUIKERSHANDLEIDING TAPEDISPENSER
MODEL: AT-60
We continue to be committed to provide you tools with competitive price. "Save Half", "Half Price" or any other similar expressions used by us only represent the estimate of savings you might benefit from buying certain tools with us compared to top brands and does not necessarily mean to cover all categories of tools offered. are kindly reminded to verify carefully when you are placing an order with us actually saving half in comparison with the top major brands.
MODEL: AT-60

natural_image
Line drawing of a toaster device with control panel and ventilation slots (no text or symbols)NEED HELP? CONTACT US!
Have product questions? Need technical support? Please feel fr contact us:
Technical Support and E-Warranty Certificate www.vevor.com/support
This is the original instruction, please read all manual instruction carefully before operating. VEVOR reserves a clear interpretation user manual. The appearance of the product shall be subject to product you received. Please forgive us that we won't inform you there are any technology or software updates on our product.
WARNING
- Lees zorgvuldig alle MONTAGE- EN BEDIENINGSINSTRUCTIES
POWER SWITCH

natural_image
Technical line drawing of a mechanical device with internal components (no text or symbols)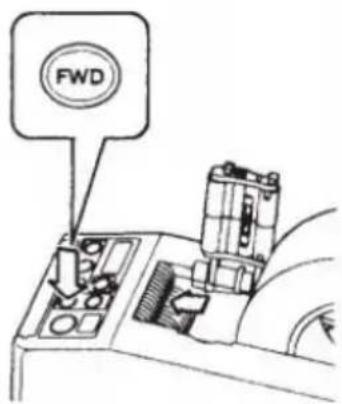
natural_image
Technical line drawing of a mechanical component with arrows indicating motion or force direction (no text or symbols)E-03 Motor is gestopt
Suite 250, 9166 Anaheim Place, Rancho Cucamonga, CA 91730
Gemaakt in China
VEVOR®
TOUGH TOOLS, HALF PRICE
www.vevor.com/support
VEVOR®
TOUGH TOOLS, HALF PRICE
www.vevor.com/support
ANVÄNDARMANUAL FÖR TEJPDISPENSER
MODELL: AT-60
We continue to be committed to provide you tools with competitive price. "Save Half", "Half Price" or any other similar expressions used by us only represent estimate of savings you might benefit from buying certain tools with us compared to top brands and does not necessarily mean to cover all categories of tools offered are kindly reminded to verify carefully when you are placing an order with us actually saving half in comparison with the top major brands.
MODELL: AT-60

natural_image
Line drawing of a toaster device with control panel and ventilation slots (no text or symbols)NEED HELP? CONTACT US!
Have product questions? Need technical support? Please feel fr contact us:
Technical Support and E-Warranty Certificate www.vevor.com/support
This is the original instruction, please read all manual instruction carefully before operating. VEVOR reserves a clear interpretation user manual. The appearance of the product shall be subject to product you received. Please forgive us that we won't inform you there are any technology or software updates on our product.
WARNING
POWER SWITCH

natural_image
Technical line drawing of a mechanical device with internal components (no text or symbols)

natural_image
Illustration of hands assembling a device into a rack, showing internal components and a close-up view (no text or symbols)
MAINTENANCE

natural_image
Technical line drawing of a mechanical assembly with arrows indicating motion or force direction (no text or symbols)Error Messages
Suite 250, 9166 Anaheim Place, Rancho Cucamonga, CA 91730
Tillverkad i Kina
VEVOR®
TOUGH TOOLS, HALF PRICE
www.vevor.com/support


