RP-TT100 - Turntable SHARP - Free user manual and instructions
Find the device manual for free RP-TT100 SHARP in PDF.

User questions about RP-TT100 SHARP
0 question about this device. Answer the ones you know or ask your own.
Ask a new question about this device
Download the instructions for your Turntable in PDF format for free! Find your manual RP-TT100 - SHARP and take your electronic device back in hand. On this page are published all the documents necessary for the use of your device. RP-TT100 by SHARP.
USER MANUAL RP-TT100 SHARP
natural_image
Black Sharp desktop music<|im_start|> Dominator with open lid and remote control (no visible text or symbols)User manual
RP-TT100
Automatic Turntable with Bluetooth-out

text_image
EN BG CS DA DE EL ES ET FI FR HR HU IT LV NL NO PL PT RO SK SLLT SR SV UATrademarks:

Bluetooth®
The Bluetooth ^® word mark and logos are registered trademarks owned by Bluetooth SIG, Inc.
1
text_image
1 2 3 4 5 6 7 8 9 10 11 12 13 14 15 14 SHARP2
text_image
2134563
text_image
1 2 3 4 5 6 7 84

text_image
Technical diagram illustrating the step-by-step installation of a CD or DVD disc, labeled with components A and B.5
text_image
Technical diagram showing two views of a CD or DVD disc assembly with labeled parts and directional arrows indicating assembly steps.6
text_image
DC IN 12V7
text_image
LINE PHONO PREAMP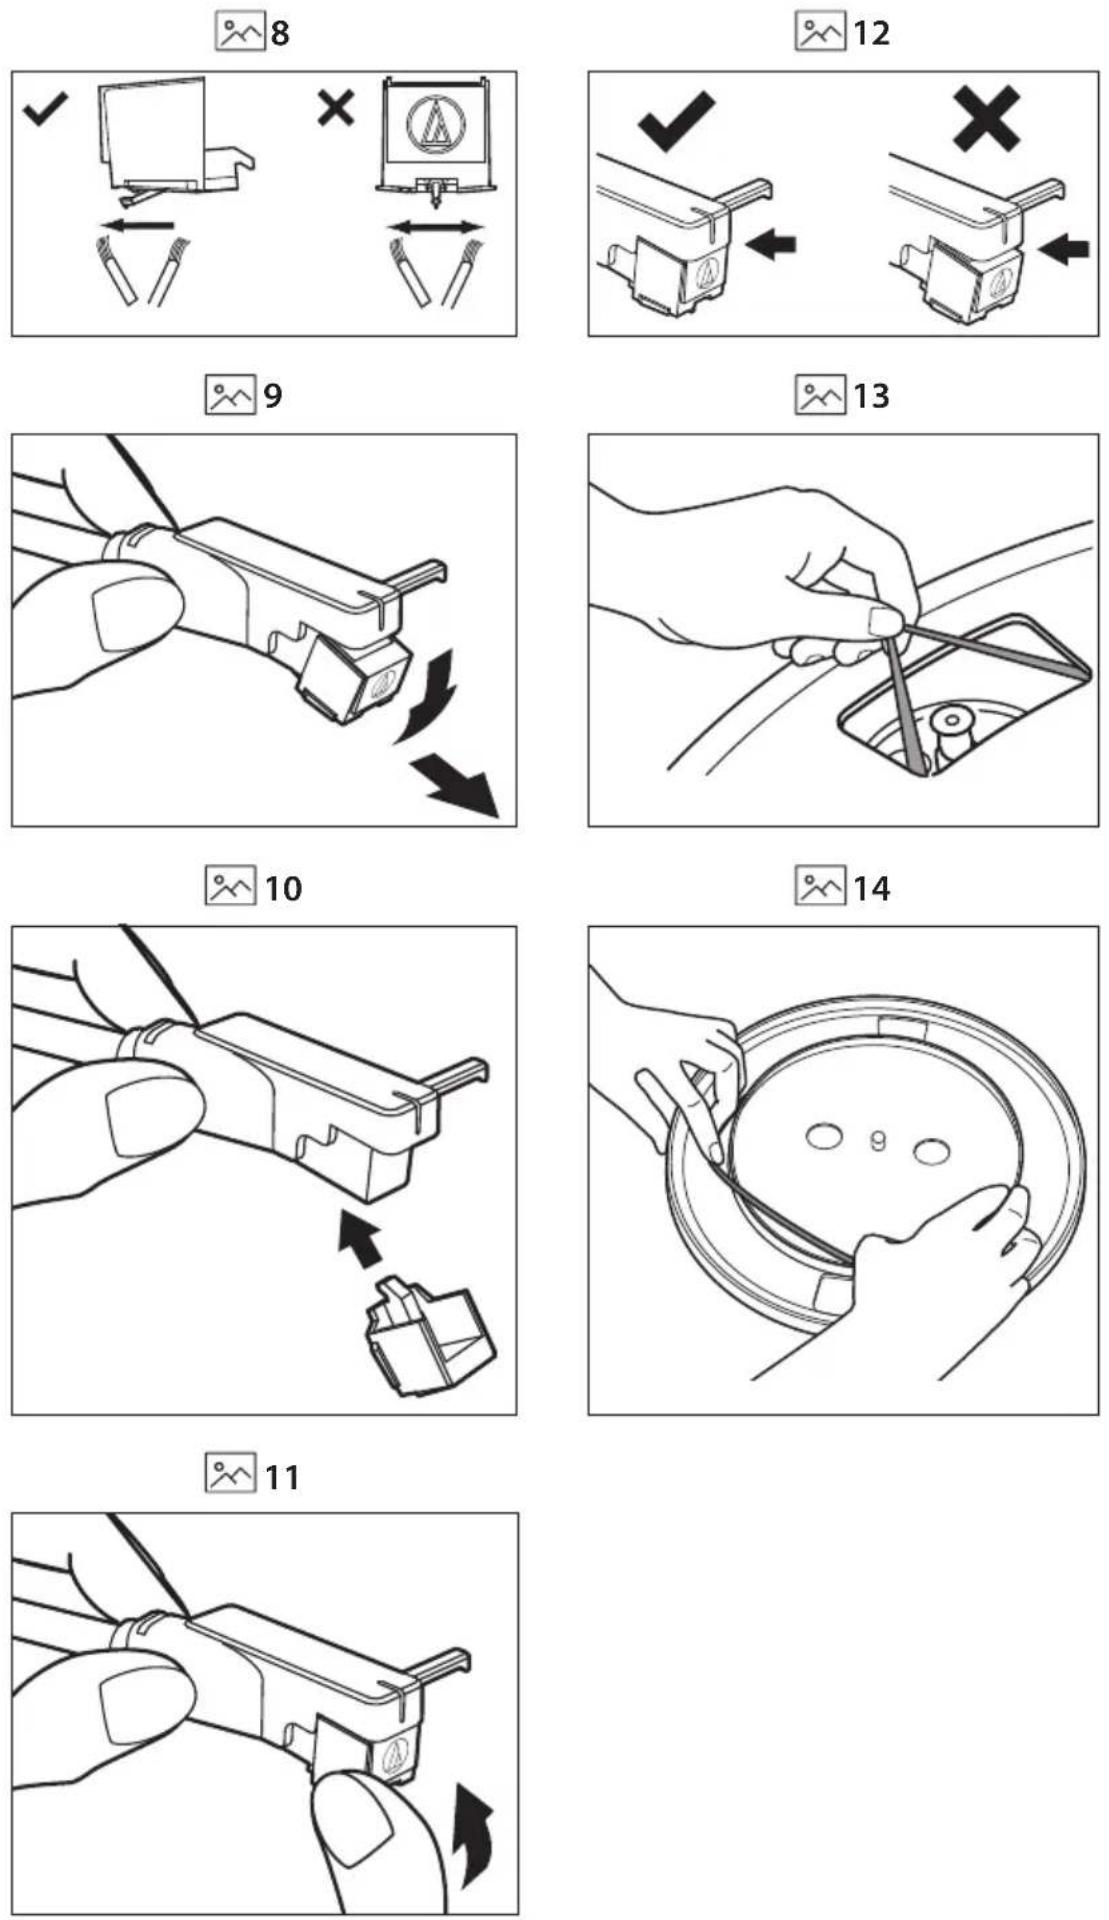
Important safety instructions
Please follow all safety instructions and warnings. Keep this manual for reference.

Consult user manual for safety, operation, and maintenance information.

Class II equipment: Double insulation, no need for electrical earth (ground) connection.

Alternating current (AC): Voltage marked is AC.

Direct current (DC): Voltage marked is DC.

Indoor use only.
Energy efficiency marking with level VI

Polarity of d.c. power connector
Precautions
Damage
Inspect the product after unpacking; if damaged, do not use and consult your dealer.

text_image
CAUTION RISK OF ELECTRIC SHOCK DO NOT OPENUser should not attempt repair nor expose the internal parts; this action can be hazardous and will void your warranty. Contact only authorised service centers for repairs.
Power connection and accessibility
- Do not handle the power cord with wet hands. Do not force the plug into the outlet. Turn off and unplug the product when not in use. Keep the power plug accessible, without using extension cables.
Power source
- Use only AC 100-240V 50/60Hz outlets. Higher voltages can cause malfunction or fire.
- The AC power adater should be removed from the power outlet if not in use for an extended period of time.
- Only use the supplied mains adapter. Failure to do this may result in a safety risk and/or damage to the product.
Power cord protection
- Protect the power cord from damage; do not overload, stretch, or bend it. If damaged, it can result in fire or electric shock. Damaged cords must be replaced by the manufacturer or a qualified technician.
Fused moulded power plug (non-rewireable) - UK, Malta, Cyprus and Ireland only.
- The power lead includes a 3A Amp fuse. Replace only with a BS1362 approved fuse of the same rating.
Child safety
- Use basic safety precautions around children to prevent misuse of the product.
Location
- Place on a flat, stable surface without overhang. If wall mountable, refer to the wall-mounting instructions in this user manual.
Ventilation
- Do not block, cover or insert objects into the ventilation slots. Do not insert objects into the product's openings. Doing so may result in a safety risk and/or damage to the product. Ensure a minimum distance of 5 cm around the product for sufficient ventilation to avoid overheating.
Heat and operating temperature
- Do not place the product near heat sources or direct sunlight for prolonged periods.
Naked flames
- Keep open flames away from the product to prevent fire.
Water, moisture, and liquid entry
- Do not expose the product to liquids; keep away from rain, water, and objects filled with liquids to prevent fire or electric shock.
Storms and lightning
- Disconnect all cables during storms or lightning to prevent damage.
Maintenance
- Disconnect power cords from the product before cleaning and use a soft, dry cloth without chemicals or detergents. If using a vacuum cleaner, use the soft brush attachment.
Batteries
Installation
- Use only specified batteries; do not mix types or new with old. Use the correct polarity upon battery insertion.
Use and maintenance
- Keep batteries away from heat, such as near fire or in direct sunshine. Remove batteries if unused for over a month to prevent leaking. Replace leaking batteries inside the battery compartment.
Child safety
- Ensure battery compartment is secure. Keep batteries away from children's reach. Seek immediate medical help if swallowed.
Environmental conditions
- Keep batteries away from low pressure or high heat to avoid explosion or leakage.
Disposal
- Dispose of the battery pack according to the manual (see "Disposal: equipment and batteries"). Do not throw into fire, disassemble or recharge non-rechargeable batteries, as it may leak or explode.
Disposal: equipment and batteries
Information for users on collection and disposal of old equipment.
Symbol indicates product contains batteries per EU Directive 2023/1542/EU; cannot be disposed with household waste. Cd, Hg, or Pb shows battery contains cadmium, mercury, or lead.


This symbol means that the product is designed and manufactured so that it can be recycled and reused.
These symbols on the products, packaging, and/or accompanying documents mean that used electrical and electronic products and batteries should not be mixed with general household waste. Household users should contact either the retailer where they purchased this product, or their local government office, for details of where and how they can take these items for environmentally safe recycling.
CE and UKCA statement:
- Hereby, Sharp Consumer Electronics Poland sp. z o.o. declares that this audio device is in compliance with the essential requirements and other relevant provisions of RED Directive 2014/53/EU and UK Radio Equipment Regulations 2017.
- The full CE text and UKCA declaration of conformity are available at sharpconsumer.com and then entering download section of your model and choosing "Declaration of Conformity".
ERP II NOTE:
- This unit is designed to enter STANDBY mode automatically after approximately 15 minutes of inactivity. Press the POWER button to turn the unit on.
What is included in the box:
- RP-TT100 Automatic turntable
- Platter (with drive belt)
- Rubber platter mat
- Spare drive belt
- Dust cover
- Dust cover hinges x2
- 45 RPM adapter
- AC adapter
- Remote control (inc. batteries)
- Needle brush
- RCA cable
- User documentation
Controls
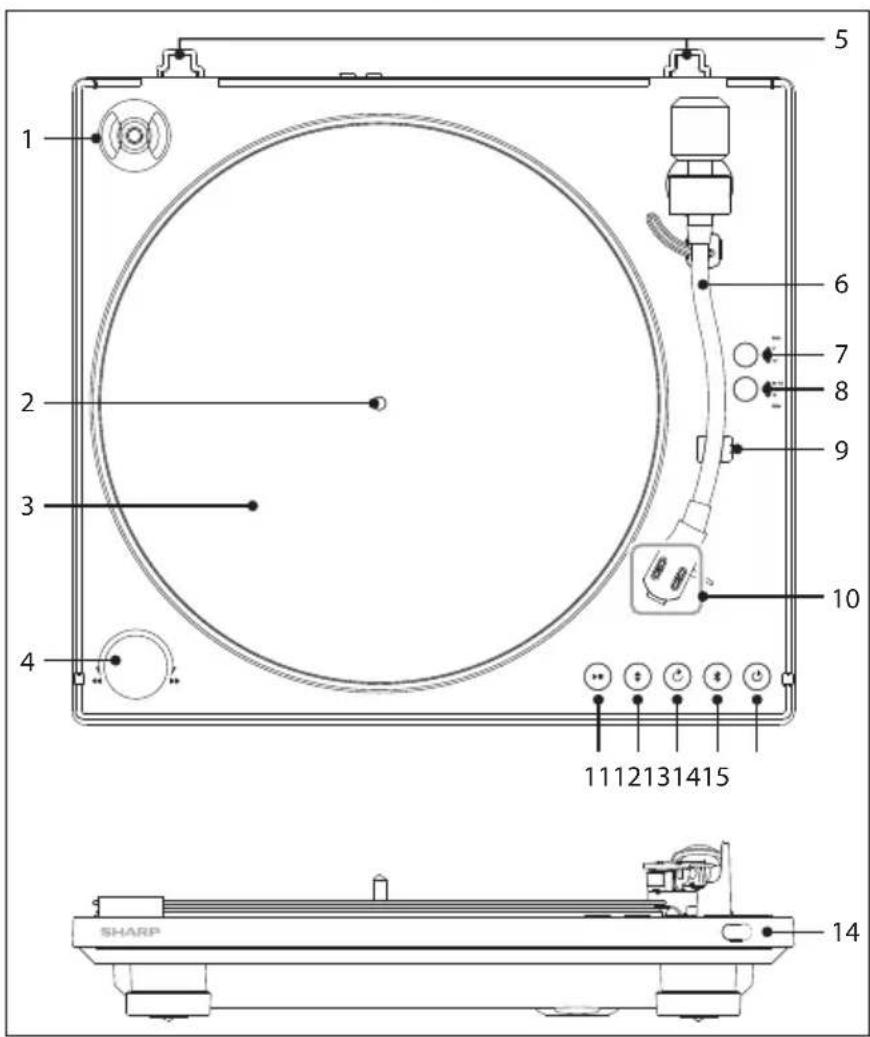
Front panel
(Refer to 1 on page 1)
- 45 RPM adapter store hole
- Spindle
- Platter
- ◀◀/▶Skip control knob. Rotate left or right to make the tonearm one step. Rotate left or right and hold to make the tonearm keep moving
- Dust cover hinge slots
- Tonearm
- SIZE button. Short press to switch between 7" and 12" record
- RPM button. Short press to switch between 33 1/3 or 45 RPM
-
Tonearm rest
-
Cartridge
-
▶■Short press to begin or stop playback.
-
Short press to lower or raise the tonearm.
-
↻ Short press to enable or disable the repeat mode.
-
Select Bluetooth mode. Press to activate the pairing function in Bluetooth mode or disconnect the existing paired Bluetooth device.
-
⏻ Switch the unit between ON and STANDBY.
-
IR Sensor
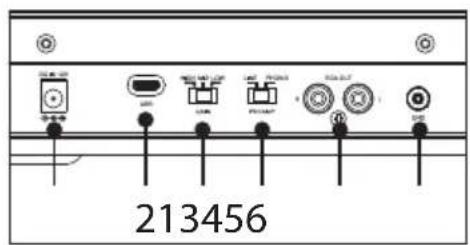
Rear panel
(Refer to 2 on page 1)
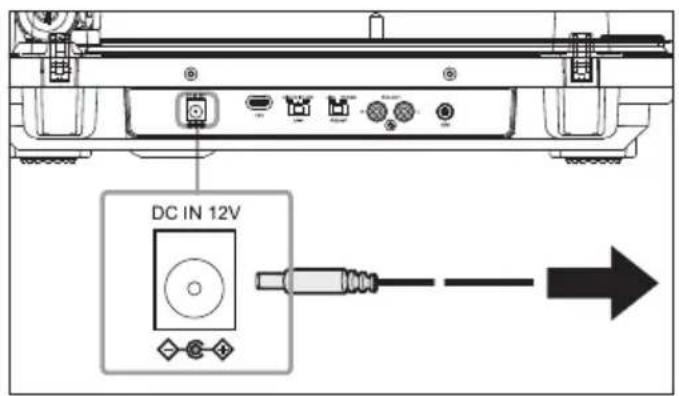
- DC IN 12V - Socket for connecting power adapter (DC 12V, 1A).
- USB - Connect a USB-C cable to a PC to enable real-time recording.
- GAIN SELECT Switch - If the record is recorded quietly, set volume adjustment to HIGH.
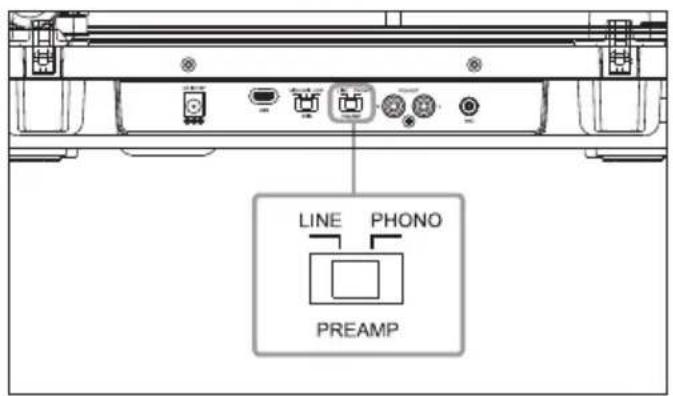
If the record is recorded loudly, HIGH setting may cause distortion. Select volume setting appropriate to the record for correct playback level. - PREAMP Switch - If using an amplifier with a PHONO input jack, set this switch to the PHONO position. If connecting to the AUX jack of an amplifier, set this switch to the LINE position.
- RCA L+R output - Connect to an external audio device
- Ground Terminal - When using an external preamp, using a ground cable connect to the ground terminal on the back of the turntable and also connected to the external preamp.
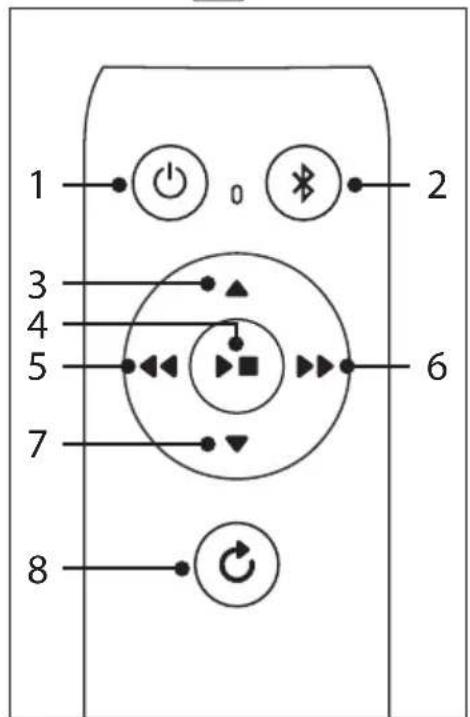
Remote Control
(Refer to 3 on page 1)
- Switch the unit between ON and STANDBY.
- ✗ – Select Bluetooth mode. Press to activate the pairing function in Bluetooth mode or disconnect the existing paired Bluetooth device.
- ▲ – Short press to raise the tonearm.
- ▶■ – Short press to begin or stop playback.
- ◀◀ – Skip control button. Short press to move the tonearm back one step. Press and hold to make the tonearm move until you let go.
- ▶▶ – Skip control button. Short press to move the tonearm forward one step. Press and hold to make the tonearm move until you let go.
- ▼ – Short press to lower the tonearm.
- ⬇ - Short press to enable or disable the repeat mode.
Battery installation
- To open the battery compartment, push your thumb down on to the battery compartment cover and slide it down.
- Fit two AAA batteries observing polarity +/- as shown. When replacing the batteries, use only the same type of battery supplied.
- Re-fit the battery cover and clip it in place.
Assembling the turntable
Your RP-TT100 ships with a protective cover over the stylus. Leave this cover on as you assemble your turntable.
- Do not connect your turntable to a power outlet with the AC adaptor until you are finished with assembly.
- The stylus is a high precision component. Do not touch the stylus while handling it.
- Touching the stylus with your fingers, or banging the stylus into the platter may cause damage to the stylus.
- Once assembled, remove the stylus cover and keep in a safe place.
Precautions on placement
- Position the turntable on a stable, level surface.
- Do not place the unit near electrical appliances such as televisions, hair dryers, or fluorescent lights, as these may introduce unwanted hum or noise.
- Avoid locations subject to vibrations from speakers, door slams, or similar disturbances.
- Ensure the unit is placed at a distance from devices that emit radio waves or electromagnetic interference.
Attaching the platter
- Fit the Platter
(Refer to 4 - Step 1 on page 2)
Carefully place the platter (A) onto the spindle, ensuring it stays level as you lower it. The motor pulley (B) should be visible through the rectangular hole in the platter.
NOTE:
ū Always hold the platter securely while handling. Dropping it could cause injury or damage to the turntable.
- Locate the Motor pulley
(Refer to 4 - Step 2 on page 2)
You may need to slowly rotate the platter until the motor pulley (A) is visible through the opening in the platter, with the tips of the red ribbon (B) also exposed.
- Attach the Drive Belt
(Refer to 4 - Step 3 on page 2)
Gently peel off the adhesive tape (A) and pull the red ribbon (B) to
access the belt. While holding the ribbon, carefully loop the drive belt around the motor pulley.
NOTES:
ū Ensure the belt is not twisted. A twisted belt can cause speed instability and stop the platter from rotating properly.
ū Do not overstretch the belt. Excessive tension can degrade its quality, leading to unstable playback and pitch fluctuations.
ü If the belt slips off the platter's inner rim during this process, remove the platter, turn it upside down, and reposition the belt evenly around the inner circle before starting again.
ū Once the belt is properly secured around the motor pulley, remove the red ribbon completely.
ū While the red ribbon is designed to assist with setup, it is no longer needed once the platter is in place.
- Place the rubber platter mat on top of the platter. Remove the twist tie and foam block securing the tonearm. Please retain these in case you need to move the turntable.
- To complete setup, make all the required connections as instructed in the "Connections" section. Once complete, power on the turntable and initialise the tonearm and platter mechanisms.
- Press the ◆ button on the unit or remote control to raise the tonearm.
- Manually rotate the platter clockwise 10 full turns to stabilise its movement.
- Press the ◆ button on the unit or remote control to lower the tonearm.
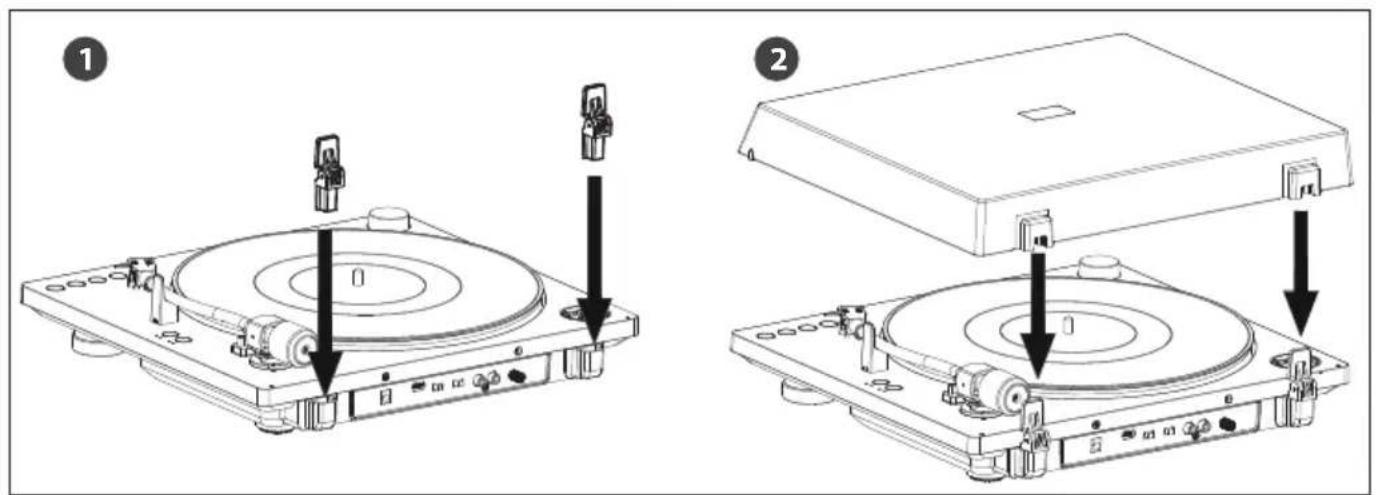
Attaching the dust cover
- Insert the Hinges
(Refer to 5 - Step 1 on page 2)
Insert the supplied dust cover hinges into the corresponding hinge pockets of the record player. Ensure they are fully seated.
- Attach the dust cover to the turntable.
Align the hinge pockets on the dust cover. Gently push the dust cover downward until it clicks into place.
NOTE:
ū To remove the dust cover, fully open it, hold both sides near the bottom, and gently lift it upwards to release it from the hinge pockets.
To move your turntable after assembly
- Place the tonearm onto the tonearm rest and retain it gently with the twist tie (if retained) or a piece of string.
- Attach the protective cover over the stylus.
- Remove the platter.
Connections
Connecting via RCA Audio Cable
- Connect the RCA Audio Cable
Use a high quality, shielded RCA audio cable to connect the RCA L+R output of the turntable to your audio device. The white RCA connector inserts into the white input jack (L), and the red RCA connector inserts into the red input jack (R). Connect to your external audio device via either a PHONO or LINE input.
- Select the PREAMP
(Refer to 7 on page 2)
A. If the external audio device has a PHONO input jack (connected to the PHONO input jack) Set the PREAMP switch to PHONO.
In this configuration, an audio signal from the cartridge bypasses the turntable's built-in preamp. The external device is used instead.
B. If the audio device does not have a PHONO input jack, set the PREAMP switch to LINE.
In this configuration, an audio signal from the cartridge uses the turntable's built-in preamp.
NOTE:
ū Ensure the RCA plugs are inserted firmly into their respective jacks. Loose connections may cause noise, drop-outs, or degraded audio quality.
NOTES:
ü If you're using Bluetooth only and have disconnected the RCA audio cable from your external device, make sure the metal tips of the cable do not touch each other or any metal surfaces (such as racks or casing). To use the turntable in Bluetooth mode, set the PREAMP switch to LINE.
ü If you connect the RCA cable to a PHONO input but leave the PREAMP switch set to LINE, the output may be extremely loud and could damage your amplifier or speakers.
Always set the switch to PHONO when using a PHONO input.
ü If you connect the RCA cable to an analogue input (such as AUX or LINE IN) but set the PREAMP switch to PHONO, the output will be very quiet. Always set the switch to LINE when using a standard analogue input.
- Connect the AC adapter.
(Refer to 6 on page 2)
NOTE:
ū To avoid noise interference, place the AC adaptor body away from your turntable as far as possible.
Bluetooth operation
When connecting your turntable to a Bluetooth playback device for the first time, allow up to one minute for the connection process. Please ensure you turn your speakers on first before starting the connection process.
- Place the playback device (that supports Bluetooth wireless technology) as close as possible to the turntable.
- Press the ✗ button on the unit or the remote control to enter Bluetooth pairing mode.
The ✗ button on the unit will light up white and begin flashing while pairing.
- Activate pairing mode on the Bluetooth playback device you wish to connect. Once the connection is successful, the ✗ button will stop flashing and remain steadily lit.
ü If the playback device is already connected to another source (such as a phone or computer), disconnect or unpair it from that device before attempting to connect to the turntable.
NOTE:
ü If you are only using the Bluetooth connection and not connecting the turntable to another device using the RCA audio cable, set the PREAMP switch on the back of the turntable to LINE.
4. To disconnect from the paired device, press the ✗ button on the unit or the remote control.
If you cannot pair devices
ü If multiple Bluetooth-enabled playback devices are nearby, some may connect automatically even if they are not the intended device. Disable Bluetooth on those devices and try pairing again.
ü If an unintended device connects during pairing, adjust that device's settings to prevent automatic Bluetooth wake-up, or turn it off and retry pairing.
Listening to a vinyl record
Follow these steps to play a vinyl record using your turntable.
If this is your first time playing a vinyl, make sure you have initialised your turntable by following the steps in step 5 of section "Assembling the turntable".
- Place a vinyl record on the platter. To play a 7-inch (17 cm) vinyl record (EP), place the supplied 45 RPM adapter on the spindle.
- Select the rotation speed.
Press the RPM button on the unit to toggle between 331/3 RPM and 45 RPM.
The corresponding indicator will light up..
- Select the record size.
Press the SIZE button on the unit to choose between 7-inch and 12-inch record sizes.
The corresponding indicator will light up.
- Remove the stylus protective cover.
- Press the ▶■ button on the unit or remote control.
The tonearm will automatically descend to the correct starting position (based on the selected size), and playback will begin. - Adjust the volume using your connected audio device.
Stopping or Pausing Playback
ū To stop playback, press th▶■ button. The tonearm will return to the tonearm rest, and the platter will stop.
ū To pause playback, press the button. The tonearm will lift from the record, but the platter will continue spinning.
ū When playback reaches the end, the tonearm will return to the tonearm rest automatically, and the platter will stop rotating.
Repeat Playback
Press the ⬇ button to toggle repeat mode on or off.
ū When repeat mode is active, the record will automatically replay from the beginning after playback ends.
ū The backlight of the REPEAT icon will light up white while repeat mode is active.
Fast Forward and Rewind
ū Turn the ◀/ ◀ knob on the unit once to move the tonearm one step to the left or right.
ü Short press the ◀ or button on the remote control to move the tonearm one step in the desired direction.
ū To move the tonearm continuously, hold the knob in the desired direction, or press and hold the corresponding button on the remote control. The tonearm will remain raised while moving and lower again once movement stops.
NOTE:
ū When the tonearm reaches the end of the record, it will automatically return to the tonearm rest.
Gain Select
Adjust the GAIN switch to suit the volume level of the record being played.
If the record is recorded quietly, set volume adjustment to HIGH.
If the record is recorded loudly, HIGH setting may cause distortion.
Select volume setting appropriate to the record for correct playback level.
Gain settings only affect output when the PREAMP switch is set to LINE, or when using Bluetooth.
They do not affect audio output when the PREAMP switch is set to PHONO.
Maintenance
Cleaning the stylus:
(Refer to 8 on page 3)
If dust or grime builds up on the stylus tip, clean it using the included stylus cleaning brush.
Always brush the stylus from rear to front (in the direction the record spins).
Replacing the stylus
A worn stylus not only reduces sound quality, but may also damage your records.
As a general guideline, we recommend replacing the stylus after approximately 400 hours of use.
Before replacing the stylus:
ū Disconnect the AC adapter from the power outlet.
ü Hold the headshell and cartridge body firmly during removal and installation.
To remove the old stylus:
(Refer to 9 on page 3)
Rotate the front of the stylus downward and forward to detach it.
Installing a new stylus:
(Refer to 10 on page 3)
Mount the replacement stylus onto the cartridge.
(Refer to 11 on page 3)
Gently lift the stylus until you hear a click.
(Refer to 12 on page 3)
Ensure there is no visible gap between the headshell and the cartridge.
Replacing the drive belt:
Over time, the drive belt may wear out or break. Replace it with a new belt when needed.
There is a spare drive belt included with the unit.
To replace the drive belt:
-
Turn off the turntable and any connected audio devices.
-
Unplug the AC adaptor from the power outlet.
-
Remove the rubber mat from the platter.
(Refer to 13 on page 3)
- Unhook the existing drive belt from the motor pulley.
Insert your fingers through the round holes in the platter to grip it, then lift to remove the platter.
(Refer to 14 on page 3)
-
Turn the platter upside down and remove the old drive belt.
-
Fit the new drive belt around the inner rim of the platter, ensuring it remains flat and untwisted.
To reassemble the unit, follow the steps in the "Assembling the turntable" section.
Recording to PC
You can record the audio from your vinyl records to a computer using the USB-C connection on your turntable and compatible audio recording software.
What You'll Need
ū A computer or laptop with a USB port
ū Audio recording software installed on your computer (not supplied)*
ū A USB-C to USB data cable
*Many third-party audio recording applications are available online.
For example, software like Audacity is commonly used for this purpose.
Sharp Consumer Electronics is not affiliated with or endorsed by its developers.
Connecting the Turntable to Your Computer
Plug the USB-C cable into the USB-C port on the back of the turntable.
Connect the other end of the cable to an available USB port on your computer.
Turn on the turntable using the ⏻ button.
Your computer should automatically recognise the turntable as an audio input device. It may appear as USB PnP Audio Device or a similar name, depending on your operating system.
Recording Setup in Software
Open your chosen audio recording software.
Go to the audio input or recording device settings.
Select the USB input device associated with the turntable (often listed as "USB PnP Audio Device").
Set the recording input to stereo for full-channel recording (if applicable).
Adjust the sample rate or other recording preferences as required by your software.
Start Recording
ū Place a vinyl record on the platter and begin playback using the ▶■ button.
ū Press the Record button in your software to begin capturing the audio.
ū When finished, stop the recording and save the file in your preferred format (e.g. WAV, MP3).
Troubleshooting
Vinyl record playback
The tonearm skips or skates.
ū The turntable is not level. Place it on a stable, level surface.
ū The vinyl record is dusty or scratched. Clean it with a commercial record cleaning product or replace the record.
Upon playback, the stylus drops off the edge of the record.
-
Press and hold the ⏻ button for at least 6 seconds. The tonearm will return to the tonearm rest, and the platter will stop.
-
Press play. The stylus will move from outside the record inward, towards the correct starting drop point.
-
You can repeat steps 1 and 2 up to 3 times to fine-tune the position by increments of 2 seconds.
Upon playback, the stylus lands too far into the record.
-
Press and hold the ◆ button for at least 6 seconds. The tonearm will return to the tonearm rest, and the platter will stop.
-
Press play. The stylus will move from the inside of the record outward, closer to the correct starting drop point.
-
You can repeat steps 1 to 3 up to 3 times to fine-tune the position by increments of 2 seconds.
Upon playback, the stylus is not at the default starting position.
ū Press and hold the button for at least 6 seconds. This resets the stylus to its factory-set default starting position.
You experience sound problems.
ū If the stylus is dirty, clean it using a stylus cleaning brush or cleaning fluid.
ū If the stylus is worn out, replace it with a new one.
ū If sound pitch is unstable, the drive belt may be worn or twisted. Inspect the belt and replace if necessary.
ū If the vinyl record is dusty, clean it using a commercial record cleaner.
You hear rumbling or low-frequency howling.
ū The turntable is too close to your speakers. Move it further away to avoid feedback or resonance.
You hear playback noise.
ū Ensure the PREAMP switch on the back of the turntable is set correctly.
ū If connected to a PHONO input, set the PREAMP switch to PHONO.
ū If connected to an AUX or LINE input, set the switch to LINE.
ū Mismatched settings may result in excessive noise or distortion.
The sound pitch is too high or too low.
ū The wrong rotation speed may be selected.
ü Check the record label or jacket for the correct speed and press the RPM button to select 33 1/3 RPM or 45 RPM.
ū The drive belt may be twisted or worn. Inspect and replace as needed.
The sound pitch fluctuates.
ū The stylus may be worn. Replace it.
ū The drive belt may be stretched, worn, or broken. Replace the drive belt.
The platter does not turn.
ū Ensure the AC adapter is properly connected to both the power outlet and the DC IN 12V jack on the turntable.
ū Check that the drive belt is properly looped around the motor pulley.
Playback is too quiet or distorted.
ū Verify that the PREAMP switch setting matches the type of input jack on your audio device.
Using the wrong setting can result in low or distorted output.
Bluetooth connections.
You cannot pair with a Bluetooth playback device.
ü If other nearby playback devices also have Bluetooth enabled, they may interfere with pairing. Disable Bluetooth on those devices and try again.
ü If an unintended device connects automatically, adjust its Bluetooth settings to prevent auto-connection or power it off before retrying pairing.
ū Pairing methods may vary by device. Refer to the playback device's manual if needed.
You cannot connect to a smartphone, TV, or computer.
ü The turntable's Bluetooth function is transmit-only. It can send audio to Bluetooth speakers or headphones, but it cannot receive audio data or pair with smartphones, TVs, or computers.
The Bluetooth range is limited.
ü Disconnect other electronic devices connected to the turntable or playback device to reduce interference.
ū Avoid plugging the turntable into an outlet shared with a microwave or high-interference appliance.
ū Place the turntable on a non-metal table to maximise wireless performance.
Olulised ohutusjuhised
text_image
ATTENTION RISQUE D'ÉLECTROCUTION NE PAS OUVRIR(Consultez 7 page 2)
(Consultez 6 page 2)
REMARQUE
(Consultez 8 page 3)
(Consultez 9 page 3)
(Consultez 10 page 3)
(Consultez 11 page 3)
(Consultez 12 page 3)
(Consultez 13 page 3)
(Consultez 14 page 3)
Opname-instelling in software
1. Sett inn hengsler
- Insira as Dobradiças
Sharp Consumer Electronics Poland sp. z o.o.
Ostaszewo 57B, 87-148 Lysomice, Poland
Made in China
SAU/MAN/0216 V3
www.sharpconsumer.com
SHARP