
40X-800X - Microscope National Geographic - Free user manual and instructions
Find the device manual for free 40X-800X National Geographic in PDF.

| Product type | Optical microscope |
| Brand | National Geographic |
| Model | 40X-800X |
| Magnification range | 40x to 800x |
| Eyepieces | 10x WF and 20x WF |
| Objectives | 4x, 10x, 40x |
| Illumination | LED transmitted and reflected light with selector wheel (I and II) |
| Power supply | Batteries (battery compartment, non-rechargeable) |
| Included accessories | Smartphone adapter, preparation kit (slides, coverslips, pipette, tweezers, etc.), color filter disc, magnifying glass, dimmer |
| Use | Adult supervision recommended; do not disassemble |
| Safety | Warnings: choking hazard (small parts), electrocution, explosion/fire, injury (battery acid) |
| Maintenance | Clean lenses with a soft, lint-free cloth; protect from dust and moisture |
| Warranty | 2 years (extendable upon registration) |
| Compliance | CE |
Frequently Asked Questions - 40X-800X National Geographic
User questions about 40X-800X National Geographic
0 question about this device. Answer the ones you know or ask your own.
Ask a new question about this device
Download the instructions for your Microscope in PDF format for free! Find your manual 40X-800X - National Geographic and take your electronic device back in hand. On this page are published all the documents necessary for the use of your device. 40X-800X by National Geographic.
USER MANUAL 40X-800X National Geographic
NATIONAL GEOGRAPHIC KiDS
40X-800X MIKROSKOP MICROSCOPE
DE Bedienungsanleitung
EN Operating Instructions
FR Mode d'emploi
NL Handleiding
IT Istruzioni per l'uso
ES Instrucciones de uso
PT Manual de utilização
natural_image
Black and white photo of a National Geographic microscope (no visible text or symbols on the instrument body)
BRESSER

SERVICE AND WARRANTY:

www.bresser.de/warranty_terms

MICROSCOPE GUIDE:

WARNINGS! Not suitable for children under three years. CHOKING HARZARD - small parts. PUNCTURING HAZARD - functional sharp points! LACERATING HAZARD - functional sharp edges! Keep instructions and packaging as they contain important information.
natural_image
Close-up of a hand using a screwdriver to adjust a component (no visible text or symbols)natural_image
Close-up of a microscope with labeled parts (14 and 8), no readable text or symbols beyond numbered annotationsnatural_image
Four-panel image showing a smartphone mounted on a stand, with no visible text or symbols.- Choking hazard – This product contains small parts that could be swallowed by children. This poses a choking hazard.
- Risk of electric shock – This device contains electronic components that operate via a power source (batteries). Only use the device as described in the manual, otherwise you run the risk of an electric shock.
- Risk of fire/explosion – Do not expose the device to high temperatures. Use only the recommended batteries. Do not short-circuit the device or batteries, or throw them into a fire. Excessive heat or improper could trigger a short-circuit, a fire explosion.
- Risk of chemical burn – Make sure you insert the batteries correctly. Empty or damaged batteries could cause burns if they come into contact with the skin. If necessary, wear adequate gloves for protection.
- Leaking battery acid can lead to chemical burns. Avoid contact of battery acid with skin, eyes and mucous membranes. In the event of contact, rinse the affected region immediately with a plenty of water and seek medical attention.
- Use only the recommended batteries. Do not mix old and new batteries. Always replace
weak or empty batteries with a new, complete set of batteries at full capacity. Do not use batteries from different brands, types or with different capacities. Remove the batteries from the unit if it is not to be used for a long period of time, or if the batteries are empty!
- When inserting the batteries, ensure that the polarity (+/-) is correct.
- Never recharge normal, non-rechargeable batteries. This could lead to explosion during the charging process.
- Rechargeable batteries are only to be charged under adult supervision.
- Rechargeable batteries are to be removed from the toy before being charged.
Handling The terminals must not be short-circuited.
Do not disassemble the device. In the event of a defect, please contact your dealer. The dealer will contact the Service Centre and can send the device in to be repaired, if necessary.
- Tools with sharp edges are often used when working with this device. Because there is a risk of injury from such tools, store this device and all tools and accessories in a location that is out of the reach of children.
- Keep instructions and packaging as they contain important information.
DISPOSAL
Dispose of the packaging materials properly, according to their type (paper, cardboard, etc). Contact your local waste disposal service or environmental authority for information on the proper disposal.

Do not dispose of electronic devices in the household garbage!
As per the Directive 2012/19/EC of the European Parliament on waste electrical and electronic equipment and its adaptation into German law, used electronic devices must be collected separately and recycled in an environmentally friendly manner.
Empty old batteries must be disposed of at battery collection points by the consumer. You can find out more information about the disposal of devices or batteries produced after 01.06.2006 from your local waste disposal service or environmental authority.
In accordance with the regulations concerning batteries and rechargeable batteries, disposing of them in the normal household waste is explicitly forbidden. Please pay attention to dispose of your used batteries as required by law - at a local collection point or in the retail market (a disposal in domestic waste violates the Battery Directive).
Batteries that contain toxins are marked with a sign and a chemical symbol. „Cd“ = cadmium, „Hg“ = mercury, „Pb“ = lead.

Cd^1Hg^2Pb^3
^1 battery contains cadmium
^2 battery contains mercury
^3 battery contains lead
EC Declaration of Conformity
CE Bresser GmbH has issued a "Declaration of Conformity" in accordance with applicable guidelines and corresponding standards. The full text of the EU declaration of conformity is available at the following internet address:
www.bresser.de/download/9039500/CE/9039500_CE.pdf
UKCA Declaration of Conformity
UK Bresser GmbH has issued a „Declaration of Conformity“ in accordance with applicable guidelines and
corresponding standards. The full text of the UKCA declaration of conformity is available at the following internet address: www.bresser.de/download/9039500/UKCA/9039500_UKCA.pdf
Bresser UK Ltd. • Suite 3G, Eden House, Enterprise Way • Edenbridge, Kent TN8 6HF, Great Britain
Here are the parts of your microscope
1 10x WF Eyepiece
2 20x WF Eyepiece
3 Eyepiece supports
4 Objective Nosepiece
5 Objective
6 Clips
7 Microscope Stage
8 LED Illumination (transmitted light)
9 Microscope Base
10 Battery compartment
11 Focus knob
12 Selection switch for Illumination
13 LED Illumination (reflected light)
14 Slides, Cover Sips and Prepared Specimens plastic box
15 Empty Bottles
16 Specimens:
a) Yeast
b) Shrimp Eggs
17 Specimen slicer
18 Hatchery
19 Test tube
20 Tweeze
21 Dissecting needle
22 Dissecting knife
23 Pipette
24 Cover glasses and adhesive labels
25 Petri dish
26 Magnifying glass
27 Color Filter wheel
28 Smartphone holder
29 Dimmer
How do I use my microscope?
Before you assemble your microscope, make sure that the table, desk or whatever surface that you want to place it on is stable, and does not wobble.
How do I operate the electric LED illumination?
natural_image
Close-up of a hand holding a screwdriver inserted into a black electronic device (no visible text or symbols)In the base of the microscope there is a battery compartment (10). Loosen the screw at the battery compartment cover with a small Philips screwdriver and re-
move the cover. Place the batteries in the compartment so that the flat minus poles (-) press against the spring terminal and the plus poles (+) are touching the flat contact sheets.
Close the battery compartment with the cover and turn the microscope around again.
The first lamp shines onto the specimen from below and the second from above. (The thing that you want to observe with the microscope is called the object or specimen, by the way.) You can use each lamp on its own. There is a selection switch for this (12). It has two numbers: I and II. If you select the ...
I, the light only comes from below (transmitted light).
II, the light only comes from above (reflected light).
For transparent objects (transmitted-light objects), number I is best. In order to observe firm, non-transparent objects (direct-light objects), select number II.
When do I use the color filters?
The color filter wheel (27) is located below the microscope stage (7). They help you when you are observing very bright or clear specimens. Here, you can choose from various colors. This helps you better recognize the components of colorless or transparent objects (e.g. grains of starch, protozoa).
How do I adjust my microscope correctly?
Each observation starts with the lowest magnification.
Adjust the microscope stage (7) so that it goes all the way down to the lowest position (11). Then, turn the objective
nosepiece (4) until it clicks into place at the lowest magnification (objective 4x).
Note:
Before you change the objective setting, always move the microscope stage (7) to its lowest position. This way, you can avoid causing any damage!
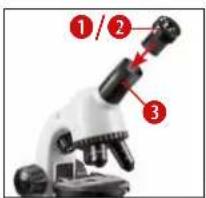
Now insert the smallest eyepiece, in this case the WF10x (1) into the eyepiece support (3).
How do I observe the specimen?
After you have assembled the microscope with the adequate illumination and adjusted it correctly, the following basic rules are to be observed:
Start with a simple observation at the lowest magnification. This way, it is easier to position the object in the middle (centering) and make the image sharp (focusing).
The higher the magnification, the you will require for a good image quality.
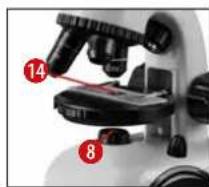
Now place the prepared specimen (14) directly under the objective on the microscope stage. The object should be located directly over the illumination (8).
In the next step, take a look through the eyepiece (1) and carefully turn the focus knob (11) until the image appears clear and sharp. If you would like an even higher level of magnification, insert the 20x eyepiece (2) and turn the objective nosepiece (4) to a higher setting (10x or 40x).
Important tip:
The highest magnification is not always best for every specimen!
Note:
Each time the magnification changes (eyepiece or objective change), the image sharpness must be readjusted with the focus knob (11). When doing this, make sure to be careful. If you move the microscope stage too quickly, the objective and the slide could come into contact and become damaged!
more light
Which light for which specimen?
With this unit, a reflected light and transmitted light microscope, you can observe transparent, semi-transparent as well as non-transparent objects.
The image of the given object of observation is "transported" through the light. As a result, only the correct light will allow you to see something!
If you are observing non-transparent (opaque) objects (e.g. small animals, plant components, stones, coins, etc.) with this microscope, the light falls on the object that is being observed. From there, the light is reflected back and passes through the objective and eyepiece (where it gets magnified) into the eye. This is reflected light microscopy.
For transparent objections (e.g. protozoa), on the other hand, the light shines from below, through the opening in the microscope stage and then through the object.
The light travels further through the objective and eyepiece, where it is also magnified, and finally goes into the eye. This is transmitted-light microscopy.
Many microorganisms in water, many plan components and the smallest animal parts are already transparent in nature. Others have to be prepared. We may make them transparent through a treatment or penetration with the right materials (media), or by taking the thinnest slices from them (using our hand or a specimen slicer), and then examine them. You
can read more about this in the following sections.
How do I make thin specimen slices?
Only do this with the supervision of your parents or another adult.
As I already pointed out, the thinnest slices possible are taken from an object. In order to get the best results, we need some wax or paraffin. It is best if you get a candle. Place the wax in a pot and heat it carefully over a low burner. Now, dip the object in the liquid wax a few times. Then, let the wax get hard. Using the Specimen slicer (17) or a knife/scalpel, cut the smallest slices from the object that is covered with wax. These slices are to be laid on a slide and covered with a cover slip.
How do I make my own specimens?
Take the object that you want to observe and place it on a glass slide (14). Then, add a few drops of distilled water on the object using a pipette. Now, place a cover slip vertically at the edge of the drop of water, so that the water runs along the edge of the cover slip. Then, slowly lower the cover slip over the water drops.


Experiments
Use the following web link to find experiments you can try out.
| Error Solution | |
| No recognizable image | Turn on lightReadjust focus |
Make sure your microscope has a long service life.
Clean the lens (objective and eyepiece) only with the cloth supplied or some other soft lint-free cloth (e.g. microfibre). Do not press hard as this might scratch the lens.
Ask your parents to help if your microscope is interesting really very dirty. The cleaning cloth should be moistened with cleaning fluid and the lens wiped clean using little pressure.
Make sure your microscope is always protected against dust and dirt. After use leave it in a warm room to dry off. Then install the dust caps and keep it in the case provided.
natural_image
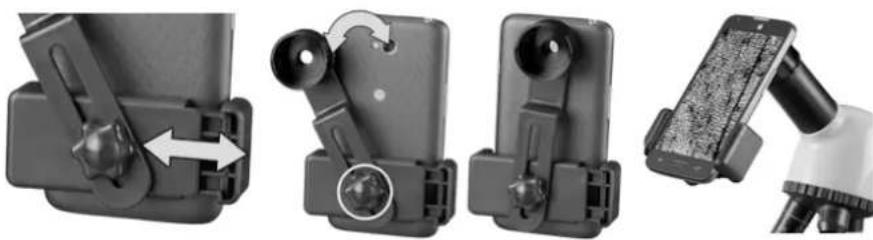
Four-panel image showing a smartphone mounted on a stand, with no visible text or symbols.Smartphone holder
Open the flexible holder and put your smartphone in it. Close the cradle and make sure your phone is properly seated. The camera must be positioned exactly above the eyepiece. Open the locking clip on the back of the holder and fit the eyepiece view exactly onto your smartphone camera. Now retighten the locking clip and attach the smartphone holder to the eyepiece of your microscope. Now start the camera app. If the image is not yet centered on your display, loosen the locking clip slightly and readjust. It may be necessary to use the zoom function to fill the image on the display. A slight shading at the edges is possible. Remove the smartphone from the cradle after use!
NOTE:
Make sure that the smartphone cannot slip off the cradle. Bresser GmbH accepts no liability for damage caused by a dropped smartphone!
Warranty
The regular warranty period is 2 years and begins on the day of purchase. To benefit from an extended voluntary warranty period as stated on the gift box, registration on our website is required.
You can consult the full warranty terms as well as information on extending the warranty period and details of our services at www.bresser.de/warranty_terms.

CONSIGNES GÉNÉRALES DE SÉCURITÉ
natural_image
Close-up of a microscope with labeled component (11), no visible text or symbols beyond the numbernatural_image
Close-up of a microscope with labeled parts (14 and 8), no readable text or symbols beyond labelsnatural_image
Two-step illustration showing a hand holding a small object with a pipette, before and after (no text or symbols)Expériences
natural_image
Four-panel image showing a smartphone mounted on a stand, with no visible text or symbols.ALGEMENE WAARSCHUWINGEN
natural_image
Close-up of a hand using a screwdriver to adjust a small component (no text or symbols visible)natural_image
Four-panel image showing a smartphone mounted on a stand, with no visible text or symbols.Smartphone houder
natural_image
Close-up of a hand using a screwdriver to adjust a component (no visible text or symbols)natural_image
Four-panel image showing a smartphone mounted on a stand, with no visible text or symbols.Supporto Smartphone
natural_image
Close-up of a hand using a screwdriver to adjust a component (no visible text or symbols)natural_image
Two-step illustration showing a hand holding a small object with a pipette, being held by another hand (no text or symbols visible)Experimentos
natural_image
Four-panel image showing a smartphone mounted on a stand, with no visible text or symbols.natural_image
Close-up of a hand using a screwdriver to adjust a component (no visible text or symbols)natural_image
Close-up of a microscope with labeled component (11), no visible text or symbols beyond the numbernatural_image
Two-step illustration showing a hand holding a small object with a pipette, before and after (no text or symbols)Experiência
natural_image
Four-panel image showing a smartphone mounted on a stand, with no visible text or symbols.Every purchase helps support the global nonprofit National Geographic Society in its work to protect and illuminate our world through exploration, research, and education.
TO LEARN MORE, VISIT NATGEO.COM/INFO
© National Geographic Partners LLC. All rights reserved. NATIONAL GEOGRAPHIC KIDS and Yellow Border Design are trademarks of National Geographic Society, used under license.
Visit our website: kids.nationalgeographic.com

BRESSER®
Bresser GmbH
Gutenbergstr. 2
46414 Rhede
Germany
www.bresser.de
info@bresser.de
Bresser UK Ltd.
Suite 3G, Eden House
Enterprise Way • Edenbridge,
Kent TN8 6HF, Great Britain
Irrtümer und technische Änderungen vorbehalten. · Errors and technical changes reserved. · Sous réserve d'erreurs et de modifications techniques. · Vergissingen en technische veranderingen voorbehouden. · Con riserva di errori e modifiche tecniche. · Queda reservada la posibilidad de incluir modificaciones o de que el texto contenga errores. · Erros e alterações técnicas reservados. Manual_9039500_Microscope_de-en-fr-nl-it-es-pt_NGKIDS_v012023a


- NATIONAL GEOGRAPHIC KiDS
- 40X-800X MIKROSKOP MICROSCOPE
- DISPOSAL
- EC Declaration of Conformity
- UKCA Declaration of Conformity
- Here are the parts of your microscope
- How do I use my microscope?
- How do I operate the electric LED illumination?
- When do I use the color filters?
- How do I adjust my microscope correctly?
- Note:
- How do I observe the specimen?
- Important tip:
- Which light for which specimen?
- How do I make thin specimen slices?
- How do I make my own specimens?
- Experiments
- Make sure your microscope has a long service life.
- Smartphone holder
- Warranty
- CONSIGNES GÉNÉRALES DE SÉCURITÉ
- Expériences
- ALGEMENE WAARSCHUWINGEN
- Smartphone houder
- Supporto Smartphone
- Experimentos
- Experiência
- BRESSER®
Brand : National Geographic
Model : 40X-800X
Category : Microscope