HT-SB123 - Soundbar SHARP - Free user manual and instructions
Find the device manual for free HT-SB123 SHARP in PDF.

| Product Type | Compact 2.0 Soundbar |
| Brand | Sharp |
| Model | HT-SB123 |
| Power Supply | AC adapter 100-240 V ~ 50/60 Hz |
| Connectivity | HDMI ARC, Bluetooth, Optical, AUX, USB |
| Functions | Preset equalizer (Voice, Movie, Sports, Game, Night, Music, Custom), bass/treble adjustment, auto standby, LED dimmer |
| Wall Mounting | Yes (kit included) |
| Maintenance | Soft dry cloth, vacuum cleaner with soft brush |
| Safety | Safety instructions included; do not open, do not expose to water |
| Package Contents | Soundbar, remote control (AAA batteries included), AC adapter, wall mounting kit, documentation |
| USB Audio Formats | MP3, WAV |
| Remote Control | Yes, range 6 m, AAA batteries (type supplied) |
| Bluetooth | Pairing, typical range 10 m |
| Auto Standby | After 15 minutes without signal (Optical, Bluetooth, Audio In) |
Frequently Asked Questions - HT-SB123 SHARP
User questions about HT-SB123 SHARP
0 question about this device. Answer the ones you know or ask your own.
Ask a new question about this device
Download the instructions for your Soundbar in PDF format for free! Find your manual HT-SB123 - SHARP and take your electronic device back in hand. On this page are published all the documents necessary for the use of your device. HT-SB123 by SHARP.
USER MANUAL HT-SB123 SHARP
natural_image
Black rectangular audio streaming device with a remote control unit beside it (no visible text or symbols)User manual
HT-SB121, HT-SB123
Compact 2.0 Soundbar

Product images are for illustration purposes only. Actual product may vary.
Trademarks:

The terms HDMI, HDMI High-Definition Multimedia Interface, HDMI Trade dress and the HDMI Logos are trademarks or registered trademarks of HDMI Licensing Administrator, Inc.

Bluetooth®
The Bluetooth ^® word mark and logos are registered trademarks owned by Bluetooth SIG, Inc. and any use of such marks by Sharp Consumer Electronics is under license. Other trademarks and trade names are those of their respective owners.

Roku TV, Roku TV Ready, and the Roku TV Ready logo are trademarks of Roku, Inc.
This product is Roku TV Ready-supported in the United Kingdom. Countries are subject to change. For the most current list of countries in which this product is Roku TV Ready-supported, please email rokutvready@roku.com
ENGLISH
Important safety instructions
Please follow all safety instructions and warnings. Keep this manual for reference.

Consult user manual for safety, operation, and maintenance information.

Class II equipment: Double insulation, no need for electrical earth (ground) connection.

Alternating current (AC): Voltage marked is AC. Direct current (DC): Voltage marked is DC.

Indoor use only.
Energy efficiency marking with level VI

Polarity of d.c. power connector
Precautions
Damage
Inspect the product after unpacking; if damaged, do not use and consult your dealer.
User should not attempt repair nor expose the internal parts; this action can be hazardous and will void your warranty. Contact only authorised service centers for repairs.
Power connection and accessibility
- Do not handle the power cord with wet hands. Do not force the plug into the outlet. Turn off and unplug the product when not in use. Keep the power plug accessible, without using extension cables.
Power source
- Use only AC 100-240V 50/60Hz outlets. Higher voltages can cause malfunction or fire.
- The AC power adapter should be removed from the power outlet if not in use for an extended period of time.
- Only use the supplied mains adapter. Failure to do this may result in a safety risk and/or damage to the product.
Power source
- Use only AC 100-240V 50/60Hz outlets. Higher voltages can cause malfunction or fire.
Power cord protection
- Protect the power cord from damage; do not overload, stretch, or bend it. If damaged, it can result in fire or electric shock. Damaged cords must be replaced by the manufacturer or a qualified technician.
Fused moulded power plug (non-rewireable) - UK, Malta, Cyprus and Ireland only.
- The power lead includes a 3A Amp fuse. Replace only with a BS1362 approved fuse of the same rating.
Child safety
- Use basic safety precautions around children to prevent misuse of the product.
Location
- Place on a flat, stable surface without overhang. If wall mountable, refer to the wall-mounting instructions in this user manual.
Ventilation
- Do not block, cover or insert objects into the ventilation slots. Do not insert objects into the product's openings. Doing so may result in a safety risk and/or damage to the product. Ensure a minimum distance of 5 cm around the product for sufficient ventilation to avoid overheating.
Heat and operating temperature
- Do not place the product near heat sources or direct sunlight for prolonged periods.
Naked flames
- Keep open flames away from the product to prevent fire.
Water, moisture, and liquid entry
- Do not expose the product to liquids; keep away from rain, water, and objects filled with liquids to prevent fire or electric shock.
Storms and lightning
- Disconnect all cables during storms or lightning to prevent damage.
Maintenance
- Disconnect power cords from the product before cleaning and use a soft, dry cloth without chemicals or detergents. If using a vacuum cleaner, use the soft brush attachment.
Batteries
Installation
- Use only specified batteries; do not mix types or new with old. Use the correct polarity upon battery insertion.
Use and maintenance
- Keep batteries away from heat, such as near fire or in direct sunshine. Remove batteries if unused for over a month to prevent leaking. Replace leaking batteries inside the battery compartment.
Child safety
- Ensure battery compartment is secure. Keep batteries away from children's reach. Seek immediate medical help if swallowed.
Environmental conditions
- Keep batteries away from low pressure or high heat to avoid explosion or leakage.
Disposal
- Dispose of the battery pack according to the manual (see "Disposal: equipment and batteries"). Do not throw into fire, disassemble or recharge non-rechargeable batteries, as it may leak or explode.
Disposal: equipment and batteries
Information for users on collection and disposal of old equipment.
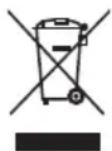
Symbol indicates product contains batteries per EU Directive 2023/1542/EU; cannot be disposed with household waste. Cd, Hg, or Pb shows battery contains cadmium, mercury, or lead.

This symbol means that the product is designed and manufactured so that it can be recycled and reused.
These symbols on the products, packaging, and/or accompanying documents mean that used electrical and electronic products and batteries should not be mixed with general household waste. Household users should contact either the retailer where they purchased this product, or their local government office, for details of where and how they can take these items for environmentally safe recycling.
CE and UKCA statement:
- Hereby, Sharp Consumer Electronics Poland sp. z o.o. declares that this audio device is in compliance with the essential requirements and other relevant provisions of RED Directive 2014/53/EU and UK Radio Equipment Regulations 2017.
- The full CE text and UKCA declaration of conformity are available at sharpconsumer.com and then entering download section of your model and choosing "Declaration of Conformity".
What is included in the box:
• HT-SB121 / HT-SB123 Compact 2.0 Soundbar
- Remote control (inc. batteries)
- Power adapter
- 2 pin (type C) plug adapter
• 3 pin (type G) plug adapter (HT-SB121 only)
- Wall-mount kit
- User documentation
Controls
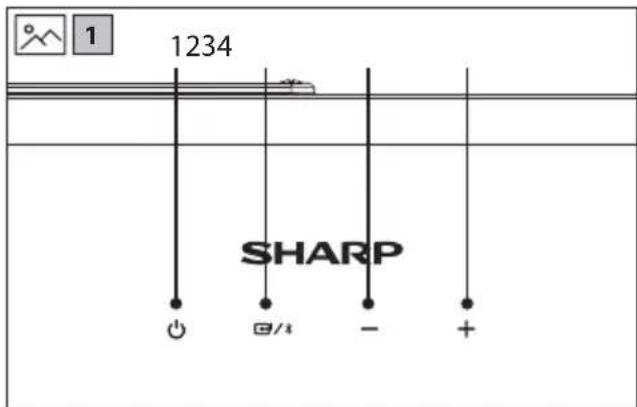
(Refer to 1 on page 2)
- ⏻- Switch the unit between ON and STANDBY.
- Select the audio source (TV (HDMI), Bluetooth, Optical, Aux in or USB).
- — - Volume down.
- +Volume up.
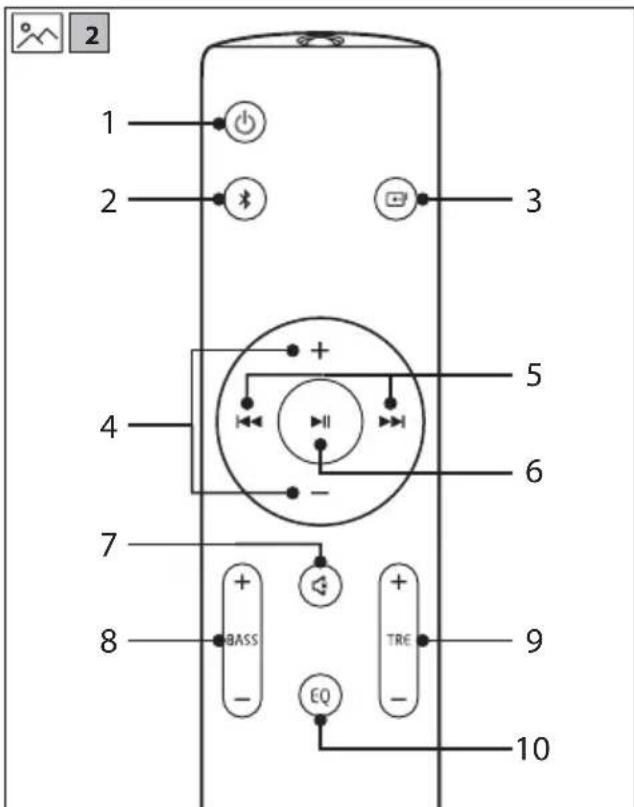
(Refer to 📋 2 on page 2).
- ⏻ – Switch the unit between ON and STANDBY mode.
- Select Bluetooth mode. Press and hold to activate the pairing function in Bluetooth mode or disconnect the existing paired Bluetooth device.
- ☐ – Press to select the audio source (HDMI ARC, OPTICAL, BLUETOOTH, AUX IN and USB).
- +/− Increase/decrease the volume level.
- /◀◀◀◀◀ previous/next track in Bluetooth or USB mode.
- -Play/pause/resume playback in Bluetooth or USB mode.
- ✕ – Mute or resume the sound.
- BASS Adjust bass level. This only changes custom EQ settings.
- TRE +/- =Adjust treble level. This only changes custom EQ settings.
- EQ – Press repeatedly to switch between EQ off, voice, movie, sport, game, night, music and custom equaliser modes.
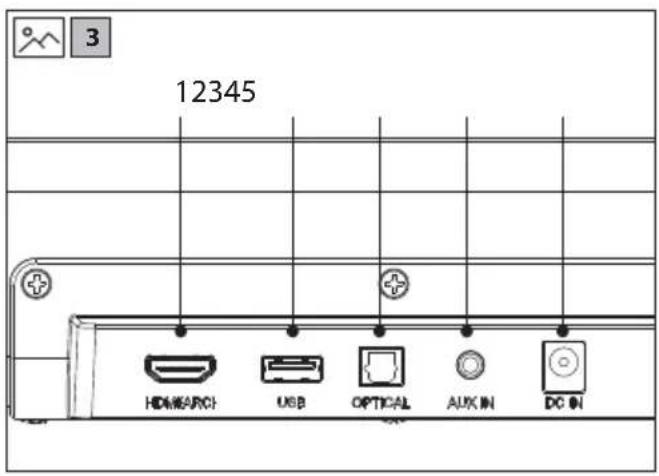
Inputs/outputs
(Refer to 3 on page 3).
- HDMI (ARC)
Connect to a TV via HDMI cable (HDMI version 1.4 or higher). -
USB
Insert USB flash drive to play music. -
OPTICAL
Optical input jack.
- AUX IN
Connect to an external audio device.
- DC IN
Connect power cable.
Initial set up
Remote control operation
The provided remote control allows the unit to be operated from a distance.
- Even if the remote control is operated within the effective range of 6m, operation may be impossible if there are any obstacles between the unit and the remote control.
- If the remote control is operated near other products which generate infrared rays, or if other remote control devices using infrared rays are used near the unit, it may operate incorrectly. Conversely, the other products may operate incorrectly.
Battery installation
- To open the battery compartment, push your thumb down on to the battery compartment cover and slide it down.
- Fit two AAA batteries observing polarity +/- as shown. When replacing the batteries, use only the same type of battery supplied.
- Re-fit the battery cover and clip it in place.
First time installation
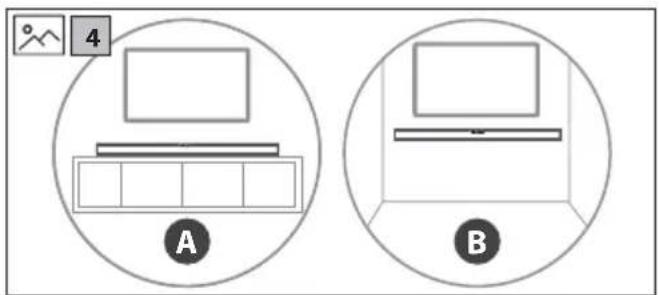
Placement and mounting
(Refer to 4 on page 3).
A: Normal placement
B: Wall mounting
Wall mounting
NOTES:
ü Installation must be carried out by qualified personnel only. Incorrect assembly can result in severe personal injury and property damage (if you intend to install this product yourself, you must check for installations such as electrical wiring and plumbing that may be buried inside the wall). It is the installer's responsibility to verify that the wall will safely support the total load of the soundbar and wall brackets.
ü Additional tools (not included) are required for the installation.
ū Do not overtighten screws.
ū Keep this instruction manual for future reference.
ū Use an electronic stud finder to check the wall type before drilling and mounting.
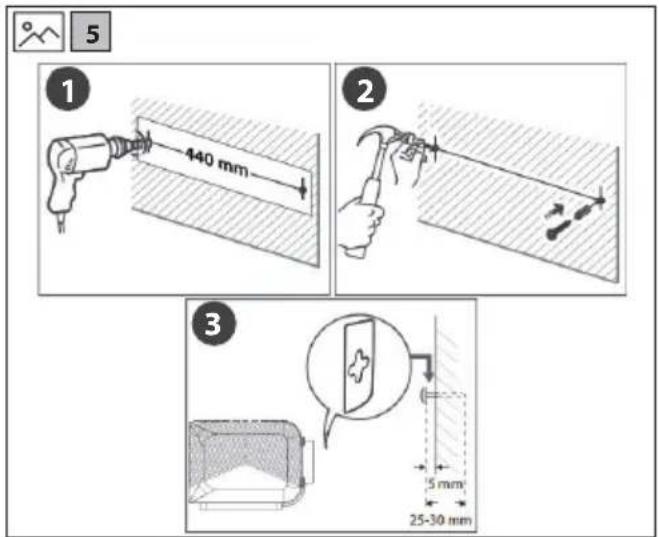
(Refer to 5 on page 3).
- Drill 2 parallel holes into the wall (∅ 5.5-6 mm each according to the wall type). The distance between the holes should be 440 mm.
- Firmly fix 1 plug into each hole in the wall. Screw in the supplied screw into the plug ensuring you leave a 5 mm gap between the screw head and the wall.
- Align the mounting bracket holes over the screw heads, then slide the unit down to secure it in place.
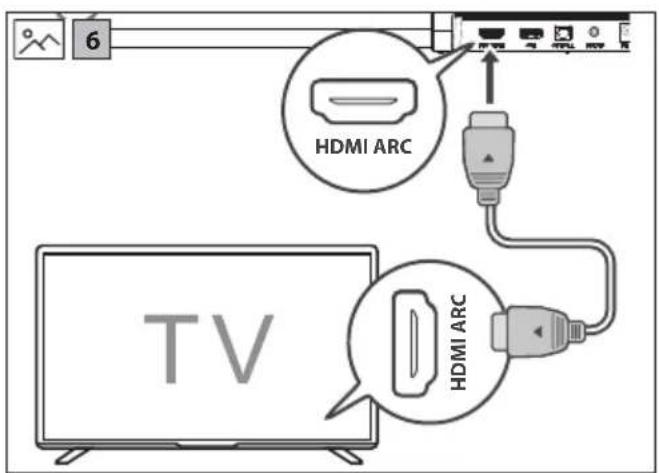
HDMI ARC
(Refer to 6 on page 3).
The ARC (Audio Return Channel) function allows you to send audio from your ARC-compliant TV to your unit through a single HDMI connection. To enjoy the ARC function, please ensure your TV is both HDMI-CEC and ARC compliant and set up accordingly. When correctly set up, you can use your TV remote control to adjust the volume output (+/- and ⏻) of the soundbar.
- Connect the HDMI cable (not included) from the unit's HDMI (ARC) socket to the HDMI (ARC) socket on your ARC compliant TV.
TIPS:
ū Your TV must support the HDMI-CEC and ARC function and this must be set to "ON" or "ACTIVE" in the TV settings menu.
ū The setting method of HDMI-CEC and ARC may differ depending on the TV. For details about ARC function, please refer to your TV manual.
ū Only HDMI cables of version 1.4 or higher can support the ARC function.
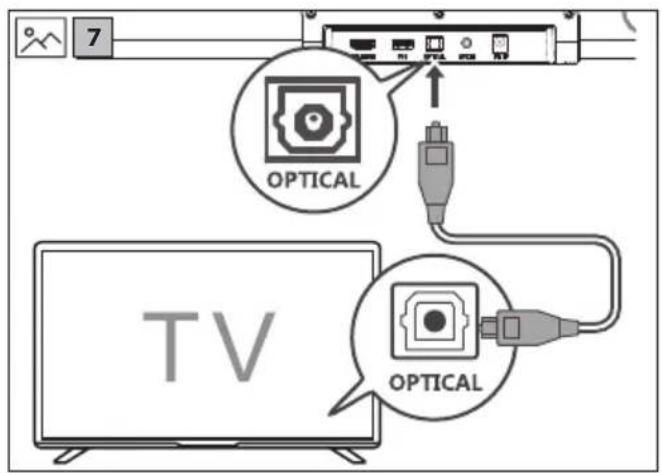
Optical
(Refer to 7 on page 3).
- Connect an OPTICAL cable (not included) to the TV's OPTICAL OUT socket and the OPTICAL socket on the unit.
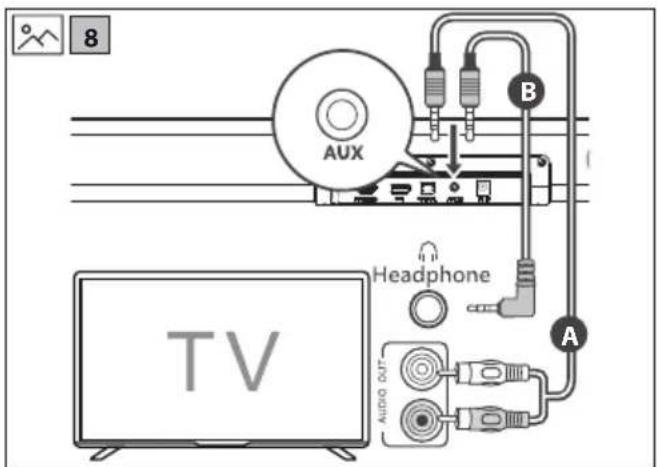
Aux in
(Refer to 8 on page 3).
A:
Use a RCA to 3.5mm audio cable (not included) to connect the TV's or external audio device's audio output sockets to the AUDIO IN socket on the unit.
B: Use a 3.5mm to 3.5mm audio cable (not included) to connect the TV's or external audio device headphone socket to the AUDIO IN socket on the unit.
TIP:
ū When you use the headphone output on the TV set, you will be able to adjust the volume level directly using the TV remote control.
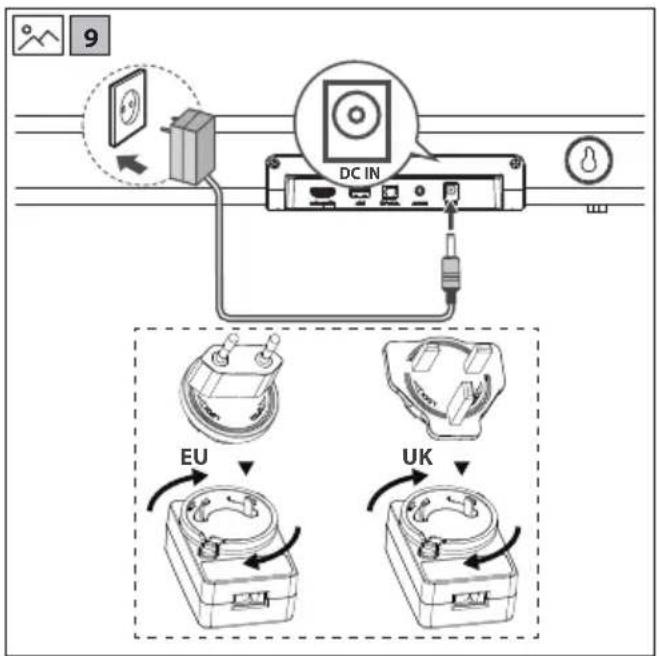
Connect to power
(Refer to 9 on page 3).
- Before connecting the power cable, ensure you have completed all other connections.
Risk of product damage!
- Ensure that the power supply voltage corresponds to the voltage printed on the back of the unit.
- Before connecting the DC adapter, ensure you have completed all other connections.
Soundbar
- Connect the adapter to the DC socket of the soundbar and then into a mains socket.
Basic operation
Standby/ON
- When you first connect the unit to the power socket, the unit will be in STANDBY mode.
- Press ⏻ on the remote control or the unit to switch the unit ON or OFF.
- Disconnect the plug from the power wall socket if you want to switch the unit off completely.
Change source
- Short press to-change between HDMI ARC, OPTICAL, BLUE-TOOTH, AUX IN and USB. The units LED will light up as shown below to signal which source is selected.
| SOURCE LED COLOUR | |
| HDMI (ARC) Cyan | |
| OPTICAL Yellow | |
| BLUETOOTH Blue | |
| AUX IN Green | |
| USB Purple |
Volume control
- Press the + buttons on the unit or on the remote control to adjust the volume.
- If you wish to turn the sound off, press 📁 on the remote control. Press 📁 again or press the Ⓧ on the unit or on the remote control to resume normal listening.
- While adjusting the volume, the LED will flash quickly. When maximum or minimum volume levels are achieved, the flashing will stop.
- With HDMI CEC control, you can use your TV remote to increase/decrease the volume.
Equaliser
During playback, press the EQ button on the remote control to cycle through the preset equaliser modes. Each time you press the button, the unit's LED will blink a specific colour to indicate the selected mode, as shown below:
| EQUALISER LED COLOUR | |
| EQ OFF Off | |
| VOICE Cyan | |
| MOVIE Purple | |
| SPORT Blue | |
| GAME Yellow | |
| NIGHT Red | |
| MUSIC Green | |
| CUSTOM White |
Adjust Bass and treble
Press BASS+/ or TREBLE / + on the remote control to enter Custom EQ mode.
- The white LED will blink twice to indicate Custom EQ mode is active.
- The LED will then show the current value of Bass or Treble:
| Custom EQ Level LED COLOUR | |
| +3 Red – fast blink | |
| +2 Red – medium blink | |
| +1 Red – slow blink | |
| 0 White - Steady | |
| -1 Green – slow blink | |
| -2 Green – medium blink | |
| -3 Green – fast blink |
While the LED is displaying the current value (within 3 seconds), press the same button again to adjust the setting.
If no button is pressed within 3 seconds, the current value is saved.
- The white LED will blink twice (1.5 seconds total) to confirm the new value has been saved.
• The unit will return to normal operation.
Auto standby
By default, the unit will go into standby if no signal is detected for 15 minutes on Optical, Bluetooth and Audio In sources. To turn auto-standby on or off, long press the ⏻ for 5 seconds when the unit is on.
| AUTO-STANDBY LED COLOUR | |
| OFF | Red – blinks 3 times |
| ON | Green – blinks 3 times |
LED dimmer
After performing an operation on the soundbar, the LED will dim. You can toggle the behaviour of the LED to OFF or DIMMED. The default is DIMMED.
To make the LED turn OFF after an operation:
- Press ☐ on the unit or remote control to select HDMI (ARC) source.
- Quickly press the ▶ button on the remote control. The LED will blink red two times. Wait ten seconds, making sure not to press any other buttons on the unit or remote control.
- The units LED will now turn OFF after performing an operation.
To make the LED DIMMED after an operation:
- Press ☐ on the unit or remote control to select HDMI (ARC) source.
- Quickly press the ▶ button on the remote control. The LED will blink green two times. Wait ten seconds, making sure not to press any other buttons on the unit or remote control.
- The units LED will now be DIMMED after performing an operation.
Roku TV™ Ready operation
For UK only.
If you have a Roku TV™ model, setup is easy. Just use a cable to connect your soundbar to the HDMI ARC port on your TV and follow the on-screen instructions.

√ Simple setup
√ One remote
√ Quick settings
Bluetooth operation
The first time you connect your Bluetooth device to this player, you need to pair your device to this player.
NOTE:
ū Compatibility with all Bluetooth devices is not guaranteed.
ū Any obstacle between this unit and a Bluetooth device can reduce the operational range.
ü If the signal strength is weak, your unit may disconnect, but it will re-enter pairing mode automatically.
- Press the button to select Bluetooth. The LED will turn blue and start blinking.
-
Activate your Bluetooth device and select the search mode. "SHARP HT-SB121" or "SHARP HT-SB123" will appear on your Bluetooth device list.
-
Select "SHARP HT-SB121" or "SHARP HT-SB123" from the list of devices. Once connected, the LED will turn solid blue.
-
Begin playing music from the connected Bluetooth device.
-
To pause or resume play, press the ▶/|| button on the remote control.
- To skip to the previous/next file, press the ◀◀◀ / 🔍️ buttons on the remote control.
- Some mobile device applications will not allow you to press and hold ◀◀◀/▶◀skip parts of a track.
NOTE:
ū To unpair a device, long press (3 seconds) the button on the unit or the on the remote control to start the pairing process.
USB operation
- Insert the USB device into the soundbar's USB socket.
- Press the ⏻ button repeatedly on the soundbar or the remote control to select the USB sourc.
- Press ▶ to play the selected track.
- During playback:
ü To pause or resume play, press th ▶ button on the remote control. ü To skip to the previous/next file, press the ◀◀ / buttons on the remote control. Press and hold ◀◀ / fast rewind / fast forward a track.
TIPS:
ü USB devices up to 64GB are supported. ü Only MP3/WAV files can be played back.
The USB port is for playback or upgrading the software of the soundbar. It is not for charging purposes.
Troubleshooting
Perform a factory reset
To perform a factory reset, press and hold the ⏻ and the ⓝ on the unit for 5 seconds. When complete, the unit will go into standby.
No power
Ensure that the plug is properly connected.
Ensure that there is power at the AC outlet.
Press standby button on the remote control or unit to turn the unit ON.
No sound
For HDMI ARC to work, ensure you are using a version 1.4 or higher HDMI cable.
Increase the volume. Press + on the remote control or on the unit.
Press 📧 on the remote control to ensure the unit is not muted.
Press ⏻/✗ to select a different input source.
When connected to a digital source (HDMI or Optical), if there is no audio:
- Try setting the TV output to PCM or your TV may be set to variable audio output. Confirm that the audio output setting is set to FIXED or STANDARD, not VARIABLE. Consult your TV's user manual for more detailed information.
If using Bluetooth, ensure that the volume on your source device is turned up and that the device is not muted.
Remote control does not work
Before you press any playback control button, first select the correct source.
Reduce the distance between the remote control and the unit.
Insert the battery with its polarities (+/-) aligned as indicated.
Replace the battery.
Aim the remote control directly at the sensor on the front of the unit.
I hear buzzing or humming
Ensure all cables and wires are securely connected.
Connect a different source device to see if the buzzing persists. If it does not, the problem may be with the original device.
Connect your device to a different input on the unit.
I can't find the Bluetooth name of this unit on my Bluetooth device
Ensure the Bluetooth function is activated on your Bluetooth device. Re-pair the unit with your Bluetooth device.
This device is set to standby after 15 minutes of no source signal.
When the unit's external input signal level is too low, the unit will be turned off automatically in 15 minutes. Please increase the volume level of your external device. This feature is a requirement of ERPII and is designed to save energy when the unit is not in use.
БЪЛГАРСКИ
√ Simple setup
√ One remote
√ Quick settings
Bluetooth операция
√ Simple setup
√ One remote
√ Quick settings
Obsluha Bluetooth
Roku TV™ Ready operation
Kun for UK.
√ Simple setup
√ One remote
√ Quick settings
Bluetooth anvendelse
√ Simple setup
√ One remote
√ Quick settings
Bluetooth-Betrieb
√ Simple setup
√ One remote
√ Quick settings
√ Simple setup
√ One remote
√ Quick settings
Olulised ohutusjuhised
√ Simple setup
√ One remote
√ Quick settings
Bluetoothi kasutamine
√ Simple setup
√ One remote
√ Quick settings
Bluetooth-käyttö
√ Simple setup
√ One remote
√ Quick settings
Fonction Bluetooth
√ Simple setup
√ One remote
√ Quick settings
Upotreba funkcije Bluetooth
Bluetooth uređaj je prije prve upotrebe uz ovaj Soundbar potrebno upariti sa Soundbarom.
UPOZORENJE:
ū Ne jamčimo kompatibilnost sa svim Bluetooth uređajima.
ū Bilo kakve prepreke između ove jedinice i Bluetooth uređaja mogu smanjiti radni domet.
ū Ako je jačina signala slaba, vaš uredaj može se automatski prekinuti, ali će ponovno ući u način rada za uparivanje.
- Pritisnite tipku za odabir Bluetooth veze. LED će zasvijetliti plavo i početi treptati..
-
Aktivirajte Bluetooth uređaj i odaberite način pretraživanja. "SHARP HT-SB121" ili "SHARP HT-SB123" će se pojaviti na popisu Bluetooth uređaja.
-
Odaberite "SHARP HT-SB121" ili "SHARP HT-SB123" s popisa uređaja. Nakon povezivanja, LED će postati neprekidno plava.
-
Pokrenite reprodukciju glazbe s povezanog Bluetooth uređaja.
-
Za pauziranje ili nastavak reprodukcije, pritisnite tipku ▶/||na daljinskom upravljaču.
- Za preskakanje na prethodnu/sljedeću datoteku, pritisnite tipke / maljinskom upravljaču.
- Neke aplikacije za mobilne uređaje neće vam omogućiti pritiskanje i držanje ◀◀◀/▶▶preskakanje dijelova zapisa.
NAPOMENA:
Ü Za poništavanje uparivanja uređaja, pritisnite i držite tipko na uređaju ili daljinskom upravljaču 3 sekunde kako biste pokrenuli proces uparivanja.
Operacija USB
√ Simple setup
√ One remote
√ Quick settings
√ Simple setup
√ One remote
√ Quick settings
Usare il Bluetooth
√ Simple setup
√ One remote
√ Quick settings
To turn auto-standby on or off, long press the ⏻ for 5 seconds when the unit is on.
| AUTO-GAIDSTÄVES REŽİMS | LED KRÄSA |
| IZSLĘGTS | Sarkans – mirgo 3 reizes |
| Deg | Zaļš – mirgo 3 reizes |
√ Simple setup
√ One remote
√ Quick settings
Werking Bluetooth
√ Simple setup
√ One remote
√ Quick settings
Bruk av Bluetooth
√ Simple setup
√ One remote
√ Quick settings
√ Simple setup
√ One remote
√ Quick settings
Operarea Bluetooth
Prevádzka Bluetooth
√ Simple setup
√ One remote
√ Quick settings
Delovanje Bluetooth
Ko prvič povežete svojo napravo z Bluetooth s tem predvajalnikom, jo morate pariti.
OPOZORILO:
√ Simple setup
√ One remote
√ Quick settings
Bluetooth rukovanje
Prvi put kada povežete Bluetooth uređaj na ovu jedinicu, treba da uparite svoj uređaj sa ovom jedinicom.
UPOZORENJE:
ū Kompatibilnost sa svim Bluetooth uređajima nije garantovana.
ū Svaka prepreka između ove jedinice i Bluetooth uređaja može smanjiti radni domet.
ū Ako je jačina signala slaba, vaša jedinica može se isključiti, ali će automatski ponovo ući u režim uparivanja.
-
Pritisnite dugme da izaberete Bluetooth. LED lampica će postati plava i počeće da trepće.
-
Aktivirajte svoj Bluetooth uređaj i izaberite režim pretrage. "SHARP HT-SB121" ili "SHARP HT-SB123" će se pojaviti na listi vaših Bluetooth uređaja.
-
Izaberite "SHARP HT-SB121" ili "SHARP HT-SB123" sa liste uređaja. Nakon povezivanja, LED će postati stabilno plava.
-
Počnite reprodukciju muzike sa povezanog Bluetooth uređaja.
-
Za pauziranje ili nastavak reprodukcije pritisnite dugme na daljinskoj kontroli.
- Da preskočite na prethodnu/sledeću datoteku, pritisnite dugmad / na daljinskoj kontroli.
- Neke aplikacije na mobilnim uređajima neće vam omogućiti da pritisnete i zadržite / da preskočite delove pesme.
NAPOMENA:
ū Da biste razdvojili uređaj, pritisnite i držite dugme na uređaju ili daljinskom upravljaču 3 sekunde da započnete proces uparivanja.
USB rukovanje
- Ubacite USB uređaj u USB utičnicu zvučne trake.
- Pritisnite dugme više puta na zvučnoj traci ili daljinskoj kontroli da biste izabrali USB izvor.
-
Pritisnite da reprodukujete izabranu numeru.
-
Tokom reprodukcije:
ū Za pauziranje ili nastavak reprodukcije pritisnite dugme na daljinskoj kontroli.
ü Da preskočite na prethodnu/sledeću datoteku, pritisnite dugmad / na daljinskoj kontroli. Pritisnite i držite / za brzo premotavanje unazad/unapred numere.
SAVETI:
√ Simple setup
√ One remote
√ Quick settings
Bluetooth-funktion
√ Simple setup
√ One remote
√ Quick settings
Sharp Consumer Electronics Poland sp. z o.o.
Ostaszewo 57B, 87-148 Lysomice, Poland
Made in China
SAU/MAN/0213 V5
www.sharpconsumer.com
SHARP