GRAFFIK600 - Speaker IBIZA SOUND - Free user manual and instructions
Find the device manual for free GRAFFIK600 IBIZA SOUND in PDF.

| Product type | Portable powered speaker |
| Brand | Ibiza Sound |
| Model | GRAFFIK600 |
| Dimensions (L x W x H) | 347 x 319 x 728 mm |
| Weight | 15.2 kg |
| Mains power supply | 100-240 V ~ 50/60 Hz |
| Rechargeable battery | Lithium 18.5 V / 4000 mAh |
| Total power | 600 W |
| Speakers | 2 x 8" (20 cm) |
| Wireless connectivity | Bluetooth (range 10 m) |
| Audio inputs | 3.5 mm jack (AUX), 2 x 6.35 mm jack (mic and guitar) |
| USB output | 5 V / 1.5 A for smartphone charging |
| USB player | Yes (MP3 files) |
| TWS function | Yes (wireless stereo pairing) |
| LED lighting | Yes (multiple modes) |
| Preset equalizer | 5 modes |
| Voice recording | On USB key |
| Remote control | Yes (included, AAA batteries) |
| Power consumption | 196 W |
| Protection class | Class II (double insulation) |
| Use | Indoor only (dry rooms) |
| Operating temperature | 5 °C to 35 °C |
| Maintenance and cleaning | Clean with a soft, dry cloth. Do not use water or chemicals. |
| Spare parts and repairability | No user-serviceable parts. Contact customer service. |
Frequently Asked Questions - GRAFFIK600 IBIZA SOUND
User questions about GRAFFIK600 IBIZA SOUND
0 question about this device. Answer the ones you know or ask your own.
Ask a new question about this device
Download the instructions for your Speaker in PDF format for free! Find your manual GRAFFIK600 - IBIZA SOUND and take your electronic device back in hand. On this page are published all the documents necessary for the use of your device. GRAFFIK600 by IBIZA SOUND.
USER MANUAL GRAFFIK600 IBIZA SOUND
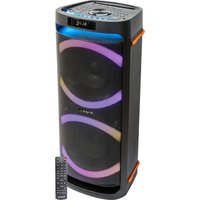
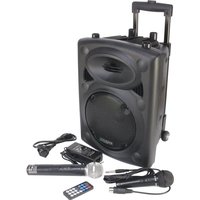
natural_image
Black and white photo of a multi-tiered outdoor audio device with two large circular speakers and a remote control (no visible text or symbols)MANUAL
EN- Instruction Manual - p. 3
Congratulations to the purchase of your new speaker.
WARNINGS

CAUTION DO NOT OPEN THE HOUSING SHOCK HAZARD
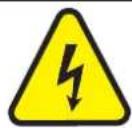
EXPLANATION OF SIGNS

The triangle containing a lightning symbol is used to indicate whenever your health is at risk (due to electrocution, for example).

An exclamation mark in a triangle indicates particular risks in handling or operating the appliance.

In accordance with the requirements of UK standards

Class II protection without earth connection

The product is for indoor use only

This marking indicates that this product should not be disposed with other household wastes throughout the EU. To prevent possible harm to the environment or human health from uncontrolled waste disposal, recycle it responsibly to promote the sustainable reuse of material resources. To return your used device, please use the return and collection
systems or contact the retailer where the product was purchased. They can take this product for environmentally safe recycling.
IMPORTANT SAFETY INSTRUCTIONS AND DANGER WARNINGS
- Please read the manual carefully and keep it for future reference.
- All safety instructions and warnings must be adhered to. They are part of the manual and must be kept with the manual.
- Any warranty claims are rendered invalid if damage occurs due to non-observance of these operating instructions. We assume no liability for any consequent damage.
- We assume no liability for personal injury or damage to property caused by incorrect handling or disrespect of the safety instructions. Any warranty claims expire in such cases.
- Unauthorized conversions and/or modifications of the appliance are not permitted for safety and licensing reasons (CE).
- The product shall be connected to a power supply only of the type described.
- Unplug the product from the wall socket when it is not to be used for a long time.
- Adequate care shall be taken so that foreign objects do not fall, or liquids are not spilled into the enclosure through openings.
- Do not remove the cover or back, as there are no user-serviceable parts inside.
- The product is approved for operation in dry, closed rooms only. Do not operate the product nearby water, such as in bathrooms or nearby swimming pools. The product shall not be exposed to dripping or splashing and no objects filled with liquids, such as vases, shall be placed on the product.
- Do not place on the product as naked flame source, such as lighted candles.
- Do not use the product in a tropical climate. Only for use in temperate climates.
- Please place the equipment on a level and stable platform. Never place the product on an unstable or movable surface. Persons could be injured or the product damaged by it falling down.
- A minimum distance of 0.5m around the unit must be kept ensuring sufficient ventilation and avoid overheating.
- The appliance may not be exposed to extreme temperatures ( < +5^ / > +35^ ), strong vibrations or heavy mechanical strain during operation.
- To avoid injury or falls, only lift the device using the handle provided.
- To avoid injury or falls, do not use the product as a seat.
- To avoid hearing loss, do not expose yourself to high volume levels for long periods of time.
- Caution: Flashing lights can cause epileptic seizures in sensitive people.
- The device complies with current European legislation regarding human exposure to electromagnetic fields.
DISCONNECT DEVICE: The power outlet must be installed near the equipment and be easily accessible.
CHARGING THE BATTERY
- Connect the mains power plug to an AC outlet and the built-in battery will start charging. The LED lights up in red and the battery symbol displays steadily.
- Once the battery is fully charged, the LED lights up in green.
Please note: It is NOT recommended to use the unit during charge.
IMPORTANT NOTE ON LITHIUM-ION BATTERIES
- PRIOR to using the unit for the first time, please charge fully the battery without any interruption.
- Charge the battery regularly after each use. Don't wait until it is discharged!
- DON'T allow the battery to discharge completely, otherwise it will lose 20% of its capacity or even be totally damaged! If the voltage becomes too low, the internal circuits are not powered anymore and it will become impossible to recharge the battery!
- If you don't use the unit for a longer period of time, it is recommended to charge it at 40% of its capacity and check/charge it once per month.
The life time of the battery depends on the observance of these recommendations.
** BATTERIES ARE NOT COVERED BY THE WARRANTY **
WE CANNOT BE HELD RESPONSIBLE FOR DAMAGED BATTERIES FURTHER TO THE NON-OBSERVANCE OF THESE BASIC RULES.
DESCRIPTION OF THE TOP PANEL
- Decrease master volume
- Menu
- Increase master volume
- Previous song
- Short press: Play/Pause; long press 3 seconds: TWS function
- Next song
- BT mode indicator
- USB mode indicator
- TWS mode indicator
- Light modes
- Mode: LINE IN, USB, Bluetooth
- Mega bass
- Power ON/OFF
DESCRIPTION OF THE REAR PANEL
- USB input: Connect a USB device to play music
- DC 5V OUT: USB output allowing to charge your smartphone
- AUDIO IN/OUT:
- Guitar input:
- Microphone input
- Charging indicator: Lights up in red during charge and in green when the battery is fully charged.
- Charging input: Connect the supplied mains lead to this input and the other end into an appropriate wall outlet
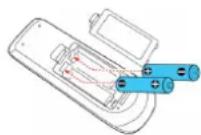
INSTALLING THE BATTERIES IN THE REMOTE CONTROL
Remove the battery cover from the back of the remote control as shown and insert 2x AAA size batteries ensuring correct polarity
RECOMMENDATIONS FOR BATTERIES

This symbol indicates that used batteries should not be disposed of with household waste but deposed correctly in accordance with your local regulations.
Batteries shall not be exposed to excessive heat such as sunshine, fire or the like.
When the internal batteries are not to be used, remove them to avoid damage caused by battery leakage or corrosion.
ATTENTION: Danger of explosion if battery is incorrectly placed. Only replace by the same or equivalent type.
WARNING : Do not swallow the battery. Danger of chemical burns. Keep new and old batteries out of the reach of children.
If the battery compartment doesn't close properly, stop using the product and keep it out of the reach of children.
If you are in doubt whether the batteries have been swallowed or introduced into any other part of the body, contact imme-
diately a doctor.
REMOTE CONTROL
- Mute: Mutes the sound in any mode
- Short press in USB & BT mode: Previous Song. Long press: fast backwards through the song
- Mode: Press shortly to skip to Wireless BT / LINE IN / USB mode.
- Record function: In USB mode, press "REC" button to record
- Echo-
- BASS+/-
- EQ function
- Microphone Volume+/-
- Stand by
- Pause / Play / TWS: Short press to play/pause the music. Long press to enter into TWS mode
- Short press in USB & BT mode: Next Song. Long press: fast forward through the song
- Changes the light mode: press to cycle through the various modes
- Repeat function: repeat one song or all songs on the USB device
- Play the recorded file
- Delete the recorded file
- Echo+
- Microphone priority: When you speak into the microphone during music play, the volume of the music will decrease in USB and BT mode as long as you are using the microphone.
- Treble+/-
- Master volume
- Number buttons: In USB mode enter directly the number of the desired songs
STANDBY MODE
Press the standby button on the remote control to switch the system into standby mode. Press again to switch the system on.
Please note that after 15 minutes of inactivity, the unit switches automatically into standby-mode
MODE BUTTON
Press the button 11 on the unit or 3 on the remote control and select BLUETOOTH (BLUE is displayed), USD (only if the USB input is connected) or AUX (LINE is displayed).
VOLUME ADJUSTMENT
Press the buttons 19 on the remote control or 1 & 3 on the unit to adjust the overall playback volume.
PRE-EQUALIZER
The system has a preset audio equalization system. Press the EQ button 7 on the remote control repeatedly to select one of the 5 audio equalizations available and which best suits the current music.
BASS / TREBLE ADJUSTMENT
Press the buttons on the remote control to adjust the treble (18) and the bass (6).
MIC ECHO EFFECT
Press the buttons (5 / 16) on the remote control to adjust the microphone echo effect.
Note: the echo effect only works on the microphone input.
MIC VOLUME
Press the button (8) on the remote control to adjust the microphone sound level.
Note: This function is only available when a wired microphone is connected (not provided)
LED LIGHT SWITCH
Press the light button (10) on the unit or (12) on the remote control to cycle through the various light effects and switch the light off.
BLUETOOTH FUNCTION
Press MODE button on the unit or the remote control until BLUE is displayed and flashing.
-
Put the cell phone within 10 meters
-
Activate the BT search function on your cell phone to search for the BT device. Please refer to the user manual for details
- Select GRAFFIK600 in the list of found devices. Enter the password "0000" if required.
- Shortly press the PLAY/PAUSE button ▶ II to play or pause the music. Shortly press the “◀” or “▶” button to select the previous or next track.
AUX MODE:
Press the MODE button on the unit or the remote control until LINE is selected. Play the music of the device connected to the AUX input via a 3.5mm Jack.
USB MODE:
- Insert a USB stick and press the MODE button to select "USB" mode. The unit will automatically read and play the music on the connected device.
- Press "▶ II" button shortly to pause or play.
- Shortly press "◀◀" button to go to the previous song.
- Shortly press "▶" button to go to the next song.
- Press the Repeat button (13) on the remote control. The display will show "ONE" and the track will be played continuously. Press twice and the display will show "ALL". All songs on the USB will be played continuously.
TWS MODE
- Place the two TWS speakers near each other (the distance should not exceed 10 meters).
- Power on the two speakers, both speakers must be in Bluetooth mode. Press and hold for about 5 seconds the TWS button on one of the speakers that will be the master speaker. The TWS connection will be built up.
- In TWS mode, press and hold TWS button for about 5 seconds on either speaker or power off the speaker to exit the TWS mode.
VOICE RECORDING
The unit can record voice from the microphone on a USB stick. It will create automatically a folder called 'Record' on the USB stick where it will store all log files.
- Switch on the unit
- Insert a USB stick into the socket.
- Select USB mode via the MODE button on the unit or the remote control.
- Press the REC button on the unit or the remote control to start recording.
- Press REC again to stop recording. The unit will play automatically the recorded file.
Note: You can record only voice. During recording, some controls are deactivated; They will resume their normal function when recording is stopped.
SPECIFICATIONS
Input voltage....100-240V\~50/60Hz
Battery......Lithium 18.5V 4000mAh
USB output voltage....5V 1.5A
Consumption....196W
Bluetooth frequency band....2402-2480MHz
Max. RF emission value of BT....0.19dBm
Dimensions 347 x 319 x 728mm
Weight....15.2kg
ENCEINTE ACTIVE HIGH POWER 2 X 8"/20CM - 600W AVEC DOUBLES EFFETS LUMINEUX
INTRODUCTION
RECOMMANDATIONS POUR LES PILES

EU Declaration of Conformity
Hereby we, LOTRONIC SA
RUE FRANCOIS ENGLERT, 17 Bt2
1480 TUBIZE
Belgique
+32.2.390.91.91
Certify and declare under our sole responsibility that the following product:

SOUND

Trade name:
Product name: Portable speaker
Type or model: GRAFFIK600
Conforms to the essential requirements of the RED directive 2014/53/EU, ErP directive 2009/125/EC, Commission Regulation (EC) 1275/2008, 2011/65/EU RoHS directive and the Commission Delegated Directive (EU) 2015/863
Place and date of issue:
Tubize ( Belgium ), on 08/12/2023
Manuel De Sousa
Quality Manager
LOTRONIC SA
Zoning Tubize II
Rue François Engler 17 W2
1480 Tubize - Belgium
T. +32 (0)2 390 91 91 - info@lotronic.net
TVA: DE 0887 125 178
CE
RUE FRANCOIS ENGLERT, 17 Bt2
1480 TUBIZE
Belgique
+32.2.390.91.91
Download the manual in other languages

Any questions or problems?
Contact us
IBIZALIGHTSOUND
Follow us on Instagram

Join us on facebook
Assembled in PRC • Designed by LOTRONIC S.A. •
https://ibizashop.eu/