
LOUNGE265 - Speaker IBIZA SOUND - Free user manual and instructions
Find the device manual for free LOUNGE265 IBIZA SOUND in PDF.

| Product Type | Amplified speaker with media player |
| Brand | Ibiza Sound |
| Model | LOUNGE265 |
| Dimensions | 260 x 257 x 654 mm |
| Weight | 6.9 kg |
| Power Supply | 100-240 V~50/60 Hz |
| Power Consumption | 60 W |
| Bluetooth | Frequency band 2402-2480 MHz, max range 10 m, power 0.5 dBm |
| Audio Inputs | Guitar (6.35 mm jack), microphone (6.35 mm jack), AUX line (RCA), USB, microSD |
| Playback Functions | USB, microSD, Bluetooth, AUX |
| Controls | Main volume, microphone/guitar volume, echo, treble, bass, EQ (Rock/Pop/Jazz/Classic/Flat) |
| Light Effects | Yes, with program change button |
| Recording | On USB key or microSD card via REC button |
| Remote Control | Yes, works with 2 AAA batteries (not included) |
| Safety | Double insulation (Class II), indoor use only, temperature 5-35°C |
| Maintenance and Cleaning | Unplug before cleaning, use a dry cloth, avoid liquids and foreign objects |
| Spare Parts and Repairability | No user-serviceable parts - do not open the casing |
| Included Accessories | Power cord, remote control |
| Certifications | CE, WEEE recycling |
Frequently Asked Questions - LOUNGE265 IBIZA SOUND
User questions about LOUNGE265 IBIZA SOUND
0 question about this device. Answer the ones you know or ask your own.
Ask a new question about this device
Download the instructions for your Speaker in PDF format for free! Find your manual LOUNGE265 - IBIZA SOUND and take your electronic device back in hand. On this page are published all the documents necessary for the use of your device. LOUNGE265 by IBIZA SOUND.
USER MANUAL LOUNGE265 IBIZA SOUND
natural_image
Abstract black-and-white dot pattern forming a stylized number 1 (no text or symbols)
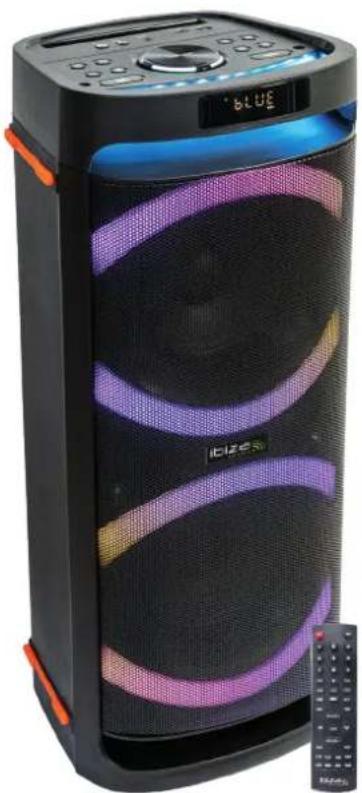
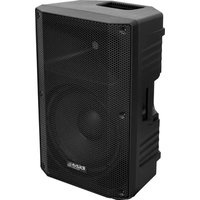
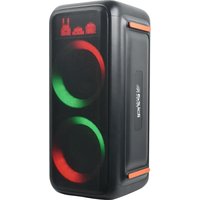
LED ILLUMINATED SPEAKER BOX
2 x 6.5"/16cm 400W
with BLUETOOTH, USB, microSD
& REMOTE CONTROL
Ref.
LOUNGE265
natural_image
Black and purple portable electronic device with glowing screens and a control panel (no visible text or symbols)
natural_image
Dot pattern composed of evenly spaced black dots on white background (no text or symbols)MANUAL
EN - User Manual - p. 3
Congratulations to the purchase of your new speaker.
WARNINGS

CAUTION DO NOT OPEN THE HOUSING SHOCK HAZARD
EXPLANATION OF SIGNS
The triangle containing a lightning symbol is used to indicate whenever your health is at risk (due to electrocution, for example).
An exclamation mark in a triangle indicates particular risks in handling or operating the appliance.
UK CA Accordance with the requirements of UK standards
☐ Class II protection without earth connection
The product is for indoor use only
This marking indicates that this product should not be disposed with other household wastes throughout the EU. To prevent possible harm to the environment or human health from uncontrolled waste disposal, recycle it responsibly to promote the sustainable reuse of material resources. To return your used device, please use the return and collection systems or contact the retailer where the product was purchased. They can take this product for environmental safe recycling.
IMPORTANT SAFETY INSTRUCTIONS AND DANGER WARNINGS
- Please read the manual carefully and keep it for future reference.
- The unit shall be connected to a power supply only of the type described.
• To reduce the risk of fire or electrical shock, do not expose this unit to rain or moisture. - Unplug the unit from the wall socket when it is not to be used for a long period of time.
- Adequate care shall be taken so that foreign objects do not fall, or liquids are not spilled into the enclosure through openings.
- Do not remove the cover or back, as there are no user-serviceable parts inside.
- The apparatus shall not be exposed to dripping or splashing and that no objects filled with liquids, such as vases, shall be placed on the apparatus.
- Do not place on the apparatus as naked flame source, such as lighted candles.
- Do not use the unit in a tropical climate. Only for use in temperate climates.
- A minimum distance of 0.5m around the unit must be kept to ensure sufficient ventilation and avoid overheating.
- All safety instructions and warnings must be adhered to. They are part of the manual and must be kept with the manual.
- Any guarantee claims are rendered invalid if damage occurs due to non-observance of these operating instructions. We assume no liability for any consequent damage.
- We assume no liability for personal injury or damage to property caused by incorrect handling or disrespect of the safety instructions. Any guarantee claims expires in such cases.
- The appliance is approved for operation in dry, closed rooms only. Do not operate the device nearby water, such as in bathrooms or nearby swimming pools.
• The appliance may not be exposed to extreme temperatures ( < +5^ / > +35^ ) in operation.
- The appliance may not be subject to strong vibrations or heavy mechanical strain.
- DISCONNECT DEVICE: Where the MAINS plug or an appliance coupler is used as the disconnect device, the disconnect device shall remain readily operable.
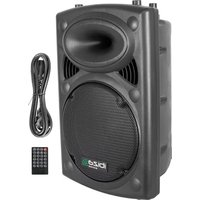
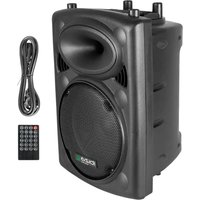
DESCRIPTION OF THE TOP PANEL CONTROLS & CONNECTORS
- Guitar input: Plug in a guitar
- Microphone input: Connect a microphone
- Line input
- microSD CARD: insert a memory card to play your music
- USB: Connect a USB device to play music
- Previous song
- Next song
- Play/Pause: In USB/TF/BT mode, press to play and pause music.
-
Press to repeat one song or repeat all songs.
-
Input selector: Line-in (AUX)/USB/microSD (TF)/BLUETOOTH
-
Increase/decrease master volume.
-
MIC/GT: Adjusts the mic volume, echo, treble and bass and guitar in conjunction with volume control (11). Press once: CU is displayed. Rotate the wheel (11) to adjust the volume of the microphones from CU00 to CU15. Press again: EC is displayed. Rotate the wheel (11) to set the microphone echo from EC00 to EC10. Press again: Gt is displayed. Adjusts the volume of the guitar in conjunction with volume control (11). Rotate the wheel (11) to set the guitar volume from gt00 to gt10. Press again: t is displayed. Rotate the wheel (11) to set the treble of the microphone from t -12 to t 12. Press again: b is displayed. Rotate the wheel (11) to set the bass of the microphone from b -12 to b 12
-
REC button: Press to record your voice on USB or TF
-
Sound mode key (Choose from rock, pop, jazz and etc.).
-
Change the light effect
-
Increases/reduces treble/bass. Press the button and b (bass) or t (treble) is displayed. Rotate the wheel (11) to adjust the bass or treble of the sound output from -9 to +9.
-
RCA output connectors to connect the box to another active speaker, amplifier, etc.
-
Press the switch to turn on/off the device
-
Mains input: Plug the supplied power lead into this connector and the other end into a wall outlet delivering a voltage of 100-240V\~50/60Hz.
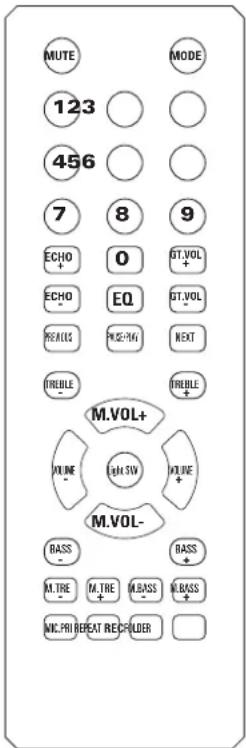
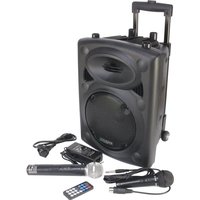
Remote Control
Mute
Mode key: (Choose from AUX/USB/TF/BLUETOOTH)
0-9 keys: Access directly the file number
ECHO + / ECHO -: Increases / reduces the echo effect on the microphone
GT VOL + / GT VOL -: Increases / reduces the volume of the connected guitar
EQ: Sound mode key (Choose from rock, pop, jazz and etc.)
PREVIOUS ◀: Previous track/FM channel
PAUSE/PLAY ▶ II : Press to pause and resume play.
NEXT ▶: Next track/FM channel
TREBLE + / TREBLE -: Increases / reduces the high frequencies
MIC VOL + / MIC VOL -: Increases / reduces the volume of the connected mic
VOL+ / VOL-: Increase/reduce the overall volume
LIGHT SW: Press to cycle through the various light effects
BASS + / BASS -: Increases / reduces the low frequencies
M.TRE +/M.TRE+: Increases / reduces the high frequencies of the microphone
M.BASS +/M.BASS+: Increases / reduces the low frequencies of the microphone
MIC PRI: Press to reduce the volume of all other input sources while you are talking into the microphone
REPEAT: Repeat one/all tracks.
REC: Press to record your voice on USB or TF
FOLDER: Press to select a folder on your USB or TF card that contains the songs you want to play
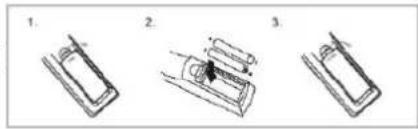
INSTALLING THE BATTERIES IN THE REMOTE CONTROL
Remove the battery cover from the back of the remote control as shown and insert 2x AAA size batteries ensuring correct polarity
RECOMMENDATIONS FOR BATTERIES

This symbol indicates that used batteries should not be disposed of with household waste but deposed correctly in accordance with your local regulations..
Batteries shall not be exposed to excessive heat such as sunshine, fire or the like.
When the internal batteries are not to be used, remove them to avoid damage caused by battery leakage or corrosion.
ATTENTION: Danger of explosion if battery is incorrectly placed. Only replace by the same or equivalent type.
WARNING : Do not swallow the battery. Danger of chemical burns. Keep new and old batteries out of the reach of children.
If the battery compartment doesn't close properly, stop using the product and keep it out of the reach of children.
If you are in doubt whether the batteries have been swallowed or introduced into any other part of the body, contact immediately a doctor.
BLUETOOTH PAIRING PROCEDURE
Press the MODE button on the device or on the remote control until BT is displayed.
- Place the mobile phone within 10 meters
- Activate the BT search function on your mobile phone to search the BT device. Please refer to the user manual for details.
- Select LOUNGE from the list of found devices.
- Short press the PLAY/PAUSE ▶|| button to play or pause the music. Briefly press the "◀" or "▶" button to select the previous or next track.
LINE MODE:
Press the MODE button on the device or on the remote control until LINE is selected. Listen to music from the device connected to the LINE input.
USB/TF Operation
Switch the unit on. Insert a USB stick or a TF card. The music stored on the stick or card will be played automatically.
- Play/pause: Press to play, press to pause, press again to resume play.
- Previous/Next: During play press once to go back to the beginning of the track or to the next track/
- Repeat: During play press to repeat the current song
Adjust the volume with the VOLUME control (11)
REC FUNCTION
The REC function is not available in Bluetooth and AUX mode. Insert a USB stick or microSD card into the relevant connector. The music on the inserted device will start playing. Switch on the microphone and press shortly the REC button. The music will stop and you can speak or sing into the microphone. Your voice will be recorded on the USB/microSD device. At the end of your record, press the REC button to listen to your record. Long press the REC button to delete the recorded file.
SPECIFICATIONS
Power supply....100-240V\~50/60Hz
Consumption....60W
BT frequency band....2402-2480MHz
Maximum RF emission power of Bluetooth....0.5dBm
Dimensions 260 x 257 x 654mm
Weight....6.9kg
The above specifications are for reference only.
Design and specifications are subject to change for improvement without prior notice.
ENCEINTE ACTIVE AUTONOME 2 X 6.5"/16CM 400W AVEC BLUETOOTH, USB, MICRO-SD & TELECOMMANDE
INTRODUCTION
RECOMMANDATIONS POUR LES PILES

HINWEISE FÜR BATTERIEN

ADVIES VOOR BATTERIJEN

Tasta Mode: (Alegeti dintre AUX/USB/TF/BLUETOOTH)
RECOMANDĂRI PENTRU BATERII

PREPORUKE ZA BATERIJE

Ovaj simbol označava da se iskorištene baterije ne smiju odlagati zajedno s kućnim otpadom, već da se odlažu ispravno u skladu s lokalnim propisima.

Any questions or problems?
Contact us on facebook

View the product on our website and download the manual in more languages
Imported from China by LOTRONIC S.A. Avenue Zénobe Gramme 9 B-1480 Saintes

www.ibiza-light.com
©Copyright LOTRONIC 2022
- LOUNGE265
- MANUAL
- WARNINGS
- CAUTION DO NOT OPEN THE HOUSING SHOCK HAZARD
- EXPLANATION OF SIGNS
- IMPORTANT SAFETY INSTRUCTIONS AND DANGER WARNINGS
- DESCRIPTION OF THE TOP PANEL CONTROLS & CONNECTORS
- Remote Control
- INSTALLING THE BATTERIES IN THE REMOTE CONTROL
- RECOMMENDATIONS FOR BATTERIES
- BLUETOOTH PAIRING PROCEDURE
- LINE MODE:
- USB/TF Operation
- REC FUNCTION
- SPECIFICATIONS
- ENCEINTE ACTIVE AUTONOME 2 X 6.5"/16CM 400W AVEC BLUETOOTH, USB, MICRO-SD & TELECOMMANDE
- INTRODUCTION
- RECOMMANDATIONS POUR LES PILES
- HINWEISE FÜR BATTERIEN
- ADVIES VOOR BATTERIJEN
- RECOMANDĂRI PENTRU BATERII
- PREPORUKE ZA BATERIJE
Brand : IBIZA SOUND
Model : LOUNGE265
Category : Speaker