
Cyclofry Plus Health 22101-56 - Electric fryer RUSSELL HOBBS - Free user manual and instructions
Find the device manual for free Cyclofry Plus Health 22101-56 RUSSELL HOBBS in PDF.

| Product type | Electric hot air fryer |
| Brand | Russell Hobbs |
| Model | Cyclofry Plus Health 22101-56 |
| Power supply | Mains (220-240 V, 50/60 Hz) |
| Power | Approximately 1500 W |
| Main functions | 4 preset programs: Hot air fryer, Roast/Bake, Grill, Rotisserie |
| Included accessories | Drum, lid, folding grill, rotisserie with spit and hooks, 10 kebab skewers, support discs, tongs |
| Display | Touch screen with temperature and time display |
| Settings | Temperature: 100-220 °C, Time: 1-60 minutes depending on program |
| Drum capacity | Approximately 750 g of frozen fries |
| Safety | Automatic shut-off after program, lid lock, hot surfaces indicated |
| Care and cleaning | Dishwasher-safe removable parts; removable bowl; wipe exterior with damp cloth |
| Use | Household use only |
| Recycling | Do not dispose of with household waste; take to an approved collection center |
Frequently Asked Questions - Cyclofry Plus Health 22101-56 RUSSELL HOBBS
User questions about Cyclofry Plus Health 22101-56 RUSSELL HOBBS
0 question about this device. Answer the ones you know or ask your own.
Ask a new question about this device
Download the instructions for your Electric fryer in PDF format for free! Find your manual Cyclofry Plus Health 22101-56 - RUSSELL HOBBS and take your electronic device back in hand. On this page are published all the documents necessary for the use of your device. Cyclofry Plus Health 22101-56 by RUSSELL HOBBS.
USER MANUAL Cyclofry Plus Health 22101-56 RUSSELL HOBBS
natural_image
Exterior view of a white Russell Hobbs air fryer with digital display and mechanical components (no text or symbols on main body)22101-56
natural_image
Illustration of a mesh sieve with metal pins suspended from its side, labeled 'A' in the top-left corner (no text or symbols on the main subject)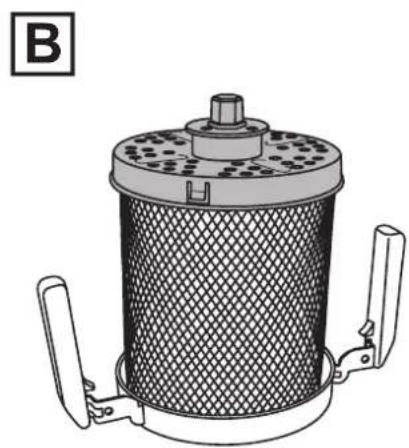
natural_image
Technical illustration of a cylindrical industrial filter or reactor with two side arms and a central hub (no text or symbols)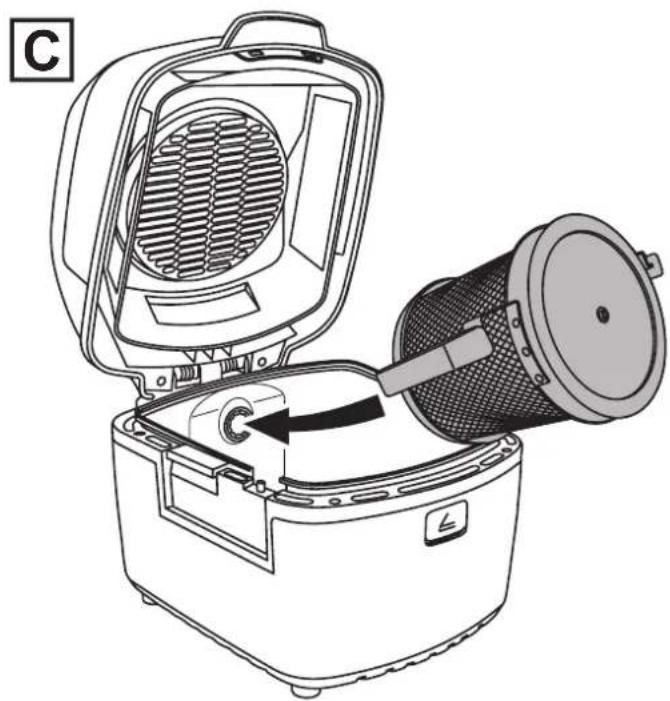
natural_image
Line drawing of an air fryer with a mesh fan inside, showing internal components and a close-up of the lid (no text or symbols)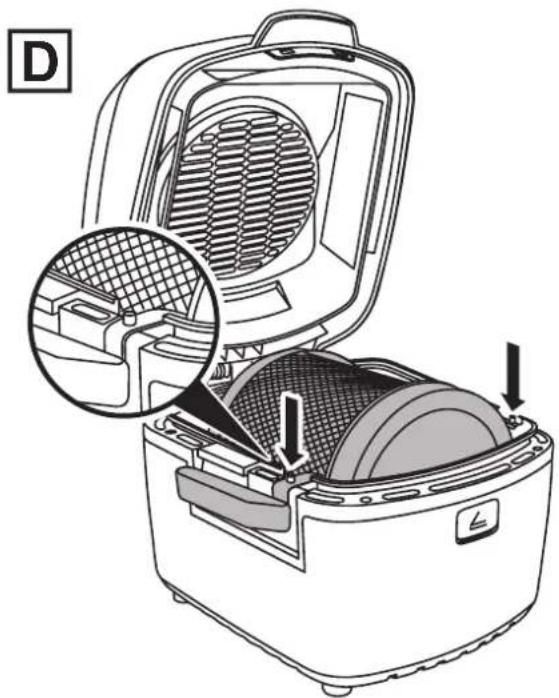
natural_image
Line drawing of an electric food processor with internal components and a magnified inset showing internal structure (no text or symbols)
natural_image
Line drawing of a portable flatbed grill with metal frame and three legs (no text or symbols)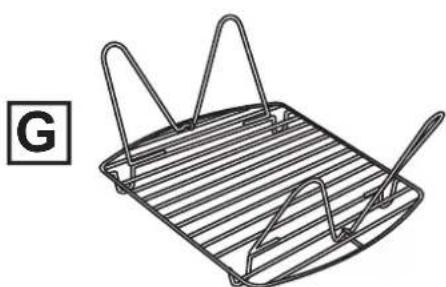
natural_image
Line drawing of a metal rack with handles and a handle, labeled 'G' in the corner (no text or symbols on the diagram itself)
IMPORTANT SAFEGUARDS
Follow basic safety precautions, including:
This appliance shall not be used by children from 0 year to 8 years. This appliance can be used by children aged from 8 years and above if they are continuously supervised. This appliance can be used by people with reduced physical, sensory or mental capabilities or lack of experience and knowledge if they have been given supervision or instruction concerning use of the appliance in a safe way and understand the hazards involved. Keep the appliance and its cord out of reach of children aged less than 8 years. Cleaning and user maintenance shall not be made by children.
Cooking appliances should be positioned in a stable place with the handles positioned to avoid spillage of the hot liquids.
Don't connect the appliance via a timer or remote control system.
Don't use the appliance near or below combustible materials (e.g. curtains).
The surfaces of the appliance will get hot during use.
If the cable is damaged, return the product, to avoid a hazard.
Don't immerse the body of the appliance in liquid.
- Don't use accessories or attachments other than those we supply.
- Don't use the appliance for any purpose other than those described in these instructions.
- Don't operate the appliance if it's damaged or malfunctions.
- Don't use anything metal or sharp, you'll damage the non-stick surfaces.
HOUSEHOLD USE ONLY
PARTS
| 1. Lid | 7. Drive shaft | 13. Rotisserie forks |
| 2. Display/touch controls | 8. Drum lid | 14. Spindle |
| 3. Heating element | 9. Drum | 15. Skewers (x10) |
| 4. Bowl handles | 10. Drum handles | 16. Kebab holder plates |
| 5. Bowl | 11. Folding rack | |
| 6. Lid release button | 12. Tongs |
BEFORE USING FOR THE FIRST TIME
- The new element may smoke a little at first but it's nothing to worry about. Ensure the room is well ventilated the first couple of times you use it
- Hand wash the removable parts. Rinse then dry thoroughly.
DISPLAY
During use, the display alternates between showing the current temperature and the default program time for the currently selected program. If a program is already running, the display will show the remaining program run time. When the temperature is displayed, the temperature button (☐) will light up. When the time is displayed, the time button (☐) will light up.
PROGRAM GUIDE
You can change the default program temperature and program run time.
| Program | Default Settings | Adjustable Range | ||
| Temperature °C | Time (mins) | Temperature °C | Time (mins) | |
| Air Fry 📋 | 220 | 30 | 150 - 220 | 1 - 60 |
| Roast/Bake 📋 | 175 | 30 | 100 - 220 | 1 - 60 |
| Grill 📋 | 190 | 15 | 100 - 220 | 1 - 60 |
| Rotisserie 📋 | 190 | 30 | 120 - 220 | 1 - 60 |
- To select a program, press the relevant button shown above.
- To change the temperature, first tap the temperature button (☐) then use the up (▲) and down (▼) arrows to select the desired temperature.
• To change the program run time, first tap the time button (☑) then use the up (▲) and down (▼) arrows to select the desired time. - If required, you can change the time and temperature settings using the same method while the program is running.
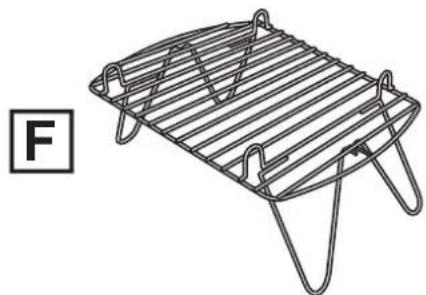
RACK
Before use, unfold and secure the legs of the rack as shown (fig. E). The supplied rack can be placed in the high position (fig. F) moving the food nearer to the heating element, or the low position (fig. G) moving the food further from the heating element. The legs of the rack can be folded for storage.
AIR FRYING
- Unplug your Cyclofry plus.
- Place the items to be fried into the drum. Don't overfill the drum. Allow enough space for air to circulate and the ingredients to move freely (fig A).
- Fit the lid onto the drum (fig. B).
- Insert the drive shaft into the opening in the bowl (fig. C).
- Lower the drum down until the two holes in the handles fit over the two pins in the body of the fryer (fig. D). The lid won't close unless the pins pass through the holes in the handle.
- Plug in your Cyclofry plus. The unit will beep and the display will light up briefly.
- Tap the power button (⏻).
- The display will light up showing the available programs.
- Tap the air fry button () button to select the air fry program.
- The display will alternate between showing the default air fry temperature and the program run time (see DISPLAY). You can change either of these settings (see PROGRAM GUIDE).
- Change the settings as desired or accept the defaults. Tap the power button (⏻) to start the program.
- Once the program has finished, the display will go out (except the power button) and the fan will operate for 20 seconds. After 20 seconds, your Cyclofry plus will beep 5 times and then switch off.
Removing the drum
- Open the lid. Beware of any escaping steam and hot air.
- Use the two handles to remove the drum. We recommend using oven gloves because the drum and surrounding areas will be HOT.
- Press the drum away from you (towards the rear of the unit) then lift the end of the drum that is nearest to you slightly upwards until it clears the rim of the bowl.
- Lift the drum clear of the bowl and place it down onto a heat resistant surface.
- Carefully remove the drum lid and tip out the contents.
GRILLING
The grilling function is perfect for grilling, crisping or browning foods. Use as you would a conventional grill by bringing the food close to the heat using the rack.
- Unplug your Cyclofry plus.
- Place the rack in the bowl. Use it in the high position.
- Plug in your Cyclofry plus. The unit will beep and the display will light up briefly.
- Tap the power button (⏻).
- The display will light up showing the available programs.
- Tap the grill button () to select the grill program.
- The display will alternate between showing the default grill temperature and the program run time (see DISPLAY). You can change either of these settings (see PROGRAM GUIDE).
- Change the settings as desired or accept the defaults.
- Tap the power button (⏻) to start the program.
- Once the program has finished, the display will go out (except the power button) and the fan will operate for 20 seconds. After 20 seconds, your Cyclofry plus will beep 5 times and then switch off.
- Open the lid. Beware of any escaping steam and hot air.
- You can use the tongs to carefully remove the rack. We recommend you wear oven gloves.
- The program can be paused at any time by opening the lid. Close the lid to resume the program.
- To stop the program, press the power button (⏻). The program will stop and the fan will continue to run for 20 seconds. Any program settings will be lost.
ROASTING/BAKING
- Unplug your Cyclofry plus.
- Place the rack in the bowl. Use it in the low position. Food can also be baked directly in the bowl (e.g. cakes).
- The food can be placed directly onto the rack or into a suitably sized oven-proof container.
- Plug in your Cyclofry plus. The unit will beep and the display will light up briefly.
- Tap the power button (⏻).
- The display will light up showing the available programs.
- Tap the roast/bake button () to select the roast/bake program.
- The display will alternate between showing the default roasting/baking temperature and the program run time (see DISPLAY). You can change either of these settings (see PROGRAM GUIDE).
- Change the settings as desired or accept the defaults.
- Tap the power button (⏻) to start the program.
- Once the program has finished, the display will go out (except the power button) and the fan will operate for 20 seconds. After 20 seconds, your Cyclofry plus will beep 5 times and then switch off.
-
Open the lid. Beware of any escaping steam and hot air.
-
You can use the tongs to carefully remove the rack. We recommend you wear oven gloves.
- The program can be paused at any time by opening the lid. Close the lid to resume the program.
- To stop the program, press the power button (⏻). The program will stop and the fan will continue to run for 20 seconds. Any program settings will be lost.
ROTISSERIE ATTACHMENT
The rotisserie attachment slowly turns the food under the heating element to give even cooking perfect for larger joints of meat and whole chickens.
- Slide one of the rotisserie forks onto the spindle and tighten the screw. Skewer the meat onto the spindle then slide on the other fork as shown (fig. H). Tighten the screw on the fork to hold the meat.
- Insert the drive shaft end of the spindle into the opening in the bowl (fig. J)
- Lower the other end of the spindle onto the support bracket inside the bowl (fig. K).
- Plug in your Cyclofry plus. The unit will beep and the display will light up briefly.
- Tap the power button (☐).
- The display will light up showing the available programs.
- Tap the rotisserie button () to select the rotisserie program.
- The display will alternate between showing the default grill temperature and the program run time (see DISPLAY). You can change either of these settings (see PROGRAM GUIDE).
- Change the settings as desired or accept the defaults.
- Tap the power button (⏻) to start the program.
- Once the program has finished, the display will go out (except the power button) and the fan will operate for 20 seconds. After 20 seconds, your Cyclofry plus will beep 5 times and then switch off.
- Open the lid. Beware of any escaping steam and hot air.
- You can use the tongs to carefully remove the food. We recommend you wear oven gloves.
- The program can be paused at any time by opening the lid. Close the lid to resume the program.
- To stop the program, press the power button (⏻). The program will stop and the fan will continue to run for 20 seconds. Any program settings will be lost.
KEBAB ATTACHMENT
The kebab attachment is ideal for cooking kebabs etc. and gently rotates the food under the heating element for even cooking. The attachment can hold 10 skewers.
- Slide the circular kebab holder plate onto the spindle. Orient this plate so that the part with the screw in it is at the same end as the black drive coupling. Slide the plate which has the slots in the rim onto the spindle with the screw facing outwards away from the other plate. There are two depressions on the face of the spindle. When securing the plates, make sure that the screws go into the depressions in the spindle before tightening (fig. L).
- Place the food onto the skewers. Fit the end of the skewer into a hole in the plate (fig. M).
- Fit the other end into the slot opposite the hole (fig. N).
- Push the skewer forward until the curved end of the skewer clips into the hole below the slot (fig. P).
- When all the skewers have been fitted, fit the kebab attachment into the bowl in the same way as the rotisserie attachment.
- Operate your Cyclofry plus in the same way as when using the rotisserie attachment (See ROTISSERIE ATTACHMENT).
CARE AND MAINTENANCE
- Unplug the appliance and let it cool down.
- The bowl can be lifted out of the main body for cleaning.
- Wipe the inner and outer surfaces of the appliance with a damp cloth.
- Hand wash the removable parts, rinse, and dry.
- When refitting the bowl, make sure that you press it all the way down into the body of the appliance.
You may wash these parts in a dishwasher.
If you use a dishwasher, the harsh environment inside the dishwasher will affect the surface finishes. The damage should be cosmetic only, and should not affect the operation of the appliance.
HINTS AND TIPS
- Don't put food that has a coating such as breadcrumbs into the drum because the rotating/tumbling action of the drum will shake the coating from the food during cooking.
- Don't overfill the drum because this can restrict hot air flow which can alter the cooking time and affect cooking quality.
RECYCLING
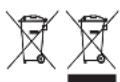
To avoid environmental and health problems due to hazardous substances, appliances and rechargeable and non-rechargeable batteries marked with one of these symbols must not be disposed of with unsorted municipal waste. Always dispose of electrical and electronic products and, where applicable, rechargeable and non-rechargeable batteries, at an appropriate official recycling/collection point.
RECIPES
TRIPLE CHEESE GRILLED PORTOBELLO MUSHROOMS Serves: 4
Preparation time: 5-10 minutes Cooking time: 15-20 minutes
• 4 Portobello mushrooms
• 200 g cheddar cheese, grated
• 3 cloves garlic, finely diced
• 2 spring onions, finely diced
- 50 g parmesan cheese, grated
- 75 g goats cheese
-
3 g cracked black pepper
• 4 g flat leaf parsley, chopped -
15 ml olive oil
• 2 g paprika -
Remove the stalk and peel the skin off the mushrooms. Drizzle with olive oil and season.
- Mix the cheddar cheese, garlic, onion, cracked black pepper, parsley and olive oil together. Divide the mix equally between the mushrooms.
- Divide the goats' cheese into 4 equal amounts and crumble on top of the mushrooms. Do the same with the grated parmesan. Sprinkle the paprika evenly over the top.
- Select Grill mode. Place the wire rack into the bowl in the low position and place the mushrooms onto the rack. Cook for 15-20 minutes.
LEMON AND DILL GRILLED SALMON Serves: 4
Preparation time: 5-10 minutes
Cooking time: 5-10 minutes depending on shape and size of salmon portions
• 4 salmon portions approx. 200 g each
- 30 ml olive oil
- Salt and pepper to taste
• Zest and juice 1 lemon
- 30 ml white wine
• 2 cloves garlic, finely chopped
- 3 g dill leaves
- Mix the lemon zest, lemon juice, garlic, olive oil, white wine together.
- Place the salmon portions on a tray and coat with the mixture. Season.
- Select Grill mode. Place the wire rack into the bowl in the high position and place the salmon portions onto the rack. Cook for 5-10 minutes until the salmon starts to flake.
HERB AND CHILLI ROTISSERIE CHICKEN Serves: approx. 4
Preparation time: 5-10 minutes plus 20 minutes out of the fridge
Cooking time: 45-60 minutes
• 1 whole chicken, approx. 2 kg
• 3 g thyme leaves, chopped
• 3 g chilli puree
- 30 ml olive oil
• 3 g cracked black pepper
- Salt to taste
• 3 g rosemary leaves, chopped
• 4 cloves garlic, finely chopped
-
Remove chicken from fridge 20 minutes prior to cooking.
-
Mix the olive oil, rosemary, thyme, cracked black pepper, garlic, chilli and salt together.
- Put the spindle through the middle of the chicken and secure using the folks.
- Rub the mix all over the chicken.
- Select Rotisserie mode. Fit the spindle into the bowl and cook for 45-60 minutes until the juices run clear.
HALOUMI AND VEGETABLE KEBABS Serves: 5
Preparation time: 20-25 minutes Cooking time: 15-20 minutes
- 500 g haloumi cheese, cut into 20 equal pieces
• 1 red onion, cut into 10 equal pieces
• 3 cloves garlic, finely chopped
• 2 mixed peppers, cut into 20 equal pieces
- 1 courgette, cut into 20 equal pieces
- Salt and pepper to taste
• 10 cherry tomatoes
- 120 ml olive oil
- Blend together the basil, garlic and olive oil, set aside.
- On each kebab skewer put two pieces of haloumi and pepper, one cherry tomato and one piece of red onion and courgette. Spoon the basil oil evenly over the kebabs. Assemble the kebab attachment and skewers according to the instructions.
- Select Rotisserie mode and fit the kebab attachment into the bowl. Cook for 15-20 minutes.
CHOCOLATE ORANGE FONDANTS Serves: 6
Preparation time: 45 minutes including time to refrigerate
Cooking time: 15 minutes
Equipment: 6 moulds
• 200 g dark chocolate (at least 54%)
- 140 g caster sugar
• 20 g cocoa powder plus extra for dusting
• 200 g unsalted butter
- 4 large eggs
- 5 g baking powder
- 50 g unsalted butter, melted
- 100 g plain flour
- Zest of 2 oranges
-
Place the moulds on a tray and brush the inside with some of the melted butter using upward strokes. Refrigerate the moulds for 5 minutes and repeat the above process with more butter. Put a little cocoa powder into each mould and rotate the moulds until the buttered coating is evenly covered with the cocoa powder. Tap out any excess cocoa powder.
-
Slowly melt the chocolate, butter and orange zest together. Separately whisk the sugar and eggs together until light and fluffy. Remove the orange zest from the chocolate mixture. Combine the chocolate mixture with the eggs and sugar.
- Sieve the flour, cocoa powder and baking odder. Fold into the chocolate mixture until well combined.
- Divide the mixture between the moulds and refrigerate for at least 20 minutes.
- Select Roast/Bake mode. Place the wire rack into the bowl in the low position and heat for 2 minutes. Carefully place the fondants onto the rack and set the time for 12-13 minutes. Bake until the top starts to crust over and the fondants start to pull away from the sides of the moulds. Once cooked leave to stand for 1 minute before serving.
| Food | Program | Accessory | Quantity | Approx. Time (min) | Temperature (°C) | Notes |
| Frozen chips Air Fry Drum | 500 g 35-50 | 220 | ||||
| 750 g 40-60 | ||||||
| Homemade chips Air Fry Drum | 500 g 35-45 | 220 Rinse twice in cold water, drain and dry with paper. Toss in 1 tbsp oil | ||||
| 750 g 40-60 | ||||||
| Chicken wings | Air Fry | Rack, high | 15-20 | 220 | Turn half way through cooking. Ensure cooked through. | |
| Chicken drumsticks | Air Fry | Rack, high | 20-25 | 220 | Turn occasionally. Ensure cooked through. | |
| Chicken breast | Grill | Rack, high | 10-15 | 190 | Ensure cooked through. | |
| Fresh chicken strips | Grill | Rack, low | 10-12 | 200 | Turn half way through cooking. Ensure cooked through | |
| Frozen chicken nuggets | Bake | Rack, low | 12-14 | 190 | Turn half way through cooking. | |
| Whole chicken | Rotisserie | Rotisserie | 45-60 | 190 | ||
| Turkey breast | Air Fry | Rack, low | 250 g | 7-10 | 220 | Turn half way through cooking. |
| Fresh burgers | Bake | Rack, high | 15-20 | 175 | Make burgers similar sizes | |
| Frozen burgers | Bake | Rack, high | 13-18 | 175 | Turn half way through cooking. | |
| Pork chop | Air Fry | Rack, high | 250 g | 12-18 | 220 | Turn half way through cooking |
| Sausages | Grill | Rack, high | 25-35 | 190 | Turn half way through cooking. | |
| Bacon | Air Fry | Rack, low | 7-40 | 220 | Streaky or back bacon | |
| Sweet potato wedges | Air Fry | Drum | 750 g | 30-45 | 220 | Skin on. Toss in 1 tbsp oil and season |
| Roasted med veg | Air Fry | Drum | 500 g | 15-20 | 200 | Cut into even sized pieces |
| Homemade fish fingers | Air Fry | Rack, low | 7-8 | 220 | Turn half way through cooking. Ensure cooked through | |
| Frozen fish fingers | Bake | Rack, low | 10-12 | 190 | Turn half way through cooking. | |
| Salmon | Grill | Rack, high | 200 g | 4-8 | 190 | Cooking time depends on size. |
| Roasted cauliflower | Air Fry | Drum | 500 g | 10-15 | 220 | Cut into even sized pieces, approx. 2cm |
| Roasted sprouts | Air Fry | Drum | 300 g | 15-20 | 220 | Toss in 1 tbsp oil |
| Roasted broccoli | Grill | Drum | 500 g | 15-20 | 190 | Cut into small (2cm) pieces |
| Mushrooms | Air Fry | Drum | 300 g | 10-12 | 220 | |
| Jacket potato | Air Fry | Rack, low | 30-50 | 220 | Rub with oil and season. Turn occasionally | |
| Brie wedges | Bake | Rack, low | 7-10 | 175 | Cook from room temperature | |
| Pizza | Bake | Rack, low | 5-7 | 200 | Pitta pizza/mini/slice. Remove all packaging | |
| Meat kebab | Rotisserie | Skewers | 15-20 | 190 | Cooking time depends on size of meat | |
| Vegetable kebab | Rotisserie | Skewers | 10-20 | 190 | Haloumi, vegetables, etc. | |
| Basic cake | Bake | Rack, low | 10-15 | 175 | Cook the cakes inside cupcake cases | |
Cook poultry, pork, burgers, etc., until the juices run clear. Cook fish, prawns, etc., until the flesh is opaque throughout.
APENAS PARA USO DOMÉSTICO
ESQUEMAS
KEBABS MED HALOUMI OG GR∅NTSAGER 5 Pers.
Forberedelse: 20-25 minutter Tilberedning: 15-20 minutter
PLEIE OG VEDLIKEHOLD
Preparation time: 20-25 minutes
Cooking time: 15-20 minutes
GRILOVANÉ ŠAMPIŇÓNY PORTOBELLO S TROMI DRUHMI SYRA Pre 4
- Salt and pepper to taste
natural_image
Simple line drawing of a document with a right-pointing arrow (no text or symbols)let-reactive in the clearance assoxianine (الشكل)
- IMPORTANT SAFEGUARDS
- HOUSEHOLD USE ONLY
- BEFORE USING FOR THE FIRST TIME
- DISPLAY
- RACK
- AIR FRYING
- Removing the drum
- GRILLING
- ROASTING/BAKING
- ROTISSERIE ATTACHMENT
- KEBAB ATTACHMENT
- CARE AND MAINTENANCE
- HINTS AND TIPS
- RECYCLING
- RECIPES
- TRIPLE CHEESE GRILLED PORTOBELLO MUSHROOMS Serves: 4
- LEMON AND DILL GRILLED SALMON Serves: 4
- HERB AND CHILLI ROTISSERIE CHICKEN Serves: approx. 4
- HALOUMI AND VEGETABLE KEBABS Serves: 5
- CHOCOLATE ORANGE FONDANTS Serves: 6
- APENAS PARA USO DOMÉSTICO
- KEBABS MED HALOUMI OG GR∅NTSAGER 5 Pers.
- PLEIE OG VEDLIKEHOLD
- GRILOVANÉ ŠAMPIŇÓNY PORTOBELLO S TROMI DRUHMI SYRA Pre 4
Brand : RUSSELL HOBBS
Model : Cyclofry Plus Health 22101-56
Category : Electric fryer