
SWL R990 - Sweeper Lavor - Free user manual and instructions
Find the device manual for free SWL R990 Lavor in PDF.

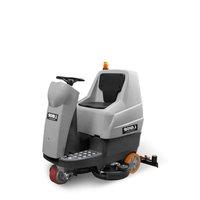
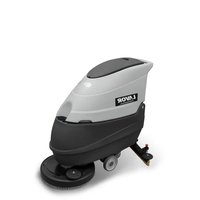
| Product type | Ride-on sweeper |
| Brand | Lavor |
| Model | SWL R990 |
| Power supply | ET version: electric (24V battery); ST version: petrol |
| Dimensions (L x W x H) | 1430 x 910 x 1140 mm |
| Weight (without battery) | ET version: 260 kg; ST version: 300 kg |
| Working width | Central brush: 700 mm; +1 side brush: 920 mm; +2 side brushes: 1150 mm |
| Tank capacity | 62 L |
| Filter surface | 6 m² (6 cartridge filters) |
| Maximum forward speed | ET version: 1.72 m/s; ST version: 2.13 m/s |
| Maximum slope | ET version: 18%; ST version: 16% |
| Turning radius | 1450 mm |
| Sound pressure level (LpA) | ET version: 64.9 dB(A); ST version: 80.8 dB(A) |
| Main functions | Central and side sweeping, filtration suction, collection bin, forward/reverse, parking brake |
| Safety | Automatic shutdown if operator leaves seat or hood open; parking brake; safety guards |
| Routine maintenance | Filter cleaning every 40/70 h, regular bin emptying, brush adjustment, engine oil change (ST) every 40/50 h |
| Spare parts | Central and side brushes, cartridge filters, dust seals, batteries (ET) |
| Warranty | 12 months against manufacturing or assembly defects |
Frequently Asked Questions - SWL R990 Lavor
User questions about SWL R990 Lavor
0 question about this device. Answer the ones you know or ask your own.
Ask a new question about this device
Download the instructions for your Sweeper in PDF format for free! Find your manual SWL R990 - Lavor and take your electronic device back in hand. On this page are published all the documents necessary for the use of your device. SWL R990 by Lavor.
USER MANUAL SWL R990 Lavor
INSTRUCTIONS AND OPERATING MANUAL
EN pag. 19
MANUEL D'INSTRUCTION
FR pag. 36
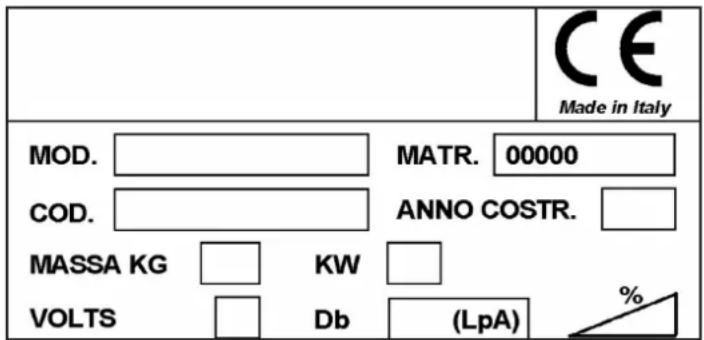
Technical data plate
indice....pag.
CAPITOLO 1 - NORME GENERALI ....3
CAPITOLO 2 - SCOPI / INTENZIONI....3
CAPITOLO 3 - PREPARAZIONE (SBALLAGGIO)....3
CAPITOLO 4 - CONDIZIONI DI USO CONSENTITE E NON CONSENTITE . . . . . . . . . . . . . . . . . . . . . . . . . . . . . . . . . . . . . . . . . . . . . . . . . . . . . . . . . . . 4
CAPITOLO 5 - CARATTERISTICHE TECNICHE E LIVELLI DI RUMORE. . . . . . . . . . . . . . . . . . . . . . . . . . . . . . . . . . . . . . . . . . . . . . . . . . . . . . . . . . . . . . . . . . 5
SPAZZOLA LATERALE:
natural_image
Line drawing of a person operating a cleaning or cleaning vehicle (no text or symbols present)RISCHI RESIDUI NON ELIMINABILI
ATTENTION: READ THIS INSTRUCTIONS MANUAL CAREFULLY BEFORE USING THE MACHINE
THE MANUFACTER DISCLAIMS ALL LIABILITY FOR DAMAGE TO THINGS AND / OR INJURY TO PERSONS RESULTING FROM FAILURE TO COMPLY WITH THE INSTRUCTIONS IN THIS MANUAL AND FROM INCORRECT AND / OR IMPROPER MACHINE USE.
ALWAYS KEEP THIS MANUAL HANDY FOR QUICK REFERENCE (IN CASE OF LOSS, ASK YOUR DEALER FOR ANOTHER COPY)
THE MANUFACTER RESERVES THE RIGHT TO MAKE CHANGES OR UPGRADE ITS MACHINES, WITHOUT ANY OBLIGATION TO UPGRADE PREVIOUSLY- SOLD MACHINES.
ALL SWEEPERS CONFORM TO EEC STANDARDS AND ARE LABELLED:
CHAPTER 2 - PURPOSES / INTENDED USE
To make it easier to read about and look up various subjects, refer to the table of contents at the beginning of the section in your language. This manual has been prepared by the manufacturer and is an integral part of the product. As such, it must be kept in a safe place for the machine's entire service life until demolition.
The customer must ensure that machine operators have read or are familiar with the contents of this manual so that they strictly follow the instructions described herein.
Constant compliance with the instructions provided in this manual is the only way to guarantee the best results in terms of safety, performance, efficiency and service life of the product you now own. Non-compliance with these rules may cause injuries to people and damage to the machine, the scrubbed surface and the environment: in no case can such injuries or damage be attributed to the manufacturer.
This manual refers in detail to the machine and provides instructions and descriptions only about our batteries and battery chargers (optional).
The batteries and the battery charger are basic complementary machine parts and will affect its operation in terms of running time and performances.
Only the correct combination of the two accessories (batteries and battery charger) will ensure the highest possible performances and avoid wasting lots of money. For more detailed information
refer to the special battery and battery charger manuals.
Our recommended battery chargers and batteries (optionals) ensure the best combination with the machine and offer outstanding versatility (battery charger) as well as the category's highest quality and performance standards.
CHAPTER 3 - PREPARATION (UNPACKING)
After removing the outer packaging, remove the machine from the pallet; this operation can be done in two ways:
- Take a hook and 4 tie-rods of suitable lifting capacity for the weight of the machine (shown on the CE plate). Lift the motor bonnet and secure the four eyebolts or hooks in the threaded housings (the lifting hooks are inside the collection bin Part. B FIG. 1 together with the side brushes and instruction manuals); secure all four straps to their respective lifting hooks Part. A Fig. 1 and with the aid of a fork lift truck or bridge crane (suitable for weight of the machine), lift this off the pallet and rest it on the floor very slowly.
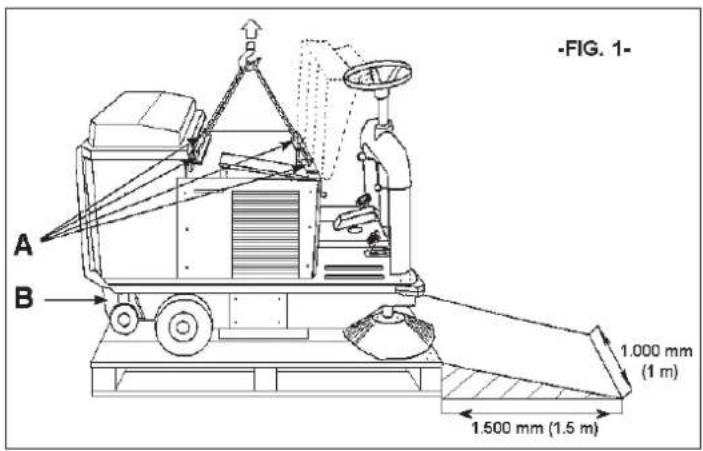
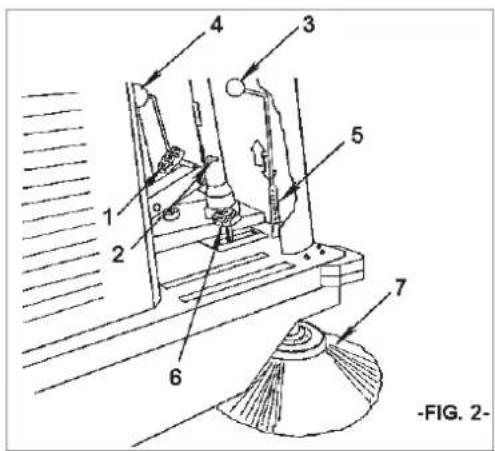
- Position a sloping surface (having a load-bearing capacity suitable for the weight of the machine) close up to the narrow side of the pallet. This must be at least 1,5 m long (so as not to damage the rubber dust seals) and 1 m wide. Remove the pieces of wood around the wheels and release the parking brake Part. 1 Fig. 2, pressing this so as to release the retention lever. At this point, simply push the machine onto the chute. This operation must be performed without anyone in front of the machine and on a large flat surface. At the end of the unpacking operation, remove and keep the eyebolts and fit the right side brush Part. 7 Fig. 2 and, If necessary, the left side brush as shown in page 17.
IMPORTANT: All the materials remaining after the unpacking operation must be carefully disposed of by the user, following applicable regulations.

ATTENTION:
SURE THAT THE MACHINE PROTECTION DEVICES ARE IN GOOD CONDITION AND PROPERLY FITTED. IN THE EVENT OF FAULTS OR MISSING PARTS, DO NOT START UP THE MACHINE AND NOTIFY THE DEALER OR MANUFACTURER
CHAPTER 4 - INTENDED AND FORBIDDEN USE
INTENDED USE:
The sweepers have been built to clean the residues left by machining operations, dust, dirt in general, from all flat, hard and not excessively uneven surfaces like: concrete, asphalt, stoneware, ceramic, wood, metal, marble, rubber or plastic covering, both rusticated and smooth, synthetic or short-pile carpeting, in open or closed premises.
FORBIDDEN USE:
- The SWL-R 990 ET sweeper cannot be used on gradients over 12% with standard switchboard. They can reach a 20% gradients with increased switchboards.
● The SWL-R 990 ST sweepers cannot be used on gradients over 16%.
- The SWL-R 990 ST model with internal combustion engines cannot be used inside for they could produce carbon monoxide (an odorless but lethal gas) series with internal combustion engines cannot be used inside for they could produce carbon monoxide (an odorless but lethal gas)
● They cannot be used in explosive or inflammable environments.
● They cannot be used on uneven, gritty or very rough surfaces.
- They cannot pick up oils, poisons and chemical materials in general, (for use in chemical plants, apply for specific authorisation from the dealer or manufacturer).
● They cannot be used on town or country roads. They cannot circulate on public roads.
- They cannot be used in premises where the lighting is bad, as they are not equipped with their own lighting system.
● They cannot be towed in any way, either on private premises or on public roads or premises.
● They cannot be used to brush snow or to wash or grease surfaces in general, either wet or very damp.
- They cannot operate in the presence of stringy materials as this is incompatible with brush rotation.
- They cannot be used to rest things on or as raised platforms for things and persons.
● Never allow people within machine operating range.
- Do not make any changes to the machines unless authorised to do so by the manufacturer.
CHARTER 5 - TECHNICAL CHARACTERISTICS AND NOISE LEVEL
| TECHNICAL FEATURES M.U. SWL-R 990 | ET SWL-R 990 ST | |
| POWER // BATTERY PETROL ENGINE | ||
| CENTRAL BRUSH WIDTH mm 700 700 | ||
| CENTRAL BRUSH WIDTH+1 RIGHT SIDE BRUSH mm | 920 920 | |
| CENTRAL BRUSH WIDTH+2 RIGHT AND LEFT SIDE BRUSHES | mm 1 | 150 1.150 |
| MAX SPEED | m/s 1,72 | 2,13 |
| REVERSE MAX SPEED | m/s | 0,88 |
| MAX CLEANING CAPACITY (WITH 2 SIDE BRUSHES) | mq/h | 6.200 |
| MAX SLOPE | % | 18 |
| TRACTION | // BACK WHEELS FRONT WHEELS | |
| TRANSMISSION | // | ELECTRIC |
| MAX. SPEED TURNING RADIUS | mm | 1.450 |
| FILTERING SURFACE (6 FILTERS) | mq | 6 |
| CONTAINER CAPACITY | L | 62 |
| MAX LENGTH CONTAINER | mm 1 | 430 1.430 |
| MAX WIDTH | mm | 910 910 |
| HEIGHT | mm | 1.140 1.140 |
| WEIGHT (BATTERIES NOT INCLUDED) | Kg | 260 300 |
| Acoustic pressure LpA | dB(A) | 64,9 |
| Acoustic power measured LwA | dB(A) | 85,1 |
| Acoustic power granted LwA | dB(A) | 85,1 ± 2,5 |
| Vibrations, on steering wheel | m/s2 | 1,38 |
| Vibrations, on seat | m/s2 | 0,38 |
CHAPTER 6 - DESCRIPTION OF MACHINE
● SAFETY PROTECTION DEVICES:
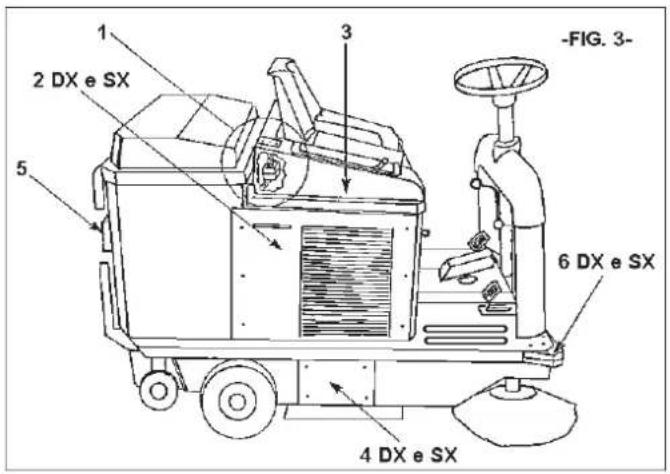
Fig. 3 shows the safety protections, which must be carefully fitted and in good working condition. The machine cannot be used with one or more safety protections devices missing or damaged. The description of the protection devices and relevant order codes are shown below:
PART.
DESCRIPTION
1 Driving seat safety switch
2 Right and left side panel
3 Motor bonnet
4 Central brush protection plate: Right and Left
5 Reverse indicator light
6 Front angular wheel
SIDE BRUSH:
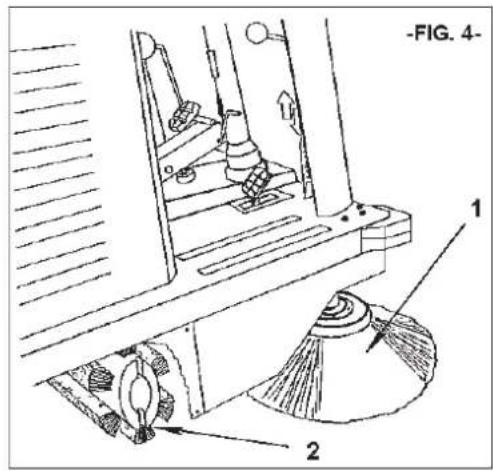
The side brush, Part. 1 Fig. 4, acts as a dust and waste conveyor. Its purpose is to clean edges, corners and profiles. After cleaning, this must be disengaged (raised) to prevent raising dust and because the cleaning effect of the side brush is inferior to that of the central brush. A left side brush is also available as an optional feature.
CENTRAL BRUSH:
The central brush Part. 2 Fig. 4 is the main machine component for loading the dust and waste into the collection bin. It is available in various degrees of hardness and bristle types, depending on the type of material to be collected up and on the type of floor. It is height adjustable in case of wear (See Chapter 13).
IMPORTANTE: do not pick up cords, wires, packaging straps, sticks, etc., longer than 25 cm as these could wrap around the centre and side brushes and damage them.
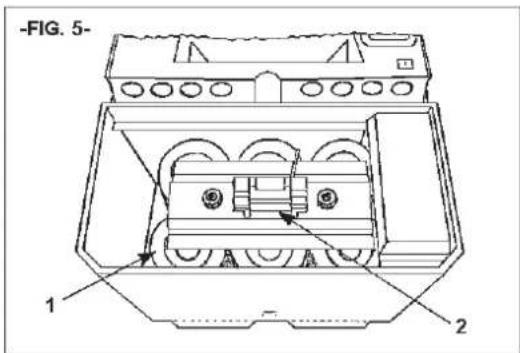
FILTER SYSTEM:
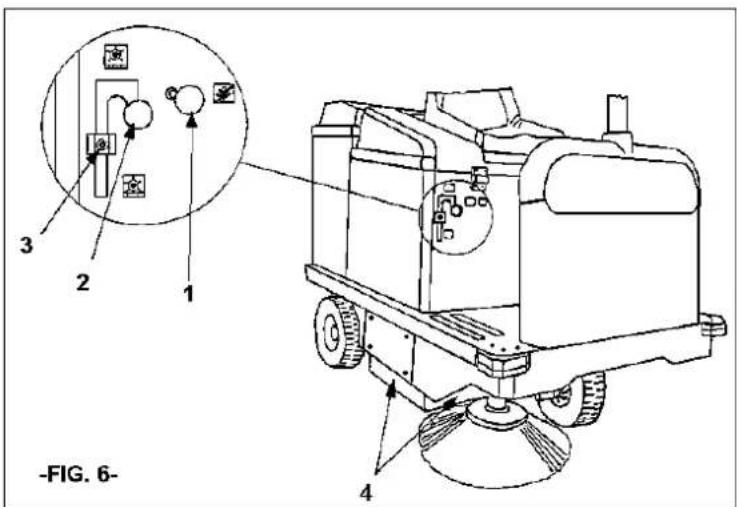
During operation, the filter system ensures that the machine does not raise dust in the surrounding areas. It consists of six cartridge filters Part. 1 Fig. 5. The filter system can be disengaged by pulling knob Part. 1, seen in Fig. 6.
IMPORTANT: Disengage the filter system when passing with the machine over wet or very damp areas to prevent dampening and therefore deteriorating the paper filters.
DUST SEALS:
See Part. 4 Fig. 6. These seals surround the central brush and are very important for ensuring good machine operation, making possible as they do the suction effect. Frequently check to make sure they are in good condition.
COLLECTION BIN: The container or collection bin Part. 1 Fig. 7, made of resistant plastic, holds all the material
picked up by the central brush and the filter dust. It can be easily removed thanks to a wheeled frame Part. 2 Fig. 7.
IMPORTANT: container emptying must always be done with the motor shut off. Wear gloves and possibly a face mask to protect the airways from dust (always present in this operation).
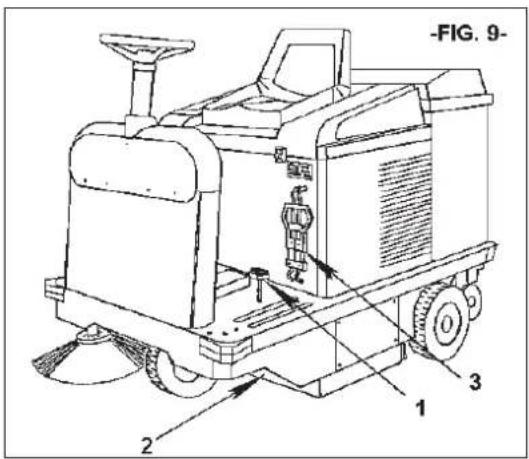
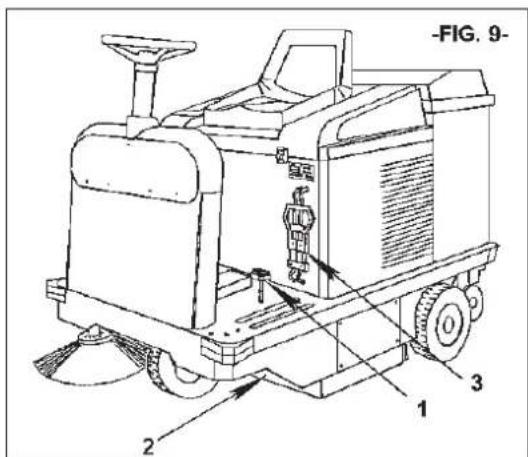
FLAP-LIFT PEDAL:
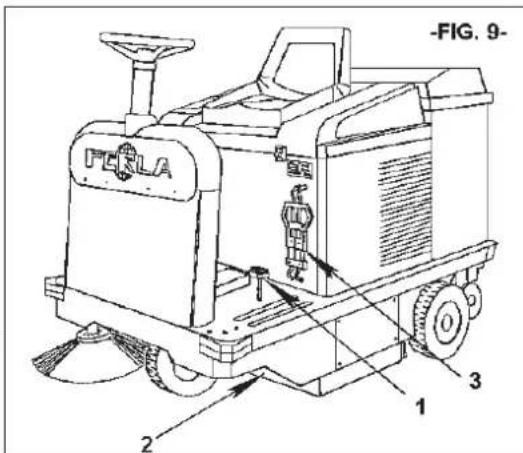
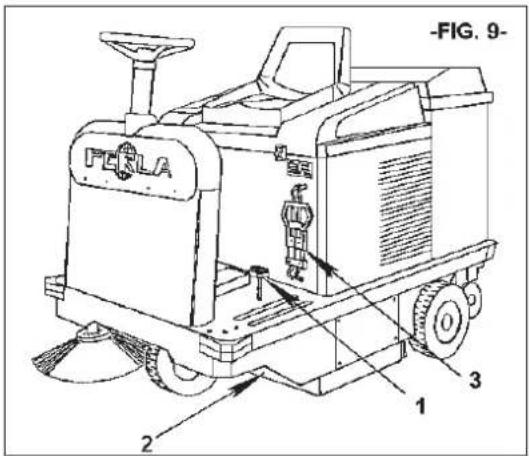
By pressing the flap-lift pedal Part. 1 Fig. 9, the front seal Part. 2 Fig. 9 lifts up for picking up a large objects. Suitable for collecting leaves, cigarette packets, etc.
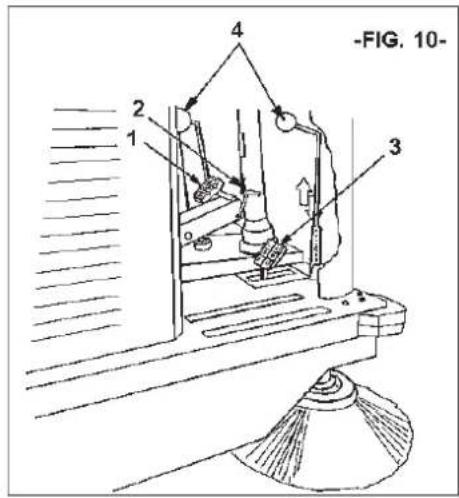
BRAKE PEDAL:
By pressing this pedal Part. 1 Fig. 10, the machine slows down and stops (until the pedal is released).
PARKING BRAKE:
To leave the machine in parking position, proceed as follows: press the brake pedal with the left foot and then insert the stop tooth with the right foot by pressing lever. To release the parking brake, simply press the pedal Part. 4 Fig. 10 again.
FORWARD AND REVERSE PEDAL: (only for battery version)
Part. 3 Fig. 10. This pedal has two functions depending on the position of the operation switch Part. 1 of switchboard: when the switch is in forward position, the machine moves forward when the pedal is pressed. When switch is positioned in reverse, the machine reverses. For safety reasons, the reverse speed of the machine is very low. When the switch is in central position, the machine moves neither forward not in reverse.
FORWARD AND REVERSE PEDAL: (only for internal combustion engine)
Part. 3 Fig. 10. This pedal has two functions depending on the position. By pressing the right side (with arrow pointing UP) the machine goes forward while by pressing the left side (with arrow pointing DOWN) the machine withdraws. For safety reasons, the reverse speed of the machine is very low.
SIDE BRUSH ENGAGEMENT LEVER: (for all models)
The engagement lever Part. 1 Fig. 10 makes it possible to lower the brush from the driving seat. Remember that the side brush must only be used for cleaning edges, profiles and corners and that it continues to rotate when the machine motor is rotating. To lower and then activate the side brush push forward lever Part. 1 fig. 10; to disconnect the side brush bring back the lever in the initial position by pulling it back.


ATTENTION:
TOUCH THE SIDE BRUSH WITH YOUR HANDS AND NEVER PICK UP THREADED MATERIALS.
● SUCTION OFF KNOB: For all models.
Fitted to both models Part. 1 Fig. 6. When this knob is pulled outwards, suction is disengaged. Disengage the suction every time the filters need shaking or when passing over damp areas (with the motor on).
CENTRE BRUSH ENGAGEMENT LEVER: For all models.
This lever Part. 2 Fig. 6 makes it possible to engage and disengage the centre brush. By sliding the lever down along the slot, the work position is lowered, while when the lever is slid upwards and inserted in the notch, the centre brush is disengaged.
1) Gear switch
2) Hour counter
3) Ignition key
4) Brushes motor switch
5) Charge indicator
6) Filter Buzzer Button
7) Acoustic Indicator Button
8) Working light switch (optional)
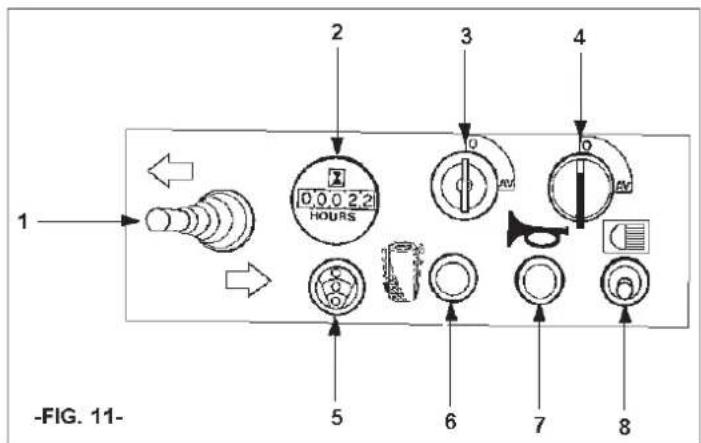
GEAR SWITCH :
Part. 1 The purpose of the gear switch lever is to move the machine forward or reverse. When the switch is in forward position (arrow pointing up) by pressing the pedal Part. 3 Fig. 10 the machine moves forward. When the switch lever is in reverse position (arrow pointing down) by pressing the pedal the machine moves reverse. For safety reasons, the reverse speed is very low. If the switch is left in central position, the machine moves neither forward nor in reverse.
FILTER BUZZER BUTTON:
Part. 6 This buzzer cleans the suction filters through a motor-vibrator Part. 2 Fig. 5; it must be pressed at least 6 / 7 times for 8 / 10 seconds each (operation to be performed before starting work, before emptying the bin and with the motor off); to perform this operation with motor running, close the suction by pulling the knob Part. 1 Fig. 6.
ACOUSTIC INDICATOR BUTTON:
Part. 7 By pressing this button the acoustic indicator switches on.
BRUSHES MOTOR SWITCH:
Part. 4 By actioning this switch either central and side brushes are activated.
IGNITION KEY :
Part. 3 It activates the switchboard and in particular the movement potentiometer. It is therefore possible to move the machine without have it working.
● WORKING LIGHT SWITCH: Optional
Part. 8. It activates the adjustable working light.
CHARGE INDICATOR:
Part. 5 It indicates the charge level of batteries and it's represented by three coloured lights (red, yellow and green); by turning on the ignition key Part. 6 they switch on in the following order: red-yellow-green; wait until green light is on before forwarding or reversing. If red light should switch on batteries need recharging.

IT IS RECOMMENDED NOT TO WAIT UNTIL THE RED LIGHT TURNS ON TO PROCEED WITH RECHARGING OF BATTERIES BUT TO PROCEED WITH THE OPERATION AS SOON AS YELLOW LIGHT SWITCHES ON.
HOURCOUNTER:
Part. 2 Makes it visible the number of hours worked by the machine.
1) Accelerator lever
6) Filter buzzer button
2) Start lever
8) Working light switch (optional)
3) Hourcounter
4) Ignition key
5) Acoustic indicator button
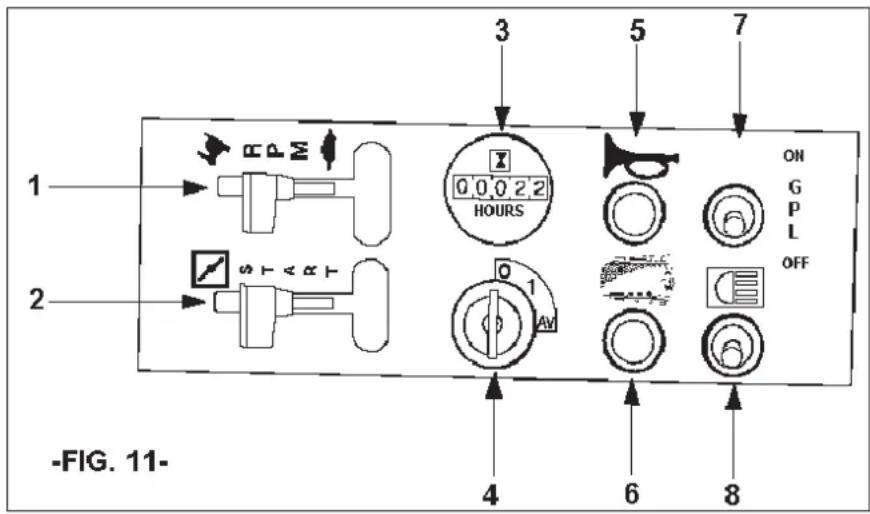
- ACCELERATOR LEVER:
Part. 1 Fig. 11. It controls the number of motor's rotations.
START LEVER:
Part. 2 Fig. 11. It is needed for "cold" ignition of the machine. It is positioned in "up" position. After the ignition it must be slowly brought back.
HOURCOUNTER:
Part. 3 Fig. 11. Makes it visible the number of hours worked by the machine.
IGNITION KEY :
Part. 4 Fig. 11 It activates the switchboard and in particular the movement potentiometer. It is therefore possible to move the machine without have it working
ACOUSTIC INDICATOR BUTTON:
Part. 5 Fig. 11. By pressing this button the acoustic indicator switches on
FILTER BUZZER BUTTON:
Part. 6 Fig. 11 This buzzer cleans the suction filters through a motor-vibrator Part. 2 Fig. 5; it must be pressed at least 6 / 7 times for 8 / 10 seconds each (operation to be performed before starting work, before emptying the bin and with the motor off); to perform this operation with motor running, close the suction by pulling the knob Part. 1 Fig. 10.
● WORKING LIGHT SWITCH: Optional Part. 8 Fig. 11. It activates the adjustable working light.
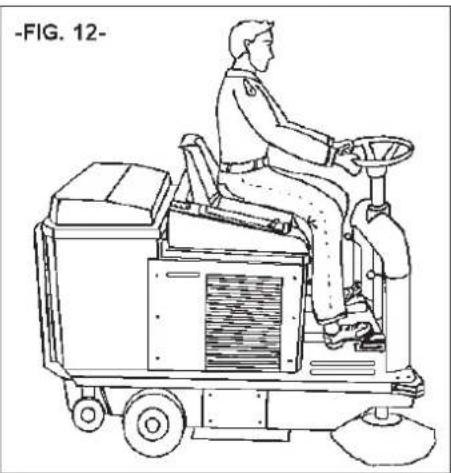
CHAPTER 7 - OPERATOR WORK STATION EMERGENCY STOP
WORK STATION:
The working place that must be occupied by the operator when using the machine is only the one shown in Fig. 12.
IMPORTANTE: For safety reasons, the machine switches off automatically if the operator moves from the driving seat or if the motor bonnet part. 3 fig. 3 is raised or is not completely closed.
● EMERGENCY STOP: (Only for battery version)
Using the left hand, grip the connector handle Part. 3 Fig. 9, pull this upwards and out and press the brake pedal Part. 4 Fig. 10 hard; power will be interrupted and motors will stop immediately.
● EMERGENCY STOP: (Only for petrol version)
natural_image
Line drawing of a person operating a cleaning or cleaning vehicle (no text or symbols)Release the forwarding pedal and press the brake pedal Part. 4 Fig. 10, switch off the machine by turning off the key on the switchboard (anticlockwise) Part. 7
CHAPTER 8 - SAFETY REGULATIONS
OUTSTANDING RISKS WHICH CANNOT BE ELIMINATED
● DEFINITION: These are risks which, for various reasons, cannot be eliminated. Please find below some indications on how operating in total safety..
- Risk of injury to the hands and eyes if the machine is used without all the safety protections properly fitted and in good working condition.
- Risk of injury to hands by touching the side brush or central brush for any reason during rotation. The brushes must only be touched with the motor switched off and wearing protective gloves to avoid being pricked or cut in the event of sharp objects caught up between the bristles.
● Risk of inhalation of harmful substances and hands injuries in emptying the container (bin) without using protective gloves and a face mask.
● Risk of not controlling the machine if this is used on different gradients than those indicated in chapter 5
● Risk of explosion or fire if refuelling with engine switched on or with engine switched off but not yet cold.
● Risk of heavy burn by operating maintenance with engine switched on or with engine switched off but not yet cold.
FOR MOD. SWL-R 990 ST SEE ALSO THE ENGINE MANUAL IN THE CHAPTER "SAFETY RULES".
GENERAL RISKS FOR BATTERIES
● Before charging the batteries, make sure the premises are well-ventilated or perform charging operations in premises set aside specifically for the purpose.
- Do not smoke, do not move near to the batteries with open flames, do not use grinding or welding machines; do not cause sparks near the batteries
- Do not take current samples from the batteries using pliers, sockets and provisional contacts.
● Make sure all connections (cable terminals, sockets, plugs, etc.) are always well tight and in good conditions
- Do not rest metal tools on the batteries.
- Keep the batteries clean and dry, if possible using antistatic cloths.
- Top up with distilled water every time the level of the electrolyte falls to 5 - 10 mm from the splash guards.
● Avoid overcharging and keep battery temperature below 45^ C.
- Maintain any centralised topping-up systems in good working order and service regularly.
- Risk of electric shocks and short circuits; for safety's sake, before performing any maintenance or repairing on the batteries (or on the machine), remove the +/- terminals from the battery poles.
● Risk of explosions during charging; this can occur when recharging with an unsuitable battery charger (depending on battery Amperes)
- During battery recharging operations, or whenever the battery charger plug is inserted, the machine must never be switched on or moved (even manually)
MODEL SWL-R 990 ET (battery model)
- Check the level of the battery solution and if necessary top up with distilled water.
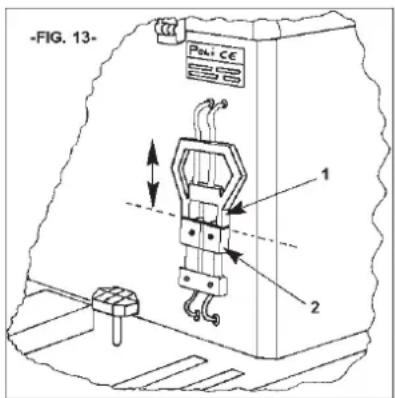
- Make sure the connector Part. 1 Fig. 13 is well inserted in the socket Part. 2 Fig. 13..
MODEL SWL-R 990 ST (engine model)
Read carefully the Engine User Manual attached to this machine booklet and follow some simple instructions:
- Check the level of oil in the engine and top up, if low, wearing protection gloves (possibly nitrile gloves with cotton inside) the oil sump (from 5,5 hp-3,75 kw) contains about 5hg of oil. The recommended oil for temperate climate is 10w-30. To protect engine a particular device stops the engine by switching on if oil is absent or not enough; it is therefore necessary checking the oil level very often.
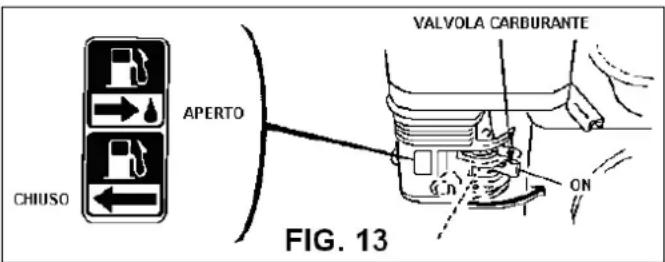
- Refuel with switched off and cold engine only; Unlead petrol is strongly advised.

ATTENTION:
FUEL OUT OF CHILDREN'S REACH, IN A DRY AND AIRY PLACE, FAR FROM HEAT SOURCES E AERATO, LONTANO DA FONTI DI CALORE.
IMPORTANT: Fuel tank must be fit for the purpose and well cleaned. This will grant you a good and long lasting of the petrol engine filter. Please use a tank suitable to use up fuel in max 2/3 months in order to have fresh fuel all the time.
CHAPTER 10 - STARTING AND STOPPING

ON PLEASE: BEFORE PROCEEDING MAKE SURE YOU HAVE READ ALL PREVIOUS CHAPTERS.
MODEL SWL-R 990 ET (battery model)
IMPORTANT: To start the machine, first of all sit in the driver's seat. If the operator is not sat, or if he/she stands up during start up, the machine will stop.
START UP :
● Turn the key Part. 6 of switchboard clockwise
- Turn the switch Part. 5 of switchboard to start the engine, the rotation of brushes and to activate suction.
The machine is in working position with the central brush lowered and suction engaged.
FORWARD MOVEMENT:
- Position the switch Part. 1 of switchboard forwards and press the forward pedal with the foot Part. 6 Fig. 2.
REVERSE MOVEMENT:
- Position the switch Part. 1 of switchboard backwards and press the backward pedal with your foot Part. 6 Fig. 2
NEUTRAL:
With the switch Part. 1 of switchboard in central position the machine is in neutral.
STOP:
● Turn the switch Part. 5 of switchboard anticlockwise
● Turn the key Part. 6 of switchboard anticlockwise.
MODEL SWL-R 990 ST (engine model)
STARTING:
● Disconnect the brake Part. 4 Fig. 10.
- Put the lever "START" in position "Switch off" Part. 1 of the switchboard.
- Move the acceleration lever Part. 2 of switchboard in position "MAX" (represented by a hare).
- Turn the key Part. 7 of switchboard in position 1 and then in position AV
- As soon as the engine starts bring the Start lever back, slowly, and regulate the number of rotations ("RPM"); it's better to warm up the engine for some minutes at slow running before starting.
IMPORTANTE: For warm starting of the engine use the same procedure
STOPPING:
● Turn anticlockwise the key Part. 7 of switchboard.
ATTENTION:
IF THE ENGINE DOESN'T START AT FIRST TRY, REPEAT THE SEQUENCE AT TIME BREAKS OF 10/15 SECS. DON'T PERSIST IN STARTINGS FOR MORE THAN 5/6 SECS.
CHAPTER 11 - CORRECT USE AND ADVICES
IMPORTANT: Before starting work, make sure there are no strings, plastic or metal wires or long strips of cloth, sticks, power leads, etc. on the floor as theY are hazardous and could damage the dust seals and brushes. These must be removed before starting work with the machine.
- Be very careful when driving over rails, door runners, ets. These can cause damage to dust seals. Drive over them very slowly.
- Avoid driving over puddles of water. In the presence of damp surfaces, close the suction by means of knob Part. 1 Fig. 6 located to the right of the operator, alongside the central brush start lever.
- In the presence of large or lightweight objects (leaves, cigarette boxes etc.) lift the front flap by pressing the flap-lift pedal with the heel of your left foot Part. 1 Fig. 9.
- If the surface to be cleaned is very dirty in terms of quantity and quality of the material or dust to be picked up, first of all go over the area "roughly" without paying too much attention to the result. Then with a clean bin and the filters well shaken, go over it again. This way, the desired effect will be achieved.
- Subsequently, if the machine is used regularly and properly, such "rough" cleaning will no longer be required.
- The side brush must only be used for cleaning edges, profiles, corners, etc. It must be raised (disengaged) immediately after use so it does not lift up dust and also because results achieved with the side brush engaged are always inferior to those obtained with the central brush alone.
- For good results, empty the container regularly and keep the filters clean, shaking them with the tools provided.
CHAPTER 12 - ROUTINE MAINTENANCE

ATTENTION: ALL OPERATIONS MUST BE PERFORMED WITH COLD AND SWITCHED OFF ENGINE.
- CLEANING THE DUST FILTERS:
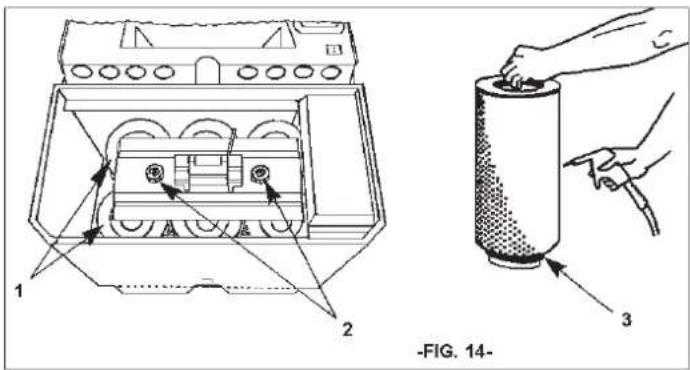
Every 40 / 70 working hours or whenever necessary, check the dust filters Part. 1 Fig. 14. Remove them from housing, loosen the filter-pressing blocks Part. 2 Fig. 14 and clean the filters by, first of all, banging them on the floor (not violently), keeping the perforated side towards the floor. For more thorough cleaning, use a compressed-air gun and blow from outside towards the inside, as shown in figure 14. When refitting the filters, always remember to replace the black seal Part. 3 Fig. 14 on the bottom of the filter.
Make sure that the filters are always in good condition and, whenever necessary, replace them.
DUST SEALS:
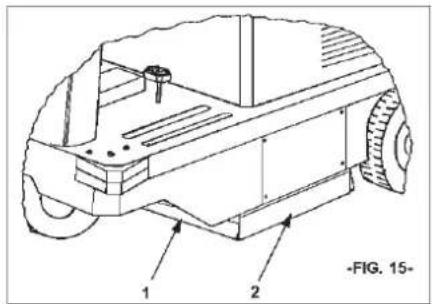
Every 40 / 70 working hours, check the condition of the dust seals Part. 1 (movable) and Part. 2 (3 fixed seals) Fig. 15 surrounding the central brush Part. 2 Fig. 4. Whenever necessary, replace these.
IMPORTANT: By replacing the seals make sure the side seals (the shortest one on the right and on the left. in total 2) are raised off the ground of about 2 mm.
CENTRAL BRUSH:
Part. 2 Fig. 4. Every 50 / 80 working hours, or whenever necessary, check the condition of the central brush, especially if you have picked up pieces of string, wire, etc.
To remove such items from the brush:
- Remove the bin Part. 2 Fig. 7.
- Kneel down and inspect the central brush under the machine. Wearing gloves and a face mask to protect the airways, remove any pieces of string or wire wrapped around the central brush. The 4 hooks (eyebolts) provided can also be used to raise the machine (see Fig. 1) and perform this operation. Take care not to stand underneath the machine.
ADJUSTMENTS AND REPLACEMENTS
CENTRAL BRUSH ADJUSTMENTS:
- If the machine starts cleaning in a faulty manner or leaves dirt around, it will have to be adjusted and lowered as followed:
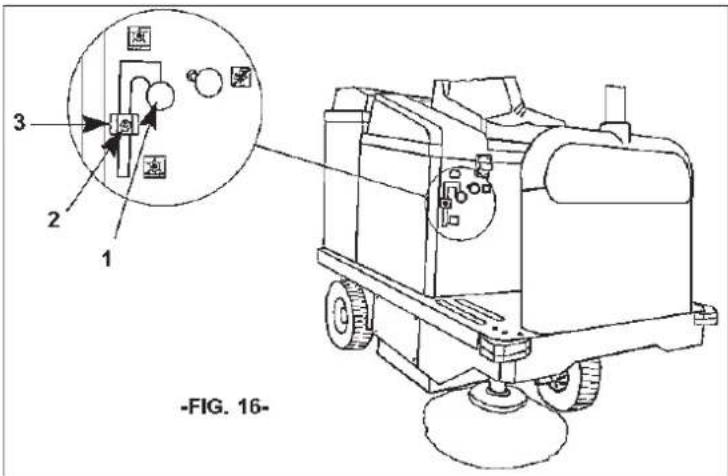
- Position lever Part. 1 Fig. 16 so that the central brush is raised.
- Loosen screw Part. 2 Fig. 16.
● Lower the adjuster Part. 3 Fig. 16 by 3/4 mm or by the desired distance.
- Secure the adjuster by tightening screw Part. 2 Fig. 16
- Position lever Part. 1 fig. 16 above the adjuster Part. 3 fig. 16.
- The central brush can be adjusted until the adjuster Part. 3 fig. 16 reaches the end of stroke; after this, the brush must be replaced.
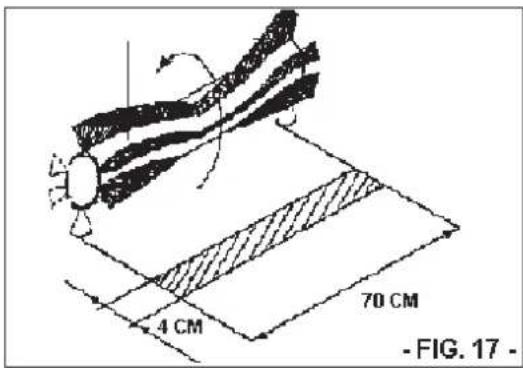
IMPORTANT: To ensure the central brush is correctly adjusted, measure its "Track" as follows:
● After adjustments, start the machine up and, and without moving either forwards or backwards, leave it standing in the same place for at least 10 / 15 sec. with the central brush lowered.
- Turn off the engine, raise the central brush and move the machine forwards manually until the mark left on the floor by the rotation of central brush is visible, as shown in Fig. 17.
IMPORTANTE: The width of the track must not be under 4 cm.
SIDE BRUSH ADJUSTMENT:
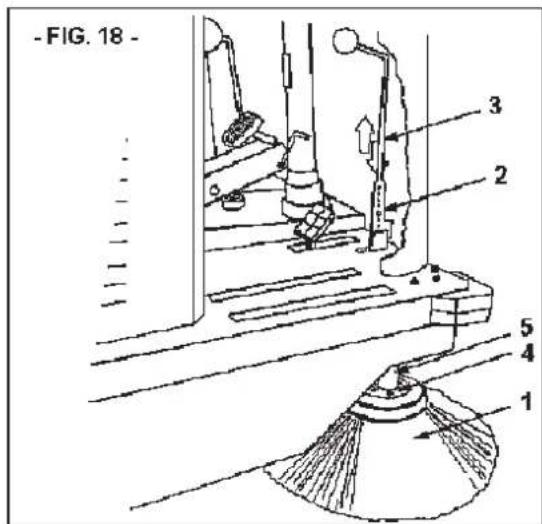
When the side brush Part. 1 Fig. 18 is no longer able to convey dirt to the central brush, the height of the side brush will have to be adjusted as follows: Keeping the side brush raised turn anticlockwise the register Part. 3 fig. 8.

APTANT: This operation must be performed the engine switched off.
COLLECTION BIN:
Every 50 / 60 working hours or whenever necessary, wash the collection bin Part. 1 Fig. 7 using warm water and, if necessary, common detergent. This will prevent any bacteria build-up (wear rubber gloves).
GENERAL RULES: To ensure a good machine functioning and life-span, keep both the outer bodywork and the inside of the machine, under the bonnets, clean by using jets of compressed air (perform this operation with the engine off and cold).
REPLACEMENTS
REPLACING THE CENTRAL BRUSH:
(This operation must be performed wearing gloves and a face mask to protect the airways. Use 10 / 13 / 17 mm spanners and make sure the engine is off and cold.).
- Remove the left panel (left to the driving seat) Part. 4 (Left) Fig. 3, by loosening the retention screws.
- Remove the 3 bolts on Part. 7 and 9 of Table 1.
- Remove the screws securing the left panel Part. 13 Tab. 1 to which the side seal is also fastened.
- Pull out the central brush Part. 15 Tab. 1 and proceed to replace this being careful to ensure the brush bristles are in the right direction as shown in Fig. 17. Ensure the drive notches of the two brushes supports Part. 4 and 24 (see Tab. 1) are inserted in the brush housing Part. 15 Tab. 1.
-
To end assembly, repeat the operations in the reverse order.
-
Adjust the height of the new brush (see "CENTRAL BRUSH ADJUSTMENT" paragraph).
● REPLACING THE SIDE BRUSH:
This operation must be performed with the engine off and wearing gloves, using two 10 mm spanners.
- Unscrew the three bolts Part. 4 Fig. 18 to detach the side brush Part. 1 Fig. 18 from the plastic flange Part. 5 Fig. 18.
- Replace the worn brush and screw up the bolts Part. 4 Fig. 18 to the flange Part. 5 Fig. 18.
ONLY FOR SWL-R 990 ST MODEL

ATTENTION: When checking or replacing the motor oil, always wear protectives gloves, if possible made of nitrile with cotton lining; Do not discard the used oil into the environment as this is a pollution hazard.

Carefully read the attached motor instruction booklet and always:
IMPORTANT: The motor of the SWL-R 990 ST sweeper feature an OIL-ALERT system. This prevents motor start up in the absence or if the oil level is low.
- Check the level of the oil every 5 work hours.
- First oil change after 5 work hours. The sump contains about 5 hg of oil. The oil recommended for temperature climates is 10W-30 multigrade for petrol engines. If the machine is operating outside the temperature zone, determine the right oil by referring to the motor booklet. When changing oil, use the special oil drain pipe.
- Subsequent oil changes every 40/50 work hours.
- Clean the motor air cartridge every 25 hours or before if necessary. Replace if necessary (see motor booklet).
CHAPTER 13 - EXTRAORDINARY MAINTENANCE


ATTENTION: Extraordinary maintenances are all those not mentioned in this manual. They must therefore be performed by specialised after-sales personnel (see manual cover).
CHAPTER 14 - PUTTING OUT OF USE
MODEL SWL-R 990 ET (battery model)
- Remove the batteries from their housing and keep them in a dry and well-ventilated palce. To ensure a long lasting of unused batteries charge them and eventually top up with distilled water every 30/40 days
- Clean the dust filters and the bin. if necessary wash the bin as in instructions in "Collection bin" paragraph
MODEL SWL-R 990 ST (engine model)
● Leaving the machine switched on use up all the petrol in the tank;
● Clean the machine (with cold and switched off engine);
- Clean the dust filters and the bin ; If necessary wash the bin as in instructions in "Collection bin" paragraph.

ATTENTION: Dismantling and demolition are a customer's responsibility. These operations must be performed in accordance with applicable regulations, handing the entire machine or its components to companies specialised in such services.
As the owner of electrical or electronic equipment, the law (in accordance with the EU Directive 2012/19/EU on waste from electrical and electronic equipment and the national laws of the EU Member States that have implemented this Directive) prohibits you from disposing of this product or its electrical / electronic accessories as municipal solid waste and obliges you to make use of the appropriate waste collection facilities. The product can be disposed of by returning it to the distributor when a new product is purchased. The new product must be equivalent to that being disposed of. Disposing of the product in the environment can cause great harm to the environment itself and human health.

The symbol in the figure indicates the urban waste containers and it is strictly prohibited to dispose of the equipment in these containers. Non-compliance with the regulations stipulated in the Directive 2012/19/EU and the decrees implemented in the various EU Member States is administratively punishable.
SCRAPPING OF THE MACHINE
If the machine will no longer be used, remove the batteries and dispose of them in accordance with the eco-compatibility regulations as set forth in European standard 2013/56/EU or deposit them in an authorized collection centre. To dispose of the machine, comply with the current laws where it is used: - disconnect the machine from the mains and clean it after emptying any liquids; - separate the machine into groups of homogeneous materials (plastics in accordance with the recycling symbol, metals, rubber, packing). For parts containing different materials, contact the competent authorities; Each homogeneous group must be disposed of in accordance with recycling laws. In addition, it is recommended to eliminate those parts of the machine that may be dangerous, especially for children.
CHAPTER 16 - EMERGENCY SITUATIONS
IN THE EVENT OF ANY EMERGENCY SITUATIONS SUCH AS, FOR INSTANCE: THE MACHINE HAS ACCIDENTALLY BEEN DRIVEN OVER POWER CABLES AND THESE HAVE WRAPPED AROUND THE CENTRAL BRUSH OR SIDE BRUSH, OR AN UNUSUAL NOISE IS HEARD COMING FROM INSIDE THE MACHINE OR ENGINE, HOT MATERIALS, INFLAMMABLE LIQUIDS, CHEMICAL MATERIALS IN GENERAL, POISONS ETC. HAVE BEEN PICKED UP ETC:
PROCEED AS FOLLOWS:
- Disengage the traction
- Hardly press the brake pedal
- Switch off the engine by the key on the dashboard or simply by leaving the driving seat as the safety micro switch under the seat will automatically turn the engine off.
- After picking up the above materials, remove the container (bin) part. 1 and 2 fig. 7 and clean it, wearing gloves and mask to protect the airways. Follow the instructions in the "collection bin" paragraph.
CHAPTER 17 - TROUBLESHOOTING
Two basic faults can effect: the machine raises dust during use, or leaves dirt on the floor; causes could be many but if the machine is carefully operated and routine maintenance is properly carried out, such faults will not occur.
| FAULT CAUSE REMEDY | ||
| The machine raises dust Suction | lever is in OFF position (pulled out) | Turn to ON position (pushed in) |
| Filters blocked Clean them by “shaking” them using the provided tools and if necessary take them off and clean thoroughly | ||
| Filters damaged Replace | ||
| Filters badly fitted Fit with the seal pro | vided and make sure they are well inserted and uniformly well-secured | |
| Side seals damaged Replace | ||
| The machine leaves dirt on the floor | The central brush is not well set or is worn | Ad just the central brush and check the “track” |
| Wires, strings etc. have been picked up | Remove them | |
| Side seals damaged Replace | ||
| Collection bin full Empty | ||
| The machine battery is not performing properly. The machine is slow and does not clean well | Battery flat or not completely charged | Check the level of the electrolyte and procede with complete new charge cycle |
| The battery charter is not that recommended or is not enough | Use a proper battery charger | |
| The internal combustion engine doesn’t start | Oil level too low or not at maximum. | Top up |
| Micro-seat not activated. Check | ||
CHAPTER 18 - WARRANTY
This machine is warranted against manufacturing or assembly defects for 12 months from the date of sale. The warranty covers only and exclusively the replacement or repair of parts that prove to be defective.
Any other request will not be accepted.
It does not include damage due to normal wear and tear, use other than that indicated in this manual, damage caused by incorrect adjustments, technical interventions not carried out correctly, acts of vandalism.
BALAI LATERAL:
PEDALE SOULEVE-FLAP:
natural_image
Line drawing of a person operating a cleaning or cleaning vehicle (no text or symbols)SWL-R 990 ST
● REMPLACEMENT DU BALAI CENTRAL :
SEITENBÜRSTE:
natural_image
Line drawing of a person operating a cleaning or cleaning vehicle (no text or symbols)CEPILLO LATERAL:
PALANCA ACELERADOR:
natural_image
Line drawing of a person operating a cleaning or cleaning vehicle (no text or symbols)ROZDZIAŁ 2 - CELE / ZAMIARY
SZCZOTKA BOCZNA:
PEDAL DO JAZDY (PRZÓD TYŁ) TYLKO WERSJA SPALINOWA
natural_image
Line drawing of a person operating a cleaning or cleaning vehicle (no text or symbols)БОКОВАЯ ЩЕТКА:
natural_image
Line drawing of a person operating a cleaning or cleaning service vehicle (no text or symbols)KAPITOLA 2 - ÚČEL / URČENÉ POUŽITÍ
BOČNÍ KARTÁČ:
PEDÁL PRO JÍZDU VPŘED A VZAD:
PÁKA AKCELERÁTORU:
natural_image
Line drawing of a person operating a cleaning or cleaning vehicle (no text or symbols)
- INSTRUCTIONS AND OPERATING MANUAL
- MANUEL D'INSTRUCTION
- SPAZZOLA LATERALE:
- RISCHI RESIDUI NON ELIMINABILI
- ATTENTION: READ THIS INSTRUCTIONS MANUAL CAREFULLY BEFORE USING THE MACHINE
- CHAPTER 2 - PURPOSES / INTENDED USE
- CHAPTER 3 - PREPARATION (UNPACKING)
- ATTENTION:
- CHAPTER 4 - INTENDED AND FORBIDDEN USE
- INTENDED USE:
- CHAPTER 6 - DESCRIPTION OF MACHINE
- ● SAFETY PROTECTION DEVICES:
- PART.
- DESCRIPTION
- SIDE BRUSH:
- CENTRAL BRUSH:
- FILTER SYSTEM:
- DUST SEALS:
- FLAP-LIFT PEDAL:
- BRAKE PEDAL:
- PARKING BRAKE:
- FORWARD AND REVERSE PEDAL: (only for battery version)
- FORWARD AND REVERSE PEDAL: (only for internal combustion engine)
- SIDE BRUSH ENGAGEMENT LEVER: (for all models)
- TOUCH THE SIDE BRUSH WITH YOUR HANDS AND NEVER PICK UP THREADED MATERIALS.
- ● SUCTION OFF KNOB: For all models.
- CENTRE BRUSH ENGAGEMENT LEVER: For all models.
- CHAPTER 7 - OPERATOR WORK STATION EMERGENCY STOP
- WORK STATION:
- CHAPTER 8 - SAFETY REGULATIONS
- OUTSTANDING RISKS WHICH CANNOT BE ELIMINATED
- FOR MOD. SWL-R 990 ST SEE ALSO THE ENGINE MANUAL IN THE CHAPTER "SAFETY RULES".
- GENERAL RISKS FOR BATTERIES
- MODEL SWL-R 990 ET (battery model)
- MODEL SWL-R 990 ST (engine model)
- CHAPTER 10 - STARTING AND STOPPING
- START UP :
- FORWARD MOVEMENT:
- REVERSE MOVEMENT:
- NEUTRAL:
- STOP:
- STARTING:
- IMPORTANTE: For warm starting of the engine use the same procedure
- STOPPING:
- CHAPTER 11 - CORRECT USE AND ADVICES
- CHAPTER 12 - ROUTINE MAINTENANCE
- - CLEANING THE DUST FILTERS:
- ADJUSTMENTS AND REPLACEMENTS
- CENTRAL BRUSH ADJUSTMENTS:
- IMPORTANT: To ensure the central brush is correctly adjusted, measure its "Track" as follows:
- IMPORTANTE: The width of the track must not be under 4 cm.
- SIDE BRUSH ADJUSTMENT:
- COLLECTION BIN:
- REPLACEMENTS
- REPLACING THE CENTRAL BRUSH:
- ● REPLACING THE SIDE BRUSH:
- ONLY FOR SWL-R 990 ST MODEL
- CHAPTER 13 - EXTRAORDINARY MAINTENANCE
- CHAPTER 14 - PUTTING OUT OF USE
- ATTENTION: Dismantling and demolition are a customer's responsibility. These operations must be performed in accordance with applicable regulations, handing the entire machine or its components to companies specialised in such services.
- SCRAPPING OF THE MACHINE
- CHAPTER 16 - EMERGENCY SITUATIONS
- PROCEED AS FOLLOWS:
- CHAPTER 17 - TROUBLESHOOTING
- CHAPTER 18 - WARRANTY
- BALAI LATERAL:
- PEDALE SOULEVE-FLAP:
- SWL-R 990 ST
- ● REMPLACEMENT DU BALAI CENTRAL :
- SEITENBÜRSTE:
- CEPILLO LATERAL:
- ROZDZIAŁ 2 - CELE / ZAMIARY
- SZCZOTKA BOCZNA:
- PEDAL DO JAZDY (PRZÓD TYŁ) TYLKO WERSJA SPALINOWA
- БОКОВАЯ ЩЕТКА:
- KAPITOLA 2 - ÚČEL / URČENÉ POUŽITÍ
- BOČNÍ KARTÁČ:
- PEDÁL PRO JÍZDU VPŘED A VZAD:
Brand : Lavor
Model : SWL R990
Category : Sweeper