
SMSS 1000 A1 - Hand blender SILVERCREST - Free user manual and instructions
Find the device manual for free SMSS 1000 A1 SILVERCREST in PDF.

| Product type | Immersion blender |
| Brand | SilverCrest |
| Model | SMSS 1000 A1 |
| Rated power | 1000 W |
| Power supply | 220-240 V ~, 50-60 Hz |
| Protection class | II |
| Speed range | 5600 to 13600 rpm (continuous adjustment) |
| Short operating time | 1 minute |
| Required cooling time | at least 3 minutes |
| Measuring cup capacity | 700 ml (max. 300 ml for blending) |
| Power cable | Spiraled cable, long reach |
| Included accessories | Motor unit, blender shaft, measuring cup, instruction manual |
| Material of blender shaft | Stainless steel (very sharp blade) |
| Intended use | Chopping and pureeing boneless food (household use) |
| Cleaning | Blender shaft and measuring cup dishwasher-safe; motor unit damp cloth |
| Safety | Never immerse motor unit in water; very sharp blade |
| Warranty | 3 years |
| Country of origin | Germany (manufacturer TARGA GmbH) |
| Weight | Approx. 0.8 kg (estimated) |
| Dimensions (approx.) | Height 40 cm, diameter 7 cm (estimated) |
Frequently Asked Questions - SMSS 1000 A1 SILVERCREST
User questions about SMSS 1000 A1 SILVERCREST
0 question about this device. Answer the ones you know or ask your own.
Ask a new question about this device
Download the instructions for your Hand blender in PDF format for free! Find your manual SMSS 1000 A1 - SILVERCREST and take your electronic device back in hand. On this page are published all the documents necessary for the use of your device. SMSS 1000 A1 by SILVERCREST.
USER MANUAL SMSS 1000 A1 SILVERCREST
Tet Information Update Version of the information
Perturbation theory
Oclinia albusfgeae
Abalince a zuklak rajovskih infore
Akhalbask no zakhode sujrovich imomlad
Operating instructions and safety instructions
N
STAAFMIXER
and
@
TYCOVY MIXER
Nawad k obwua a berpeoanl polyny
②
BATIDORA DE BRAZO
6.1 Attaching the immersion blender (3) 29
6.2 Attaching the immersion blender (3) 29
6.3 Setting the speed 30
6.4 The measuring cup 30
- Initial use 30
7.1 Operating with the immersion blender (3) 30
7.2 Table of processing times 32
7.3 Recipe suggestions 33
- Cleaning 35
- Storing the device when not in use 35
10.Troubleshooting 35
11. Environmental and waste disposal information 36
12. Marks of conformity 37
13.Warranty information. 38
Congratulations!
By purchasing the SilverCrest SMSS 1000 A1 1000-watt hand-held blender, hereinafter referred to as hand-held blender, you have opted for a high-quality product.
Familiarise yourself with the hand-held blender before using it for the first time and read these operating instructions carefully. Observe the safety instructions and only use the hand-held blender in the manner described in these operating instructions and for the indicated fields of application.
Keep these operating instructions in a safe place. Hand over all documents in the event that you pass on the hand-held blender to a third party.
1. Intended use
This hand-held blender is a household device and is only intended for chopping and blending boneless foodstuffs. The hand-held blender must not be used outside of closed rooms or in regions with a tropical climate. The hand-held blender is not intended for business or commercial use. Use the hand-held blender solely for private purposes in living areas; any other use is deemed improper. This hand-held blender meets the requirements of all relevant standards related to CE conformity. Compliance with these standards is no longer guaranteed if a change is made to the hand-held blender without the authorization of the manufacturer. The manufacturer shall not be liable for any damages or faults arising as a result.
Please observe the national regulations and/or laws of the country in which the device is used.
2. Package contents
Unpack the hand-held blender and all of the accessories. Remove all packaging materials and check all of the components for completeness and signs of damage. If any parts are missing or damaged, please contact the manufacturer.
- Motor block with power cable and plug
- Immersion blender
- Measuring cup
These operating instructions
This operating manual also has a cover that can be unfolded. The inside of the cover provides a numbered schematic of the SilverCrest SMSS 1000 A1 hand-held blender and all controls. This cover page can remain unfolded while you read other sections of the operating instructions. This provides you with a reference to the controls at all times. The numbers identify the following parts/functions:
| 1 | Speed controller |
| 2 | Motor block |
| 3 | Immersion blender |
3. Technical data
| Manufacturer TARGA GmbH | |
| Designation SilverCrest SMSS 1000 A1 | |
| Power supply | 220-240 V ~ (AC voltage), 50-60 Hz |
| Rated power 1,000 | W |
| CO time 1 minute | |
| Power cable Coiled cable for large range | |
| Protection class | II ☑ |
| Measuring cup capacity 700 ml of liquid | |
| Measuring cup processed amount Max. 300 ml of liquid | |
The specifications and design are subject to change without notice.
3.1 CO time
The CO time (continuous operation time) specifies how long the hand-held mixer can be operated before the motor overheats and causes damage. The CO time for the hand-held blender is 1 minute.
3.2 Cooling time
Following the maximum period of use of up to 1 minute, let the hand-held blender cool down for at least 3 minutes and only then continue with the process previously started.
4. Safety instructions
Before using the device for the first time, please read the following instructions carefully and observe all warnings, even if you are familiar with using electronic and household devices. Keep this operating manual in a safe place for future reference. If you give the device away or sell it, please ensure that you also pass on this operating manual. It is part of the device.
Key to symbols

DANGER! This warning indicates a hazard involving a high level of risk, which if not avoided, may result in severe injury or death.

WARNING! This warning indicates a hazard involving a medium level of risk, which if not avoided, may result in severe injury or death.

DANGER! This icon indicates hazards to health and/or property posed by an electric shock, potentially including risk of death.

Risk of fire! This icon warns us that fires may occur if instructions are not followed.

This icon indicates that under no circumstances may the motor block (2) be immersed in water.

This symbol indicates parts that are dishwasher-safe.

This icon indicates products that have been tested in relation to their physical and chemical composition and that in accordance with EC 1935/2004 have been regarded as harmless to health in terms of contact with foodstuffs.

This symbol gives you further information on the topic.

This symbol on the measuring cup indicates the maximum amount of liquid that can be processed in the measuring cup without the contents overflowing.

Manufacturer's address
Foreseeable misuse
- The hand-held mixer must not be used to chop very hard or very firm foodstuffs. These include frozen foods, coffee beans, grains and spices. It is also not possible to process chocolate. This may result in physical damage.
- No other materials than foodstuffs may be processed. The handheld blender may be damaged.
- The hand blender should not be operated in the air, but only in combination with suitable food. Prolonged operation in the air can damage the hand blender.
Personal safety
- This device must not be used by children. The hand-held blender and its connecting cable are to be kept away from children. Ensure that children are supervised and do not play with this device. In particular, keep the immersion blender (3) away from children in order to prevent any injuries caused by it.

DANGER! The packaging material is not a toy. Children must not play with plastic bags. There is a risk of suffocation. Store the device out of reach of children.
- This device can be used by people with reduced physical, sensory or mental abilities or who lack experience and knowledge, providing they are supervised or have been instructed in the safe use of the device and understand the resulting dangers.
Children must not play with the device.

DANGER! Risk of injury
-
The device must be switched off and disconnected from the mains prior to replacing accessories or additional parts that move during operation.
-
Disconnect the hand-held blender from the mains network if you wish to assemble, disassemble or clean it. The same applies for periods of non-use and during thunder and lightning. There is a risk of injury!
- Do not remove the motor block (2) until the immersion blender (3) has stopped. Under no circumstances should you put your hand in the bowl when the blade is turning. There is a risk of injury!
- Take care when cleaning the hand-held blender! The blade in the immersion blender (3) is very sharp! There is a risk of injury!
- After switching off the device, wait until the blade has stopped before removing the hand-held blender from the foodstuff. There is a risk of injury!
- Under no circumstances should you put your hand in the bowl when the blade of the immersion blender (3) is turning. Do not place any objects in the blade and keep baggy clothing and long hair away from the rotating blade. There is a risk of injury!

DANGER of electric shock
- Only connect the hand-held blender to the mains network once the motor block (2) and immersion blender (3) are assembled. There is a risk of electric shock!
- Only plug the hand-held blender into a power socket that is accordingly installed and easily accessible and whose mains voltage corresponds with the rating plate specifications. The user does not have to do anything to switch the product between 50 and 60Hz . The product is suitable for both 50 and 60Hz supplies. Once the device is plugged in, the power socket must be
kept easily accessible so that the plug can be pulled out quickly in an emergency.
- Never operate the hand-held blender in the vicinity of the bath, shower or a filled sink.
- The power cord and plug must not be damaged.
- If the device's power cord is damaged, it must be replaced by the manufacturer, their service department or by a similarly qualified person in order to prevent any hazards.
- Never open the housing of the motor block (2), as this contains parts to be maintained. If the housing is open, there is a risk of electric shock.
- If you notice any smoke, unusual noises or smells, remove the plug from the power socket immediately. If this happens, you must stop using the hand-held blender until it has been checked by a technician. If the device catches fire, do not inhale any resulting smoke. If you do inhale any smoke, seek medical attention. Inhaling smoke can be harmful to your health, there is a risk of injury!
- Ensure that the power cord cannot be damaged by sharp edges or hot surfaces. The power cord must not get jammed or squashed. Always remove the power cord from the power socket by the plug; never pull on the cable itself. Always lay the power cord in such a way that nobody can stand or trip on it. There is a risk of injury!
- The device must always be disconnected from the mains network if left unattended, in the event of malfunctions, prior to assembly and disassembly or cleaning. There is a risk of electric shock!

Under no circumstances may the motor block (2) be immersed in water and no liquids must ingress into the housing of the motor block (2).
- Should liquids ingress into the housing of the motor block (2), immediately remove the plug from the power socket and contact the service department. There is a risk of electric shock!
- Never touch the motor block (2), the power cord or the plug with wet hands. There is a risk of electric shock!
- Disconnect the hand-held blender from the mains network as soon as it has been used. The device is only de-energised once the plug has been removed. There is a risk of electric shock!

DANGER of fire
Following the maximum period of use of up to 1 minute, let the handheld blender cool down for at least 3 minutes and only then continue with the process previously started. There is a risk of fire.
5. Copyright
All contents of this operating manual are subject to copyright law and are provided to the user solely as a source of information. Any form of copying or reproduction of data and information without the express written permission of the author is prohibited. This also concerns commercial use of the content and data. The text and illustrations correspond to the technical standards at the time of printing. Subject to alterations.
6. Before initial use
Remove the SMSS 1000 A1 hand-hand blender and all accessories from the packaging and check the completeness of the delivery. Remove any protective film. Keep the packaging material away from children and dispose of it in an environmentally-friendly manner.
Prior to using it for the first time, the hand-held blender must be cleaned as described in the "Cleaning" section.
Assemble the hand-held blender once the cleaned parts have fully dried:
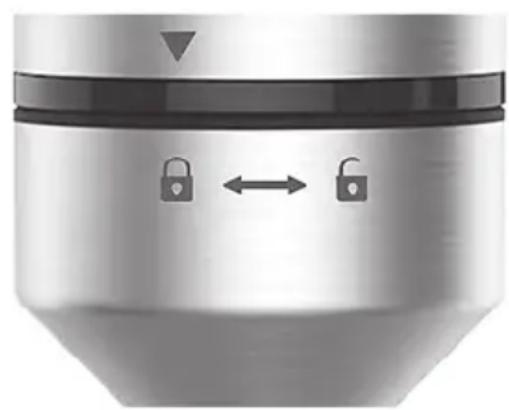
An arrow () is marked on the motor block (2). The markings and can be found on the immersion blender (3).
These markings provide support when attaching and removing the immersion blender (3).
6.1 Attaching the immersion blender (3)
- Attach the motor block (2) onto the immersion blender (3) so that the arrow marking () points towards the opened padlock G on the immersion blender (3). See figure B.
- Now rotate the motor block (2) as far as it will go in the direction of the closed padlock symbol so that the arrow marking () points towards the closed padlock on the immersion blender (3). Ensure that the immersion blender (3) audibly clicks into place.
6.2 Attaching the immersion blender (3)
- Rotate the motor block (2) as far as it will go in the direction of the open padlock symbol so that the arrow marking () points towards the open padlock on the immersion blender (3). See figure C.
Now remove the motor block (2) from the immersion blender (3).
6.3 Setting the speed
The speed controller (1) on the motor block (2) allows you to continuously adjust the speed of the handheld blender from approximately 5600 rpm to approximately 13,600 rpm.
Hold the hand-held blender so that your index finger or middle finger rests on the speed controller (1).
- Now carefully press the speed controller (1) to start the hand-held blender at the slowest speed.
- Press the speed controller (1) down further to increase the speed.
- Reduce the pressure on the speed controller (1) to decrease the speed.
- Let go of the speed controller (1) to stop the hand-held blender.
6.4 The measuring cup
- Liquids of up to 700ml can be measured with the measuring cup provided.
- You can also use the measuring cup to process your foodstuffs.

If you use the measuring cup for processing, only a maximum quantity of 300ml ( ) may be filled. Otherwise, liquid may overflow or spray out from the measuring cup.
7. Initial use
The hand-held blender is suitable for the following uses:
Chopping and blending fruit and vegetables in soups, sauces and dips.
Mixing drinks
Making milkshakes

WARNING! Risk of injury!
When using the hand-held blender to blend hot foodstuffs in a pan, remove the pan from the heat before blending and make sure the liquid is not boiling.
Let hot foodstuffs cool down to avoid scalding.

It is recommended to adjust the speed of the hand-held blender to the food to be processed. Select a lower speed for soft foodstuffs and a higher speed for harder foodstuffs.
7.1 Operating with the immersion blender (3)
Place food to be chopped in a container as narrow and high-sided as possible with a flat base. This is the ideal requirement for consistent blending. Nevertheless, it is also possible to use the appliance in a standard saucepan.
To prevent injuries caused by the rotating blade, only switch the hand-held blender on once the immersion blender (3) is immersed in the mixture.
Proceed as follows:
Pour the food to be processed into a suitable container or pan.
- Vertically guide the immersion blender (3) into the mixture.
- Start the hand-held blender with the speed controller (1) and select a suitable speed. Press and hold the speed controller (1) during the mixing or blending process and adjust the speed to your requirements. If the immersion blender (3) sticks to the base of the container, briefly release the speed controller (1) and then continue with the mixing process.
- To achieve consistent processing of the mixture, gently move the hand-held blender up and down during blending.
- Once the mixing result meets your requirements, release the speed controller (1) while the immersion blender (3) is still in the mixture.
Wait until the blade has stopped before you remove the immersion blender (3) from the blended food.

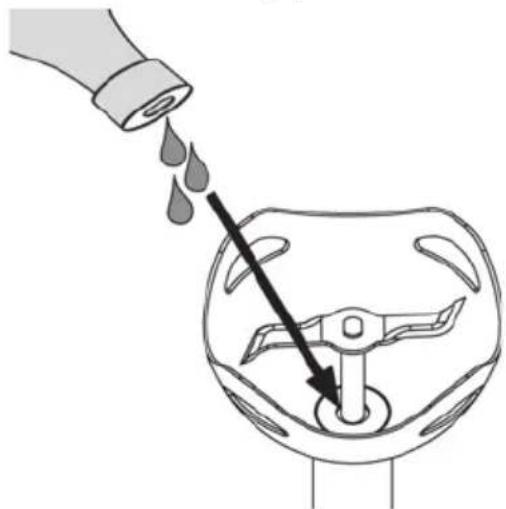
If you notice any unusual noises during operation, such as squeaking or similar noises, apply a little flavourless cooking oil to the drive shaft of the immersion blender (3). Please refer to the example illustration opposite when doing so.
7.2 Table of processing times
The following table is intended to serve as a general guide when processing different foods. Follow the recommended processing times to prevent the hand-held blender from overheating. If the mixing result does not meet your requirements within this time, discontinue the blending process and allow the motor to cool down. Only then continue with the blending process.

Following the maximum period of use of up to 1 minute, let the hand-held blender cool down for at least 3 minutes.
| Foodstuffs Recommended quantities | Speed Processing | time |
| Fruit, vegetables 100–200 g | MIN-MAX* | |
| Soups, sauces, baby food 100-400 ml | MIN-MAX* | 60 seconds |
| Beverages with dairy products, blended drinks | 100-1,000 ml | MIN-MAX* |
*: Set the speed according to the desired consistency.

If you use the measuring cup for processing, only a maximum quantity of 300ml (A) may be filled. Otherwise, liquid may overflow or spray out from the measuring cup. Please always use a mixing container adequate for the quantity to be processed when processing larger quantities of food.
7.3 Recipe suggestions
Mango lassi
| Ingredients Volume Note |
| One mango 250 g It's best to use a ripened mango. |
| Yoghurt 250 g You can use a dairy-free yoghurt (soy or coconut, for example) to create a vegan version of this recipe. |
| Soy drink 130 ml |
| Lemon juice 1 tsp |
| Sugar 4 tsp Alternatively, you can use honey or agave syrup. |
How to make the recipe:
Start by peeling the mango, and then cut the flesh into cubes and remove the stone. Then blend the other ingredients together with the diced flesh of the mango. Start blending at low speed, gradually increasing the speed to the maximum until you have a creamy consistency to the lassi drink.
Strawberry cream dessert
| Ingredients Volume | Note | |
| Strawberries | 500 g | |
| Thickening agent 1 tbsp | for example, agar, pectin, starch | |
| Sugar | 1 tsp | |
| Vanilla sugar | 1 sachet | |
| Sheep's-milk yoghurt | 150 g | |
| Lime syrup | 100 ml | |
How to make the recipe:
Blend 250g of the strawberries with the rest of the ingredients on low speed. Gradually increase the speed until achieving the desired creaminess. Dice the remaining strawberries (250g) and divide all but 2 tbsp into three bowls. Then divide the cream evenly among the bowls and decorate with the remaining small-diced strawberries. Then chill in the refrigerator for three to four hours.
Parsley-basil pesto
| Ingredients Volume | Note | |
| Basil | 1/4 bunch | |
| Smooth parsley | 1/2 bunch | |
| Pine nuts | 1 tbsp | |
| Parmesan | 35 g | |
| Salt | A pinch | |
| Pepper | A pinch | |
| Olive oil | 65 ml |
How to make the recipe:
Wash the basil and parsley. Remove the leaves from the stalks of parsley. Cut the cheese into cubes. Then place all ingredients into the supplied measuring cup and blend finely at full speed. While blending, gently lift the hand-held blender up and down. Divide the pesto between two jars and cover with a little oil and screw the lids on tightly.
Fig and cream cheese dip with walnuts
| Ingredients Volume | Note | |
| Cream cheese 300 g | ||
| Dried figs Four | ||
| Walnuts 50 g | ||
| Honey 1 tbsp | ||
| Lime | 1/2 | |
| Salt A pinch | ||
| Pepper | A | pinch |
How to make the recipe:
Finely chop the walnuts. Mix the juice of half a lime, cream cheese, honey, dried figs, salt and pepper at low speed until you obtain a creamy mixture. Finally, stir in the finely chopped walnuts.
Salsa dip
| Ingredients Volume | Note | |
| Tomatoes 250 g | ||
| Red bell pepper | 1/2 | |
| Onion, | small | |
| Garlic, | 1/2 clove | |
| Chilli (hot pepper) | 1/2 | |
| Tomato paste | 1 tbsp | |
| Parsley 1 stalk | ||
| Salt A pinch | ||
| Pepper | A pinch | |
| Sugar | A pinch |
How to make the recipe:
Clean the onion, tomatoes, red bell pepper, garlic, chilli pepper and parsley, removing any seeds. Cut the ingredients into medium sized pieces. Blend the ingredients to your preferred consistency. Use a higher speed to get a finer salsa. The higher the speed, the finer the salsa.
We hope you enjoy your creation!
8. Cleaning

Risk of injury! Take care when cleaning the hand-held blender! The blade in the immersion blender (3) is very sharp!

Warning of damage to property! Do not use any scratching or abrasive cleaning agents or abrasive objects (such as a metal scouser) for cleaning purposes. Failure to do so may cause the hand-held blender to become damaged.

It is recommended to clean the immersion blender (3) immediately after use to prevent the processed foodstuffs from drying. The immersion blender (3) should be immediately rinsed with clean water after processing very salty foodstuffs in particular.
- Remove the plug from the socket.
- Remove the immersion blender (3) from the motor block (2).
- Clean the motor block (2) with a soft damp cloth and then dry it well. Cleaning in the rinsing bath would result in irreparable damage!
- You can clean the immersion blender (3) and measuring cup in a sink. After cleaning, rinse with plenty of clean water to remove any detergent residue. Then thoroughly dry the immersion blender (3) and measuring cup.
- Alternatively, you can clean the immersion blender (3) and measuring cup in the dishwasher.

For optimal cleaning of the immersion blender (3) in the dishwasher, make sure you position it vertically with the blade facing up. Then allow the immersion blender (3) to dry thoroughly.
9. Storing the device when not in use
If the hand-held blender is not going to be used for a long period of time, clean it as described in the previous section. Store the hand-held blender in a clean, dry location out of reach of children.
10. Troubleshooting
If your hand-held blender does not work as usual, use the following instructions to try and solve the problem. If working through the following tips does not eliminate the fault, please contact our hotline (see the 'Warranty information' section).
The hand-held blender is not working
- The plug is not inserted. Insert the plug into the power socket.
The power socket is faulty. Try the device in another power socket that definitely works.
The blade does not rotate / rotates with difficulty
- The motor block (2) and immersion blender (3) are not correctly assembled. Disconnect the device from the mains and check the assembly.
Is there an object in the mixing container? If so, remove this. - The mixed foods are too hard or too tough.
11. Environmental and waste disposal information
| Devices marked with this symbol are subject to the European Union Directive 2012/19/EU. Electrical and electronic devices may not be put in the household waste, but must be disposed of via designated public disposal centres. By properly disposing of the old device, you can avoid environmental damage and hazards to health. Further information regarding proper disposal of the old device can be obtained from your local authority or the shop where you purchased the device. | |
| The crossed-out bin symbol on batteries indicates that they are not permitted to be disposed of with household waste, rather they must be collected separately. With batteries that contain harmful substances, you will also find the chemical symbol of the harmful substance under the crossed-out bin symbol. These symbols mean the following: - Pb: Battery contains lead - Cd: Battery contains cadmium - Hg: Battery contains mercury You are legally obligated to return disposable and rechargeable batteries. Old batteries may contain harmful substances that can be harmful to your health or the environment when stored or disposed of improperly. Batteries also contain important raw materials, such as iron, zinc, manganese or nickel. You can return old batteries to us or at collection points in your immediate vicinity (for example, at shops or municipal collection points) Please note that you should only dispose of batteries in collection containers for old batteries when they are fully discharged. If the batteries are not completely dead, you need to take precautionary measures before disposal to prevent short circuits. | |
| ES/PT | Make sure that the packaging is disposed of in an environmentally friendly manner. Cardboard packaging can be put out for waste-paper collection or taken to public collection points for recycling. The plastic packaging used for your device will be collected by your local waste management company and disposed of in an environmentally friendly manner. |
Relevant for France only:


ÉLÉMENTS D'EMBALLAGE


'Sorting made easier'
This product, including all accessories, its printed material and packaging components, can be recycled. They are subject to an extended producer responsibility and are sorted and collected separately.

Please pay attention to the labels on packaging materials when you separate waste; these are marked with abbreviations (a) and numbers (b) that mean the following:

1-7: Plastics/20-22: Paper and cardboard/80-98: Composite materials.
Symbol Material This product contains the following packaging
components

Corrugated cardboard Sales packaging, cardboard insert

Paper Tissue paper within sales packaging
12. Marks of conformity

This product fulfils the requirements specified in the applicable European and national policies. This product's conformity has been verified. The declarations and documents are stored with the manufacturer.

This product fulfils the requirements specified in the applicable national policies for the United Kingdom.
You can download the full EU declaration of conformity at the following link:
https://www.targa.gmbh/downloads/conformity/427252_2301.pdf
13. Warranty information
Warranty of TARGA GmbH
Dear Customer,
This device is sold with three years warranty from the date of purchase. In the event of product defects, you have legal rights towards the seller. These statutory rights are not restricted by our warranty as described below.
Warranty conditions
The warranty period commences upon the date of purchase. Please keep the original receipt in a safe place as it is required as proof of purchase. If any material or manufacturing faults occur within three years of purchase of this product, we will repair or replace the product free of charge as we deem appropriate.
Warranty period and legal warranty rights
The warranty period is not extended in the event of a warranty claim. This also applies to replaced and repaired parts. Any damage or defects discovered upon purchase must be reported immediately when the product has been unpacked. Any repairs required after the warranty period will be subject to charge.
Scope of warranty
The device was carefully manufactured in compliance with stringent quality guidelines and subjected to thorough testing before it left the works. The warranty applies to material and manufacturing faults. This warranty does not cover product components which are subject to normal wear and which can therefore be regarded as wearing parts, or damage to fragile components such as switches, rechargeable batteries or components made of glass. This warranty is void if the product is damaged, incorrectly used or serviced. To ensure correct use of the product, always comply fully with all instructions contained in the user manual. The warnings and recommendations in the user manual regarding correct and incorrect use and handling of the product must always be observed and complied with. The product is solely designed for private use and is not suitable for commercial applications. The warranty is rendered void in the event of incorrect handling and misuse, if it is subjected to force, and also if any person other than our authorised service technicians interfere with the device. No new warranty period commences if the product is repaired or replaced.
Submitting warranty claims
To ensure speedy handling of your complaint, please note the following:
Before using your product for the first time, please read the enclosed documentation carefully. Should any problems arise which cannot be solved in this way, please call our hotline.
- Always have your receipt, the product article number as well as the serial number (if available) to hand as proof of purchase.
- If it is not possible to solve the problem on the phone, our hotline support staff will initiate further servicing procedures depending on the fault.
- You can find this and many more manuals, product videos and installation software available for download at www.lidl-service.com. This QR code takes you directly to the LIDL service page (www.lidl-service.com). There, you can enter the item number (IAN) to access your operating manual.


Service

Phone: 0800 404 7657
E-Mail:
targa@lidl.co.uk

Phone: 1800
101010
E-Mail:
targa@lidl.ie

Phone: 800
62230
E-Mail:
targa@lidl.com.mt

Phone: 8009
4241
E-Mail:
targa@lidl.com.cy
IAN:427252_2301

Manufacturer
Please note that the following address is not a service address. First contact the service point stated above.
TARGA
GmbH
Coesterweg 45
59494 Soest
GERMANY
Table des matieres
https://www.targa.gmbh/downloads/conformity/427252_2301.pdf
13. Informations concernant la garantie
Cher client, chere clientele,
Cher client, chere clientele,
https://www.targa.gmbh/downloads/conformity/427252_2301.pdf
13. Garantiebepalingen
https://www.targa.gmbh/downloads/conformity/427252_2301.pdf
13. Gwarancja
https://www.targa.gmbh/downloads/conformity/427252_2301.pdf
m = 311 ;

https://www.targa.gmbh/downloads/conformity/427252_2301.pdf
https://www.targa.gmbh/downloads/conformity/427252_2301.pdf
https://www.targa.gmbh/downloads/conformity/427252_2301.pdf
