18290008 - Other kitchen appliances Gastronoma - Free user manual and instructions
Find the device manual for free 18290008 Gastronoma in PDF.

User questions about 18290008 Gastronoma
0 question about this device. Answer the ones you know or ask your own.
Ask a new question about this device
Download the instructions for your Other kitchen appliances in PDF format for free! Find your manual 18290008 - Gastronoma and take your electronic device back in hand. On this page are published all the documents necessary for the use of your device. 18290008 by Gastronoma.
USER MANUAL 18290008 Gastronoma
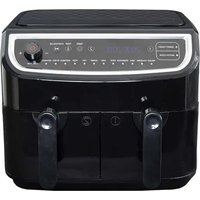
UK Dual zone air fryer 38
natural_image
Line drawing of a wire rack with a numbered label pointing to the side (no text or symbols on the rack itself)
text_image
6
natural_image
Pure diagram of a rectangular device with internal components and a central square, no text or symbols present.OFTE STILLEDE SP∅RGSMÅL
natural_image
Line drawing of a metal rack with a numbered label pointing to the bottom section (no text or symbols on the rack itself)
text_image
6
natural_image
Pure diagram of a rectangular device with internal components and a central square, no text or symbols present.natural_image
Line drawing of a metal rack with a numbered label pointing to the bottom section (no text or symbols on the rack itself)
text_image
6
natural_image
Pure diagram of a rectangular device with internal components and a central square, no text or symbols present.To get the best out of your new air fryer, please read through these instructions carefully before using it for the first time. Take particular note of the safety precautions. We also recommend that you keep the instructions for future reference, so that you can refer to them at a later date.
GENERAL SAFETY GUIDE
- This appliance may only be used by children aged from 8 years and above and persons with reduced physical, sensory or mental capabilities or lack of experience and knowledge if they are supervised or have been given instructions concerning use of the appliance in a safe way and
understand the hazards involved.
Children must not play with the appliance.
Cleaning and user maintenance must not be performed by children without supervision.
- Never leave unattended when in use. Keep an eye on any children in the vicinity of the appliance when it is in use. The appliance is not a toy.
UK
- Incorrect use of this appliance may cause personal injury or damage the appliance.
- Use for the intended purpose only. The manufacturer is not responsible for any injury or damage resulting from incorrect use or handling (see also Warranty Terms).
- For domestic use only. Not for outdoor or commercial use.
- Remove all packaging and transport materials from the inside and outside of the appliance.
- Check that the appliance has no visible damage and that no parts are missing.
- Do not use with any cords other than that supplied.
- Check that it is not possible to pull or trip over the cord or any extension cord.
UK
- The appliance must not be used together with a timer switch or a separate remote control system.
- Turn off the appliance and remove the plug from the socket when cleaning or when not in use.
- Avoid pulling the cord when removing the plug from the socket. Instead, hold the plug.
-
Keep the cord and appliance away from heat sources, hot objects and naked flames.
-
Ensure that the cord is fully extended.
- The cord must not be twisted or wound around the appliance.
- Check regularly that neither the cord nor plug is damaged and do not use the appliance if there is any damage, or if it has been dropped on the floor, dropped in water or damaged in any other way.
UK
- If the appliance, cord or plug have been damaged, have the appliance inspected and if necessary repaired by an authorised repairer.
- Connect to 230 V, 50 Hz only. The warranty is not valid if the appliance is connected to incorrect voltage.
- Never try to repair the appliance yourself. Please contact the store where you ought the appliance for repairs under warranty.
- Unauthorised repairs or modifications will invalidate the warranty.
- Caution! Some parts of this appliance can become very hot and cause burns if touched. Particular attention should be paid where children and vulnerable people are present.
- The appliance or cord must not be placed in water or any other liquid. If you drop the
UK
appliance in water by accident, or it gets wet in any other way, you must immediately remove the plug from the socket and get an authorised repairer to examine the appliance before you use it again.
- It is extremely important that you follow these instructions, as water in the appliance could give rise to fatal electric shocks.
- Do not use the appliance when your hands are wet, when the floor
is wet or when the appliance itself is wet. Never touch the plug with wet or damp hands.
- Do not let the cord hang over the edge of the counter top. Keep it away from hot objects and naked flames and make sure that it never comes into contact with the hot parts of the appliance during use.
- The appliance gets hot very quickly and takes a long time to cool down again. Only touch the appliance by the handle.
UK
Never place the appliance next to hot objects (e.g. cookers or ovens) or in the vicinity of flammable materials (e.g. curtains).
• Make sure there is sufficient ventilation around the appliance. There should be at least 10 cm of space on all sides of the appliance.
- Make sure not to cover the appliance's air intake or blower, as this may cause the appliance to overheat!
- Be aware that the appliance may emit very hot steam or grease splashes when in use and particularly when opened.
- Do not pour oil or other fat into the pan! The appliance does not deep-fry food but cooks it using hot air.
- The food must not be placed directly into the pan but must always be placed on the tray in the pan.
UK
PRIOR TO FIRST USE
- Remove all packing materials.
-
Remove any stickers or labels from the appliance, other than the rating label.
-
Thoroughly clean the frying tray, with hot water and some liquid washing soap using a non-abrasive sponge.
Note: You can also clean these parts in the dishwasher. -
Wipe the inside and outside of the appliance with a moist cloth.
UK
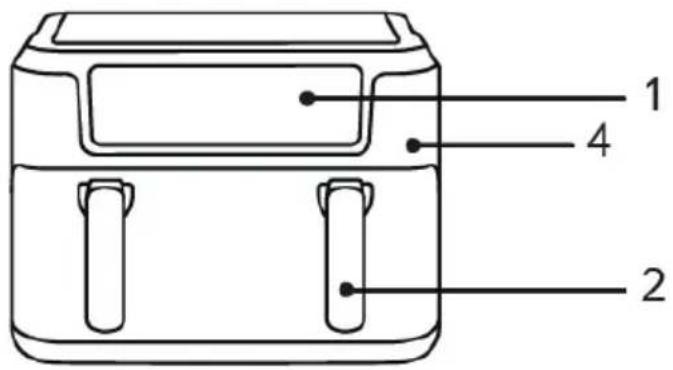
MAIN COMPONENTS
text_image
1 4 2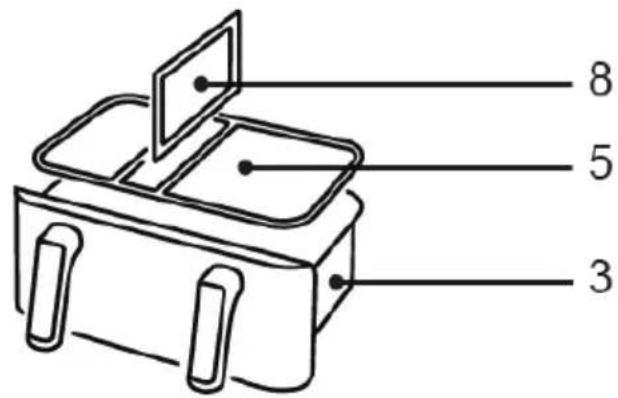
text_image
8 5 3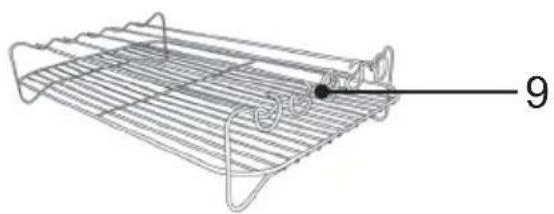
natural_image
Line drawing of a metal rack with a numbered label pointing to a small object (no text or symbols on the rack itself)
text_image
6
natural_image
Pure diagram of a rectangular device with internal components and a central square, no text or symbols present.- Display
- Handle
- Basket
-
Main body
-
Grill plate
- Air outlet
- Power cord storage compartment
- Divider plate
- Grill set with skewers
UK
INSTRUCTIONS FOR USE
- Before using the device for the first time, clean it with a damp cloth and run it empty to eliminate the new smell. It is recommended to use the device for the first time at 200° for 3-5 minutes.
- Connect the appliance to the mains supply and press the button (E) to switch on the air fryer.
- When the fryer is switched on, it will beep and “----” will appear on the digital display and then all cooking functions, time and temperature will be displayed.
text_image
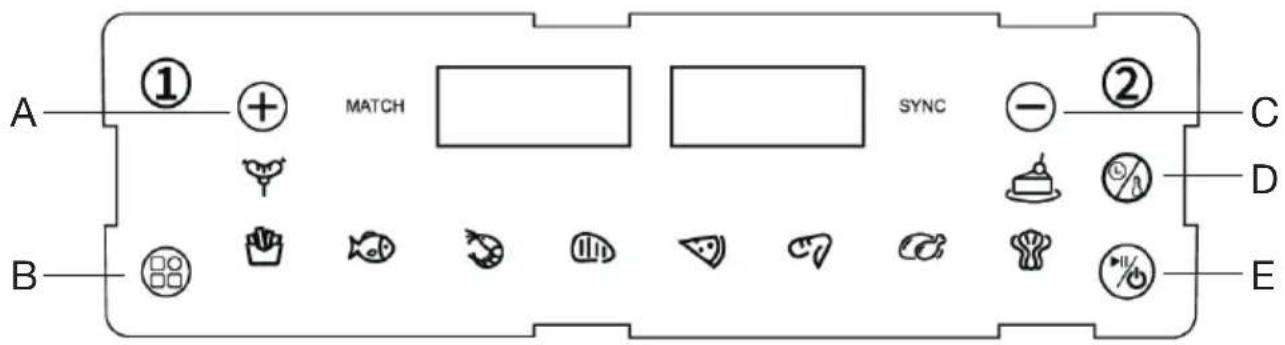
A ① MATCH SYNC ② C B D E- This fryer offers the option of cooking in basket zone 1, 2 or both.
- To select basket zone 1, press the button ①. The display will show 180^ C and 15 ~min by default. If you wish to cook with the default settings, press (E) to start cooking.
- To set the cooking time and temperature, press the button (D) and then the button (A) to increase and (C) to decrease the cooking time and temperature. Once selected, press the button (E) to start the cooking process.
- To use basket zone 2, press the button ② and repeat the above procedure.
- If you wish to change the cooking settings for one zone of the baskets, first press on the basket number button (1 or 2) to select it and then make the necessary changes. Once made, press the button (E) to resume the cooking process.
- If you wish to interrupt the cooking process of some of the basket zone, first select the no. of the basket zone you wish to turn off and then press the button (E) for a few seconds. The display will show OFF.
• To interrupt the cooking process of both basket zone, press button (E) for a few seconds.
- This air fryer comes with a divider plate that allows you to adjust the size of the cooking zones of the basket according to your needs. Insert the divider plate into the centre slots of the basket to have two basket zones of the same size. If you want basket zone 1 to be smaller than basket zone 2, insert the plate into the slots on the left side.
UK
PRESET PROGRAMME
Our air fryer includes 10 preset
programmes, which facilitate the cooking process


• To select any of the preset programmes, press the button (B) as many times as necessary until the desired programme is selected. Then press the button (E) and the cooking process will start.
time or temperature manually based on your experience or the amount of food to be cooked.
The table below lists the preset cooking times and temperatures for each programme:
• If desired, you can adjust the cooking
- If the cooking time of the two basket zones are different, but you want both zones to finish at the same time
- Select the cooking programme for basket zone 1.
- Select the cooking programme for basket zone 2.
- Press SYNC button and then, press the button (E) to start the cooking process.
- The basket zone with the longest cooking time will start cooking and another basket zone will remain paused.
- The paused basket zone display will show "HOLD" until both basket zones operate synchronously. The display of the basket zone in operation will show the temperature and the remaining cooking time.
MEMORY FUNCTION
- This air fryer remembers the last programme used for up to one hour after switching it off, as long as it is not disconnected from the mains.
COPY SETTINGS FUNCTION
- To make both basket zones work with the same settings, select a basket zone (1 or 2), set the temperature and time or choose a preset programme.
- Press the MATCH button and then, press the button (E) to start cooking in both basket zones with the same settings.
FOOD PREPARATION
- To start cooking a food, it is recommended to place it in a bowl, season as desired, add a spoonful of oil and stir.
- Once seasoned, place it in the air fryer and choose the desired cooking programme.
- When the entire cooking process is finished, OFF will be shown on the display and the air fryer will beep. After a few seconds, the fan will stop running. You can also manually switch off the device by pressing and holding the button (E) for 3 seconds.
- Once cooking is complete, the appliance is ready to instantly prepare another batch of ingredients if desired.
- To avoid burns when removing the food, it is advisable to use an oven glove.
• After each use, unplug the appliance from the mains.
NOTE: You must remove the basket to check and shake the food during the cooking process. When you replace the basket, the machine will continue to operate at the selected setting. This will ensure more uniform cooking.
CLEANING
- Unplug the appliance.
- Allow the appliance to cool to around 30-40 degrees before cleaning it.
- Wash the food basket, divider and flat grill rack with a little detergent added. These parts can also be cleaned in a dishwasher.
UK
- Wipe the inside and outside of the appliance with a damp cloth or sponge.
- You must not use steel wool, scouring powder or any other form of strong solvent or abrasive cleaning agent.
INFORMATION ON DISPOSAL AND RECYCLING OF THIS PRODUCT
Please note that this product is marked with this symbol:
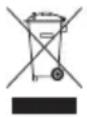
This means that this product must not be disposed of along with ordinary household waste, as electrical and electronic waste must be disposed of separately.
According to the WEEE directive, every member state must ensure correct collection, recovery, handling and recycling of electrical and electronic waste. Private households in the EU can take used equipment to special recycling stations free of charge. In certain member states, used appliances can be returned to the retailer where they were bought on the condition you buy new products. Contact your retailer, distributor or the municipal authorities for further information on what to do with electrical and electronic waste.
WARRANTY TERMS
The warranty does not apply:
- if the above instructions have not been followed
- if the appliance has been interfered with
- if the appliance has been mishandled, subjected to rough treatment, or has suffered any other form of damage
- if the appliance is faulty due to faults in the electricity supply.
Due to the constant development of our products in terms of function and design, we reserve the right to make changes to the product without prior warning.
FREQUENTLY ASKED QUESTIONS
If you have any questions regarding the use of the appliance and cannot find the answer in this user guide, please try our website at www.commaxx.nl.
You can also see contact details on our website if you need to contact us for technical questions, repairs, accessories or spare parts.
MANUFACTURED IN CHINA FOR
Commaxx B.V.
Wiebachstraat 37,
NL-6466 NG Kerkrade
Netherlands
www.commaxx.nl
We cannot be held responsible for any printing errors.
DE
EINLEITUNG
natural_image
Line drawing of a metal rack with a numbered label pointing to the side (no text or symbols on the rack itself)
text_image
6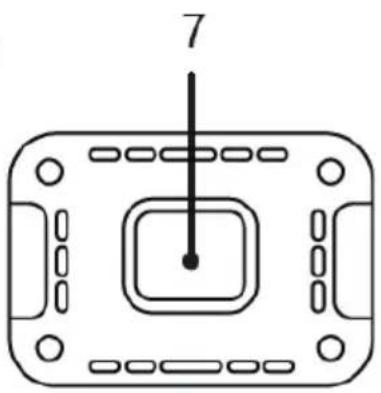
natural_image
Pure diagram of a rectangular device with internal components and a central square, no text or symbols present.ALGEMENE VEI- LIGHEIDSVOOR- SCHRIFTEN
natural_image
Line drawing of a wire rack with a numbered label pointing to the side (no text or symbols on the rack itself)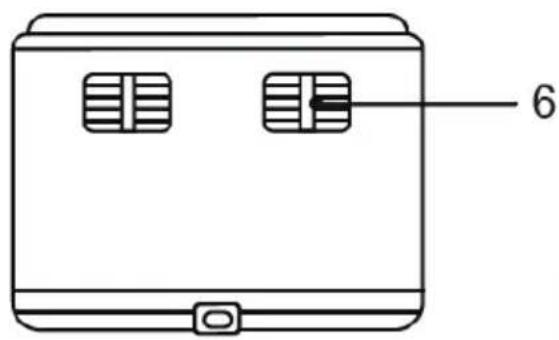
text_image
6
natural_image
Pure diagram of a rectangular device with internal components and a central square, no text or symbols present.natural_image
Line drawing of a metal rack with a numbered label pointing to the bottom section (no text or symbols on the rack itself)
text_image
6
natural_image
Pure diagram of a rectangular device with internal components and a central square, no text or symbols present.INFORMATIONS RELATIVES À LA MISE AU REBUT ET AU RECYCLAGE DE CE PRODUIT
CONDITIONS DE GARANTIE
natural_image
Line drawing of a metal rack with a numbered label pointing to a small object (no text or symbols on the rack itself)
text_image
6
natural_image
Pure diagram of a rectangular device with internal components and a central square, no text or symbols present.natural_image
Line drawing of a metal rack with a numbered label pointing to a small object (no text or symbols on the rack itself)
text_image
6
natural_image
Pure diagram of a rectangular device with internal components and a central square, no text or symbols present.WYPRODUKOWANO W CHINACH DLA
Commaxx B.V.
Wiebachstraat 37,
NL-6466 NG Kerkrade
Netherlands
www.commaxx.nl
natural_image
Line drawing of a wire rack with a numbered label pointing to the side (no text or symbols on the rack itself)
text_image
6